Leaderboard


Popular Content
Showing content with the highest reputation on 07/31/2022 in all areas
-
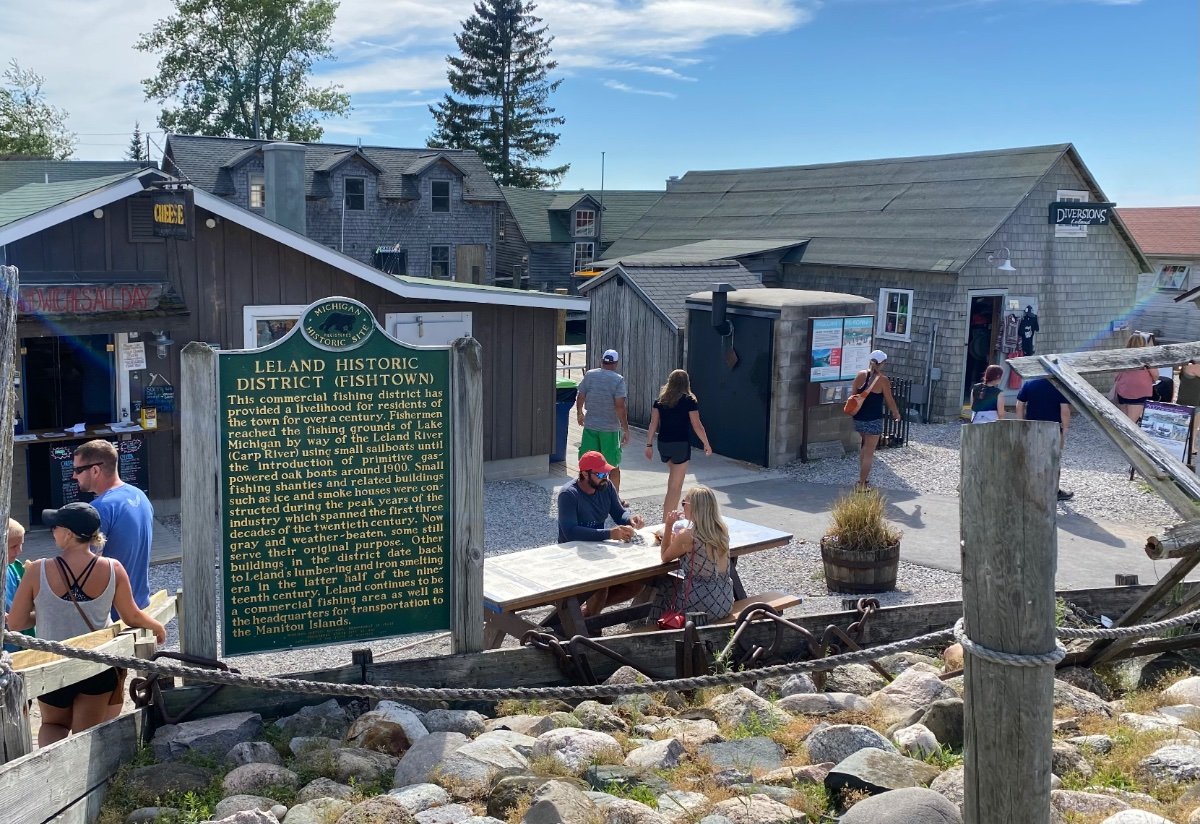
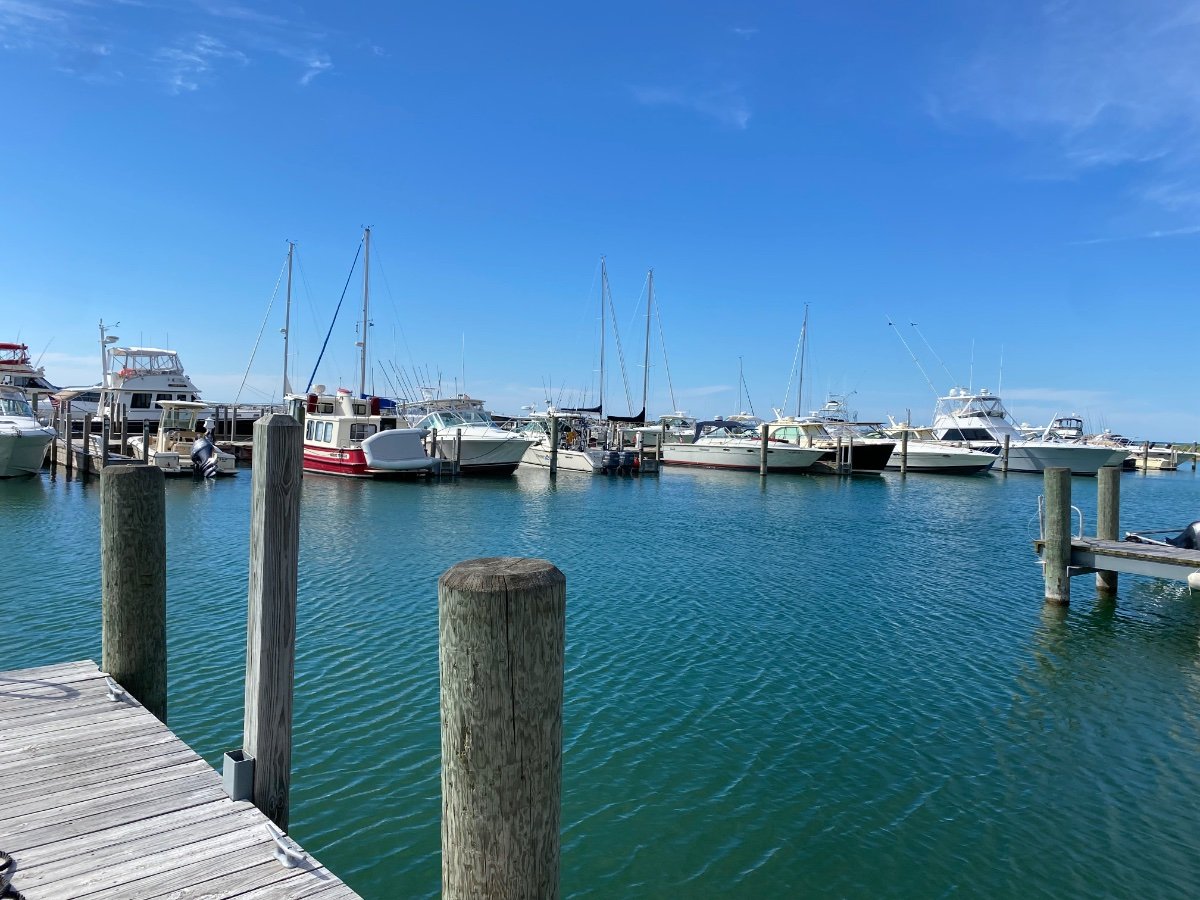
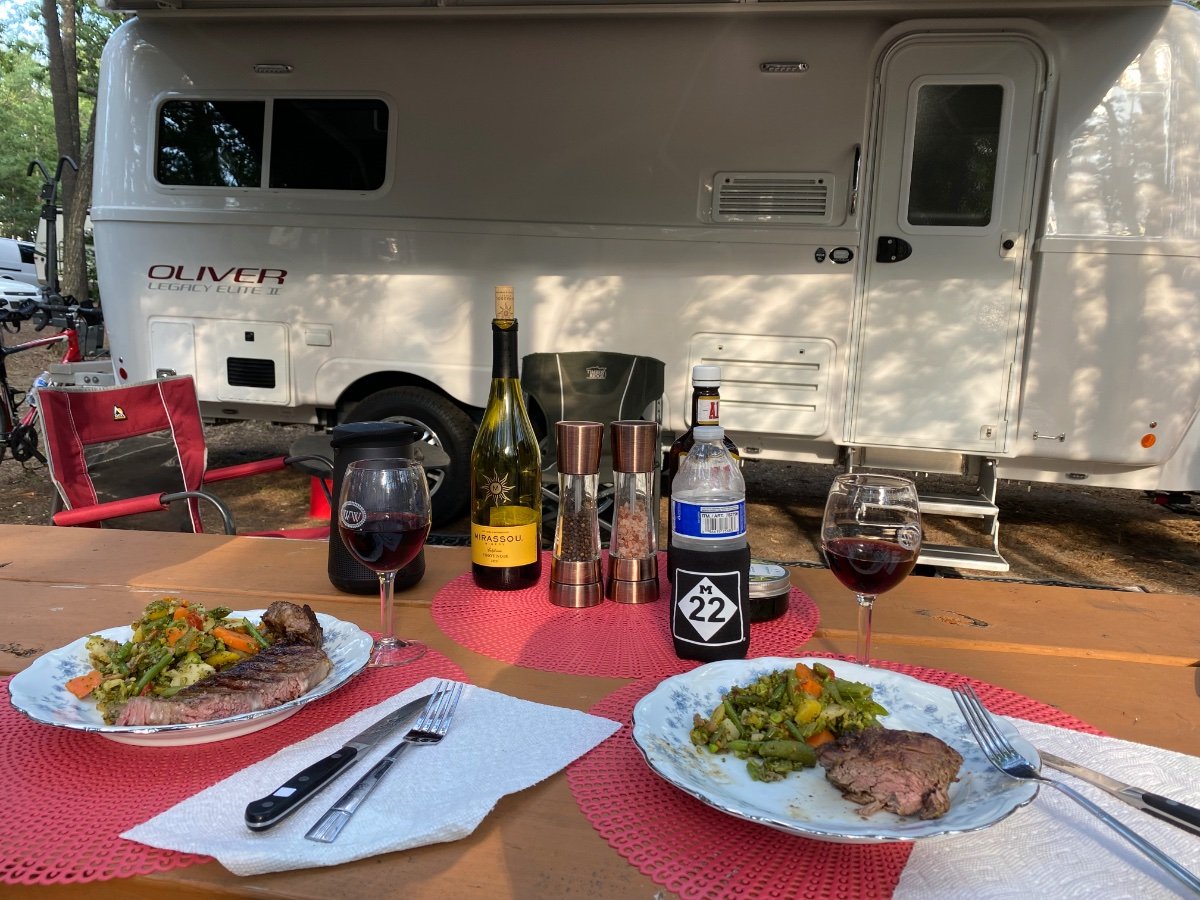
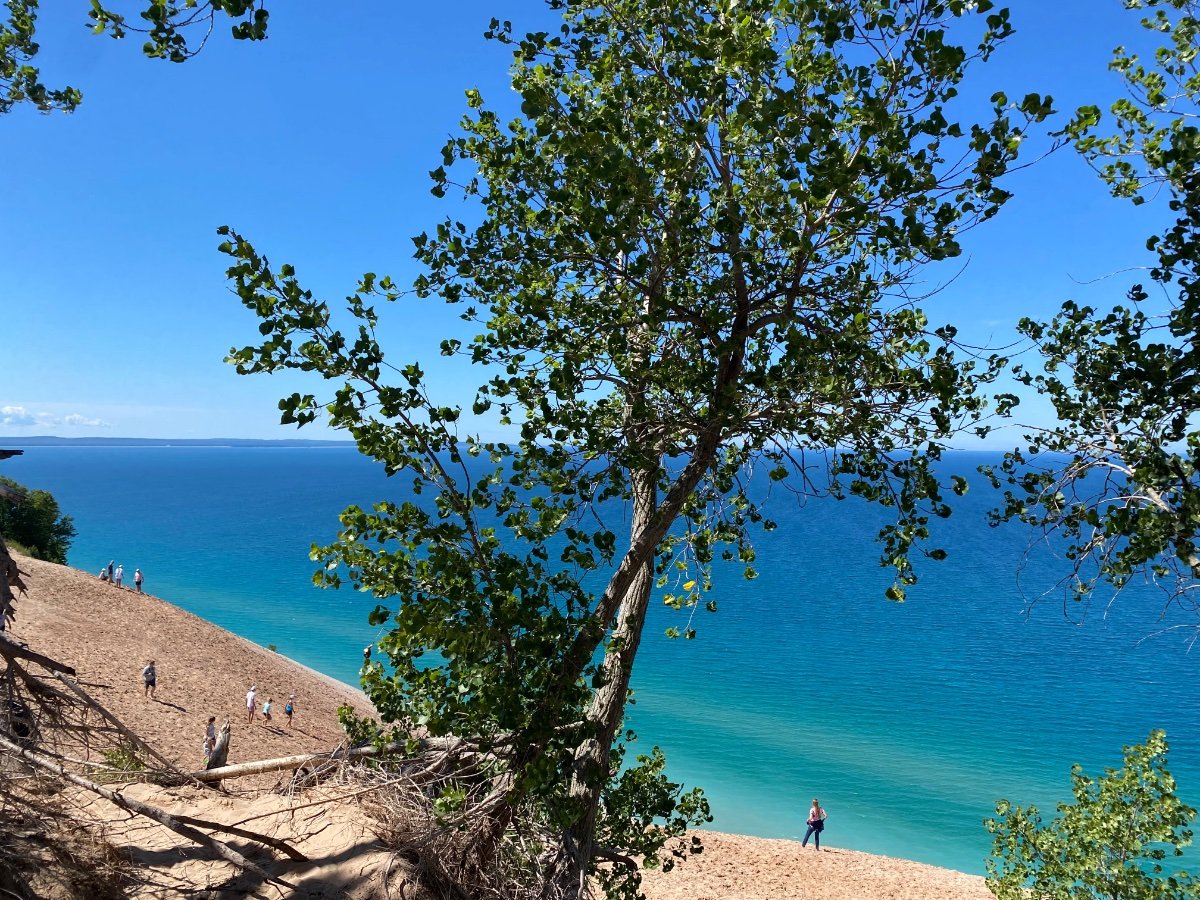
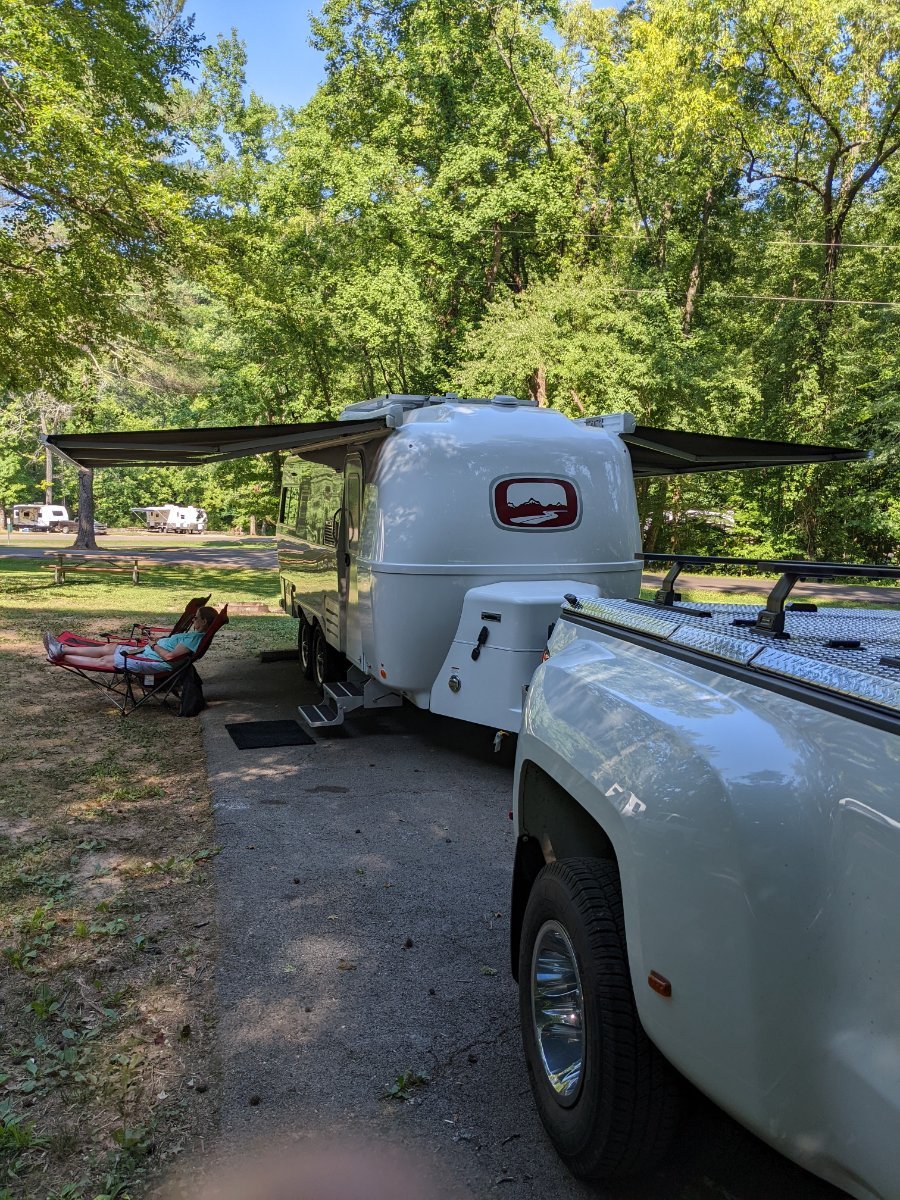
We are with Elli Rose 🌹 in the Traverse City Region of Michigan. Only 3 months since we picked her up. She’s a dream to travel in. Here are some pics along the way 🙂A good place for lunchOn the 45th!Leland, otherwise known as FishtownFrom the dock…can’t beat nature’s paletteA break for dinner from our trek on M22 Cherries everywhere 🍒 Sleeping Bear Dunes…the water looks like the Caribbean 🏝 Until tomorrow 🥰
 10 points
 -
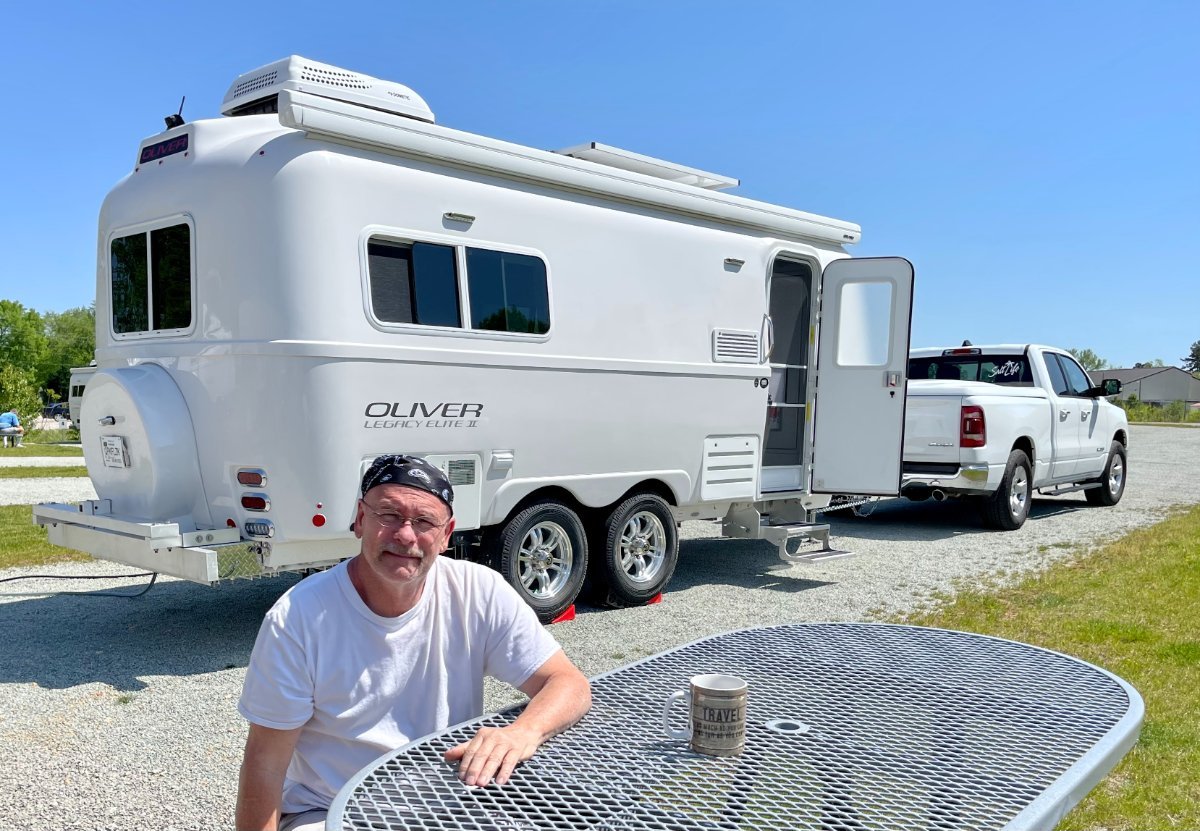
Picked up Hull 1182 on 7/22 after almost 9 1/2 long months, but who is counting. First night at the mothership. Long hot day!! The AC didn't seem loud at first, probably just glad to be able to get out of the heat, lol. I can' t say enough about the Oliver Service folks and Oliver for putting in a campground right there for us. We moved from the delivery area to the Oliver Campground and when we went to put the front Jack down it would not come down. I walked back over to ask one of service folks what I was doing wrong, they checked it and then they immediately replaced the front jack. Camped next to a wonderful couple from Texas, the Sparks. We went from there for a night at Davey Crockett, wonderful campground and just stayed one night. Then off to a COE campground near Booneville MS called Piney Grove Recreation Area. I was able to find a spot right on the water for Shawna, Bay Springs Lake. The campground was really nice and the hosts were wonderful. The humidity took a little getting used to, we ate lunch the first day inside the Ollie. Sorry for the Picture quality but it was dusk with iphone. Just wanted you to get an idea of what we had to endure lol. On our way back home we stopped at the mothership to pick up an entry rug Shawna saw and I asked them to look at the Anderson for me, I thought something was wrong. It turns out it failed and we didn't notice it until we stopped for gas on the way back towards Hohenwald. Oliver Service quickly replaced the ball, sorry I don't have any pics of the failed piece, and we were good to go. Back in Ohio now, This is our first RV of any kind and we are new to all this. We could not be happier with our Ollie and with Oliver. We are planning our next trip in a couple weeks. Looking forward to next year's rally and a chance to meet everyone, space already reserved.
7 points
-
Back on topic for an update. 😉 After several delays due to some health concerns (all okay) we finally saw our first Oliver trailer yesterday. Sue and Matt, hull #944, invited us for a visit to see their 2021 Elite II that they picked up last fall. We spent over three hours with them, both exploring the trailer, and sitting beside their lake talking about actual use and travel in general. it was everything we were hoping for, and then some! 😍 Much roomier than we expected in the twin configuration. No concern about the 30” bed width. So bright and airy feeling inside, and quality that’s on par with very expensive boats we’ve been in before. Absolutely nothing that we didn’t like, and so much we loved. So, we’re still heading to Hohenwald mid-August, and have a pretty good idea of what options we’d select. The only thing that will keep us from placing an order is indecision on actually making the commitment. No other trailer will do, so it’s either the Oliver or continue with the tiny squaredrop and motel travel. Thank you so much Sue and Matt, and to everyone else here sharing their knowledge and experiences!3 points
-
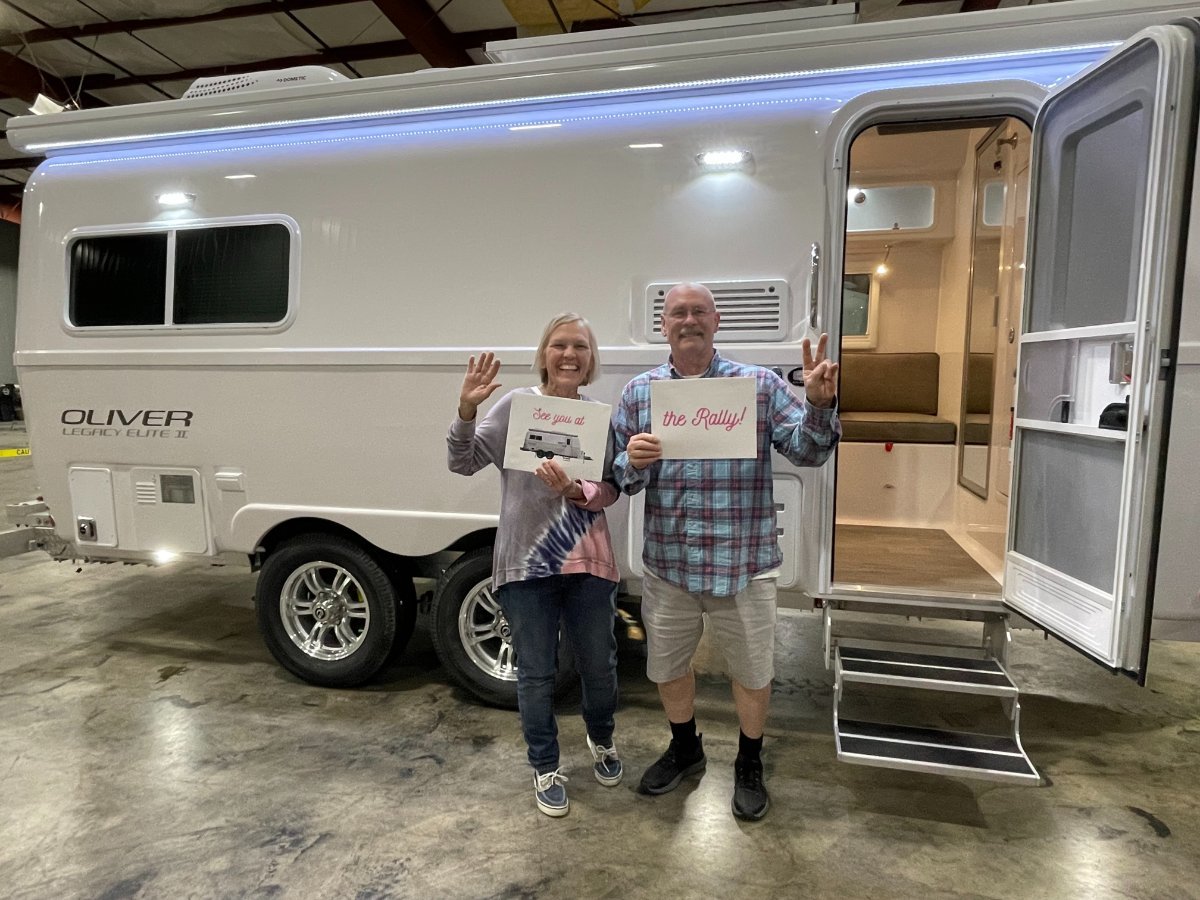
Delivery Day went great yesterday! Kudos to Ryan for a thorough orientation that enabled us to learn, have fun, and ask endless questions before choosing our spot on the Oliver Campground. It's been so much fun meeting other owners and learning from their experiences during our stay here so far. We were also blessed with beautiful weather on pick-up day and a quiet peaceful evening for our first night stay. Today, we are enjoying another sunny and warm day in the 70's before we head home tomorrow for PA, where it's currently in the 40's according to family members. Oh well. We eagerly look forward to seeing you all at the Oliver Rally, which is quickly approaching. Peace, love, & safe travels!
2 points
-
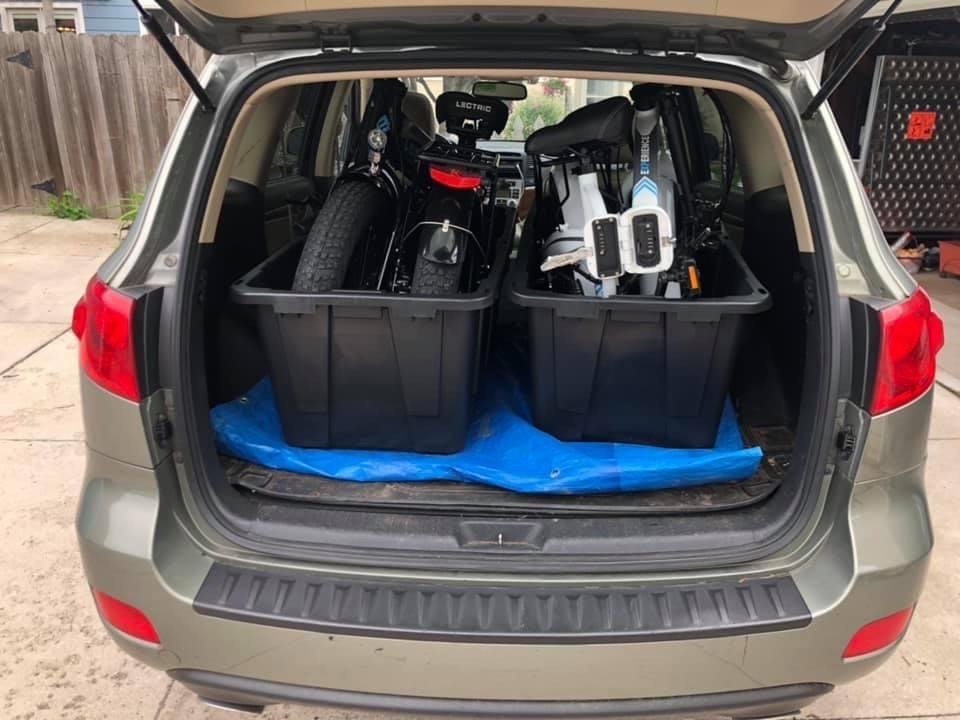
You wouldn’t be able to stack them because they don’t fit flush inside the bin, they stick up over the top of the bin, but I think they would fit end to end in the aisle since the aisle is 2ft wide and the bin is 22”. I agree, long term it’s not a practical solution because the bikes are quite heavy (63lbs) each and somewhat awkward to fold up. This is not my photo, it’s just to show you how the 2 bikes fit in the 40 gallon Commander totes.
2 points
-
Thanks John, I'll check it to make sure I didn't leave it that way. I experimented with a longer hose at one time so that was probably me not the factory. Something about that image was off but I guess I was too focused on the bracket to realize it's the street side bracket, the creaking is on the curb side. The longer hose did not work out well for me. No good ideas yet on how to manage the hose with this system. I was hoping someone would find an upgrade for the outdoor water system and post a how-to about it.2 points
-
Yep, submit a work ticket and service will sell you a brandy new one. 👍🏻 They ship fast in my experience.2 points
-
I would like to see RV A/C units built like the home/business Ductless units. We have one in my wife's Woman Cave and it's quite, you could mount the outside compressor unit either upfront, or in the rear, sure might take a little rearranging of things. Both the heat and A/C outputs are high and super quite. trainman2 points
-
Congrats and welcome to the family. Remember.... A/C Fan on LOW.... Heat... Fan on AUTO. Happy camping.2 points
-
Before ordering our Elite II, we tried to shop Airstreams, including the Bambi. We contacted our local Airstream dealer in Boise, Idaho, asking to walk through and check out a Bambi. We were told we could not, as all Airstreams on the lot had been pre-sold and could not be shown. We were advised that if we wanted an Airstream, it would have to be ordered "sight unseen," based on the virtual tours available online. That would be like buying a new truck without even driving it, or even one like it! No thanks. After thoroughly evaluating, inside and out, an Elite II owned by another Idaho resident, we ordered the Oliver.2 points
-
Stripped carriage bolts ….. darn it! Drill or grind the heads off, completely. Drive the shanks down and out the bottom with a brass drift. Replace them with hex head bolts and thick washers. Perhaps an hour’s labor IF you have good access up top. Oliver should definitely cover the repair! They are stainless, not that hard to drill, as you discovered when the square heads rounded off. (I have snapped a seized 1/2” bumper bolt into pieces with a regular breaker bar, to wasn’t TOO difficult.) Hand cut square holes? That seems overly primitive for a factory, but these are special jacks I think, so that bracket defect probably is the jack manufacturer’s fault. Good luck, stuff like this makes you want to scream, doesn’t it? John Davies Spokane WA2 points
-
Our LEII started creaking and popping loudly during our second trip. But it sounds different than yours, at least on video. It happens walking around inside the trailer, moving in bed and using the steps. I used a stethoscope to isolate the source of the creaking to the street side stabilizer. I think ours is rubbing against the hull near the wheel and the hull resonates the sound like a speaker box. Although the caulk prevents being able to seeing this the creaking stopped after loosening the bolts on the frame. First I tried putting the stabilizers down which reduced the creaking when moving inside the trailer, not when using the steps. Next I loosened the bolts that's holding the support ring to the trailer then tightened down the bolts in different orders then test. Several iterations of this stopped the creaking while static. The creaking returned the next time I towed the trailer. I've been able to manage the creaking while parked by running the stabilizers down to the ground then alternating them a little at a time until the popping stops. Fortunately this happens well before the wheels clear the ground. I also place a scissors jack under the steps which drastically reducing rocking of the trailer. This usually takes some tweaking at times, but I've been able to get it stable for days. I was hoping to get this resolved at Oliver, but a cascade of events has prevented this from happening. Now I'm considering shaving off some of the fiberglass that is against the support myself someday. Any recommendations for a caulking to use for this area? creaking-inside.mp4 creaking-manual.mp4 creaking-using-steps.mp4
2 points
-
I never even look at their prices. I have seen a lot of complaints on airforums, on the base camp. I'm super glad about our 2008 decision. And, we still enjoy our 2008 elite. Hull is great. Frame is great. We just update as we wish. 15 seasons in, best trailer, ever. It's a bit heavy, but so easy to tow. Do I wish we had a queen bed? Sure. I do. I'm looking forward to the redesign , coming soon.2 points
-
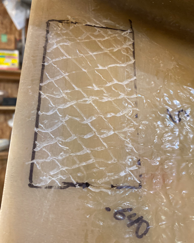
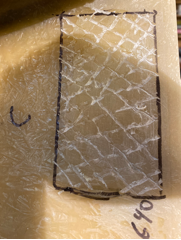
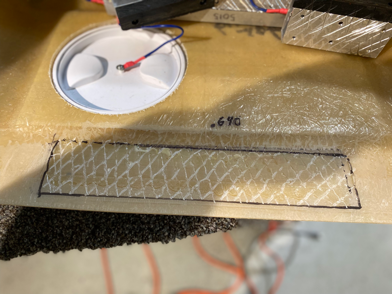
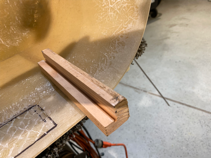
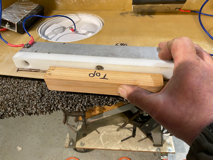
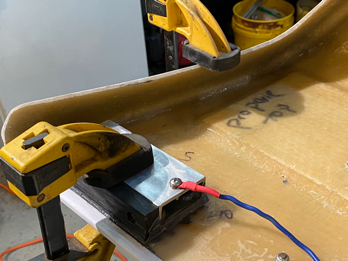
I bought my Oli used at 10 months old (2020 hull# 648). When I got my Oli one of the small Aluminum support bars was missing in the dog house lid. One my first voyage, We lost the other one within the first 40 miles. I noticed I had a bad habit of lying down the access port cover, so I fixed up a 18g wire and hooked to the large support bar and to the back of the access port cover. Just one year as the owner on one of our 5 day outings, I got to the camp site and went to open the access port to turn on the propane; The large bar had fallen off, and was hanging by the wire. I was going to call Oliver to order 2 more small bars, but since I am out in the cold when it comes to Olivers Warranty I decided to make Aluminum Support bars. I had left over 1”x2” Aluminum rectangle left over from mud flap installation (Original rectangle material was 1”x1.5”), and I had a few small pieces of Black 5/8” thick Ultra High Molecular Weight Polyethylene (UHMW) lying around. The large bar that I still had only a few very small areas that had the resin attach to it (marked in Red), and the area where the bars came off where real smooth. The surface of the aluminum had a fair amount of oxidation. I cut a couple pieces of aluminum with a Angle grinder cut-off wheel, and the UHMW was cut to size on a table saw. I counter sinked the UHMW with a 3/8 spade drill and drilled out for a 10-24 SS screw. I also tapped the aluminum with a 10-24 tap for attaching the UHMW. I got a little carried away when I attached the UHMW to the aluminum, I used blue lock tight and lock wash and nut on the back side. I was paranoid of the aluminum support bars falling off again, so I go a little carried away with the mating surfaces to be attached. I used a 1/16 angle grinder cut-off wheel and cross hatched the aluminum, I then drilled and tapped 1/4-20 threads into the aluminum. The 1/4-20 holes are NOT for bolts but something extra for what ever I used to adhere to the Aluminum. I also sanded the aluminum by hand with 40 grit sandpaper for metal. For the Fiberglass I sanded down the original area with the 60grit sanding pad on a angle grinder. I left one small portion of an edge for locating the bars side to side. I used a Dremel tool with a carbide bit to cross hatch the fiberglass. Finally I did a final hand sanding with 40grit sandpaper. I made a tool for locating the aluminum support bars from the edge of the of the fiberglass. I took measurement from the impressions in the fiberglass from the resin, and the one Aluminum bar that I had. I calculated the offset of the bar .640” from the edge. This measurement was including the white trim piece. I didn’t realize that the trim would just come right off. If I had to do it over again, I think I would done the measurement without the trim piece. Note the picture shows me holding it without the trim on the shell, but I did not use it that way. Note the wires in the second picture. Before I mounted the bars I made a couple of security straps. I figured that by some chance one of the bars would come off I Attached 16g wire with heavy duty eyelets to each bar. That way I will not loose any more support bar if they cam unglued. The next question was how to adhere the support bars to the fiberglass. I felt that my 2 low tech options were JB weld or Gorilla glue. I research both, and both seemed to be a reasonable option for adhering aluminum to fiberglass. I have used Gorilla glue a few times and never had any problems with it besides the bottle has a short life span in Oregons high humidity after it is opened. The JB Weld had a fractionally higher shear factor than the Gorilla glue did, and I have use JB weld in so many applications and it has never failed. I flipped a coin and JB Weld won, although it might have been a 2 headed coin. I ended up using 1 package of the Professional size JB Weld, and one of the regular size. to do the job. I used a Bondo plastic putty tool to spread the JB weld. I put a small amount on the fiberglass just enough to fill the cross hatching squeegeed across the fiberglass. Then I put a large amount on the Aluminum cross hatching. Put the Aluminum bar in placed and then clamped. Note the trim piece in place. Below is of one of the bar ends. The puddle of JB Weld on the inside of the bar is what pushed up through the 1/4-20 holes. Here are the tools I used for the JB weld. The 3M adhesive remover worked great for cleaning up the JB Weld (sometimes I can make a mess). The final Product. I secured the wires with GB 1” square adhesive back wire tie downs to keep the wires out of the way.
1 point
-
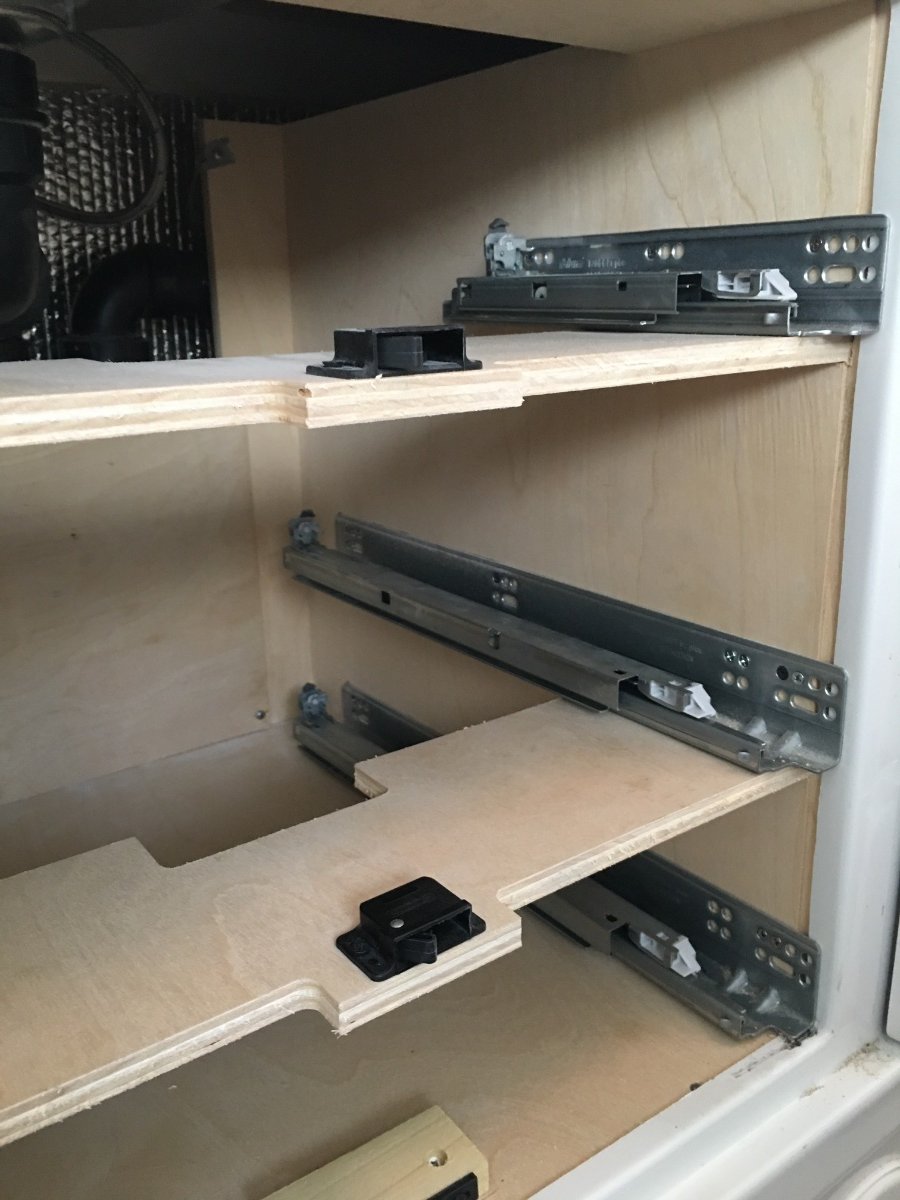
I recently found that a galley drawer would not close properly, and discovered that all 3 of the #6 5/8" screws holding the slide mount to the cabinet walls had fallen out. I pulled all of the drawers and found that about half of the screws on other drawer slide mounts were either loose or missing. The Blum undermount tandem slides are arguably the best in the business, and in my opinion Oliver's drawer and cabinet construction is superb. While 3 screws per slide might suffice in the standard stationary kitchen cabinet, it was clearly not enough for this rolling galley. I installed several screws per slide in fresh holes (giving about 8 per slide). Hopefully this does the job -- time will tell. If my current mounting proves insufficient, I'll go with even more #8 screws. Point of the story: it may be worth checking these in your trailer and adding screws if necessary. p.s., this apparently isn't a new problem:
1 point
-
Hi All! I will be picking up my Ollie in less than 2 months. Again, as a newbie to RVing, I am still trying to learn…but so far, I feel I have learned a lot from reading these forums – so a big thanks to all of you! Anyway, I have looked at different checklists on how to set up and break down the trailer, trailer hookup, trip preparation, etc. After looking at tons of checklists (and Youtube videos), I have attempted to create my own checklists. Some may look at these lists and think they have too much info, and that they are overkill – but personally, I work better with very specific instructions. Although these checklists are long, I was hoping that you guys would look and provide feedback on them. Did I miss steps? Is the order correct? Did I use the correct terminology? And so on. I know this is a big ask as the lists are longs on detailed....but any help would be appreciated. If worst comes to worse, I guess I will find out if they are correct when I go to use them. Note that if you see RED in the script, then it is a question I have or something I still need to fill out – so if you have the answer, I would love to hear it. I have attached a document with the checklists, but I have also cut and pasted the checklist below....just to make it easier for anyone. The document is in .docx format...if you need it in another format, let me know. Also, after I complete the checklist and go through them a couple of times, I will post a file with all the updates of them so it can be downloaded by anyone interested in it. Thanks! (1a) Campsite arrival and set up - Inside trailer 1) Put steps down of Ollie. 2) Unlock Ollie door. 3) Open window shades. 4) Open windows as needed. 5) ? Open stove vent ? 6) Pull out shower drain cutoff valve (inside bathroom at toilet base) to open shower drain. 7) Open bathroom fan vent. 😎 Open Maxx fan lid/vent if it is not open. 9) If propane was not on: Verify stove is off, turn on propane outside, and light stove burner for 30 seconds (to remove air from line). 10) If at RV park (with electrical): Switch refrigerator from ‘LP’ (propane) to electric. 11) Verify refrigerator is working correct AND in correct mode (should be ‘LP’ if not at RV park with electric). 12) If boondocking and using fresh water tank: Turn on water pump. (but maybe turn on faucet first?) 13) Verify kitchen faucet is working. 14) Turn on gas water heater switch ? 15) Turn off backup camera. ? 16) Turn on furnace if cold. 17) If at RV park AND electrical is hooked up: Turn on A/C if hot. 18) Put out welcome mat, chairs, etc (1b) Campsite arrival and set up - Outside trailer 1) Using spotter, back up into campsite. Watch out for branches. 2) ? Turn off GPS in vehicle. ? 3) Put on work gloves. 4) Eyeball trailer is not too far and will be able to hook up to sewer, electrical, and water. 5) Level trailer side to side using Anderson levelers. Use level inside for final determination. 6) Set chocks - front and back of both wheels. Important: set chocks before detaching safety chains or the trailer from the hitch! 7) To unhitch trailer (after you are sure you are close enough to water/electrical/sewer): A) Detach breakaway cable from truck and stow. B) Remove hitch coupler pin (that has electric pigtail under it) from hitch coupler lever and stow. C) Detach 7-pin electric pigtail from truck and stow. D) Detach safety breakaway cord from truck and stow. E) Detach safety chains from truck and stow. F) Put leveling blocks under front jack leg so it doesn’t sink in. G) Lower front jack leg so tongue is raised about 2-4" until chains are slack. H) Pull cotter pin from WDH triangle pin. I) Pull WDH triangle pin from WDH (you may have to wiggle triangle back and forth while pulling out). J) Insert cotter pin back into WDH triangle pin (so you don’t lose it) and stow WDH triangle pin. K) Drop WDH triangle and chains on ground. L) Raise front jack leg so tongue is level with truck hitch. M) Pull up on hitch coupler lever. N) Lower front jack leg to raise tongue and release tongue from ball. If necessary, use foot to push down on hitch to help separate ball from hitch. O) Lock trailer hitch with hitch lock. 😎 Move truck to parking spot. 9) Raise or lower front jack leg onto leveling block to level trailer front to rear. Use level inside for final determination. 10) Lower rear stabilizer legs onto leveling blocks to stabilize back of Ollie. 11) After making sure that stove, heater, furnace, and water heater are off: Turn on propane 12) If at RV park: Hook up electric: A) Attach one end of electrical cord to RV. Note: Always hook up to RV first!!! B) Attach the other end to surge suppressor. C) Attach surge suppressor to 50-amp converter if needed. D) Verify that breaker is OFF on pole side before plugging in. E) Connect converter (or surge suppressor) to park electric outlet. F) Make sure no faults are detected by surge suppressor. G) Turn on breaker. 13) If at RV park: Hook up water: A) Wipe off water faucet with sanitizing wipe (or spray with disinfectant). B) Attach ‘Y’ to faucet. C) Attach 55 PSI pressure regulator to ‘Y’. D) Attach inline filter to pressure regulator. E) Attach white water hose to inline filter. F) Attach white water hose to city water line. G) Do NOT turn on water pump inside Ollie! 14) If at RV park: Hook up gray water sewage: A) Put on gloves. B) Bring out sewage drain hose support and put sewage drain hose on it. C) Remove cap and attach sewage drain hose to sewage hole. D) DO NOT pull out grey tank handle to open. Save grey water for cleaning sewage hose. 15) Check water heater for propane odor - light pilot and turn on or use auto ignite on newer models. 16) Turn furnace electric switch on - older model have switch on the furnace under the sink, newer models do not have a switch. Not sure if we have a switch or not. 17) Extent and secure awning (optional). (2a) Campsite departure preparation - Inside trailer 1) Clean up, put stuff away, secure items. 2) Vacuum. 3) Refrigerator - check inside, throw away anything old, latch door tightly, switch to ‘LP’ (propane) (if you were set to electric), and verify that refrigerator is running on propane. 4) If dumping garbage: Collect and bag garbage AND put in truck. 5) Turn off TV and stow away. 6) Verify stove burners are off. 7) Secure microwave glass plate (maybe in sink?). 😎 Close and secure ALL windows (including bathroom window). Note that non-bathroom windows can be left open ( < 4 inches) if there is no rain in the forecast and the day is hot. 9) Close ALL window shades (so they don’t have problems when traveling) unless windows are kept open. 10) Close bathroom fan vent. 11) Push in shower drain shutoff valve (inside bathroom at toilet base) to close shower drain. 12) If dumping garbage: Collect and bag garbage AND put in truck. 13) Turn off A/C. 14) Turn off furnace and lower thermostat. 15) Turn off Maxx fan - close lid/vent, turn switch and speed to off, thermostat on red. Note that the Maxx fan lid/vent can be left open if there is no rain in the forecast. 16) Make sure ALL cabinet and drawers are closed tightly. 17) Lock bathroom door. 18) Lock pantry and front closet door. 19) Turn on backup camera ? 20) Turn off water pump. 21) Bring in any outside mats. 22) Turn off all lights. (2b) Campsite departure preparation - Outside trailer 1) If at RV park/dump station: Raise 2 rear stabilizer jacks a foot. 2) If at RV park/dump station: Raise front of trailer one-half foot using electric stabilization jack so grey tank will flow out better. DO NOT raise so high that 2 rear stabilizer jacks touch ground! 3) If at RV park/dump station: Put on disposable gloves. 4) If at dump station: Connect sewage drain hose to sewer hole (it should already be attached if at RV park). 5) If at RV park/dump station: Empty black tank by pulling out black tank handle to open. 6) If at RV park/dump station: Verify sewage drain hose has stopped draining. 7) If at RV park/dump station: Push in black tank handle to close. 1) If at RV park/dump station: Empty grey tank by pulling out grey tank handle to open. 2) If at RV park/dump station: Verify sewage drain hose has stopped draining. 3) If at RV park/dump station: Push in grey tank handle to close. 4) If at RV park: Turn off white tank water at RV faucet. 5) If at RV park: Disconnect white water hose, spray with disinfectant, connect ends, and stow. 6) If at RV park/dump station: Spray black tank water hose with disinfectant and attach to RV faucet. 7) If at RV park/dump station: Attached black tank water hose to black tank flush inlet. 😎 If at RV park/dump station: Turn on water at faucet. 9) If at RV park/dump station: Monitor black tank from inside RV. When 2/3 full, pull open black tank handle. 10) If at RV park/dump station: When running clear, turn off water at faucet. 11) If at RV park/dump station: Disconnect black tank water hose, spray with disinfectant, connect ends, and stow. 12) If at RV park/dump station: Squeeze sewage drain hose so any excess goes into sewer hole. 13) If at RV park/dump station: Disconnect sewage drain hose from sewer hole 14) If at RV park/dump station: Spray sewage drain hose with disinfectant, cap, and stow. 15) If at RV park/dump station: Throw away gloves and wash hands. 16) If at RV park/dump station: Spray water hose ends with disinfectant, connect ends, and stow. 17) If at RV park: Turn off electric from electrical hookup. 18) If at RV park: Disconnect electrical cord from RV and stow. 19) If at RV park: Disconnect cable TV cord from RV and stow. 20) Stow outside thermometer. 21) Get any items you need for truck from inside trailer (water, keys, etc.). 22) Close and secure awning. 23) Bring up both stabilizers and front tongue support jacks. Stow all 3 leveling blocks. 24) Water heater - off. 25) ? Secure stove vent. ? 26) ? Put on A/C cover. ? 27) Walk around trailer and stow anything left out. 28) Lock outside storage compartments. 29) Verify all lights are out. 30) Lock trailer door. 31) Raise aluminum steps. 32) Hitch up truck to travel trailer. Follow instructions in '(3) Trailer Hookup' section below. (3) Trailer Hookup 1) Back up truck to hitch about 6 inches from trailer hitch - make sure you are straight. 2) Need to add part if trailer and truck are not straight to each other (could be tough to set up WDH). 3) Raise rear stabilizer legs all the way up and stow both leveling blocks. 4) Unlock hitch coupler lock and stow. 5) Pull up on hitch coupler lever. 6) Put leveling block under, then lower front jack leg to raise tongue so ball receiver (on trailer) will clear the hitch ball (on truck). 7) Back up truck as to position hitch ball under ball receiver, but just a little forward - about a 1/2". 😎 Raise front jack leg to lower tongue onto hitch, until hitch is snug with ball. 9) Push down on hitch coupler lever to lock hitch onto ball. 10) Insert hitch coupler pin into hitch coupler lever (so secure it). 11) Lower front jack leg until no weight on truck hitch. This not only verifies the lock/ball is secure, but allows easier installation of WDH. 12) Take cotter pin out of WDH triangle pin. 13) Slide WHD triangle under the hitch 14) Secure WDH triangle with WDH triangle pin. 15) Insert cotter pin in WDH triangle pin to secure it. 16) Raise front jack leg all the way up. 17) Verify that WDH chains are tight. 18) Attach safety chains to truck so they crisscross UNDER tow bar. 19) Attach 7-pin electrical pigtail to truck (under hitch coupler pin). 20) Attach safety breakaway cord to truck (NOT to safety chains). 21) Remove chocks and stow. 22) Pull trailer forward a little - recheck hitch to see if secure. 23) Pick up Anderson levelers and any 24) Test trailer brake lights and turn signals. 25) Walk around trailer and stow anything left out. (4) When leaving the RV for a hike or car trip 1) Retract awning. 2) Bring in any items that you don't want wet or blown away. 3) Turn off generator and lock it up. 4) Put away solar. 5) Check A/C or heat – turn on if needed. 6) Lock up trailer. (5) Trip Preparation (leaving home) 1) One day before: Connect RV to shore power (AC). 2) One day before: Check propane tanks and fill if needed. 3) One day before: Verify stove is off. 4) One day before: Open up propane valve. 5) One day before: Turn on stove for 30 seconds to clear air from propane lines. 6) One day before: Turn refrigerator on to AC and set to 9 (which is the coldest setting). 7) Check air in tires - fill to recommended psi of tires. 😎 Fill fresh water tank about 1/3 full - top it off at or near your destination. 9) Open hot water tank bypass valve - handle in vertical position to open, horizontal to bypass. 10) Turn on pump and run all faucets (not all at once) from the rear to the front - hot and cold to remove air. 11) Run water into toilet to remove air from lines and to add water to black tank before use. 12) Day of trip: Follow instructions in ‘(2a) Campsite departure preparation - Inside trailer’ section above. 13) Day of trip: Disconnect electrical cord from RV and stow. 14) Day of trip: Follow instructions in '(2b) Campsite departure preparation - Outside trailer’ section above, including any instructions in the ‘(3) Trailer Hookup’ section. Ignore any ‘If at RV park/dump station’ instructions. 15) Open Maxx fan vent. (6) Trip ending (arriving home) 1) Follow instructions in '(1b) Campsite arrival and set up - Outside trailer’ section above. 2) Put steps down of Ollie. 3) Unlock Ollie door. 4) Turn off backup camera. ? 5) Remove all items from refrigerator. Turn off refrigerator. Make sure door stays open. 6) Put dog towels in refrigerator to capture water from defrosting. 7) Turn off propane. 😎 Empty water tank. 9) Close Maxx fan vent. 10) Close window shades. (7) Filling up 30 gallon white water tank from water spigot (fresh water inlet) 1) Wipe off water faucet with sanitizing wipe (or spray with disinfectant) 2) Attach 55 PSI pressure regulator to water faucet. 3) Attach inline filters to pressure regulator. 4) Attach white water hose to inline filter. 5) Attach white water hose to fresh water tank inlet. 6) Turn on water until water overflows or Seelevel monitor says it is full - then turn off water. 7) Detach pressure regulator from water faucet. 😎 Detach white water hose from inline filter. 9) Squeeze out water from white water hose, then detach from fresh water tank inlet. 10) Wipe off white water hose with sanitizing wipe (or spray with disinfectant), connect ends. 11) Stow white water hose, pressure regulator, and inline filters. (8) Filling up 30 gallon white water tank from water container or jugs (via boondocking inlet) while you are boondocking 1) Wipe off boondocking inlet with sanitizing wipe (or spray with disinfectant) 2) Attach white water hose to boondocking inlet behind Ollie. 3) Attach white water hose to jug or container holding the water. 4) Turn ALL 4 valves counter clockwise. As info: a) upper left valve opens from rear boondocking inlet. b) lower left valve opens from fresh water tank. c) lower middle valve closes from faucets. d) lower right valve closed from city water. 5) Tun on pump – water will start flowing from water jugs to fresh water tank. 6) When all water has been pumped in, turn off pump. 7) Detach white water hose from inline filter. 😎 Squeeze out water from white water hose, then detach from boondocking inlet. 9) Wipe off white water hose with sanitizing wipe (or spray with disinfectant), connect ends. 10) Stow white water hose, pressure regulator, and inline filters. 11) To continue boondocking: a) Turn upper left valve clockwise to close rear boondocking inlet. b) Turn lower middle valve clockwise to open faucets. tripmush - checklist.docx1 point
-
Those are beautiful pics and LOVE THOSE kayaks!1 point
-
Mr cool makes at least one 12000 btu 120v system. (We have a larger one in our garage.) The problem is, where to put the condenser? And, the interior unit is quite large, as well. Even if it fit, it would take up the entire attic space. Bonus if you figure it out. 22 seer. Extremely quiet. Well constructed. Coastal rated fins on condenser. Quiet night mode. Our smaller unit, in the garage, was diy. Charged line comes with the units. We looped up the extra.1 point
-
As always, post your hull number and model in a signature in every post…. preferably your tow vehicle info too. Do not assume that we all know what you own. Otherwise we have to look at your profile page to see if it is there… These trailers change constantly from year to year, and you are very correct, the technology is not at all intuitive if something does not work correctly. Once we know what systems you have, somebody can assist. Off the top of my bald head, I suspect there is a problem with the transfer switch, which is supposed to seamlessly bring your batteries online as soon as you unplug from shore power. EDIT - The latest Xantrex inverter has a built in transfer switch. (My five year old one is a separate relay.) So either that inverter function failed (a defective unit):, or the batteries are not in fact charged (check the voltage with a hand volt meter.) That is far as I can go with this problem because I don’t have this system…. Good luck. John Davies Spokane WA1 point
-
Here ya go. Nice and quick service! Easy to replace. https://www.itc-rv.com/product-category/replacement-parts/1 point
-
Congrats on your new Oliver!! Wishing you many happy miles and smiles exploring! Happy Camping!!! -Patriot1 point
-
Makes the pricing and functionality on the Elite 1 look pretty nice…granted it is lighter. https://www.airstream.com/configurator/tt/complete/?model=20&length=16&floorplan=basecamp-16&decor=rei&options=732,723,733,6361 point
-
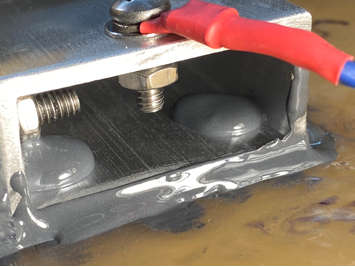
That is unfortunate. I am not convinced that a nylon cable tie, even a big one, makes for a proper HVAC clamp, it really needs a worm screw steel one, IMHO. Once positioned and tightened correctly, it should not “blow off”. Cable ties are used in residential duct installations, but they usually just support the weight from a rafter, the actual connections are first screwed and then either taped or puttied. Thanks for posting the pictures. John Davies Spokane WA1 point
-
Congratulations and welcome, safe travels from Hull # 901 MD1 point
-
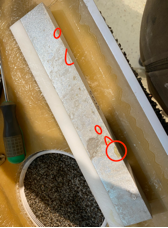
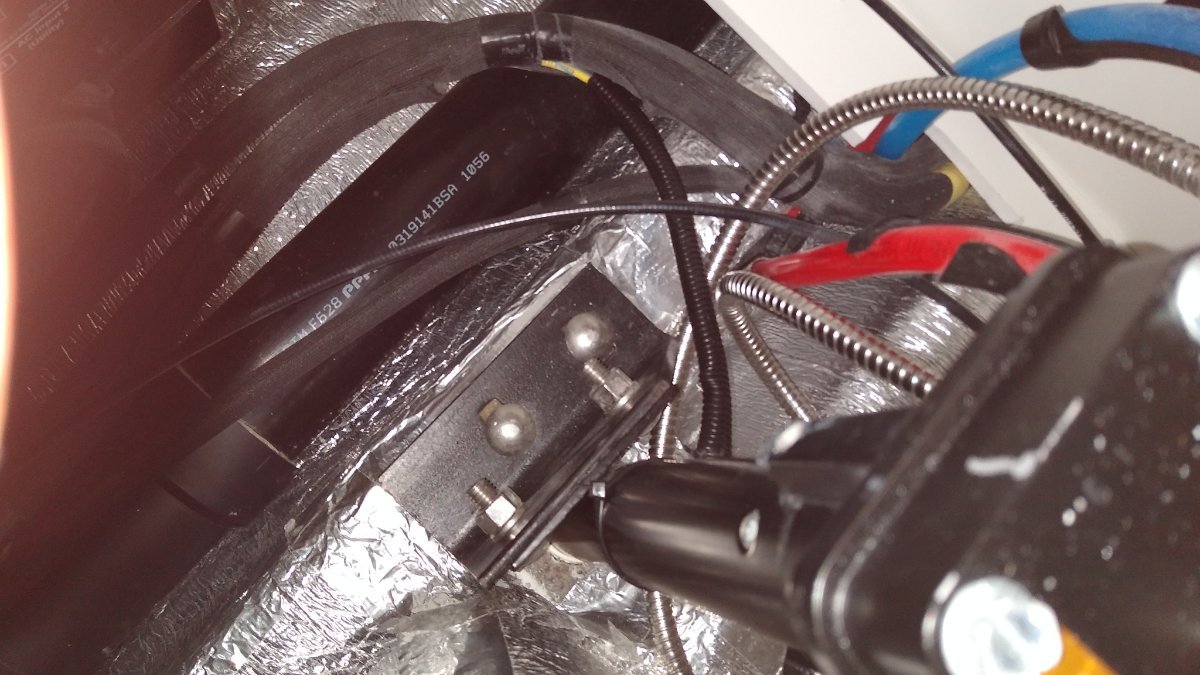
Yikes, sorry to hear that. I can't check mine at the moment but the photo I took shows the holes are oversized. It also looks like my bracket may have shifted which may be the issue. I'll look into this closer first so thanks for posting this information. Edit: Oh rats! John just pointed out this is a photo of my street side bracket, the creaking is on the curb side. I'll leave it since it does give an idea of how large the hole is.
1 point
-
Hello, We have Lectric folding ebikes and love them! They are a great bang for your bike, we’ve had ours a little over a year with no issues. We’ve transported them in the back seat area (not folded) as well as the bed of our truck (folded). You can also fold them and put each one in a 40 gallon Commander Tote bin (from Lowes). There are several posts about transporting Lectrics on the Lectric owners FB page.1 point
-
Dave and Kimberly, Absolutely beautiful! Thanks for posting!1 point
-
+1 on the eccotemp L5. We've had one for 14 years, for outdoor springwater showers at our camping property. I've also used it for washing dishes, etc. We replaced the original showerhead and hose with a longer stainless wrap hose and a better shower head. We've replaced 2 small parts over the years. (We forgot and left the batteries in one year over the winter, and messed up the battery box.) Eccotemp live USA customer and technical support are excellent. I bought one for my cousin in Alaska, who has a dry cabin, but has a well. We helped her set it up the first year. She loves it, too. We sometimes have a bunch of tent campers here with us. The Ollie freshwater tank doesn't last long with 8 to 10 folks. The Ecco temp is one of our best purchases, ever.1 point
-
I have Lectric bikes. For the money, they're hard to beat. I ride them in the hilly terrain of southeastern AZ and I can go about 20 miles or so without issue. I have not found a bin large enough to fit 2 Lectric bikes and still fit into a trailer. I haven't gotten my Oliver yet but they wouldn't fit in my Lance. I have ended up transporting them in the bed of the truck bungee corded in place. Not ideal but it works. Also, don't forget your bike keys and charger when you take them...I've done both and ended up transporting the bikes for nothing 😄1 point
-
Albert & Terri, Hello, If you haven’t already downloaded the Xantrex app for FXC Control. That is the first thing to do, makes setting changes easy. With the apt open power up the inverter and on the remote panel press and how the top ESC button until you set two lines flashing on the screen. This will allow the Bluetooth to connect. They apt will search for your inverter. Then go to settings. To charge the batteries I change GRID Breaker settings from normal 25 amps to 15 amps for the (Honda EU2200I) CHARGER current settings from normal 50 amps to 15 amps To charge batteries at a low rate and run the AC I change GRID Breaker settings from normal 25 amps to 15 amps CHARGER current settings from normal 50 amps to 5 amps (lowest setting) you can make minor adjustments up and down to match you generator. Reference Oliver trailer service tab also for Xantrex Inverter normal settings. Everybody please join in if you do it differently thanks . Safe Travels1 point
-
I talked with a Honda rep this past week regarding the 3200. They used stronger magnets and a higher rpm to get the output numbers. The fuel burn is very impressive, it could run forever on 6 gallons of gas. I might give it a try if it drops below $2.6k.1 point
-
Is it permissible on this forum to offer up our driveway for a couple of overnight stays to fellow Oliver owners who might be traveling through our area? We are contemplating being hosts on Boondockers Welcome but haven’t committed yet. We have a large driveway with 30 amp rv receptacle and water, and live 2 miles from an awesome beach.1 point
-
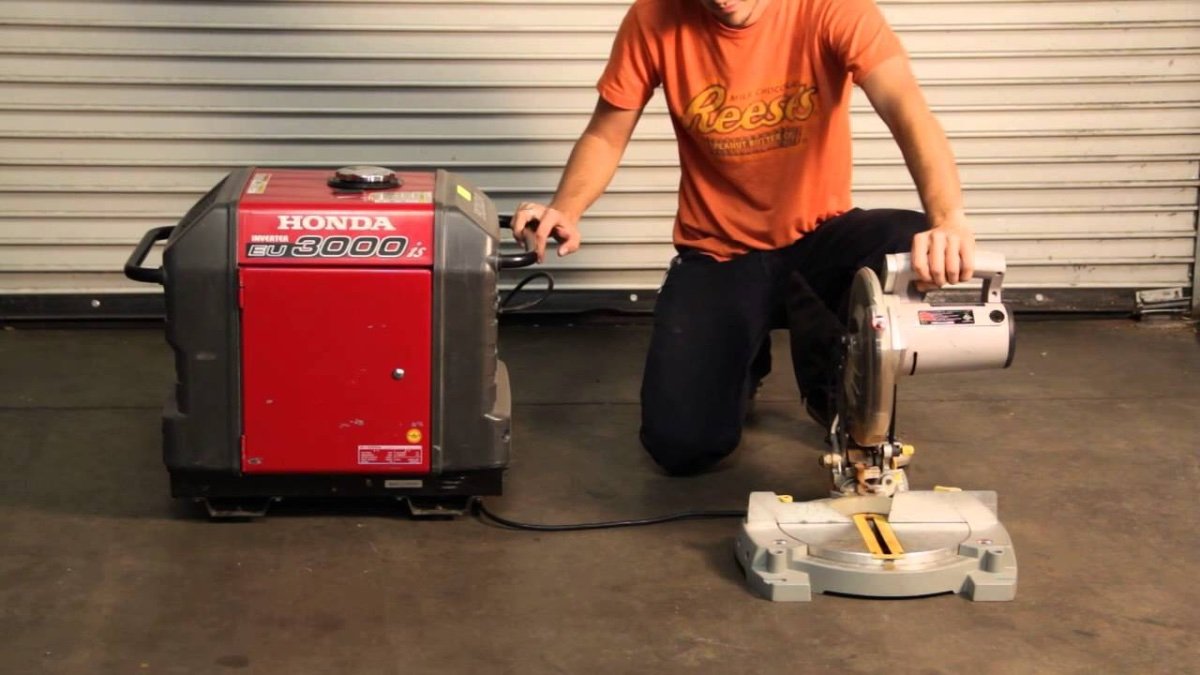
Wow, that's crazy that they've squeezed that much power into such a small package. And fuel injected to boot! We have the EU3000is, which has a slightly larger engine (160cc vs 130), but the whole package is huge by comparison. Here's a random photo I found with a person for scale. It looks like my old one is a tiny bit quieter at 49-58 dB vs 54-58, but I'd trade that for size. We ended up putting the wheel kit on ours, as it takes both of us to move it around when we need to use it. Ours does have the same engine as our snowblower, so that's good for service parts commonality. I added propane as an alternate fuel a couple of years ago using the Hatch Mountain kit. Much easier to maintain, as Honda's carburetors are notorious for clogging with old gas.
1 point
-
I purchased the Honda EU2200i to charge the batteries and run the AC when needed. Just need to select what is your priority and change the Xantrex setting. It just purrs away in eco mode with the AC running and is very quiet. So far so good. Definitely would wait some time per John’s recommendation before purchasing the EU 3200. Using the Honda app is nice to keep a eye on the generator load and shutting it down without leaving the trailer at night.1 point
-
Wow, that looks interesting, I have an older Yamaha 2400 which works great, but this is 15 pounds lighter, smaller, more fuel efficient, way more powerful and has nifty modern features like fuel injection. But double the cost 😳. I personally would wait a year for any new model bugs to surface and get corrected, and for some impartial reviews showing how much surge power they can truly produce, and how much continuous power. They are not the same for all generators. “Peak power” numbers can be very deceptive. And wait for that price to drop a LOT. I am not a Honda fan boy, I have been burned by poor quality control and numerous warranty issues on their other products in the past…. Maybe that has been corrected. Caveat emptor ! https://powerequipment.honda.com/generators/all-new-eu3200i BTW I have been very interested in a new Ryobi 30 inch zero turn mower, when the first test articles appeared it had an MSRP of $3999. It is sold exclusively through Home Depot. HD raised the price by $500, and shortly after raised it another $500😳. That mower is no longer on my honey-do list, for this mowing season at least. John Davies Spokane WA1 point
-
I got that email from REI/Airstream this morning and watched their videos and read through the literature. We’ve been in a Basecamp a couple of times and we weren’t overly impressed. If you have to have a small Airstream I’d probably go for the small Bambi. We were just at REI in San Antonio yesterday. There’s an old Airstream food trailer that parks outside and has for a couple of years. I didn’t check to see if it had an REI plaque on the side…. Mike1 point
-
I looked around at Yakima's website and did not see anything, you should email them to make sure a travel trailer is included in that general RV approval statement. I do know that SOME Yakima products like my Rocket Box are not rated for "off-road' and the warranty terms specifically say that that is anything rougher than a smooth graded gravel road. So potholed forest roads are "off-road". 😉 Reopening that receiver worm can anyway: it makes no sense at all to a normal person to buy an $850 (!!!) bike rack with less than desirable features, as a compromise, simply because it will fit the small Ollie receiver. It makes far more sense to spend less for a wonderful 1-Up Super Duty Double rack ($665 shipped in silver) and simply change the receiver so that it works. It is a far better rack than any Yakima, and debatably better than the other good e-bike rated racks like the Kuat. The 1-Up is designed and sold here in the USA, has individual spare parts available, stellar customer service, and it can be added to with more bike trays or a cargo tray. But only two bike trays for off-road, max 75 pounds per bike. This too small receiver issue is so VERY frustrating, ain't it? It makes you want to storm into the Oliver headquarters and give somebody a good shaking 😉 John Davies Spokane WA1 point
-
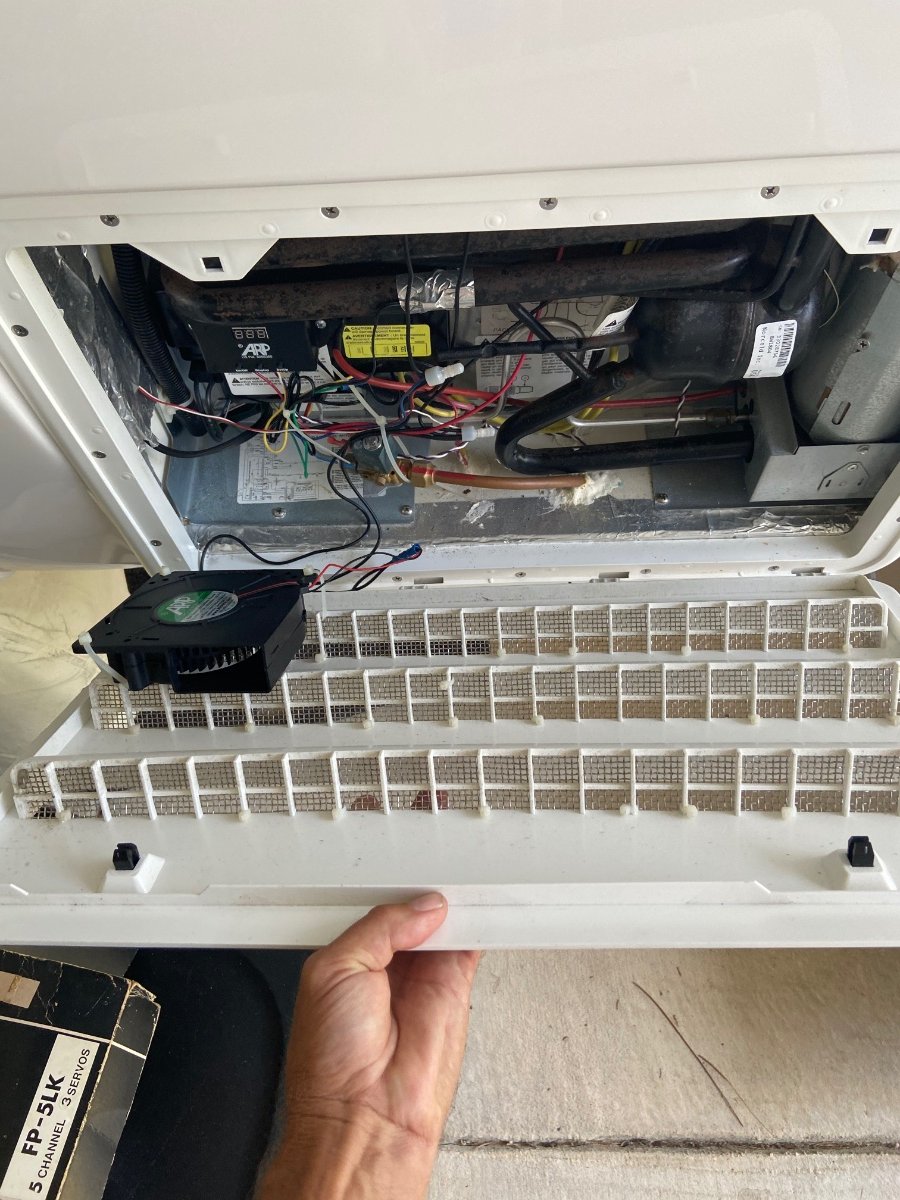
Everything is done from the outside unless you opt for the defrost/air circulation fans mounted inside the refrigerator on the ceiling.1 point
-
Did you use a torque wrench for the mount nuts? They should be 43 foot pounds as per Service Department recommendation. Hand tight with a small ratchet is not tight enough. Have a helper repeat that motion while you are inside, look and feel with your fingers for any movement at the head of the jack and where the bracket is attached to the side of the frame. Look for any signs of distress on the bracket itself, like a crack. It is possible that the jack or the hole in the hull is slightly mis-located (touching in one spot). If it all seems to be solid up top, you should file a service ticket. See what Oliver says, it could damage or crack the hull fiberglass if this continues for years. If they say it is trivial, just ignore it. It would require removing the jack and looking at the hull where it goes through, to see if there is a clearance issue… it might be something as simple as a small piece of debris wedged in the gap. While you are inside, check the three (3/16”?) Allen screws that hold the gearbox to the round shaft. Some owners have found them to be loose or entirely missing 😳. There should be no movement between those parts. Check all three jack heads! Good luck. https://olivertraveltrailers.com/forums/topic/6781-how-to-service-your-rear-electric-jacks/ John Davies Spokane WA1 point
-
There are four bolts associated with mounting the jacks. Two attach the mounting bracket to the jack tube. The other two attach the bracket to the trailer frame. Make sure all the are tightened down well. I believe all the bolts are carriage style so the nuts are easily tightened with no worries about the bolt spinning in the hole. The bracket to frame are accessible from underneath the trailer. The other two are accessed from under the bed.1 point
-
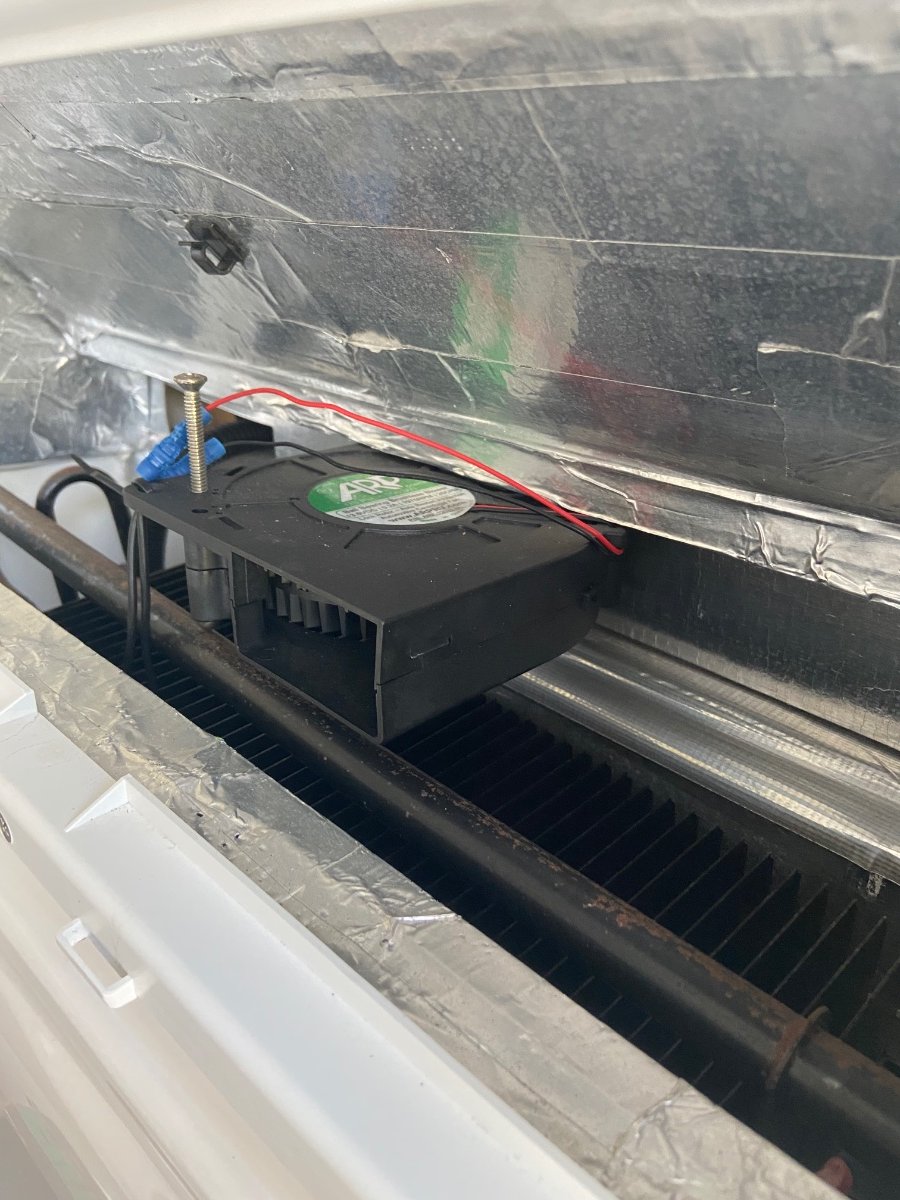
Installation was easy. Hardest part was deciding where and how to mount vent fans. Used double sided VHB tape along with a long screw for added support on the upper fan and zip tied lower fan on vent panel. Would liked to have centered lower fan left to right but space constraints dictated mounting to the left.
1 point
-
I installed the system last year as an extra measure of safety. Added benefit are the 2 fans that come with it , one mounted in upper and lower outside vents. I opted for 2 additional interior fans that help keep internal temperature uniform. So far, so good. Fridge has operated flawlessly even in very hot weather.1 point
-
"Eggcelsior" is home and soaking in a CT rainstorm after a week-long odyssey in 90+ degree heat following our delivery last Monday. We arrived on time for our delivery Monday morning (Steph was worried we'd hit "rush hour traffic" in Hohenwald, LOL) and were met by Ryan, who did our walkthrough. The walkthrough went fairly quickly, both because we were experienced RVers and because we had studied so much about Olivers on this forum and Oliver University. The only issue we spotted in the walkthrough was a blemish in the gelcoat on one countertop - which they addressed immediately. We then moved to the Oliver campground for the night. The plan was to run with shore power and water connected until the evening, then switch to boondocking mode for the overnight to test all the systems. While in the Oliver campground we met the new owners of Hull 1149 - who were camped overnight, too - and the owners of Hull 77 (Kathy and ? - forgive me, there was a lot going on...) who were there for service. We found a few more issues with Eggcelsior while we camped. We had a bad 30A shore power cable (it wouldn't twist into the locked position) which Oliver replaced. We also had a jumper set wrong inside the Xantrex unit that caused a 5 minute delay in delivering power to the camper after connecting to shore power. That was fixed onsite. Finally, the toilet was rocking on the flange. That which was fixed onsite, too. The next day we moved to David Crockett State Park. The site we chose (Campground 1, Site 1) would have been impossible for a larger rig, but the Ollie and our big dually were able to squeeze in. That night we noticed our air conditioner short-cycling so we filed a repair ticket and returned to Oliver service the next day. Jason was unable to replicate the condition after a morning spent in Service, but I think we found the issue later. The details are here: The next stop was a KOA in northeastern TN. (We booked commercial campgrounds for the entire trip home just in case there were any systems issues that would interfere with dry-camping.) The trailer pulled very well behind our 3500 gas dually, as expected. Steph did some towing driving for the first time in many years (she wasn't comfortable towing the fifth wheels), which was nice. Towing mileage ranged roughly from 9-12 MPG, typically around 9.5 at 70+ MPH and 10+ at around 65 MPH. The next day took us to MD. We have the Lithium Platinum package and ran the fridge on DC while travelling. On a full-sun day we saw the batteries drop to 99% after 7 hours of travel. On a partly cloudy day they were at 97% after 7 hours. On a 4-hour cloudy run we saw a drop to 95%. The third travel day brought us back to CT, where we experienced the worst traffic (and drivers) of the whole trip. (This is our usual experience when we come home.) A quick run to DMV the next morning to get registered, then the truck and trailer got a bath and we loaded up the rest of our stuff for our next trip. All in all, the staff at OTT were excellent and it was a successful venture. A few other observations: Tanks: The trailer is happiest slightly nose high with a slight tilt up on the curb side. After one day with no sewer in the state park, including 2 showers, the black read 19% and the gray 25%. Smart TV: This is really nice. We ran it off my 4G tablet's hotspot and it worked pretty well. There was a some buffering, but the signal strength wasn't great, either. Brakes: Braking was good, but one brake seems a little more aggressive than the other three. Something to watch.
1 point
-
Great comments and thank you for the welcome! I think I can make the payload, but maybe I'm being short-sighted not trying a 250. I agree regarding the garage comments, and I already have a buyer for my house so we are skipping the realtor and reducing the price. My assistant loves my house and adored my late hubby, so it would mean a lot to me for her and her family to be here. My family is on the east coast and my job (working with farmers) means I am usually working somewhere away from home, so I know selling is the right decision regardless. But not until the end of the year. I am hoping to get used to the truck before I hitch a trailer. My husband was 6'3" did construction and LOVED big trucks. Not that same for me. But he is smiling reading the recommendations on the posts:) Isn't there an insurance issue with larger trucks, since they are deemed commercial? I was trying to avoid that as well. I could take out a loan and go newer, but I'll be in the Rivian in a year or so, and would want to get back my investment on the resale of the prior TV. I appreciate the sentiment SeaDawg - I once could double clutch and so funny new rigs are all automatic. It's a lost art.... And yes, CNC, I'm good with gas over diesel right now. I'll check out the Ram. sigh...just a lot to think about! And thank you John - is the Anderson hitch really that much of a pain? It sounds like it. PS. No dogs, likely 2 cats but one has kidney disease and I'm not sure of her timeline.1 point
-
Thank you for the very honest and descriptive review. And it takes a very big person to admit a $900 mistake, kudos to you! I have a feeling about how frugal you and Paul are from previous posts on this forum and I know y’all put a lot of thought into your decision which must make it a bitter pill to swallow. I have a feeling that you will make it work in time even if you don’t share with visitors again. I still haven’t heard anyone talk about their mobile installation disposal methods which should be a different issue from a barn installation. Mossey1 point
-
Anita at Oliver called yesterday to make sure we got the printed brochure in the mail, and to answer any questions we had. We had a nice chat, but the old saying of "you don't know what you don't know" definitely applies here. Since we are currently in a 5X8 squaredrop (a boxy teardrop) without plumbing, gas, or any appliances built in, and basic electrical, everything about a potential purchase is unknown. We've done a *lot* of reading and YouTubing over the last couple of years, but I know there will be tons of questions down the road if we go this route. That said, Deb received her "golden ticket" from Maker's Mark as an ambassador, and her bottle is ready for pickup in Loretta, Kentucky. (Side note; she doesn't even like whiskey, but signed up for the free stuff they send at Christmas every year. 🤣 ) Meanwhile, Choice Privileges emailed me and let me know that I need to use my points on a stay before August 1, else lose them. So after Maker's Mark, we're headed to Hohenwald for a factory visit and to tour the Elite II. Who knows whether we'll leave with one less check in the checkbook...1 point
-
I still think this is caused by air pressure from the forward facing drain hole. My interim solution is a pair of the ever popular RV magnetic catches. Fit perfectly.
1 point
-
Pretty thorough. Made my head hurt a little reading through everything. I think you’ll be able to whittle these steps down after a while. We don’t use checklists when setting up, tearing down or dumping, it’s pretty much second nature. We both do specific things and then we double check what each has done. We do use checklists for packing, too easy to forget to bring something. A few comments on your list: - I am not aware of any stove vent that needs opening. - We travel with propane on. The fridge switches to 110v automatically if we’re hooked up. - We generally turn the water pump on when we need to use water, we don‘t leave it on 24/7 when boondocking. - If you have the suburban hot water tank and the outside switch is on it will automatically use 110v. If dry camping we turn the hot water gas on before we need hot water. Once hot, it will stay pretty hot for a while without the gas cycling on and off. - When we arrive at a site the first thing we do before backing or pulling in is to walk the site and verify where utilities are (if any) so we know where best to park. - Not sure why you need to hook your electrical cable to the trailer first. Just ensure the breaker in the box is off before hooking up electrical. We don’t have the on board surge protector, so we plug one into the pole that checks the electricity. It usually has about a 45 second delay before it passes electricity. I think the newer trailers have built in surge protection. You’ll use 30a most of the time, only twice have I had to use 50a, once because that’s all there was and once because the 30a was bad. - Your “gray water sewage” is really black water sewage. Black and gray go down the same hole. I flush the black tank a couple of times before pulling the gray handle. - Trip prep: I always check trailer lug nuts before a trip. - We travel with a full fresh tank. There are times you may not be able to fill once you arrive. - “white water” is normally referred to as fresh water. Gray and black have the colors! - if you are at a dump station, you’ll learn to be pretty efficient especially if folks are waiting. We’ve never had anyone get impatient but we try to be ready so we don’t have to do a lot of unloading to get what we need to dump. Like I said, some of this will get to be second nature, just enjoy the process! Mike1 point
-
SeaDawg Moderators Posted May 22 So, I came across this the other day-- Separett's new Tiny composting toilet. As toilets go, it's rather pretty and sleek. And small. But a big capacity. And, like all the other composting toilet, a pretty big price tag. Comes in two versions, with a urine hose, or with a urine tank. Vent adaptor from Swedish 50 mm to us 1.5 inch vent pipe. Seat height is about 3" lower than nature's head. I wonder if the odor from the fan would really be any worse than the odor from the nature's head fan, or the vent stack from the Oliver black tank? I'm sure I'll see it pop up on one of the youtuber sites soon. I saw this on the Air Forums and thought of you and your post about the Separett Tiny. https://www.airforums.com/forums/f446/part-l-tmi-review-of-the-separett-tiny-1270-01-a-224421.html Mossey1 point
-
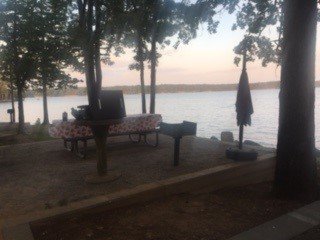
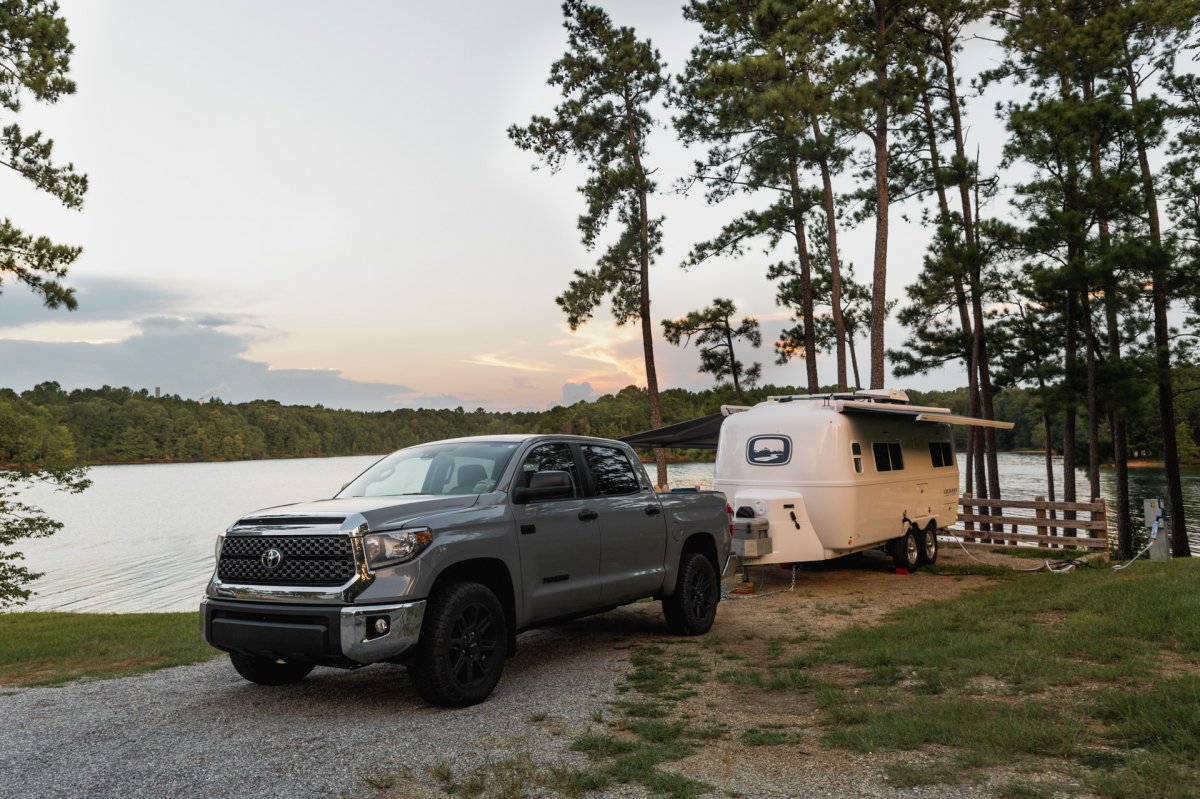
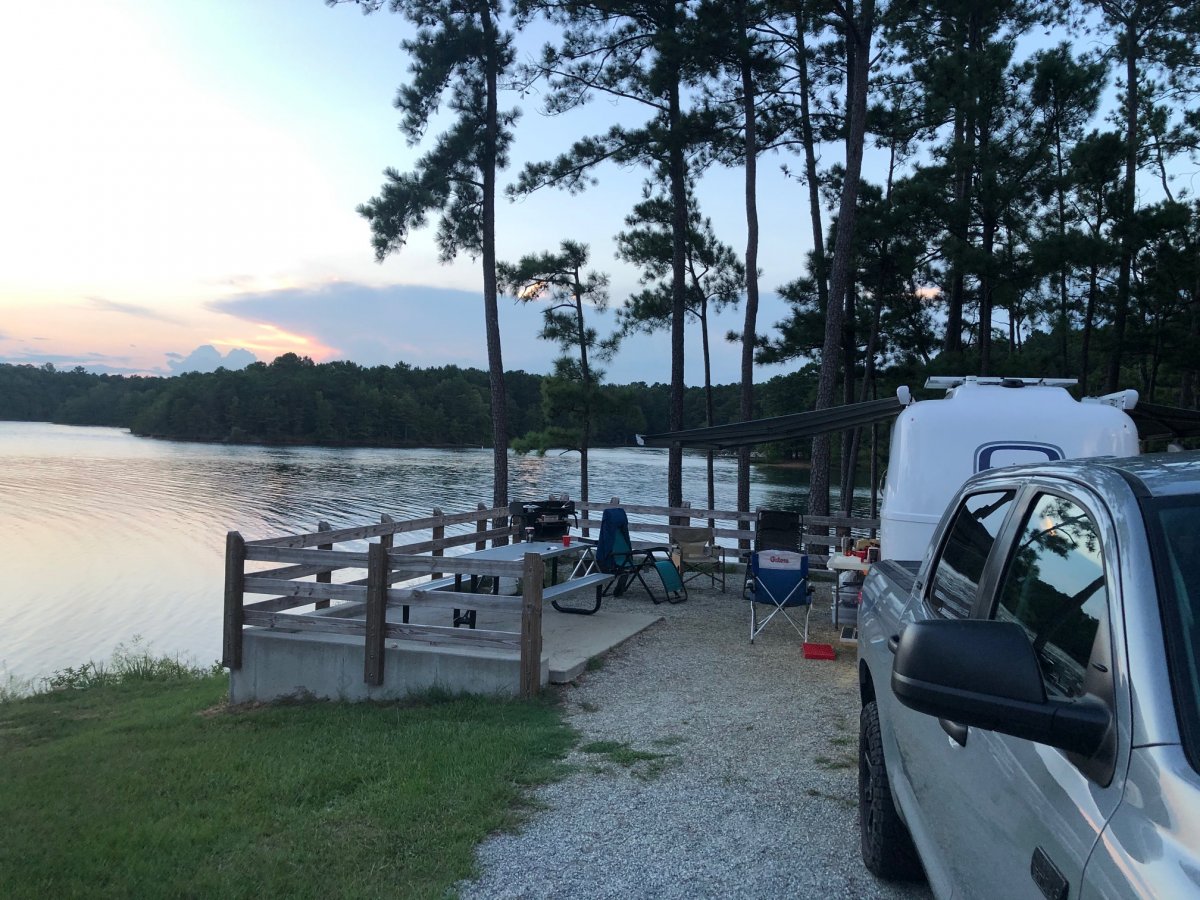
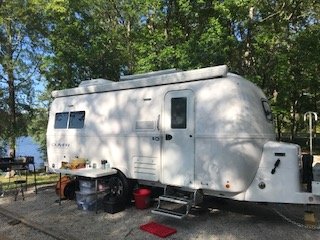
Little late showing but time flies when your having fun. Spent 4 nights at David Crockett State Park and then 2 nights at Cloudland Canyon State Park in North Ga and the Ollie was great. 2020 Tundra really did a great job towing. Nice having the V8 on a few hills and didn't feel stressed at all. Only hiccup we had was leaving Davey Crockett the street side awning would not close completely. Came to about 1 inch on the front end from totally closing. We called Jason and dropped by service to check out the problem. Seems 2 acorns had fallen in the front track and was preventing it from closing completely. So I chalked up some experience and we were on our way. I guess this would make a case for carrying a ladder. These pics are from 10 days later staying at Juliette State Park in GA and Hamburg State Park in Ga. Really love the camper and really surprised with the amount of storage. Yes, the air conditioner is loud but 93 degree days were handled with no issues. Spending 20+ years in a power plant loud noise is something I am a little familiar with. After a couple of nights it was no problem even though we are looking forward to fall camping. Erv & Sherry
1 point


-
Recent Achievements
-


")


")


")


