Leaderboard


Popular Content
Showing content with the highest reputation on 10/29/2022 in all areas
-
Swing out windows.6 points
-
A larger refrigerator. I would forego the microwave for that.4 points
-
I would move the fire extinguisher and put a small half in/half out waste basket.4 points
-
I too have a 2020 LE II and I definitely bought mine new as a 4 season trailer and as I use it extensively through the winter in Oregon, I do not winterize it. I am extremely pleased with the LE II overall, but OTT completely failed when they engineered the forced air heating system. A forced air heating system does not distribute hot air throughout the living space, it has return ducts that pull hot air from the supply ducts across the living space to a one or more return ducts and back to the furnace. Oliver only put in one return duct and they located it immediately in front of the furnace itself. This means that there is no circulation of heated cabin air through the basement. It is dead air space. Even more inexcusable, OTT didn't put any return vent in the bathroom so when the bathroom door is closed, the supply vent in the bathroom pressurizes the bathroom space and warm air doesn't flow into the bathroom. Given the primary problem is a lack of properly sized and located return air vents, adding or relocating supply vents will not be very effective at warming the basement. I too spent did lots of testing with thermostats to get a good understanding of basement temperatures at various cabin temperatures. Like you, I found that no matter how hot I heated the cabin, the area around the outside shower would inevitably fall to around 5 degrees above the outside temperature. I determined the main reason was the lack of heated air circulating through the basement due to the lack of appropriately located return vents in the cabin. I also found that the tiny vents in the bottom of the trailer designed to drain any water that finds its way to the basement are a problem in cold weather given the flaws in the heating system. There are enough tiny air leaks in the cabin to create a slow convection effect which draws cold outside air slowly through the basement vents. Since there is no warm air circulating through the basement even when the furnace is running given the flawed design, this slow intrusion of outside air pools in the basement creating the dramatic temperature differentials between the cabin and the basement. I have not permanently fixed the problem yet, but found a temporary workaround that I am confident is good down to 15 degrees or so. If you have the inverter like I do, there is a large street side hole just behind the battery box (to access the inverter GFCI). When it gets cold, I just unscrew and remove the cover and create a second temporary street side return vent. Now more than 50% of the hot cabin air flows into the street side of the basement and across the water tanks and rear area stirring up the air. The area by the outside shower now varies less than 10 degrees from cabin temperature and the battery box stays within 5 degrees of cabin temperature (I have lithiums and have sealed and insulated the battery door). The furnace seems to run quieter and the cabin heat is more evenly distributed. The walls don't get quite as cold either. This winter if it gets real cold, I will also temporarily tape over the vents under the trailer to stop the convection currents from pulling cold outside air directly into the basement. For me, I think the permanent fix is to add a few return vents to the trailer. I will probably put one under the front dinette next to the CO detector and another smaller one in the bathroom. This should ensure that the entire basement enjoys adequate circulation of warm air when the furnace is running and that the bathroom is warm even with the door closed. You may want to try unscrewing the cover from the street side hole in front of the inverter and see if you experience the same improvements in basement temperatures that I did.4 points
-
Hello, I want give everyone one who posts on this forum a BIG THANK YOU. We picked up Ms Ollie in July, traveled hill and dale from Tennessee to New York, Canada, Michigan and back home to California. A lot of states and miles behind us. Every little post has helped in a huge productive way .... and it is all inspirational when maybe you are having a less than perfect day. So, with this said. I do have a question about the curbside awning. We were told at pick up not to use the awning in the rain. It is made for sunshade and not rain protection. Big disappointment. It would be wonderful to sit out on a warm rainy evening under the protection of little awning right next to Ms Ollie. My question is, how do Oliver owners use their awnings? We have not used it in the rain because we were told not to. You cannot use it in any sort of wind because it retracts with the slightest wind gust. So we it gets used very little. other little questions: would like to change my graphics. I don't know where my head was at when I decided on green and gold. I took off the rear decal easily and now I'm thinking of taking off the front and maybe be brave to do the same on the sides. Does anyone have experience in replacing the graphics? I am assuming I could order a new set from the factory that actually matches the tow vehicle. Replacing them is certainly low priority especially when learning to use all the systems. but my poor choice bugs me every time I look at the trailer. Another sideline. Months ago I asked for opinions of compost toilet v traditional flush/black holding tank. We opted for the traditional flush system and have NOT regretted it for a second. Oh, we did purchase a new holding tank connection cap that extends out and easier to twist (thanks to forum suggestions). The location of the hose in the bumper is great, but getting to the hose connection was frustrating. Thanks!3 points
-
Quick connects help a lot when hooking up water….3 points
-
Bad knees I would change the water hookup.3 points
-
This has been discussed several times over the years. I’d have a quieter AC and a larger black holding tank. Mike3 points
-
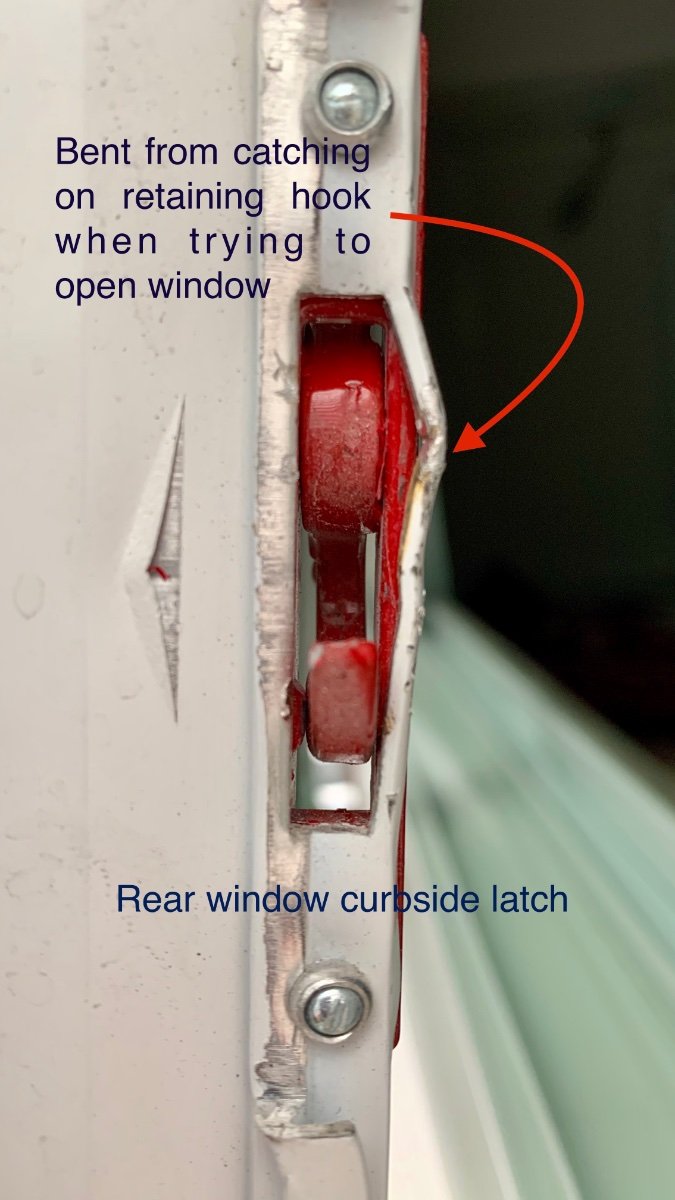
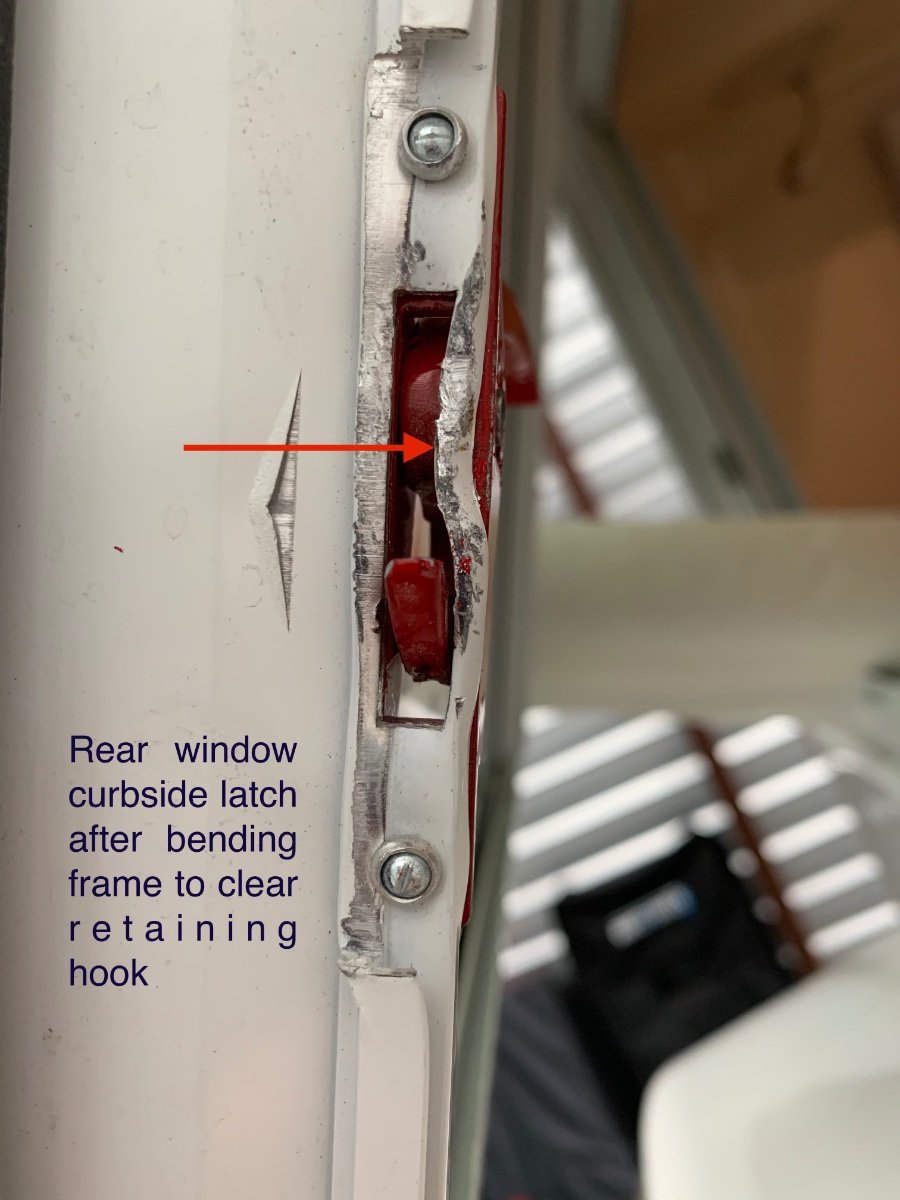
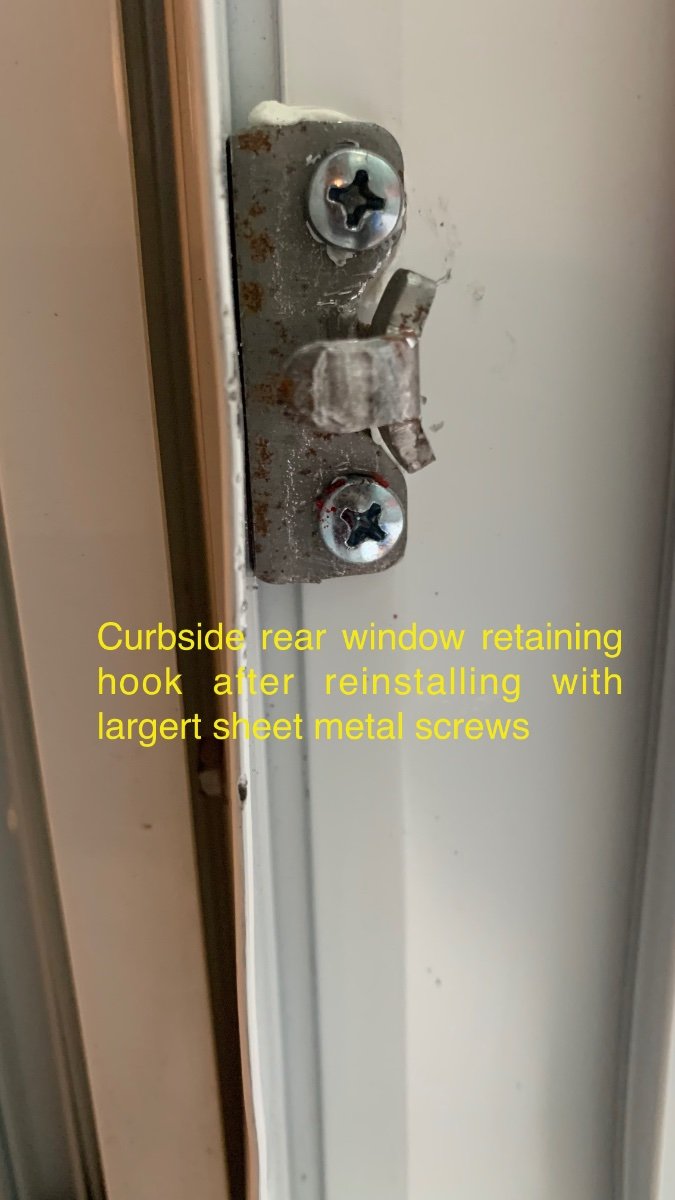
While cleaning our Ollie prior to storing it indoors after 8000K miles traveling this year, I discovered that the rear emergency escape window would not open - the latch would not release completely on the curbside. I had not previously tried to open the rear window since taking delivery in September 2021 (oversight on my part at delivery, trust but verify). With the curbside red handle completely open, the window would only open about 3/16ths of an inch, just enough to see that the metal hook that the red lever grabs onto was loose, and was impinging on the frame of the movable window. With some gentle lateral prying, I was able to open the window. When I attempted to tighten the screws that attach the metal hook to the window mounting frame, they were stripped. I reattached the metal hook using larger sheet metal screws and thought the problem was solved, but that would be too easy. After much pondering, it turns out that the hinged window was not perfectly centered in the external mounting frame, being offset approximately 1/8th inch to the curbside, and there is no way to change that - it was just a defective window assembly from the supplier. With my precision hammer, I modified (bent) the part of the moveable window frame that contacted the metal hook enough that it would allow the window to open and close, but not without some contact between the parts. So, the window is now functional, but not pretty when open, which won't happen very often, but resale value would be compromised when the time comes to part with Ollie, as I would have to disclose the damage. Mike Sharpe at Oliver Support has been very helpful throughout this process, and has offered to send me a replacement window assembly. I asked Mike if the installers at Oliver actually verify that windows work properly after they plug them into the hull openings, because delivering a defective emergency escape window would be a huge liability for Oliver in the event of injury or death. I can't imagine how a functioning window assembly could fail if it had never been opened. I have not gotten a reply to this question yet, as it was after business hours in Hohenwald when I posed this question. Because I live in far northern California, and am not planning to travel back to the mothership any time soon, I need to find a reputable RV repair facility that works on fiberglass trailers to install the new window assembly. I know that there a handful of Ollie owners on the West Coast, and would appreciate recommendations for repair shops that would be within a day or two travel time. So, for current or soon-to-be Ollie owners, make sure your emergency escape window works properly.
 2 points
 -
Lisa: Great to hear your thoughts of a super fun initial run with your Oliver! It would be helpful if you would add your signature line showing the typical info about your TV and Ollie. See Top Gun's above for a good example. Below are a few thoughts that have helped me become a bit "Awning Wiser". Our Ollie came with the manual awning. As with Topgun2, we love sitting outside under it in "reasonable" rain storms. For those owners with the older style manual awnings I garnered some great lessons learned (The hard way) during our TX to Alaska trip this summer: A. Even when expecting a "Reasonable" rain event, we would extend the awning about 1/2 to 2/3 out and cock the awning so that one side is higher than the other. We have done this many times so that the runoff would dump aft vs. near the entry. Works great.... BUT: water weight on the lower side streached our awning to the point where it could not close for travel. (For the Pros: Yes I did all the adjustments to compensate, but they were not enough.) Hence I gained an opportunity to convert my perfectly beautiful awning into a ground cover. Most expensive ground cover we have ever acquired. 😞 B. When replacing your awning, be VERY aware that securely tying off the awning arms at all three arms is IMPERATIVE. My aft paracord line knot failed due to poor rope-man-ship by the owner. At just the wrong moment, it self deployed. Very quickly much to my surprise, it went from 20" to full open far faster than I could react. Damage was total to the aft awning arm center "Elbow" joint. Please take extra time to carefully tie the arms off at the replacement open distance suggested in the installation instructions. My one knot failure caused my worst DUHHHHHH moment in a long time. (PS: A candid comment by the Carefree Tech was: "Sorry about your loss, sadly I see it all the time." 😞 C. Some professional awning experts advertise in the video's that they can replace their awning by themselves. I stupidly believed them. But from my one time experience, it was not true for this owner, and likely would be so for about 95% of us. Awning replacement needed to be for me a full time two-person effort. Also, it is a three person effort for at least one moment. (See Item B above) Despite the above learning opportunities, we continue to enjoy our awning even in rain storms. As stated above, we caution to not have it full out if we anticipate any adverse weather. I also fill my milk crate (Front basket container for jack blocking) and my large Fortiflex feed buckets (basement storage) with local rocks. They are then tied to each of the three awning legs to help keep them were we placed them. Finally as suggested, we don't leave it more than a foot out when not present. I hope that at lease one owner does not make the same dumb mistakes I learned this past summer. GJ2 points
-
That's how I plan to use it. The key is light rain. I verified with Oliver if it could be used in light rain and they said yes. John2 points
-
Ron, Following up on the articulating table mount. Here is what I plan to install in "Coddiwomple" (Elite 1) when we get it next spring. With this setup we should be able to position the tabletop next to the stovetop and my wife is happy about that. It is a lagun-type removable table mount and seems to be very strong. The powdercoat finish is nice and the fit is tight. I contacted Foy and he can make a tabletop for us with the underside routed out to lighten it up so I will order that later when I dial in the final tabletop dimensions. Need to figure out support bracing and backing later. Might have to have a custom brace made so as not to stress the fiberglass. I purchased this from EZ-Reach (division of Cass Hudson) and spoke to the design engineer about my plan to add a second arm so I would have an elbow like movement rather than just one arm with an arc. He thought it was a good idea and would work so I ordered two of the 12" arms. I cut one tube down so it would fit in to the other and it works great. I extended it out all the way and put 20lbs on the table bracket - It is solid. Now I just need a trailer to install it in! David Purkey
2 points
-
Fargoman, Replacing a window is really a very simple process. The only real work is removing the old caulk. I have found using just butyl tape works very well, requires no caulking and is a much cleaner installation. If you are anywhere near San Diego, I would be more than happy to help you with it. Andrew2 points
-
As improbable as it would be since it would require expensive mold changes, I would enjoy 80" twins instead of the 75".2 points
-
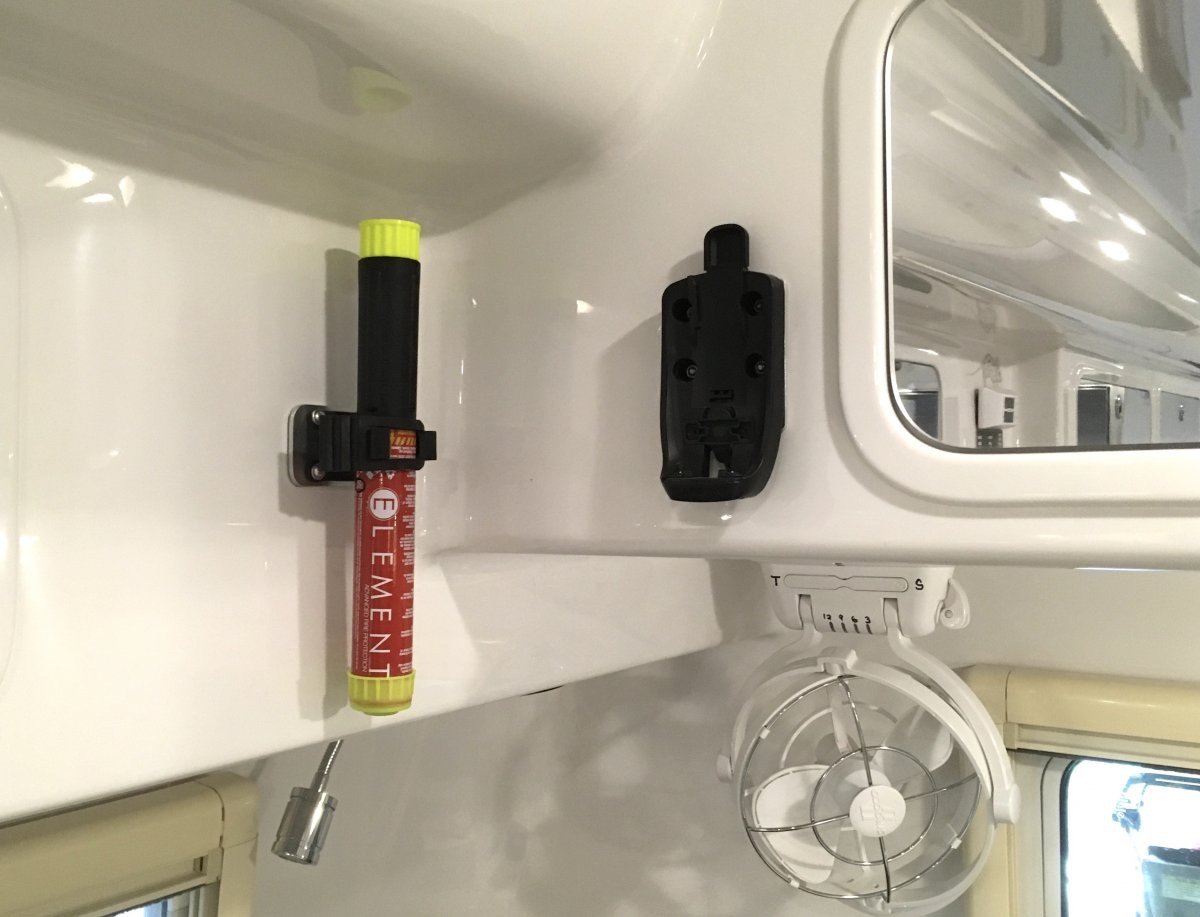
Unless you are not able to reach either the extinguisher or the door. That is one reason for the emergency egress window in back, which is where I put my second fire extinguisher. https://olivertraveltrailers.com/forums/topic/4291-how-to-element-fire-extinguisher-install/ BTW, has everyone actually opened and USED the rear window? Are you able to actually climb out and get around the spare tire and or bikes? I removed my fiberglass cover long ago for other reasons, but the rubber tread makes it much less problematic in scrambling over it and to the side. Those of you who are mobility impaired and can’t climb out that way should definitely install a second extinguisher in back. John Davies Spokane WA
2 points
-
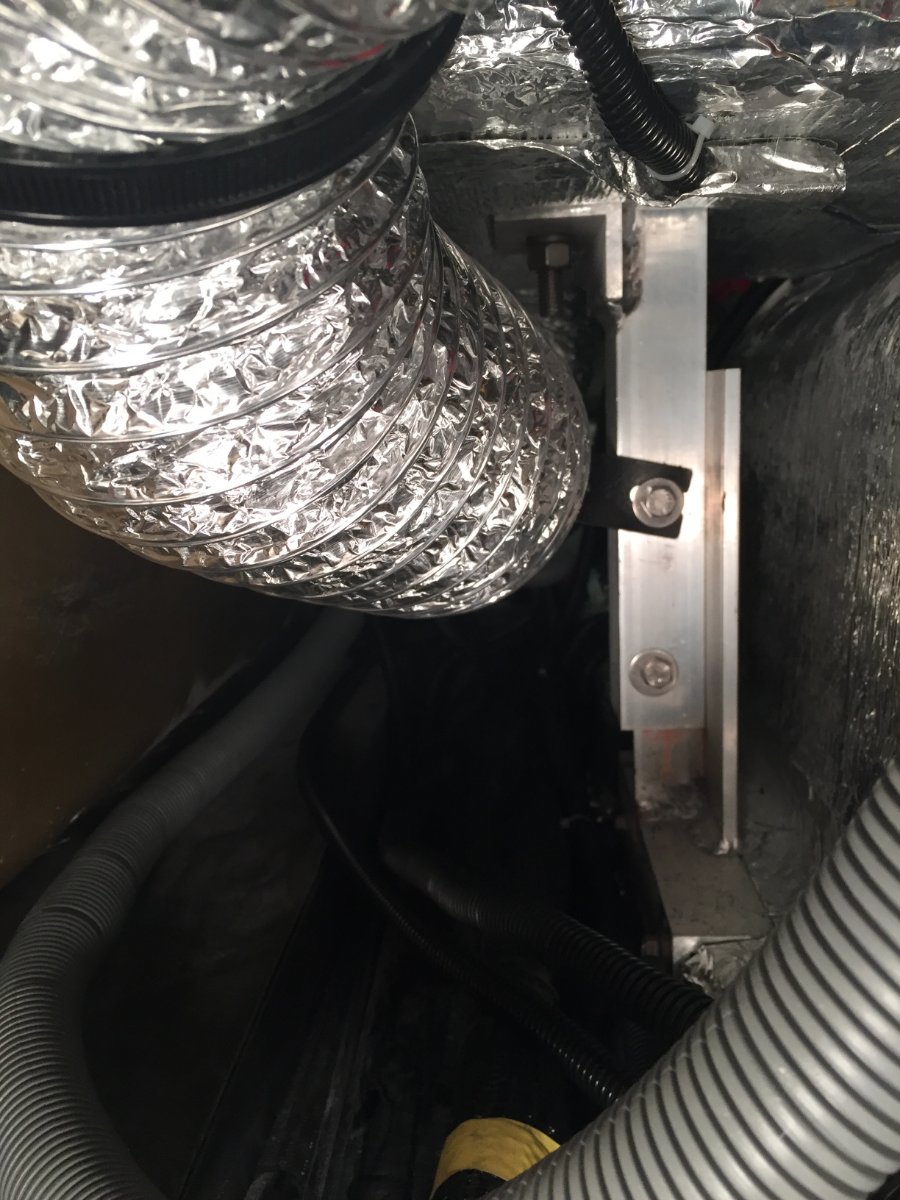
My trailer is stored across town so I can't post a picture today but it sounds like your 2021 doesn't have an access plate hatch where my 2020 does which is located below and slightly left of the galley. That hatch is very close to the pex lines to the outside shower and distributes heat to that area well. I think you are on the right track and this is what I will probably do when I get around to doing a permanent, quality fix. First, your idea to make the existing return vent in front of the furnace on the street side smaller when you add other vents is a very good idea. I will probably close off that vent entirely. I will then ensure I add sufficient return vent area to replace it. The manual says something like a minimum of 50 sq. inches but I will probably make sure I have at least 60 sq. inches unobstructed with at least 8 sq. inches in the bathroom and at least 50 sq. inches on the streetside of the main cabin. I am leaning toward placing the bathroom vent immediately below the sink in the upper part of the recessed towel bar insert so that shower water can't easily enter. This vent should keep the bathroom warmer when the door is closed and also keep the plumbing area under the closet close to cabin temperature. For the main cabin, I will block the existing vent in front of the furnace and add two square vents of at least 25 sq. inches each to the streetside. I will place one of these directly across from the existing vent on the curbside to heat the garage/outside shower area and the second somewhere close to the front of the main cabin on the streetside. One other issue in my 2020 was that OTT shared the bathroom duct run with an adjustable duct in the main cabin. This is another design flaw as when the adjustable vent is closed (to try to force more air to the bathroom vent?), there is insufficient supply duct capacity (a safety issue) and the furnace overheats and short cycles. I tried to make sure that the vent was always adjusted open but found that the vent always closed itself when traveling. It is easy to remove the rotating closure ring from the back of the round vent cover which I did so now that vent is always fully open. This solved my short-cycling problem and the furnace heats the main cabin of the trailer much better (but not the bathroom).2 points
-
Our previous camper had Dometic Seitz style windows you could open while raining. They had built in shades, screen, and hinged window. Miss having that style of window.2 points
-
A quieter AC is on my wishlist also!2 points
-
Way to dump tanks when raining so that water running off roof doesn’t fall onto open outside basement door. Don’t want electric dump valves and don’t want to cut holes in basement door.
2 points
-
Agreed, we always talk about why they didn’t put a window over the kitchen sink.2 points
-
Been planning for a travel trailer for several years getting ready for retirement. We finally purchased the new tow vehicle last year and got it paid for. We finally settled on the Oliver LE II and decided to place the order this week. We have a build schedule of March and deliver around the middle of April. We can't wait to begin this chapter of our lives and start exploring all the places we've only dreamed of till now. We aren't new to camping, nor are we inexperienced with travel trailers. We had a 34' Jayco Eagle with a super slide back in the late 90s. Sold it by around 2002 and haven't owned a camper since. We started researching brands about three years ago, watching tons of YouTube channels about full timing and all the other RV topics that are there for the watching. We started narrowing down the brands and models we like last year and the Olivers were at the top of the list. We did take the factory tour about a year and a half ago and were blown away. We are both semi retired right now, meaning my wife works part time for social outlet and fun money at a local farm market, and I work for myself at my own pace when I feel like it. We have several hobbies we enjoy and I'm also in the middle of remodeling our downsizer retirement home in the country in preparation for full retirement soon. We have two dogs, Border Terriers, at home. We have one married son and one grandson a year old. Part of our RV life will include spending extended periods in Texas with our son's family and enjoying our grandson as much as possible. We look forward to becoming seasoned Ollie owners and participating and getting to know the greater Oliver family.1 point
-
We all love our Ollie’s but….If you could change/add one thing on your Oliver what would it be? I would love a window over the kitchen galley.1 point
-
My wife and I took delivery of our new Oliver Elite I on Sep 26, 2022 and commenced a 15 day "shakedown" camping trip through TN, SC, NC, VA, back through TN, AL, GA, and home to FL without significant issues. We love it! Still learning the details of the electrical system but it is great fun. We bought this particular model because it fits perfectly under our carport and we love the compact size of the trailer itself. Before my wife and I first got married 52 years ago, I purchased a new VW camper (not a pop top). We camped 55 days, 12, 500 miles around the US on our honeymoon in it. All three of our children grew up camping in that VW until we outgrew it 12 years later. Then we tent camped until they all left home. Now we are back in the camping business, albeit, significantly upgraded. 0E6177D3-23D6-4052-9298-13D9126CBD50.heic1 point
-
I concur. I just replaced my bathroom window under warranty (the issue was a Lippert issue and not due to Oliver production). Service sent me the new window, butyl rope and caulk. Mike patiently walked me through the steps of removal, surface prep and reinstallation. It went quite well and was very simple to both remove and install. I was quite nervous before I started. Now after having done it I wouldn't hesitate on performing the procedure.1 point
-
Andrew, Having to replace the bathroom window three times must have been frustrating, especially since your Ollie isn't very old, but now you're the window expert by necessity. I'll definitely keep your offer in mind when the new window assembly arrives.1 point
-
Thanks for the info. The thread from Frank C was very helpful and yes after further study, I do not believe the BB 270Ah batteries will fit even if you do remove the battery tray. So going with the 100s. I will add another post and list of upgrades once complete.1 point
-
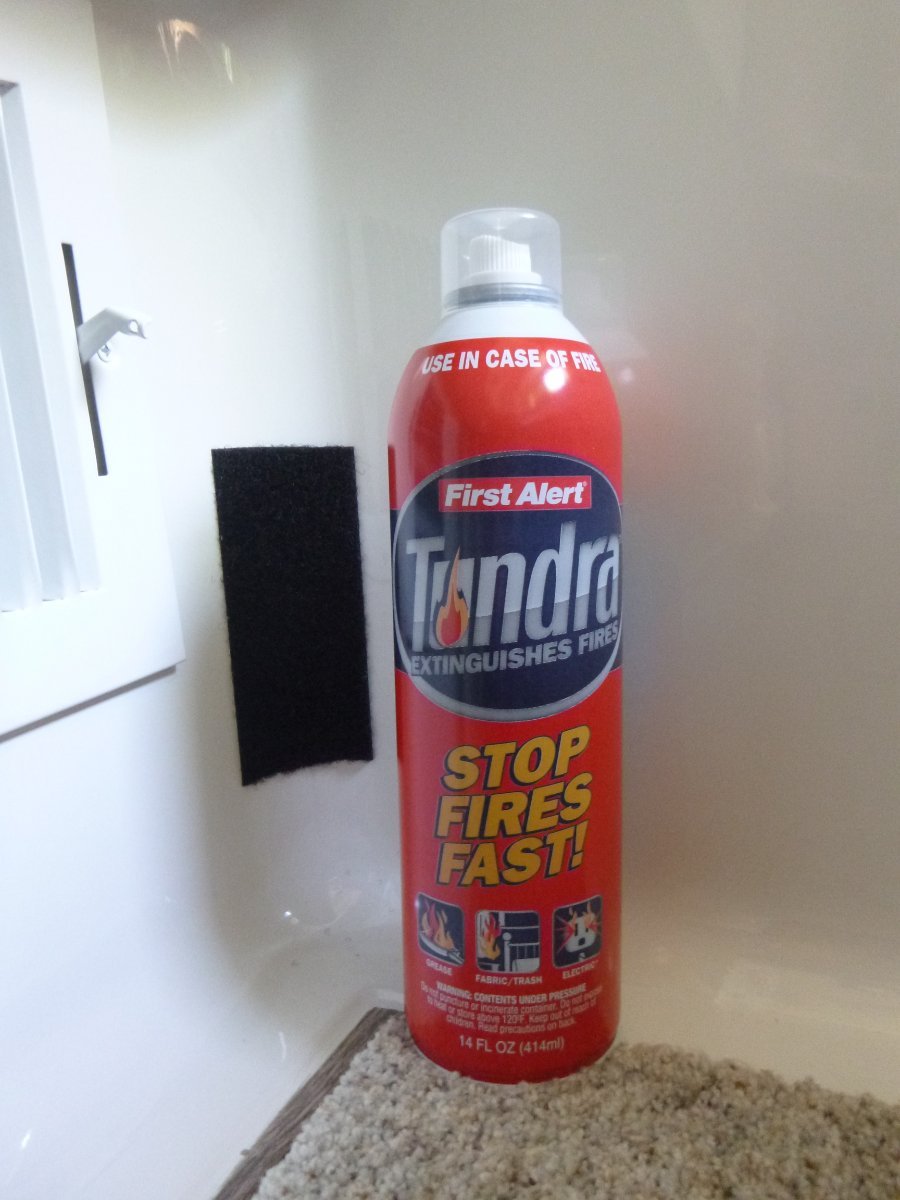
Here's another way to do the rear fire extinguisher thing:
1 point
-
SCL- There are a fair number of owners who have either replaced or simply applied their own graphic in various places on Olivers - mainly the front. There are a number of those that have posted both pictures and basic "how-to's" here on the Forum. I'd contact Service about getting a new set (I'm not sure that they do this anymore) and I'd also contact local print shops as to cost and availability. Hopefully owners with the newer style awnings will chime in here relative to your questions about rain. I have the old style awning that can be left up in light rain and I believe that even these newer awnings can be left up as long as you do not allow water to collect. The easiest way to do this is to only have the awning extended a small amount - (i.e. half way or less) - and I certainly would not leave mine extended overnight or when I was not there regardless of that wind sensor feature. Glad to hear that your trip home was good and very happy to hear that you have gain some knowledge and help from some of the threads here. Bill1 point
-
Fargoman, I have had to replace the bathroom window three times due to fogging. I would be more than happy to walk you through it once you get the replacement or help you install it. Message me your contact information when you are ready. Andrew1 point
-
You can adjust the sensitivity of the wind sensor on your awning. We use our awning when it’s a light rain so I can keep the window open on that side, we just don’t put it all the way.1 point
-
Rivernerd, along with a replacement window assembly, I asked Mike Sharpe to send detailed removal and installation instructions so that I, or whoever replaces the window knows what to do. I'm not certain that most RV repair facilities are used to working on fiberglass trailers. If the process is not complicated, I'd consider doing the job myself, with a helper to give me 'constructive criticism'. 😄1 point
-
No pans come with the oven. I have 8”, 10”, and 12” cake pans one of each. Also a pie pan and a 12” pizza pan. These all nest together quite well. I have silicone muffin cups that I use with the pizza pan. I like to bake. Well actually a more accurate statement would be “I like to eat baked goods”.1 point
-
Never researched if they can be mounted in an Oliver, Yep, we liked being able to open windows while it was raining. Also liked having the ability to adjust shade and screen height together.1 point
-
1 Bigger black tank (There is only so much room... but I've always thought the grey and black tank combined capacity should be just a bit more than the fresh tank capacity... so you should run out of fresh about the same time your gray and black tanks reach capacity) 2 a redesign of the sewer hose storage. The stinky slinky hose storage is really awkward (especially with a bike rack in the way). Oh wait... you said just one thing.1 point
-
Love these windows! Would love to open the windows while it’s raining.1 point
-
Clever idea! Will probably happen. Just haven't figured out how to keep it stationary while going down the road. Think the solution will depend on when I find the right waste receptacle...1 point
-
With you all's help I got this done. Parts came from Summit Racing: new timken bearings and 4 extra seals for $157.82 total!! I was glad my neighbor helped, he showed me how NOT to smash those races and seals into place. Thanks everybody!1 point
-
The only time that I know of when Oliver had "problems" delivering a trailer when promised was during the height of the pandemic. And, this was due to supplier issues - not under Oliver's control. Personally - I'd bet heavily on that April delivery.😃 Bill p.s. If you have not been there - this is one of the better - if not the best State Park I've ever been to. Plan on bringing your bikes, good walking shoes, camera and notebook. Never be afraid to approach ANY Ollie owner of even knock on their door if you have a question for them or see a mod that interests you.1 point
-
Try THIS to get a map in your signature. Bill1 point
-
Didn't want to confuse the folks that have responded to my introduction, here's an update to my introduction. BTW I decided to change my profile name to Ollie-Haus to more personalize the Oliver connection and include a fitting part of our last name. Chris and Stacie (Woods) Neuhaus from Greenfield, Indiana. We've lived in Indiana for all of our 30 years of marriage and I've lived within 50miles of Indianapolis my entire life. Stacie has traveled the world, so to speak, in her pre-married years and I've pretty much kept it state side. We've always dreamed of exploring America together and prefer the back road method of eating local and getting to know the locals at the same time. We love what I would call the national attractions like everybody else, but really do enjoy the lessor known out of the way gems that can be discovered on the back roads. I'm a tradesman by career, I've worked as a certified welder, sheet metal fabricator, Machinist, Draftsman, and general machine repairman for over 40 years, including several years as a front line supervisor. I started out when I was 15 working in a vet clinic and quarter horse farm until I was 24 years old. I've also dabbled extensively in electrical work, auto repair, carpentry and wood working my whole life. Needless to say I am a little handy with stuff and a diehard do-it-yourselfer. Stacie ("WoodsHaus" on the forum) has worked most of her carrier in purchasing/procurement and retired about 5 years ago. Today she's an avid gardener, food preserver and connoisseur of the kitchen. She also is an avid crafter. Our dogs are my passion these days. I guess some of us always need something to nurture and care for. My experience in the vet clinic solidified me as a lover of horses and dogs, the latter being much easier to own and travel with. We have at the time two crazy Border Terriers (profile page background). Smaller dogs with very large hearts and desire to go places. They are very well mannered and don't make too much fuss except when we arrive and they have been at home alone. They love all people and do well out and about in public. We aren't as physically agile as we once were but are doing our best to stay fit and active as we enter into our retirement years. Hopefully traveling and exploring will be conducive to maintaining and strengthening our well being in the process. Well, nough said for now. The bigger connections will take place in person over the next few years.1 point
-
Thanks for the welcome friend. You better know me by my handle on the Tremor forum as Redzilla. Looking very much forward to new friends and adventures in our new Ollie when it arrives. Will be gleaning as much as possible here on the Oliver forum.1 point
-
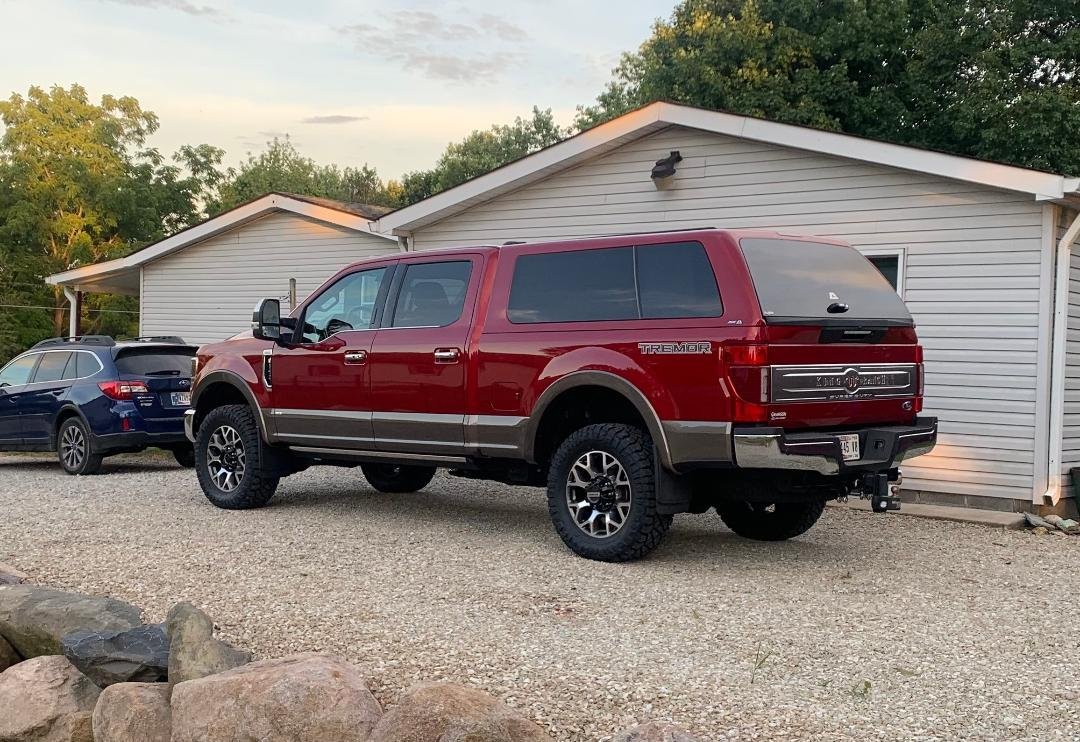
Hey Bill, What's it cost for the event as far as camp sites? I saw the $100 registration fee. Also what is the best area to camp in, or are they all really nice? I've kept up on previous rallies and it looks like a lot of fun. We bought a '21 F350 7.3 gas Tremor last year in anticipation for the travel trailer. Plenty of truck for sure and capable of getting us off the beaten path if we choose. I added an ARE Z series fiberglass cap to the back to gain more weather proof cargo space on board.
1 point
-
I think they were testing temperatures while winterized so they could establish a baseline before risking winter camping with water in the lines.1 point
-
No reason, I use it, but what can perhaps happen is you install a new rod and the threads are a little smaller diameter, and instead of screwing in smoothly and a little deeper, it hits the white crusty “ridge” in the hole threads that forms from calcium deposits. It can leak then, because the nut isn’t quite deep enough. That is why a thread chaser should be used to clean all the gunk from the threads each time you remove the rod. I mentioned this at the top of this page. You can make one easily. John Davies Spokane WA1 point
-
magnesium anode protects: have to agree. A wire and about 3" of material are about my time to replace. Lot of holes mean more surface area. I would screw the anode back in the ( loosely) water heater just to keep bugs out. When you sanitize? Do you keep the water heater on bypass? Probably a good idea. We have a brass nozzle that screws on our hose that gives a fine high press stream. We direct it into the anode hole and it will flush out most of the "crap" in there. I have heard of, and have done, is pour a mixture of vinegar into the water heater and let it sit overnight. And then flush in the morn. It does seem to help remove some "stuff". And then Teflon tape and the new anode.1 point
-
A magnesium anode protects better and lasts longer than Aluminum Anodes. Sacrificial Anodes are used to protect the hulls of ships, water heaters and other metals in contact with water or a dissimilar metal.1 point
-
Too much or little application is usually a controller or actuator design causation. I use both a Redarc Elite and Prodigy P3 controllers when towing HydraStar EOH braked trailers, including my LEII with 12" discs. The P3 modulation is noticeably smoother during light applications as in stop and go traffic but the Redarc is much easier to "tune" on the fly for specific conditions. Point is, one controllers may perform "better" than another and some EOH actuators perform differently than others. As far as cold weather operation, there are two things that should be validated with any EOH installation subject to extreme cold temperature operation. Given your location, I would have expected MoRyde's top notch operation to be mindful of at least the first and suggest it be part of the installation. Hopefully they did. First concern is the current rating of the 7-way aux circuit. EOH actuators typically need a 40 amp minimum for extreme cold operation but there is no consensus between vehicle manufactures and 20 or 30 amp circuits are the most typical. The Ram 3500 is 30 amps. I have had to upgrade every tow vehicle for EOH compatibility except my Toyota Land Cruiser, which came with 40. Second is brake fluid. DOT 3 or 4 is generally the norm for manufacturer recommendations but DOT 4+ or 5.1 (not DOT 5) have a significantly lower viscosity at the low temperature end and will improve EOH performance below zero degrees. If the installer filled your system with DOT 4, this is the highest viscosity of all and not the ideal choice for extreme cold operation. I currently use a Bosch branded fluid that is an approved substitute for all of the above but there are a number of single spec, Low Viscosity, fluids available. My experience with EOH disc brakes has been quite the opposite. Using either controller, the discs are more confidence inspiring in downhill or emergency applications, and don't feel the additional cost over electric drums is even a consideration. While the LEII is only about 6300# ready to go, behind my 7300# Land Cruiser, it hardly feels like a light-weight rig. Maybe I need a bigger truck.1 point
-
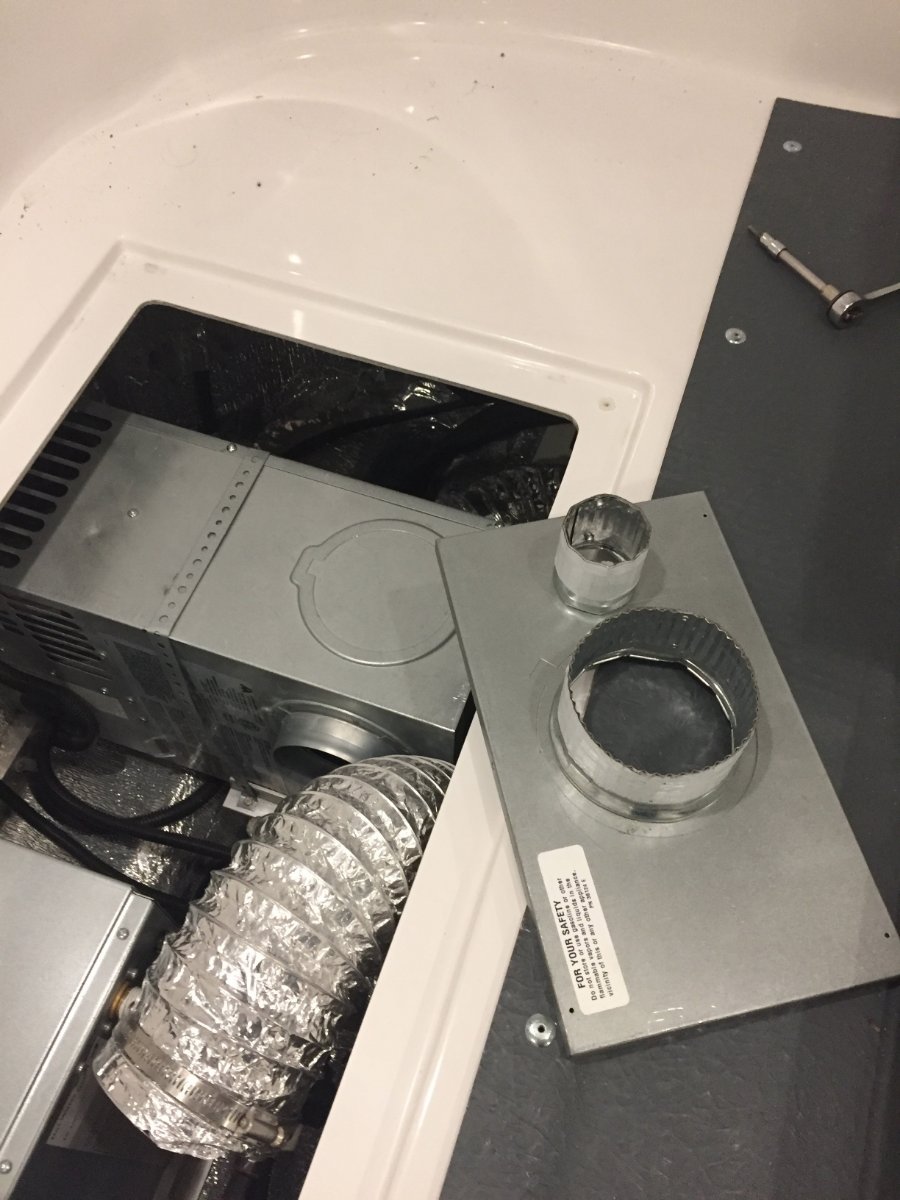
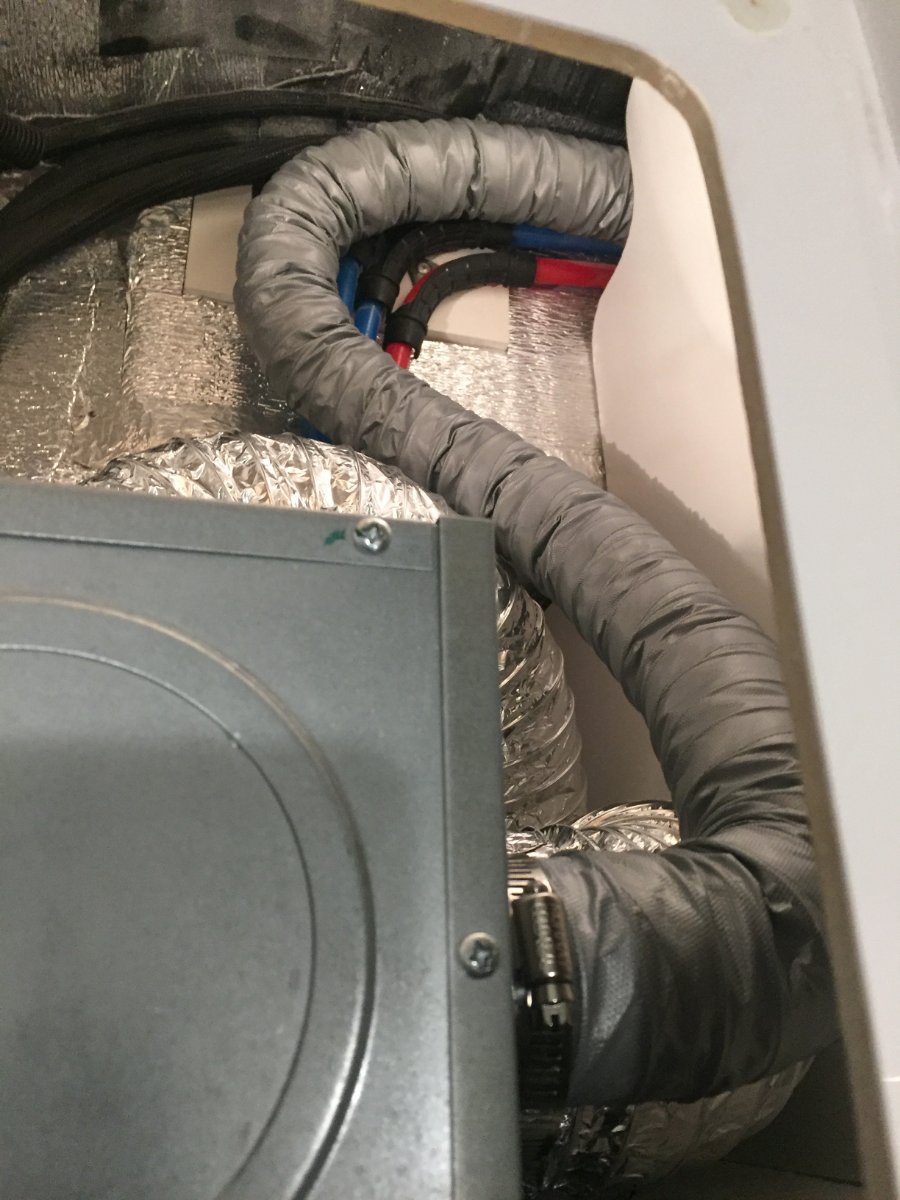
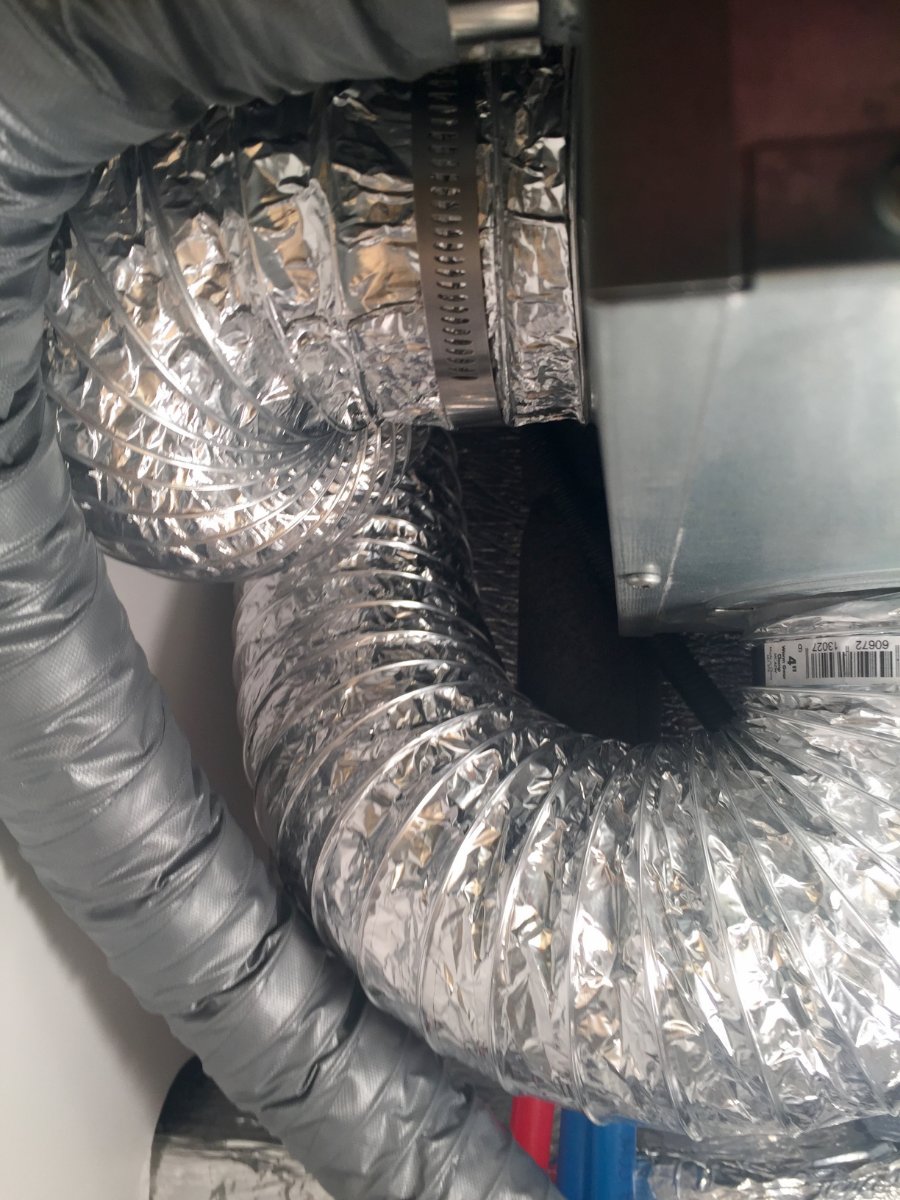
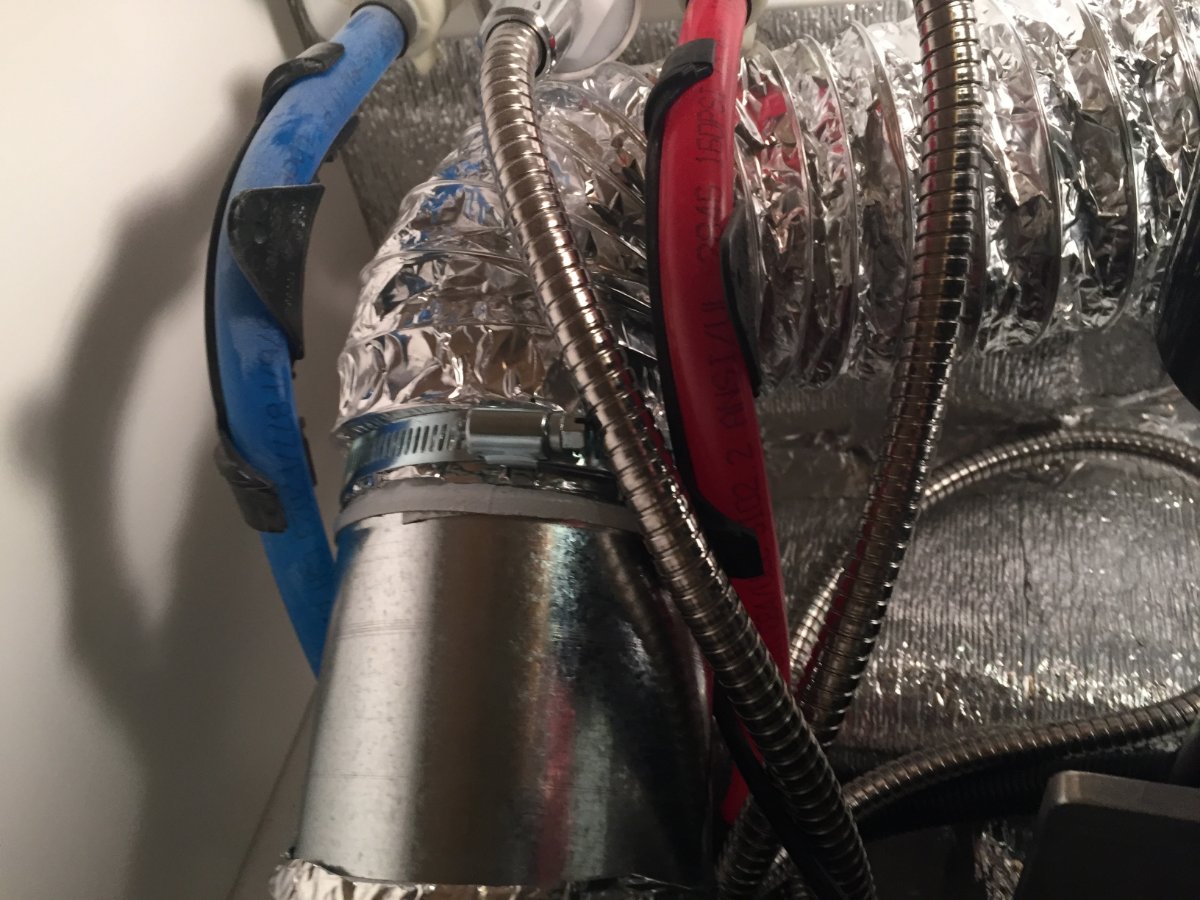
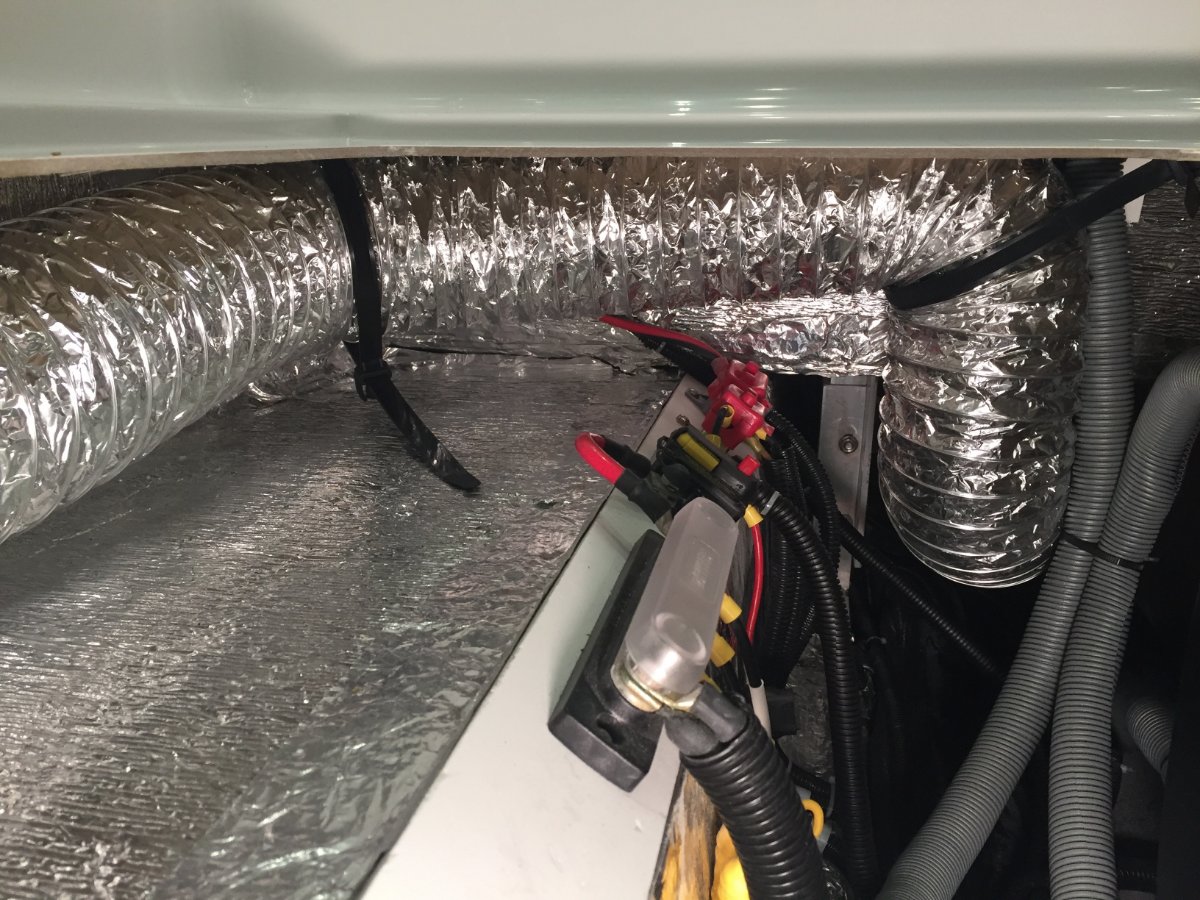
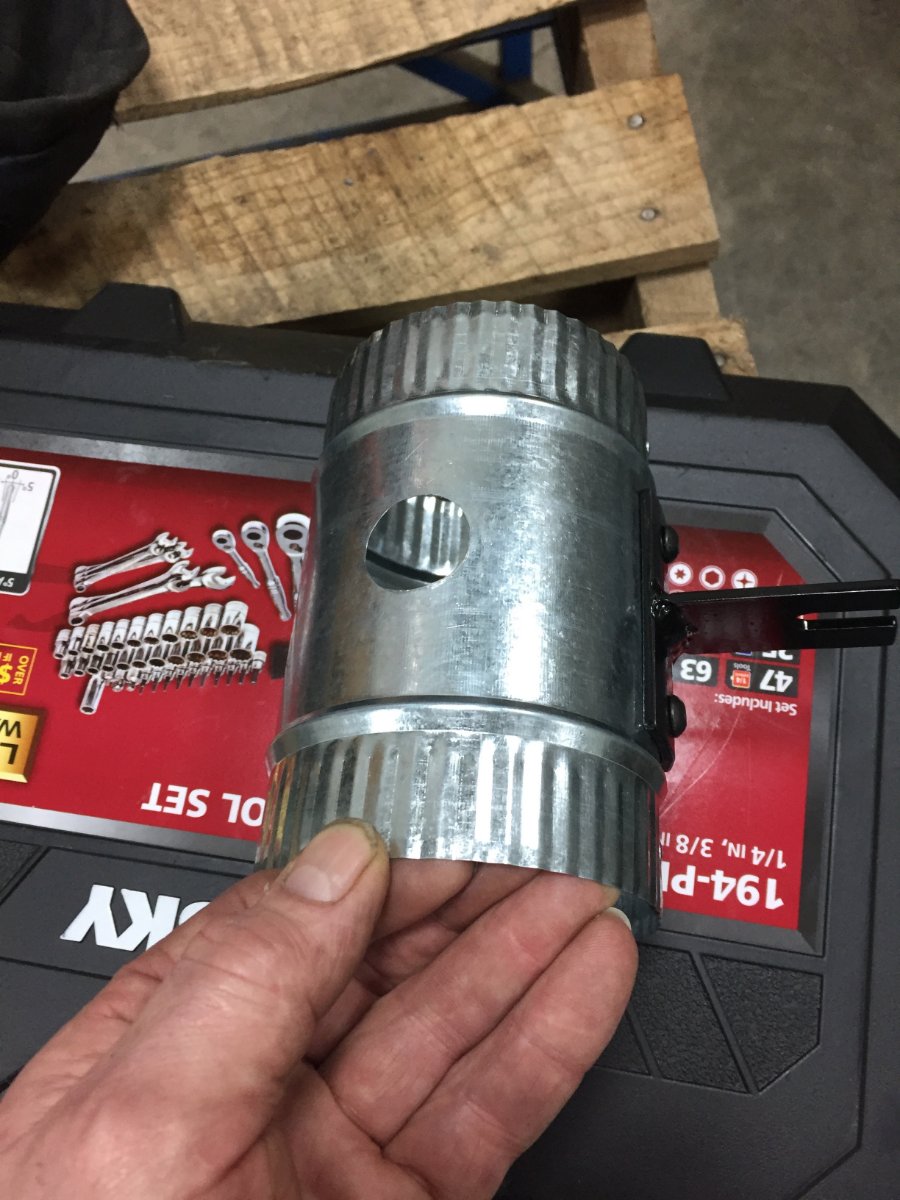
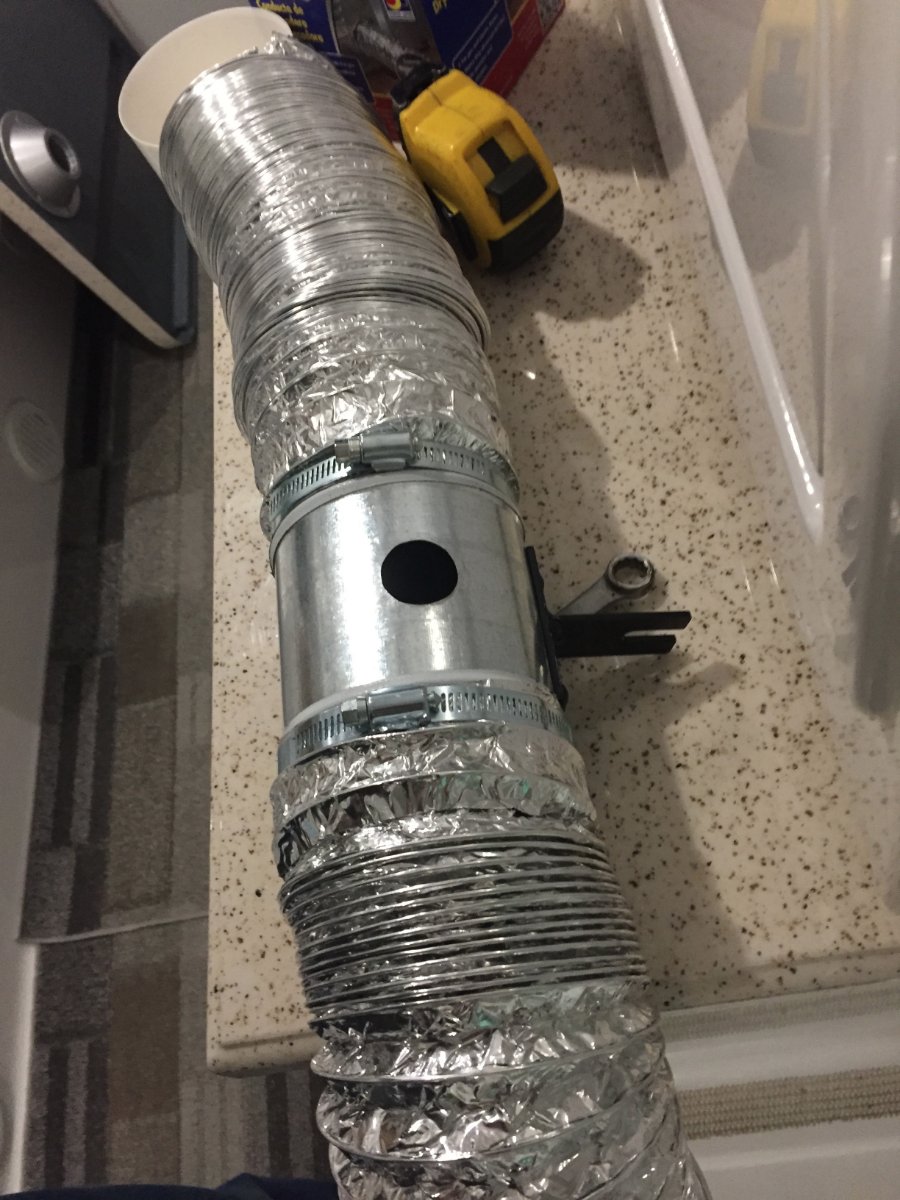
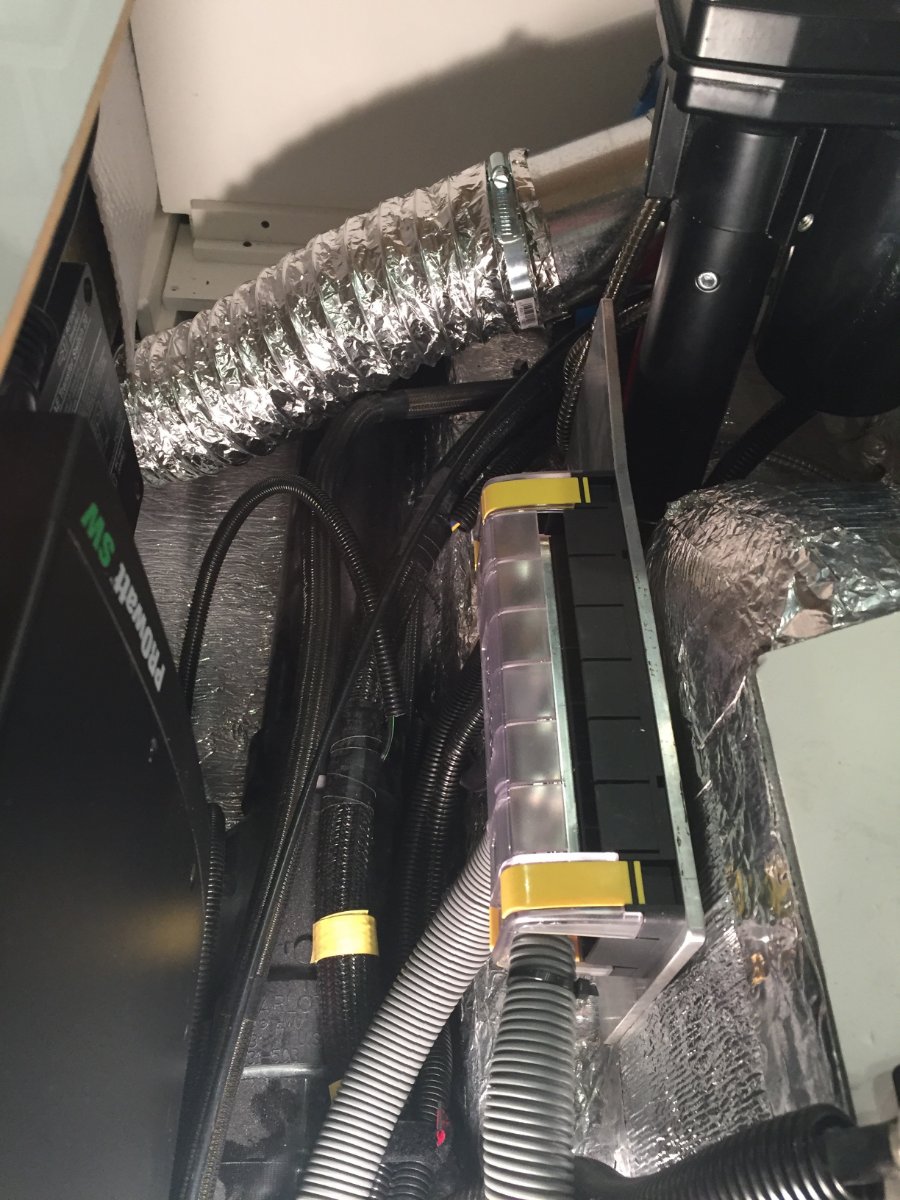
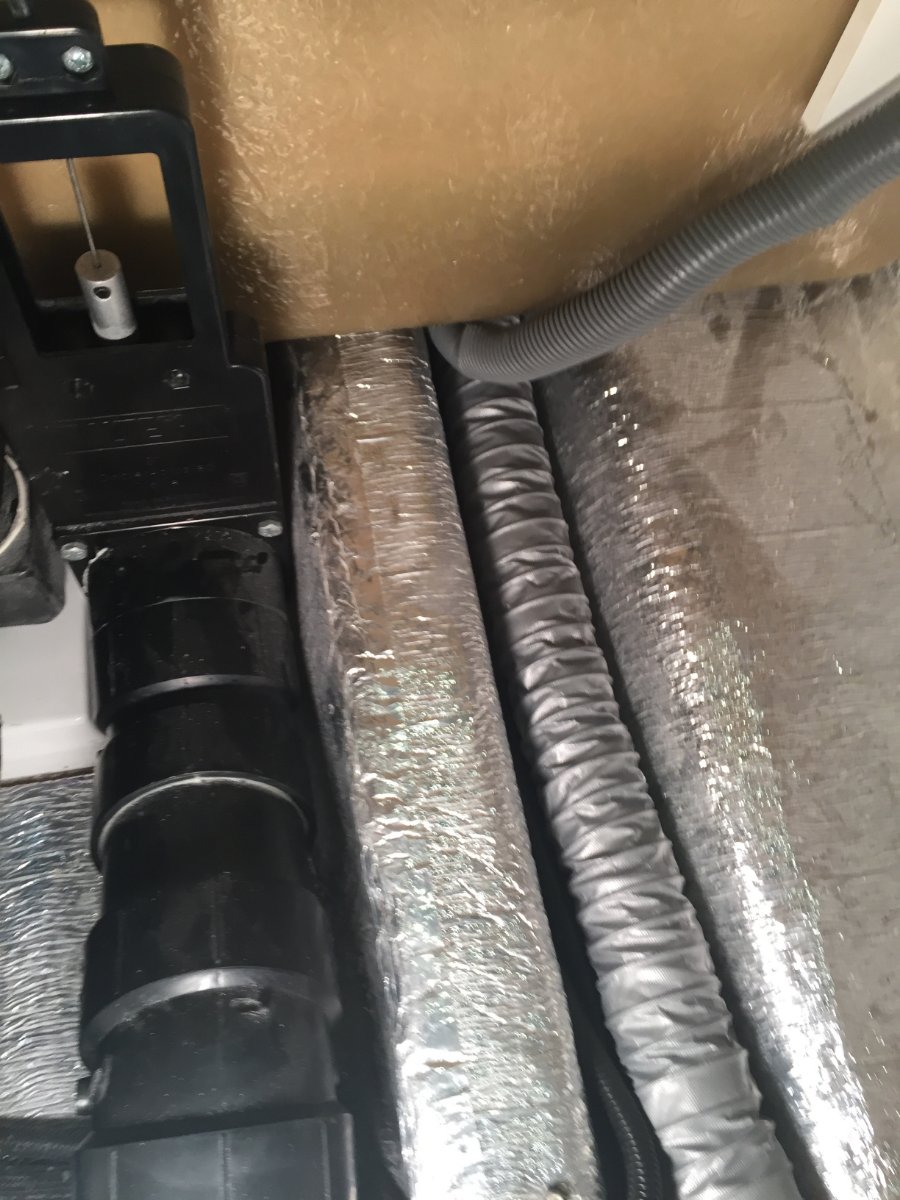
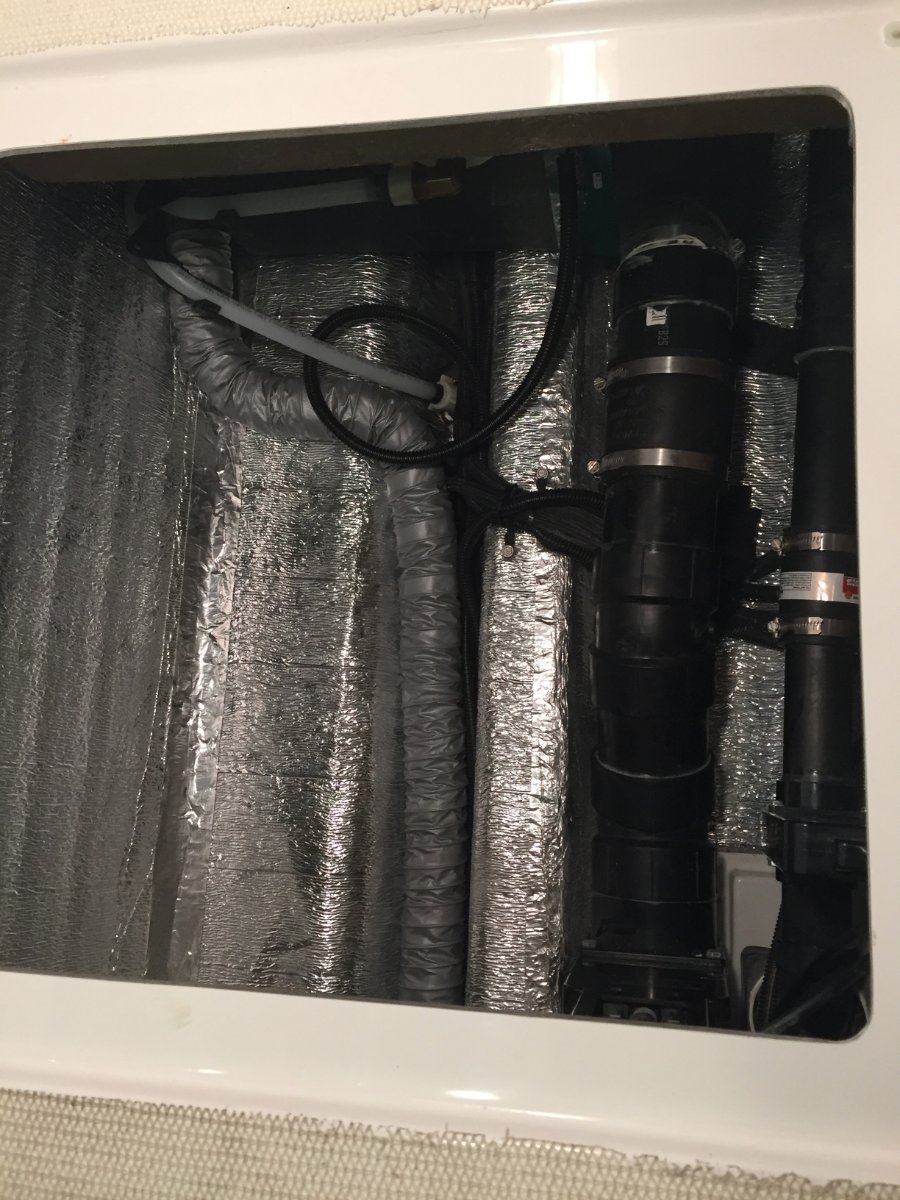
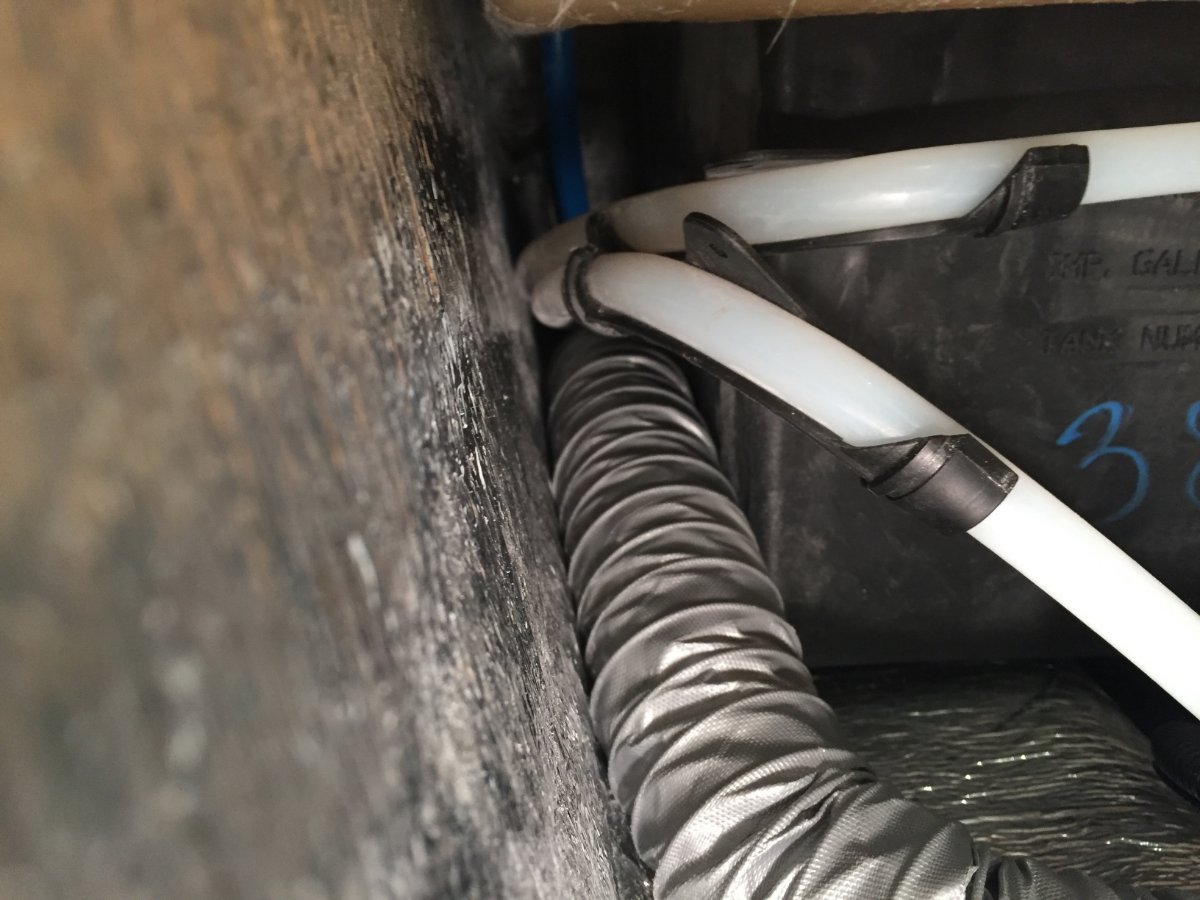
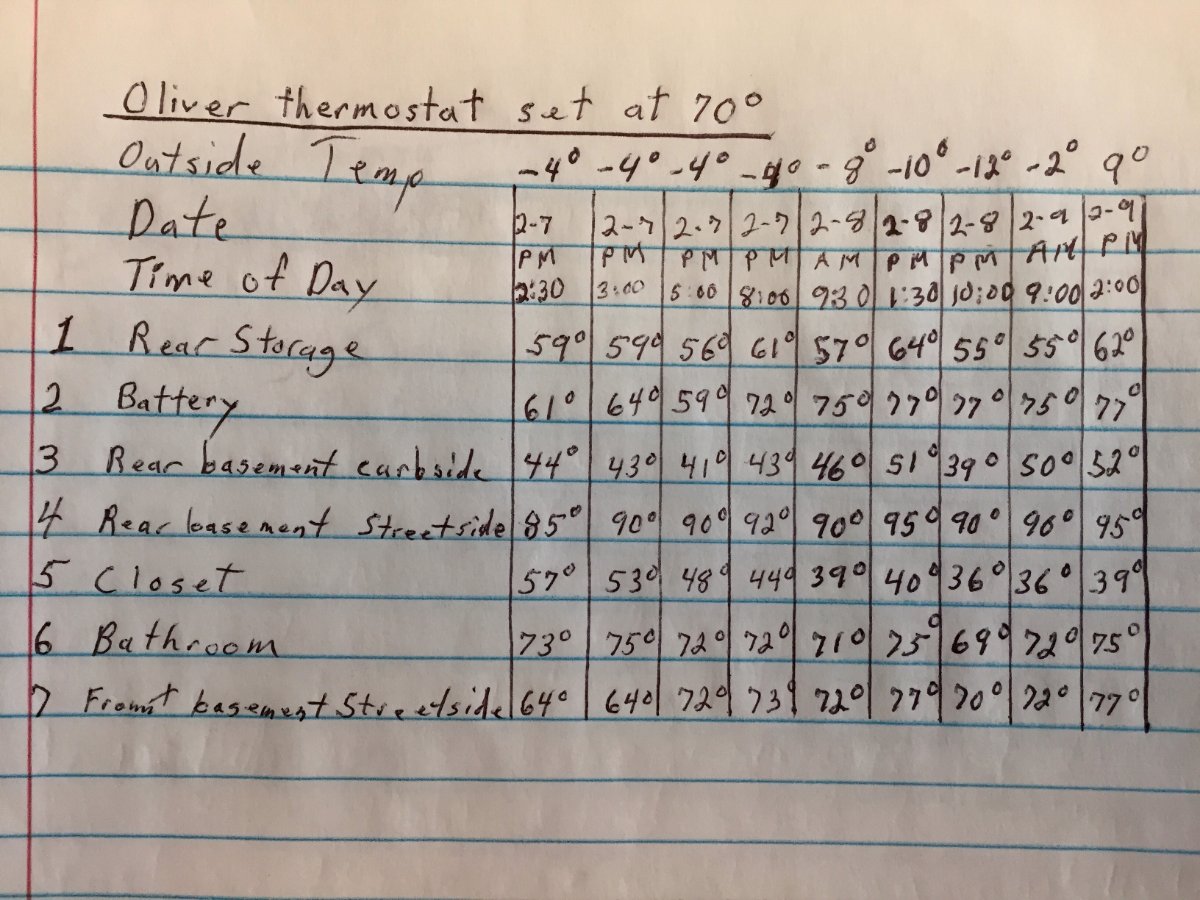
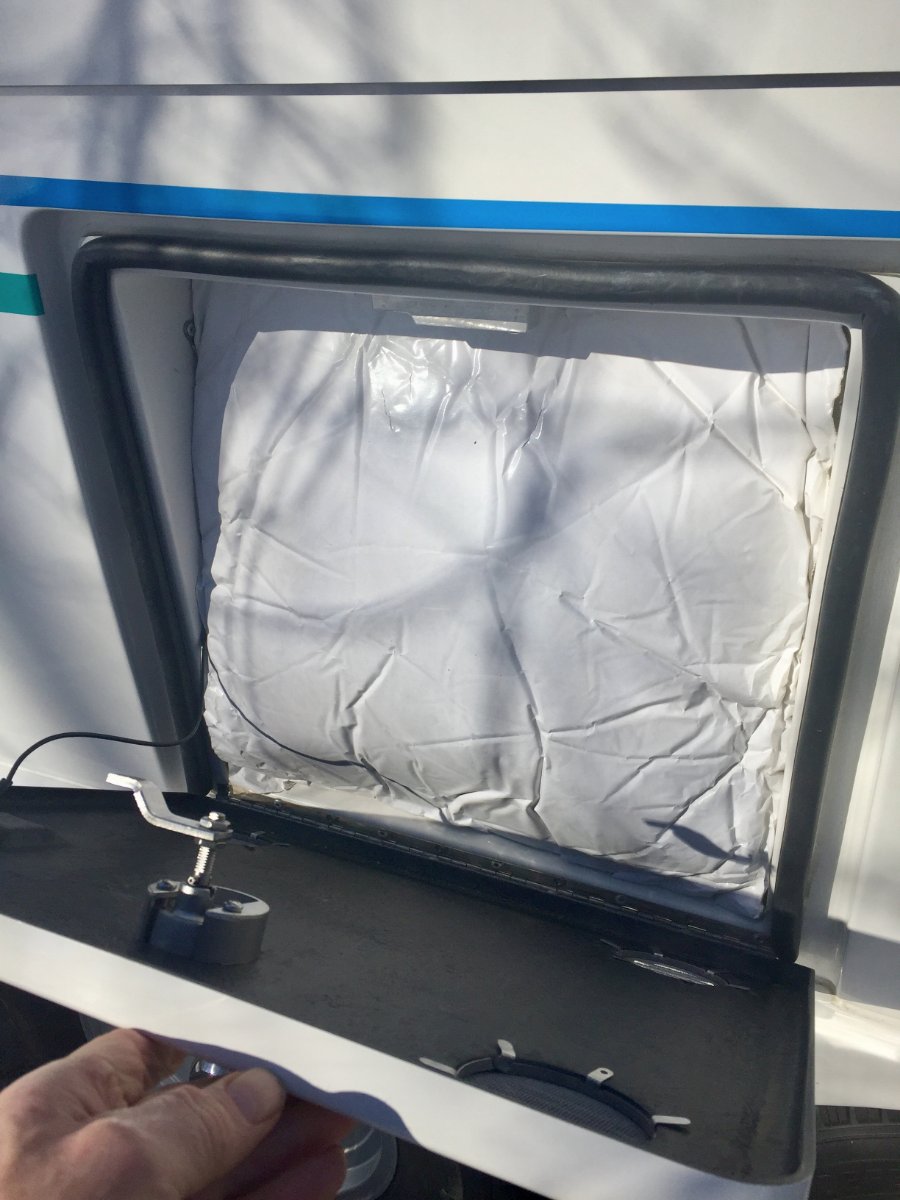
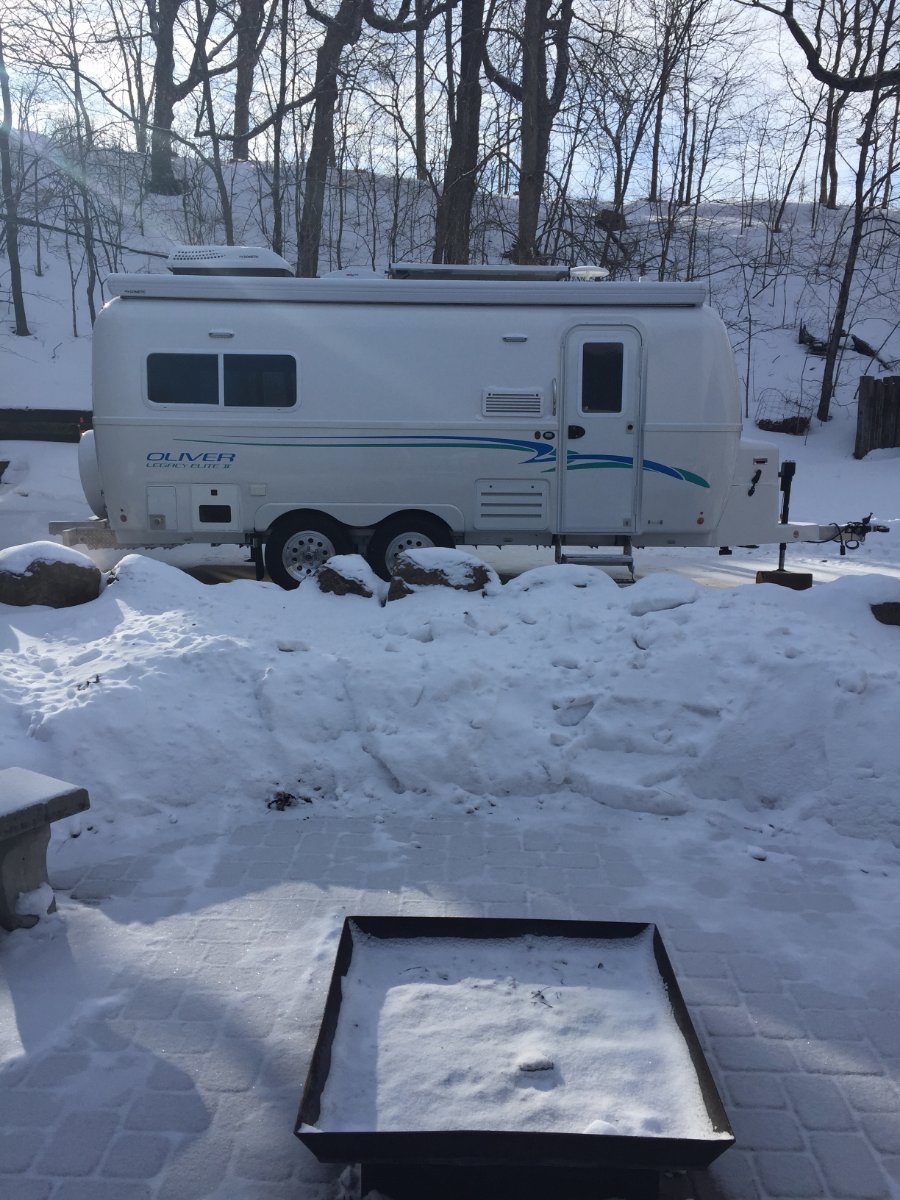
The seed was planted for this furnace mod when we grabbed a canceled reservation three weeks out at a Minnesota State Park. This reservation was mid October and when the date arrived the weather forecast had changed for the worse. We stayed for only two of the three days and we received our first snow of the season, 6 inches of wet snow. We had a non electric site and my batteries were having trouble making it through the night and I was concerned about the water freezing in the Oliver. I have already addressed switching to lithium batteries and posted about it on Oliver Forum. Now I want to share with you what I have done to relieve my worries about water freeze ups in the Oliver, provided that I have a functioning furnace. I first tried to identify the weak spots and came up with the following. Boondocking Inlet Outside Wash Station Fresh Tank Fill Inlet City Water Inlet Black Tank Flush Port Toilet Water Supply Line Hot & Cold Lines Crossing Back Of Oliver The Oliver has all of it's heat ducts run on the curbside which protect the kitchen and the bathroom faucets from freezing. My plan is to run a 2" ducting along the back to the street side and terminating in to the trough that the water lines run in for the city water inlet, fresh tank fill inlet and outside faucet. This trough also has the check valves for those two inlets and has the floor of the exterior storage compartment covering over the top of it. To get at the trough you will have to remove the back wall of the storage compartment and flip the mat back that covers the floor. This exposes the water lines that come across the back of the trailer and drop into that trough. There is a wall that separates the furnace compartment from storage and extends past the wall you just removed. It has a opening for the water lines and it is large enough to run the 2" duct through it and on top of the water lines across the back and into the trough. Now you can flip the mat back down and they are long enough to cover the water lines and the newly installed 2" duct, then the wall is put back in place. On the connection to the furnace I removed the back of the heat exchanger. There is one hard to get at screw on the bottom but the rest are easily accessible. I made two holes, a 2" and a 4" in that back plate. I could not find a 2" starter collar locally so I bought two 4" and removed the rivets on one of them and formed a two inch collar, cut to length and re-rivet. I then installed the 2" and 4" starter collars to the heat exchanger back panel and then the panel to the furnace. I then hooked up the 2" duct to the furnace. Looking in to the access hole under the street side bed you are able to see where the water lines come up and out of the trough and to the valve of the out side wash station. When the furnace fan is running it will blow out a lit Bic Lighter held in that area. So we're protecting water lines, the check valves and dumping warm air underneath the outside wash station valve. Now back at the furnace I attach a 4" heavy duty aluminum foil duct to the newly installed starter collar. It is routed forward a short distance until it can be routed across the basement to the street side and then fed between the hot and cold water lines that go to the outside wash station valve. At this point I need to use a 4" coupler that is 6" long to attach the next 8' piece of 4" duct. I use the 6" long coupler so I can add holes if I need to flood a area with heat, this particular coupler did not need to. I then routed the duct from the wash station valve along the outer wall and over the wheel well, make the corner by the battery compartment and then once getting past the wheel well go down and under battery compartment. Up in that corner I attach a adhesive base 3/4" cable anchor so I can loop a 20" releasable tie strap through it and around the 4" duct holding it up and out of the way. A second 20" tie strap is used were the duct heads down under the battery compartment, it utilizes the loop that anchors the 4/0 cable coming out of the battery compartment. Next I prep another 6" long 4" coupler by adding a metal mounting bracket. It is bolted to the coupler using two 10-24 machine screws that go through the bracket the coupler wall and then a backing plate that has tapped holes. This coupler I will add a1" hole that will be pointed up to flood heat at the battery compartment. The mounting bracket will be utilizing the upper bolt of the support leg for the battery compartment. This keeps the duct up and away from the inverter and electrical components and positions it to flood heat up against the bottom of the battery compartment. The next length of 4" duct is clamped to that coupler and routed up from under the battery compartment over to and along the wheel well. It is held by two 20" tie straps similar to the other side. Because I want to run the heat duct under the foot space of the dinette I need to transition to 2" duct. There is access via the same trough that I utilized in the back of the trailer, but at the front there is more room and I am able to pull the 2" ducting through. From there it continues toward the front until it reaches the black tank flush inlet where it then follows that pipe back along the black tank and terminates by the water supply line for the toilet. At the transition point I add two more short pieces of 2" duct and route them down to where the main black tank drain pipe goes under the dinette foot space, they are terminated on either side of that pipe. There was not enough room to run the 2" duct but enough to force air along either side. At the transition from 4" to the three 2" ducts I simply inserted the three 2" into the end of the 4" and used aluminum foil duct tape to seal the transition. I also want to mention that I used the aluminum foil duct tape to reinforce the ends of every 4" duct by wrapping outside and inside before clamping. That should cover the install, now lets talk about the results of the test in subzero weather. I rounded up seven digital thermometers and put them in the areas I was concerned about. Was placed just inside the empty rear storage compartment. Was placed on top of the batteries and a piece of acoustical insulation that was for large generator enclosure, it was 1-1/2" thick and 19" square. This was squeezed in the opening before the door was closed. Was placed in the rear basement curbside next to boondocking inlet. Was placed in the rear basement street side below the outside wash station valve. Was placed on the floor of the closet with the door left closed. Was placed on the lower shelf in the vanity in the bathroom with the door left closed. Was placed in front basement street side next to the black tank flush port line. I moved it out of the heated shed at 1:00 pm on Sunday 2-7-21. I moved it back in at 3:00 pm on Tuesday 2-9-21. The furnace was cycling off and on at -4 ' but I noticed at -8' and colder it ran continuous. I have the Truma water heater and that was also turned on. I checked propane consumption by putting on two 20 pound tanks that I had weighed and left them in place for 12 hours. It was -12' when I put them on and -2' when I took them off. Because of the subzero temperature the propane was not gasifying very well and the regulator automatically changed from the primary to the reserve after only consuming 2.353 gallons. The total consumed out of both tanks in 12 hours was 3.294 gallons, so that would be .274 gallons in one hour. My Victron BMV-712 was telling me that I had depleted my 400 Ah Battle Born batteries to 47% and at rate of use I had two days and nine hours left. I thought I would comment on a couple of things I like about the outcome of the project. The bathroom was comfy warm and the wall next to the bed was not icy cold. I am not planing to take up subzero camping but it does gives me a benchmark to go off of for any situation that I might run in to. If you have any suggestions or see something that is of concern please let me know. Paul
1 point
-
We have recently changed our phone system to provide a better experience for owners and prospects. If you need to call us for sales or service, we have now consolidated our numbers down to one number. Please call 1-888-526-3978 for all sales and services needs. When we switched the phone system over, the service number was supposed to forward to the 1-888-526-3978 number but apparently is not forwarding. We apologize if anyone has attempted to contact the service using the service phone number.1 point


.jpg.b4fb182c2dd38b005d42f99a3317e409.jpg)


-
Recent Achievements
-


")


")


")
