Leaderboard
Popular Content
Showing content with the highest reputation on 07/04/2023 in all areas
-
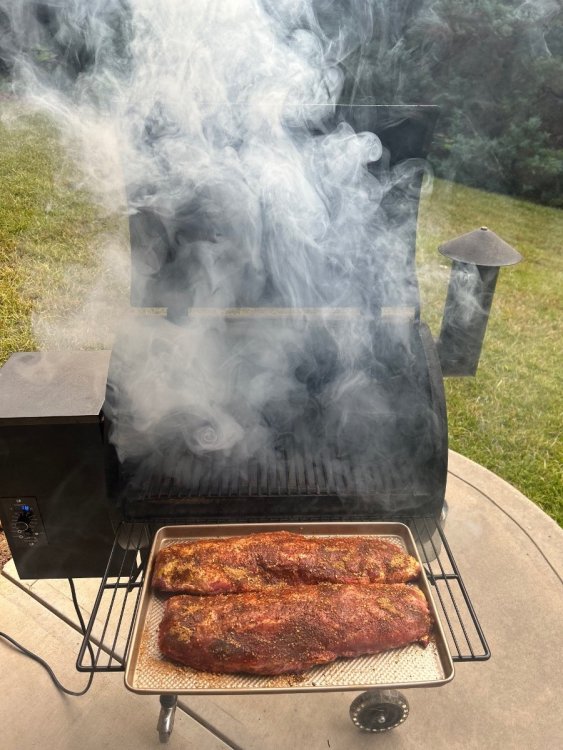
Happy 4th of July! 🇺🇸🇺🇸 Here on Blueberry Hill we traditionally smoke a few racks of dry rubbed ribs and then enjoy fireworks 💥 off our deck over the lake in the evening. Enjoy everyday as we are still a free country thanks to those that fought for our freedoms those that still stand for freedom! Patriot🇺🇸🇺🇸 These baby backs are just going on the Traeger for a nice long slow rolling smoke. Almost done!8 points
-
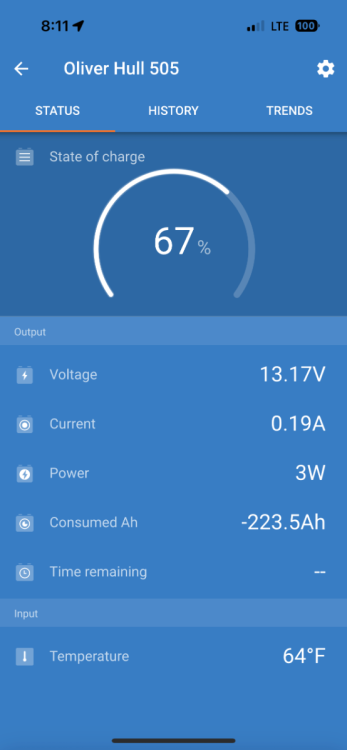
I think we're one of the few with the factory-installed Lithium Platinum Package, and that's actually by accident. When OTT was doing our build they had trouble sourcing the batteries for the Lithium Pro Package so they offered us a deal on the Platinum Package instead. Gotta say, really impressed with this system. We just got back from a week long trip in full shade with rain every day and we didn't even put a dent in it. 63% SOC at the end of the trip with virtually no solar charging and no use of the genny. That's with using the microwave, coffee maker, and TV, too. If you frequently dry-camp or boondock in shady/cloudy environments, the Platinum Package might be worth the investment for you. We could have easily gone 2 weeks without a charge. I put a full trip report (and a one-year ownership wrap-up) on our blog if anyone wants more info. Happy Fourth of July!3 points
-
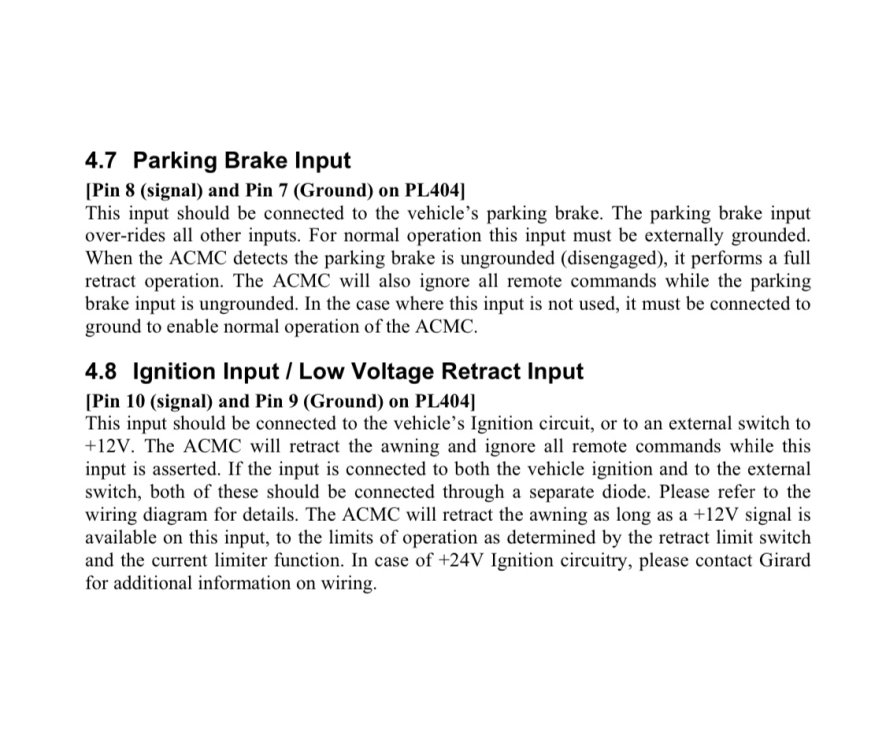
Girard does have a couple of special features on some awning motor controllers that are normally utilized when the awning is an installation on a motor home, to prevent driving off with the awning still extended. The Girard manual details both a parking brake off retract, and an ignition on retract option. Maybe Oliver figured out a way (accidentally or intentionally) to utilize one of those features by tying into the 7 pin harness running light connection.3 points
-
3 points
-
Yup, need the hole dia. (2 or 2.5”), door thickness, short or long cam and grip size/range. My trailer is in storage, I can check this weekend.3 points
-
Not fair! I get to wash Twist and then its Dogs and corn on the cob for supper. Ribs would be WAY better. Either way - none of this would matter if we weren't free and living here in the US of A. Happy 4th everyone!. Bill2 points
-
Happy 4th to ALL! (We're doing ribs on the Big Green Egg this afternoon, too!) Cheers!2 points
-
Ok I found this from Southco (attached PDF), so definitely available in a more secure option....i.e. style 9 cut key vs the stock style 8 stamped key that we have from Oliver. Southco M1 latch.pdf2 points
-
These drawers are not at all intuitive when it comes to taking them out of the galley cabinet. It is dead easy if you pretend that you are a simpleton and don't over think things... . Stand over the end of the open drawer, reach under the sides at the very front with both hands. Put your fingers underneath on the inner edge of the orange release thingies and squeeze, move your fingers toward your palms. The latches will release and you can lift the drawer up and out, away from the slides, which will probably spring back out of sight. That is the "self closing" feature at work. Here is what is going on: The drawer is held to the latch assembly by two TINY SHORT screws. They are known to strip out the soft wood. Sometimes you will find the drawer lying up by the bathroom door with spatulas and other stuff scattered everywhere. Tighten them gently, they will move! If they are stripped, install longer ones. FYI this is a six year old drawer, Oliver may have altered these parts. For example, mine don't have the inner safety latches. Note that you might want to wear disposable gloves. EDIT: one member installed 1” long screws, driven into new holes at an angle, and found that to be a very solid way to do this. Here is the end of the slide, showing the opening that catches the latch. THIS IS SO VERY COOL! I just discovered it after all these years.... On the bottom of each slide, about 5 inches in from the end, is a tiny pin that sticks down. When reinstalling the drawer, you can use it to pull the slide outwards until it clicks into the latch. It keeps your fingers away from the grease too. Finally, you can flip each drawer and lay a thin bead of wood glue around the joint between the bottom and the sides and let it sit overnight. It will dry almost clear, so don't worry about minor mistakes. Plus nobody but you will ever know. I do not recommend gluing the inside of the drawers, that will show and it also has some sort of protective clear coat, so the glue might not stick. This thread is very much related: ... https://olivertraveltrailers.com/forums/topic/2151-how-to-galley-drawer-travel-straps/ John Davies Spokane WA1 point
-
Hopefully my recent experience will not happen to anyone else - but, if you ever have to re-pair your Voyager system for whatever reason here is how you do it. Over the winter I got in contact with the folks at ASA Electronics - the makers of the Voyager camera system that most of us have on our Ollies. The camera I had developed a weak and got moisture inside the lens. Almost immediately they sent me a replacement (free) but it wasn't until today that I got around to installing it. What I thought would be a fairly simple swap turned out to be a 3/4 or a day job! The old camera had already been removed because I had to send it in for ASA to confirm that it had a "seal" malfunction. So, I thought that all I would have to do is take the electricians tape that was used as a temporary covering the hole in the hull, feed the camera wire through the hull, plug it in and then reseal everything back up. Anyone that has actually taken a look at the "instruction" that comes with these cameras might remember that there are nothing but a few pictures (i.e. nothing is mentioned about re-pairing the camera and monitor). Well, once I plugged the new camera in and powered it up, the monitor would NOT automatically "pair" with it. Over the next two hours I tried everything that I could think of to get it to "pair" to no avail. Of course this meant that I traced all electrical connection to make sure power was getting to the camera which involved starting at the switch by the door, and undoing my nicely bundled wiring all the way back to the camera. Countless times I turned the camera off turned the monitor off - all for no change in the situation. Until I took a 15 minute break for lunch! It just so happened that after the lunch break I turned on the monitor first without powering on the camera. I noted that the screen on the monitor looked different than it had earlier and instructed me to hold down the first two buttons at the top of the monitor for 5 seconds. After doing this another screen popped up that instructed me to power on the camera. Within 10 seconds a picture appeared on the monitor and the "problem" was solved. Of course I then had to replace my nice wiring bundles, re-caulk the hole through the hull and put the "attic" back in order. But at least now I have a new camera that works. As an added bonus, I played around with the setting (access via the "menu" button) and improved the color and crispness of the monitor well beyond what I had with the first camera. Happy camper!😊 Bill1 point
-
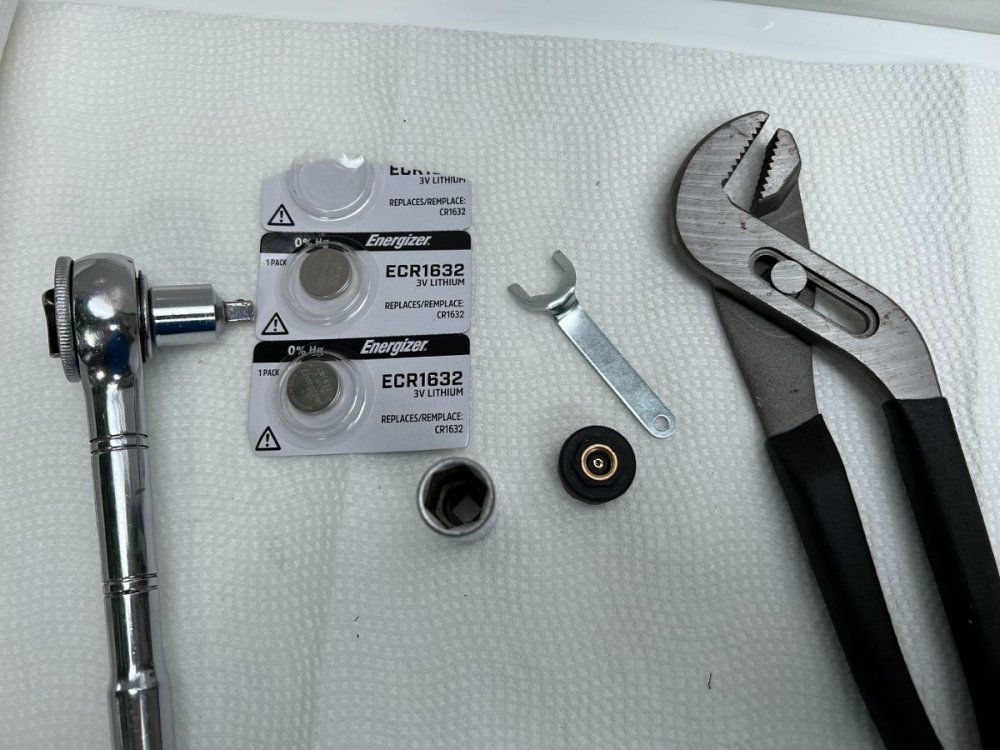
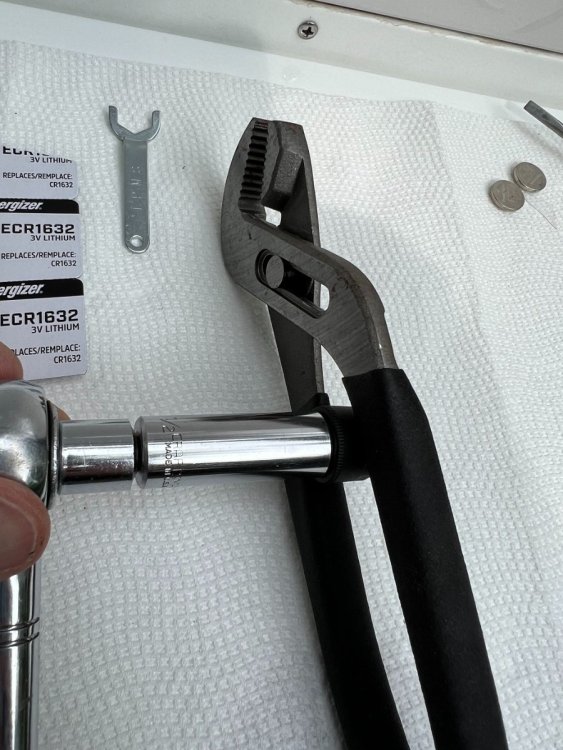
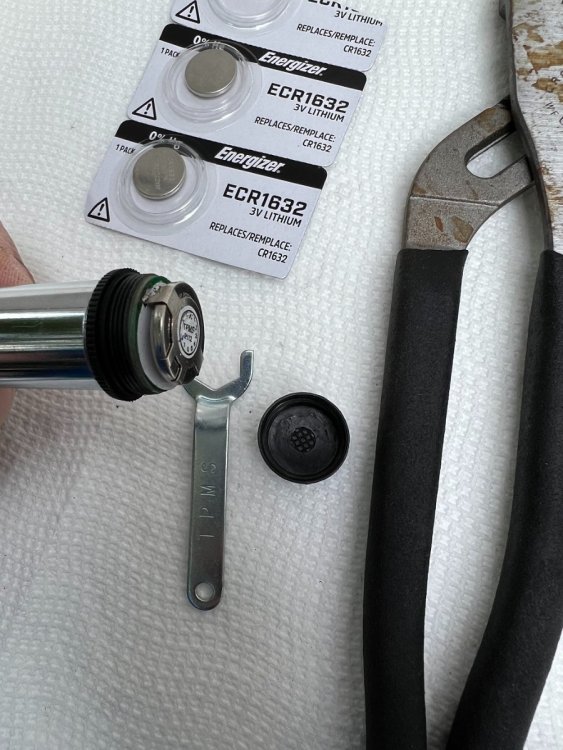
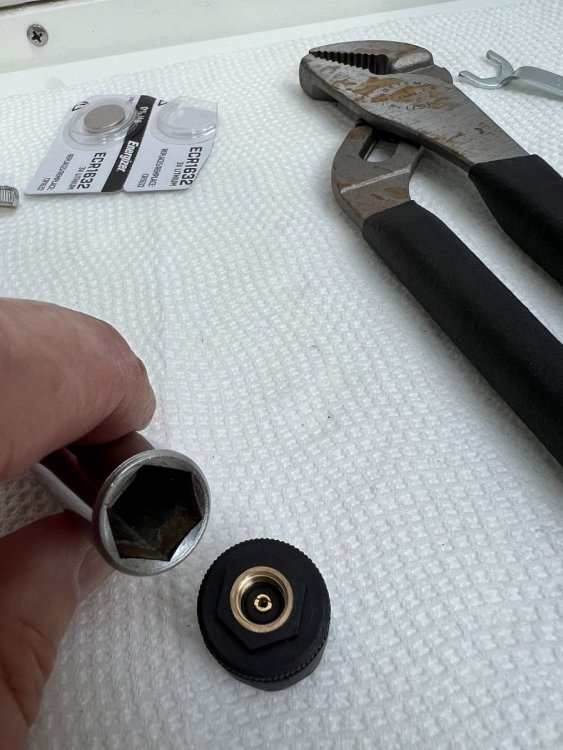
I thought that I'd post this in case anyone else runs into the situation that I did whereby the TPM sensor battery compartment was unable to be removed with the supplied stamped sheet metal wrench. In my case the battery compartment was so stuck on that the supplied wrench began rounding off the plastic hex nut profile of the sensor, had I gone any further the sensor would have been ruined. I ended up using a 1/2 inch six-sided socket that provided much more surface area contact than the wrench and the socket did not mar the surface of the plastic nut; even doing that I was unable to grasp the barrel end of the sensor with enough force using my hand to unscrew the barrel from the sensor until I squeezed the barrel between the padded hand grips of my channel-lock pliers ( don't use the jaw end or you'll risk crushing the barrel ). Curiously ProSmart used to ship a tool that more accurately fit the profile of the sensor but have included only the stamped sheet metal wrench in the current kits which provides significantly less surface area contact leading to the possibility of destroying the plastic nut profile. Also, when replacing tires I'd recommend changing the tire stems to metal versions rather than rubber to prevent premature failure of the stem as a result of the added weight of the TPM sensors.1 point
-
This is what you need. A neutral - ground bonding plug. It’s a plug that ties the neutral and ground lines together on the generator. This gets plugged into one outlet on the generator and then the trailer gets plugged into the other outlet on the generator. Or, if you are comfortable doing basic electrical wiring you can also make your own using a standard replacement plug and a copper jumper wire as some owners have done. Southwire Company LLC Neutral-Ground Bonding Plug https://a.co/d/gkhoMF01 point
-
1 point
-
1 point
-
Just updating this thread....RecPro now offers covers for Houghton AC's. I've ordered one but haven't received it yet so I don't know anything about the quality. Around $30 for the cover that fits the 3400 model that many (not all) have installed. Free shipping too. Free shipping might be Fourth of July related. Happy Fourth to all!1 point
-
Nothing will happen if someone(s) doesn't actually send a letter/email/PM/all of the above making this suggestion to Oliver. I'd do it but I'm on the road for the next two months 😁. If it were me - I'd start with communication to Rodney Lomax. Bill1 point
-
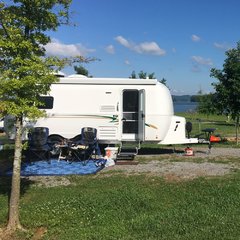
Sure do like the view out that rear window. Shame it was raining but it does set the mood.1 point
-
Cheap yoga mats from Amazon. We cut out templates out of paper grocery bags, then cut mats to fit. we used 3m no-residue duct tape on edges. Items are listed on the Amazon Oliver’s Outfitter Guide here: Amazon Olive Outfitters Guide Cheers, Craig & Rose1 point
-
1 point
-
1 point
-
1 point
-
1 point
-
Count me in, sure Oliver can get a good volume discount, I’m prepared to pay for 2 from Oliver!1 point
-
With the $'s invested in our kit inside the battery compartment (i.e.; numerous LAs, AGMs, or LiFePo's, solar charge controllers, etc,), the hatch is begging for a more secure locking mechanism other than the Southco M1 25 Series Compression Latch with the easily obtainable and punny M1-546 key. Wondering if it would be worth the effort to have a large number of forum members approach Oliver with a collective request to upgrade the battery compartment compression latch? The same thieves stealing catalytic converters could easily change their focus on ripping off RV battery compartment components and probably increase their effort/profit margin by doing so.1 point
-
@rich.dev, you are good! I didn't realize there were different key options for the various latches! Thank you!1 point
-
This popped up in my feed today. Basically a replacement for my favorite tried and true sealant (butyl tape), for windows, vents, and ports. The actor in the video claims it is much faster to use than butyl tape. Since we've used tape so many, many times, we're pretty fast with that. Sealant doesn't look as thick, but it is a nice light gray. I got a kick out of his "finish" with big blobs of lap sealant run around a nice installation of the butyl caulk with the vent. (We normally finish the edge of trimmed butyl tape with a nice even bead of white caulk, to keep the butyl from attracting dirt, and limit uv exposure.) We'll have to wait and see how this compares to old school butyl tape, in the long run. It's so new, I haven't found any user reviews yet. The "can be used on some plastics" is also a concern. I'd want to have a conversation with dicor before using it, as fiberglass is actually glass reinforced plastic, as we all know. https://www.rvtravel.com/product-dicor-butyl-rubber-sealant-2100/1 point
-
Thanks for the info. Does that sensor use an oring? If so it needs to be inspected and replaced if necessary. I always add a dab of silicone dielectric grease to the oring and threads to to keep out moisture and prevent thread seizing. I am glad you figured out how to get it open, non-destructively. John Davies Spokane WA1 point
-
..on Schoodic Peninsula headed for Schoodic Woods campground…has a green swoosh. Who might that be?…just a couple miles from my home.1 point
-
Max Burner, The MicroAir Easy touch RV T'Stat has a very colorful display and seem intuitive. Hope it functions great.1 point
-
This is Ruth. About the Facebook group experience: Some people are more familiar with the Facebook format than the Forum structure. Me, for one. When I’ve had an issue with my Oliver, and try to search on the Forum, I rarely manage to find anything that’s helpful without reading through a lot of unrelated stuff. My problem, I know. With the FB group, someone always seems to be browsing, and people who are having problems at zero dark thirty get a response and help within a few minutes. Trying to maintain a positive, helpful environment, we have dumped some people for ad hominem attacks, and also for bashing Oliver regarding component problems when they haven’t even contacted Oliver about their problem. And then, other folk, usually not owners yet, who pile on the bashing. Sometimes, we make mistakes. We are human.1 point
-
A bit of insurance trivia, but you can have the Oliver on your (USAA) auto policy as a trailer, but that's where you end up with Actual Cash Value (ACV) coverage...just like your car. Getting a standalone policy for an Agreed Value either directly with Progressive ( or Progressive through the USAA General Agency) or other carrier remains the way to go. Other than major collision, fire or badly flipping one, like someone experienced on here, it would take a lot to total an Oliver, I expect. You can play with deductibles a bit also, you may be surprised that the premium difference isn't that great between deductibles. The downside of a low deductible is the tendency to want to claim against it...and claims frequency will come back to bite you over time, i.e., pre-requisite to a non-renewal letter. Location is the big premium driver, so comparing to other's premiums doesn't have a lot of value.1 point
-
@ScubaRx thats exactly what happened. When it went over it broke the hinge pin on the bulldog so it was just the chains keeping me attached to it. It slid maybe 40-50 feet on its side as it pulled me sideways. the crack in the AC housing and missing TV antenna were from where it hit one of those black plastic poles on the side of the road.1 point
-
Looking at the photos, this doesn’t appear to have actually “roiled.” If it had, the air conditioner and solar panels would have been destroyed. It looks like it just flipped onto its side and slid for a bit.1 point
-
Everything inside was pretty much intact aside from the bathroom wall being pushed in a bit. If the money was there it could have certainly been fixed. parts and materials cost was maybe 1/4 of the repair estimate and all the rest was labor as it would take quite a while for them to fix everything. Even the frame and axles were all still perfectly straight so the tow company i used to get it to the mothership simply replaced the bulldog coupler and towed it back. I was told by the insurance that they had it picked it up today and will send it to a salvage auction. Honestly it would make a steal of a parts vehicle with all the upgrades that were on it if someone wanted to pull everything out and transplant them into a different trailer or van remodel.1 point
-
I would think the insurance company owns it now since paying out claim, so it probably will be taken where insurance companies take totaled out vehicles.1 point
-
Your story is a true testament to the love for an Oliver. I am so glad no one was hurt. I know you said you do not want to discuss the details of the rollover, but I would ask for the benefit of others if you might reconsider and start a thread on how and why it happened. We all make mistakes, and a post event analysis is the best way to learn how to do better. ❤️1 point
-
How often have we passed an unfortunate accident of a "stick built" trailer and seen a debris field of trailer pieces and strewn personal effects? The integrity of the Oliver structure is truly impressive. Glad you and your tow vehicle remained upright. Sometimes, "THINGS" happen.1 point
-
There is a sad beauty in those pictures. We are all proud of our shiny new Olivers and tend to believe that they are "over built". But, the proof is in the pudding! It is in unfortunate situations like this that we can really be proud. Can you give us any idea of how the interior faired? I suspect that basically things were found intact. Bill1 point
-
1 point
-
You might want to re-think this in that the grease caps used by Dexter are not made of the heaviest material and are not the easiest to put back on the hub. These things are not expensive nor are they complicated. Where I've had to replace mine over the years I've gone to ones like THESE because they are made from heavier gauge material and given the "flat" top they can be installed much more easily compared to the "rounded top" variety. Bill1 point
-
And here I thought that some "tongue in cheek" person would immediately say, "because the little center $9.00 plug in the "hub cap" is missing!" More than one way to skin THAT cat.🤣1 point
-
When brake inconsistencies pop up, one of the basic and easy to do checks is to measure the amperage of power going to each brake actuator (magnet). If they are all the same, then it eliminates them from the stew. If you find that one or more of them are not drawing the amps (3 amps for our model and likely yours) per brake, then the temperature of the drums on the other side will be elevated. I fought the same problem as you did and ultimately my problem was that the brakes on the street side were not adjusted properly. Likely by the dude doing the annual brake service. Oh.... sorry.... that was me. Once i tightened them up about 20 clicks the temp's equalized and the brakes work great. PS: years ago, JD suggested (and I implemented) the removal of the Ollie rim fat "hubcaps". It makes getting a direct temp reading of the rotors SO much easier. Also, it makes inspection of the grease cap (is it still there) or adjusting the spindle nut with the tire still installed (but off the ground) possible as well. And at $9 for the little hub cap plastic cover no longer necessary it saves a few $$ too.1 point
-
Awesome thread,y'all - informative. I inspected my wheel bearings, brakes/wiring, drums, shocks, rear jacks, and torque settings on the Dexter running gear yesterday in preparations for our 2nd "shake-down" cruise with our "new-to-us" Ollie - leaving later today. No major issues discovered other than running gear had not been kept clean enough to provide accurate visual inspection of linkages and general running gear, so I broke out the pressure washer to remove old grease build-up and generally clean up a 5+ year old mess. ABOVE: Before... Pic #2: After... I found 2 leaky shocks and mounting bracket nuts for rear jacks were about a half-turn less than properly torqued. Although the wheel bearing grease appeared serviceable all the way around repacked with fresh, since I was there anyway. - I Getting ready to button up curbside after cleaning, inspection, and repack operations. Headed to El Caballo Lake around noon for a long weekend of fishing, good company, and maybe a beer or 3.... HA!1 point
-
Final update (I hope). Just returned from a 500 mile trip to midstate NY. All 4 brake drums are running approximately the same temp now. I'm thinking the left shoes are finally broken in and all 4 brakes are working properly now. 😀1 point
-
Yes, these are NevRLube hubs. Different spindle nut and procedure. It was done correctly. Today's trip was encouraging. First, braking power was greatly enhanced. Until now, my brake controller setting had been on 5. That was way too high for the trailer today. I had to lower it to 2.5 to get balanced braking power. Second, the temperature difference was only about 20-25 degrees today (96 on the left wheels, 115-120 on the right). Granted, it was a much cooler day than previous trips, so that was probably a factor, but I'm still encouraged by the smaller differential. Now I'm wondering if the problem was the left brakes. New auto adjusting brakes are supposed to be adjusted manually when first installed. I wonder if that didn't happen on the left side, so the right brakes were doing most of the work and overheating. When the tech reassembled the brakes this week he might have corrected the problem. Or maybe the right brakes just overtightened over time and the problem will return. Will keep monitoring. Fingers crossed.1 point
-
Compare what you watched him do to these steps: 1- After the hub has been replaced and the spindle nut is started, spin the hub with one hand while tightening the nut with the other. 2- When the nut is hand tight, the hub will still turn but with possibly some resistance. 3- Using a socket of the appropriate size, tighten the nut until the hub can no longer be turned by hand. This process is to properly seat the bearings into their races. 4- Back the nut off with the socket until you can once again turn it by hand. DO NOT allow the hub to spin during this step. If it does, retighten with the socket. 5- Tighten the nut by hand until it stops. BACK OFF the nut to where you can insert the cotter pin. This could be up 1/8 turn. 6- Spin the hub to make sure it’s not too tight. Install the cotter pin. Note: Some Dexter spindle/nut combinations do not use a cotter pin but rather a spindle nut retainer which I much prefer. Same steps apply.1 point
-
For anyone following this, I just got a response from Dexter. If the drum temp goes over 200 degrees F in normal driving conditions it should be investigated. Something solid to hang your hat on.1 point
-
1 point
-
I am interested in a enclosue to put over a picnic table. will all the Clam models fit over most CG picnic tables.1 point
-
ShallowGal - I know that you can obtain new CLAM covers (and other replacement parts) directly from CLAM - try THIS. Bill p.s. shortly after purchasing my CLAM I lost my storage bag in a wind storm. I sent an email to CLAM's customer support telling them what happened and they promptly sent me a replacement bag that was even better than the original - FREE!1 point
-
Recent Achievements


