Leaderboard


Popular Content
Showing content with the highest reputation on 11/24/2023 in all areas
-
.Minnesota friends have arrived! Florida friends here. It's a happy day.
 6 points
 -
The main reason Oliver started using the "touch" lights in the first place is because prospective buyers kept asking for them. On our previous Oliver, 2008 Hull #026, each light was outfitted with a little rocker switch. We enjoyed being able to control each light individually. Also, the original lights used a 12 volt Halogen T3 Lamp with a G4 Bi-Pin Base rated at 10 watts. These bulbs drew about 0.8 amp each and put out a good amount of heat. Most of us early adopters quickly swapped the bulbs out with LED's drawing about 0.1 amp each. LED's were just coming into wide spread usage in mid to late 2008 and they were still reasonably expensive. I remember ordering enough bulbs to replace all the inside and outside lights and it costing over $120. During our 2013 build, I was somewhat dismayed when I found out they intended to connect several lights together on a single switch. I convinced them to wire a switch placed right beside each of our lights. I love the lights in our current Oliver. There was a time around 2015 when Oliver got a bad batch of those lights and they started burning out quickly. Oliver came to the rescue with a bag of lights for each owner that said any of their lights had gone bad. Our trailer has now been on the road for 10 years and I've only ever had one to fail. I like the idea of them going back to lights with integral switches.5 points
-
Of course one must have the required tools to actually accomplish the level condition, but the Levelmate Pro tells you exactly what you need to achieve level. We shoot for at least marginally level sites to start with and use the leveling wedges to accomplish the job. Sitting in the cab and rolling into the wedge you know exactly when you are at level. Chock the wheels, unhitch and level the tongue the same way and done. Love it.4 points
-
It's on my Amazon Wishlist, must be the right time. Thank you!3 points
-
That’s a tough request, it depends…. There is such a difference in parks in east Texas, west Texas, along the gulf coast, etc. Palmetto is a good choice. Others to consider would be Palo Duro Canyon SP near Amarillo and Caprock Canyon SP (lots of Bison). Davis Mountain SP in west Texas is close to Big Bend NP, Marfa and Alpine. Mustang Island SP and Goose Island SP on the coast are nice if you like the beach. In east Texas on the LA border is Caddo Lake SP (only natural lake in Texas), totally different than any other Texas SP. There are so many more that we’ve been to, it’s hard to make recommendations for just one. Maybe others will chime in with their experiences and recommendations. Mike3 points
-
Welcome to the Oliver family. Sounds like you guys have lots of fun times ahead. Hopefully you can plan to attend the annual Owners Rally next May. You’ll meet lots of other owners and have a lot of fun. It’s the week fallowing Mother’s Day.3 points
-
Personally, I find the touch lights very easy to use and efficient. Granted, I’ve had issue with three of them, two under cabinet and one ceiling center, but with each a simple adjustment of the spring (under cover) remedied the problem whether flickering or not coming On. And, they’re fun! When showing the Oliver to prospective buyers, they are always ‘amazed’ when I touch the lights with the back of hand, and they’re faces light up, as well!2 points
-
This manual was downloaded from the Oliver University, which is in the Owner Resources section. It looks like the answer to solving your issue begins on page 30. Girard Awning.pdf Good luck, Mossey2 points
-
Galveston Island SP, Beach campground, Inks Lake SP, Garner SP, McKinney Falls SP, or Mustang Island SP (near Corpus). It will start getting warm in late March or I would throw in Caprock Canyon SP or Palo Duro Canyon SP, both just SE of Amarillo. We have camped at Palmetto SP, but we would never go back unless there was a group gathering. We go to Galveston Island Beach Campground every March. I can think of another 5-6 I would go back to before Palmetto every showed back on my radar. Reminder that Texas SP booking window is 5 months. Good Luck2 points
-
@SeaDawg what happened to the back half of your Ollie? Yeah, those lil' Ollies are so cute! Still daylight out west, near sunset. On my first drink, but don't worry, I'll catch up to y'all soon. 🤣 No camping here today, just a simple oven-roasted holiday bird. Our son Adam just came upstairs to mash potatoes, the old-fashioned way, with homemade gravy, yum! Love the cartoon supplied by @mountainoliver - thank you! To all, have fun with your family & friends and Happy Thanksgiving!
2 points
-
If you do use the space between the beds for storage, keep it on the street side half. Be sure to allow at least 12" of free air space in front of the furnace return air vent on the curb side. The Truma Varioheat furnace installed in all 2023-24 Elite II units will register error messages when the air return is blocked, such as by a storage tub. This is because the furnace air opening is right behind the bulkhead under the bed on the curb side, and it has air flow sensors that should not be blocked. We have even gotten those error messages from the Truma Varioheat in our standard floor plan model when a pair of shoes shifted during travel and ended up in front of the return air vent! We feel your pain. We, too, have searched for storage locations in our Elite II. We have learned the "hard way" that using too much of the tempting space between the beds (or under the bed in our standard floor model) will prevent furnace performance.2 points
-
I don’t think it’s in Oliver’s mindset to cut costs by using inferior components. These obviously didn’t work out. I think they should stay with the original lights, 8 years and ours have never failed. Mike2 points
-
Been thinking about this for a while, reading posts, and collecting parts. So, this is what I'm thinking (see pic). The OEM water pump is a basic model, at 55 PSI (not bad) and 3 GPM (pretty bad). I had the same model in our sold Bigfoot class-C, which I replaced as well. Now I will have 2 basic back-up water pumps! Those of you with newer models have an accumulator, older hulls did not. When done, we will NEVER lift a mattress to switch a water valve. Some who know me, know that I already have a 35-gallon water tank mounted to my truck. We love our water out here, in the SW, where it is scarce! I will increase the PSI a little to 60 and add volume 5 GPM (huge), also addind dual .75L water accumulators. Some may get worried re manufacturer specs, although design tolerances have considerable room, often up to 50%. I will add 9% more PSI and PEX is rated to 160 PSI (although not all the fittings are). We run our home at 60 PSI water pressure. Take a look! Please let me know what you think. I'm tearing old parts out asap tomorrow! 😋
1 point
-
During our present trip touring the (4) gorgeous Colorado NP’s and a few Service Parks our Atwood CO/LP detector started alarming and would not reset. Of course it alarmed in the middle of the night. 😄 I removed the detector and saw that it had a manufacture date of 2018. We took delivery of our new OLE2 in June of 2020. So our Atwood detector was actually 5 years old. I called Oliver and asked about purchasing/shipping me a replacement. Mike Sharpe said they are no longer installing the Atwood’s and Oliver is now installing RV Safe model #RVCOLP-2W CO/LP detectors. So not wanting to go a day longer without a detector I opted to just buy local and made a call to a local RV dealer in Montrose CO. They said they had plenty on hand. I swapped out the old Atwood and installed the RV Safe and we are back in business with no alarms. The new RV Safe detector comes with a choice of (2) backing plates. So Pro tip- If you have to replace the old Atwood use the larger backer plate that comes with the RV Safe detector as it will take cover the hole in the hull wall under the dinette that the Atwood required. It’s a pretty straight forward clean install. Onward!! Patriot🇺🇸
1 point
-
Trashcan turkey is at 156. Another 15 minutes or so. Everything else is done. Stuffing, squash, mashed potatoes
1 point
-
Inside vs. outside should make little difference (even in Wyoming where wind chill can be brutal) because when in the battery compartment, the batteries are fairly well protected from wind. The connection to shore power should keep the battery warming mat, on what must be your 390 Ah Lithium Pro Package, well supplied with power. For what it's worth, we store our Hull #1291, with the Lithium Pro Package and the battery warming mat, in an enclosed but unheated shed, connected to 30A shore power, during our central Idaho winters. We get nighttime lows barely below 0 F at times, and have not had any issues. Lows much colder than that are rare. What night time lows do you commonly get in your part of Wyoming in the "dead of winter"? If much colder than 0 F at any time, I would open a service ticket through which to ask Oliver Service what the temperature limits of the battery warming mat are, even when continually supplied with shore power.1 point
-
I posted this inside our closet door.
1 point
-
Late March is the perfect time to visit the Texas Hill Country. Inks Lake SP puts you in the triangle with amazing towns to visit. Burnet, Llano (Cooper's BBQ), Marble Falls (Blue Bonnet Cafe and Bear Brewery), and Fredericksburg. So much to do in Fredericksburg (Brewery, German food, Military museum, including George H.W. Bush exhibit. Lady Bird Johnson and LBJ historic sites around Johnson City, TX. Best of all of this is you will be in the heart of Blue Bonnet season. Follow the Blue Bonnet Trail, and the Willow City Loop. The drives are beautiful and the Blue Bonnets and Indian Paintbrush are the frosting on the cake. Inks Lake - North Loop, right on the lake, site #88. Though at this late date, the North Loop is probably full.1 point
-
Tough to really just pick one, and its really hard to go wrong with just about any of them. Texas parks and wildlife really does an excellent job at maintaining all of the parks and by my memory ive never really been disappointed with any of them. My personal favorite is lost maples sp for its backcountry camping but its prime attraction is when the maple trees turn in the fall.1 point
-
It's all good. We're just the littler cousin. That's our Minnesota friends' trailer hull 30 something.. We are father down the hill. Littler can be good. It's all about what you want, and need. We're not big people, so the Elite has been good for us. Ps, that turkey looks great!1 point
-
Just don't ever mix vinegar with bleach. Not a good result.1 point
-
p.p.s. I can get you a picture of the bottom of the microwave and/or the back of the trim piece if that helps you - just let me know. Bill1 point
-
When you take a look inside you will see that the microwave has a sheet metal piece attached to the bottom that extends about 5/8 inch from the bottom of the microwave. Then there are four rubber feet - one at each corner - that extends another 5/8 or so for a total of 1 1/4 to 1 1/2 inches. As I remember, I used scrap 2 x 4 around the bottom to wedge around that wood box and under the microwave until the wedges hit the rubber feet. Then where that didn't fit I shaved off slices (using my radial arm saw) until it was tight. Pay attention to the fore/aft movement - you can wedge wood not only against the rubber feet but also between the sheet metal at the base of the microwave and the front of the interior cabinet. I did not drill into anything - the simple wedging did the trick. Once you get the trim piece off, you will see that the "metal" is actually very thin and only supported via the plastic framing. There really isn't much metal there at all. Bill p.s. in wedging the material around the unit I used a small hammer to tap the wedges into place. Small because of the working space and I didn't want to bend anything out of shape on the microwave. However, I did want to have the wedges very snug. Finally, when I was satisfied I drilled four holes in the front of the face plate and screwed directly through the fiberglass into the wood box. Then I used screw covers to "hide" and dress up the screws. No one has ever commented that the covers look out of place.1 point
-
The obvious most important warning is not to mix those chemicals in your living space. More than a few folks trying to unclog/clean a sink/toilet have done so to their peril. So good reminder. But for this discussion (Tank and Fresh Water Line Cleaning), the solution to your process is not to mix the Pine-Sol that you put into the black/gray tanks with the the Vinegar you put into the hot and cold water lines to sanitize. How? Raise your trailer tongue at a dump station or camp site where you have full hook-up and open the black and gray valves to drain them after your tank cleaning. Then flush the water lines first with a bunch of clean water to flow water through the water and they drain into the tanks to remove any Pine-Sol residue. Then introduce the bleach water into the hot and cold water lines and complete the sanitization process. Flush the tanks some more and close the valves. Always remember to bypass your hot water tank. You don't want bleach in it. GJ1 point
-
Even though for most of my trips I travel alone, I still do not use the space between the bed to store anything meaningful. I have placed a "rack" for my shoes on the short wall below the streetside bed and when I'm towing the things that sit on top of the nightstand are placed on the floor at the foot of the nightstand. I assume that you have utilized the space below the front dinette seat and the space below the streetside bed? Once I found the perfect sized plastic container for under the front dinette seat it has been the depository for my coffee maker and things that will not fit in the pantry. Extra charcoal, my shower tent, safety cones and a few other things go below the streetside bunk. Happy Thanksgiving and good luck on finding the storage solution(s) that work for you. Bill1 point
-
These are bottom tier cheap products. I doubt that they were ever intended to go in an RV where airborne dirt particles and condensation are major factors. This is a fail on Oliver’s part, unintentional though it may be. Does anybody actually get 20,000 hours of use out of their home LED light bulbs??? These life ratings are pure scam. The LED element itself may in theory last forever, but the board it is attached to can last just a few hours. RVs need marine grade (co$tly) components. John Davies Spokane WA
1 point
-
If you like your job, it goes by far too quickly, if you don’t like your job… Here’s the secret to surviving it.1 point
-
It may seem like a long time, stay encouraged it will be here before you know it. I highly recommend it! 👍🏻😊1 point
-
1 point
-
Same here... We mounted the sending unit on the FWD bulkhead just below the closet door to the right of the main hatch... Works great!1 point
-
@jd1923 Is the valve with the blue housing a Misol brand or US Solid brand. If it is a US Solid brand the threads will be 1/2" NPT (National Pipe Thread - tapered threads) If it is a Misol brand be aware that the threads may be 1/2" BPT (British Pipe Thread - straight threads) Both of these brands are manufactured in China. I'm pretty sure that neither brand valves are using lead-free brass. However, the US Solid brand does have a SS version available. My original valves have BPT. knowing that there was a slight difference in the thread pitch, I used Teflon tape (several wraps) to make a watertight seal with the 1/2" NPT plastic nipples that I used to join the valves to the rest of the plumbing. I have never had any seeping or leakage, but I wanted you to be forewarned that it might be a good idea to seal those threads well. I like your plan to also be able to control the valves in such a way that you can also use the system to suck antifreeze into the pipes. The use of momentary contact switches is clever as well. The reason I did not include these functions into my system is because I don't use antifreeze here in the Deep South. I just blow out the lines with air pressure and keep a small electric heater going during the colder months (December thru January) to keep the entire trailer including the basement at about 60 degrees. The reason I did not use momentary contact switches is because the electric valves I used do not have any power draw while they are at rest. I have recently installed a compressed air system in the trailer that lets me flip one switch and it opens two electric valves that allows 40psi compressed air into the plumbing system to purge all the lines and the water heater for my minimal "winterization." There are back flow preventer's in the air lines to keep water from entering the air system when in normal use. I also extended the air lines to quick-connects in the wheel wells to make the checking and filling of the tires easier.1 point
-
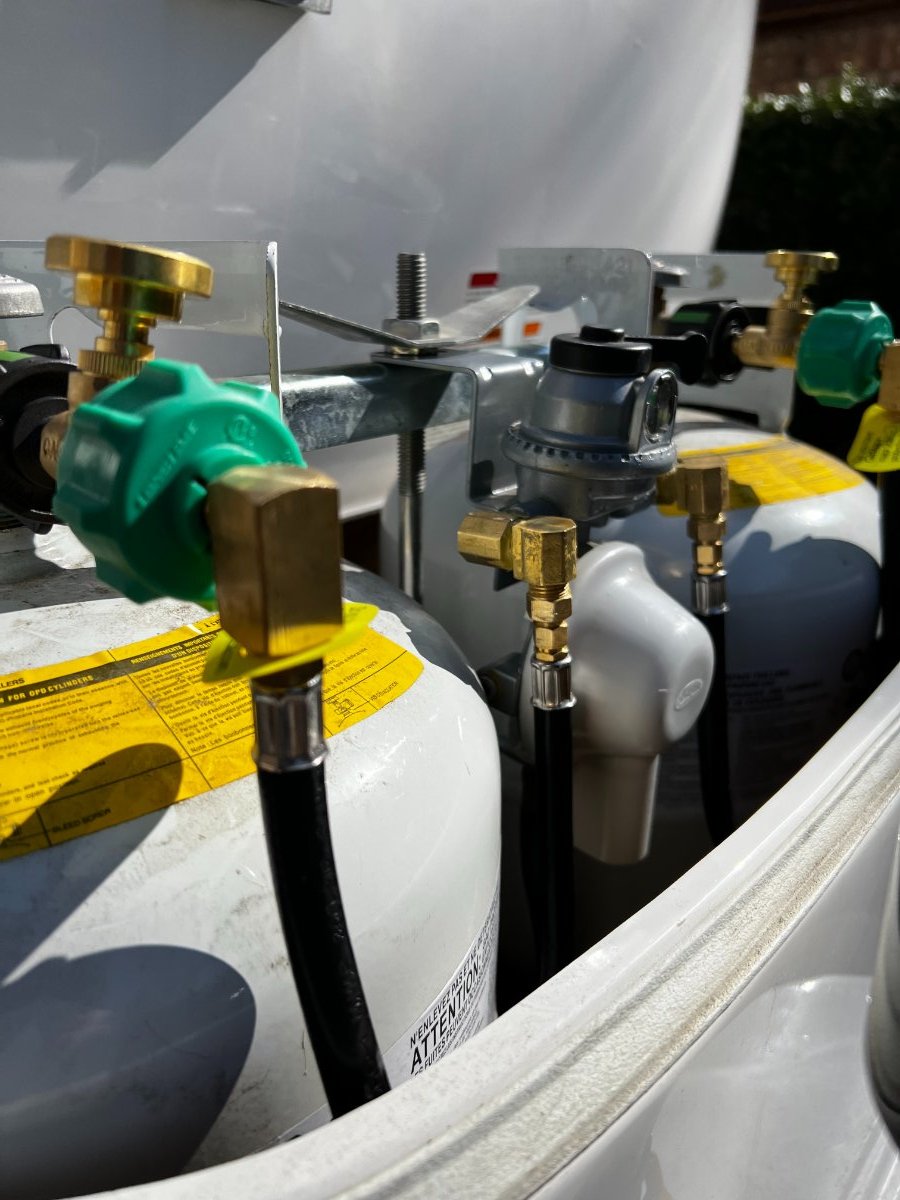
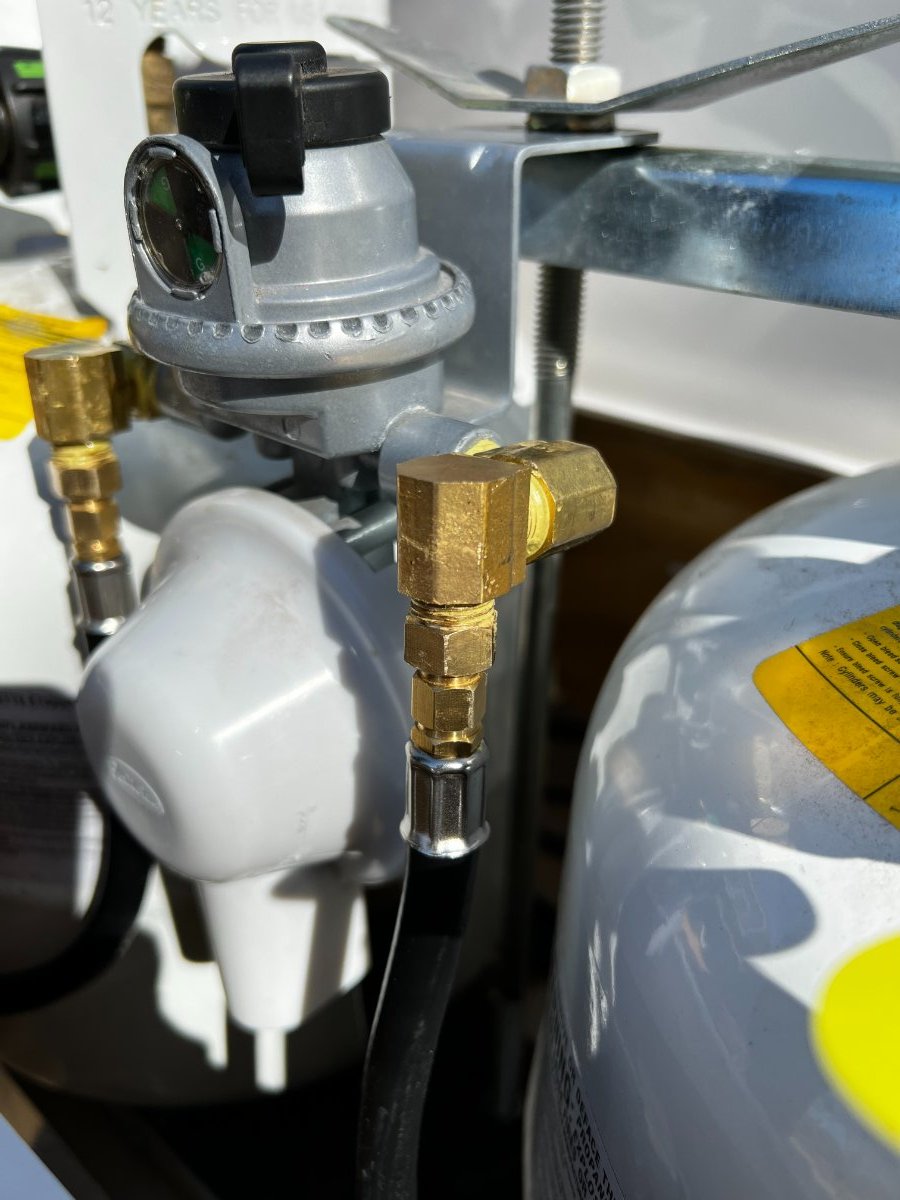
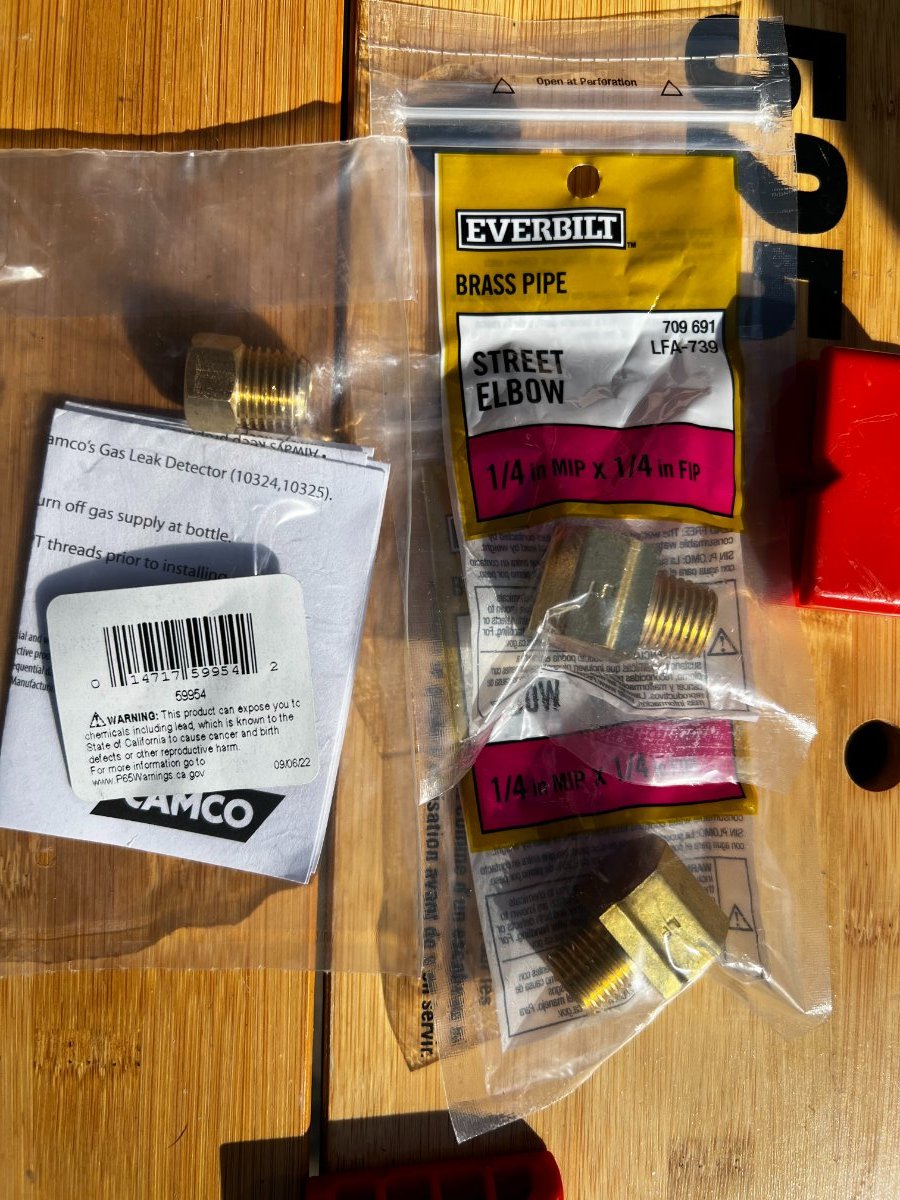
After reading @VBistro's excellent write up ( Propane Tank Mod - Installation of GasStop Valves ) on adding GasStop safety valves to LE II Hull #953 I decided that I wanted to tackle that on "Reset" LE I Hull #1030. However, as LE I owners know on the forum, what working on an LE II may or may not work on an LE I. When I put the gas stops on the LE I it was apparent that the LE I has a shorter propane box than the LE II, making the end of the hoses stick out of the box and preventing the lid from fitting correctly. I had to pull the GasStop valves off and re-evaluate. I really wanted those GasStop units on there. 🙂 Tried re-orienting the tanks, shifting hoses, etc. but nothing worked. So, I started digging around and found hoses with 90-degree heads. That solved the distance to the front problem. However – the replacement hose length was longer than the original hoses and ended up with a second bend in the line that – while technically within spec – did not make me happy for having done the work. So here is the solution that I finally came up with. Be aware that there are a good number of joints here – make sure you are comfortable with (1) gas, (2) wrenches, (3) Sealing cream or tape for gas, and that you test for leaks on each and every joint. Soapy water works great, if you know a home brewer or commercial kitchen operator Star San bubbles like crazy at the smallest leak and is a literal lifesaver in this case. Of specific note: This bit of info from @John E Davies is critical. At least for me, when I removed the old hoses, I could not get the old check valve off. It was so tightly sealed that I initially assumed that it was part of the original hose. I am including the replacement for the check valve in the parts as you will need to be able to remove it and palace it on the new 90-degree hose, or put a replacement on the new hose. Parts List (I have referenced Manufacturer Websites, most are available through Amazon as well) Quantity is for both tanks. 1) 2 GasStop Propane Shut-off Valves - Qty 2 GasStop – Use Gas Safer With GasStop (gasstopusa.com) https://gasstopusa.com/ 2) 90° Propane Pigtail Hose (12″, Rubber) - Qty 2 Product details – GasGear (gas-gear.com) https://gas-gear.com/product-details/#product1 3) ¼” NPT BRASS Street Elbows (double-check the size of your particular fitting) - Qty 4 Everbilt 1/4 in. MIP x 1/4 in. FIP 90-Degree Brass Street Elbow Fitting 802099 - The Home Depot https://www.homedepot.com/p/Everbilt-1-4-in-MIP-x-1-4-in-FIP-90-Degree-Brass-Street-Elbow-Fitting-802099/300095976 4) Pipe Thread Sealant (specifically formulated for gasses) -Qty 1 RectorSeal 1.75 oz. #5 Pipe Thread Sealant 25790 - The Home Depot https://www.homedepot.com/p/RectorSeal-1-75-oz-5-Pipe-Thread-Sealant-25790/100144191 5) Low Pressure Fitting - 1 / 4" M NPT x 1 / 4" F Inverted Flare w / Check Valve - Qty 2 Low Pressure Fitting (camco.net) https://www.camco.net/low-pressure-fitting-1-4-m-npt-x-1-4-f-inverted-flare-w-check-valve-59954 Method (Copied and expanded from original post) Detach propane hose from the ¼” straight NPT fitting at the regulator Remove the straight ¼” fitting at the low pressure regulator Remove the ACME connection at the propane tank Clean as much old pipe thread sealant as you can from both the regulator side and the hose side, being careful not to let any shavings enter the regulator Apply thread sealant to the male end of the new elbow fitting and install it at the low pressure regulator. Tighten to position the female end away from the trailer, toward the hitch. Place a second elbow fitting into the first, applying thread sealant to the male end. Tighten to position the female end pointing downward. This next step represents a preference thing for me. I feel that attaching the check valve to the new 90 degree hose before attaching the hose to the downward facing female elbow works better, as the end of the hose is an odd size for which I did not have a wrench requiring me to use an adjustable crescent wrench. Proper tool may be a small pipe wrench, which was not to hand. As always, apply sealant to the male threads and tighten firmly. Apply thread sealant to the check fitting’s male end and screw it onto the street elbow. You can use a pipe or crescent wrench to snug this connection. This is the connection where I ended up with a leak, as the dangling hose can make you think that you have it connected but in realith the hose is just binding. Re-attach gas stop to propane tank and new 90 degree hose to gas stop. Let sealant cure for 24 hours Pressurize system and leak test! Note – if your tank is full and the gas stop shows “low” this is a good indication of a leak. Here are some photos of the finished project. Again thanks to @VBistro, @MarkV, and @John E Davies for the original post and follow-ups for this great idea. I hope this helps LE I owners in making this modification to their Oliver.
1 point
-
Maybe this one?1 point
-
My 2010 Hull 45 did not come with any type of surge protection either. Used one of those pedestal types for a while but recently installed a hardwired Hughes Autoformer with surge protection. So far it seems to be working as advertised and I like the fact it can be monitored with bluetooth and that it's DIY to replace the surge protection module should it fail. Hughes Autoformer1 point
-
The EMS in our 2019 EIi is installed under the rear dinette seat on the wall facing the aisle. This pix is looking down under that seat. The readout is mounted in the attic on street side wall.
1 point
-
jd1923 - Given the amount of electronic "stuff" in the Oliver, I simply chose to have this system installed at the time of birth. It has worked perfectly over the past years, but, I've never really looked to see exactly how it is installed (with the exception of that remote readout). Unfortunately, Twist is in off-site storage or I'd get some pics for ya. Note that the readout was initially installed under the street side bed. This meant that in order to see what it was trying to tell me, I'd have to lift that bed! Be careful as to where you decide to mount it - the flashing (as it scrolls through its various screens) will make you think that you are trying to sleep in a cheap hotel if you mount it just about anywhere out in the open part of the cabin. However, you will want it in a place where you can see it easily as you plug into shore power. I moved mine from under that bed to inside the pantry - it is high up on the rear wall of the pantry. All I do is open the pantry door and I can see the readout from the entrance door, yet, it is not in the way of storage inside the pantry and, when the door is shut that flashing red display can't be reflecting off the interior of the cabin. Bill1 point
-
Yes, that is the same model PI EMS installed in my OTT.1 point
-
@Rivernerd, @Chukarhunter, @Steph and Dud B, @MobileJoy, @aaronorange, @John Dorrer, My issue has been resolved. The Xantrex Inverter/Charger is now charging my Lithionics batteries. As promised, following are the details leading to resolution of the problem. After logging a service ticket (including thorough details) with Oliver on Sunday, 11/12/23, I continued to read the Xantrex owner's manual and search the internet for clues to resolve the "AC bypass" preventing charging of the batteries. This effort was largely unsuccessful. On Monday morning, 11/13/23, I phoned Oracle Service to inquire if they could provide guidance to resolve the problem. In short, they could not. I was told since this was an AC problem, Oliver could not help resolve the problem. They recommended taking the trailer to a service center. In the course of the discussion, I was also provided erroneous information, such as the as the state of the ON/OFF switches on the Lithionic batteries. I was told the batteries are fully charged if the switch button is lighted a steady blue color. This is incorrect. The owner's manual from Lithionics clearly states a steady blue light indicates only that the battery is ON. I knew from using the Lithionics app on my phone exactly what the charge state was- between 10% and 12%. Oliver Service did forward my service request to Xantrex and I received an email from Xantrex which included a case number in their service request tracking system. In the automated email were instructions for submitting additional information. Using the Xantrex FXC Control app on my phone I made three screenshots of the current settings on the Xantrex inverter/charger, plus serial number, purchase date, etc. Below is one of the screenshots. Oliver Service also provided a phone number to Xantrex customer/technical support, (800) 670-0707. I placed a call to Xantrex, only to receive a recorded message stating they were closed for a Canadian holiday. Today, I finally reached Shawn, a Xantrex tech support agent, after about a 25 minute wait in a phone queue. I provided the case number and Shawn spotted the screenshots and quickly reviewed the settings. Shawn told me he was almost certain my issue was caused by the setting of Charger Ignition Control being Auto-ON. While still on the phone with Shawn, I went to the trailer, opened the Xantrex FXC Control app and changed the setting of Charger Ignition Control to OFF. The Xantrex Inverter/Charger immediately came on and began to charge the batteries. Neither Shawn nor I can explain how this setting got changed from the default Oliver setting of OFF. In the two hours since changing this setting the batteries SOC has increased from about 10% to >40%, while connected to a 20 amp circuit. In another hour, the batteries are all near 80% SOC. Lessons learned- I had not checked all of the inverter/charger settings using the Xantrex FXC Control app against the Oliver default settings listed at https://support.olivertraveltrailers.com/portal/en/kb/articles/xantrex-inverter-settings. Had I done this, I may have resolved the problem sooner. In my opinion, Oliver Service should have recommended verifying the current settings against the Oliver default setting for the Xantrex Inverter/Charger and our model year trailer. I had ordered #10 AWG wire and components to add a 30 amp RV outlet to a utility building near our driveway. I am now reconsidering spending about $200 and several hours of labor to do so. The 20 amp circuit already in place seems adequate for our needs when we have the trailer in the driveway. This incident confirmed my prior observation- the lithium batteries can be recharged from a very low SOC to full charge in approximately 4-5 hours using a 20 amp circuit. I have also used this same circuit to run the Dometic air conditioner in the trailer for as long as needed. While I had Shawn on the phone, I asked him why the Xantrex Inverter/Charger would occasionally come ON for brief periods (2-3 minutes) while attached to shore power. I have noticed this occurring at night, such as when the furnace cycled on. Shawn said this was not unusual, if a large DC load is activated, such as a bilge pump, or a furnace blower. I hope this information is useful to other Oliver owners whose trailers are equipped with Xantrex Inverter/Chargers. My thanks to all who offered suggestions to resolve the problem. Regards, Don
1 point
-
I don't think this is correct. Setting #28 limits the maximum draw of the converter section to X amps, with preference going to any internal 120v loads before the balance goes to the converter for battery charging. For instance, if it's set to 15A, and you have 5A of internal loads (TV, cell chargers, etc.), 10A will be used to charge the batteries. They'll still charge, but slower. I've done this many times when connected to a small generator or to a 15A circuit. Look at it this way: your solar panels still charge the batteries and they don't come anywhere near 150A of charging current. Limiting setting #28 to 15A will slow charging but not stop it unless you have 15A of other draws running in the trailer.1 point
-
I would be concerned if the GFCI on a house outlet tripped when connecting the Ollie, period. The inverter/charger by itself will not cause a GFCI outlet to trip at the house. A properly functioning GFCI will only trip if it detects a current leakage to ground, a situation that is not wise to ignore. Your problem may be with the GFCI receptacle you are otherwise using. You mentioned that your GFCI is only rated to pass 15 amps of current. Your GFCI is not rated to pass a 20 amp current to the Ollie. I would suggest you install a 20 amp WR (outdoor rated) GFCI and see if that solves the problem. It worked for me. This is the 20 amp WR GFCI that I installed to connect house power to my Ollie. https://www.amazon.com/Leviton-GFWT2-W-SmartlockPro-Weather-Resistant-Tamper-Resistant/dp/B013OVCTBO/ref=sr_1_1?crid=21PT35NK7I73G&keywords=outdoor%2Brated%2B20%2Bamp%2Bgfci%2Boutlet&qid=1699985721&sprefix=outdoor%2Brated%2B20%2Bamp%2Bgfci%2Boutlet%2Caps%2C124&sr=8-1&th=11 point
-
There appears to be some confusion around setting number 28 which is a dedicated internal circuit breaker for the 3000 watt inverter. The factory setting must stay at 25 amps because it requires at least 20 amps of 120 volt input current to charge the batteries at the factory default 150 amp charging rate. Stated differently and ignoring losses, the inverter requires a minimum of 2,100 watts of 120 volt shore power to achieve the 150 amp charging rates (150 amps x 14 volts = 2,100 watts). 2,100 watts of 120 volt power results in a shore power draw of 17.5 amps (2100 watts / 120 volts = 17.5 amps). If setting #28 is set to only 15 amps, I believe that it is guaranteed the inverter will shut down and not charge the batteries. Once the battery charging stops, the inverter will after awhile reset, restore shore power and start charging the batteries again. The inverter starts charging the batteries at a low rate initially and slowly ramps up the charging voltage until it reaches a steady state 150 amp charging rates. If setting #28 remains at 15 amps, then it will never reach 150 amps charge rate because shore power will shut down again and the cycle will repeat itself over and over. OTT should verify the above, but I don't believe there is ever a reason to reduce the AC input limit in the inverter/charger to below 25 amps. Rivernerd's advice to use an extension cord with a higher amperage rating is excellent advice in all situations. The reason is to reduce voltage drop. The footnote to the table above that rich.dev posted states that the inverter will trip shore power and switch to battery power if the shore power voltage drops below 106 volts. An undersized extension cord can cause significant voltage drop. For example, assume the voltage into the house from the utility is 118 volts. Further assume that there is an unusually long 75 foot run of 12 AWG romex from the breaker box in the house to the wall outlet feeding the extension cord to the trailer. In this example, the voltage at the wall outlet has already dropped by 6 volts to only 111.96 volts, merely due to the 75 foot run from the breaker box to the wall outlet, assuming a 20 amp current draw at the outlet. Now lets assume that you use a 12 AWG (20 amp) extension cord between the wall outlet and the Ollie. Adding the additional 50 feet of 12 AWG extension cord will further reducevoltage at the Ollie by an additional 4 volts to only 108 volts. Everything should still work fine. However, if one were to use a 14 AWG extension cord instead of a 12 AWG extension cord, the voltage at the Ollie will drop to only 105.8 volts and will cause the inverter to cut off shore power (and battery charging) because it is less than 106 volts. While this situation is unusual and situation specific, everyone should probably own a "kill a watt" or similar meter to quickly eliminate voltage concerns. This can be inserted between the extension cord and the Ollie plug to observe real time voltage and power consumption into the Ollie. They are only $30 or less and have many beneficial uses around the house besides measuring voltage. https://www.amazon.com/P3-P4400-Electricity-Usage-Monitor/dp/B00009MDBU?th=1
1 point
-
Yup still have them on my 2023, and also have one that failed and replaced by Oliver!1 point
-
The picture I posted is from under the aft dinette seat between the hulls - there is nothing at all to see from the seating area under the dinette. In the picture I posted - the "white" area that is behind the aluminum switch holder is actually looking through the hole of the propane/co alarm from the inside to the outside area under the dinette. Sorry but I don't have any other pics of the "full" installation which would show the actual switch. However, the switch is simply mounted in that hole you can see in the aluminum mount. Hope this helps. Bill p.s. here is a better pic taken from JD's post on the subject:1 point
-
As a safety precaution, check your "gas stop" brand pigtail for leaks. Both of mine had small leaks at the 90 degree bend where the chrome fitting goes into the brass elbow. I'm send them back soon and trying a different brand. Probably bad luck but I figured to just try another brand. John1 point


.thumb.jpg.e34bf01ef7f7d5e99ad31856d45afbeb.jpg)


-
Recent Achievements
-


")


")


