Leaderboard


Popular Content
Showing content with the highest reputation on 11/29/2023 in all areas
-
Just saw this and thought I would pass it along. Well done Oliver! 🇺🇸 Patriot🇺🇸4 points
-
@Rivernerd's suggestion is spot-on. Renogy products are top-notch, IMO. Making the 4/0 (pronounced, "FOUR-Ought") and 6AWG (American Wire Gauge) cables for your new 12vDC battery bank is not difficult, if you've got the tools for it and your engineer grandson is experienced in such matters. Cable cutters, a crimper tool, terminals, cable material, and proper heat shrink material are available from Amazon (no surprise there). Custom-fit cables are efficient in terms of the space they'll occupy in the tight quarters of the battery box - plus, they make the array appear neat and tidy. Being the Christmas Season, these tools would be nice stocking stuffers (get a big sock) for your engineer grandson if he doesn't already have them! HO, Ho, ho! Cheers!
 4 points
 -
Hi Steve and welcome to the forum. Although the company designs the campers to withstand colder temps, they are by no means designed for arctic temperatures. But if you are in temps in the teens or above, the camper is going to do fine with a few precautions. Of course that's providing you run the furnace continually and are prepared for the unexpected. Propane supply would be critical and a back up generator and space heater would be a smart idea. There are some slightly vulnerable points in the basement utility space on the street side that need to be monitored. Other than that, they actually do pretty good. Of course if you choose a composting toilet and winterize your water system, you can actually do just fine in colder temps without worry. One thing you will learn with research is that there's very few if any mass produced RVs on the market that are designed for continuous use in frigid temps. And even the opposite weather conditions can be a challenge for many RVs on the market. We camped in north Texas late this summer and temps were in the 100+ range each day. Most of the campers in the park were struggling to maintain comfortable temps inside their RVs, many of which had 2 or three AC units on the roof. Our LE2 with the Truma Aventa stayed comfortable inside regardless and the AC compressor would cycle like normal when it reached temperature. We have yet to need the higher fan speeds to maintain comfortable temps inside the camper. A nice thing about the Elite 2 with the Lithium Platinum package is that with the large battery capacity and the 3000 watt inverter, you can still run the AC for an hour or two before bed to sleep in comfort even when dry camping, provided you have good sunshine during the day to recharge. We've experimented with this several times this summer and the system works great in that way. Few other campers have a factory available system that compares. Anyway you're in the right place to get honest feedback from owners regarding their experiences. Most of us are just ahead of you on the same path. We wanted one good camper that would fulfill our needs with as little trouble as possible and not look back. Stacie and I are convinced we made the right choice. Good luck in your research.4 points
-
Note the absence of snow. And the fact that you can't see the actors' breath. They are wearing what would pass for fall or spring gear in Idaho, with no hats. This is consistent with my earlier observation that the stock Oliver is a "4-season trailer" where it is made, in the Southern USA. It would also be useful in winter in many parts of Western Washington, Oregon or British Columbia (such as the coast, where it rarely snows). But, without significant modifications, it is not a true "4-season trailer" for use in Idaho, Montana, Northern Utah, the Northern Great Plains, New England, Canada East of the Rockies, etc.4 points
-
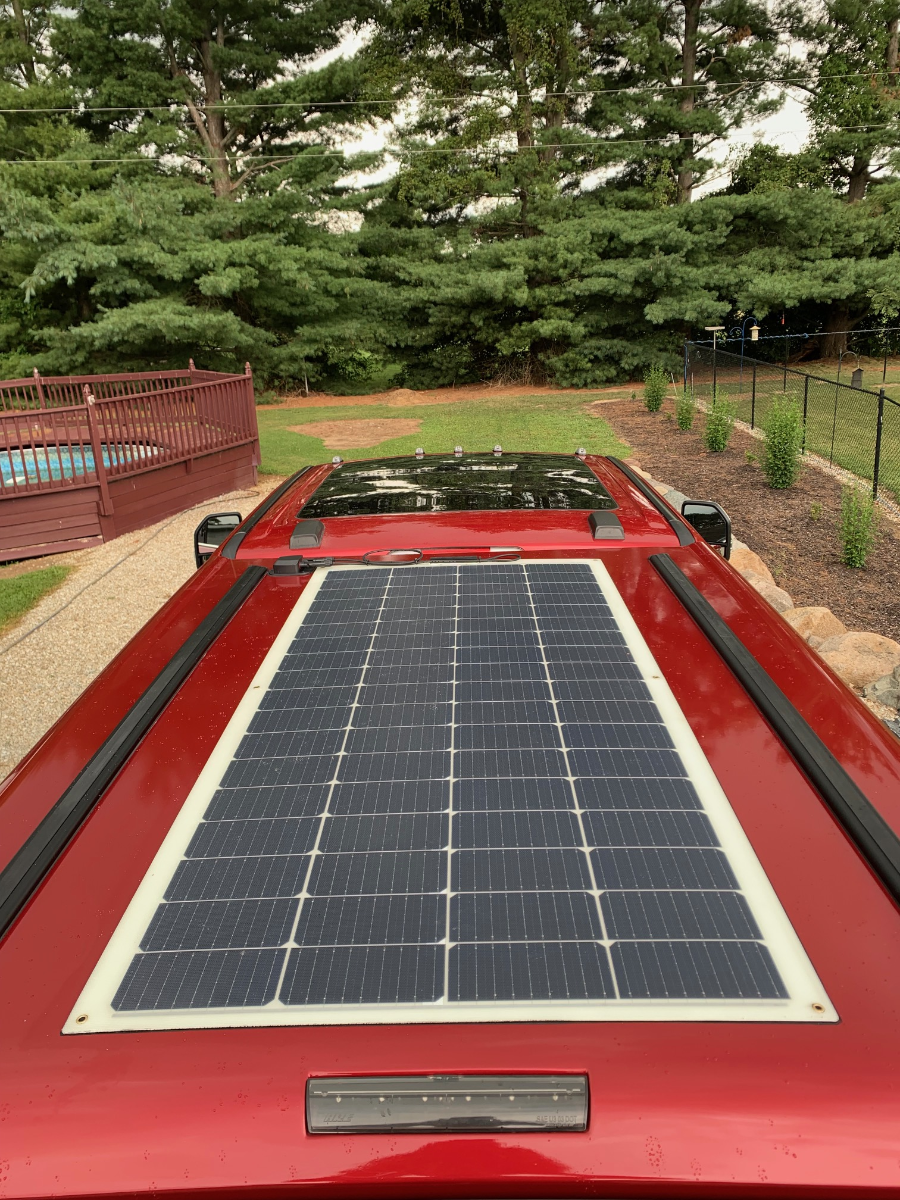
That's interesting because Renogy recommends mounting with silicone adhesive directly to the roof of the boat/RV. And they recommend this to eliminate the need to drill holes in the structure. They also say they are designed to operate normally up to 176 deg. and carry a five year warranty under these recommendations. I'm not saying they're impervious to heat damage, but according to this company, there flexible panels were designed for exactly this type of application. I purchased the 200w 12v Renogy Flex panel for my charging needs for a lithium battery pack in the truck that runs my portable fridge/freezer. I'm quite pleased with the installation and function so fare. My biggest worry was whether the panel would come loose with thermal expansion and contraction. Time will tell on this front but since the camper shell is fiberglass resin construction and the Renogy panel is as well, the rate of expansion and contraction should be similar. And the silicone adhesive remains flexible when set up so it does allow a margin of flex. We'll see. I only used a 3/8" bead around the perimeter. Once rolled flat it probably spread around and inch wide squeezing out to for a nice bead around the perimeter. I think flexible panel technology has come a long way like so many other types of technology. I may be a test case for direct mounting but at least I have a 5 year warranty backing up the experiment. Here's to trusting the manufacturer's recommendations. 🍻😉
4 points
-
While I have been very busy in the shop this holiday season and I took the time this week to update my catalog of Oliver upgrades. This version I have add four new products – A new version of my shower mat called The Slate, A curb & driver side Back Cabinet Shelf divider, The Hocken Footstool for those with composting toilets as well as, an Oak Knife Holder that drops into my Flatware organizer. Looking to add some warmth to you Oliver with wood countertops and other accessories or just want to be a little more organized? I have a world of possibilities for you. You can download the new 2024 Catalog here: https://drive.google.com/file/d/17XFL_5ine1WusHVKYguUBRmkj2KnJUN_/view?usp=sharing Onward, Foy Sperring
3 points
-
Parks Canada has announced that visitors will be able to book reservations for the 2024 season beginning in January. This is months earlier than was possible last year. The actual Parks Canada reservation launch dates are now available on the Parks Canada website. Reservations for certain popular campgrounds go quickly. To avoid disappointment, Oliver owners planning a trip to (or through) Canada should mark their calendars now and make their reservations early on the launch dates. See https://reservation.pc.gc.ca for more information.3 points
-
We hit 17 deg f. last night in central Indiana, with a high of 26 today. Checked the sensors in the Oliver on my phone and cabin was 63 with the space heater working fine. Glad I winterized because both basement spaces were reading in low 20s this morning. Before we winter camp with water in the systems I will install provisions for circulating warm air through these critical areas and set the sensors up to notify me when they hit the 40 deg mark. Without the furnace heating the cabin we have no heat being produced in the basement spaces. But in case of a failure you still have to have a plan. At the very least we would want to have time to drain and pump some anti-freeze through the system. I think a decent amount of addition insulation in key areas will be a summer project next year, followed by an air circulation system to draw cabin air into critical spaces. I do love the Yolink monitors we installed in various locations. It's nice to be able to monitor temps inside and out in a moments notice from anywhere.3 points
-
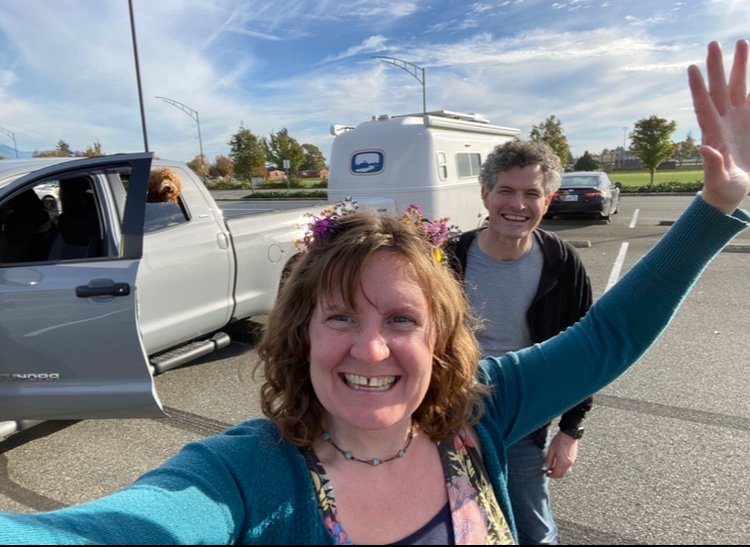
Hi Everyone, we just bought hull #1147! We spent the past few weeks cleaning and performing some minor maintenance on this LE2. We just went on a weekend camping trip to Larabee park in Bellingham WA and it is such a nice little camper. Our kids have grown up and left home and this new to us camper is going to be our getaway plan for weekends and vacations! Anyhow we are looking forward to getting to know and learning from you all.
2 points
-
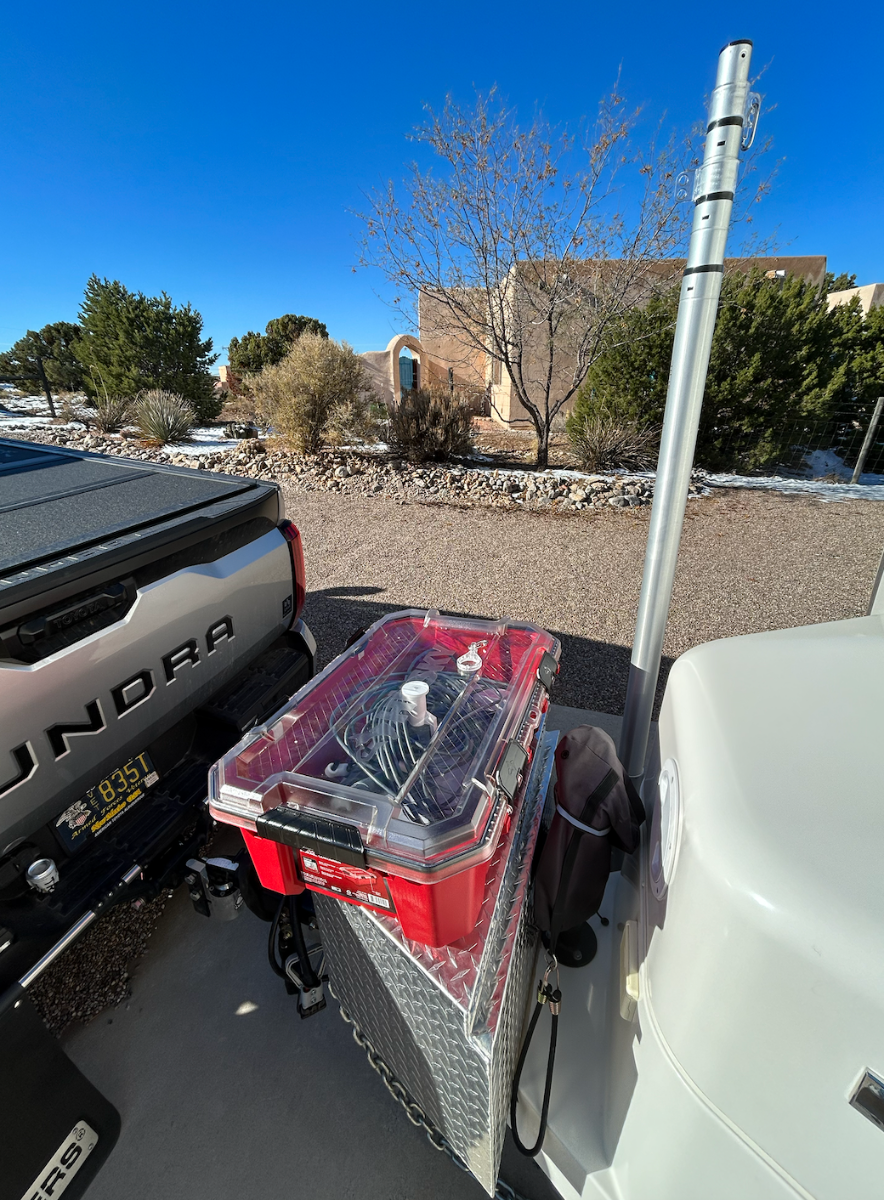
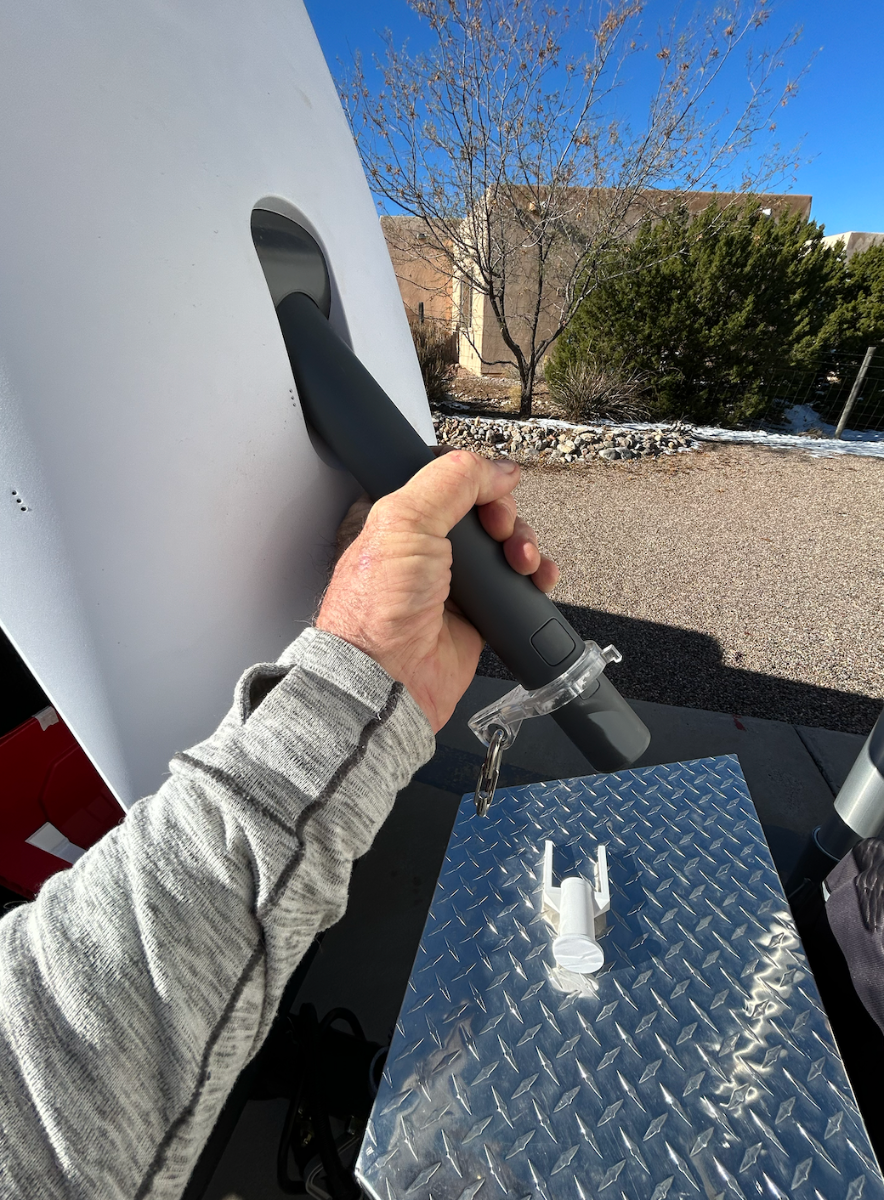
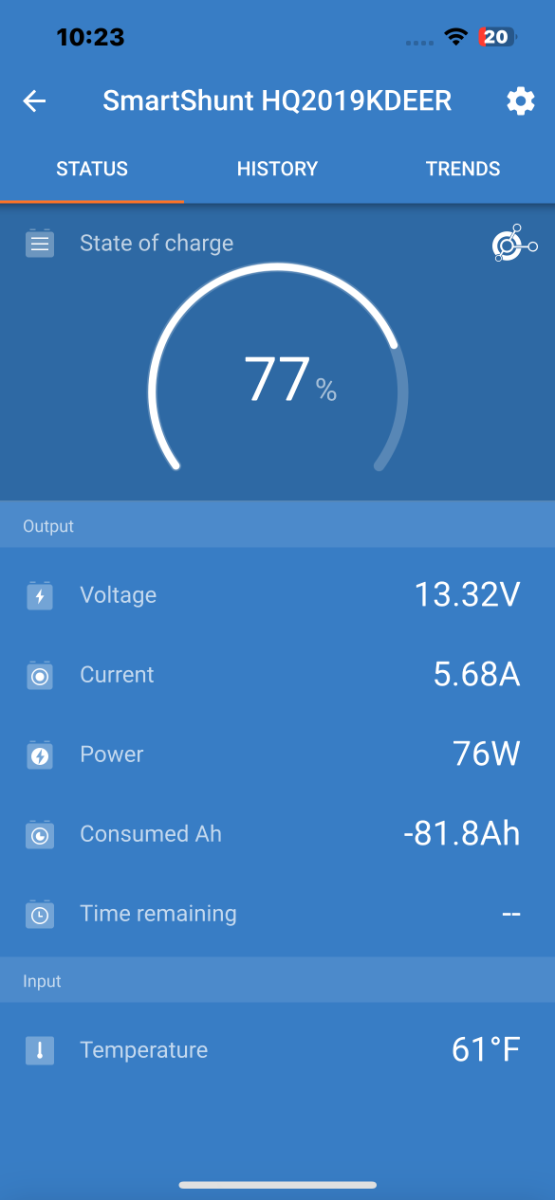
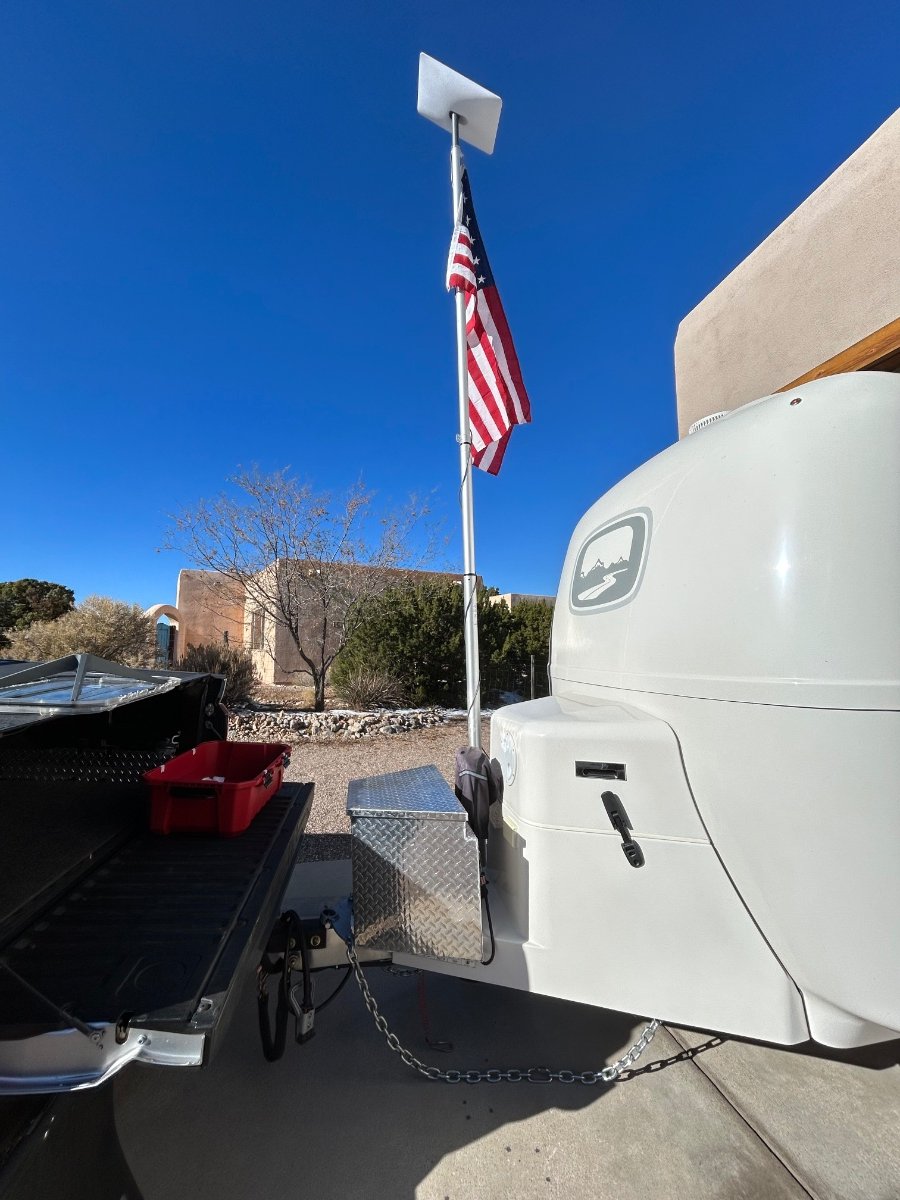
So, since D works from home and spends quite a bit of time on Zoom, Teams, etc., we decided to get into a Starlink-Mobile kit. The kit will allow her to work from Casa Blanca with Starlink's scorching fast internet connectivity and allow us to travel more often. Today we played around with a proof of concept for using Starlink in our Oliver - there are literally dozens of YouTube vids and deep rabbit holes for ideas of how to integrate Starlink with RVs. Here's how we'll be lugging is around: We're using a 12-gallon plastic Husky tote with custom-fit travel pieces from Etsy to keep components from bouncing around when towing. Its a neat and tidy mobile kit. Next, we didn't want to use the Starlink-supplied "quad stand" so we modified the top of our E-Z Flag Pole to accommodate the "Dishy" mount that would normally be inserted into the stand. We inserted an adapter (a 3D print from Etsy) into the top of the E-Z pole so the Dishy just snaps inside. By drilling-out the upper mostIMG_0441.HEIC flag connector with a step-bit, we're still able to fly the colors. We used the exterior curbside AC outlet for the Starlink router power connection. With the inverter energized, it took about 10 minutes for Starlink to connect to its satellite. Energy consumption varies between 60 and 80 watts according to our Victron Smart Shunt via the Cerbo GX. The solar modules are generating about 180watts at today's low sun angle, which more than makes up for the inverter/Starlink consumption. We'll likely put a through-hull connection using a modified waterproof Furrion capped connection (same one OTT uses for the satellite coax connection). The standard supplied cable is 75' and needs to be shortened anyway - so we'll do that when we install the modified Furrion. More later...
2 points
-
Hello everyone! I've been lurking for a while as we whittle down the long list of TT's to our final few options. Too new to have a fun couples' handle in the forum. No surprise that Oliver has risen to the top in our search, since we're wanting to camp in Spring and Fall in Colorado (which would sometimes equal Winter elsewhere). I've been most impressed with the posts here, though I'm wondering at the posts talking about mods for cold weather (despite the marketing as a "true" 4-season trailer). I'd love to hear some estimates of comfortable cold-weather ranges with no insulation mods. As we get closer to retirement (and get our tow vehicle), we'll make our final choice. And I want to be sure we're buying our LAST trailer the first time around ;). Thanks! Steve Lovaas2 points
-
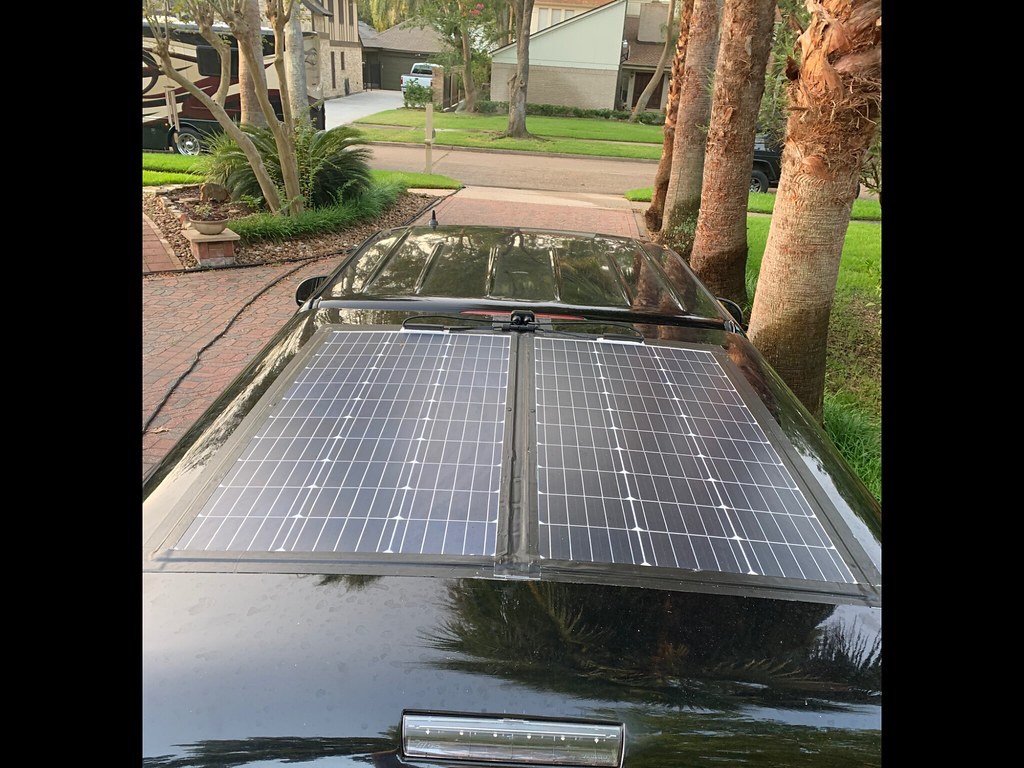
I added 200W of flexible solar panels atop the TV bed cap for the same purpose. Been great for 3.5 years! Since I did not opt for solar in my build, I’m now geared up to install a solar port at the propane tank housing to enable use of said panels to charge the OTT’s house batteries, as boondocking has become more frequent for me. Also adding a solar port outside at the rear basement hatch, inline with the other two ports for sat/cable TV. I plan to get a portable folding solar panel to further increase solar input.
2 points
-
2 points
-
Ronbrinks light the next morning.2 points
-
Welcome to the conversation. It is important to note that I have not received my Oliver yet, but I am a winter camper. With that said, I must offer up a caveat. I live in Texas, so winter for me would be equal to Spring or Fall for you. One of the many reasons I sprung for the Oliver is its ability to handle colder weather. Oliver's website states that their trailer is four-season, but I figured that it would fall into the Tennessee four-season range rather than the Arctic range. I'm not a summer guy. When it hits 85 degrees, I'm done camping. I like cold weather, warm fires and hiking when I don't have to sweat my clothes through. After owning several different rigs, I went with the Oliver. It will likely see Colorado Winters during Elk season, but not until I add a few modifications to allow it to handle prolonged sub-zero temperatures.2 points
-
Grandson explained the confusion to me...I just ordered the batteries from Home Depot!! Thank you so much for helping me!! I am going to be boon docking for the first time at the end of December. I am excited to be trying something new to me..after all I am almost 77 years old and will be solo camping as usual!!2 points
-
You are correct about the technology. I was thinking back to my truck camper days, where there was a flexible panel that got fried. There was a lot said about air flow. If the mfg. is calling for adhering to the roof surface then they would have tested. I stand corrected🙃2 points
-
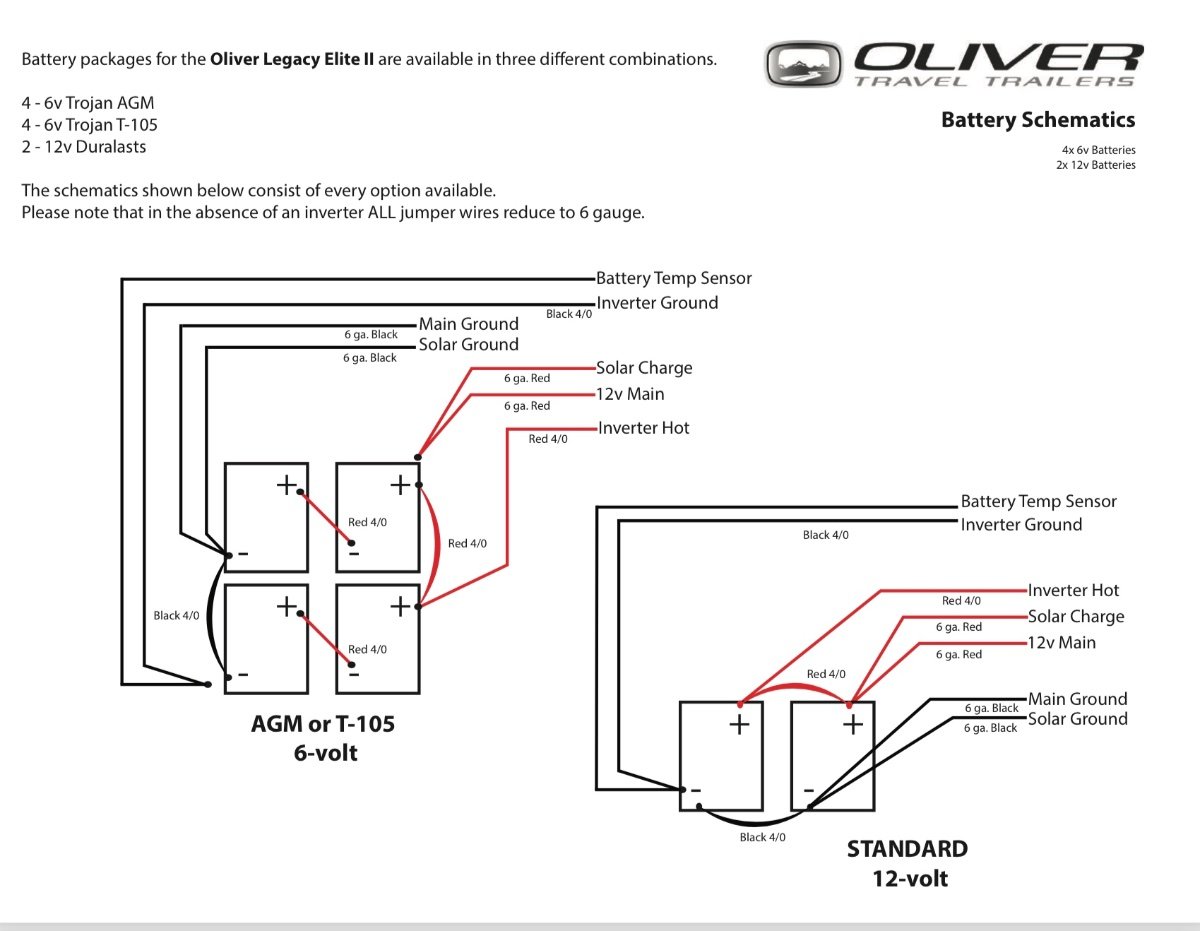
Your engineer grandson can surely follow the simple wiring diagram posted by Mossemi above to enable you to install much-more-available 12V AGM batteries rather than the harder-to-find 6V AGMs. "4/0" and "6 ga." (or AWG) should be wire sizes with which he is familiar. The key is fitting the replacement batteries into the Elite II battery tray. Once your battery box is re-wired for 12V, your will be set for the next time you need replacement batteries. I recommend you measure the "footprint" of your battery tray, provide it to your engineer grandson, then look for 12V AGM batteries that will fit within that footprint. Since you rarely boondock, maxing out the space available in the battery tray is not essential for you. You just need enough amp hours to get you by when not connected to shore power, not the maximum number of amp hours possible in that space (which is what Oliver does when installing AGMs at the factory). For example, you can buy (3) 100Ah 12V Renogy AGM batteries from HomeDepot.com today and have them shipped to your home, with free delivery. The price is good, at $190 each+tax. They will provide you with 300 Ah of 12V power, which should be fine for your camping style. At 6.9" W x 13.1" D x 8.6" H, all three should fit in your battery tray, it if is the same size as the one in my 2022 Elite II (14.2" W x 21.1" D). See link below: https://www.homedepot.com/p/Renogy-Deep-Cycle-AGM-Battery-12-Volt-100Ah-Safe-Charge-Most-Home-Appliances-for-RV-Off-Grid-Solar-System-Maintenance-Free-BATT-AGM12-100/303412933?source=shoppingads&locale=en-US&srsltid=AfmBOorSneKvTVWw2r3sIKlQ45WwEGlz22BrxiHdIMFves4CLf8EQjveME4#overlay That is what I would do in your shoes. Great price, sensible solution given how you use your Oliver. Once your grandson rewires your battery box for 12V (any additional 4/0 or 6AWG wire needed for the rewire should also be available at any Home Depot retail store), you should be good to go. Good luck! And, please post the solution you end up with.2 points
-
https://www.amazon.com/gp/product/B0B7V8ZT6L/ref=ppx_yo_dt_b_asin_title_o05_s00?ie=UTF8&psc=12 points
-
We left Palmetto SP yesterday afternoon to have a late lunch in San Antonio, and upon return a few hours later the touch light above the sink was fading in and out. Strange, because no lights were left On. This is one of the lights previously mentioned with a prior problem, but this was a first for this anomaly. When I touched the light it went full bright, but would not turn Off! Sadly, I had to find a way to block the light since I’m a light sleeper, no pun intended! Enter a dinette seat back cushion; to no surprise, another reason for my wife to call me a ‘nut’. So to bed I went, bedcovers over my head, but awakened around 2am with a thought; the Master Light switch. In careful execution and much anxiety, flip Off, light Off; now what? So, with much curiosity, flip On, light still Off, yahoo! As not to push my luck, I returned to bed with a sense of accomplishment and drifted off to sleep once again. However upon awakening, more anxiety and curiosity; will the light come On when touched and operate normally? A resounding YES!
2 points
-
@Nan You might not understand this wiring schematic, but the battery people you get you batteries from should understand it. Mossey
2 points
-
Sounds like a great approach but I think you are being conservative on the 18% figure, if you don't turn on the inverter (very inefficient) and just use battery, you will save much more. The inverter uses about 1.5 to 2x what you would calculate for the normal ac load so there is a significant savings there. BL2 points
-
Sorry, just seeing this a month later... I would use 3M VHB 4950 tape. You must clean ALL old adhesive, down to bare metal or plastic, clean with alcohol on both surfaces. I get so many products with two-sided tape included and if the mount is important, I throw it out and use the 3M product.1 point
-
Four six volt batteries would be wired as two sets of two batteries, each wired in series to create two twelve volt sets, but the amperage would stay the same as one battery. Those two sets would then be wired in parallel to keep the voltage at twelve volts. At that point, the amperage would double to that of twice the amperage of one of the batteries. Take a picture of the wiring, take each battery and deal with it separately and follow the advice that @Rivernerd outlined above.1 point
-
Good stuff and thanks for sharing! We have Starlink at home in northern MN and it works awesome! Our OTT is put away for the winter but we were planning on getting the mobile Starlink for next summer as I also do a lot of work on the road. Thanks again!1 point
-
No, I just twist off the cover, wipe to remove any dust inside, tickle the spring a bit and reinstall the cover. Thinking either the dust interferes with the action of the spring or the spring is a little out of kilter due to ‘tapping’ the fixture as opposed to ‘lightly touching’ with the back of hand. That said, guilty as charged; if these lights don’t laminate when first touched, I invariably tap, sometimes more than once, until they come on. My bad! Just know, I am now 4 of 4 in remedying inherent issue with these lights.1 point
-
Good idea and looks better than the chrome beauty ring.1 point
-
Thats a good one. Thanks for the link.1 point
-
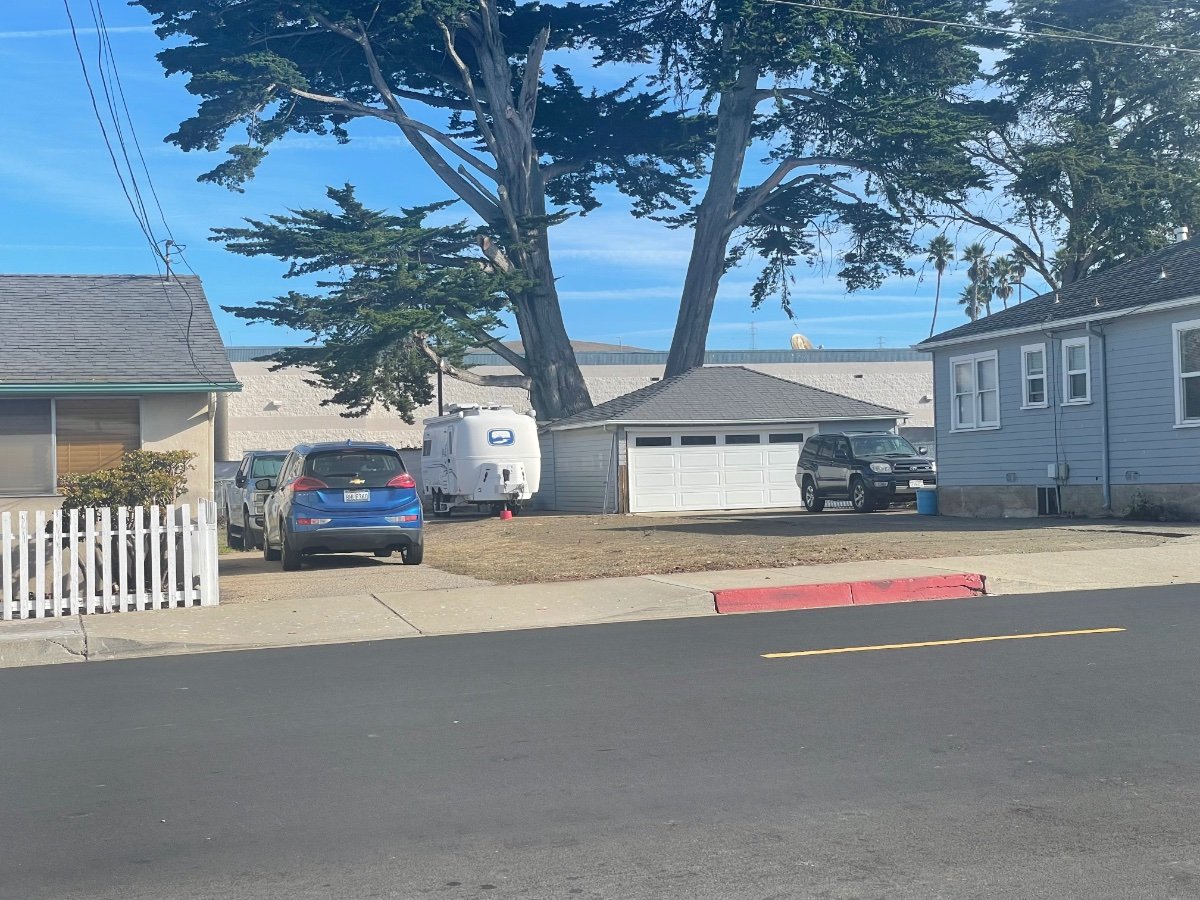
Z My daughter was waiting for a bus near a friend’s home in Morro Bay and saw this Oliie across from the stop. She should now buy a lottery ticket!
1 point
-
Of course each manufacture will have mounting recommendations for their particular panels, so obviously do your homework first. Not meant to be a correction John, just caught me off guard and had to go back and double check my method. 😳1 point
-
One of our own has a WeBoost mast mounted on suction cup kayak rollers on the back of his Oliver. You can see Steve's description about 16+ minutes into this video:1 point
-
FYI, a very simple way to keep from freezing your feet and elbows. https://olivertraveltrailers.com/forums/topic/9166-how-to-add-extra-thermal-insulation-and-foam-padding-around-the-twin-beds/ John Davies Spokane WA
1 point
-
This is Nip. He got his name because he likes to bite. Not hard, though. My wife calls him the Doods. Not sure why.
1 point
-
Still time for Cyber Monday deals. I put this kit together today for emergency tire changes and more. The little 1/2" impact is amazingly powerful, and the sockets will work for most tow vehicles and trailers. The kit stows nicely in the back corner of the truck bed. Plenty of juice to change multiple tires or just for general use. I had to use a pipe cutter to trim about 3/4" of the plastic guard from the 19mm socket to make it work on the Oliver rims, but that piece can be left on as in the picture for other uses. https://www.northerntool.com/milwaukee-m12-fuel-cordless-stubby-impact-wrench-kit-1-2in-drive-250-ft-lbs-torque-2-batteries-model-2555-22-72955 https://www.amazon.com/gp/product/B0C98ZHKQX/ref=ppx_yo_dt_b_asin_title_o01_s00?ie=UTF8&psc=1&tag=fordtremor06-20
1 point
-
Totally get y'all's concerns. The key requirement for us was to get the Dishy off the ground and still be able to use it without the OTT. The EZ Pole and mount is robust - 4 nested aluminum tubes. High wind conditions would require striking the colors, lowering the dish to the 6.5-foot position and thus keeping it off the ground. FYI, in snowy conditions, the user can select the snow melt mode (more energy) via the SL app to keep accumulation at check and maintain high signal strength. There are flat mounts available for SL that we've studied - but once its flat-mounted on the roof, you're committed to that application - we wanted flexibility to use SL if we were tent camping, for example. As noted, we're also interested in a 12vDC conversion and shortening the proprietary CAT6 SL cable to save a bit of energy - but that's down the line. We want to log some more trips in the current mode first so we're better able to make an informed decision on what best meets our needs. Guys.... Beware, there are some scary rabbit holes one could fall into when researching the RV-applicable mods for SL kits... Many hours spent crawling through these tunnels. HA!1 point
-
David: Is this the InstaCrate you are using under the front dinette set? I'm been looking high and low for something like this. Thanks GJ
1 point
-
Hey, GJ! Thanks, brother... It's a work in progress for sure. Regarding your questions: 1. The E-Z Pole mast is designed with 4 nested aluminum sections with "twist-to-lock" fittings in each. To unlock, it takes about a 1/4 turn clockwise. Push the top section up first, lock, then 2nd, and 3rd. The pix show the mast at about 2/3 max height, FYI. The mast configuration gives us more use options - for example, we can use the quad-stand at the house should we lose our Xfinity/Comcast service. 2. I measured the speeds today in on the apron at 225mbs download; 28mbs upload. Basically faster than our Xfinity service. However, we've learned through some of the previously mentioned rabbit holes, that speeds vary depending on location. In some highly dense populated areas speeds can be slower, as Starlink "chokes down" speeds - same goes with remote locations. A subscriber can pay extra for guaranteed higher speeds. We've decided to try the basic plan for the time being. 3. The basic Starlink Mobile kit is $600. The Husky tote was $28 at Walmart. The custom fit packaging pieces were $50 from Etsy. The Esty pole adapter cost $15. We're planning to modify the kit (router) from AC to 12vDC. Switching to 12vDC drops power consumption by approximately 18%, FYI. I've already purchased the component parts to make the DC conversion for about $125. Parts needed are a PoI injector, 12-48vDC converter, and a standalone router. Easy peasy. 4. The Starlink Mobile monthly service is $150 - but, service is set up as "pay by the drink". If you're not planning to travel during a particular month, or your rig is in storage mode, you can access you account online and deactivate service. Only the "Mobile" option allows this feature, the "Residential" plan does not. Hope all is well on your side - best regards to June... Cheers!1 point
-
Personally, I find the touch lights very easy to use and efficient. Granted, I’ve had issue with three of them, two under cabinet and one ceiling center, but with each a simple adjustment of the spring (under cover) remedied the problem whether flickering or not coming On. And, they’re fun! When showing the Oliver to prospective buyers, they are always ‘amazed’ when I touch the lights with the back of hand, and they’re faces light up, as well!1 point
-
Thanks Everyone for the warm welcome! We are glad to be here. Although we are still figuring out how to use the tools to do proper replies on this forum. Lol.1 point
-
Welcome to the Family! Let us know if there is anything we can do to make the trip even more enjoyable. Be sure to let the folks at the Mothership know that you are the new owners. They have the complete file on 1147 and can let you know what services have been performed by them during its life. Bill1 point
-
If you like your job, it goes by far too quickly, if you don’t like your job… Here’s the secret to surviving it.1 point
-
Looks like your pooch in the back seat is smiling too!!!1 point
-
We all have different camping styles, and free times. We do what we can do. Whatever you choose,get out and camp, while you can. The USA and Canada offer so many opportunities. Just go do it! Explore. Have fun Meet like minded folks. We'll be camping with 15 year friends from the forum, this weekend. You never know what life brings,til you step your toe in it.1 point
-
My original plan was to wait until I retired to buy my Ollie. But, in a rare instance of good judgement, I bought two years ago and only just retired this past summer. I'm very glad I did. First, the prices have really gone up. Second, I've had two years to tinker and learn about my Ollie before taking it out on longer, more frequent trips which I'm doing now. And third, I used it as a weekend getaway where I have it stored at a friend's place and enjoyed it without even going anywhere.1 point
-
This month, I started into retirement year 17. One of my better decisions. Go for it!1 point
-
Steph and I will be handing those out in about 2 months. Can't wait!1 point
-
to a 3/4 ton with excess space. Nature abhors a vacuum!😁1 point
-
Storage initially looks like a challenge. But, we’ve found it easy to pack for a couple of months without sacrificing much. The only exception is when we’re going to be in warm weather and then cold weather, we’ll carry a large Tupperware in the back seat with winter clothes. We can fold what we need and store in the overheads plus some hang ups in the closet. The closet is large for the size of the trailer and can hold lots of stuff. All in all, over the years, we’ve found that less is more. We always have the same discussion on the way home about “why did I pack this?” Or “why did we bring that?” We carry fewer kitchen items and fewer clothes. The truck is the same, we’ve gone from an overloaded Tacoma to pretty full half tons to a 3/4 ton with excess space. Mike1 point
-
Congrats on the new rig! Glad you found the thread useful. Please make sure not to miss the Shower Beer section. 😉 I'm no longer full-timing and about 2 weeks ago I emptied the trailer while doing some routing maintenance. It took like 3 days to organize all of the junk I had been carrying in the Oliver for full-timing. Some of which I had put in there the first week I rolled out, never used, and then prompty forgotten about until I hauled it out again. So that's a data point at least. 😉1 point
-
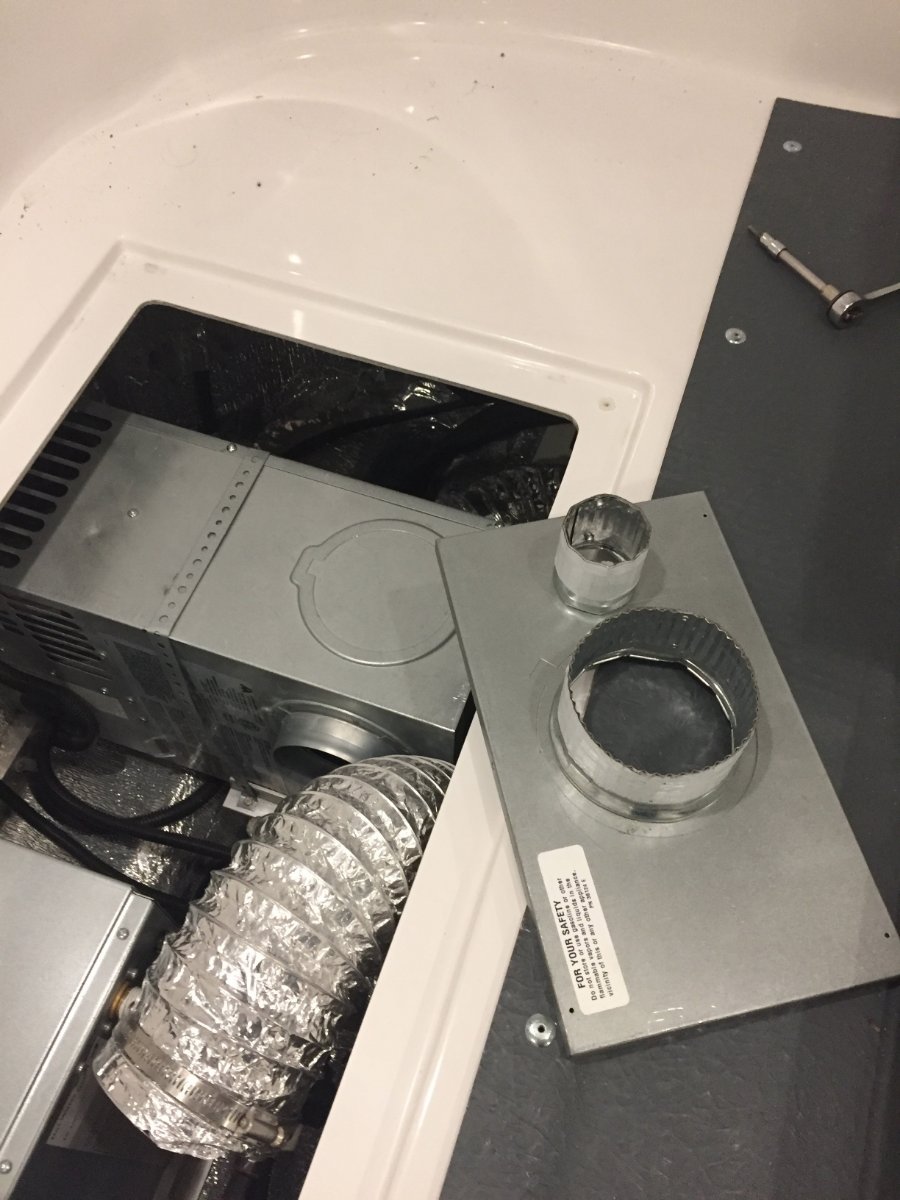
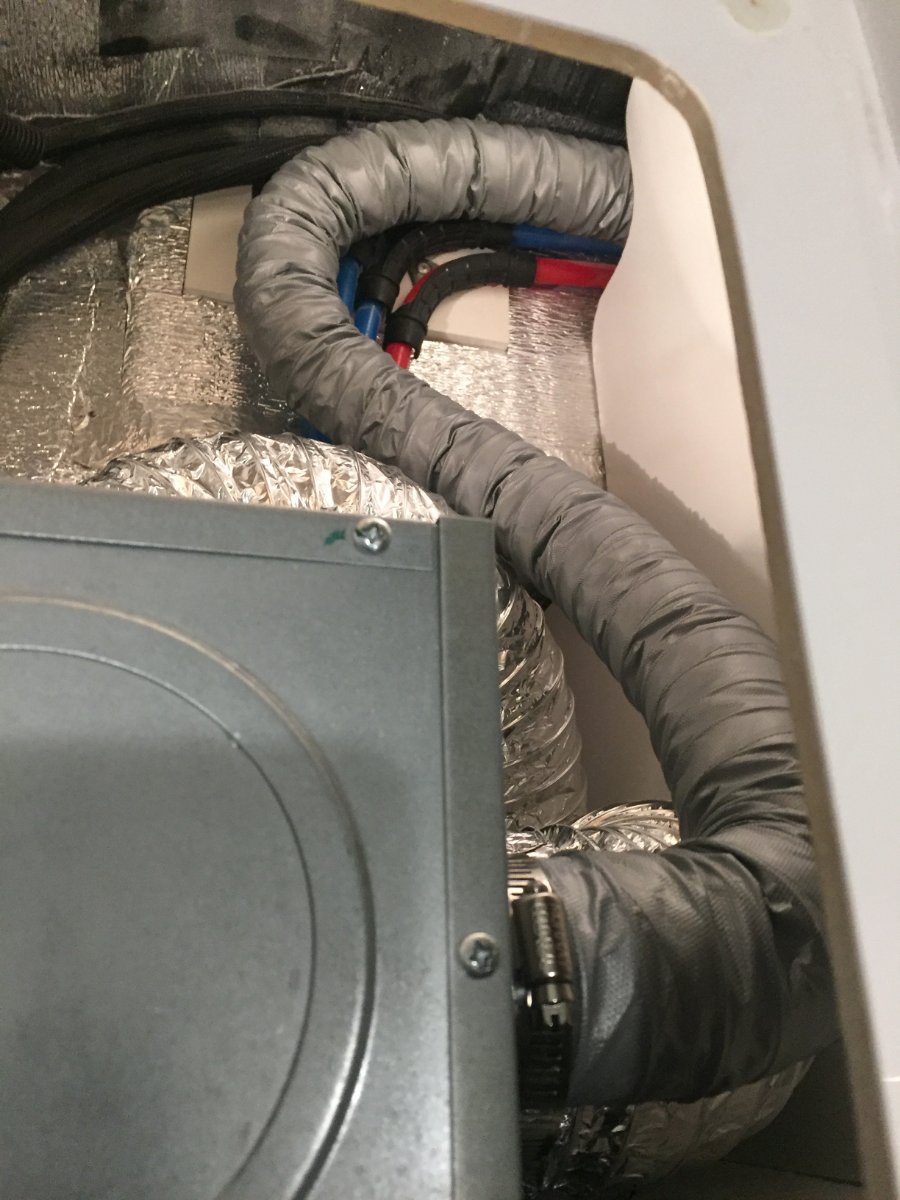
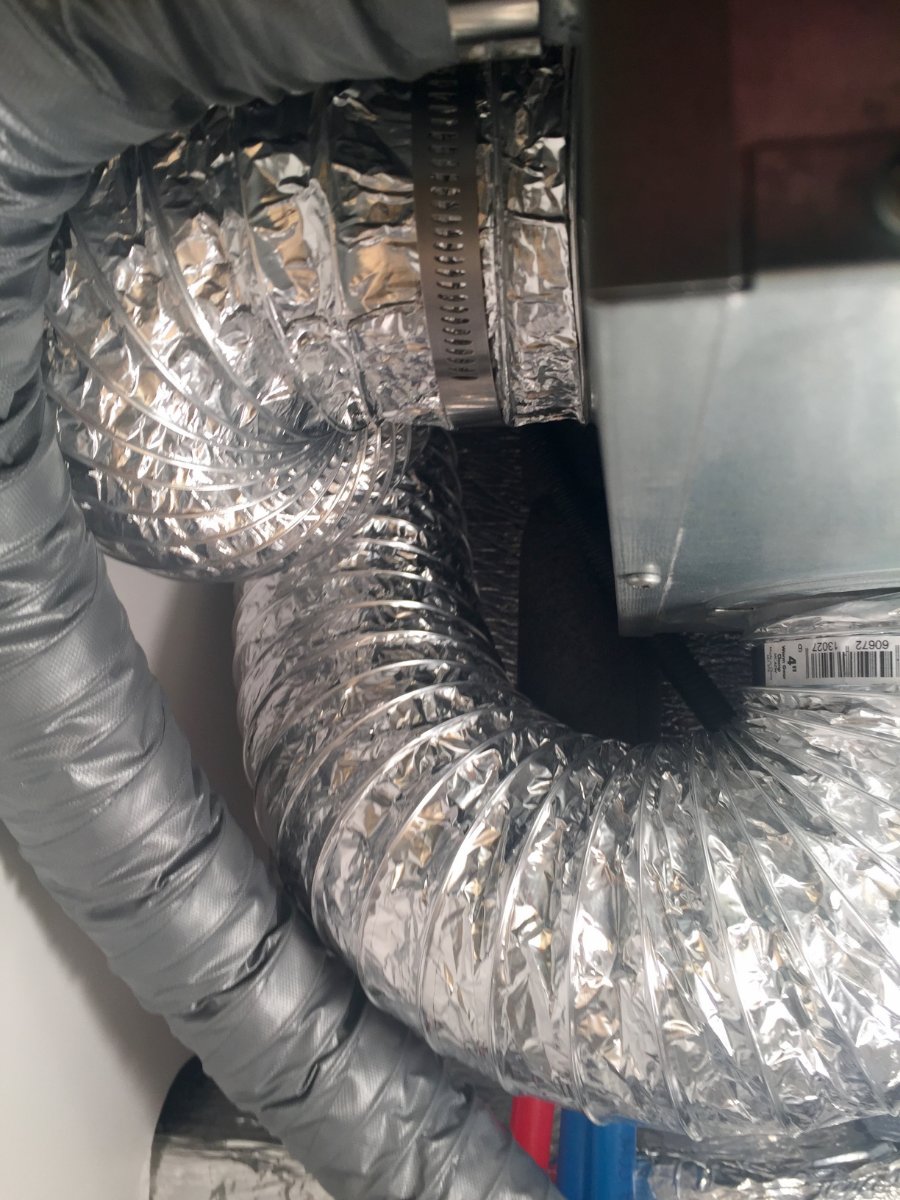
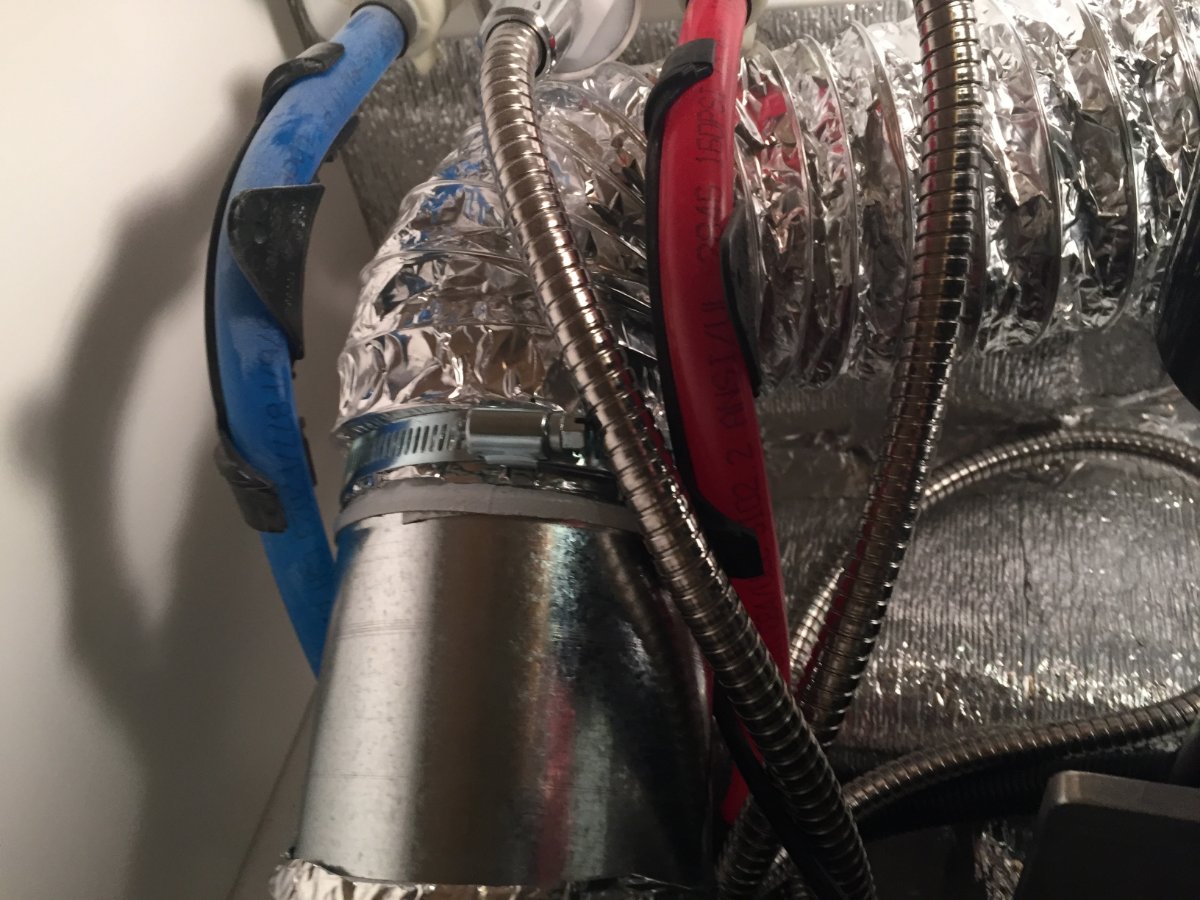
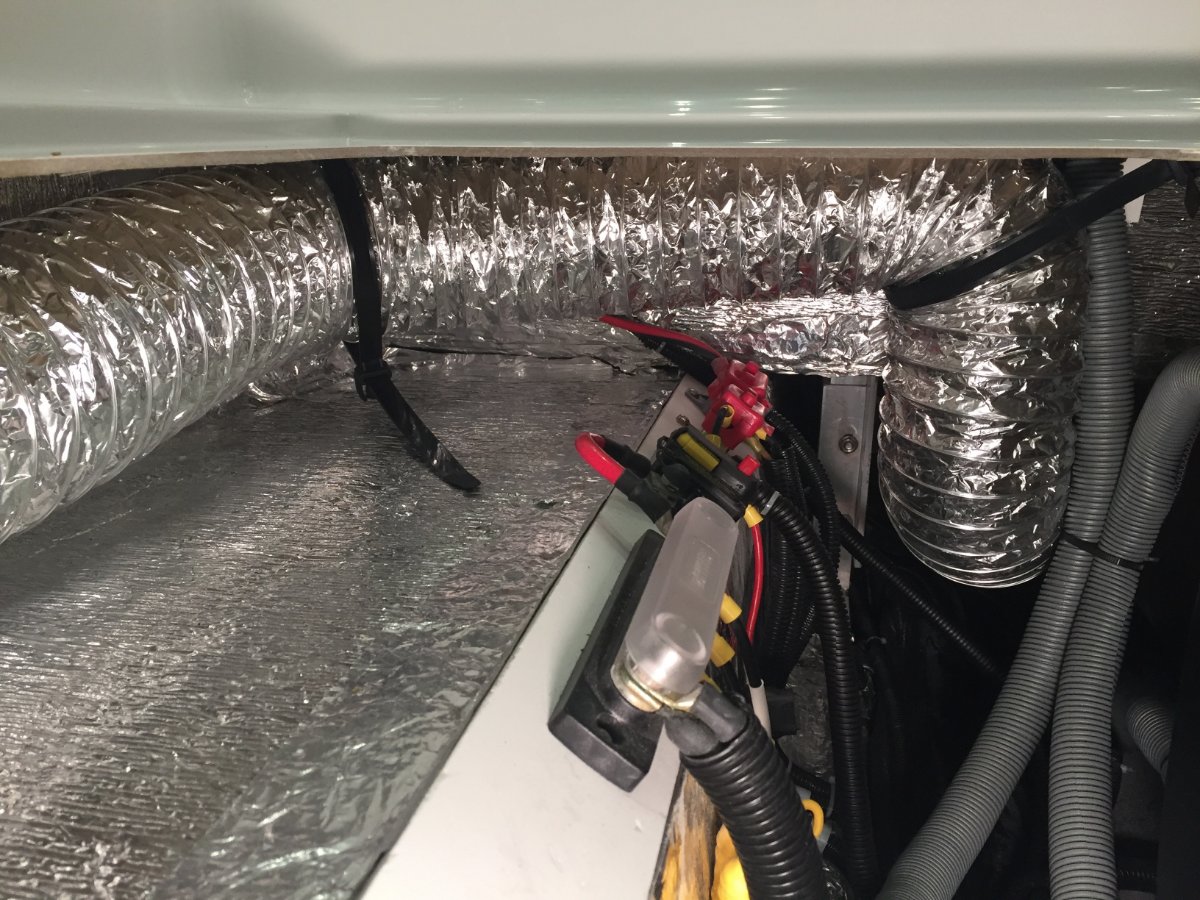
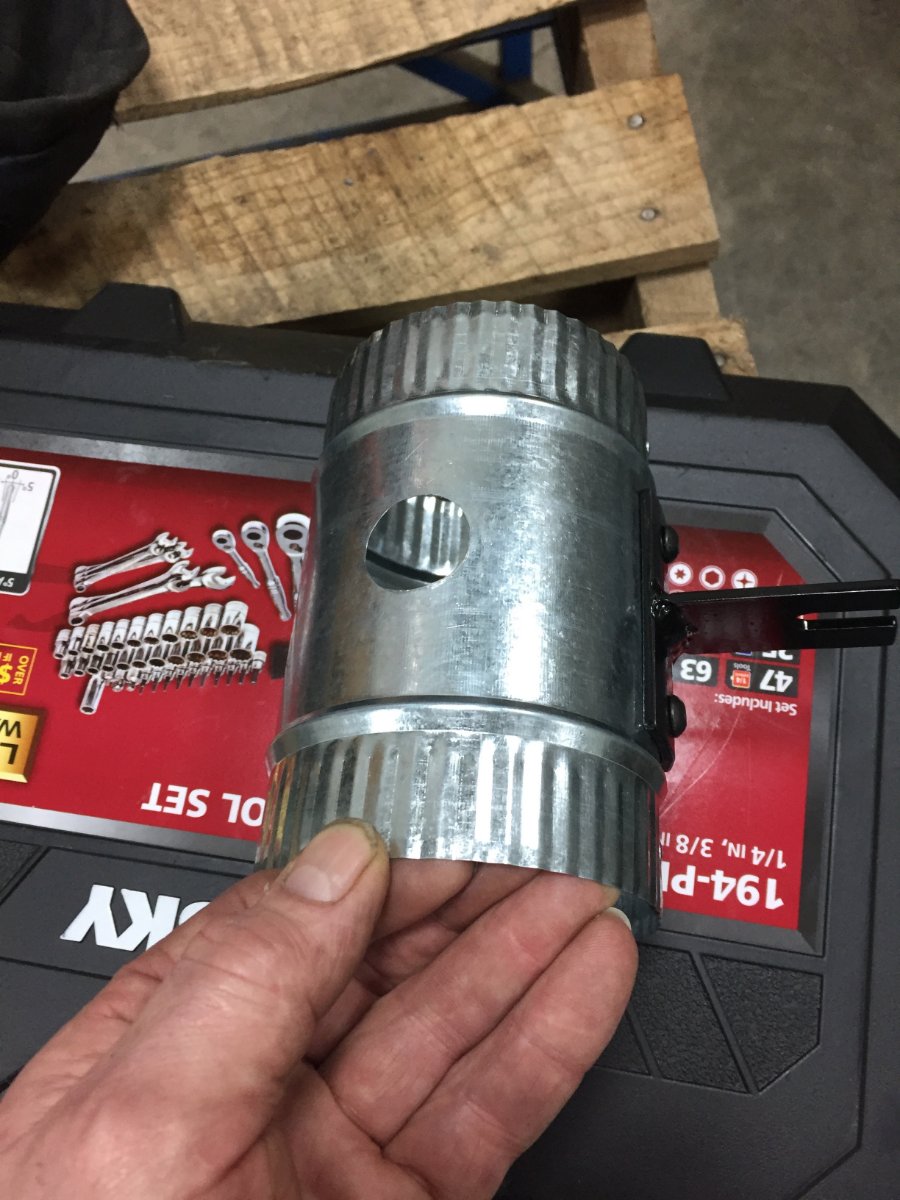
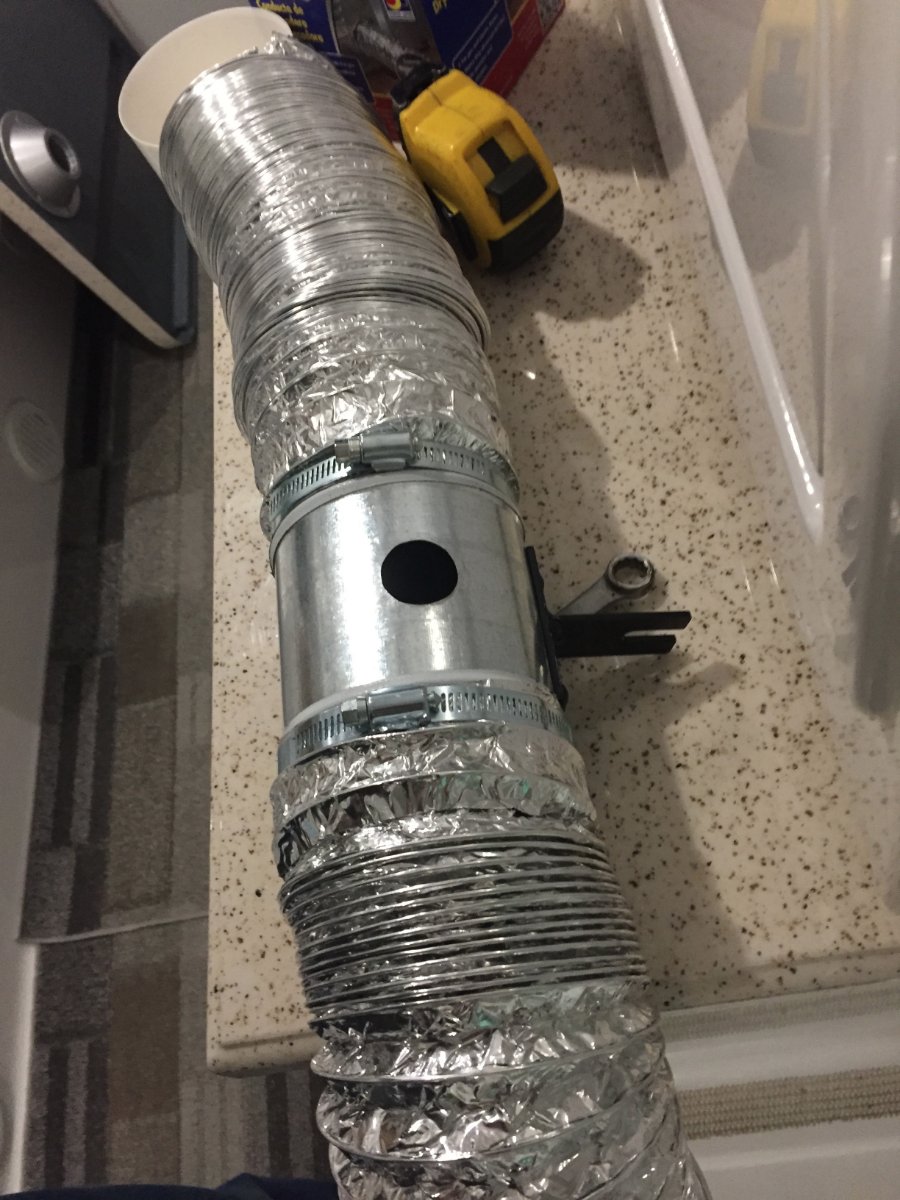
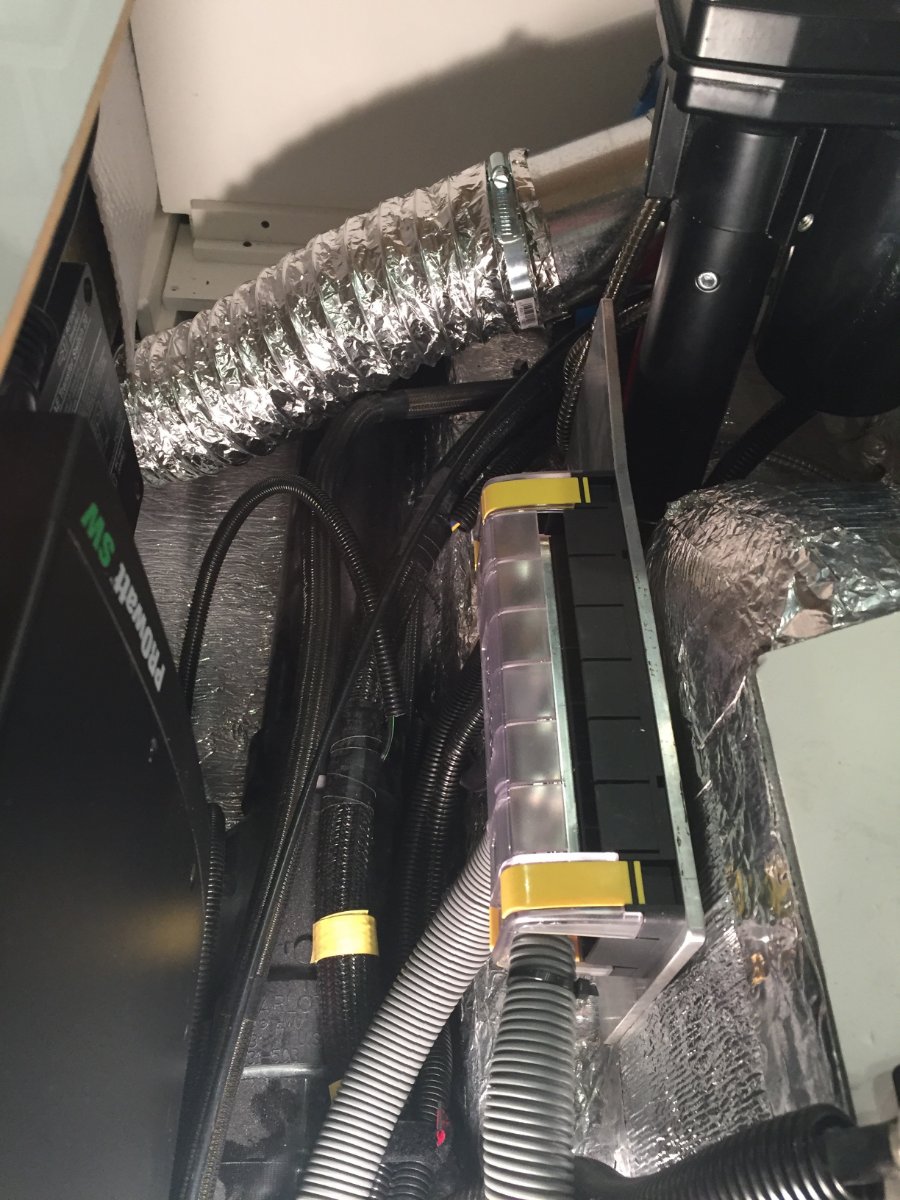
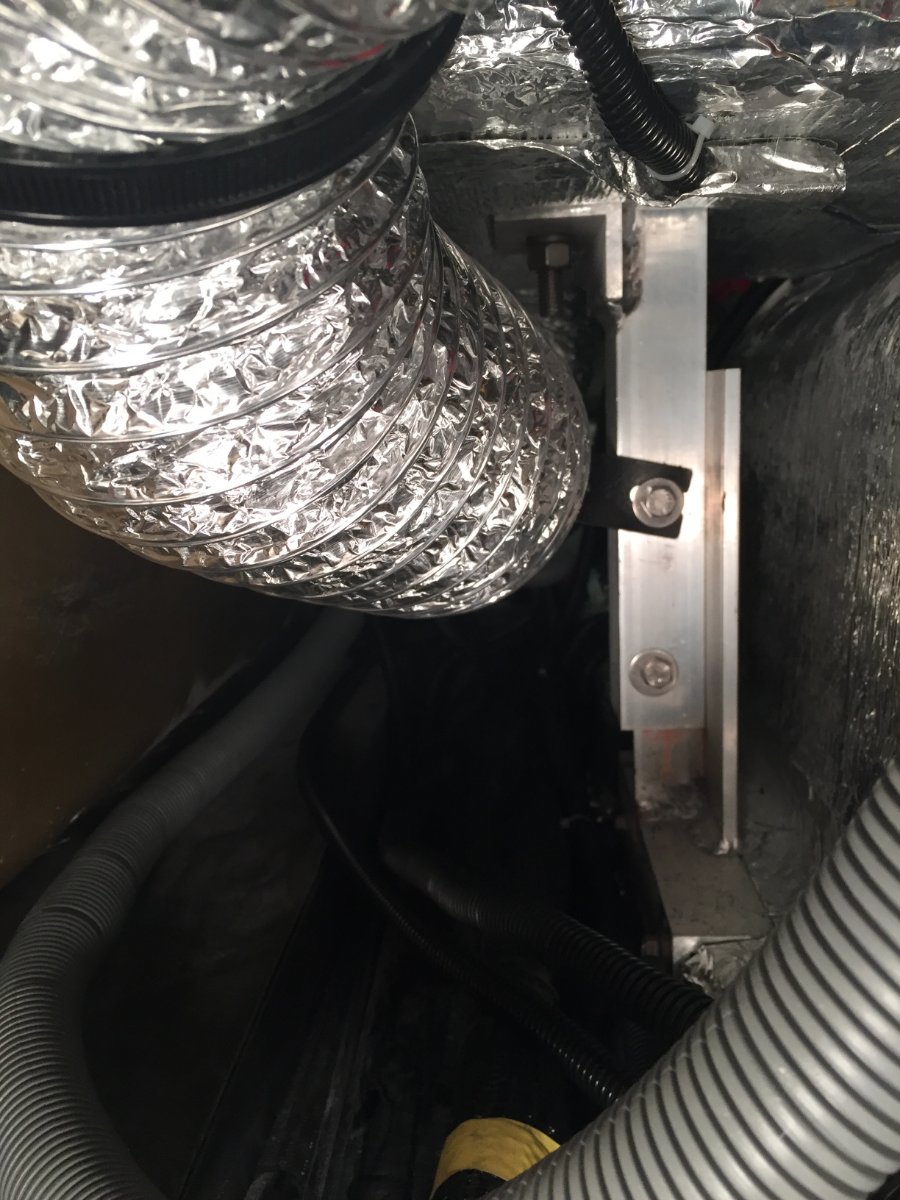
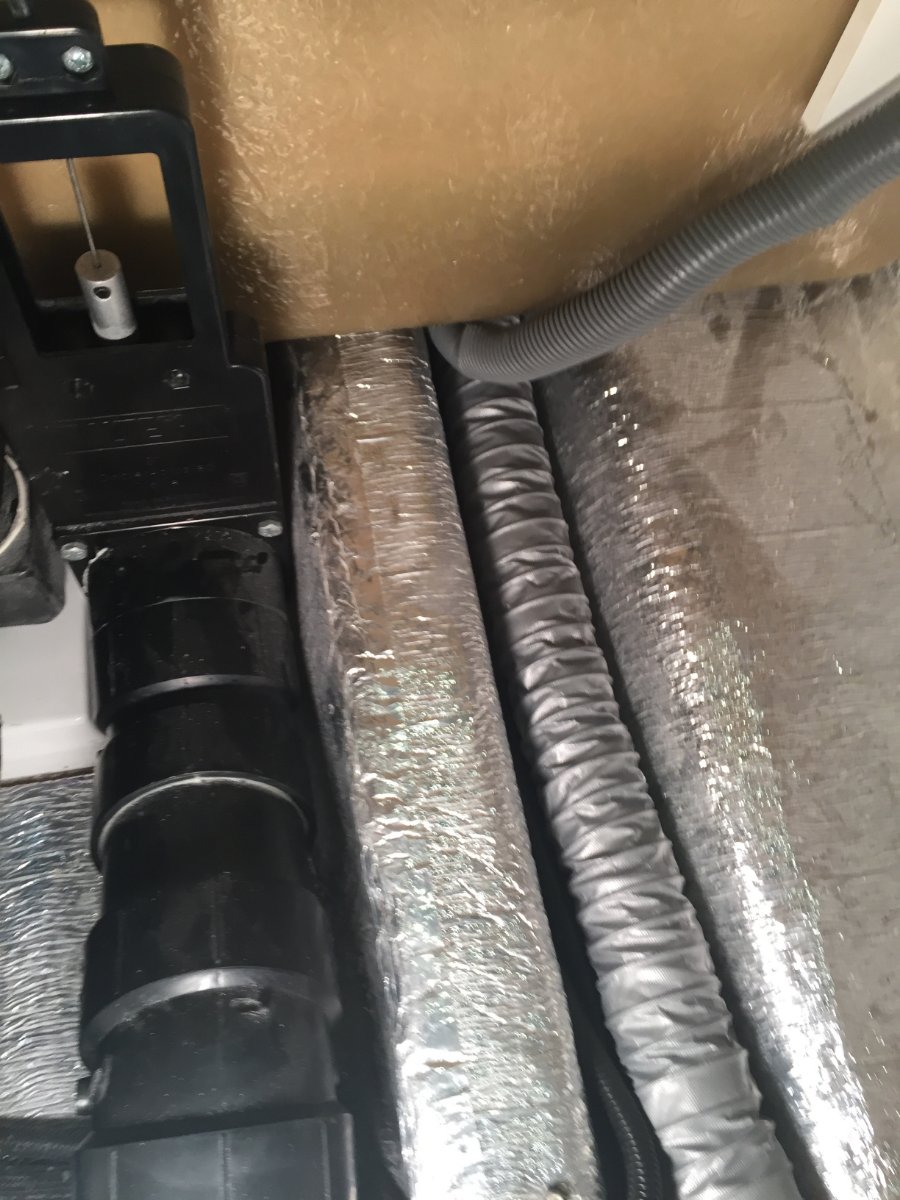
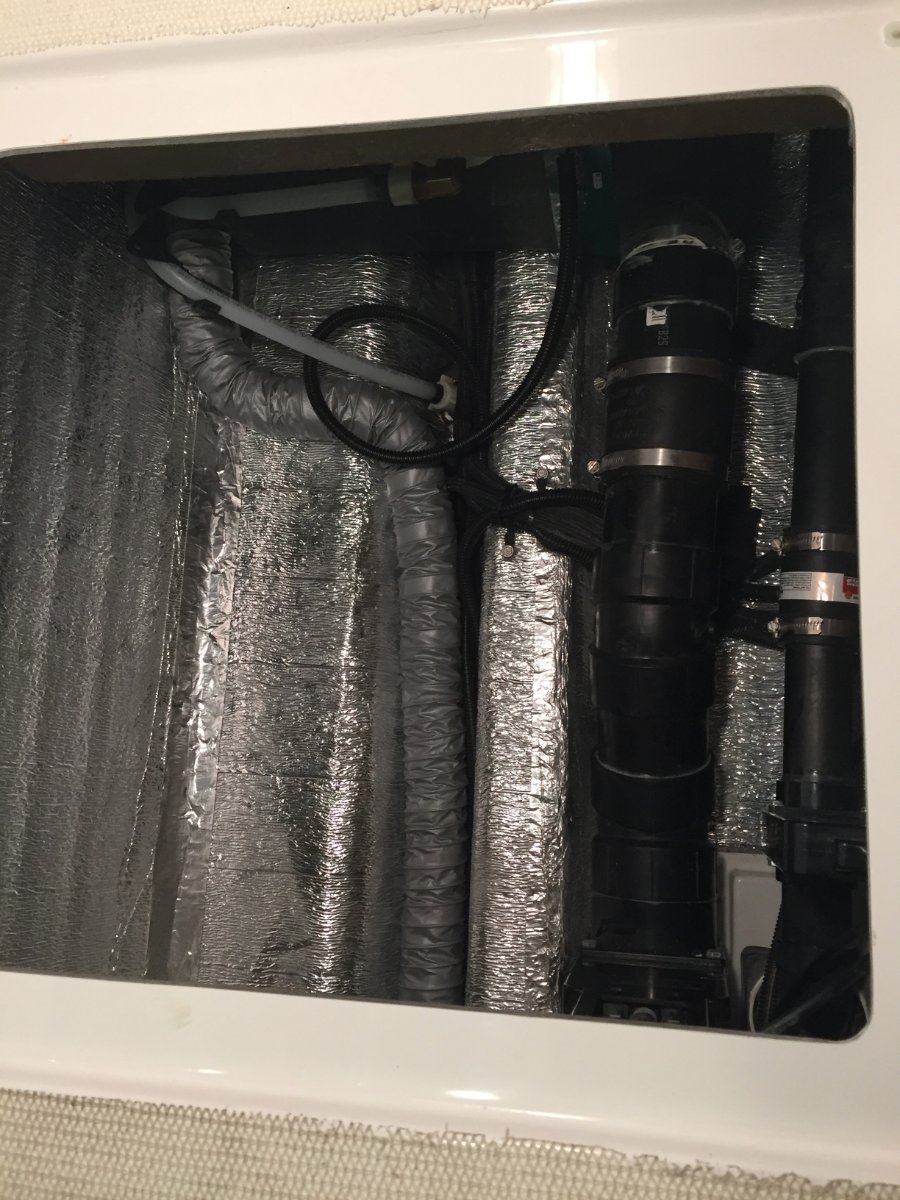
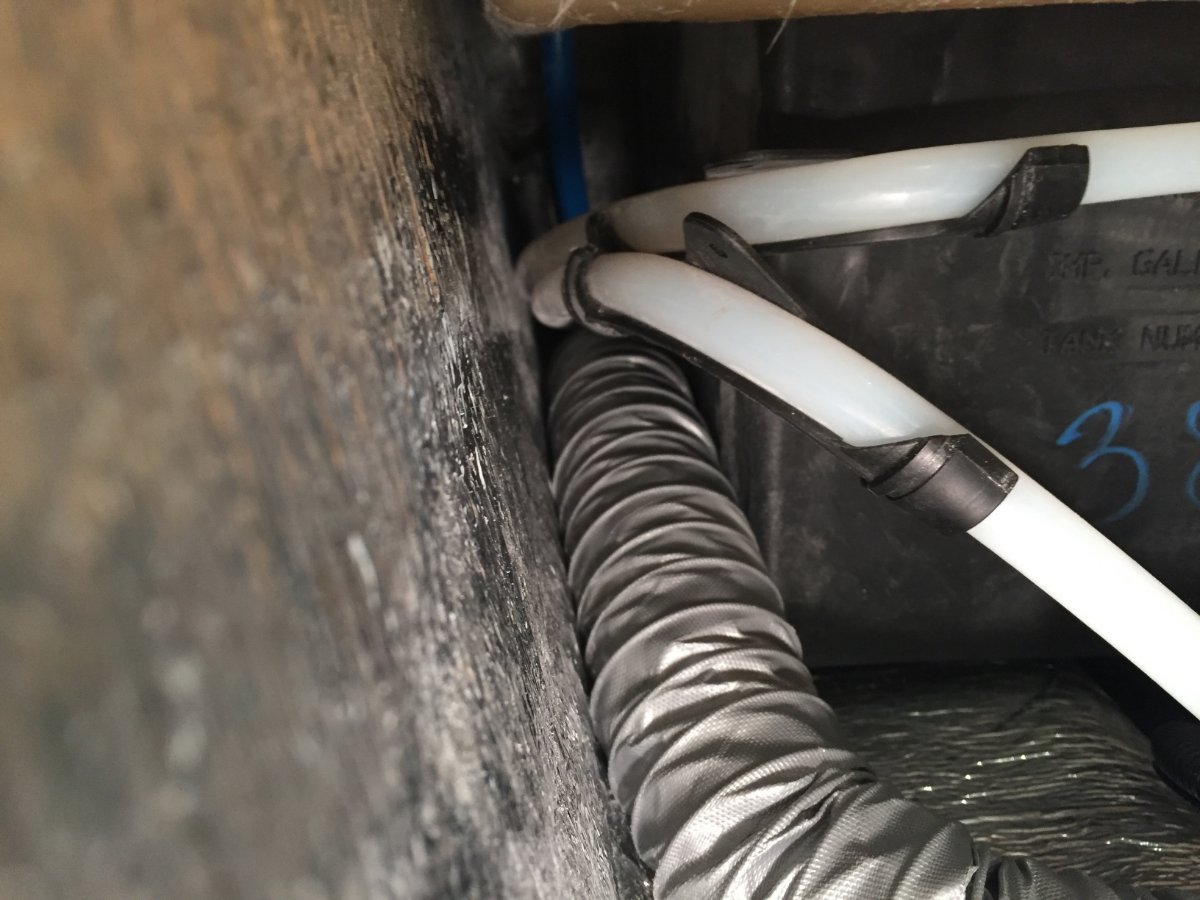
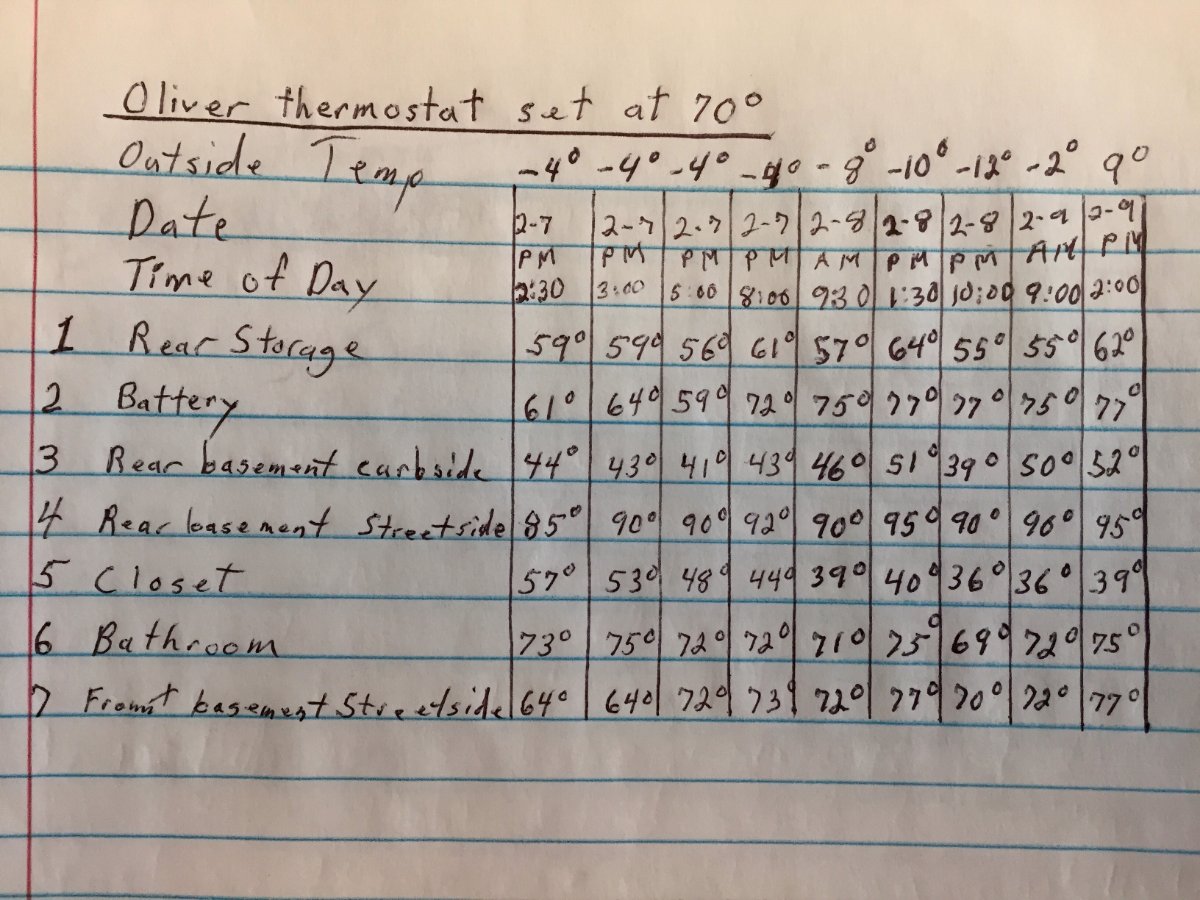
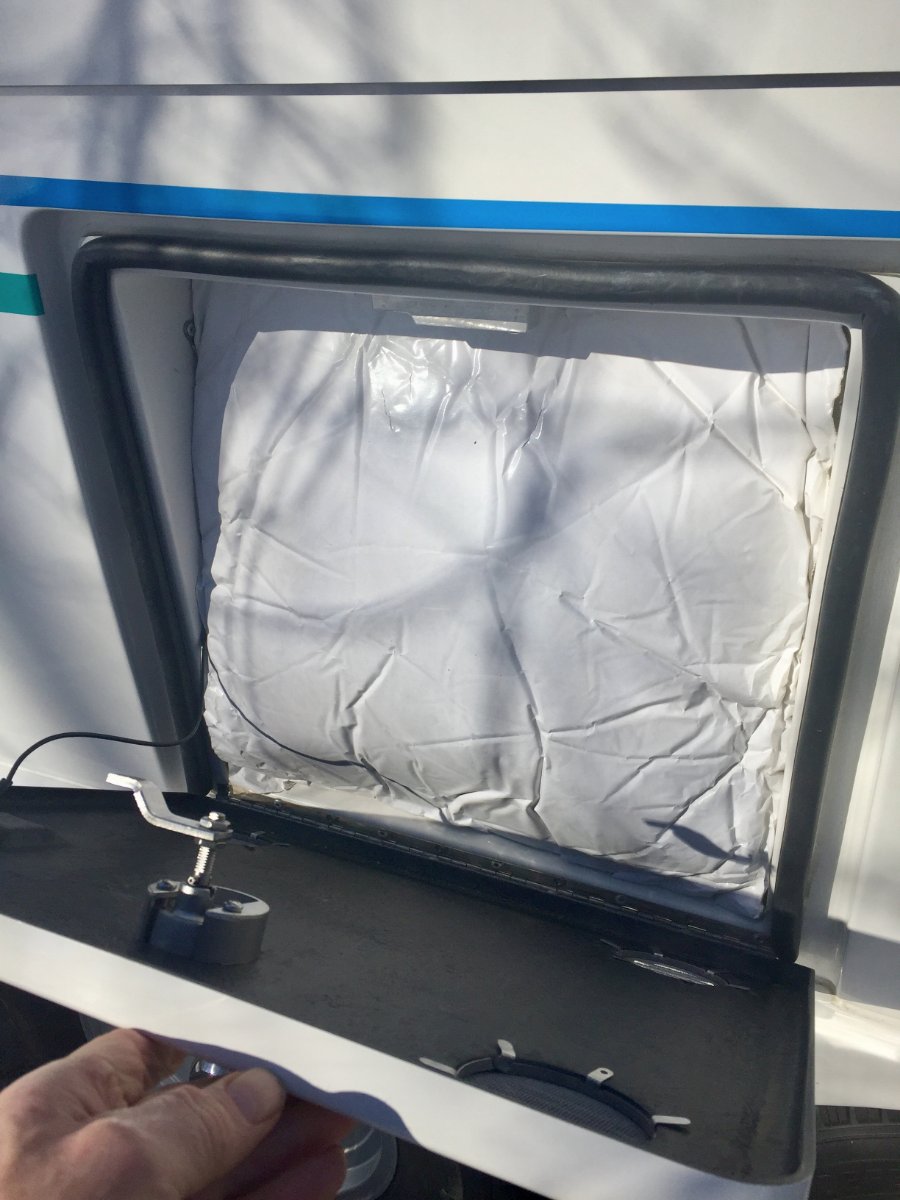
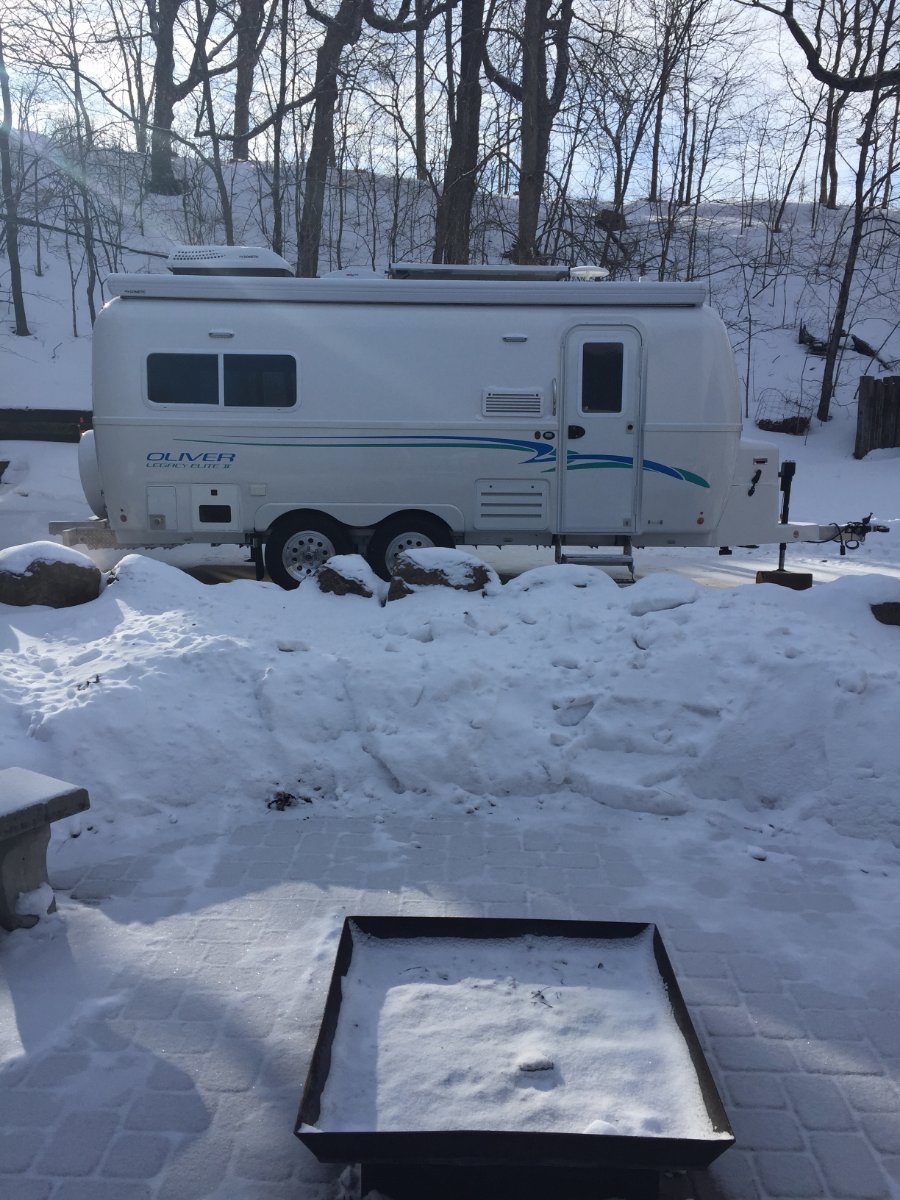
The seed was planted for this furnace mod when we grabbed a canceled reservation three weeks out at a Minnesota State Park. This reservation was mid October and when the date arrived the weather forecast had changed for the worse. We stayed for only two of the three days and we received our first snow of the season, 6 inches of wet snow. We had a non electric site and my batteries were having trouble making it through the night and I was concerned about the water freezing in the Oliver. I have already addressed switching to lithium batteries and posted about it on Oliver Forum. Now I want to share with you what I have done to relieve my worries about water freeze ups in the Oliver, provided that I have a functioning furnace. I first tried to identify the weak spots and came up with the following. Boondocking Inlet Outside Wash Station Fresh Tank Fill Inlet City Water Inlet Black Tank Flush Port Toilet Water Supply Line Hot & Cold Lines Crossing Back Of Oliver The Oliver has all of it's heat ducts run on the curbside which protect the kitchen and the bathroom faucets from freezing. My plan is to run a 2" ducting along the back to the street side and terminating in to the trough that the water lines run in for the city water inlet, fresh tank fill inlet and outside faucet. This trough also has the check valves for those two inlets and has the floor of the exterior storage compartment covering over the top of it. To get at the trough you will have to remove the back wall of the storage compartment and flip the mat back that covers the floor. This exposes the water lines that come across the back of the trailer and drop into that trough. There is a wall that separates the furnace compartment from storage and extends past the wall you just removed. It has a opening for the water lines and it is large enough to run the 2" duct through it and on top of the water lines across the back and into the trough. Now you can flip the mat back down and they are long enough to cover the water lines and the newly installed 2" duct, then the wall is put back in place. On the connection to the furnace I removed the back of the heat exchanger. There is one hard to get at screw on the bottom but the rest are easily accessible. I made two holes, a 2" and a 4" in that back plate. I could not find a 2" starter collar locally so I bought two 4" and removed the rivets on one of them and formed a two inch collar, cut to length and re-rivet. I then installed the 2" and 4" starter collars to the heat exchanger back panel and then the panel to the furnace. I then hooked up the 2" duct to the furnace. Looking in to the access hole under the street side bed you are able to see where the water lines come up and out of the trough and to the valve of the out side wash station. When the furnace fan is running it will blow out a lit Bic Lighter held in that area. So we're protecting water lines, the check valves and dumping warm air underneath the outside wash station valve. Now back at the furnace I attach a 4" heavy duty aluminum foil duct to the newly installed starter collar. It is routed forward a short distance until it can be routed across the basement to the street side and then fed between the hot and cold water lines that go to the outside wash station valve. At this point I need to use a 4" coupler that is 6" long to attach the next 8' piece of 4" duct. I use the 6" long coupler so I can add holes if I need to flood a area with heat, this particular coupler did not need to. I then routed the duct from the wash station valve along the outer wall and over the wheel well, make the corner by the battery compartment and then once getting past the wheel well go down and under battery compartment. Up in that corner I attach a adhesive base 3/4" cable anchor so I can loop a 20" releasable tie strap through it and around the 4" duct holding it up and out of the way. A second 20" tie strap is used were the duct heads down under the battery compartment, it utilizes the loop that anchors the 4/0 cable coming out of the battery compartment. Next I prep another 6" long 4" coupler by adding a metal mounting bracket. It is bolted to the coupler using two 10-24 machine screws that go through the bracket the coupler wall and then a backing plate that has tapped holes. This coupler I will add a1" hole that will be pointed up to flood heat at the battery compartment. The mounting bracket will be utilizing the upper bolt of the support leg for the battery compartment. This keeps the duct up and away from the inverter and electrical components and positions it to flood heat up against the bottom of the battery compartment. The next length of 4" duct is clamped to that coupler and routed up from under the battery compartment over to and along the wheel well. It is held by two 20" tie straps similar to the other side. Because I want to run the heat duct under the foot space of the dinette I need to transition to 2" duct. There is access via the same trough that I utilized in the back of the trailer, but at the front there is more room and I am able to pull the 2" ducting through. From there it continues toward the front until it reaches the black tank flush inlet where it then follows that pipe back along the black tank and terminates by the water supply line for the toilet. At the transition point I add two more short pieces of 2" duct and route them down to where the main black tank drain pipe goes under the dinette foot space, they are terminated on either side of that pipe. There was not enough room to run the 2" duct but enough to force air along either side. At the transition from 4" to the three 2" ducts I simply inserted the three 2" into the end of the 4" and used aluminum foil duct tape to seal the transition. I also want to mention that I used the aluminum foil duct tape to reinforce the ends of every 4" duct by wrapping outside and inside before clamping. That should cover the install, now lets talk about the results of the test in subzero weather. I rounded up seven digital thermometers and put them in the areas I was concerned about. Was placed just inside the empty rear storage compartment. Was placed on top of the batteries and a piece of acoustical insulation that was for large generator enclosure, it was 1-1/2" thick and 19" square. This was squeezed in the opening before the door was closed. Was placed in the rear basement curbside next to boondocking inlet. Was placed in the rear basement street side below the outside wash station valve. Was placed on the floor of the closet with the door left closed. Was placed on the lower shelf in the vanity in the bathroom with the door left closed. Was placed in front basement street side next to the black tank flush port line. I moved it out of the heated shed at 1:00 pm on Sunday 2-7-21. I moved it back in at 3:00 pm on Tuesday 2-9-21. The furnace was cycling off and on at -4 ' but I noticed at -8' and colder it ran continuous. I have the Truma water heater and that was also turned on. I checked propane consumption by putting on two 20 pound tanks that I had weighed and left them in place for 12 hours. It was -12' when I put them on and -2' when I took them off. Because of the subzero temperature the propane was not gasifying very well and the regulator automatically changed from the primary to the reserve after only consuming 2.353 gallons. The total consumed out of both tanks in 12 hours was 3.294 gallons, so that would be .274 gallons in one hour. My Victron BMV-712 was telling me that I had depleted my 400 Ah Battle Born batteries to 47% and at rate of use I had two days and nine hours left. I thought I would comment on a couple of things I like about the outcome of the project. The bathroom was comfy warm and the wall next to the bed was not icy cold. I am not planing to take up subzero camping but it does gives me a benchmark to go off of for any situation that I might run in to. If you have any suggestions or see something that is of concern please let me know. Paul
1 point


.jpg.b4fb182c2dd38b005d42f99a3317e409.jpg)


-
Recent Achievements
-


")


")


