Leaderboard


Popular Content
Showing content with the highest reputation on 04/26/2024 in all areas
-
My springs arrived yesterday. We leave next week and will have them installed May 6 at Oliver, then we’ll go to East Tennessee before we head to the rally. Will provide observations. Mike6 points
-
First day towing on Alcan springs update: -500 miles (Ubolts re-torqued at 50, 100 and 500 miles intervals to 90 ft lbs). Decreasing amounts of adjustment required as mileage increases) -ride slightly harsher during first 100 miles, harshness decreasing as mileage increases (finding nothing returning to the floor at 500 mile checkpoint). -running 45 psi in tires (was running 55 psi with stock springs). Monitoring tire wear at each stop. Likely will increase to 48psi at next stop. -less observable side to side (roll) movement. Very stable while underway (drove in high winds thru Kansas yesterday) -so far I am happy with the new springs I am very interested in reports from early hull number E2 owners who have purchased the Alcan springs. Wondering what their observations are as compared to stock heavy duty 5leaf springs they are replacing.5 points
-
Update: 4/29/2024 8:18pm... Everything looks good, enjoy. P.S. Let me know if you have any issues. Update: 4/28/2024 8:48 pm... Migration completed. Still looking through and making sure all configurations are correct and the data is intact! Update: 4/27/2024, 7:13 pm... Running into some delays, uploading files and working with the host to make sure we get everything done right and perfect. Will update as time progresses. Thank you! --- Hello Everyone, We will move the Oliver Travel Trailer's website and Oliver Owners' forums to a new website host this Saturday evening, 4/27/2024. We will try to get this done through the night to minimize activity times. This migration is a necessary step to improve our website's performance. This migration is an enormous undertaking, and we are still determining an estimated completion time. We understand that this may cause some inconvenience, but we assure you that we are working diligently to make the transition as smooth as possible. During this period, the website and forums may experience intermittent downtime, and you may encounter difficulties accessing certain features. We sincerely appreciate your patience and understanding as we strive to complete this migration. Thank you for your continued support. We look forward to providing you with an improved online experience on our new website host. Best regards, Oliver Travel Trailers4 points
-
That’s good. It helps keep the value of our existing trailers up.4 points
-
I have sprayed ours regularly through the years. I've used WD-40 (messy) and dry silicone lubricant (much better). Aluminum tends to want to "stick" to itself. I've not thought about using paraffin, but that is a good idea. It might stay on longer than my methods. Give it a shot and let's see how it works.4 points
-
I did, Lew (the owner) stated the person that wrote the email simply was mistaken.4 points
-
Not yet, but I plan to add an external Anderson plug on the lower portion of the propane housing. I’ll wire it into the front jack power connection. I’ve already purchased this plug. https://a.co/d/dZGlkHd My refrigerator in the tow vehicle has an Anderson plug, so this will be a more secure setup than a typical cigarette lighter outlet. And the 640 A/hr batteries in the trailer won’t even notice the extra 2-3A load of the fridge.4 points
-
Also, it would be helpful if you added a signature with which Oliver you own and your Hull number.4 points
-
The rod and washer on our Hull #1291 are not rusted either, even though they have been wet many times. They appear to be galvanized steel. Makes we wonder if Oliver recently received a batch of poorly galvanized rods and washers. I concur with Topgun's recommendation: send the photos to Oliver Service via a service ticket, and request a replacement rod, washer and cotter pin.3 points
-
Here are the pics in jpeg format:
 3 points
 -
Thanks. Just figured out how to do that and added the info.3 points
-
I use the solar accessory plug which is near my 2019 battery compartment for several 12v accessories. It has a SAE connection that is wired through a fuse to the trailer batteries. While its SAE connector it set for zamp panels it works for anything you wish. Just pay attention to polarity as the zamp connecters are reversed from normal SAE. Adapters can be made from that SAE plug to your fridge. Zamp Solar Port On Oliver EII - Note : Top Pin is ( + ) Terminal Bottom is ( - )3 points
-
Yes, there was word that management WAS considering "adjustments", however, I think that it would be best to assume that at least 99% of the original announcement will stand without material change. Bill3 points
-
I'm unclear why you would think that. Your wheels have you at 7.8K pounds, well above the stated 7K GVWR. Which tires, axles and spring packs are riding under your Hull #045? How much does your trailer weigh full of water, gear and ready to camp for a 3 month long foray? The wheels and tires under my Hull #050 have a load rating of just over 13K pounds. The Axles are rated at 10.4K pounds. The Alcan springs can support 11K pounds. The Outlaw Oliver has always weighed well over 7000 pounds in its natural habitat. And, it has traveled over 100K miles, most of it with the tires sitting at 80psi all without a single issue. I'll be forever grateful for Jim Oliver's guidance and assistance in designing the most over built Oliver rolling down the road. But, there are those here that think I tend to over-engineer everything.3 points
-
My thoughts when I see a cyber truck - the design was hijacked, looted, swiped, plundered or made off with from the inventor of the dumpster. 😄 Just not a fan.
2 points
-
If you are looking to buy a new Oliver Travel Trailer here are some things to consider. With the implementation of the new dealer network you now have several new options available to you that previously did not exist when you could only go to Hohenwald to buy a trailer. There are two ways to approach the first step. If you live a long way from Hohenwald and don’t want to have to drive that far to see the trailers you should check the Link on the Oliver page that will show you where all the current dealers that will be selling Oliver’s are located. There are currently 18 different locations spread across the United States. There are future plans to add new dealers here and in Canada. With the information on the locations of the dealers, if one is close to you and you want to do business with them that is perfectly fine. If one is no closer to you than Hohenwald you may choose to contact the sales team there. When contacting Hohenwald a member of the sales team will take your personal information and work with you to get you the exact trailer you want in the shortest time possible. They can take an order from you and get you into a queue to have the trailer of your dreams built for you. The current wait time after ordering is around four months. If you live in a state that does not have any dealers, they will see if there is a trailer already built and available at one of their dealers. If so, you could have your new trailer in a matter of days rather than months. Even if there is not one that is just like you desire, if a dealer has a trailer on order that is still early in its build, Oliver will work with that dealer to attempt to have the build altered to be what you want. Doing it this way will still get you a trailer much quicker than starting your build from scratch. If you live in a state that has dealers, Oliver’s agreement with those dealers is that you will be referred to them. Another option that was not previously available to you is that if you already own an RV of some sort and want to trade it in, many of the dealers might be able to do that whereas in Hohenwald, that was not and will not ever be an option. You can also buy a trailer through a dealer, do all the paperwork there and still pick it up in Hohenwald if you want to. And, as always, you are free to buy a trailer and take delivery in Hohenwald if you so choose. Both of these options are a good choice if you want to do a plant tour prior to pickup. At some relatively near future point (certainly this year) their plan is to have all sales conducted through the dealer network. The rumor that they will stop working on trailers older than two years or out of warranty is patently false. Service will continue to be done in Hohenwald. The rumor was started by a fired service employee. He and his wife propagated this rumor as well as other false information about the Oliver TT after he was terminated. It was posted both here and on the various FB pages. He has been terminated there as well and the false statements have been removed. As always, the Oliver sales staff will still be available to assist you and the dealers with any questions and issues. If none of this works for you, my suggestion is to take the list of dealers from the website and call each of them and tell them what you are looking for to see if they have one is stock that would suit your needs.2 points
-
Yep they do work on the spares. Researched and then called the MFG and they confirmed my faulty memory. Have re-written my above post accordingly. The transmitter sends a milli-second burst of the ID number, pressure and temperature data whenever there is air pressure from the tire to the monitor. It will be read on the monitor IF: It is within it's range Has a good battery AND it is not shielded from the monitor (Such as under the vehicle was for my Toyota Sequoia For my Sequoia the tire sensor was shielded well and did not work. I'll be re-installing the sensors on my spares this summer! GJ PS: For winter storage, recommend the Egg Carton storage suggestion with removal of the batteries from the sensors to protect from potential battery generated corrosion.2 points
-
We just returned from a 5 week trip west in our 2021 LE1 with 260 AH of lithium newly installed and 300 W of solar - 200 W on top and an outboard extra 100W panel. We had several 5-day boon docking sessions and never had a problem with keeping power around 100% - or getting it back up to 100% after a cloudy day. BUT, we had mostly sun and we have the 3 way refrigerator running on propane. The bigger challenge in boon docking was running out of fresh water, or needing to dump grey or black tanks. Full time would need water and sewage hookups, at least, we suspect. And electricity via shore power or a generator in cloudy seasons. One other challenge - we needed to develop careful choreography and rhythms to live well in a tight space. And our dog had to learn them as well!! We actually had a lot of laughs as we figured them out!! Geoff2 points
-
Concur 100%. We put north of 1900 miles on the Alcan's on our last trip to Dallas from NM. Subjectively, high cross winds on I-40 near Amarillo did not cause nearly as much roll as before replacing the spring packs. We ran the tires at +/-50psi the entire run. Nothing different noticed inside the rig after stopping (window shades still attached, converter door under dinette still closed, glass flowers & vase still on dinette table, etc.). We'll be in Hohenwald 8-9MAY to have a couple 5.2k# Nev-R-Lube Dexter's mounted over the Alcans - so, we'll probably miss meeting you and Carol until we make it down to the rally...FYI Safe travels, All... Cheers!2 points
-
Basically (like Steve) I've used dry silicone. A couple of times per year is all it takes. Wax will probably work but it is more work to put it on versus using a spray can.😁2 points
-
We use Blaster products. We have both the silicone and Multipurpose. I use the silicone one on the steps
2 points
-
I have had my leaf springs replaced with the Alcan's and will soon share my feedback. My short ride home from my mechanic's place didn't tell me much but we'll head south soon for the rally and I'll report while we're on our way down. I'm planning to run my tires at 48 PSI. Will do as so many others have suggested and re-torque u-bolts regularly.2 points
-
Yes - after I downloaded the pics I can see them. Suggestion - send the pics to Oliver Service and ask for a replacement rod and washer. Bill2 points
-
The TST monitor has icons for the spare for both the TV and trailer, so it's no surprise that the sensors work even if the tire isn't rolling. We've found the pressure and temperature of the rolling tires usually display on the monitor sooner than for the spare.2 points
-
Rationale: The TST monitor is programmed to show the wheel position of each sensor as it scrolls around the Oliver, as well as the TV if equipped. If a spare also has a sensor and deployed, the monitor was still show that wheel at the TT/TV spare mount position. I would rather remove the sensor from the flat tire and place it on the spare as not to disrupt the scrolling sequence. Also, if I choose to keep the spare on the ground and use the repaired tire as the spare, I don’t have to bother myself with reprogramming the TST monitor. As a side note, I recommend traveling with a set of replacement batteries for the type sensors used. Usually when glitches in monitor readings occur it is due to a weak battery.2 points
-
Around 50psi.2 points
-
Even if it was digital it would be a lot of work! Mike2 points
-
One of the benefits of having owned a BMW motorcycle was that it allowed membership in a club known as the BMW Owners of America. In addition to a monthly magazine, available merch, regional and national rallies, there was a paperback booklet published annually that (on a voluntary basis) contained contact information for any member. This also included additional information as to the "services" that a member might provide to other members - such as - camping space, towing, coffee and conversation, tools to borrow, etc.. And, all BMW motorcycle dealers plus repair shops were listed. It sure would be nice to have something like this for our use, but, given the number of Olivers presently on the road I would think that the cost of compiling, printing and distributing such a thing would be fairly heavy. And, this doesn't include the time and effort to put it together in the first place. Bill2 points
-
Mine is TST and I trust the readout for the spare...so far :)2 points
-
Plug needed changed plus I need to be able to disconnect the black accessory power due to large LFP battery upgrade. DC to DC charger next addition. Black was already loose. Glad I found it and got trailer plug replaced. Plus thanks to one of the forum members I got the idea to add housing storage for it. Thanks! OP
2 points
-
I also carry the Dewalt in my truck behind the back seat. I like that it can use a battery or a 12 volt cable. It has no issue inflating the tires to 57 psi which is what I keep the Oliver tires. When inflating tires it is actually my go to inflator rather than my big compressor. I carry some 6x6 blocks which I have used to give me a stable base for the jack to sit on as well as an extra few inches height the two times I had to jack up the trailer on the side of the road (once for a flat tire and once when one of the drum brakes locked up). When my children learned to drive I made them change a tire on the car by themselves. They had to pull out the jack and spare, jack up the car, remove the tire and put on the spare, lower the car back to the ground and then pull off the spare and put everything back where it came from. I just quietly sat in a chair while they worked.2 points
-
I'd unhook from the water there until the plumber is long gone. You don't want contaminated water from where they worked on the lines to get into your system. Another reason to use from your own water tank when the other choices are questionable.2 points
-
This is a good example of why we always fill the fresh water tank with the RV park plumbing system via our fresh water hose & activated carbon filter. Once the FWT is full (indicated by water exiting the overflow tube near the main hatch steps), we stow the hose/filter for a tidy "look" outside(*). This way - using the OTT water system is exactly the same procedure whether we're boon docking or staying at an RV Park (usually with unknown water pressure unless we ask). This practice exercises the water pump "ON/OFF" procedure used by OTT owner/occupants. If you're feeling "froggy" - as your FWT begins to drop in volume, use your 6-gal spare fresh water container to exercise your "boon docking" water valve procedure by topping off the FWT with the spare water. Then reposition your water valves, refill the FW container, and stow it and the hose. (*): Don't you just love seeing that SOB at an RV park leaking precious water everywhere from their fresh water hose connections that's spread helter-skelter between the hose bib and the trailer?2 points
-
Thanks for your replies, Mike & Carol, and Sea Dawg! Sorry for the response delay, we were packing for our 7 month RV trip to Nova Scotia from Michigan. Day 6 now, Boston! I will have a base + no pets. It might be mostly parked. Tow vehicle: I'll have to get a bigger one. We have a dually for the 43' 5th wheel + Toyota Sierra for my A-Liner Scout for now. I like the Oliver floorplan: rear bathroom makes it much more spacious. Olivers seem to be the best. Why get something else only to move up later? Better to start right at the top!2 points
-
I have a folding 100 watt solar panel with an on board CC. I have always thought that a CC mounted in the Ollie would be a better solution if I needed to place the solar panels further away from the batteries due to line loss. This would provide a higher voltage at the CC in the RV. Which led me to think a 3 position battery switch would be needed if I did mount the CC in the Ollie and wanted to supply 12V's to power an electric cooler. I can plug into my solar port now because it is wired straight to the batteries. Mossey1 point
-
I was only responding to the section of your post where you said "For those owners that either already have or have switched to the 5200 pound Nev-R-Lube axles you would now effectively have a GVWR of 10,400 pounds upon the installation of these heavier springs." And I responded- "In this scenario, I think the wheels and/or tires would limit most of us below that effective GVWR. Mine wheels are stamped with a 1950# rating." People should make sure that they check their wheel and tire combo if they plan on loading over the factory limits with the the upgraded springs and 5200# axles. Legally, it shouldn't be done anyway, but that's a whole other can of worms!1 point
-
I purchased the Powerwerx plug @Steve Morris highlighted, but returned it because there is no weatherproof way to seal it when in use. Even if mounted inside the propane tank housing there is a chance of moisture intrusion. I keep my Dometic dual-zone in the TV under cap and primarily operate it on a solar portable power station. I’ve never considered taking it out of the TV when at camp; it’s very heavy when loaded, and like keeping it out of the elements and secure from theft. However, as backup I can run it from a bumper-mounted Anderson. Although this particular plug can be fitted with an environmental boot as shown, it is not flush-mount and better suited for a forward rather than a side Oliver mount. I also use this Anderson to run the Viair.
1 point
-
Your comment prompted me to go take another look at the fridge light. My light and thermostat seem to be one unit with a wire going into the interior of the fridge. I do not see a way of pulling the plug on the light. Can you illuminate on how you disconnect the light.1 point
-
That information is located (somewhere) right here in the Forum. Of course, finding it just might be a problem. If I have time a bit later I'll go on the Easter egg hunt for you. Bill p.s. the height is 13 7/8 (floor or the battery tray to the fiberglass above.1 point
-
I was thinking digitally for sure and perhaps within the Oliver forum website. For someone with the right skill set and site access, this would not be difficult. During my full employment years things like this were developed in implemented in a short amount of time and at relatively low cost. If the digital tool is setup correctly, it would be largely self managed. (No printing please!) Endorsing or rating RV repair businesses can be controversial, but an offline conversation between regional Oliver owners is simply that, an offline conversation. I am just learning but I doubt many of the closest shops are equipped to deal with the electronics of an OTT.1 point
-
Ditto. I highly agree as we all learn best by doing the task in ideal conditions. When it happens on the road they are able to do what they need to do safely and with confidence. I would also add giving them a learning experience with: Battery corrosion removal Oil change Windshield wiper replacements Engine air filter cleaning and change when needed Each was a great confidence builder for them, and results in far less worry for Dad when they head down the road. Even more grins for Dad was watching the next older train the next younger on the process. By the time my youngest (daughter) got to do them, she had watched it before and was on autopilot. Took Dad three days to lose the Perma-Grin. GJ1 point
-
@Ron and Phyllis the odds were against you, but with your TPMS alarm and your cool head in finding a good place to park, you really made the best of a bad situation. Good lesson you shared and we're glad to know you two are fine. 😂 Thinking back to the half dozen trailers I've owned, never going with a single axle. Needed a trailer for our dirt bikes years ago and looked hard and found a used 12 FT flatbed dual axle. Dual axles generally come on 14 FT trailers and longer, most are 16 FT. I've had blowouts on dual-axle trailers where you lose a fender but all else is good. Thanks @topgun2 for the Dewalt compressor link. I need to get one of these when we resume spending on the Oliver (need a long break). We are a Dewalt tool family, having 8-9 20V batteries between my son and us. I bring a Dewalt handheld leaf blower to blow dirt road dust off the Oliver and clean the camping mat. My son got me this for Christmas: Amazon.com: DEWALT 20V MAX* XR Leaf Blower, Cordless, Handheld, 125-MPH, 450-CFM, Tool Only (DCBL722B) : Patio, Lawn & Garden And you gotta have 1-2 of these for the campsite, or to change that tire at night if need be. I got everybody in the family one, so they would not take mine anymore: DEWALT 20V MAX LED Work Light, 100 Degree Pivoting Head, Up to 1000 Lumens of Brightness, Cordless (DCL050) - Amazon.com1 point
-
We have the same tires...if I can them to ever wear out I'll probably switch over to metal stems then. 37,000+ miles and going strong (probably just jinxed myself ) John1 point
-
Good idea. Never thought about a sensor for the truck spare, but makes sense if I put one on the Ollie spare to also do the truck.1 point
-
Thanks for bringing this information to our attention, I stand corrected! Going back to a past FB comment I wrote: I went with the equipped rubber stems until they started failing. Our Texas heat is brutal and in the 110°+ heatwave where traveling my tire temps reached 105°+. Hopefully the aluminum stems will perform better in these extreme conditions. I have no regrets switching to the metal stems, for peace of mind if nothing else. Again, thanks.1 point
-
Its also nice have a full/same-size spare, roger?1 point
-
Good question, John. Due to prior commitments, the process is still underway, worked on it for a couple hours yesterday, plan to finish it up this morning. After speaking with Mike/Alcan, here's a high-level List of Instructions for the leaf spring R&R. 1. Break loose the wheel lug nuts on all wheels; 2. With the OTT connected to the the TV, raise enough that wheels are just high enough to spin and that 4 jack stands can be placed in front and to the rear of the running gear on the OTT frame; 3. Lower OTT onto the jack stands - wheels must still be able to spin; 4. Remove wheels; 5. Pick a side to start. Place a jack stand under front axle about 2 feet inboard of wheel assy. - use a floor jack under the spring plate to raise the axle just enough to adjust the jack stand under the axle, then lower the floor jack so the axle rests on the floor jack. There should be very little tension on the suspension at this point; 6. Remove the lower shock absorber nut and push the shock up and out of the mounting hole on the spring plate, use safety wire to hold lower shock outboard and away from spring plate - helps with aligning the spring plate later on; 7. Remove the 4 U-bolt nuts/washers; 8. Remove the spring plate (at this point - we wire brushed the plate, cleaned with acetone and rattle-canned it with RustOleum, set aside to dry for later); 9. Remove the forward wet bolt from the frame mount - this allows the spring pack to drop; 10. From the Dexter center shackle, remove the corresponding Dexter shackle nuts and the outboard connecting plate - the inboard connecting plate will be removed with the wet-bolts still "press fitted" into the plate. Keep as is and ChemKlean the shackle plates, wet bolts and nuts for later assembly; 11. Throw away the cheap-ass Chinese made spring pack. (OBTW: Our's weighed 10lbs even as compared to the Alcan 5-leaf spring pack of USA steel at 18lbs! We still have the fourth spring to replace today - but the three removed so far were definitely starting to flatten.) 12. Check the centering bolt head on the Alcan spring pack so it fits into the corresponding centering hole in the spring plate. We had to file the corners on a couple of the bolts to get the correct fitment. 13. Insert the "now cleaned" shackle components to the Dexter center shackle assy. Connect Alcan spring pack (this would be the rear-most spring pack bushing for the front axle), bolt on the outboard connecting plate. 14. Check the forward wet bolt after cleaning by connecting your Lock'nLube and squeezing grease through the journal (be sure to do this with all wet-bolts). Thoroughly grease the spring pack brass bushing and wet bolt. Ensure the wet bolt can fit through the brass bushing - tap in gently using a socket over the grease nipple. 15. Lift the forward end of the spring pack and place a floor jack under at mid-point (where the spring plate will be placed in a later step). Lift the Alcan spring pack up to the forward spring mount on the frame. Ensure the centering pin on top of the Alcan spring aligns with the centering hole on the axle's spring pad. 16. Insert the forward wet-bolt by raising/lowering the floor jack and tapping the center shackle fore/aft until the bushing aligns with the mounting holes. This is a step that takes some patience. We had to use an alignment bolt from the outboard side of the mount to get the wet-bolt through from the inboard side. (NOTE: The wet-bolts have splines near the head to keep them from spinning once tightened in the shackle plate - we oriented them so the grease hole on the wet-bolt faced "UP"). 17. Place your U-bolts in place over the axle (we painted ours just to keep the rust down to a minimum - plus it looks way cooler). Place the cleaned and freshly painted spring plate in place. Install new U-bolt washers and nuts - using an "X" pattern, tighten the U-bolt nuts slowly pulling the spring plate up and into position. Use a flashlight to check that the Alcan spring centering bolt is aligning with the centering hole in the spring plate. We tied the lower shock outboard and away to a wheel lug with safety wire to make this alignment easier. 18. Install lower shock to spring plate; 19. Torque all nuts to specs. 20. Move to same side rear assy. and repeat. 21. Move to opposite side and repeat front and rear like steps 1 thru 20 above. There's probably a few extra things I did (removed, inspected, and re-packed wheel bearing, for example) but these are the key steps. Very satisfying procedure. It's worth the peace of mind knowing your running gear is in order! More to report later after complete and test driven. Cheers!1 point
-
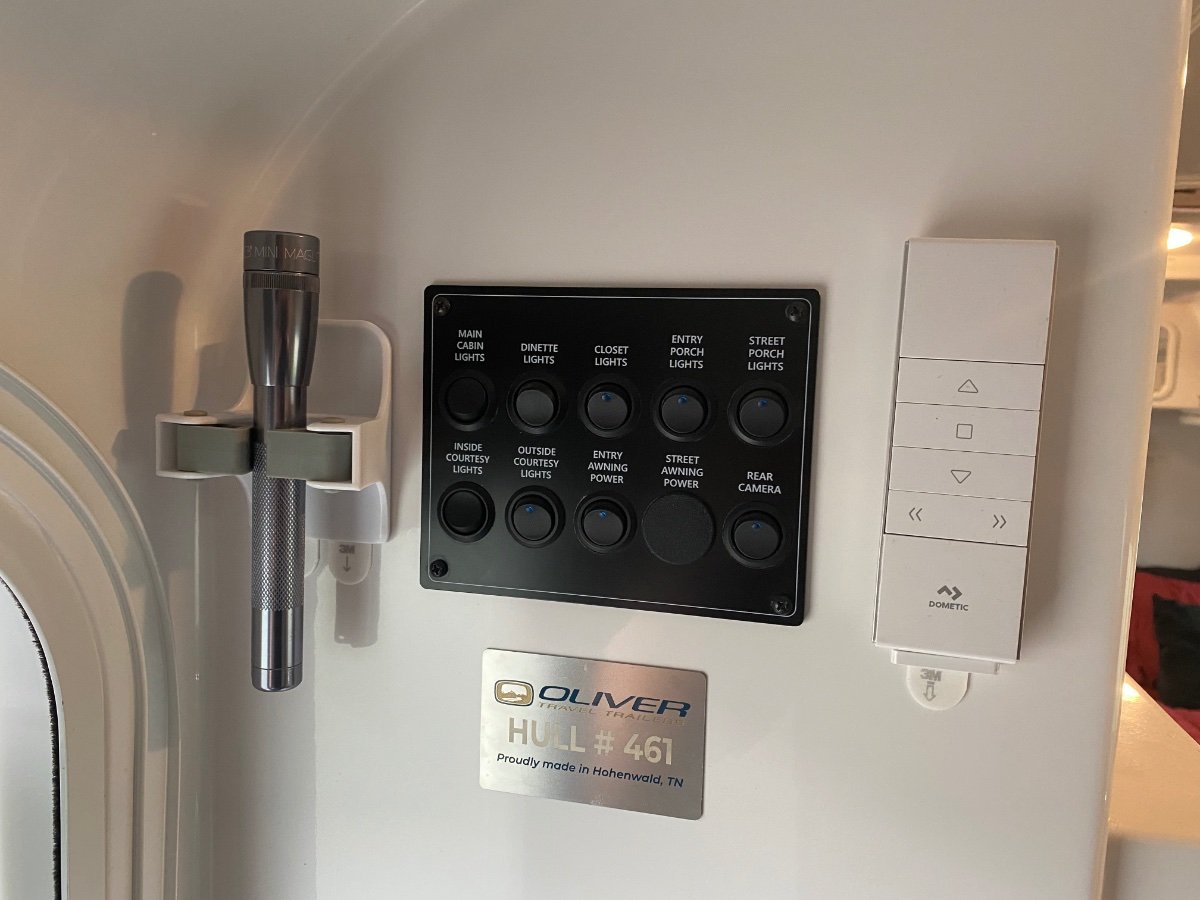
The 3M Command products are perfect for the smooth interior surface of the Ollie. Just added one of the Command broom holders by the door to keep a flashlight handy. The broom holder is the perfect size for a 2 AA cell MagLite. Also used Command strips to mount the magnetic holder for the awning remote so the remote is close by when set up at a campground (but the remote does get put in the nightstand drawer when traveling since the magnetic mount isn’t very strong). And the Command products all remove cleanly from the fiberglass so I (or a future owner) can easily change things in the future.
1 point
-
Command Strip products are awesome in the Ollie. If you havent checked them out yet, Tooletries makes a shower storage line that works in the Ollie as much more than just shower accessories. I have two of the “Henry” holders in the bed area of my trailer to hold all of the remotes. They are silicone so do not scratch and also have several of the “Arnold” hooks around inside the trailer for string lights, keys, etc. In the shower, the “Frank” holds the shampoo and conditioner on the wall and out of the way. https://tooletries.com/collections/shower-bath-organization Also just ordered two of these for the living area https://30watt.com/products/sudski It is fun finding new things to make life inside the Ollie more dialed-in1 point


.jpeg.3a49474fa415ca1b06edeacd23915aa4.jpeg)
.jpeg.e6c25cadc9cb3f5fd1a059d1a1142986.jpeg)


.thumb.jpg.e34bf01ef7f7d5e99ad31856d45afbeb.jpg)


-
Recent Achievements
-


")


")


")


