Leaderboard


Popular Content
Showing content with the highest reputation on 06/11/2025 in all areas
-
After having Alcan install their springs and me installing Bulldog shocks and Alcan installing Dexter's beefier axles 4 months later I was ready to ride off into the sunset. Then a wheel lug bolt snapped off, who knows where, and I began having issues with the new wet bolts accepting lube. I talked to Lew and he said he would replace the lug bolt, no charge. No other issues along the way to Grand Junction. When the axles were replaced I discovered I was supposed to have retorqued the wet bolts after the original spring change, not just the axle u bolts. So after the the axle change 4 months later some of the wet bolts were pretty loose. After my first 50 mile retorque I discovered some wet bolts were way loose and when tightening I did not understand the need to keep the bolts stationary while only tightening the nut in order to keep the bolt's grease ports horizontal. So, no way to know where the bolt heads should be positioned to provide the horizontal position. Today, Tucker at Alcan did his magic...replaced the lug bolt and took all wet bolts out, turned them so the zerks were, per my request, on the inside so I don't have to take the tires off to lube. But I do have to crawl under the trailer to lube ...that's plenty fine for a few more years :) And he lubed the bolts so I'm good for another 3000 miles. Now here's the point for my post... I went to pick up my trailer and Tanner informed me that Tucker did all of this work at no charge! All of my equipment, wet bolts and bushings, were reused since they were newly installed and the labor rate was graciously not applied. These people are top shelf and we are very thankful to have them work on our Bessie :) John8 points
-
Just a quick update on this project: Only four owners have requested assistance in getting one of these numbered plaques. We know that two of these were not in the original box that Oliver received from the supplier. One of these was removed by the previous owner to keep as a memento of the years that they had the Oliver. And, the last one is still being investigated. We are also in the process of investigating at least two different avenues of having these plaques produced at prices that are somewhat below what has already been quoted. Further details as we progress. Bill5 points
-
Take heart, folks. My hull #12 didn't get its plate till a few years ago. About 14 years after pickup , in fact. Just in time to take the plaque to Antarctica. Couldn't take the trailer, obviously.
 5 points
 -
Yes. And we carry a spare. And, a spare for the rear jacks, too. It is possible to raise and lower all the jacks manually. And, I'll also mention that it's slow and not so much fun. Our 2008 trailer is now almost "old enough to vote", and has lived outdoors its whole life, so replacing exterior switches due to corrosion, is not entirely a surprise. Just can be inconvenient. Jd's jumper could be a helpful small addition to our tiny spare parts kit. With a newer trailer, you might just want to check to make sure you have enough battery power to the switch. The jacks draw a lot, quickly , and I've found over the years that a low battery (i still have agms) can cause a temporary failure.4 points
-
Jd, I believe the interior of the Oliver windows will be white. I agree black interior window frames would not look good at all.3 points
-
Yes, there was just a thread on the wiring of the jack switch (link below). And these switches go bad regularly. What you described is very likely a switch that needs replacing. Also, everybody should carry a simple spade jumper like pictured below. The Oliver has many toggle switches installed and this simple jumper can be used as a temporary override. I had a brake pedal switch go bad on a Class-C which would not allow me to move the auto trans gear selector out of park. We were stuck right were we had parked. I used a jumper like this to bypass the switch which allowed us to drive an hour or two into the next town to get this common replacement switch at Napa. They also would likely have a replacement toggle switch for the jack. Nice little tool to have handy. I made one when we had the brake switch failure and have carried it with ever since. Used it once when the Oliver had a bad water pump switch under the pantry which allowed the switch under the bath vanity to work.
3 points
-
I have a slightly damaged one and appreciate the source. Mine is a PLASTIC fixture coated with fake chrome. It certainly is not worth $44 in my minds eye. Guess I'll use s small dab of JB weld on the screw hole and re-drill it. At the Rally I asked Jason about the black gaskets. He indicated they remove the gasket and silicone the fixture on 3 1/2 sides. Leaving a weep at the bottom.
2 points
-
I like the sliders on our 2022 LE2. We have a little over 500 miles on the new Alcan springs and I had a couple times that the shade frame loosened up on the bottom and one time where the dinette frame popped off completely on Colorado roads. Another owner who got the Alcan springs said they settled in after 500 miles. That was my experience too. We had some doozies of bumps today from Utah to Oregon and no issues with the shade frames. Another thing that I noticed is that when a semi passed us, the trailer isn't as affected by it as before. We had some intense wind guests today and it tracked great. John2 points
-
I suspect that he is concerned about needing to do an absolute clean off of the HDG material for a critical structural weld. The threshold for "Well Enough" in this case needs to be very very high. Axle Info: 2018 LE2 #342 SC 50.5, D35 Original axle capacity2 points
-
Our older Ollies have absorption based refrigerator systems. They have an open flame burner that drives the refrigeration process. If the system has a combustion issue, it will generate CO. If you have critters flying into the cabin via the refer vents, your box is no longer sealed properly. That could for sure put you and others at risk. Seriously recommend you: Replace your CO/Propane Detector if there is any doubt about it's age or in our case with these type of refrigerators if the detector is over 4 years old. Reseal the combustion area from the cabin area. Most of us use Foil Tape. Buy 3M foil tape. GJ2 points
-
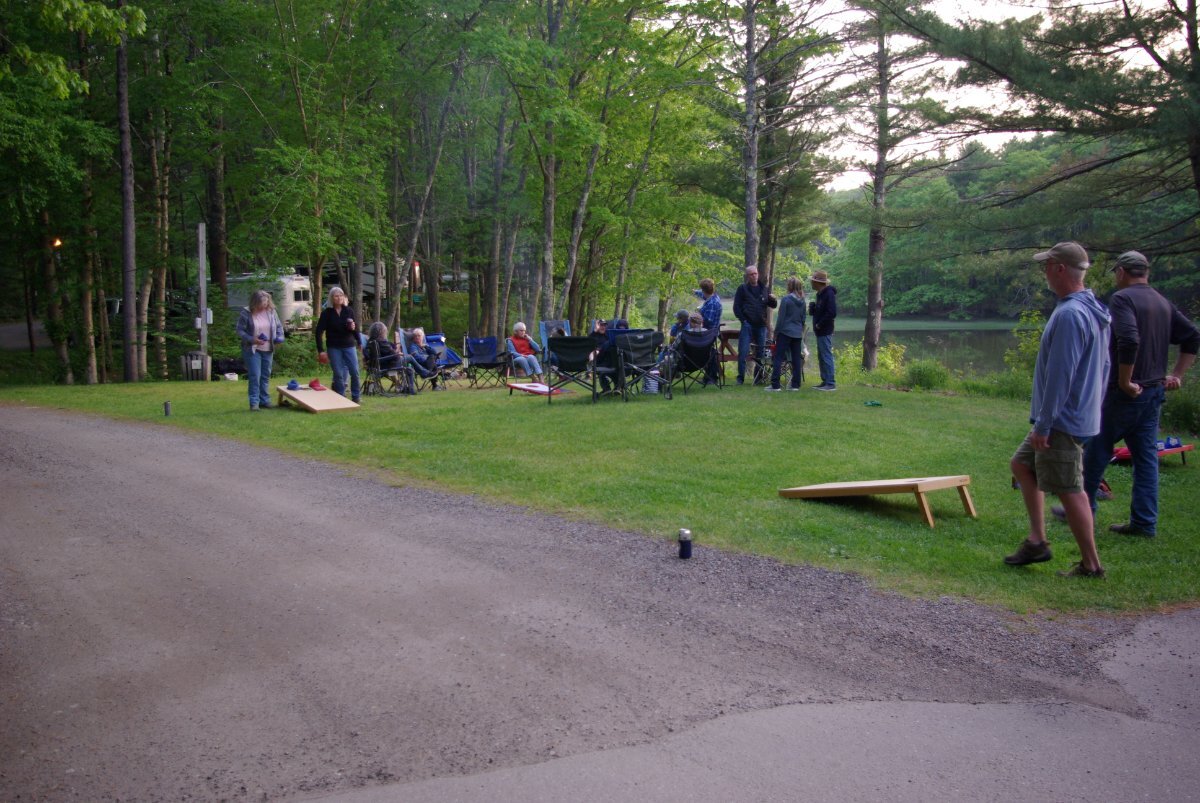
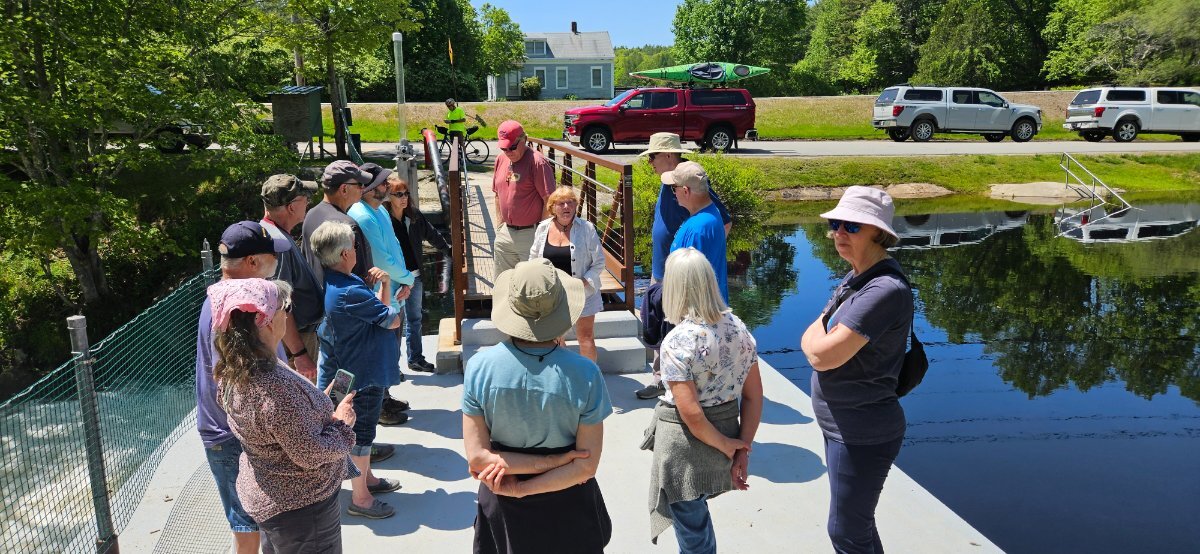
The 5th Annual Mini-Rally was held at the Shore Hills Campground in Boothbay Maine from June 2 to June 8, 2025. The weather was sunny for 5 days with occasional showers on 2 days. The event included a pot luck supper and door prize raffle, golfing match, cornhole match, presentations by CGI and the local Oliver sales and service center, Tim's RV and a catered lobster bake/barbecue chicken dinner to end the mini-rally. Below is some pictures taken during the event. One of 6 trolls at the Coastal Maine Botanical Gardens: A few of the Olivers along the river: Campground River at Sunset: Fish Ladder Tour The golfing participants: Pot Luck Supper: One of the many door prize raffle winners: Cornhole (bean bag) Tournament: Lobster Bake:
2 points
-
To finish up my post ... I did replace the the VIP 3000 with a new VIP 3000 from Barker. I would have gone with the 3500 but it has a 2 1/2 inch diameter and the 3000 has a 2 inch diameter. The Oliver has 2 thick aluminum plates with 2 inch holes and so the 3500 won't fit unless you enlarge those 2 inch holes to 2 1/2. I didn't have the tools or knowhow to tackle that job. The new jack works fine and I'm a happy camper again. Kudos to Barker as they gave me $50 off the price in spite of being out of warranty. John2 points
-
Quick Update: I received a reply email from Barker Manufacturing and then spoke on the phone in response to my email to them that included photos. They are going to send me a new tube sleeve with the proper weld at no charge. I will need to take the existing jack out and loosen the three set screws on the head. I'm told this will allow me to replace the steel tube (where the bracket is welded) on the existing jack and then reinstall so that it will be at the proper height. Happy that a resolution/fix is now hopefully in process...2 points
-
Picked up beer at the Kalispell brewery and camped at Whitefish State Park back in 2021. Last trip with our truck camper before getting Jolli Olli. We will be at the KOA in Polson, MT on Flathead Lake at the end of August on our way to Washington, Oregon, California, Nevada, and Arizona.2 points
-
Good morning Folks. I have a friend who has a car lift in his Mancave at Treasure Coast Vault and we are going to use that to lift the units on and off. I am giving him the Dometic for his Race Car Trailer for installing the unit. I ordered a 2 wire Honeywell battery powered thermostat for the Gas Heater so that I can give him the control box for the Dometic. I am thinking the drain will prolly be abandoned.
2 points
-
We did not have any fresh air coming in for this particular situation as the humidity outside was considerably higher than inside the camper. One unique characteristic of the Oliver design is you are sealed into a “plastic bubble”, if you will. Normally you will want to ventilate to alleviate the tendency to build up moisture in the cabin, but in this situation bringing in outside air would have reduced the comfort level significantly. My point in the original post was that while we were experiencing cool, rainy, humid weather outside, the comfort level in the Oliver was able to be maintained by only using the portable dehumidifier. Using the Air conditioner would have made the cabin chilled inside in order to try and control humidity, and turning on the ventilation fan only introduced cool air while increasing the already humid conditions inside. It was kind of a third option to use the humidifier only, and turned out to be very effective in keeping the humidity under control. The side benefit was the humidifier puts off a noticeable amount of heat so it actually warmed the inside of the camper while reducing the humidity. Thus not needing the AC or furnace in these particular conditions. You could always crack open a couple windows for ventilation, we just chose not to because it was so comfortable throughout the night. Again, with experience you will find that the one thing everyone battles in an Oliver is humidity. The AC works marginally at best regarding humidity control, and if the outside humidity is high with lower temperatures, it’s a losing battle. The dehumidifier is a game changer for us and an essential tool in the arsenal of comfort ( think menopause 🙄). 😆 Regarding the AC and fresh air intake, the AC only recirculates cabin air, therefore the ventilation fans and open windows are the only option. I don’t think CO2 is a problem, although some may be sensitive to slightly increased levels. It would be interesting to bring a CO2 monitor into an Oliver to test levels inside for different scenarios. On the other hand stale air is always the issue with the camper sealed tightly so some ventilation is usually the solution. Hopefully this helps answer your questions.1 point
-
I purchased one of those small dehumidifiers based on this discussion but returned it after one session. It lowered the humidity in the trailer from 78% to 74% after 6 hours - I was not impressed. I found it is much easier to control the humidity (assuming it is cool enough outside) by ventilation as you describe. The notion of fresh air and ventilation appealed to me and a small dehumidifier is just noise and nuisance in the system. I am boondocking almost exclusively, so power consumption is an issue. I also am generally not camping in wet, humid conditions. The biggest issue is when it gets cold at night - humidity and condensation will go up if windows are not crack and furnace is not running.1 point
-
Well, I certainly wouldn't leave it in long enough to get stiff. Felt tighter and buckled slightly after it was installed and warmed back up, so I'm glad I did it.1 point
-
There is always fresh air coming into the Oliver due to the "scupper holes" in the bottom. Therefore, it all depends on how much fresh air do you want. One of the first things I always do when setting up my Ollie is to open the bath roof vent. Then, depending on temps, humidity, precip, etc., I open other windows/Max Air fan (or not). Bill1 point
-
Chris: I have CONFIRMED that Dexter does make the D60 5200's with the SC of 50". They have been in use at OTT in some hulls under #100. GJ1 point
-
In this situation, are you getting any fresh air into the trailer? I would think CO2 and other chemicals would build up quickly. Related, when the AC is running, do you know if it pulls in fresh air or is it recirculating the air inside already? I'm thinking I'd always want a window cracked or roof vent open at least.1 point
-
Your question is posted under the “Utah’s Mighty Five” trip header — maybe try reposting your question under a different section of the forum as a new post — (I’m using my phone here, or else I would look at options for you) @topgun2 might be able to steer you in the right direction.1 point
-
I assume that you already know - watch the wind out there. It can come off the reservoir without warning. Bill1 point
-
They told me that they solved the problem by just leaving the black gaskets out. I removed all of mine and it solved the problem with the streaks.1 point
-
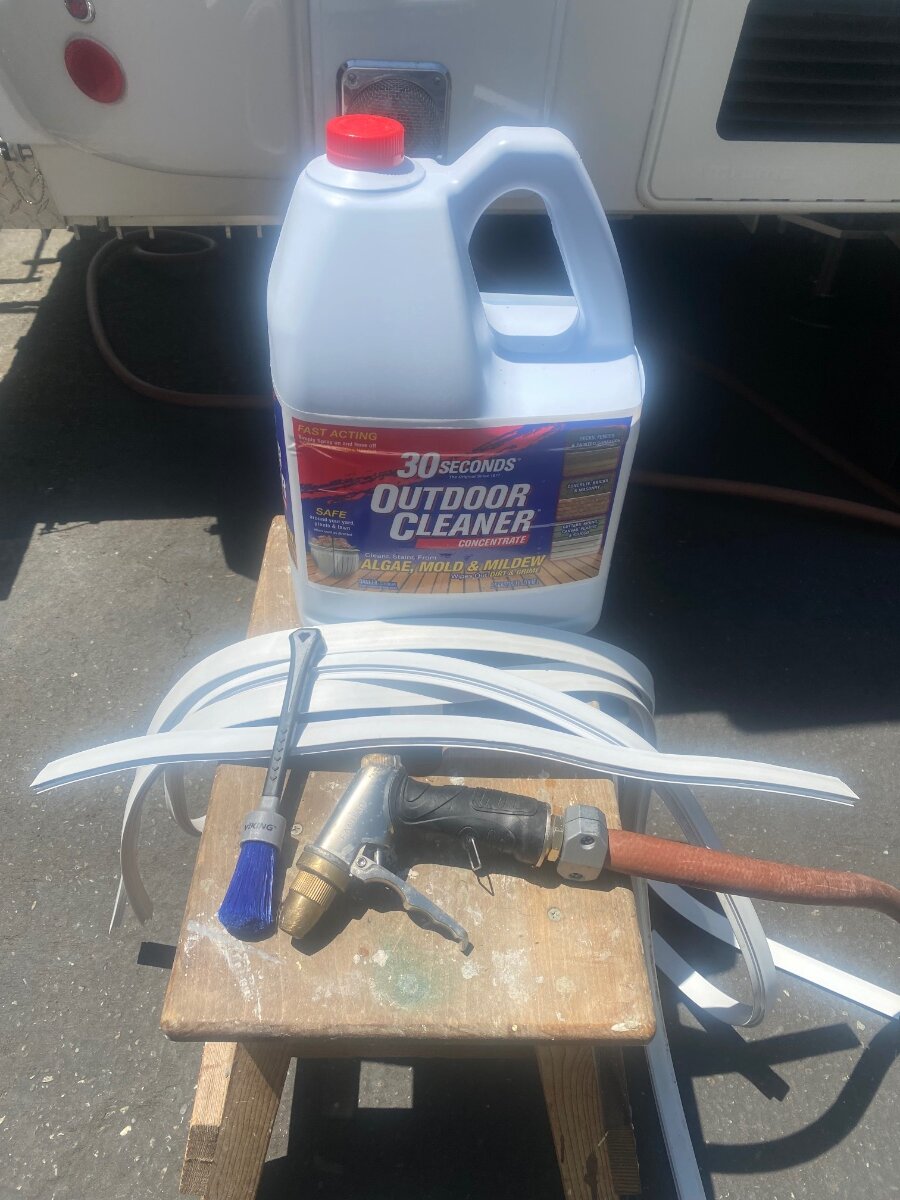
OK folks, (TLDR - Stained window seals? Soak overnight in Dawn & Bleach water.) Now that I’ve got that whiny rant out of my system, I’ve come up with a solution that saves $100 and gives me some satisfaction. I had pulled the window seals out of all four windows last season or so, scrubbed them with a toothbrush and Comet, gave them an hour soak in bleach water, and got them somewhat clean. I even moved two of them to opposite side of the trailer so I could install them “upside down” so that the more visible part was clean. They hadn’t come completely clean, but were a lot less unsightly. As I mentioned before, because I scrubbed (abraded) them, I figured they wouldn’t come as clean a second time. I’m thrilled to report that I was wrong! I pulled them off again yesterday. Coiled them up in the bottom of a plastic bucket. I put a cup of household bleach and a generous squirt of Dawn dishwashing liquid, and sprayed about a gallon of water in the bucket. I let them soak overnight. This morning I was pleasantly surprised to find that they came even cleaner than the first time! There’s just a mere hind of a shadow of the old stain on just one small part of one seal. I would pronounce (nearly) “as good as new”! I plan to coat/seal them with the same treatment I’ve used in the nose of the trailer to make bugs release easier. So - for little more sweat equity than it would take to cut and install new ones - and $100 less - I have window seals I’m quite happy with.
1 point
-
When you order the new black gasket material you will have some left over after installation. Keep this leftover material and when the gasket shrinks just cut a piece of the extra and splice it in at the top. Not really noticeable if all of the ends are cut squarely and the splice is at the top and even if it’s not perfectly tight it will still keep excess junk and insects out of the tracks.1 point
-
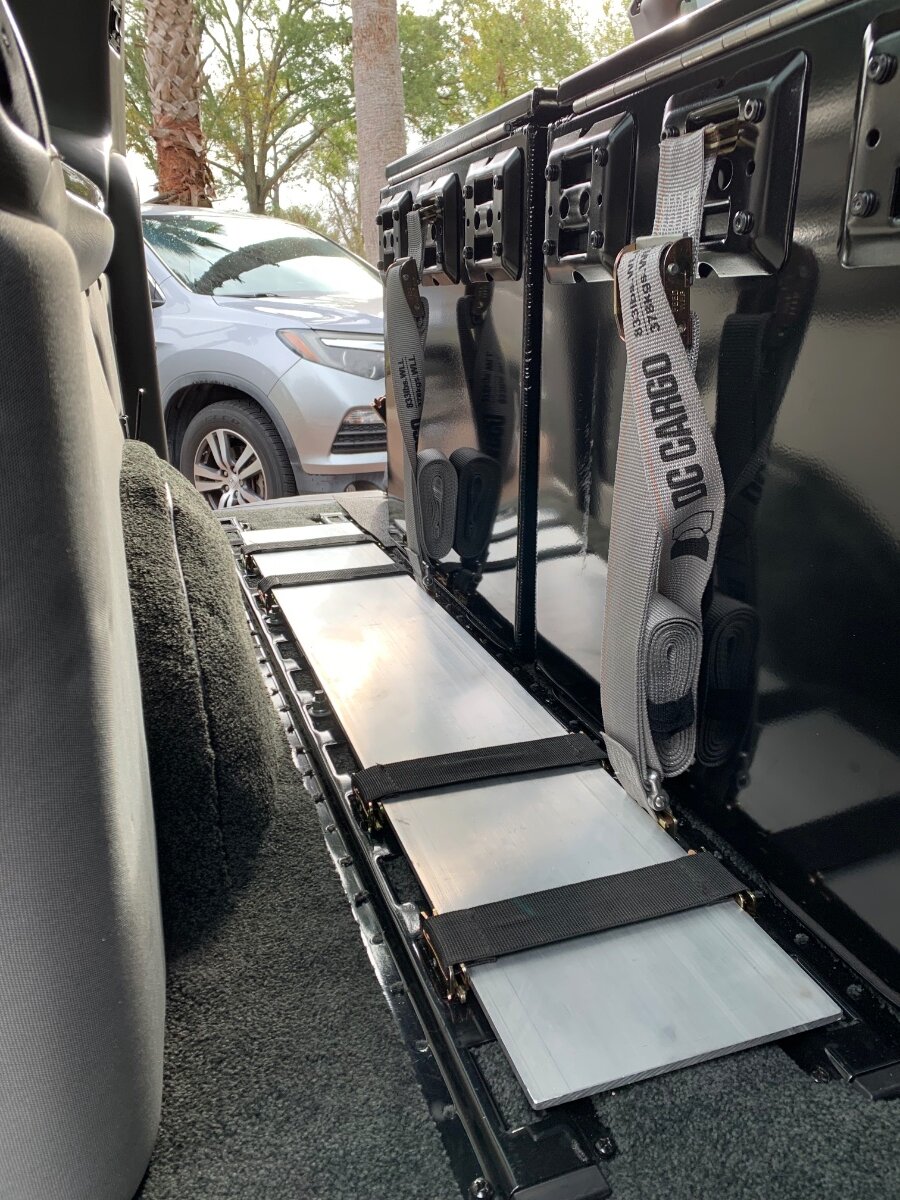
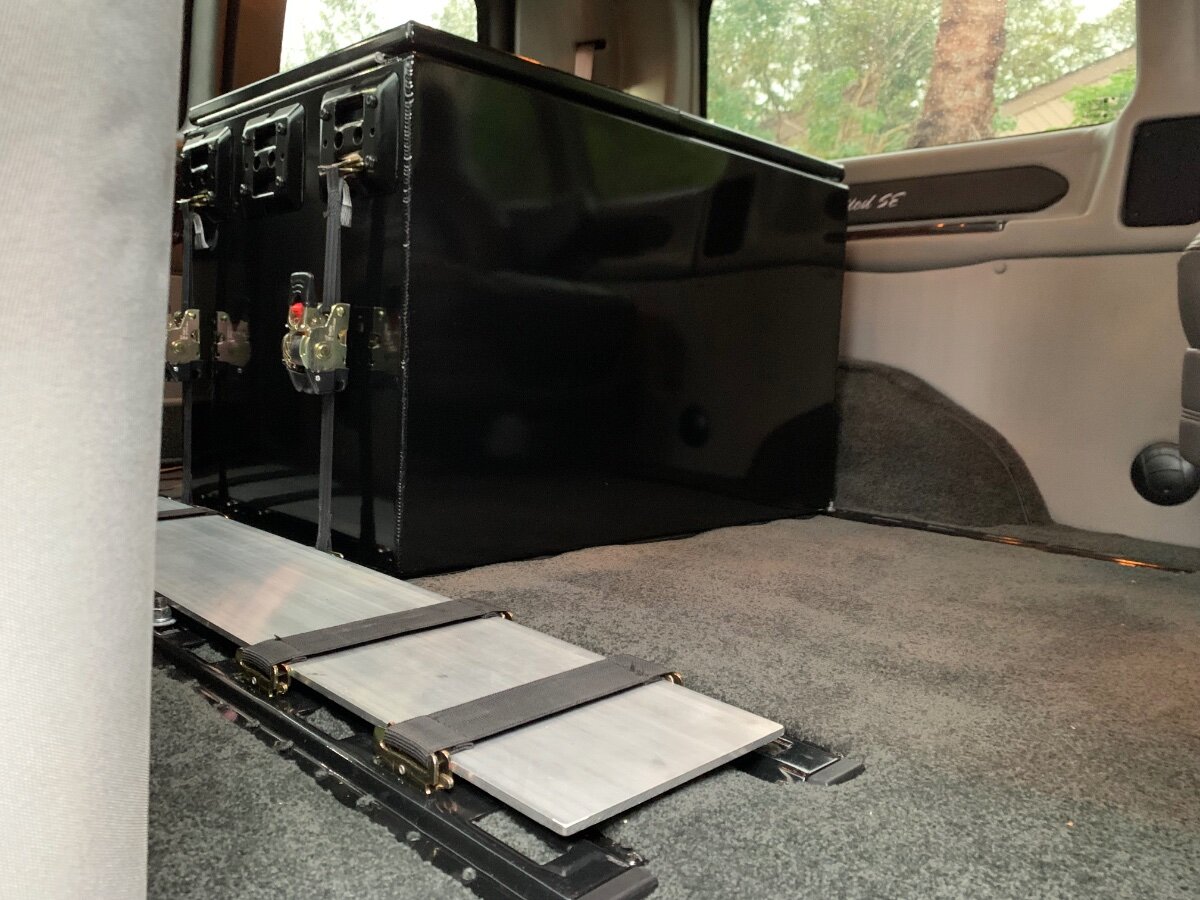
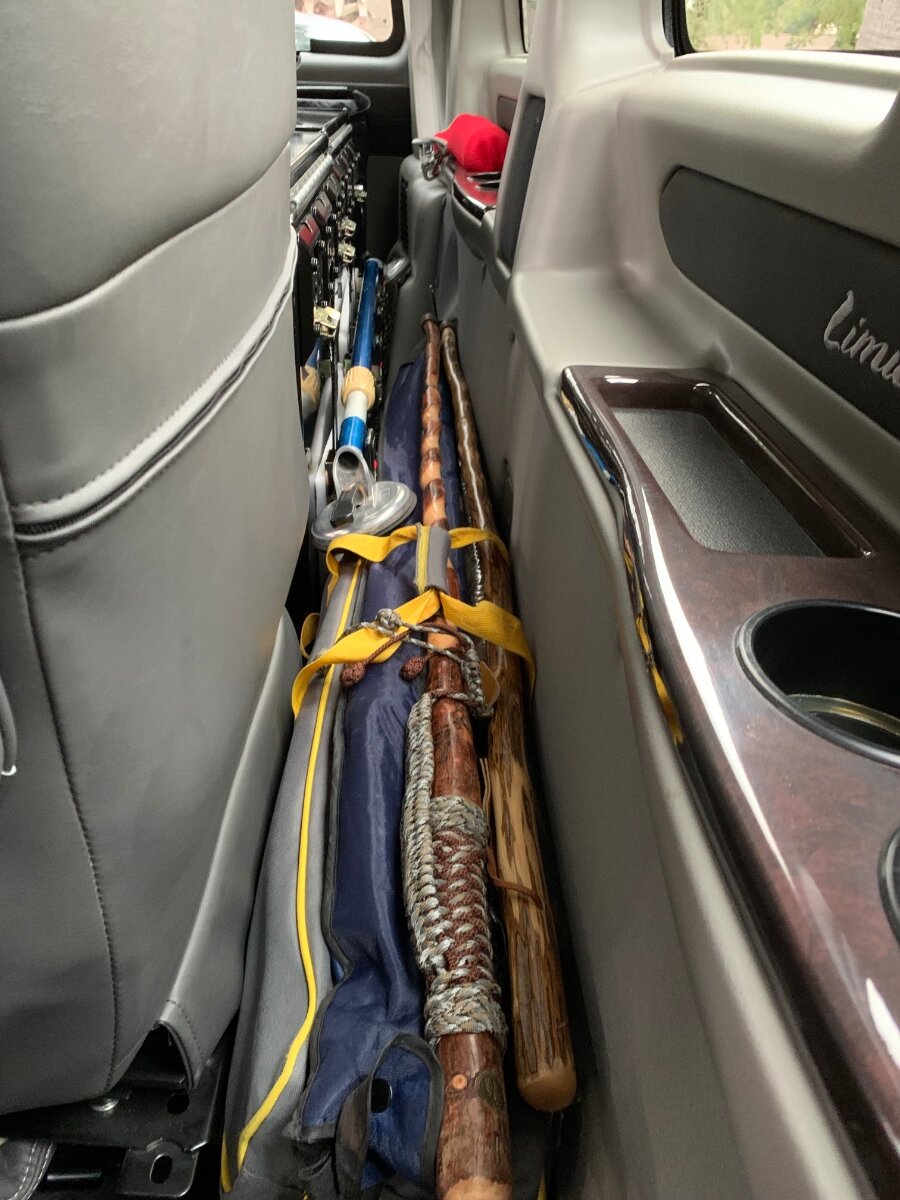
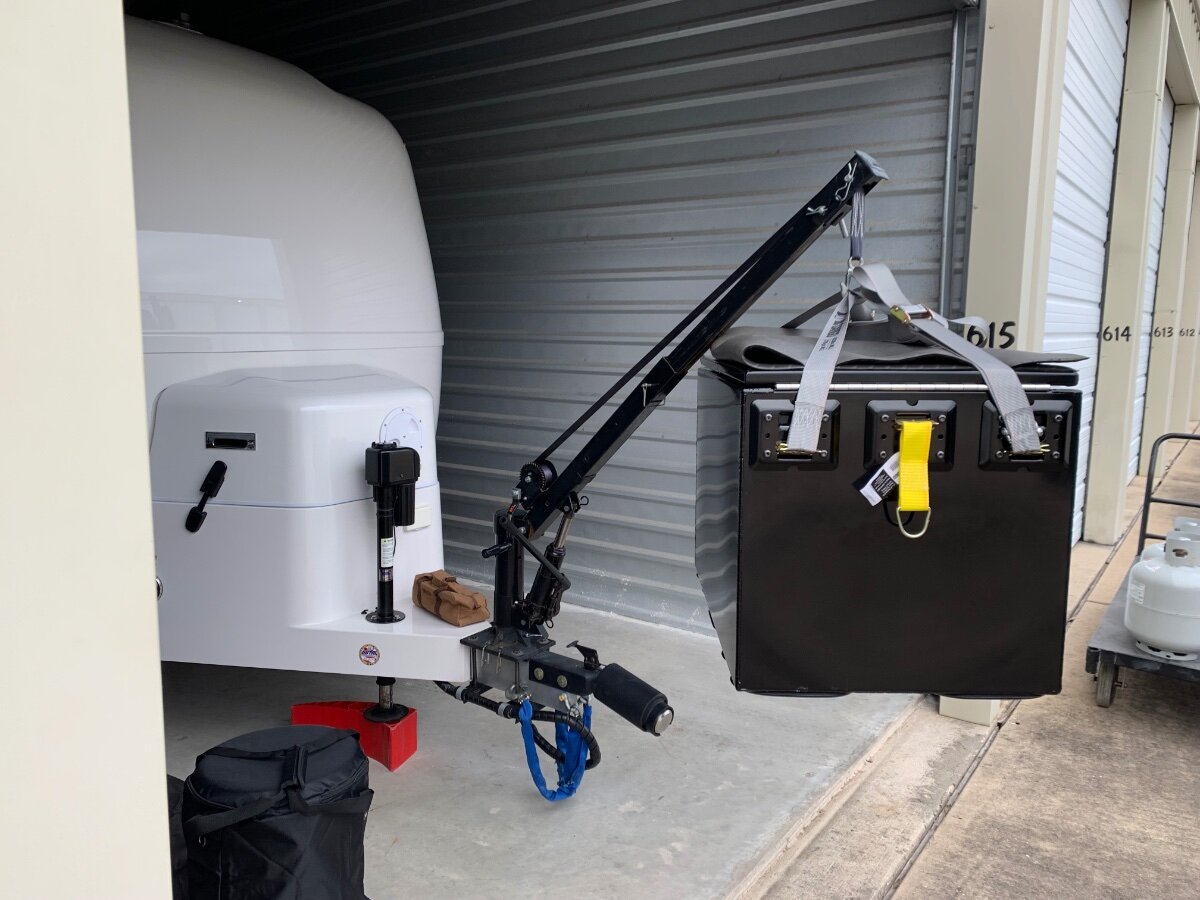
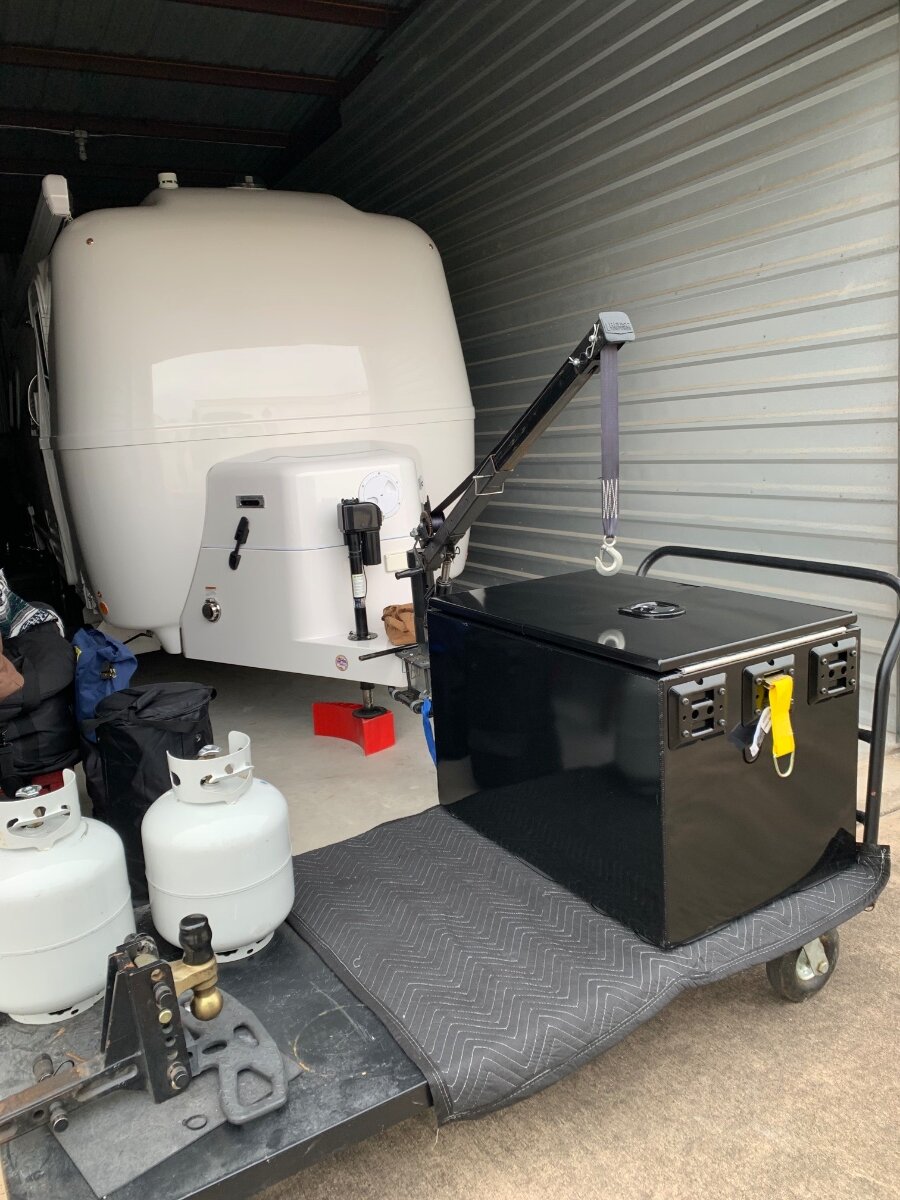
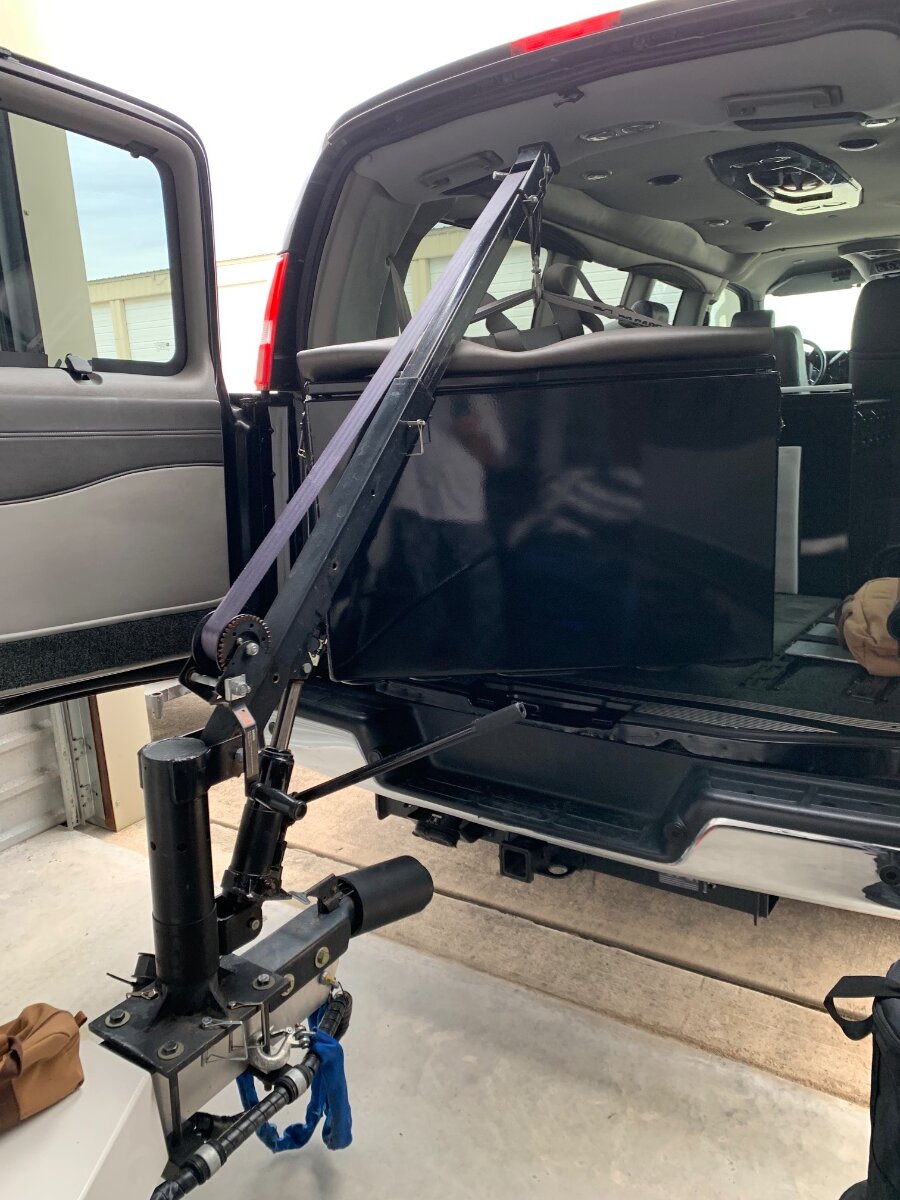
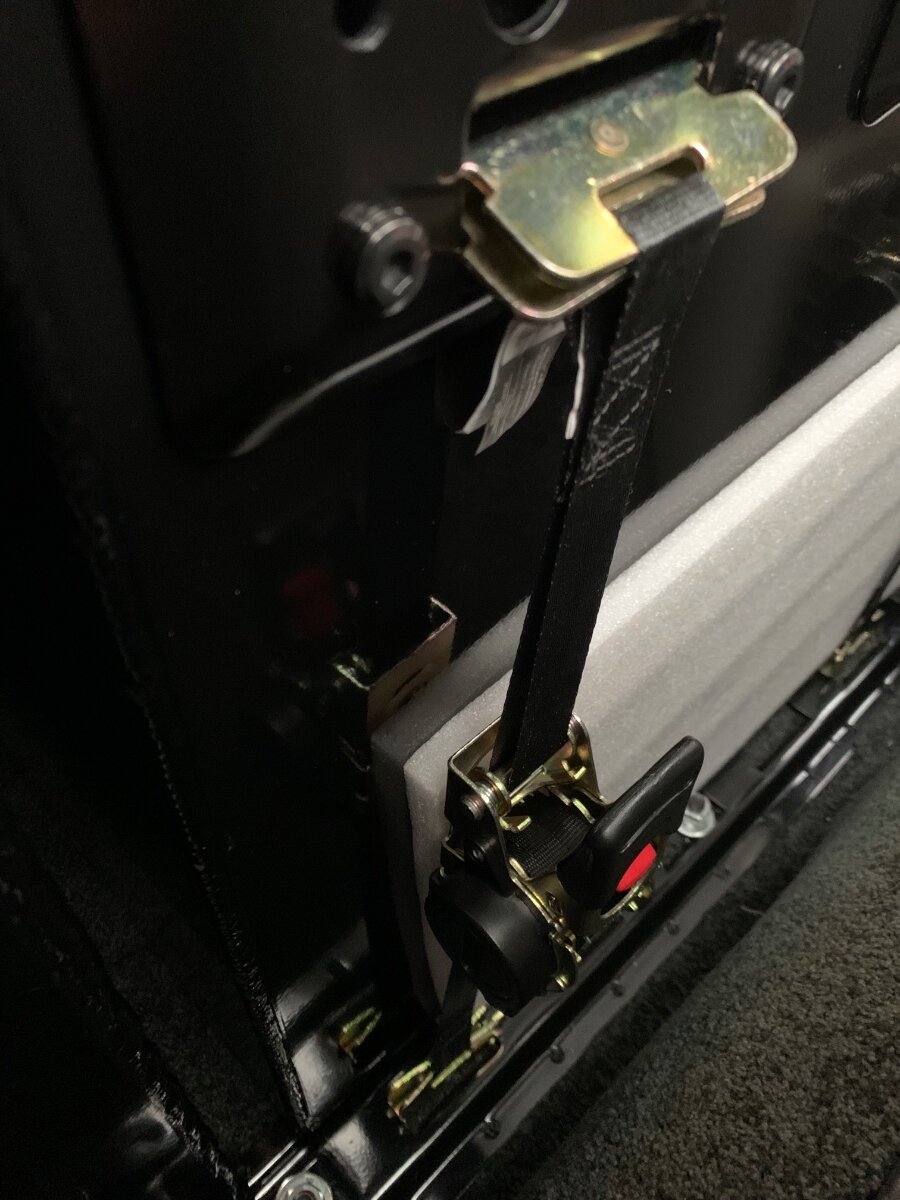
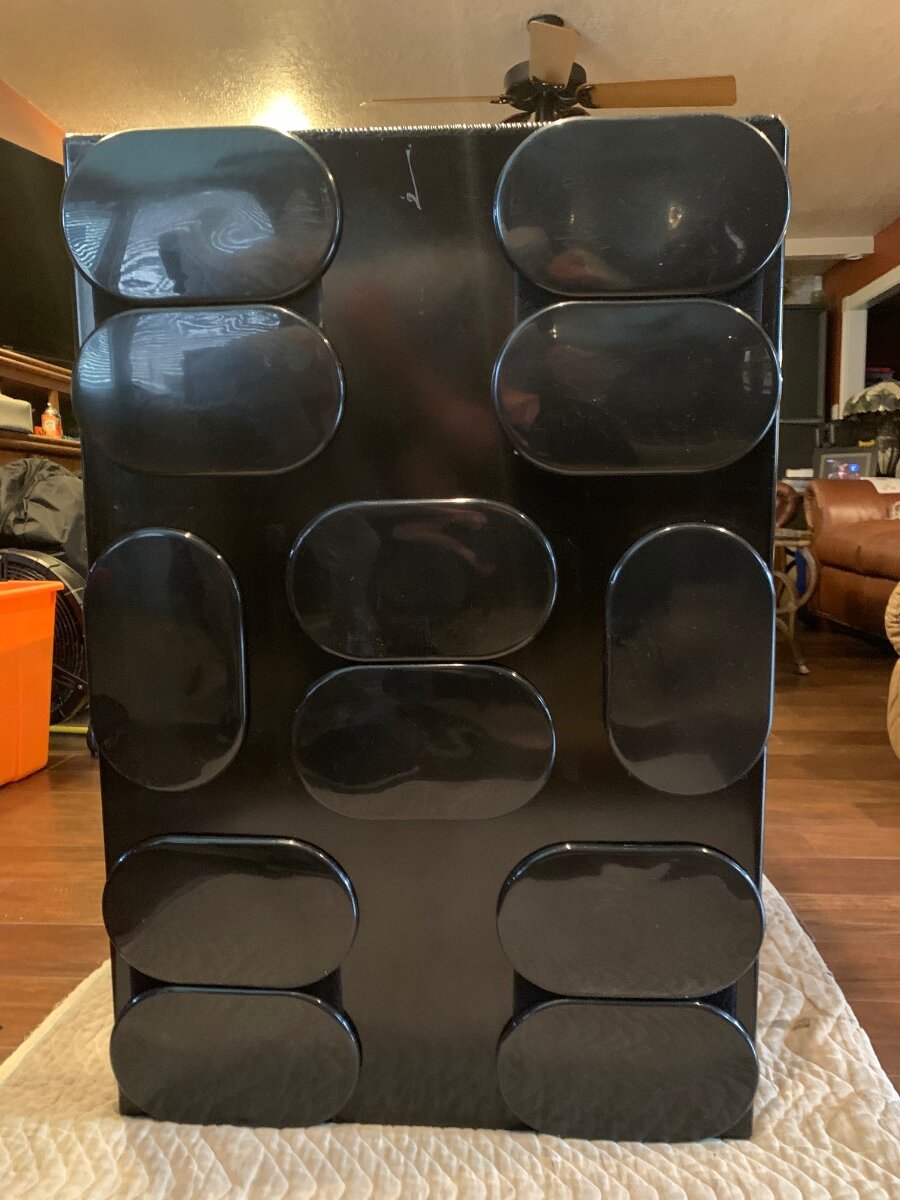
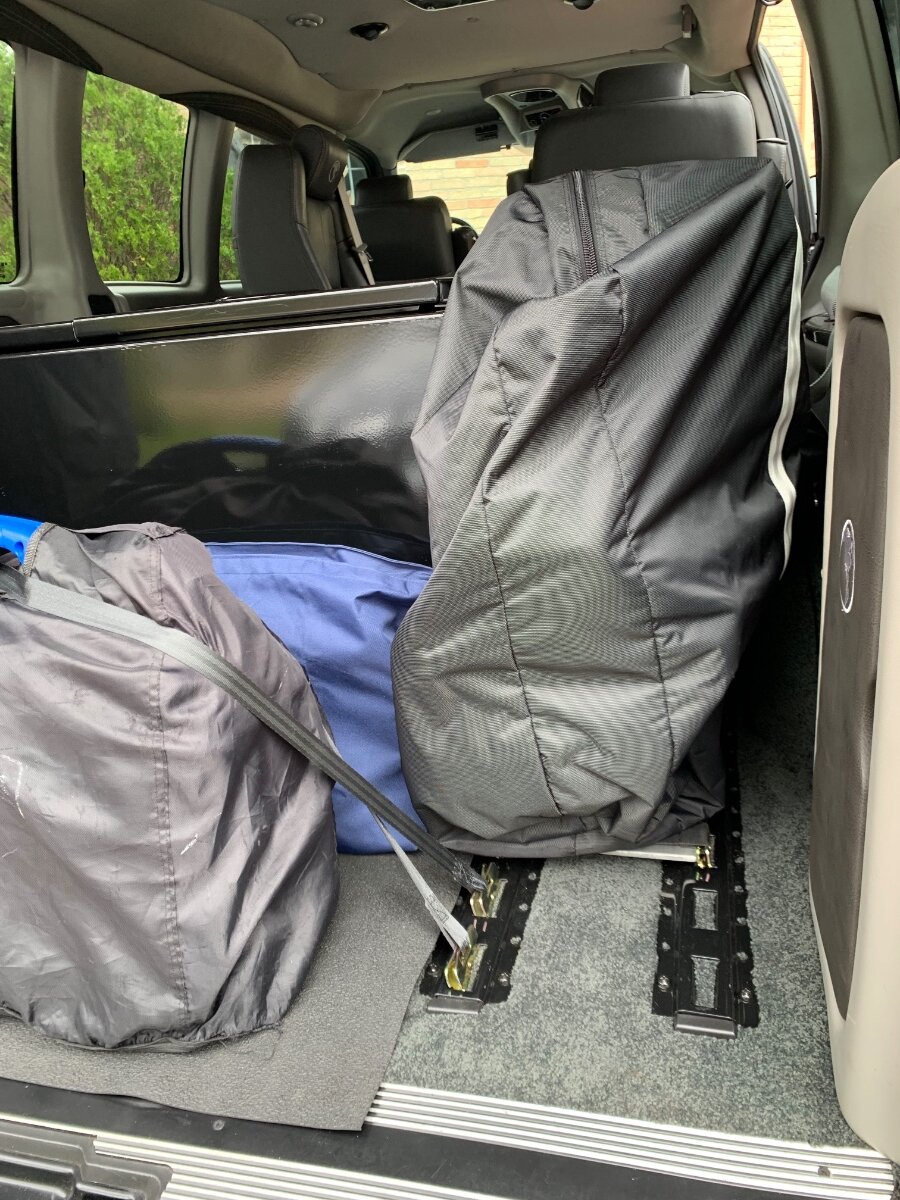
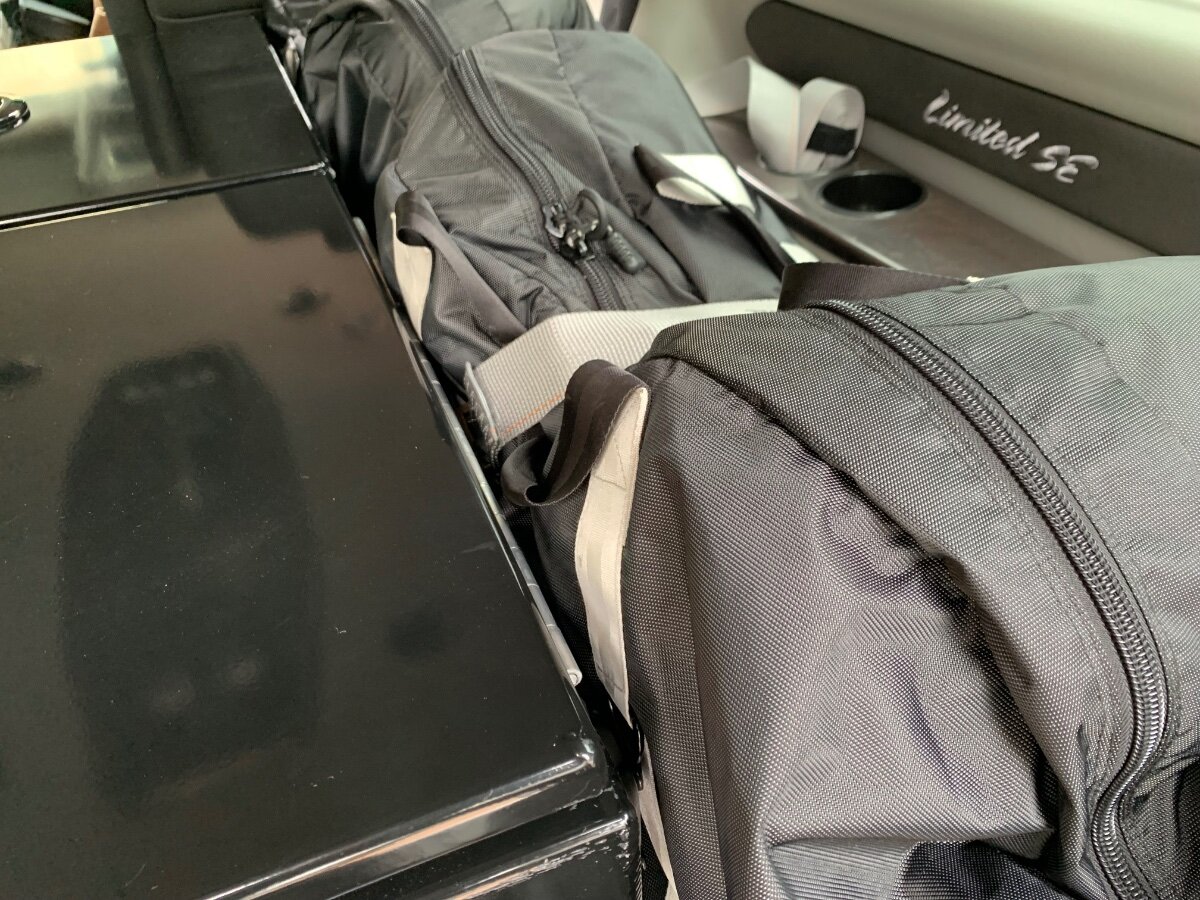
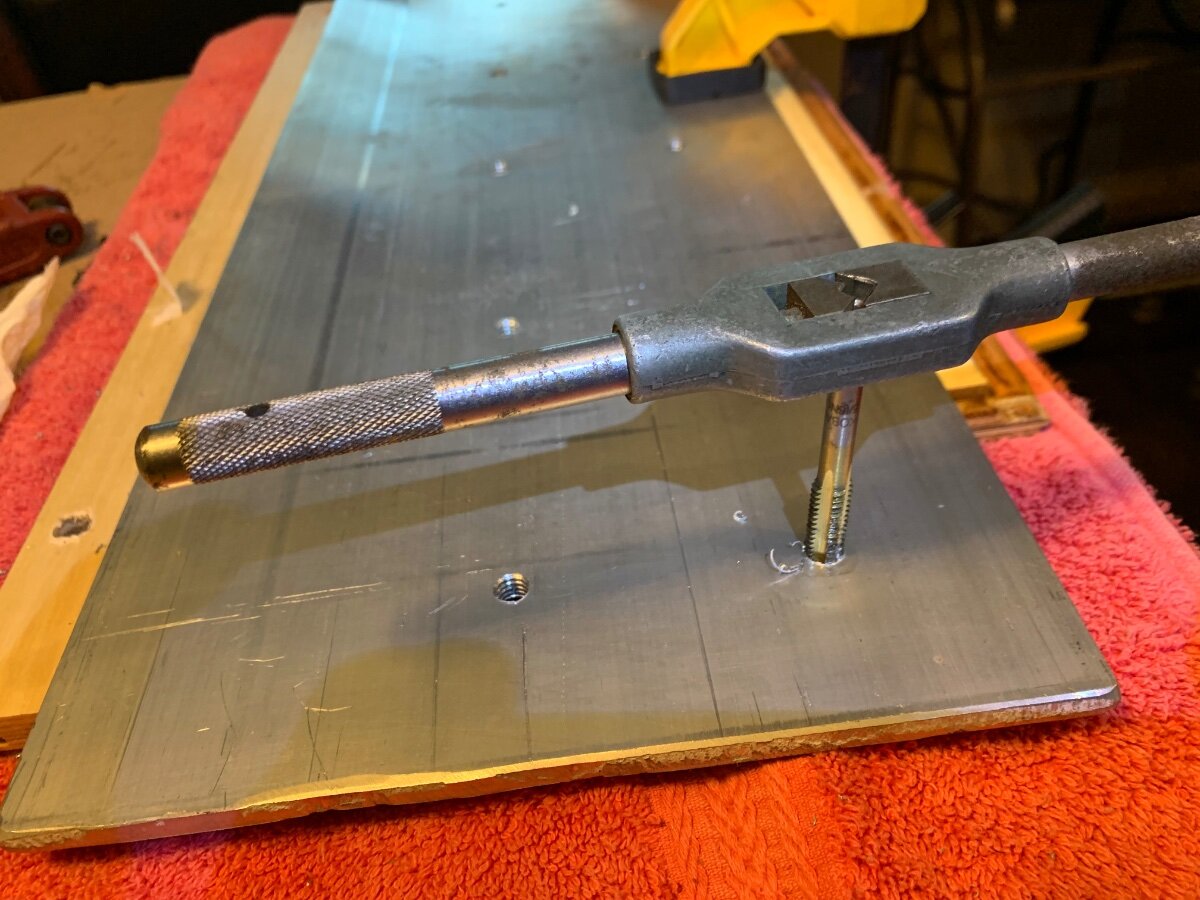
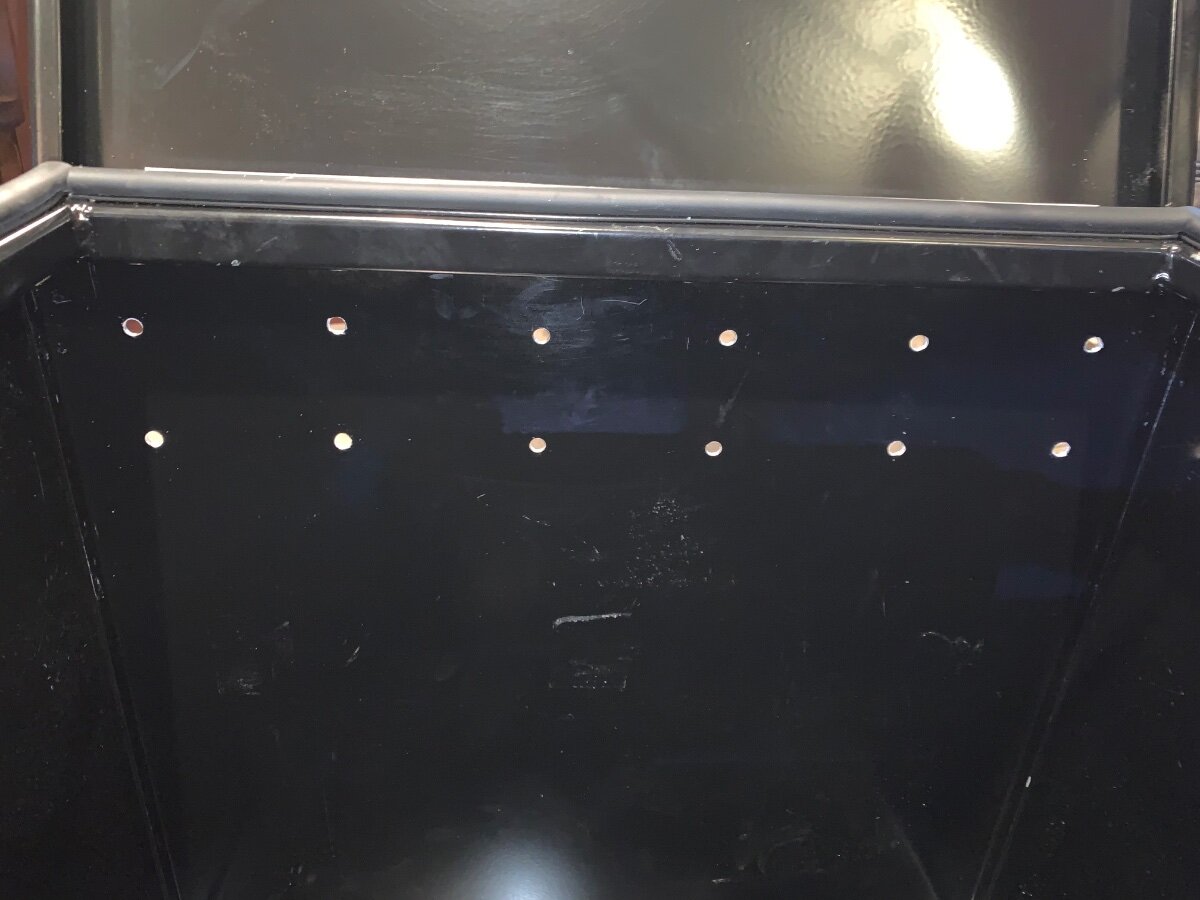
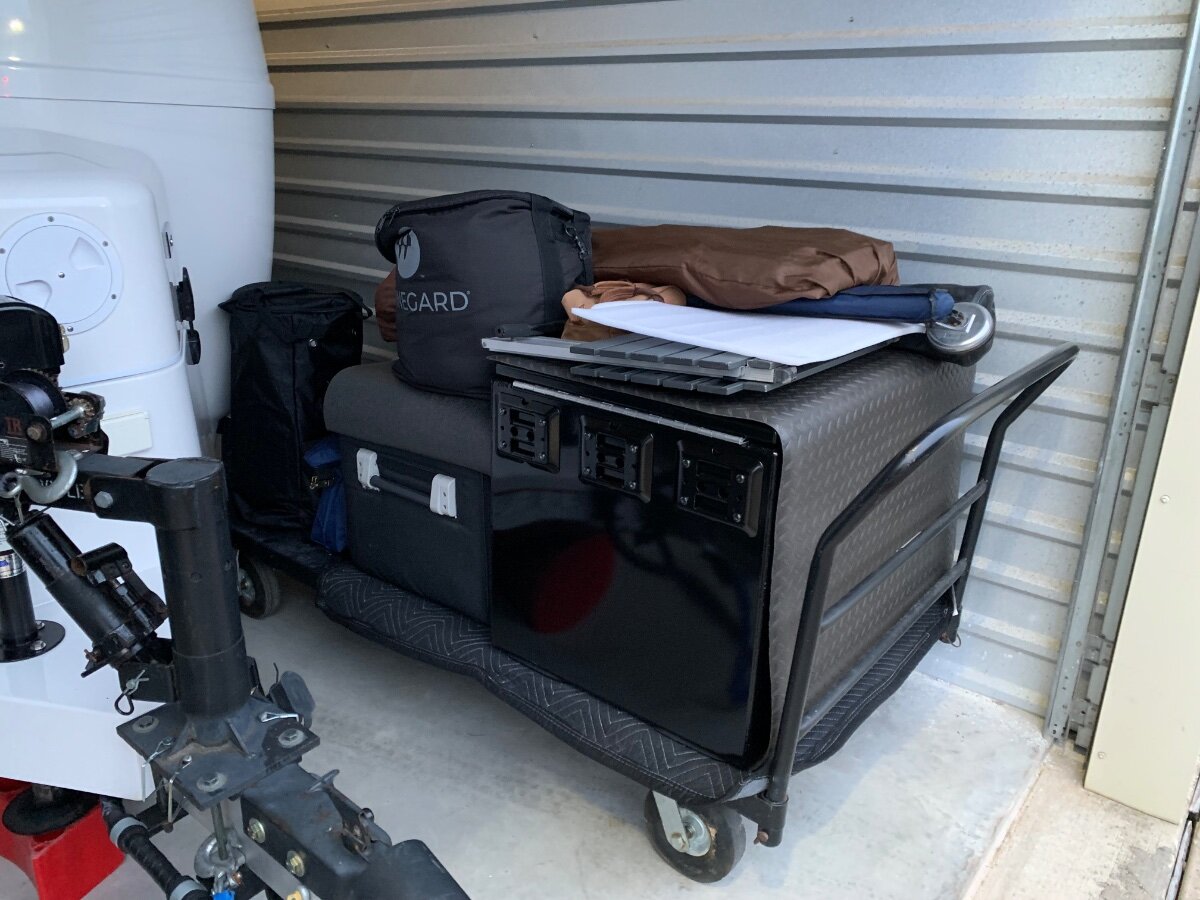
The following was copied from a former post and provided herein to better consolidate progressive modifications to the Savana in regards to the opening statement: “Ultimately, two storage boxes were acquired to safely stow much of the cargo; specifically, underbody tool boxes.” Cargo Securement Assurance/General Discussion Posted December 14, 2024 When towing with a truck, the majority of ‘stuff’ brought along on a camping trip or road adventure is conveniently stowed within the various holds of the Oliver and bed of the TV. However, even though my former crew cab Silverado 1500 had a storage box under the rear seat, it was mostly used to accommodate service tools and supplies for the truck and thus, found myself utilizing the rear floorboards and seat as additional cargo space when traveling. There’s peace of mind knowing cargo carried in the bed of a truck is adequately secured, not so much for that behind the front seats! All one needs is something going on from behind when something tragic is happening up front, no bueno! We’re required to wear seatbelts for good reason, proper securement of vehicle interior cargo should be of equal importance. I would be interested in learning how owners with trucks/SUVs safely carry their cargo within. My awareness of cargo securement was heightened recently with acquisition of a converted cargo work van as my TV; specifics are detailed in a forum post last October under ‘Towing an Oliver’ and titled ‘2019 GMC Savana 2500 Cargo Van’, if interested. Unlike service utility work vans that generally have a partition or cargo net, along with containment shelves and boxes, to secure cargo and ensure personal safety; conversion and passenger vans are more designed for ‘people’ cargo. In the aforementioned forum post, I addressed cargo containment, but cargo securement was still under consideration. Here is what I did to address the subject matter: Maiden voyage to Texas Oliver Rally, Inks Lake SP; cargo contained, but not secured! DC CARGO E-Track system components were obtained via online purchases from Tractor Supply. Each of the Buyers Products boxes were fitted with six of these brackets, three at the top of each end. A 1/4” x 8” aluminum backing plate was used to attach and strengthen these mounts. Backing plate cut to size, holes drilled and tapped for mounting bolts. Containment boxes prepped for backing plate and E-Track bracket installation. Super Sliders affixed to bottom of containment boxes for ease of handling on interior carpet. Three E-Tract rails fastened to deck to accommodate securement straps. Aluminum plate at floor level is runway for folded e-bikes. This box was slid rearward once back box was removed for storage at COW Barn. It primarily contains items typically kept in the TV with additional storage space, as needed, a trunk per se. Ratchet straps best used for non-towing vehicle use. Box securement once e-bikes are deployed. Wider Cam straps best used for e-bikes and subsequent box securement when traveling. Rear box is for camping ‘stuff’, forward as a trunk and more ‘stuff’. Driver’s side box securement using ratchet straps. View of e-bikes ready for ‘takeoff’ on runway! Cam strap securing e-bike. Ratchet straps for spare propane tank, generator and other needs. Items too long for the containment boxes are stowed behind at side panel. Oliver-mounted hoist used to transfer box at storage facility. TV moved forward to enable box positioning. Cam straps used for the lift. Containment box lowered onto platform cart. Liking the modular containment storage.
1 point
-
Well we just hit 26 pages. I remember asking the Mods to close this thread after 12 pages, but it was not my thread to close. Most of the additions I've read here in the last 10-15 pages are slight variations of the comments and questions made in the many pages before. I just reviewed pages 1-2. And yep, that's all you need to know on this subject. Except that a few pages later we learned that the Alcan springs are actually rated at 2750 vs. 2000 lbs. There was the same concern on page 2 about this rating being too much. I had that concern early but no anymore. We're on a long road trip where we have not before towed so many highway miles. Our OEM springs are in very good condition, no sag, still nicely arced and perhaps Dexter used better steel in 2015 than more recently. Who knows but htey're in excellent shape and no rust given where we live. When the other day, I crossed railroad tracks that were on about a 30 degree angle to the road, I watched our Oliver in the side view mirror. The Oliver waddled like a duck going over those tracks, side-to-side, the top of the Oliver swayed a good 1 1/2 ft like a pendulum both ways! These springs are under-rated, as the Alcan rep stated. It's crazy that this is our 2nd longest thread, just behind "Where's Ollie" at 28 pages! This truly means not enough of you are posting travel pics! 🤣1 point
-
Thanks Mike. You are appreciated.1 point
-
Close your screen while standing inside and look at the top curve in the screen door meets the frame. Keep the actual door open as you will not be able to see the gap with the actual windowed door closed. You will clearly see a gap where the door does not meet the frame for the screen door. I think it is just a side effect of the frame being mounted to the curve surface of the trailer. I would not try to bend the screen door to match as I think it would collapse the thin door frame. Simple enough to just add the furry seal. I looked at several different year models while at the rally, including the two 2025 ones on display and the all had the same gap. Hope that helps.1 point
-
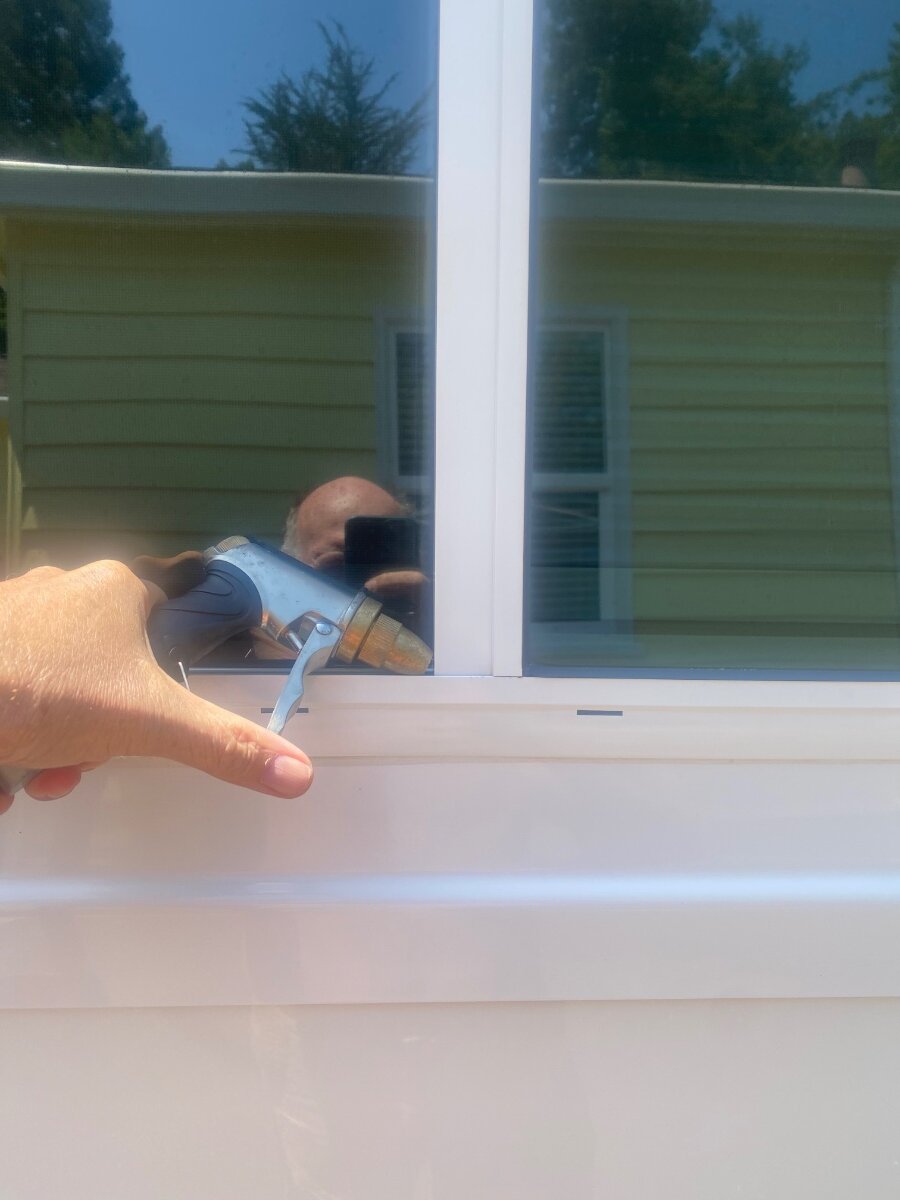
Here’s a quick and easy shortcut! After following this thread, I decided to clean our window tracks too. We live in the rain forrest and they were full of redwood needles, moss, dirt and mildew. The white rubber seals were terribly stained even after a hard scrubbing with a stiff brush. I was going to order new seals until I gave them a quick soak in “30 Second Outdoor Cleaner” from Ace Hardware. It's amazing! They looked brand new. I picked up some pipe cleaners to clean the track, but I didn’t need them. Instead I used a straight brush and a water hose nozzle. The water jet went under the fixed window section and washed all kinds of dirt out of the weep holes. I just pulsed the water jet until it ran clear. We moved the bedding and seat cushions out of the way, but there was minimal leakage inside. I'll be doing this every year now. Cheers, Geoff
1 point
-
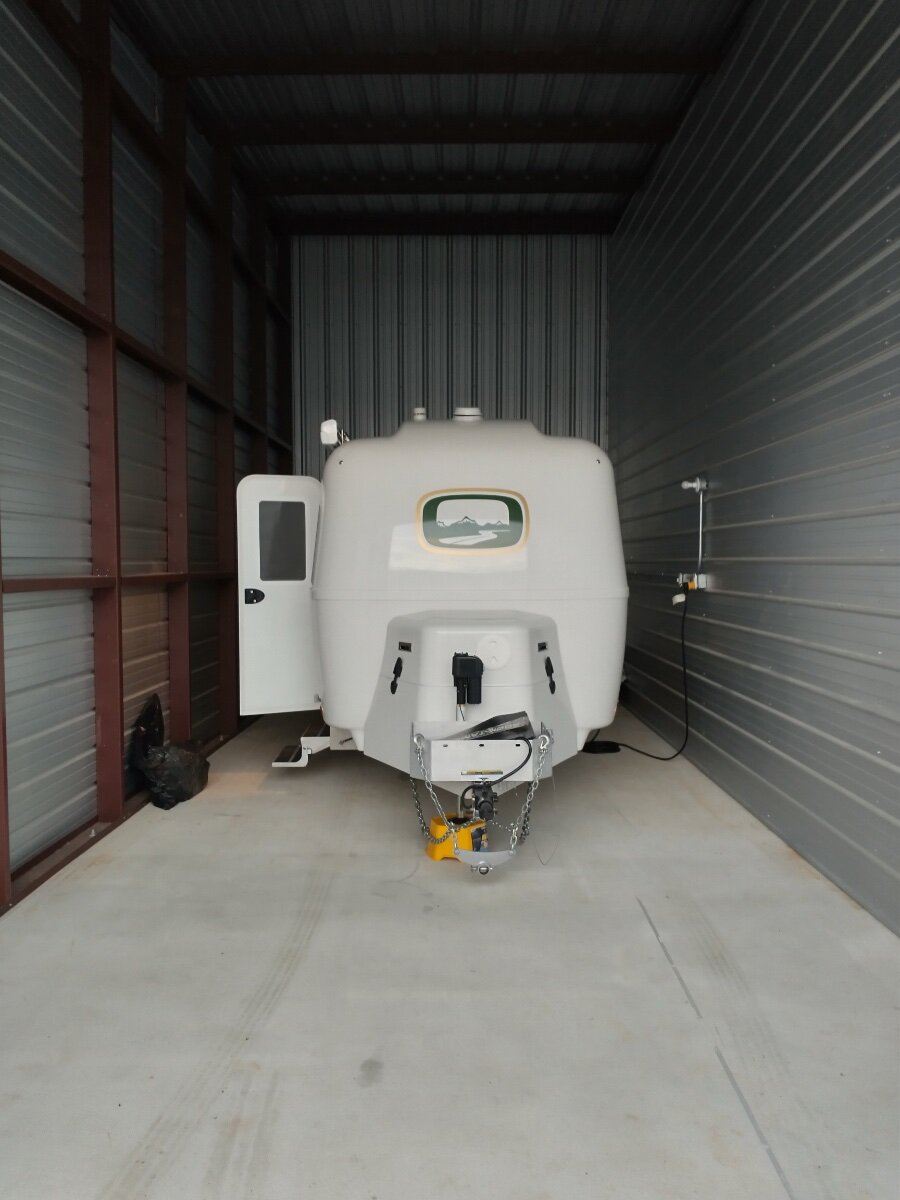
If you have the property, that’s a great option. Since we’re all but full-time, we have no property. We opted for indoor storage to keep not only the sun and birds, but the millions of mud-home-building insects out of every nook and cranny. Pricey - but worth the cost!
1 point
-
Yes, 2" up from unhitched height. Once chains are snug at this height you should get plenty of tension when you lower the jack. If your TV isn't sitting level when you're done you might have to repeat the procedure by jacking a little higher before snugging the chains. So far I've used the 2" height on two separate vehicles and it worked perfectly for each.1 point
-
In my post titled Drieha Atmos 4.4 Home Install/Ollie Modifications I recently provided comment on an easy remedy to the humidity issue with my unit, which may be applicable to the Truma Aventa, as well as other makes and models.1 point
-
Same result here. Foolproof, easy to fine tune, and responds instantly. It is the overwhelming choice in the Toyota community; not a joke.1 point
-
That's one opinion and mine is totally different. When I made the decision to buy an Oliver, I took delivery in Georgia. The seller and I had made the deal in November, so I had about 6 weeks to get my 2014 Land Cruiser ready. I needed an Andersen WD hitch and brake controller. My first was Tekonsha Prodigy 3 and I could not find a place to mount it that wasn’t in my way and it looked like a deck of cards screwed to the dash. So l bought a Redarc, which plugged straight into the Toyota wiring harness. I remove a blank button cover on the dash and modified it to accept the joke as you call it and the Redarc looked great and work flawlessly for the 5 years I used it in the Land Cruiser. Mossey
1 point
-
I like the OEM equipped sliders! Though until I added the fan, we had not used the rear slider and it’s very difficult to slide. Laying in bed, it’s a simple one-handed slide to open and to close when it gets colder late at night. Can’t do that with an awning, lock bolts on each side, requiring you to stand up, lean over using both hands. I’ll keep our sliders and with new external rubber they are in great shape considering 10 years of age. Now we could wish for blinds 3/4” thick vs. these clumsy things that stick out 3” into our living space, my big body or arms hitting them every night, and you can't fully lean back sideways at the dinette table. We don’t, though some have issues with them falling off on bumpy roads.1 point
-
I'm just going to purchase the whole shebang. I would like to stay married🤣1 point
-
Do all you can to take care of your existing windows much as possible. A friend just had Oliver replace one on his LE2 that a neighbors lawnmower shot a rock at. He was all in for $1000 including labor at Oliver😳. Oliver had to special order his replacement. And of course the neighbor denied any liability that his mower did the damage. When we roll in to a CG and if they are mowing we usually wait until they finish and the area is clear of weed eaters and mowers before set up. We have even nicely asked some CG’s to not mow or weed eat around our site until we depart. Surprisingly most owners are pretty cool and understand. Sounds like overkill I know…but beats the alternative of a big ding in the Oliver gelcoat or worse yet replacing a window.1 point
-
We have two of these we use at home and in the Oliver and they both have performed flawlessly for the past 18 months, and the one in OllieHaus bounces down the road while traveling. We rap in a blanket and set it upright on the floor while traveling.1 point
-
1 point
-
I really appreciate the duplicate post in that I'm one of those that does not "do" Facebook. Bill1 point
-
Related to this, has anyone used the dehumidfy mode on their Truma AC? Does it use significantly less power than simply running the AC? Looking at this issue from a humidity control approach while boondocking.1 point
-
@mossemi I had to correct the attached Amazon Link. Should work now.1 point
-
FYI: I ran the a/c on my LE2, while it was in my driveway, for 2 hours the other day, that test took my batteries down to 50%. Two and a half days of good sunshine had them back up to 100% with nothing else running. We have the Lithium Pro package on hull 1213. I hope this helps.1 point
-
I don't have Lithium Batteries, but I agree with some of the other postings that it would take a lot of batteries to run the AC for any length of time. I had bus conversion with 640AH of batteries, and I could not run the AC for any long length of time without a generator. The other side of the equation, is to getting those batteries charged up after being drained down with the solar. It is just not enough power. I ended up buying the Honda EU2200i generators to run the AC while boon docking. We only need it a couple of times a year, but we boondocks 3 weeks ago for 5 days and it was between 95-100 degrees. We hiked all day long and had a great time, but it was nice to be able to cool down the trailer in the evening so we could sleep. The AC had to run for 3 plus hours to get the temps down inside. It was also nice to be able to cook dinner inside the trailer in some comfort when it was really hot outside, without heating the inside of the trailer more from cooking. I love it that I can enjoy being out in nature, and still live in some luxury, No more backpacking and sleeping on the ground for me. Sometimes we will use the Microwave on the batteries/inverter to heat up water for our night time teas. The batteries can do this just fine, but you are only taxing the system for a few minutes.1 point
-
I’m not sure if you missed anything, but picture this, if you will. You’ve had to travel, perhaps to a June wedding, maybe staged in the south or in the west, you made it through the ordeal and now you’ve got some free time so you decide to slowly make your way home, boondocking along the way thinking “this will defray some of the cost of this load of horse shite.” It’s HOT, daytime temps are consistently above 100°, it won’t cool off enough to sleep until well past midnight, if then. The ability to run the AC for even a short period of time to cool things down enough to go to sleep seems, at least to me, a pretty good option.1 point
-
Wow. Quite a first post. I have to agree with Sherry, a few (not many) of our members can be very tongue-in-cheek with their comments. Most of us who have been here a long time stay because we want to help new owners. We were new once too, and looking for answers. It’s a very congenial group of owners and I hope we can all work to keep it that way. Mike1 point
-
If I were in your situation, (and I'm very sorry. That's not much of a range to work with) I'd spend a little more on a marine 12v dc secop/danfoss small portable fridge. I wouldn't trust thermoelectric, nor fake secop fridge. Too critical. John's idea of adding thermal mass to a small fridge is stellar, imo. I use thermal mass to regulate my truckfridge. Cold sink, vs heat sink.1 point
-
One other aspect of running ac on batteries is that the inverter gets VERY warm under continuous heavy load. If the inverter is not vented to the outside, then you're just adding more heat to the inside.1 point


.thumb.jpg.e34bf01ef7f7d5e99ad31856d45afbeb.jpg)


-
Recent Achievements
-
")

")


.thumb.png.eff4d7fbcbf1eb34d62e5c88cf70a0ee.png)


