Leaderboard


Popular Content
Showing content with the highest reputation on 05/27/2024 in all areas
-
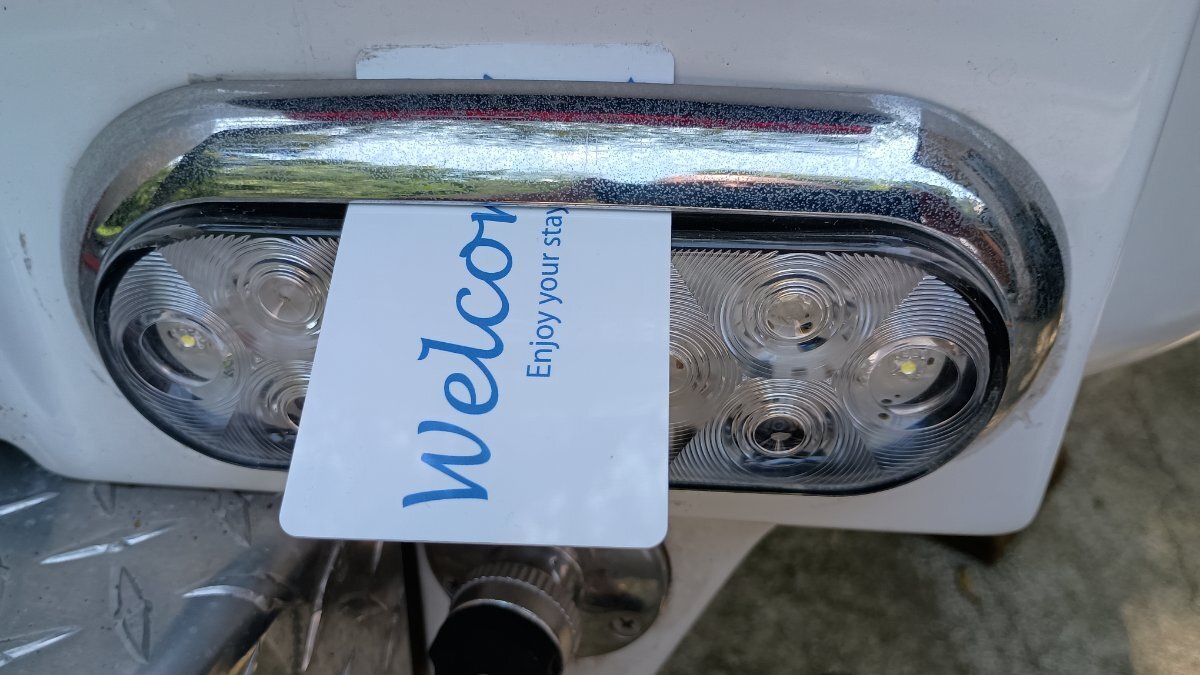
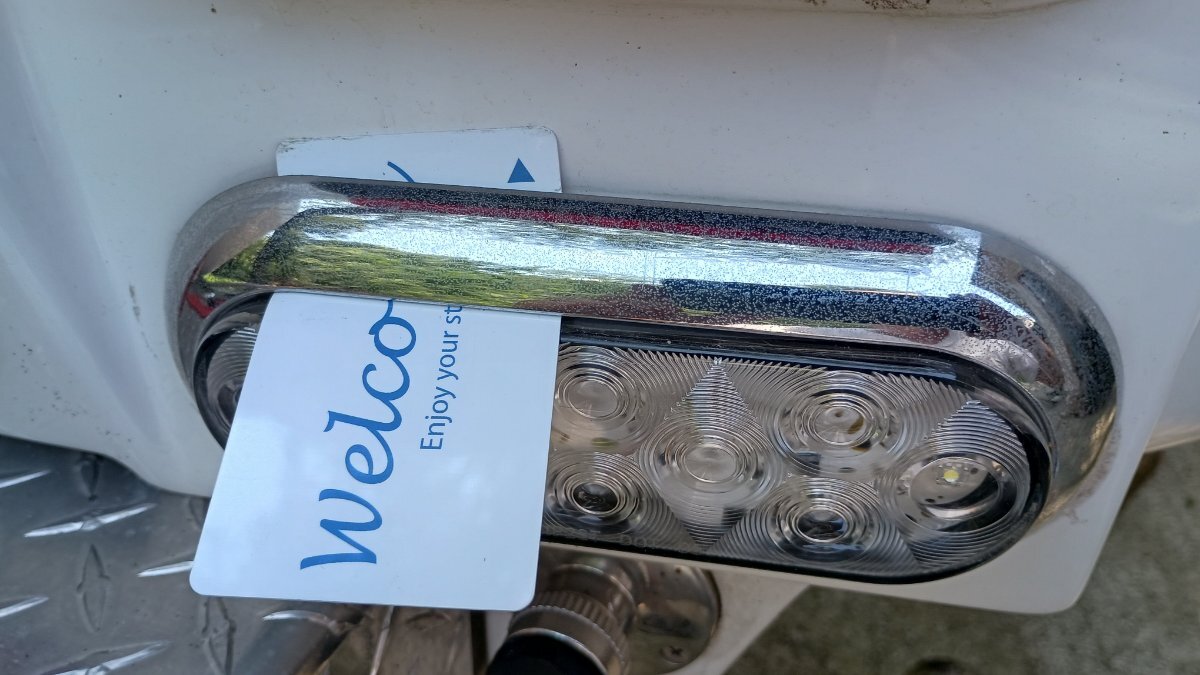
Thought I would post this in case anyone else was reluctant to remove the bezel with metal tools and risk buggering up the light or gelcoat. This involves using an old credit card, or hotel key. First slide the card between the light and bezel in the center. Next slide the card from side to side to release the clips. Sometimes there’s a click. Now the bezel can be gently pulled off. I didn’t find it necessary to release the clips on both sides but that could be the case at times.
 5 points
 -
Looks like this is related to the earlier report of a mislabeled Bulldog coupler failing: https://www.nhtsa.gov/recalls?nhtsaId=24V322000 Good that OTT is following through with this.4 points
-
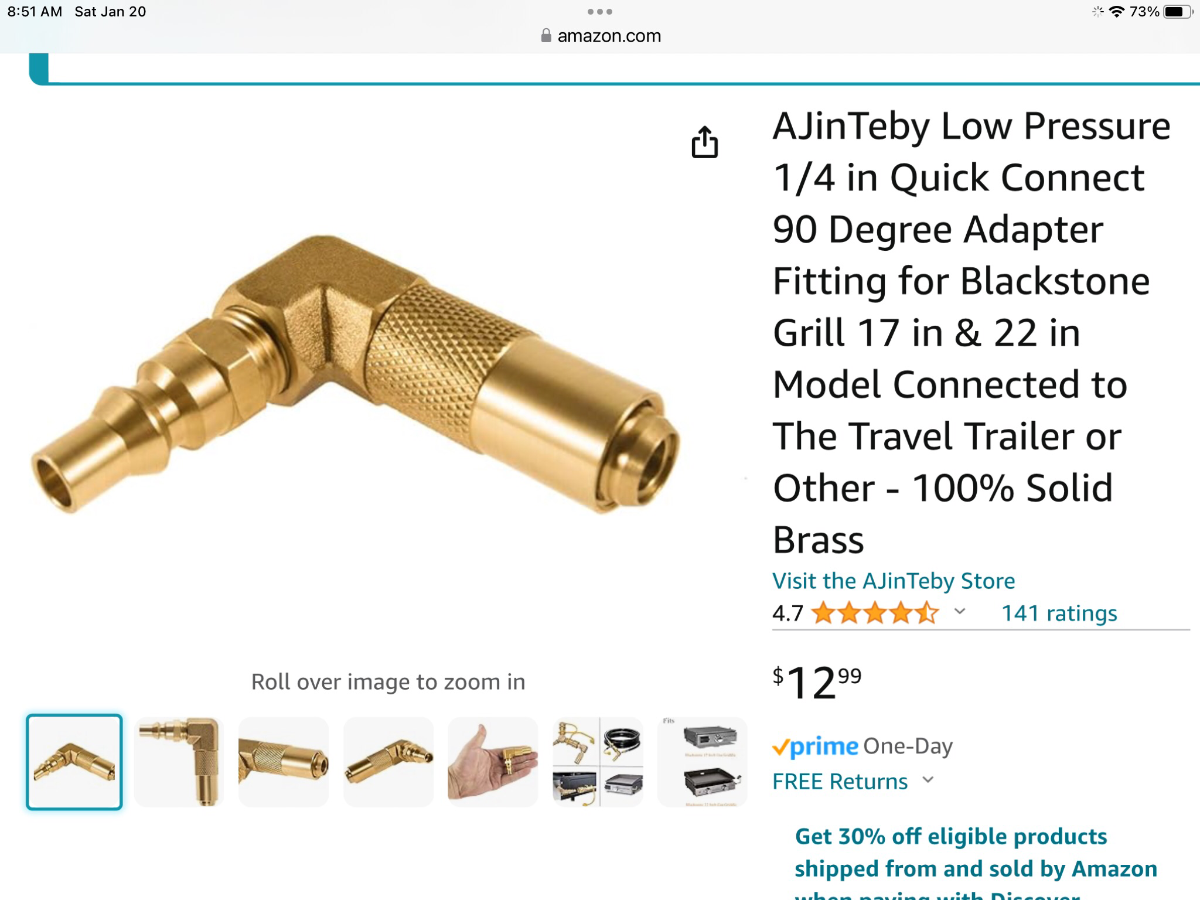
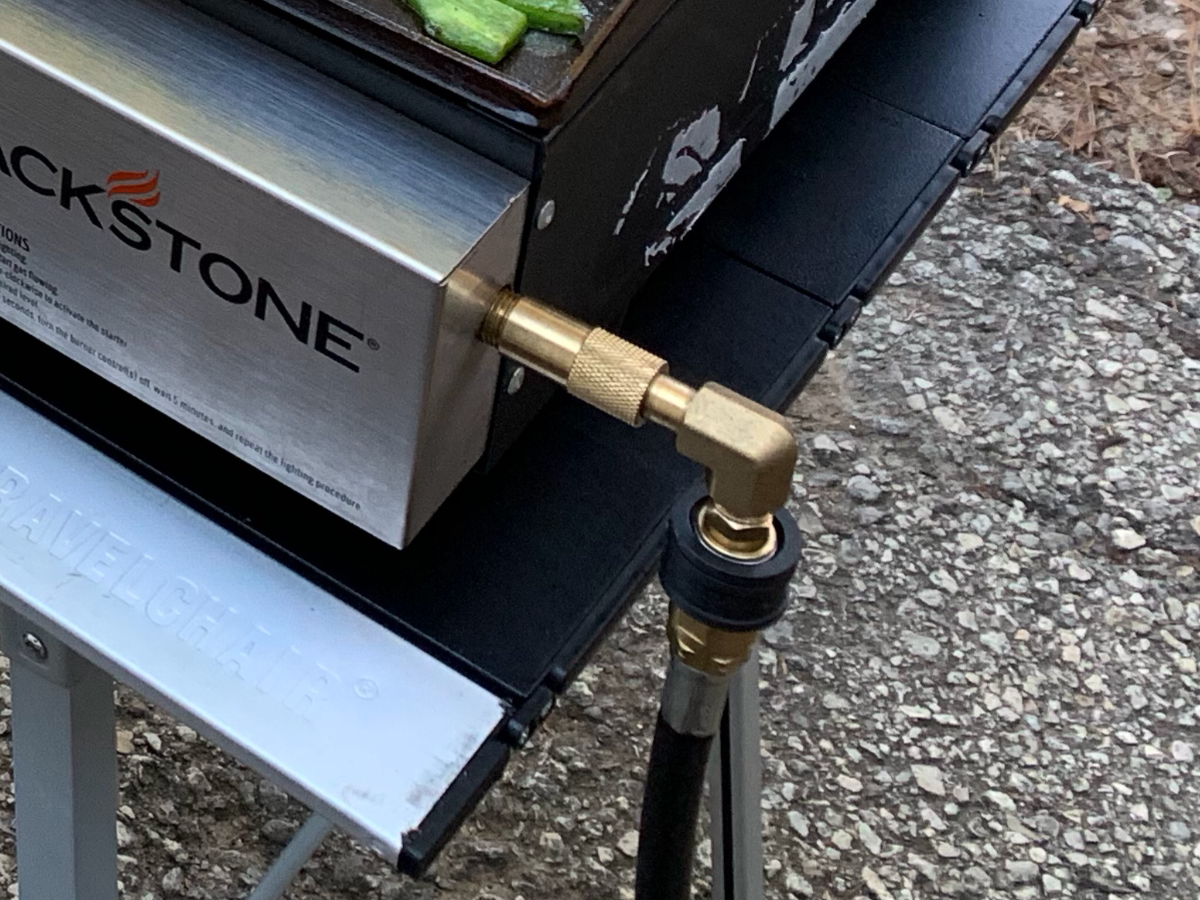
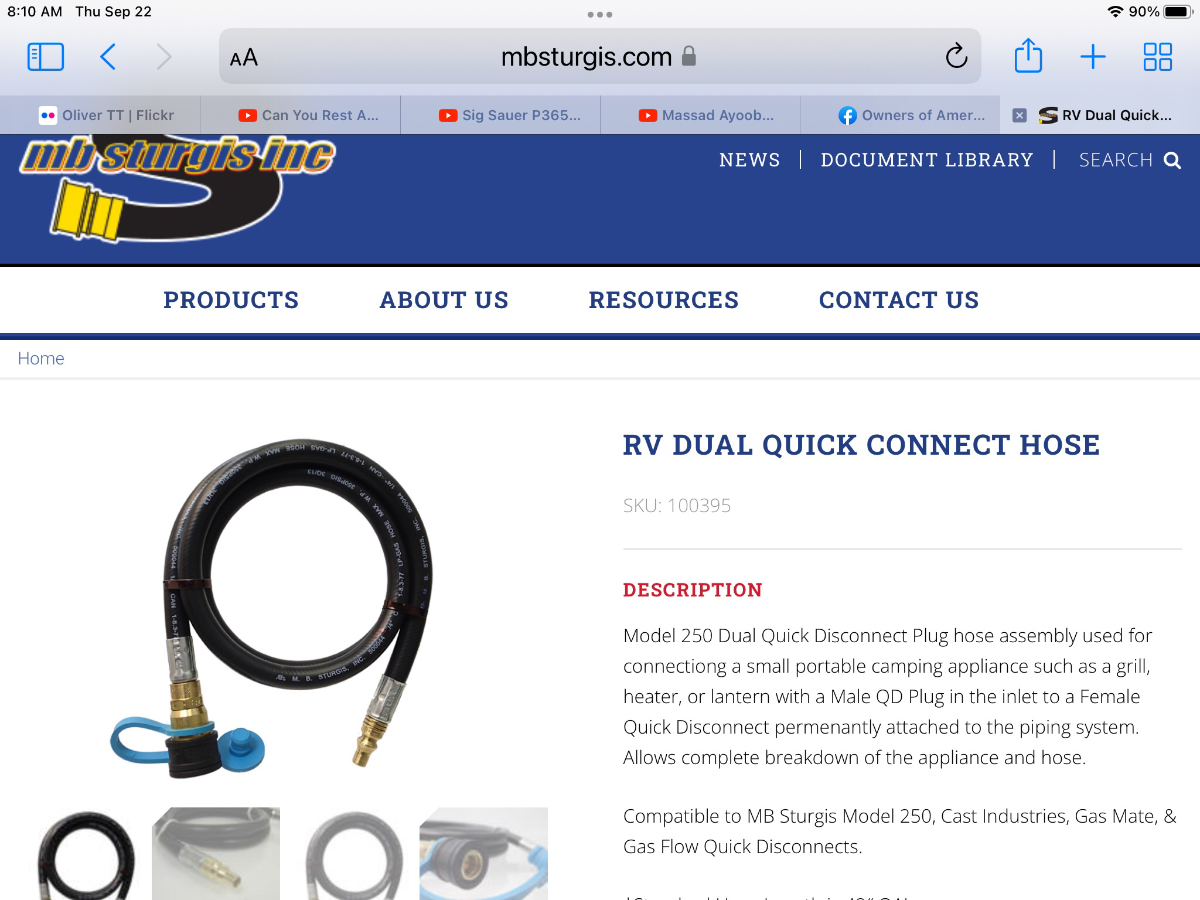
You can get an adapter for the BS. Pic connected to my 17” BS. This or a similar hose spans between the Oliver and the BS, I’m partial to MB Sturgis. I have two 15’ hoses; use one or both depending on distance from Oliver.
4 points
-
I spent 40 years in the Building Envelope business, designing, large exterior sealant jobs along with the design of large commercial roofing projects. We also did forensic investigations. My sealant of choice was high performance Polyurethane Sealants, single and and multiple component. Silicone was used for glazing by other trades. The silicone used by Oliver is, I believe, marine grade for use on fiberglass. I have seen zero issues on the sealant work on Oliver's. What I see is a lack of maintenance to re-caulk every 4-5 years, based on how the Oliver is stored and exposed to UV. . Silicone leaves a residue that can't be removed, especially on masonry surfaces. It will be very hard to remove all sealant from the Oliver, without leaving caulk and residue. Once caulked with silicone, you will need to re-caulk with silicone. If you switch to Polyurethane, there will be adhesion failure. There are several comments you made that are not accurate.3 points
-
Talk of sealants always create quite a stir. Just go on any boating forum, look up sealants and stand back!! What I have used with success is this product: https://marineformula.com/products/marine-formula-10oz-aerosol Yes it's expensive, but I have been successful removing embedded silicone oils from the gelcoat with some wet sanding and a final polish. You will not sand through the gelcoat with 1200 grit paper! I would still do a reseal around the perimeter of your windows/fixtures as this is your first line of defense from water intrusion. It can be done well and look great. It just takes time, a good tape masking job, and an understanding of the ins and outs of the sealant you want to use. You don't know how good the butyl tape (if that is what was used) job was done under the windows during installation. So I would not take chances there. The pic of your window makes me cringe. Whoever did that really had no care for aesthetics or function. Use the Debond (there are also other products, but I haven't used them), a plastic razor to get the bulk of the old sealant off. Then go to the wet sand stage. Try to keep the Debond contained to the work area. Dribble a little on and start scraping. I just "resealed" my fender flares! Strictly an aesthetic decision! I think it looks much better. But certainly not necessary. Dave2 points
-
My understanding is Oliver is simply asking owners to inspect their hitch and make sure they have the proper bulldog hitch. If they don’t, there are 1304 dealers that sell the Bulldog hitch and they can replace the bulldog hitch on an Oliver. Oliver Travel Trailers, INC. (OTT) is recalling certain 2009-2024 Elite II trailers. The towing coupler may be under rated for the Gross Vehicle Weight Rating (GVWR) of the trailer. 1,304 Dealers will replace the towing coupler, free of charge.2 points
-
It's the 2 inch coupler. Definitely a good thing to check!2 points
-
@DunnYet the Anderson WDH is available in a 2 and 2 5/16” ball, we have hull# 1386 (also a 2023) with 2 5/16” bulldog coupler and Anderson WDH. Make sure what size bulldog coupler is on your LE2 before you buy the Anderson WDH. Just an FYI.2 points
-
@DunnYet This link may also help you. When you receive your new WDH don’t forget to register for your warranty. Anytime your load changes in your TV you will likely need to adjust your WDH accordingly. We upgraded a year after owning our Oliver to a 1 ton TV and no longer needed the Andersen and sold it. A quick call to Andersen tomorrow I bet would get the info you need on the chain. Cheers! https://olivertraveltrailers.com/wp-content/uploads/oliver-university/Component_Manuals/Andersen_Hitch/Andersen-WD-Hitch-Installation.pdf2 points
-
We have a hose that connects to the Blackstone and the other end is a quick connect that goes in to the trailer. No regulator. I’m sure I found it on Amazon. Mike2 points
-
@rideandfly I always use this app when upgrading wheels and tires. Play with it and it will answer all your tire/wheel size questions! Use the left frame to enter Original and New Setup specs and look to the graphic on the right to see diffs in the measurements, for diameter, width and offset (for wheel changes). Hope it helps! Wheel Offset Calculator (tiresize.com)2 points
-
The fridge in AUTO runs first on AC, then if that is not available it switches to propane, then if that is not available it runs on DC. Inverter is not needed in this application. It is running on propane, since it is available. If you shut off the propane it would switch to DC or if you manual switch it to DC. However, the 3 way fridges are notoriously inefficient compared to your home fridge and will burn through batteries very rapidly. The best solutions are probably to leave it on propane, keep awning out if possible to shade the refrigerator. Keep the number of items in the fridge small enough that you can have good airflow inside (in otherwords don't overpack). I have also installed a supplemental fan to pull air through the coils to help efficiency.2 points
-
Its a good question and am happy to answer. The 2023 LEII we looked had a composting toilet and although those that have them swear by them, we are experienced and comfortable with managing regular black tank/toilet setups. The '23 LEII also had the top tier solar/Lithium battery/inverter package. As you know, that is a significant additional cost and as expected the sellers asking price reflected that. We aren't off grid campers and have owned several campers that didn't have solar capability so we just couldn't justify the cost for the benefit. None of the accessories that the owners had were included in the sale. If I recall, they were moving to a 5th wheel and were keeping all of their accessories. Lastly, and hardest to quantify is the fact that it seemed to me that the '23 LEII wasn't meticulously maintained. For a unit that was +/- 1x years old, it showed some wear. I suspect it may have been stored outside. In the end, we ended up with a meticulously maintained base model unit that came with all of the accessories. The previous owner had Oliver Service perform to the Truma Aventa Eco A/C conversion w/ CP control and add the aluminum storage basket. He also did a GREAT job designing and installing shelves in the closet, an upgrade that greatly maximizes that space. Hope this helps. If you have any other questions, please feel free to ask. Craig2 points
-
From time to time members of the Forum have asked how they can "bookmark" a particular thread for future reference. DavidS did a post several years ago that basically suggested using Apple Notes for this purpose. Another way of doing this basically within the Forum is to "follow" the thread (click on the dark blue box at the upper right of the thread and then click on "Do not send me any notifications" After that all you have to do is follow Wandering Sagebrush's advice posted above and you can see all the "bookmarks" that you have created. Bill Thanks to WS for starting us down this road and another thanks to Jason (W) for basically suggesting this method.2 points
-
My spare tire is 9 years old, so started researching what tire to replace the original 16" spare tire with one that fits in the original spare tire housing. On our 2015 LE2 Ollie the original spare tire is a 215/60R/16 SL load range tire. The other 4 trailer tires are LT225/75R/16 E tires. Understand some other LE2 owners have P215/70R/16 tires. Around 2017 (please correct me if I have this wrong) the spare tire fiberglass cover was modified to accommodate the full size 225/75R/16 tire/wheel assembly. Recently, Oliver started installing 15" wheels on LE2 Olivers mounting Goodyear Endurance ST225/75R/15 E tires. Went back to an old thread here posted by Steve about Oliver's move to LE2 15" ST tires. Started thinking 🙃 (that's trouble for me sometimes) if a 215/70R/16 will fit in the original spare tire housing, will the newer 15" tire, ST225/75R/15 E fit in the original spare tire housing. Contacted Oliver service and they said the ST225/75R/15 E tire will fit inside of my original spare tire housing on my 2015 LE2. Started doing some research and learned the following: Original LT tire: LT225/75R/16E Tire height: 29.28'' Section Width: 8.86'' Maximum load capacity: 2679 pounds New tire used on LE2: Goodyear Endurance ST225/75R/15E: Tire Height: 28.28'' Section Width: 8.86'' Maximum load capacity: 2833 pounds Tire used that fits in 2015/2016 LE2 spare tire housings seen in two different threads: 215/70R/16 Tire Height: 27.86'' Section Width: 8.46'' Maximum load capacity: 1764 pounds The 2015 spare tire fiberglass housing ID (inside diameter) is around 28 7/8" and around 9 1/2" deep. It looks like the ST225/75R/15E will fit if the tire/wheel is centered. Couple days ago ordered a Sendel S20 15"X6", six lug trailer wheel with 5.5" spacing and a Goodyear ST225/75R/15E tire mounted. http://sendelwheel.com/wheels/s20t.html https://www.goodyear.com/en_US/tires/endurance-trailer-tire/24464.html Load range/Load index explained: https://www.discounttire.com/learn/load-range-load-index I normally keep Ollie's spare tire in the TV pickup bed instead of in the spare tire cover, but still want a tire/wheel that fits in the spare tire housing, will see. Plan to experiment with learning how to put a nice finish on the original aluminum spare wheel before eventually polishing all of the original wheels, too.1 point
-
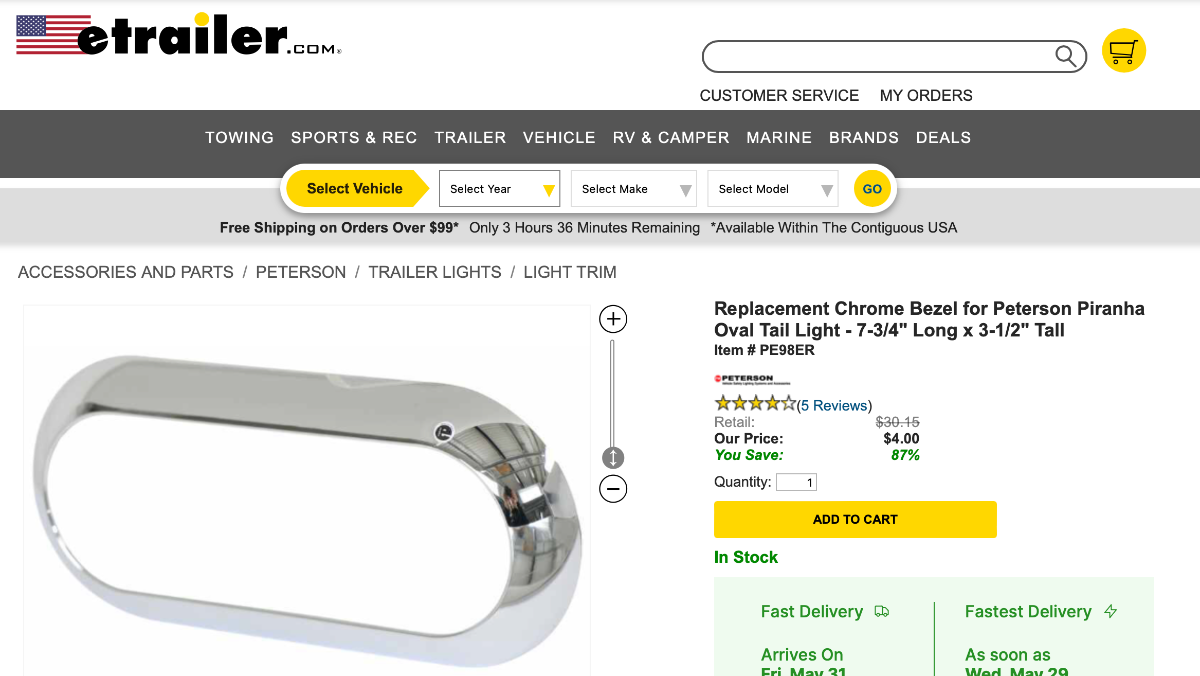
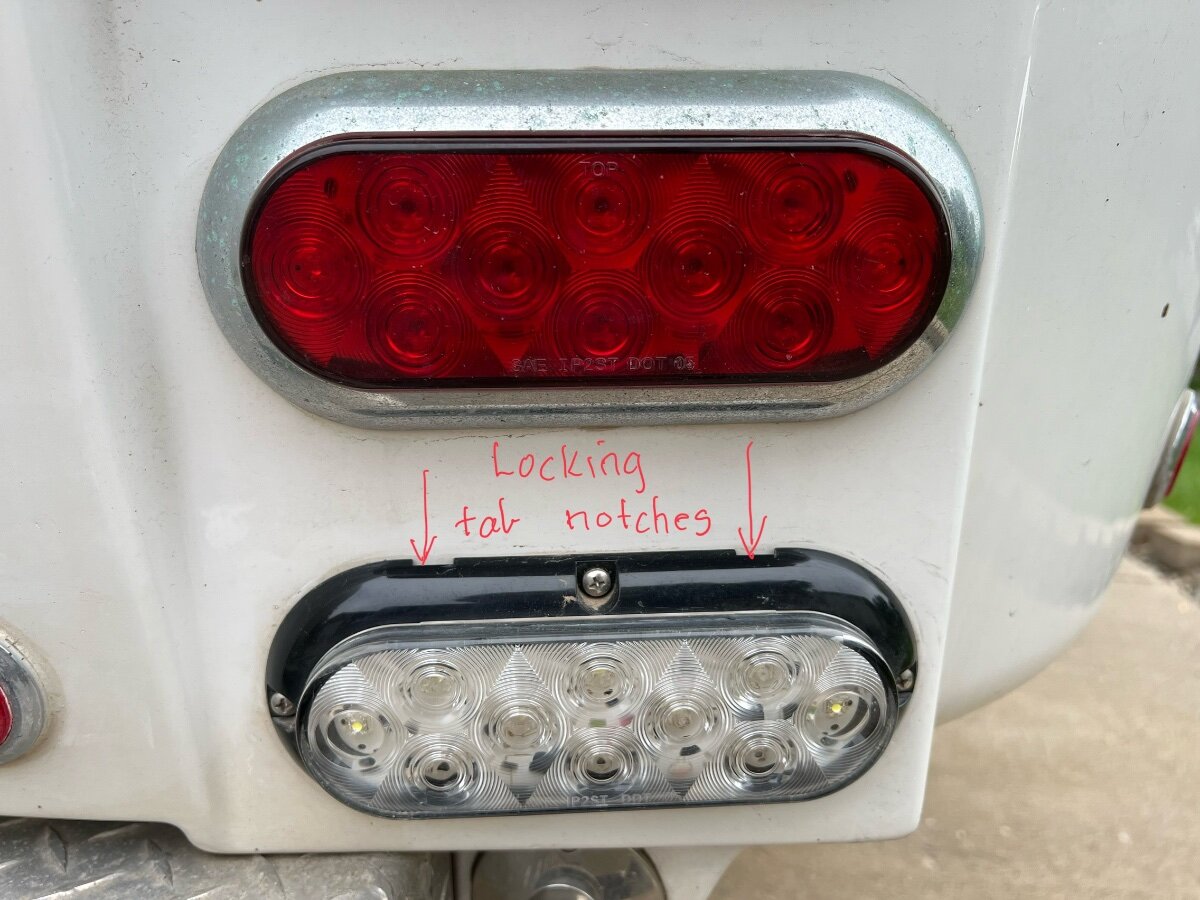
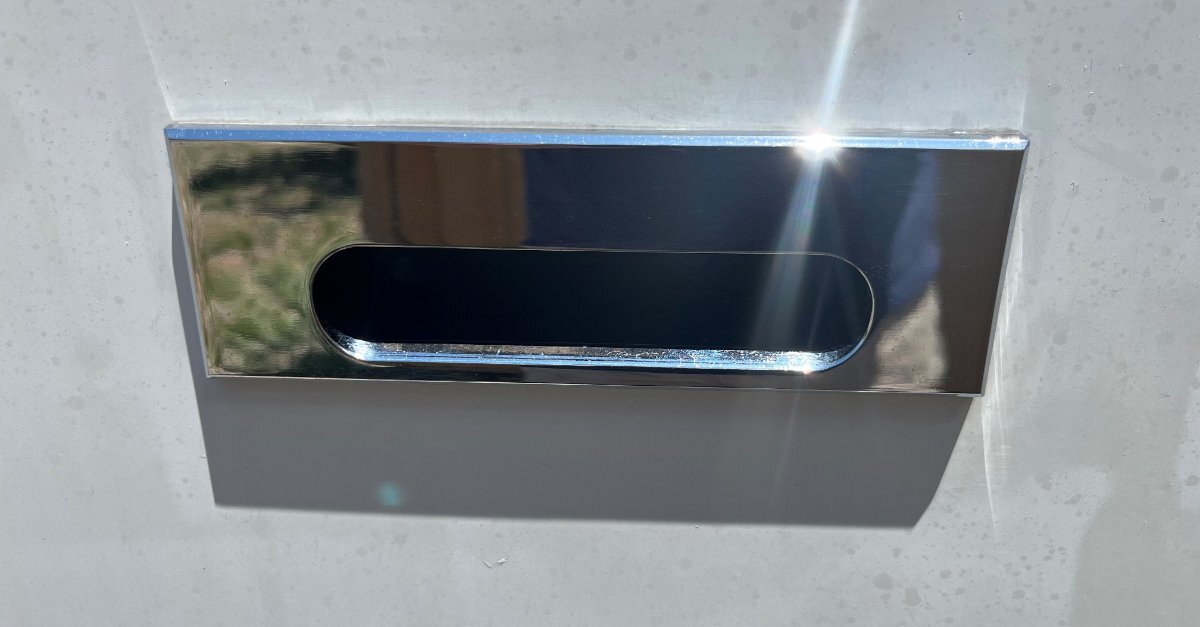
Hello All, I've been reading the forum regularly since 2017 and don't remember anybody mentioning this. The chromed taillight bezels on our 2018 tail lights were turning a gross matte green from winter road chemicals used in Minnesota and maybe a Colorado trip over I70 on my way to Moab in March a few years back. I found that etrailer.com sells just the chrome bezel separately and that I didn't need to buy the whole tail light if I wanted the taillights to look nice again. The replacement bezels are only $4 each, so I bought a set of six. Since they fit and are inexpensive, I may just buy another set and put them away for a rainy day. They are held in place by four tabs on the back of the bezel and old bezel just pops off. I've attached a photo of where the bezel tabs lock in on the light housing. There are four bezel tabs, two on the top and two on the bottom. I used a few thin screwdrivers and an old fillet knife to get them to pop loose. After learning where the tabs are on the first one it made removing the next five much easier. There are many other items on my trailer that are ugly due to unrepairable road chemical corrosion, but at least this one is fixed. Hope this helps someone else with their northern winter use trailer too. Ken
1 point
-
We reserved site 079 for the 22nd and 23rd. Can't wait to see other Ollies. Our first Ollie rally, although we've been doing the Texas Tiny Trailer Rally with the Princess Craft crew for over five years.1 point
-
First, my impression after reading your earlier comment was you intended on completely removing all sealant inside and outside. I read your comment twice and came to the same conclusion. Sealant provides a watertight seal to all joints and an estetically pleasing finish. Sealant at the windows is weatherproofing. Without sealing the windows you will have leaks everywhere. You asked why there was so much sealant in the bathroom. Our 2022 has a special plastic wall at the bathroom and closet. All panel joints are caulked to keep water in the bathroom and from leaking into the trailer. You asked why the wheel fenders are caulked. I actually don't understand your thoughts process. The sealant at the fenders is for aestetic purposes, and to keep spray confined. Sealant is a necessary component to every building, boat, trailer. As I have mentioned, my preferred sealant is polyurethane. Oliver doesn't do custom work. I get what they used, not what I want. It is what it is. For me a soft bristle tooth brush and soap cleans my sealant joints. I can promise you this, if you removed all the sealant and put your trailer up for sale, any smart person will walk so fast, and your chances of selling very remote. I would be worried about mold, because it will happen. I would worry about electronic components. Oliver would never sell or sign off on unfinished trailer. Never, ever would happen. This is my position on your posts.1 point
-
Since we're taking about refrigerators... Your trailer is level, correct? You shouldn't run an absorption fridge with the trailer more than 3 degrees off level front to back or more then 6 degrees off level side to side.1 point
-
Maybe all the LE2s with 2” bulldog couplers, we have the 2 5/16” bulldog coupler.1 point
-
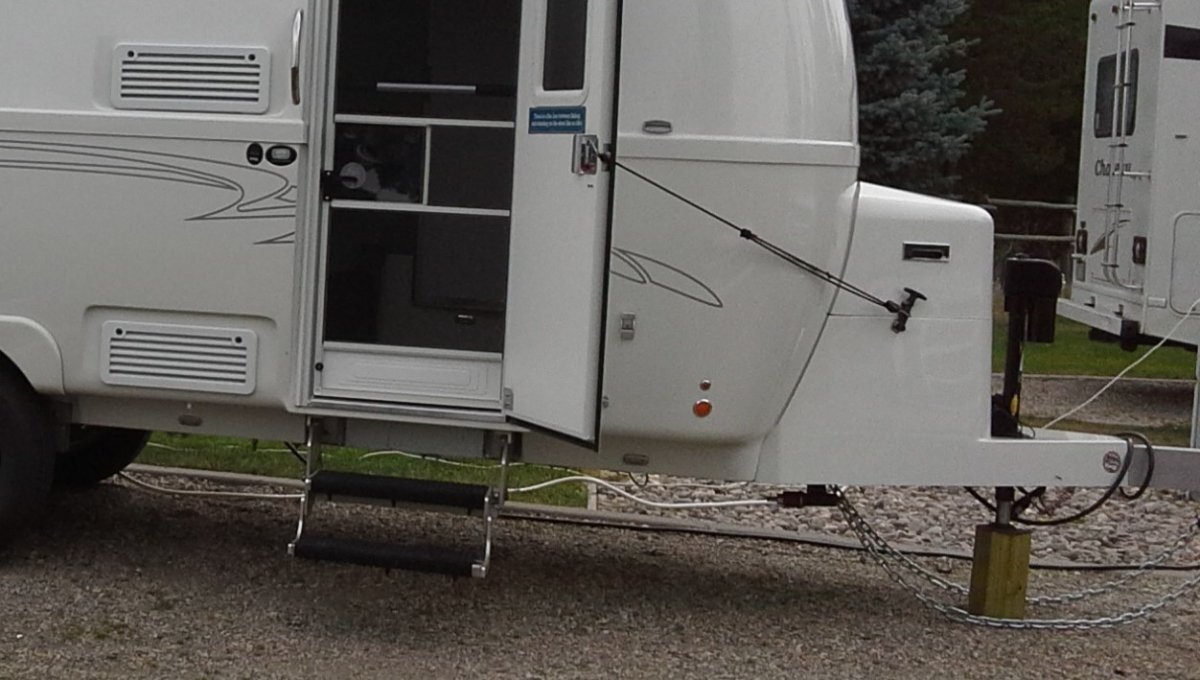
The pic below might not help you too much, but, if you count the number of chain links that Oliver added to the basic Andersen setup you will then know how many to add (assuming that the Andersen you bought simply comes with the standard amount of chain. From there you can then simply use the chains to measure off for the placement of the brackets. Remember, once the brackets are installed, you should normally have between 4 and 7 threads showing after the nut when the chains are properly tightened. Hope this helps! Bill p.s. I've also added a pic showing the placement of the brackets on my Ollie which should help give you a reference point.
1 point
-
 You can use your microwave with the 2,000 watt inverter. I did for 5 years. Since your hull is only a few years old, those batteries should last several more years. Many owners also went "less expensive" when purchasing and then when their LA batteries die, they upgrade then. That's smarter use of money already invested. It would also give you time to study the technical issues of conversion. GJ1 point
 -
Yes, now I recall reading that. Thanks Bill!1 point
-
I just received this in the mail a couple of days ago. Went out to check our Oliver bought in 2015 and as it turns out has aa 7000 lb rating not the 5000 lb. After 9 years of use looks like we were ok anyway.1 point
-
ScubaRx gave Oliver's reasons here: This thread is a good read, one of the earliest LE2s had 15" tires and LE2 spare tires are discussed, too. From information in this thread and over internet Goodyear Endurance ST tires have a good reputation. There has been a couple cases mentioned on this forum that Discount Tire will currently only install ST tires on travel trailers, when in the past they would install LT tires on trailers like they did on our LE2. I want a higher load capacity spare tire, Goodyear Endurance 225/75R/15 maximum load capacity 2833 pounds, because our original spare tire is a 215/60R/16 has a 1521 pound maximum load capacity. The full size LT 225/75R/16 is too large to fit in some of the early 2015 & 2016 LE2 spare tire housings.1 point
-
I wonder why Oliver dropped to a smaller 15” wheel?1 point
-
John, Always wanted a higher load capacity spare tire for Ollie that would fit in the original spare tire housing. Will post results. Thanks,1 point
-
I also used the Titan, but I didn't mount it to the outside cover. I added the stand off legs on the back of the fan and place it into the hot air exhaust opening and used a rubber hose to secure the fan against the back wall. It has never moved. I wanted to install the switch on the inside of the cabinet above the microwave, but Oliver discouraged me from trying to snake the wires between the hulls and thread it to the outside access opening. I did install two bus bars to power the fan and fridge with the fridge's 12V supply. We have had zero issues with this setup and have never run the temp passed 4.1 point
-
Not all that difficult. Below is some from the one I did. You may need to get creative on the attachment in the louvers. For simplicity I kept the controller next to the electrical. When I have time, I'll remount the controller inside where I can get to it easier. GJ DIY - Titan Refrigerator Fan Install.docx1 point
-
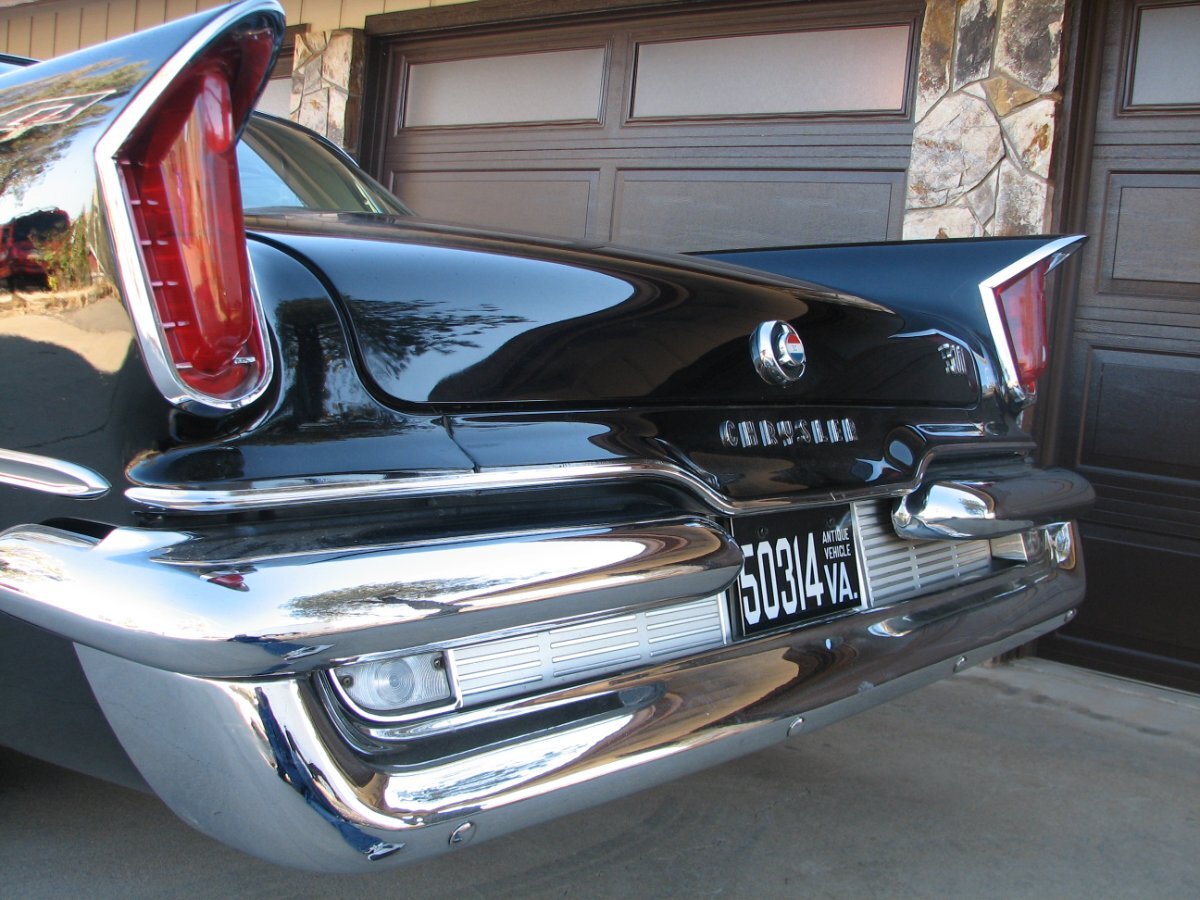
OMG Ken, wow! I see you are from the beautiful land of 10,000 lakes, frigid temps half the year and a whole lotta street salt! (This is one reason why I started the thread, re listing your location.) Good addition though. I would not think that part to be so easy to source. When I used to restore old cars, before working on the paint (which I jobbed out), I would remove EVERY piece of trim. Now it appears I am in the restoration hobby again with an old Oliver! The 2nd pic is the rear of my '59 300E (owned it 1992-2010). All trim, all stainless, all chrome, everything was removed. Then it only cost me $200 (1996 dollars) to get the paint buffed/detailed, on a 10-year-old lacquer repaint. It did cost 1000s more to rework the stainless, chrome the bumpers, purchase NOS lenses, etc. and likely 1000 hours of sweat equity (don't have that energy anymore, half-day labor now vs. a 10-hour day was normal back then). When I get around to paying $$$$ to get the exterior fiberglass redone professionally, I will remove many trim pieces like this, so they can hit the whole panel with a buffing wheel. Until that day, ours will get duller as I collect parts like these, prioritizing jobs like a new AC unit. Check out the doghouse handle on your hull a 2018 vs. ours a 2016 life in the southwest! I will remove these handles for the finish work, use a light polishing wax and remount them.
1 point
-
Wow on battery alone, it couldn’t have been too hot and the compressor not running a lot?1 point
-
I want to avoid silicone if possible.1 point
-
Reads like a great time for all! Thanks for sharing your start-up adventure though all these pages. Love every bit of it, except maybe the line above! I'd be feeling every sport I've played, every maintenance job I worked and all related arthritis and injuries. In our family, our son is good on the floor! God bless.1 point
-
First, I would start with Oliver and find out what they used. You don't want to have a comparability issue. Switching from silicone to say a Polyurethane will result in adhesion problems. Silicone sealants will leave a residue that you really can't remove.1 point
-
The VHB metal discs are permanently applied, but the magnetic rubberized feet on the mount make it removable for land mount or cleaning/waxing.
1 point
-
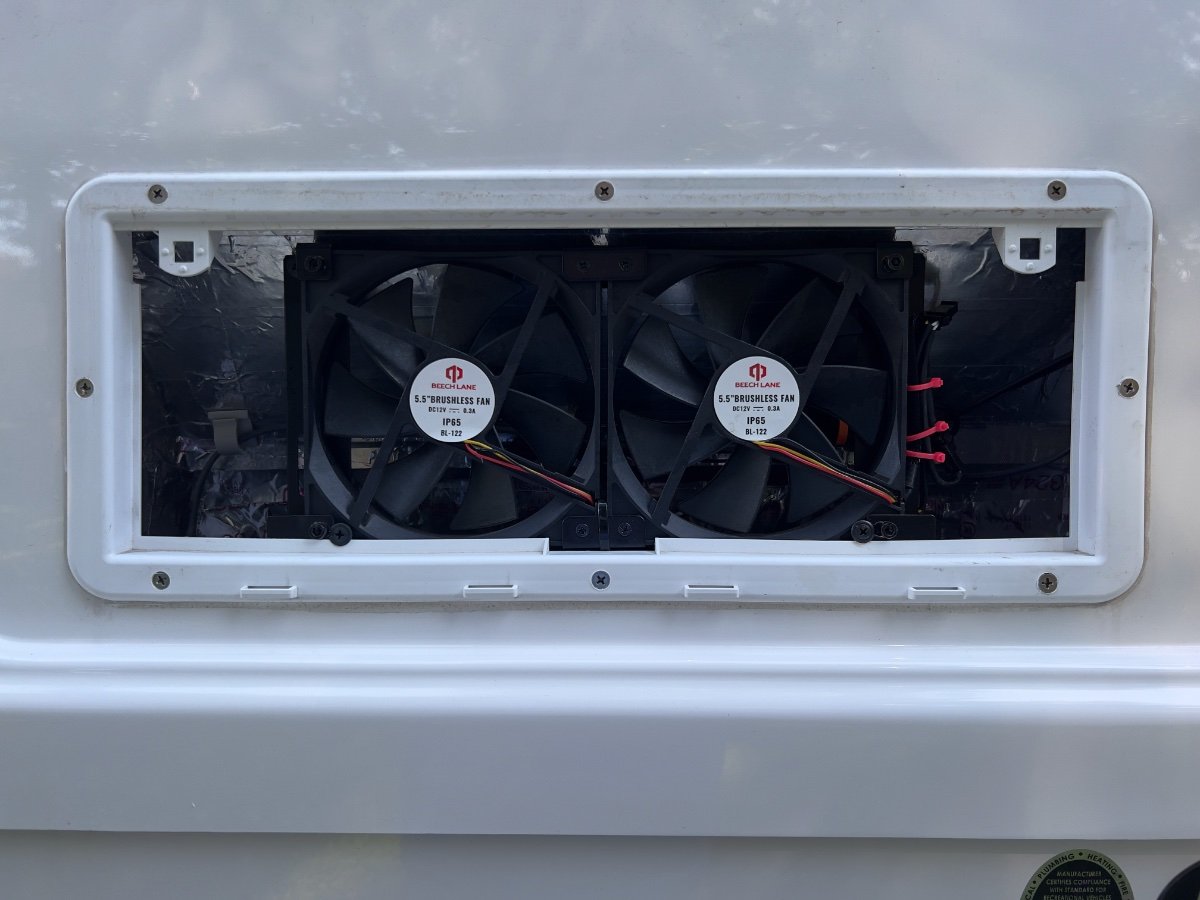
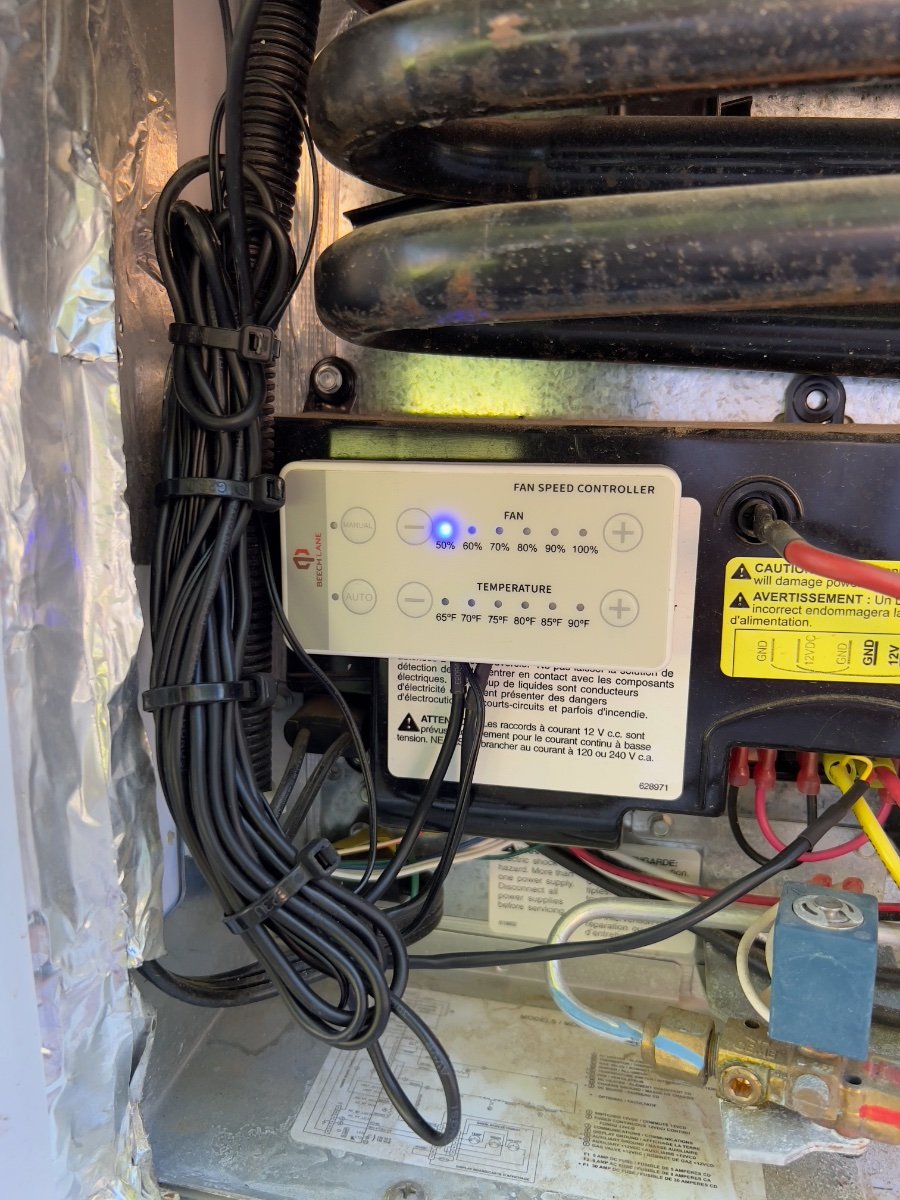
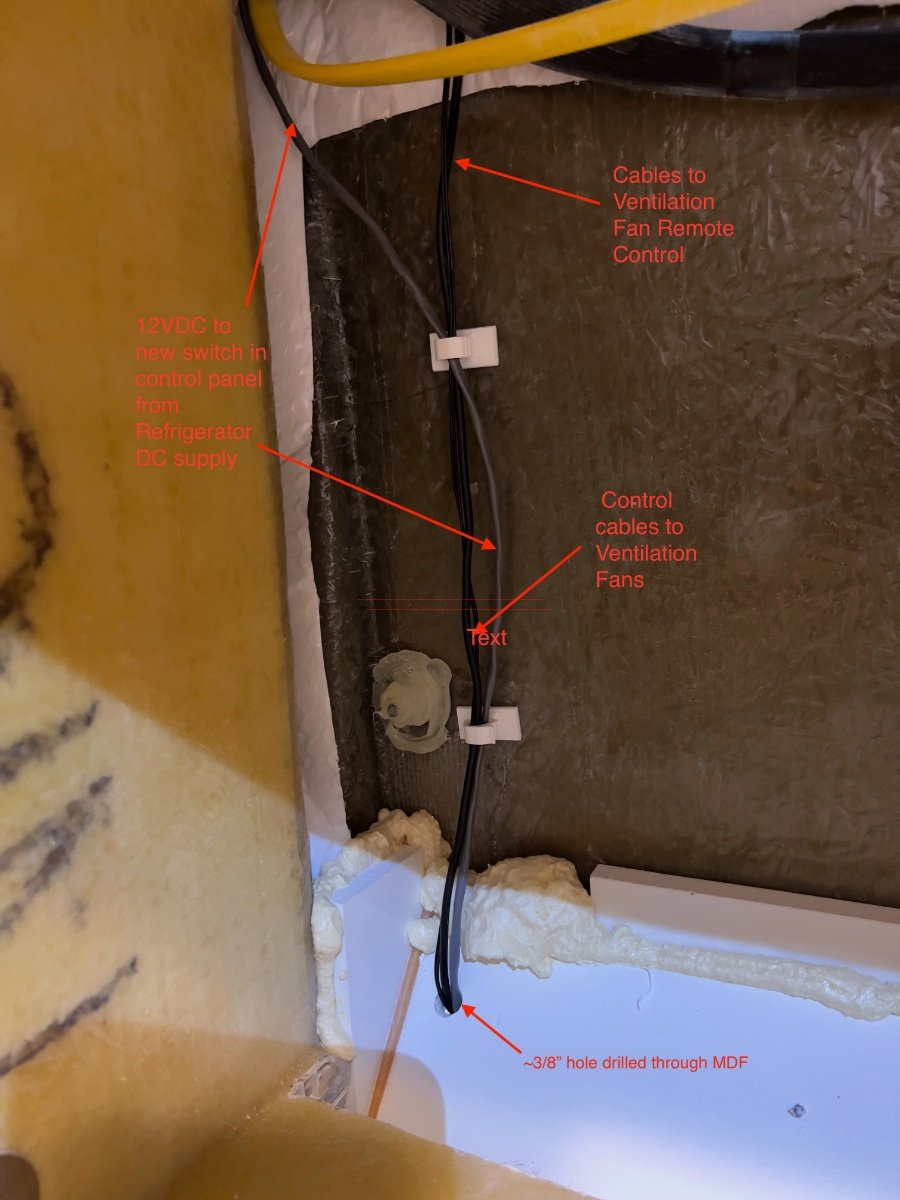
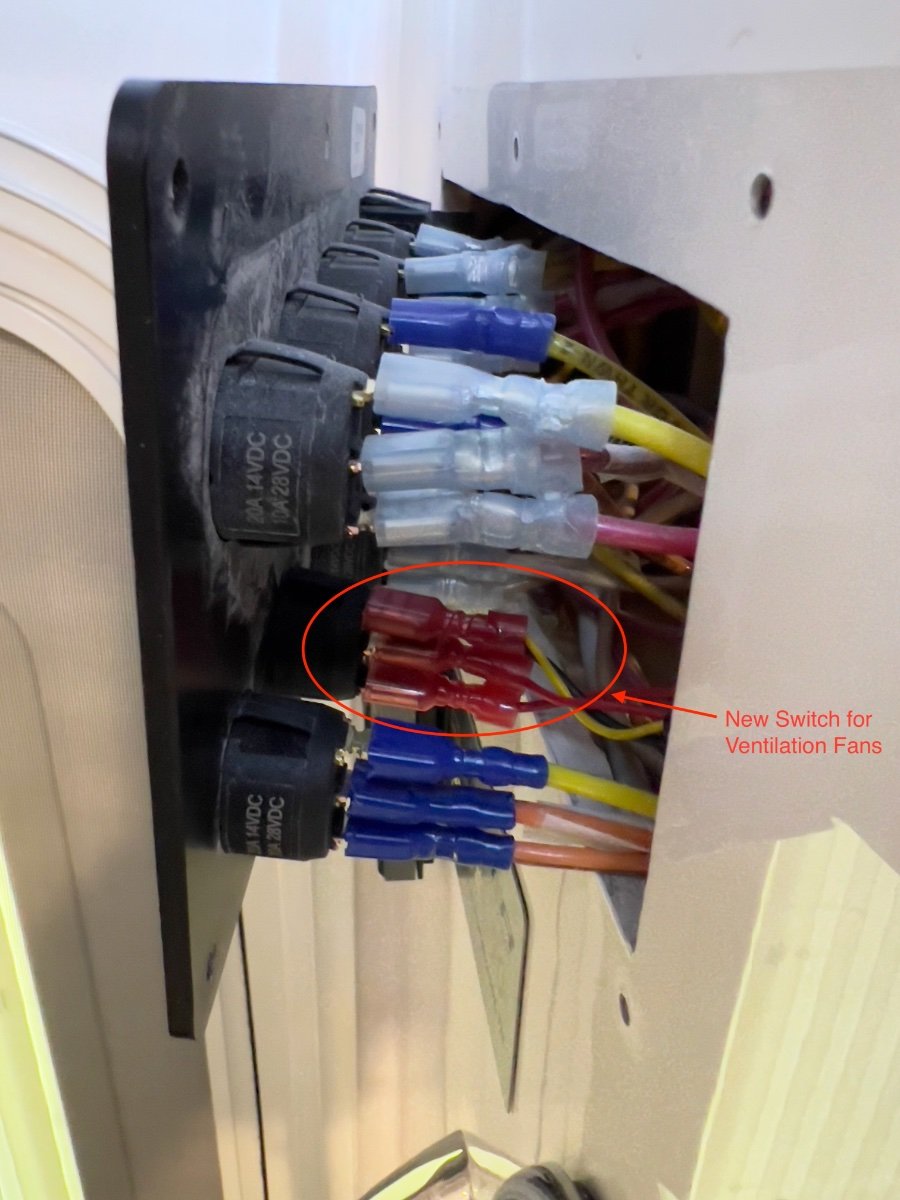
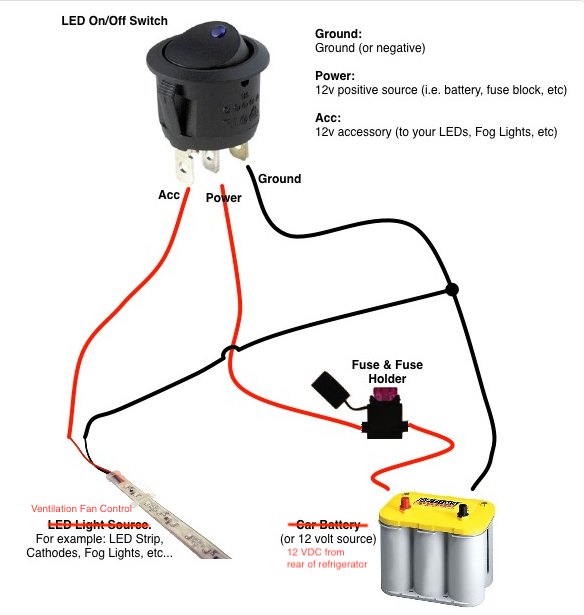
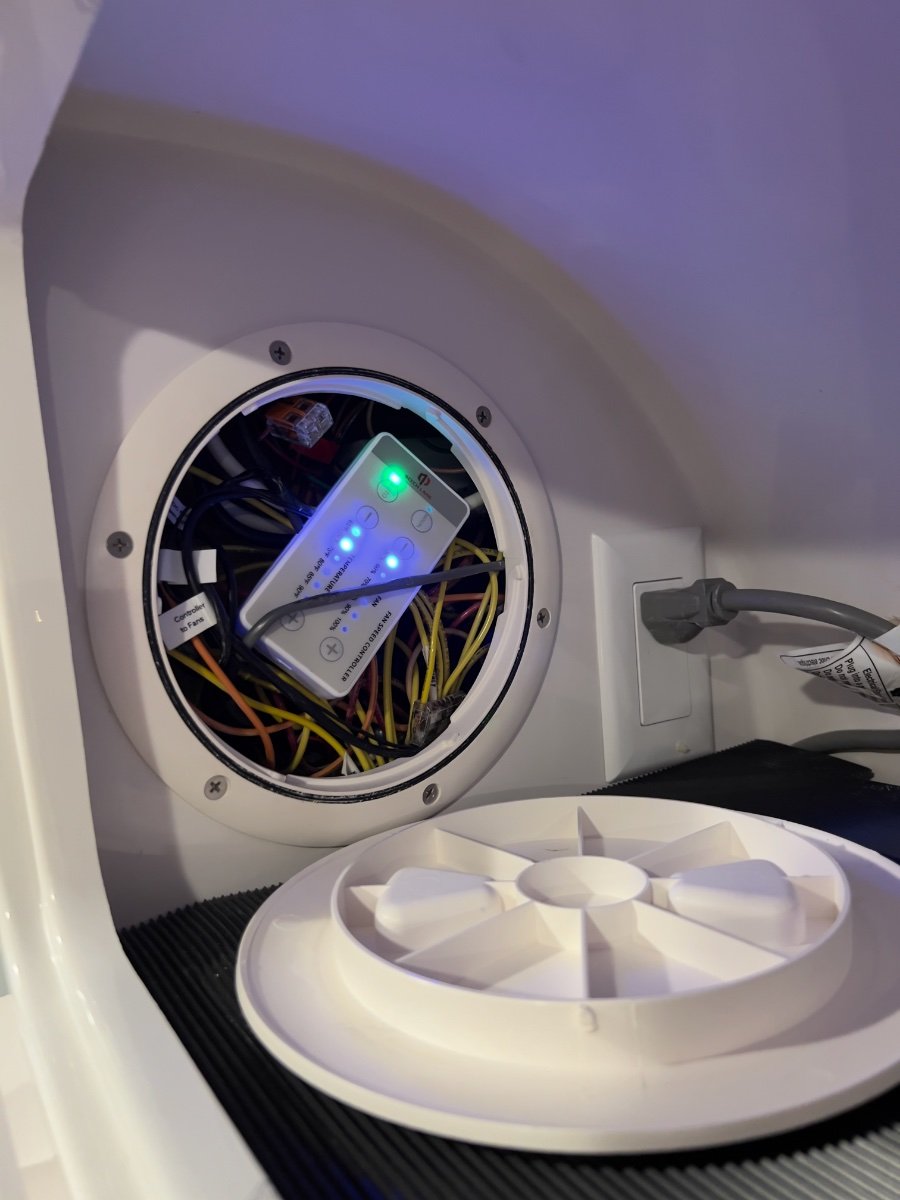
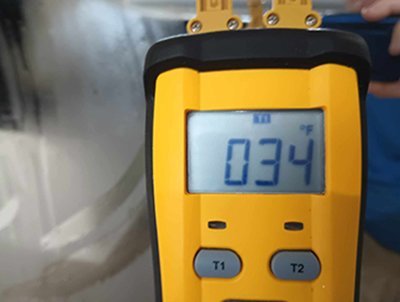
From late May to mid-June my wife and I took a loop trip from our home in Dallas, TX to: Greenville, SC; Asheville, NC; Asheboro & Seagrove, NC and back to Dallas. The trip covered approximately 1900 miles, with significant temperature variation. During the trip we experienced erratic performance by the Norcold Model 412 refrigerator, standard equipment in our 2022 Oliver Legacy Elite II trailer. The refrigerator would not maintain food safe temperatures in either compartment, except when operating on AC current. This problem occurred mostly on the second half of the trip, as daytime temperatures exceeded 90 degrees (F). Especially when in transit, operating on propane or DC current, the refrigerator temperature would climb to approximately 60 degrees and the freezer into the mid 20s. We contacted Oliver Service and made an appointment to have the refrigerator problem assessed in Hohenwald. We later decided not to divert from our trip plans and to deal with the problem when we returned home. Upon our return home to Dallas, TX, on June 20, I began a series of tests with the trailer parked in our driveway. To monitor the temperatures in the refrigerator and freezer, I used an AcuRite Digital Wireless Fridge and Freezer Thermometer, which we had purchased to monitor the Norcold refrigerator and had been using since September, 2022. I also used an Etekcity Infrared Thermometer 1080 to compare readings with the Acurite thermometer. The AcuRite and Etekcity thermometer readings agreed closely. With the refrigerator empty, I recorded the time required to go from ambient temperature to food safe temperatures using AC, DC or propane. Using AC, the refrigerator/freezer would reach food safe temperatures in 6-7 hours (low 40s F for the refrigerator; 0 degrees F for the freezer) with ambient temperatures ranging from 87 to 99 degrees F. Once achieved, when on AC, the temperatures on both compartments would hold in a food safe range. Conducting the same test on propane, the refrigerator and freezer would reach only 62 degrees and 19 degrees F, respectively after more than 12 hours of operation. This test also was done while ambient temperatures ranged from 87 to 99 degrees F. Similar results were observed while operating the refrigerator on DC. I again contacted Oliver Service and was recommended to take the trailer to an authorized Norcold service provider. Blue Moon Mobile RV (Blue Moon) was determined to be the closest available Norcold service provider. I arranged an appointment to bring the trailer to Blue Moon for troubleshooting of the refrigerator. Technicians at Blue Moon confirmed my observations of the behavior of the refrigerator. They also confirmed the cooling function was working properly, since proper temperatures were achieved when operating on AC. They also confirmed the single, small fan located at the rear of the refrigerator was operational, but providing insufficient air flow for the refrigerator to operate properly when ambient temperatures were high. Blue Moon conferred with Norcold technical support on their findings. Blue Moon and Norcold recommended additional fans be installed to dissipate warm air behind the refrigerator. Having anticipated installing additional fans, I had done online research and chose a dual fan assembly from Beech Lane 12V RV Fridge Ventilation Cooling Fan 5.5" (140mm). These fans come with a remote control with which fan speeds and threshold temperature may be set manually or automatically. These fans were installed by Blue Moon in the upper vent opening of our LEII. The 12VDC power supply to the refrigerator was also used to power the fans. The remote control was mounted to the cover over the refrigerator circuit board using double sided tape. The excess length cables provided with the fans were bundled with zip ties and secured nearby, as shown below. Blue Moon tested the operation of the refrigerator following the installation of the Beech Lane fans and reported food safe temperatures were being achieved and held, with high ambient temperatures. On July 19 I picked up our trailer from Blue Moon and returned home to repeat my prior tests to compare results running the refrigerator on propane and on DC. The trailer was parked in the same location in our driveway as previously. After installation of the ventilation fans, using propane, the refrigerator and freezer compartments achieved safe food temperatures in approximately 8 hours, with the refrigerator control set to 7, despite ambient temperatures ranging from 93 to 105 degrees Fahrenheit. Once safe food temperatures were achieved the refrigerator control setting was reduced from 7 to 6 and allowed to run overnight. The following morning both the refrigerator and freezer had slightly warmer temperatures, but still satisfactory for safe food storage. We have not yet had an opportunity to utilize the Norcold refrigerator on a trip to observe how effectively safe food temperatures are maintained when full of food and under changing environmental conditions using the three power sources. Based on the test results using the ventilation fans, I expect the performance of the refrigerator to be significantly improved. We should now be able to use DC to power the Norcold refrigerator when in transit, and avoid the use of propane. Performance running on DC appears to be similar to running on propane. While I was pleased with the significant improvement in the operating temperatures achieved by the Norcold refrigerator, there were three aspects of the installation I chose to change, all related to access to the remote control: The remote control for the Beech Lane fans has very bright blue LEDs which are ON whenever 12VDC power is ON. At night, we noticed a bright blue glow emanating from the lower refrigerator external vent cover. Accessing the remote control to change settings required removing the refrigerator external vent cover. When we store the trailer we typically turn OFF all DC power by turning OFF our lithium batteries. Upon the next use of the trailer, when DC power is restored, the refrigerator ventilation fans must also be turned ON manually. There was no switch to turn OFF DC power to the remote control. To address these issues, I relocated the Beech Lans fan remote control to the interior of the trailer and installed a switch on the control panel located at the entry to the trailer. I chose to have the remote control inside the access hatch in the storage cabinet located over the microwave oven, directly above the Norcold refrigerator. To re-route the cables to the ventilation fans, I had to remove the microwave oven. To install a new switch in the control paneI I had to loosen the panel from the wall. I had to add approximately 10 feet of 20 AWG twisted pair cable (gray) to reach from the new switch on the control panel to the 12VDC power supply at the bottom rear of the refrigerator. The photo below shows the routing of the remote control wires (black) and 12VDC power supply behind the microwave cabinet. I had to drill a ~3/8" hole in the angled MDF panel behind the microwave cabinet, directly above the refrigerator. I caulked around the cables after routing them through the hole and behind the refrigerator. Fishing the wires into the area behind the control panel was not difficult. The yellow Romex appearing at the top of the photo below supplies the AC outlet for the microwave oven. I contacted Oliver Service and ordered a single pole switch (with blue light) to match the others in the trailer control panel. The cost was slightly over $7, including shipping by first class mail. The new switch was installed in an unused location on the control panel which previously had a blank cover. I added crimp on spade type connectors to the twisted pair cable to connect to the terminals on the new switch. Although the new switch is single pole, there are three terminals on the rear with the wiring connections listed below: Ground (dissimilar color) DC Power IN (center) Switched DC Power Out I found the wiring diagram below which shows an analogous circuit. The switch and the ventilation fan remote control both require a ground connection. The Switched DC power terminal is connected to the DC+ power connection for the ventilation fan remote control. The new switch needs a ground connection in order for the blue light to operate indicating the switch is ON. In the diagram a car battery is shown as the 12VDC source. On the trailer, the 12VDC source is located at the bottom rear of the refrigerator. This DC circuit is already fused at the DC power panel located below the rear dinette seat. I chose to locate the Beech Lane fan remote control behind the access panel in the storage cabinet above the microwave oven. I made this choice to avoid having the bright blue LED lights on the remote control illuminating the interior of the trailer. The access panel is easily removed when there is a need to access the remote control, to turn ON the ventilation fans, or to change the fan speed or threshold temperature. The Beech Lane ventilation fans are very quiet. With the auxiliary fans running, the volume of air exiting the top exterior vent is noticeably greater than with the small, single OEM fan mounted to the rear of the refrigerator. We have not yet tried sleeping in the trailer with these fans running. There is no chance of hearing the fans inside the trailer with the Dometic A/C running. They are not noticeable when they are running unless you are standing close to the upper exterior vent. I recommend these fans to anyone having similar difficulty maintaining food safe temperatures in the refrigerator when ambient temperatures are high. Regards, Don
1 point
-
There is a ton of discussion on this and related topics here on the Forum. Don't be fooled - in virtually any situation the Oliver Travel Trailers do NOT sway. But, this is NOT the purpose of the Andersen weight distribution hitch (for the most part) with regards to Olivers. ALL 1/2 ton trucks that I'm aware of REQUIRE a weight distribution hitch. Yes, I know, your Tundra pulls your Ollie without any problem. Well, so does my Ford F-150 and it has a rated towing capacity of north of 12,000 pounds. But, Ford requires the weight distribution hitch for any hitch ball load over 500 pounds. I'm no engineer but I'm certain that there are other factors involved like braking, frame construction, steering, etc.. And, if you drive without a weight distribution hitch and are in an accident then it is likely that some well paid lawyer will investigate to try to determine exactly what your tongue weight was when you had that accident regardless of it being a factor in the accident or not. Certainly I would not want to risk my financial stability on a bet of being 15 pounds under or (over) the general 500 pound weight on the hitch ball number. There are also additional benefits of the Andersen - reduced porpoising/bouncing for one, and, perhaps additional safety margins for another. Yes, the Andersen is not cheap nor is it always "easy" to hookup and it does take a couple of additional minutes to make sure that it is ready to go. I doubt that the lack of an Andersen had much to do with what happened to your Bulldog one way or the other. However, the Andersen is still worth very serious consideration. Bill1 point
-
We're all over the map on camp stoves... We're both pretty much "foodies" and love to cook. Volume and weight not being an issue we'd have our Weber grill, 22" BS, and the 10" Smithy dutch oven for full range of outdoor cooking options. Depending on the trip, we may take all 3 - this current trip, only the BS came along because I'm flying solo and I like the griddle for breakfast and dinner options. Here's a snap of last night's "BS Fest": Strip steak seared to med-rare, potatoes with rosemary and garlic.... What's not to like?
1 point
-
I got mine up to about 650F while I was seasoning it. That should boil water or fry chicken in a skillet just fine.1 point
-
The double cooling fan for the fridge is officially high on our prioritized "To-Do" list for this summer's adventures. Thanks to all for posting the links and the process to modify the standard configuration for more efficient chill! Great info!1 point
-
@topgun2, Bill, I appreciate the story of your fan installation experience. Thanks for sharing. I dread projects which I must do a hurry, because they invariable turn into a huge PITA. Fortunately, I had no deadline pressure for modifying the installation of the remote control for my fans. Nonetheless, I had to re-do all of the electrical connections and add a few, due to the additional of the switch in the control panel, so there remains the possibility of problem "in use". The acid test will be our next road trip, where the shake table torture will be applied. I have very high confidence the fans can deal with extreme heat, as my driveway tests proved. One of the benefits of DIY projects is gaining the knowledge of where to look to diagnose problems appearing later. I try to take photos, before, during and after and keep notes. These are great aids in dealing with problems such as you described. Smart phones are a tremendous aid in doing so.1 point
-
This "story" is a bit embarrassing but ....🥵 At the end of last year my original exterior fridge fan bit the dust. It had been making noises for some time, but, finally, mercifully, it made no more noise. Certainly these poor things do live in a rather harsh environment and get little "love". So, over the winter I decided to get a replacement (I ordered THESE). While TWIST was in storage I looked at how the old fan was installed and decided to replace the rubber isolation bushings too which I got at Lowes. I also noted how the existing fan was wired and did all that I could in my home workshop (i.e. I installed spade connectors on the fan wires) so that when it came time to install the fan in the Ollie the process would not take very much time. Fast forward to a day before leaving for the Owner's Rally and I installed the fan with my plan proceeding very smoothly. Except for one "small" detail - when I hit the switch just inside the Ollie's door, the fan didn't come on! Of course I rechecked all my work - to no avail. I got out the multi-meter and started checking my wiring and found out that I was only getting a little over 8 volts in the fan wiring. THAT would tend to indicate a bad ground or loose connection but with the time I had before leaving I could not find any problem. Due to lack of time - fast forward to a month ago when I stopped at the Mothership for annual wheel bearing service. I mentioned my fridge fan problem to Jason and asked that if the Service guys had time would they take a look to see if they could identify the issue. That afternoon when I picked up Twist I asked if they had enough time to look at the fan . With a grin and a wink I was told that the issue was with a faulty crimp in one of the spade connectors! Yes - I did the "tug test", yes I've done hundreds of crimp connections over the years without any issues, I even double crimp each connection. Due to the environment that these things live in I also took the extra step of putting heat shrink over these connections! Just shows what being in a hurry will do. Now that things are back to normal - I can report that the fan I installed actually works better than the original and it is quieter too. Bill1 point
-
Nice work, and I'm sure you'll see a performance bump with the addition of fans.. I also added a couple of them recently, and with the arrival of Idalia I finally got to see how the fridge performed with them of the course of several days. Not too bad for a 13 year old fridge considering it's been running in 90+ deg temps during the day. IMO, these fans should be standard equipment on absorption fridges.
1 point
-
We got the Weber Traveler that was offered by Oliver at the time of purchase last month. It's extremely portable and folds up into position in seconds. I also bought the griddle plate for one side to allow making pancakes or anything else that would fall through the grate. This makes the Traveler even more camp friendly. Weber Traveler Traveler Griddle1 point
-
I took this photo this morning of one of the Elite II’s on the showroom floor. Rodney says this is the tires and wheel’s they will be using on the 2023 models. He did say that their existing stock of 16” wheels and tires will be used first. So, it may be as late as March of ‘23 before the new models will start to be delivered with the new sets.
1 point
-
The axles are not changing. The are no parts available to convert the 3500 pound axles used on the Elite II from drum to disc. It would be possible on the Elite I since it is supplied with a 5200 pound axle.1 point
-
Fifteen years ago, 16” wheels were used extensively by the automotive industry. Now it’s an oddball size. All the heavy duty trucks are using 18” or 20”. Also at that time you could not buy a heavy duty tire in a 15” size and the ST tire’s being made were all Chinese maypops.1 point
-
Michelin stopped making the tire. Papa Bean counter had nothing to do with it. Bill1 point
-
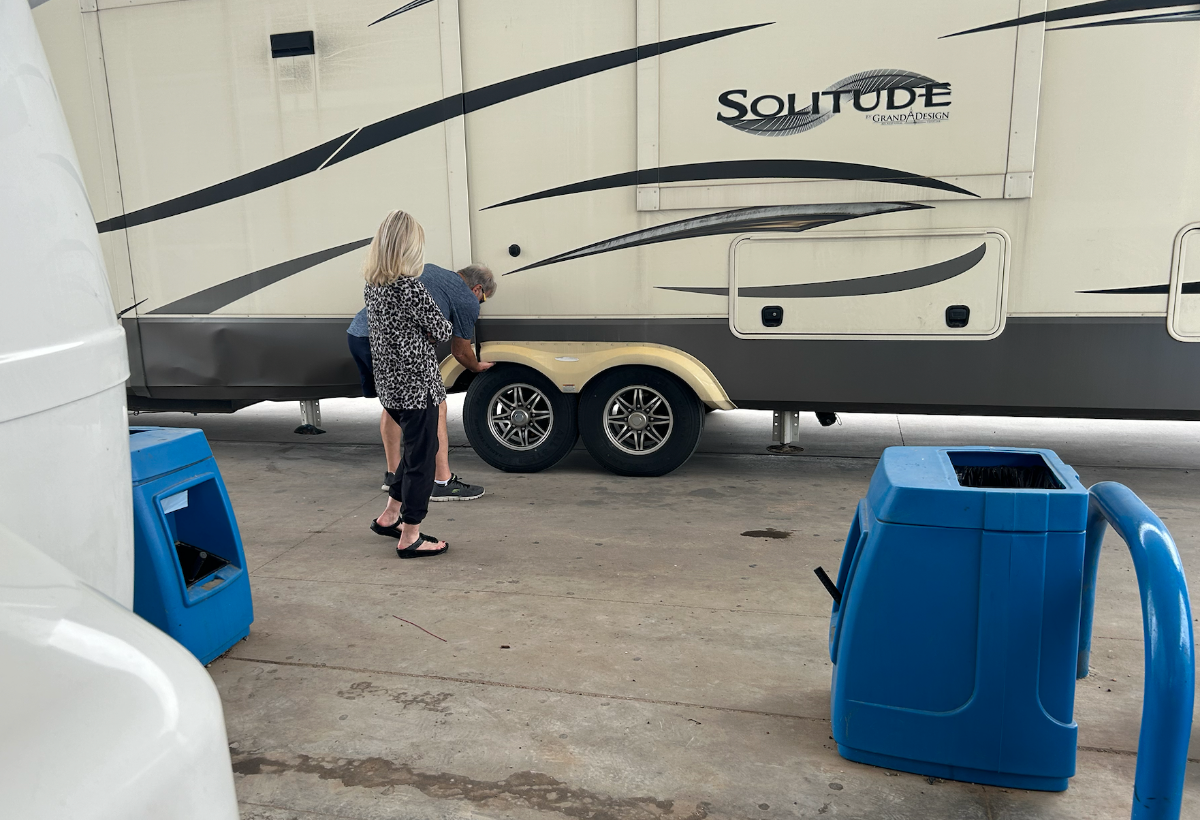
Here's an interesting event we experience on the US287 at a Valero in Childress, TX a couple days ago: We're at a regularly used Valero pumping at island #2 of four aligned left to right. Perfect pull-off/pull-onto the highway option for us. Topping off the Tundra, D's in the right front and I'm inside the store getting some sodas. A couple pulls into island #3 to our right - tons of room as we're in the forward-most pumping station on our island. The dude's TV is a 1-ton dually hauling one of the longest twin-axles 5th wheel we've ever seen. He cuts to the left way too tight and nails the blue bollard protecting the pumps from an errant vehicle or in this case, a 5th wheeler. D observes the entire episode from the passenger's seat - as he is scraping the bollard along the "Solitude" 8 to 10 feet forward of the left-front wheel. He doesn't stop - he continues to drag his RV until impacting the front running gear assembly, bending the axle/spindle to the rear until the front tire is occupying the same space as the rear tire. I'm stepping out of the store at this time finding the wife trying to figure out what to yell at her spouse - I mention to her that her two left wheels are in FULL contact and will not roll correctly in that particular configuration. She says, "NO SH!T" - an appropriate reply to my stupid comment, I'm not realizing what had just happened. At this point, the driver manages to back up and "uncouple" his RV from the blue bollard. I top-off the Tundra and hop in when D explained to me what she just witnessed. Not over yet, it gets better -- (read: worse): The dude pulls forward and attempts a U-turn directly in front of us - way too close, I back up Casablanca allowing him to swing free and miss our grill. The two street side tires aren't smoking but they're squealing loudly and burning rubber is wafting about. Jackknifing his rig in front of us, the Solitude's overhead compartment slams into the TV's left rear cab smashing the rear window, ugh! They come to a stop in the fueling area for island #1 headed 180 degrees from their original direction prior to impacting the bollard. This is the pic of them examining the damage... The wife is not impressed at this time and is using some rather choice words emphasizing her concern... Nothing much we could do but offer an assist to call a tow truck - they just said that they'll handle it. We drove away unscathed and feeling bad for them. Lesson learned? Keep your head on a swivel even if you're not moving!
0 points


.thumb.jpg.e34bf01ef7f7d5e99ad31856d45afbeb.jpg)


-
Recent Achievements
-


")


")