Leaderboard


Popular Content
Showing content with the highest reputation on 11/03/2021 in Posts
-
30 # tanks empty weigh 10 to 15 pounds more than 20s, and are taller. We looked at that idea,,and stayed with 20# tanks. We can carry an extra 11# or 20#tank in the truck bed, secured in a milk crate, for long trips, but pretty much never do. One 20# tank lasts a really long time, unless we're camping in really cold temperatures, and run the furnace a lot. We refill when we have to change to the second tank.. Propane refills are not hard to find, but lifting a tall 55 pounds over the lip of the tank enclosure is not enticing, as Mike noted.3 points
-
We have 30lb tanks. A 30lb tank has 7 gallons of propane. A 20lb tank has 5 gallons of propane. Not a lot of difference. The 30lb is heavier and difficult to lift over the tank enclosure when full. I usually get on a step to help get it over the lip. Bill’s points are valid about getting a 20lb tank filled or exchanged at many more locations than a 30lb. We’ve never run out of propane. I have had one tank go empty a few times and we switched to the full until we got home. That’s for a 4 to 6 week trip in the winter. I’m not sure I’d go with 30 pounders if I went back in time when we were ordering. I’ve got a couple of 20lb tanks around I use for grills and fire pits. When it comes time to replace the larger tanks I’ll probably go with 20lb tanks. Mike3 points
-
Maybe the folks at Oliver could produce a photo calendar featuring the fine photography of Ollie owners? I believe that everyone on this forum would want one. It would also make a great marketing tool. I slapped this together in Photoshop as an idea.
 2 points
 -
Thanks John for the quick reply...that makes total sense. Cheers.2 points
-
Our Ollie came with two 20# tanks and I recently switched to two 30# tanks. I like the extra LP and have not had any issues with finding a place to refill. With 30# tanks we rarely think about LP and am happy I made the switch. I guess I will top off LP if we ever go through Vail Valley. 😎2 points
-
I have 30# tanks. Like Mike & Carol, I two have back and shoulder problems. I have to use a 3-step ladder and I walk up the tank a step at a time until I get to the top of the ladder handle and then I can lift it over. I never look forward to changing out tanks. As I run out next year I am drop back to 20#. I have 5 20# bottles around the house. The bigger tanks are nice for weed burning.2 points
-
There are those on this Forum and elsewhere that talk about the horrors of using one of our Ollies with its aluminum frame on the chemical filled roads of winter. Even though I rarely use my Oliver in winter, I would not be concerned about it as long as there was a way to get those chemicals greatly diluted and/or removed reasonably soon after exposure. In addition, is is fairly likely that a great majority of your driving for something like Quartzite will be on Interstates. These roads tend to get enough traffic so that within a fairly short period of time any chemicals that might be used are dispersed fairly quickly (note: I'm not talking about far northern interstate here but those that are generally traveled by someone from the northeast headed to/from Quartzite). Bottom line - I'd go for it. Yes, there is some (I believe minor) risk of some small pitting in your frame from chemicals but most of that frame can not be readily seen and (after all) your Ollie was made for you to use. Bill2 points
-
I like the less tongue weight of the 20 pounders.2 points
-
There's also the issue of propane mix in changing climate/altitude With 20# tanks, we can refill the empty with local mix, at a trusted source like tractor supply, and feel comfortable that we have the right mix. Lugging big tanks around the country, not needing refill, may actually be detrimental to performance of the fridge, and furnace, imo. (Note, we no longer have a gas fridge, but it was a concern for many years, for us.)2 points
-
We, too, are evaluating upgrades and add-ons. Our Elite II is in the queue. The kind neighbor who showed us her Elite II advised that she went with the 20 lb. tanks because it was hard for her to lift full 30 lb. tanks over the tank enclosure. As I have bilateral rotator cuff tears that limit my ability to lift heavy stuff above my waist, we are presently planning to stick with the 20s but carry a spare 20 for our dual fuel generator in the bed of our Tundra tow vehicle. The choice to haul a spare 20 also informs our present choice to forgo the extra propane outlets. We plan to also use the spare 20 for a gas grill, as that will not require a long hose if the campsite table is not close to the parking pad, and will not use up the fuel in the trailer tanks. I welcome input on these issues from the many Oliver veterans whose previous posts on numerous topics have proven so valuable to us! Ralph Pond2 points
-
Installed 3M film of the front corners yesterday. Couldnt get in to a shop to have the whole lower front wrapped before leaving for a trip so this will have to do for now. ordered a 12”x72” roll of 3M film from Amazon and decided the area directly behind the truck tires was the most important to protect. Cut the sheet in half and installed as shown (if you look close you can see the inner edge), vertically from the belly seam down. I’ll report back on how well it works on this trip. Depending on the results it may as it is or Ill order a sheet large enough to do the entire front, lower half. Total cost was $25 plus about an hour of my time.
1 point
-
We have the two 20# tanks. They came with the trailer as ordered by the original owners but we would have opted for the 20# if we had completed the build sheet. I had back surgery 1-1/2 years ago and would be hesitant to lift the 30#-ers. I can lift and replace the 20# tanks without need of a step stool / ladder (so I don't need to carry one). We have one foot in Michigan and the other in Colorado. I have multiple 20# tanks at each house for grills, smokers and heaters and I can easily swap out tanks. I also prefer the smaller tanks for tongue weight as we carry our generators in the front storage tray. The only reason I would consider 30#-ers would be if we regularly did long trips off-grid in cold weather.1 point
-
My spouse is a major University Department IT Supervisor. Her troubleshooting skills are amazing. So when I am having a problem for anything that even looks at all close to being computer based, I employ a four phased approach: First, I do a hard reboot. Then I drag out the owners manuals and search the Oliver University and hopefully the answer if there. If not, I check the Oliver Owner's Forum. When all else fails, I don't mention my first three approaches and pretend that the issue just happened, and call out to my wife "Honey can you look at this please". Over time, I have found that the odds of success are about 25% for each approach! Now for the married owners, it may, or may not be wise to mention the first three approaches to your spouse. 🙂1 point
-
Yes. Ours was similarly installed with brackets and a couple pieces of threaded rod. We pulled the fridge when we removed ours. Others have said you can get to the brackets without doing so, but it's really tight.1 point
-
I've been a volunteer firefighter/EMT for a long time. Use of one of the bays for vehicle work is definitely one of the perks. Nice set of tools in there, too.1 point
-
Thank you very much Mike! Colorado and Utah are on our states to see so, that's a bonus the PW performed well in those states. No boondocking for us, at least not for the first couple of years then, it's finding all the wineries/farms we can boondock at the follow-on years. We want to ease into going from the luxury of a home to traveling in an Oliver on and off possibly half of the year. *It's a nice break to get off of the island and see the mainland. M&K1 point
-
The "issue" with the 30 pounders is that they MUST be refilled at a facility that refills propane tanks while with the 20 pounders you have the additional flexibility of "swapping" these tanks for filled ones at many gas stations, WalMarts, grocery stores, Lowes, Home Depot, etc. This ability to swap really comes into its own in places like Vail Valley, Colorado where they have prohibited "refill stations" throughout the entire Vail area. On the other hand, if you are going to be doing a bunch of cold weather camping then the 30 pounders really come in handy. Bill1 point
-
One of the main features I love about the Oliver is its solid double hull construction and great crash safety. I have been a long time hater of slide outs since they are constant maintenance hogs and they can be so darned deadly in an accident. https://axleaddict.com/rvs/RV-Slide-Out-Dangers Scarey stuff indeed. I have never owned anything with a slide out and never will. I will never buy anything that uses wood as a structural member. I wonder when the design of RVs will start to become regulated to improve occupant safety? If you have never googled "RV wreck images" then you need to go look at what can happen to "non-Oliver's" ... Comments? John Davies Spokane WA1 point
-
I agree with the sentiment: If you are flying solo the LEI is much more manageable. I had a single axel 17' Casita for 11 yrs it is similar to the LEI in size. For that size trailer a double axel is not necessary.1 point
-
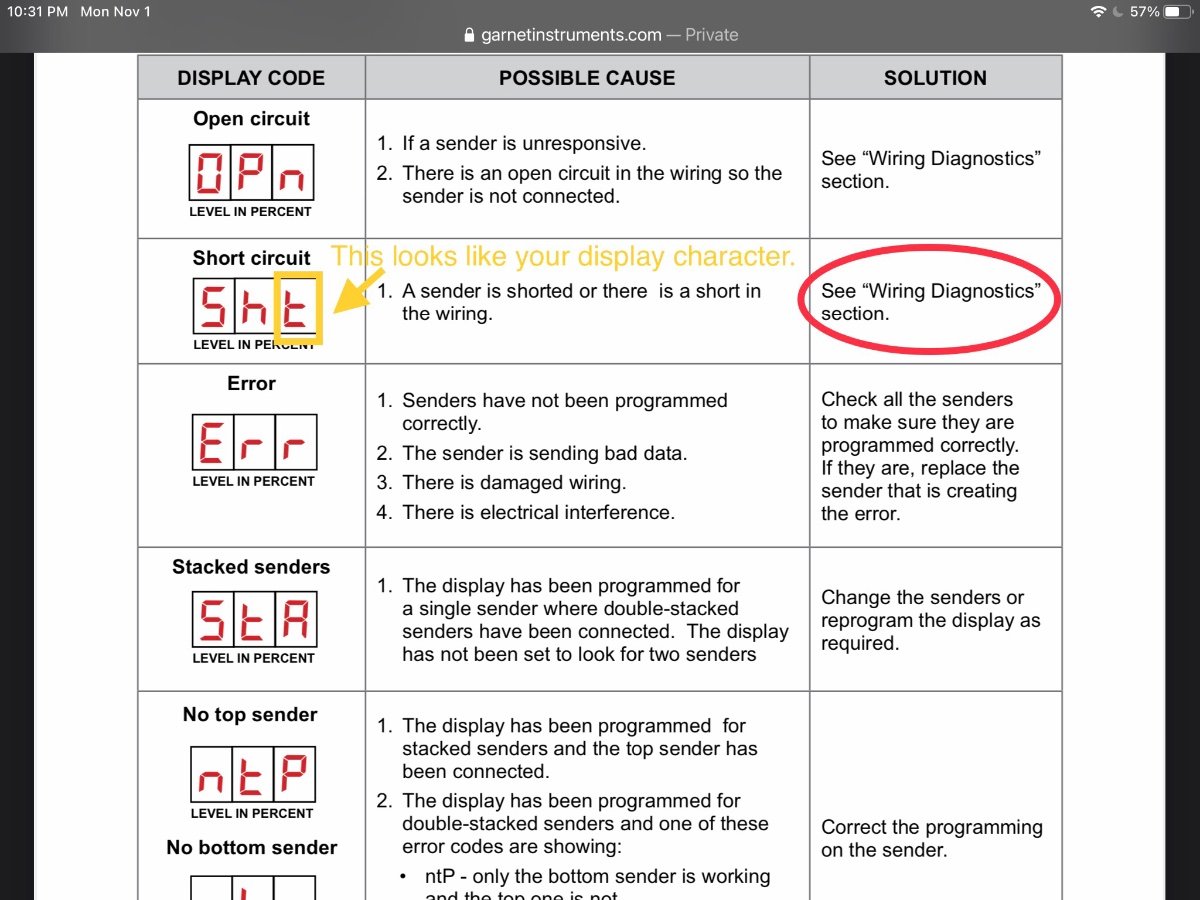
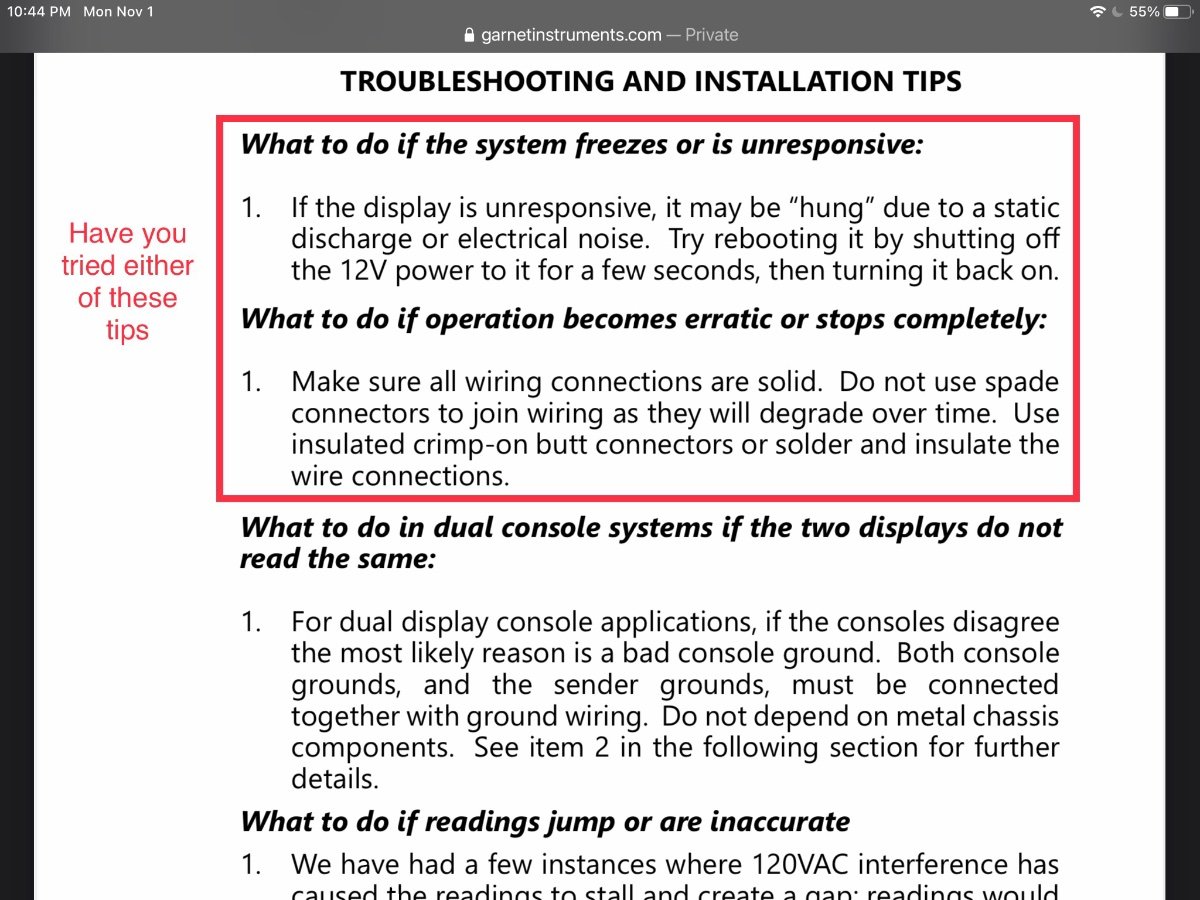
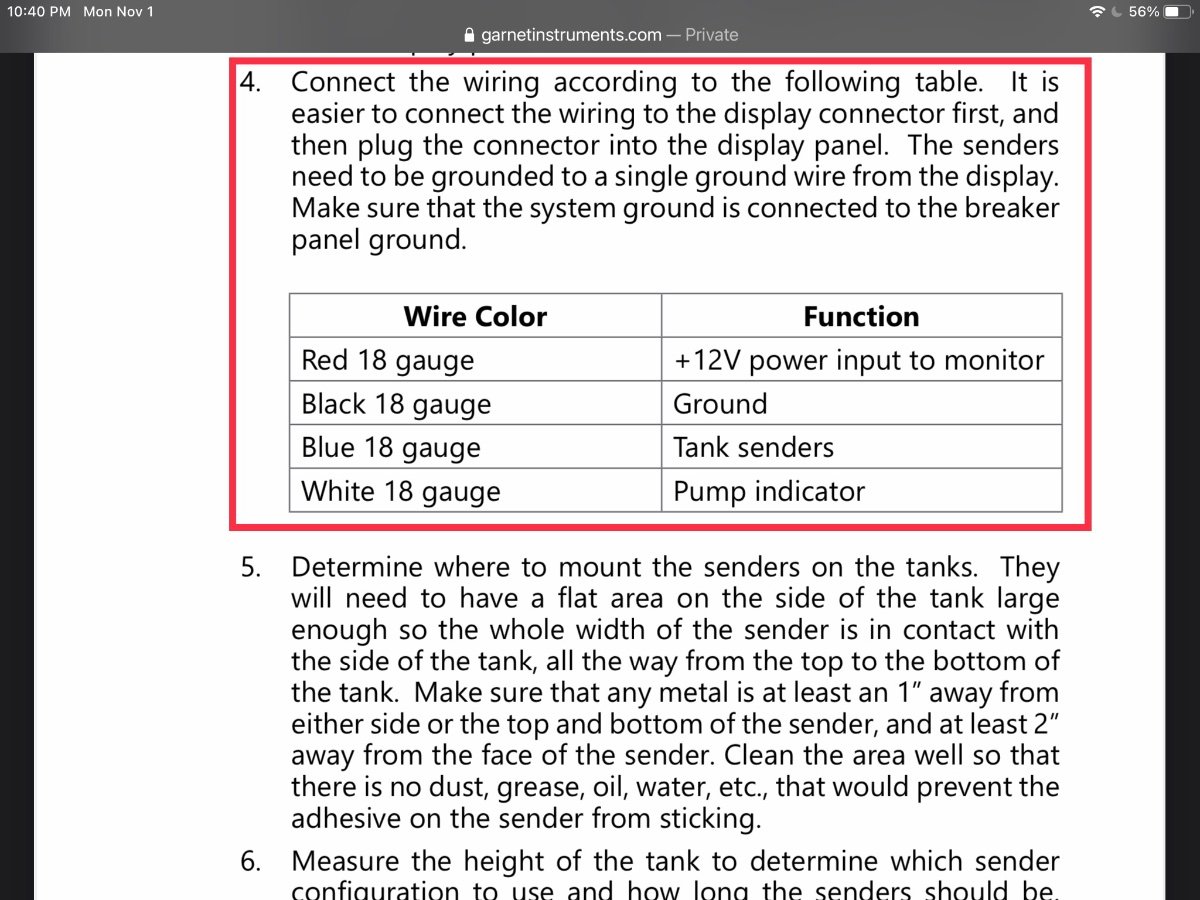
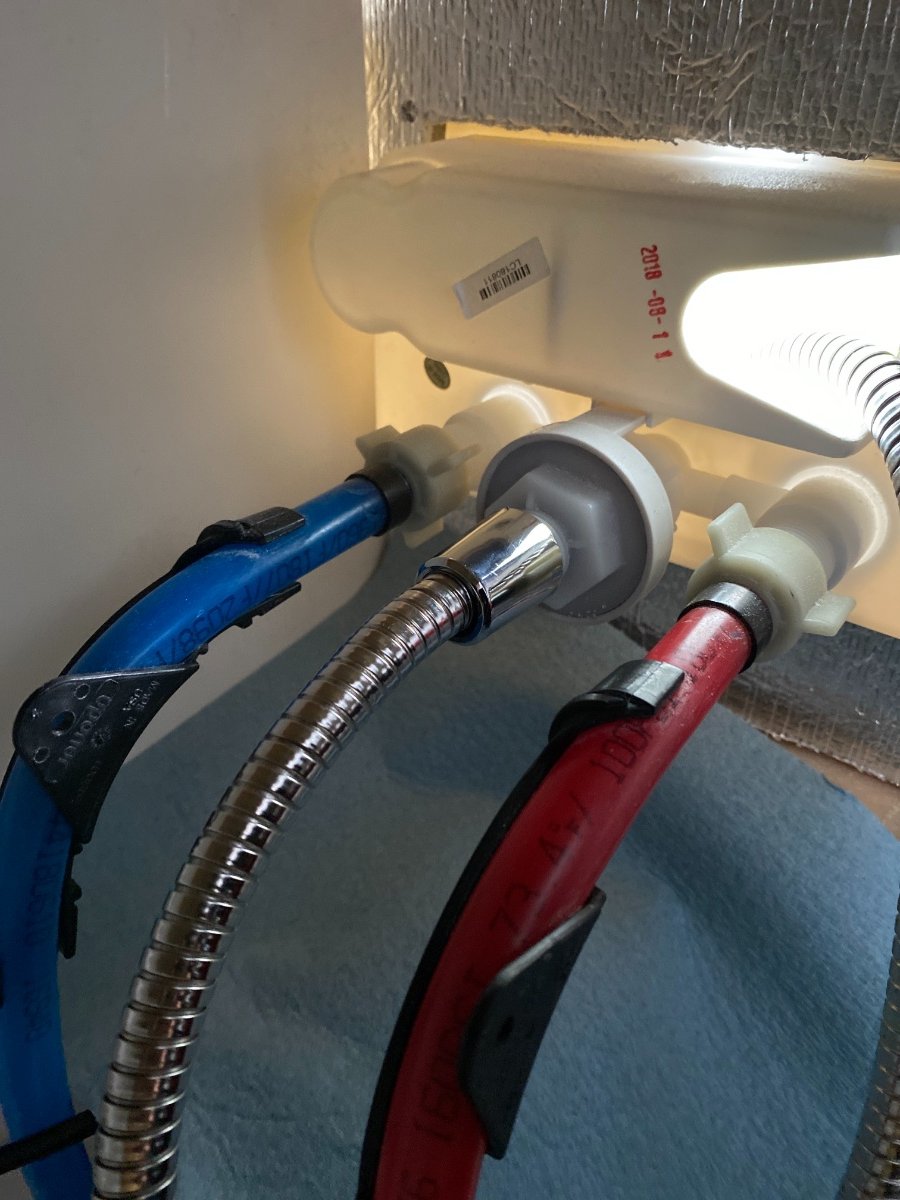
I would certainly follow AndrewK's advice above. The following screenshots are from the SeeLevel II manual. It looks like there are 2 power wires to the panel. One for the display and one for the pump and the pump circuit is working ok. The picture below shows the character in your picture and it’s a T. And the solution is to see the wiring diagnostic section. Seems like good place to start since you reinstalled the batteries. You should be able to access the back of the display through the pantry to verify the panel wiring connector. This last picture picture references frozen or unresponsive displays. Good luck! Mossey
1 point
-
A few years ago, I conducted a similar experiment (and posted it on the forum), comparing black and gray water tank treatments using dog poop. In that experiment, TankTechsRx came out the winner over the other product (I’m sorry, I no longer remember that other product’s name), as it did a much better job of reducing the odor. I recently encountered another treatment with very good reviews, so I bought a bottle of it—Unique RV Digest-It—to compare with my TankTechsRx. The experiment was this: I mixed a capful of each product with water to nearly fill a small glass, and then I placed five pieces of small dog food kibble in each glass and let them sit. The photo showing the glass with the brown colored liquid is the one with TankTechsRx product, which is naturally brown. Result: Within 12 hours or so, the Unique RV Digest-It had reduced the kibble to a sludge at the bottom of the glass, whereas the glass with the TankTechsRx still held solid chunks of kibble. The odor was also different, with the TankTechsRx glass smelling a bit funky, while the Unique RV Digest-It glass had a faint, but rather pleasant, almost floral, smell to it. I will be using Unique RV Digest-It from now on in my gray water tank. We have a composting toilet, so we don’t use a black water tank. However, we have been spraying a mixture of water and TankTechsRx in our composting toilet, which has seemed to help with the composting process and odor control. I will now be trying the Unique RV Digest-It in the same way, expecting good results. I would surmise from my experiment that Unique RV Digest-It would work well in a black water tank and accomplishing what it advertises: 1. BREAKS DOWN SOLID WASTE INSIDE TANKS. Liquifies human waste and all brands of toilet paper. Digests residual sludge from years of build-up. Works in black and gray tanks. 2. ELIMINATES TOILET & TANK ODORS without masking. Extra strength activated cleaners eliminate odors at their source without covering them with overpowering perfumes. 3. HELPS PREVENT SENSOR MALFUNCTION. Cleans and removes solid waste and paper before it can cling to sensor probes, preventing misreads. No, I have no association with either company. Yes, I suggest others give Digest-It a try.
1 point
-
Drilling is very simple, just get a bit the same exact size as your pin, do NOT go larger! That is not needed and will just make things too loose, the tight fit is needed for the ball to work correctly… There may be a slight misalignment or burr, and a bit the exactly same size as the pin will clean that up nicely. make sure the other pin is installed and lift up very slightly on the bumper to center the holes. My pins are 3/8”, double check yours, but I expect that is correct. A 3/8” bit will be found in most basic drill bit sets. If you don’t already have one, this set is quite nice for emergencies and fits in a galley drawer neatly. I also carry a Dewalt cordless drill and 1/2” impact driver when travelling, but that may be too anal for you. 😬 If you drill the holes with that bit and the pin still doesn’t go in, then you should replace it. There is either something wrong with the ball detent or it might be bent. You could try straightening a bent one using a bench vise and mallet, but there isn’t much you can do if the ball is messed up. John Davies Spokane WA
1 point
-
By far, the best and easiest way to fix this problem (many of us have had this through the years) is drill it out, I would start with the easy side locked in place and use the correct size bit (as determined from the opposite side) if that doesn’t fix the problem, go up to the next larger bit until it works, try not to go too much oversize to prevent “slop” in the fitment.1 point
-
Thanks for the report! Will also check out the 1500 3.0L Duramax!1 point
-
The rear tail light leak is a known issue caused by failure of the exterior caulking. it is likely that the leak in the front closet is due to the same thing. Exterior caulk inspection and maintenance is a normal task for any RV or travel trailer. Caulking issues are by no means an indication that you have a "lemon", and it is no surprise that the caulk needs a little TLC on a four year old trailer. Faulty blinds, bad regulator, leaking window, and blown shocks are all components manufactured by others and installed by Oliver. Unfortunately the overall quality of many RV components available in the USA market is not the caliber that Oliver would like to see. I was told by an Oliver employee that they have voiced complaints to vendors and were pretty much told to "take it or leave it". The onus is on Oliver for the fresh water pick up tube, as well as for lifting flooring and over-torqued fasteners. Take a look on the forums of SOB's and see what woes they experience on four year old travel trailers and you will be grateful that you purchased an Oliver. Good luck with your shock replacement!1 point
-
Have read and heard good things about Happy Campers. I may buy some and try an experiment comparing it to Unique. I haven't tried HC yet because it seems they don't have a liquid form, and I preferred the idea of using liquid rather than solid, especially because I liked mixing the TankTechsRx with water in a spray bottle for the composting toilet and putting a few drops in the drains to cover the drain traps when the trailer would be sitting for a while, which I will do now with the Unique product.1 point
-
If anyone else finds that these bolts are loose, there is an easier fix. Rather than removing the vanity to access the head of the bolts for a holdback, clamp a pair of vice grips on the threaded portion of the bolts and then tighten up the nuts. If it were me, I would back off the nuts a tad so that I could put on some Locktite before snugging them down. Obviously this will only work if the bolts are long enough like the ones in the photo. Yes the vice grips will damage the threads, but it is unlikely that you would ever have the need to remove these particular fasteners. If they ever had to be removed you would need to cut off the damaged portion to remove the nuts.1 point
-
Our valve does not move in & out smoothly; it is a bit difficult to manipulate it. I thought WD-40 sprayed on the metal rod would fix it. Steve said 'no', that it's the closey thingy. (my description, not his.) Anyone have an idea on how to rectify or is this the way the valvey thingy works. Thx1 point
-
Wow! That is quite a process you just described! Very helpful I am sure. The new system and batteries sound much more complex than my Blue Sky Solar controller, "old" 2,000 watt inverter, and AGM batteries. Time for me to butt out, it appears my info. is non relevant. Good luck, I hope it is a simple solution of changing some settings like Fritz has suggested.1 point
-
Yes, I bought a longer one like linked above and a holder that uses a suction cup to attach to the hull. You have to remove the existing hose and attach the new hose to the back of the valve panel in the basement. Had to use some Teflon tape because the threads were not a good match. This thread has a photo of the connection and other useful information.1 point
-
And one last thought, it may have been an installation error. So try remounting the pump a 1/2” north, south, east or west of it’s present location with new coarse thread screws. Put a washer on top off the rubber feet to help control the depth of the screw so it doesn’t penetrate the plastic wood entirely. If the screw passes through the board completely and hits the fiberglass, it could strip the hole in the board. Use a screwdriver and not a screw gun so you have a little more feel. Maybe even try some test screws for practice. Kreg pocket hole screws for soft wood might be a solution. My pump is mounted with lathe screws and hasn’t failed yet. Mossey1 point
-
I was having an issue with reduced water flow at the outside shower head. Thinking it might be the usual mineral buildup or plastic shavings issue in the hose or shower head, I decided to disassemble things starting with the shower head and working upstream. No mineral buildup or plastic shavings found, but when I removed the flex hose from the valve assembly, I did discover that the rubber washer that seals the flex hose to the valve assembly was swollen to the point that it was almost completely restricting the flow of water from the anti-siphon check valve inside the valve assembly. I’ve only used the normal chemicals in the water system for cleaning, disinfection, and winterizing (vinegar, bleach, and RV anti-freeze). But the seal obviously didn’t like one or some combination of those chemicals. I replaced the seal with one from my plumbing parts stash and now the flow is back to normal. Just something else to check for anyone noticing reduced water flow. Just be careful when removing the flex hose. There are several small parts to the little check valve inside
1 point
-
Honestly, people get phobic about "wood." As mounting, wood/marine plywood is an excellent material. Holds fasteners well, everyone (mostly) has tools to work with it, and water resistance is built in. Lasts a really long time. What's not to love?1 point
-
Well since no one would answer my question, I looked farther into it and fixed the problem myself, sorry I can't tell you what I did, it's requires two hours of work and every tool I own, haha trainman1 point
-
K-n-J Make sure that you check the payload capacity of that Titan before you commit. Bill1 point
-
FWIW, my sister-in-law is a little shorter than your wife, and she loves driving my brother's F150, even towing a trailer. The seats are really comfortable, and plenty of adjustments. His has the slideout running boards, which are really nice for her. I think the new f150s still have the adjustable pedals, which is a really nice feature for shorter people. My daily driver is a 2005 Silverado, and as much as I'd love to have a new truck, it will be very very hard to part with it someday. I really enjoy driving that truck. I love the greater visibility of a big truck windshield, and sitting up higher, so I can see further ahead than in a car or smaller suv. For whatever reason, I don't enjoy my husband's Ram nearly as much. I think it's the way the hood slopes away, and I am, of course, used to a different truck. Plus, I don't find the seats to be as comfortable as Ford or Chevy, for me. I just can't find a seat adjustment that keeps my left leg happy. He loves it, though. Good luck in your search.1 point
-
Just my opinion, but is is going to be really easy to find any old 3/4 ton with enough payload, but most old half tons are probably going to be marginal in that department, just as are the new ones. And older trucks are down on power, so a bigger truck is more likely to have a stouter engine. Besides, if they drive around in a rough riding older truck, it will make their transition to a new one all the sweeter. John Davies Spokane WA1 point
-
Good point! What are the older 3/4 ton TV preferred here?1 point
-
My opinion is the car manufacturers will probably offer large incentives down the road again. However, over the next year or two, expect the msrp to increase rapidly to offset some of the “savings”. Oliver has had some pretty large hikes as well recently. A half ton is a lot easier to live with as a daily driver and gets better mileage. The HD models haul like a dream but drink like a fish. They can also feel more “truck like” in the suspension department when cruising empty.1 point
-
Here is a RAD video on the Mini,1 point
-
We're all waiting for Overland to retire so he'll manufacture his nifty sidemount invention for the Lagun for all of us... 😅1 point
-
You can ask Oliver for their Delivery Checklist that they use to be sure they cover everything with new owners - that may include some smart additions for this list.1 point
-
Truth. Sadly, we learned this the hard way.1 point
-
And, if you change tow vehicles, you can purchase replacement flaps. Actually, most of the bits and pieces for rock tamers can be purchased online. We've used Rock tamers for over a decade. We don't travel enough gravel miles to justify John's stone stomper. That's the ultimate, though.1 point
-
GJ - From your question to FrankC I'm guessing that you do not have the Rock Tamers (yet). If that is the case you will note when you get them that you can cut them down to size via "guide" marks that are already in them. However, Be a bit careful to not cut them too short the first time - you can always go back and trim another inch or so off if you find them to be too long. This is what I did for my F-150. Bill1 point
-
The rubber flaps have molded cut lines and pilot hole locations to trim the top of them as needed to the correct length and punch through the holes to mount to the support arms at the length you’ll need. The top edge get trimmed and new holes punched since the Rocktamers have the metal logo plate at the bottom. The as-is length just happened to be perfect for my F-250.1 point
-
John, you are so right. A number of years ago, I don't have all the specifics, but there was an incident involving an Ollie, ice, a rapid angular maneuver, etc. etc. etc. ........ you get the picture. Well, the Ollie wound up sliding down the road on its side. The insurance adjuster was simply amazed at the robust Ollie, whose worst damage (other than some items out of place on the inside) was an abrasion to the belly band where it scraped along the ground. Ollie, built like a tank!1 point
-
The neighborhood family mentioned above stores their trailer outside all winter next to mine. They have been experiencing all kinds of problems. They saw me the other day and said, "We have been admiring your Ollie. Once the kids are older and no longer seek to go camping, we would love to own an Ollie. Just the two of us and our big sloppy dog!" It is interesting how many campers aspire to be Ollie owners. Buzzy1 point
-
I thought I would rejuvenate this old thread with a link to an article by a long time Casita owner about the poor build quality and the inevitable problems with cheaply made RVs. This is a very good story, and it will make you glad that the Oliver (and the Casita, to a lesser degree) is so well put together.... "After owning four RVs and looking at hundreds more, (as well as visiting various RV "factories" and seeing how they are screwed together) I can say I have learned a lot about the RV business. A lot of it is like touring a sausage factory - there are things you wish you hadn't seen. The dirty little secret of the RV industry is Quality. Very few RVs are quality made and very few outlast their payments. Let me explain." http://livingstingy.blogspot.com/2014/09/the-rv-industrys-dirty-litle-secret.html John Davies Spokane WA1 point
-
I'm completely in agreement with John on this one: no slide outs or wood used in the main frame construction.1 point


.thumb.JPG.dd838cdb3df463dab6a16861fa23a319.JPG)


-
Recent Achievements
-
")


