Leaderboard


Popular Content
Showing content with the highest reputation on 12/28/2021 in all areas
-
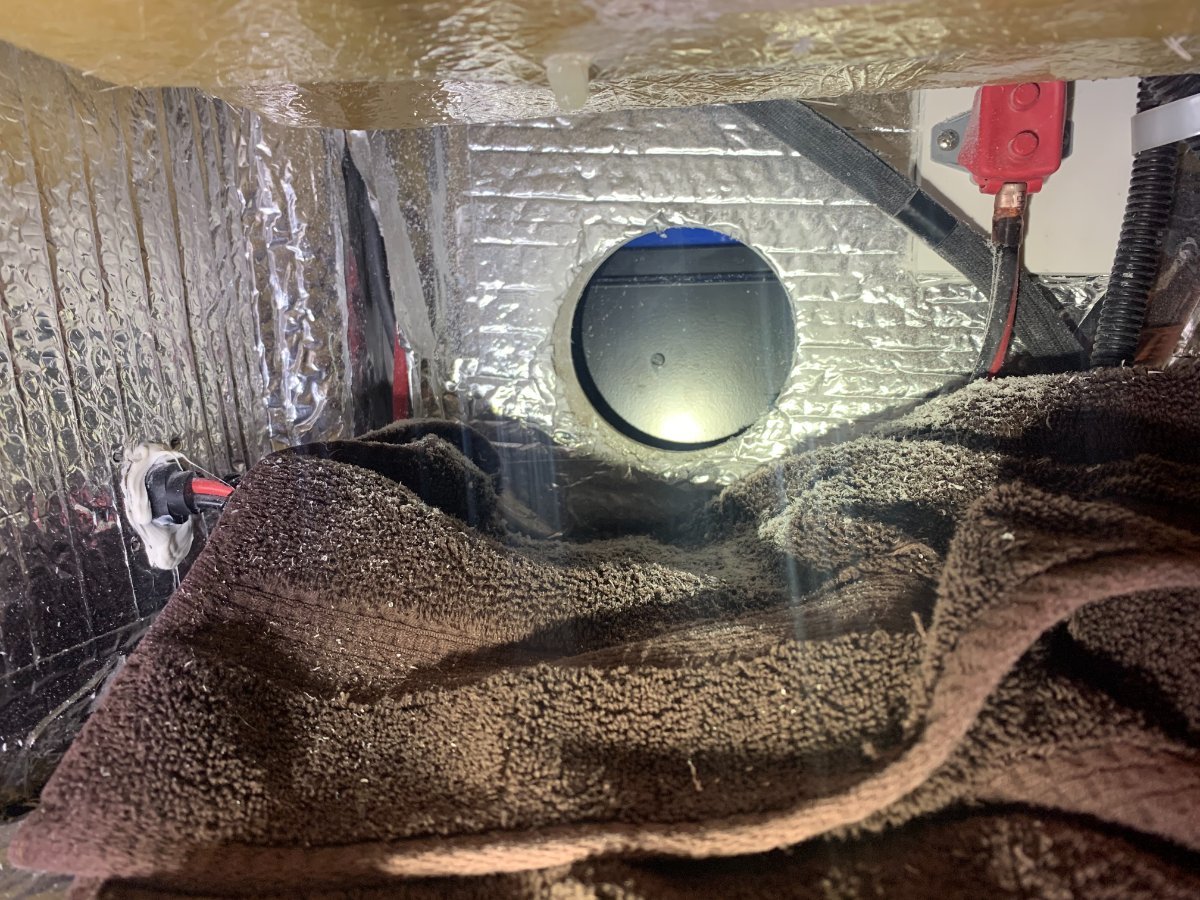
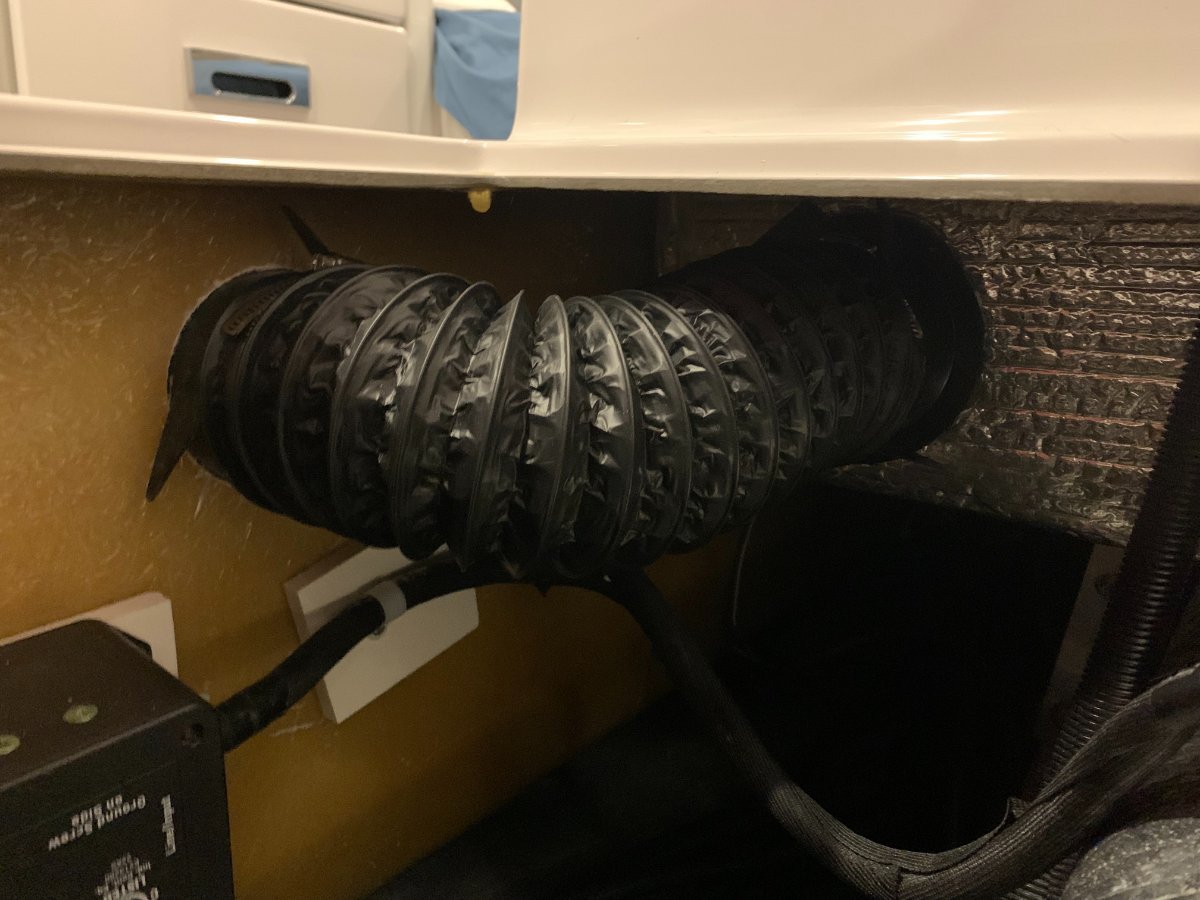
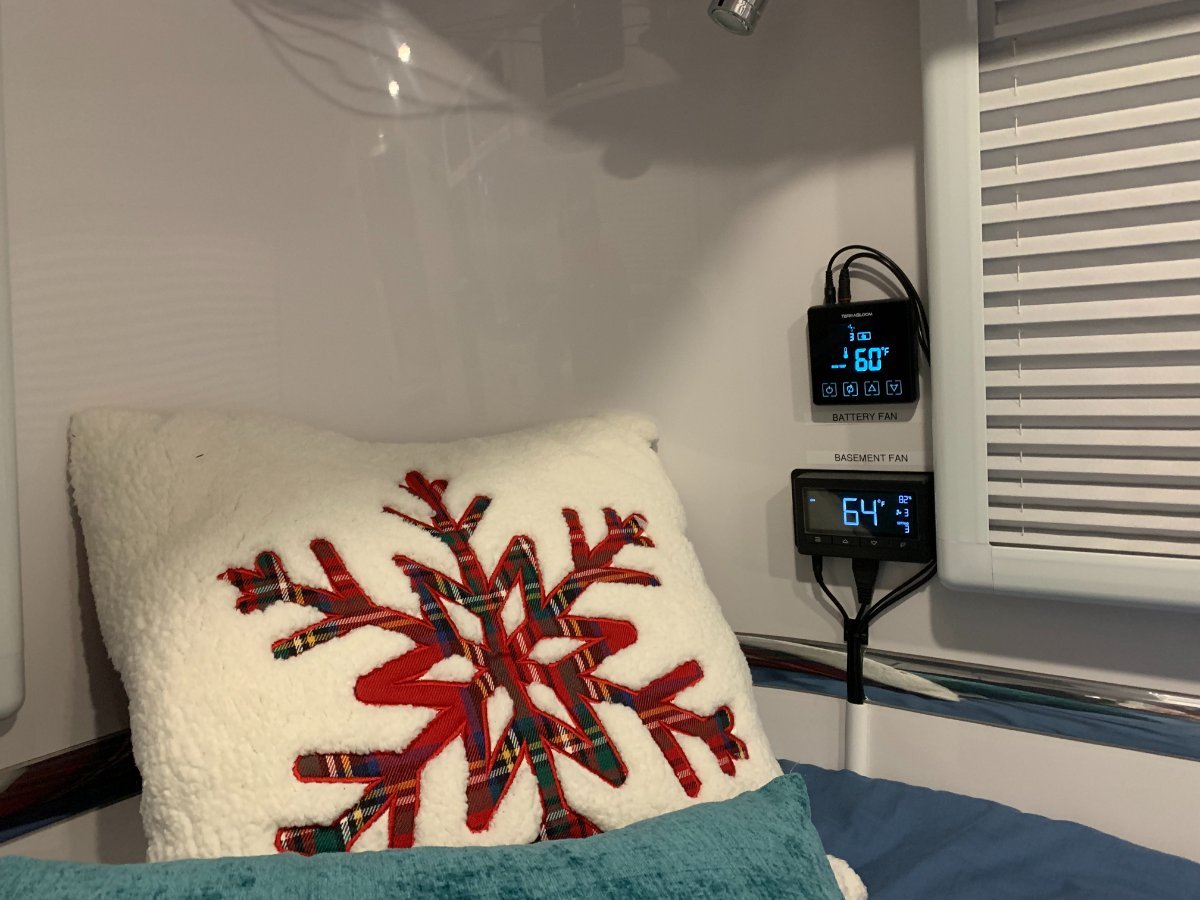
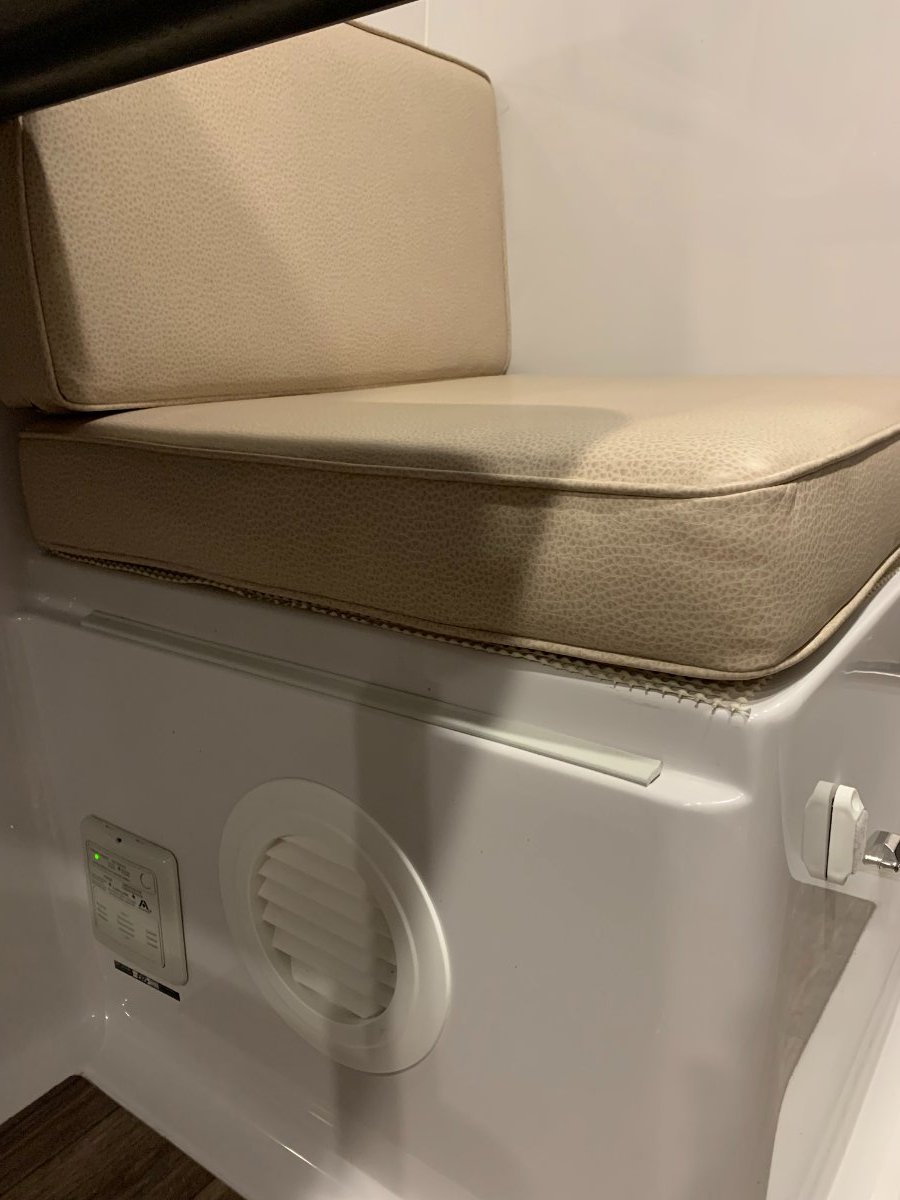
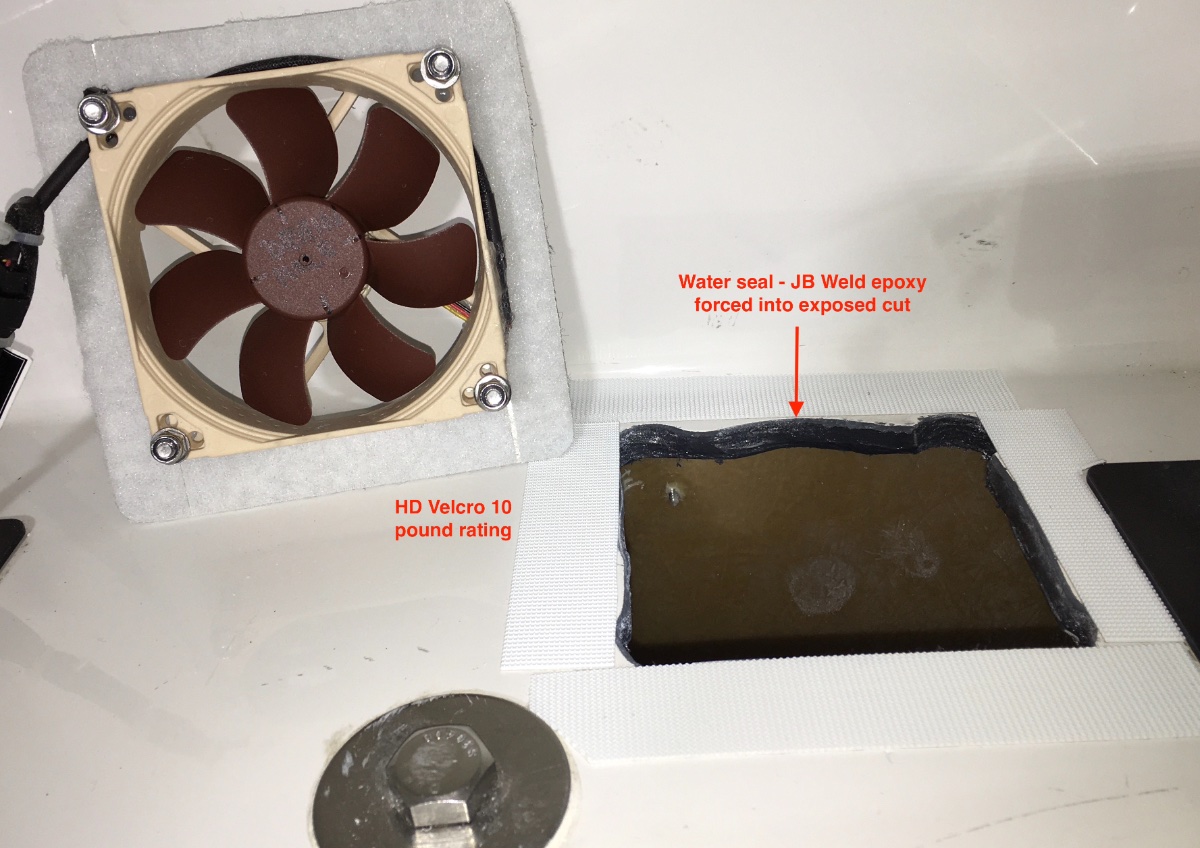
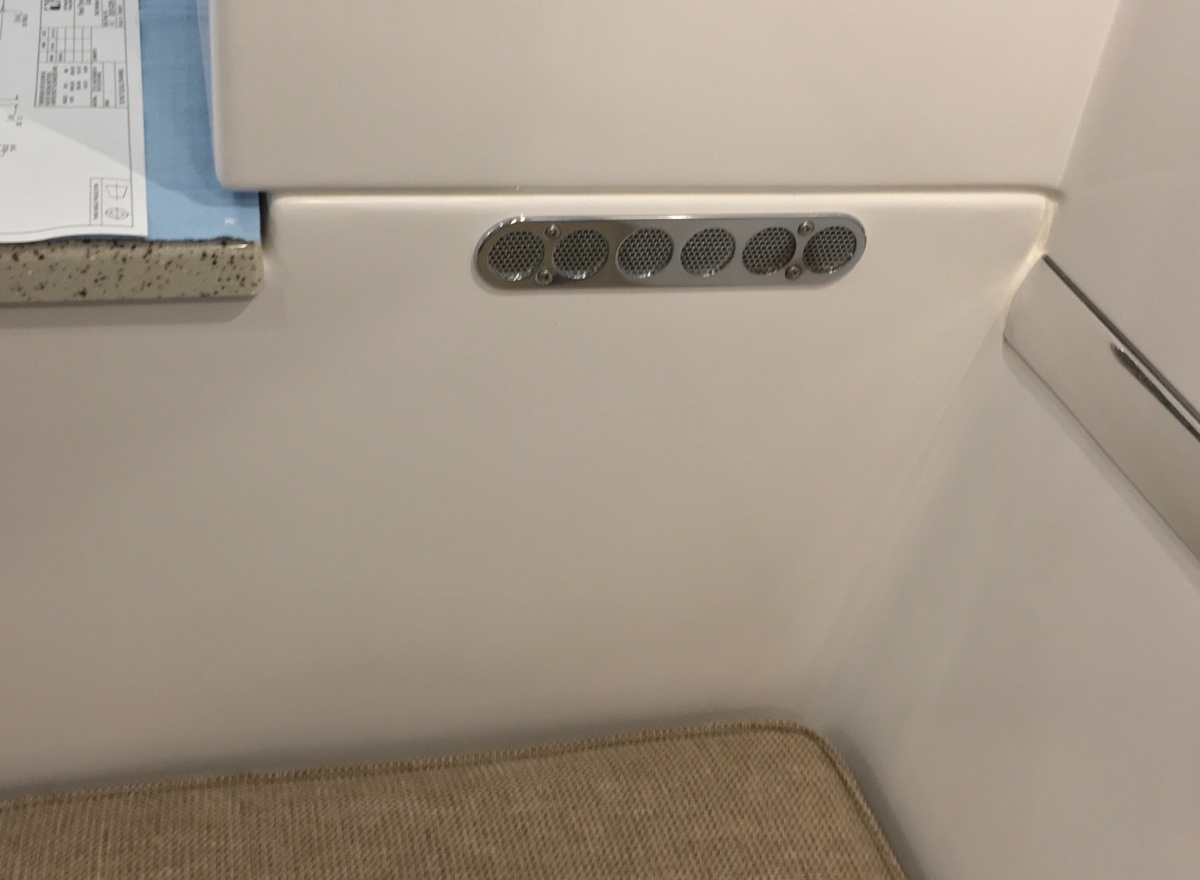
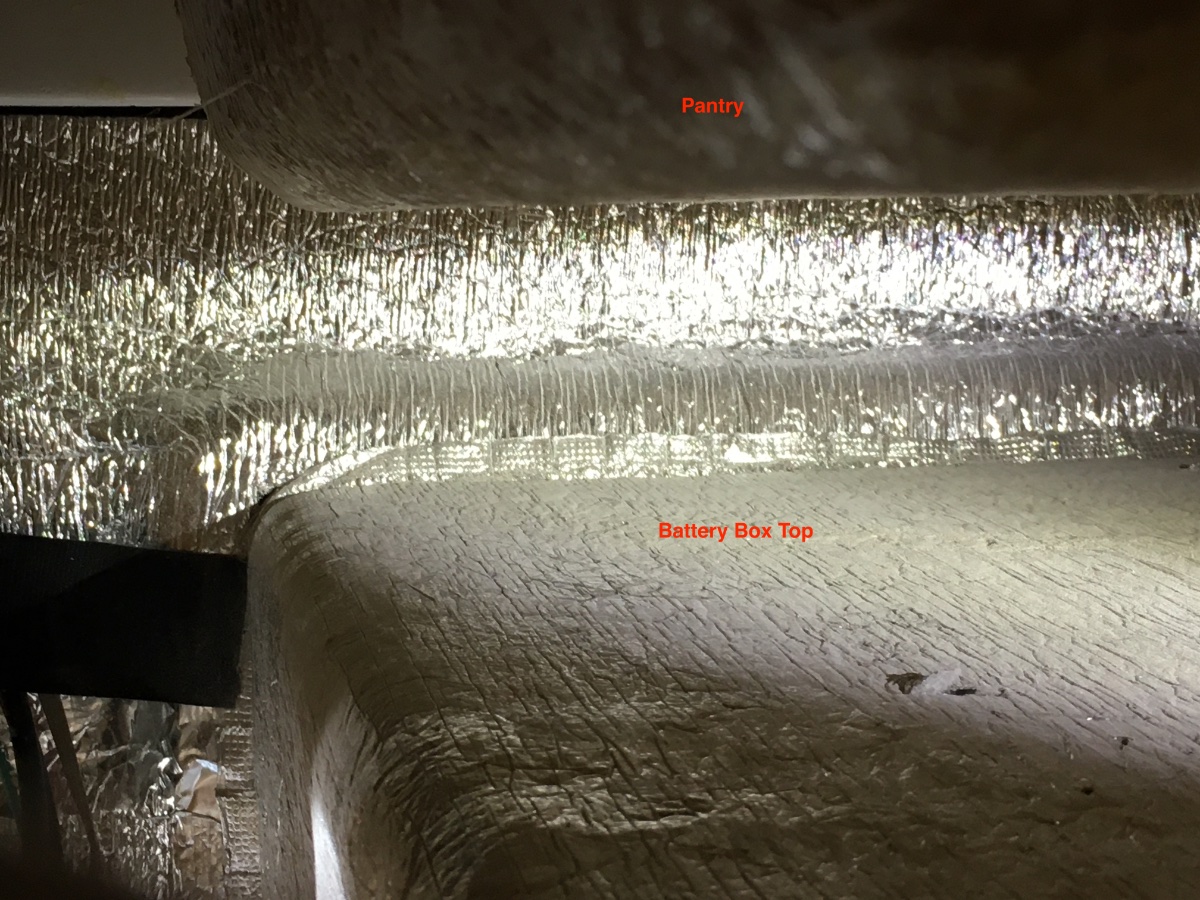
Several folks expressed interest in seeing another design to keep the battery box temperatures moderated (for lithium batteries only!). This is an alternative option to John Davies' design. They are similar except that I chose to use a forced air closed system to moderate the battery compartment temperatures while John uses a combination of forced air and natural convection. This ended up being my final design and it has been working very well since last April (2021). My goal was to keep the sealed battery box as close to cabin temperature as possible (warmer in the winter and cooler in the summer - humidity controlled at all times, etc.). I stuck pretty close to my original design except that I did end up venting back into the cabin, so essentially I am just re-circulating cabin air through the battery box. It's a super-simple design and temperature and humidity sensors have proven this works as would be expected since this is a "closed" loop system. I do think this may be a bit difficult to follow unless you have had your head under the seats and beds, but here goes... Here's a picture from the cabin that shows the 2 (finished) 4" vents used for intake (under the street side bed) and exhaust (under the aft dinette seat): I'm going to start under the bed, which is the intake side in my design. This photo shows under the street-side bed where I cut the 4" hole into the aft side of the battery box: And this picture shows the installed ducting and smart fan under the street-side bed: Here's a view of the intake vent from inside the battery compartment (it's the partially obscured vent on the lower right front of the battery box): Working our way forward, here's a picture of the 4" exhaust hole in the battery box. It's partially obscured by the rail. It's located on the lower left back side of the battery box: Moving back inside, here's a look under the aft dinette seat at the 4" holes used for the exhaust back to the cabin: And here's what the exhaust looks like with the short piece of 4" duct in place under the dinette seat: That's pretty much it. I threaded the cables for the sensor and the fan control unit under the bed and put the controller for the battery compartment smart fan by my bilge (aka basement) smart fan controller. The controller lights can be turned off and these controllers are where my feet go on the bed, so they are not in the way and tucked out of sight behind the window shade for the most part: I know this doesn't include a lot of detail (i.e., I can't come close to the quality of John Davies' post!) about how I tapped into the 120V power (in the basement), the sealant I used with the vents, the hole saw I used, how I cut the holes, etc. , but here's a list of the parts and sealant used and I can try and help with any questions if anyone uses this design. TerraBloom ECMF-100, 4" Inline Duct Fan with 0-100% Speed Controlled EC Motor, Metal Case, Energy Saving. For Ventilation Boosting, Heating, Humidity AC Infinity Flexible 4-Inch Aluminum Ducting, Heavy-Duty Four-Layer Protection, 8-Feet Long for Heating Cooling Ventilation and Exhaust Soffit Vents 4 Inch Round Air Vents Louver with Screen ABS Grille Air Exhaust Vent for Ventilation System (100mm)... J-B Weld 31312 All-Purpose RTV Silicone Sealant and Adhesive - White - 3 oz.
 5 points
 -
"Some advice on properly using the cellular booster. After you turn on the WeBoost you should briefly put the phone in airplane mode, and then turn off airplane mode. This forces the phone to let go of the distant cell tower with the weak signal, and to now look for the closest “cell tower,” which is the WeBoost. Similarly, if you were using the JetPack in the tow vehicle, you should power it off and then back on after starting the WeBoost. If you have been out hiking all day, your phone will remain connected to the distant cell tower, and you can get it to connect to the WeBoost by cycling into and out of airplane mode." Very helpful information. Thanks4 points
-
We are Doug and Dawn Frederick from the beautiful Shenandoah Valley of Virginia. We found out today that we are Hull #1021, with a pickup date of February 15th, 2022! We are excited about our future adventures in our 2022 LE 2 dubbed “Chill Pill” . See you out there!!3 points
-
Ok, I did post some photos of the battery box design I used in John Davie's original how to post: https://olivertraveltrailers.com/forums/topic/5301-how-to-lithium-battery-powered-vent-system/ I also noticed that I never posted pictures of my bilge / basement solution. It's pretty simple - bungee cord simple. 🙂 The fan only has a duct on the exhaust side so the fan pulls air from right under the seat and exhausts it into the cabin. When everything is closed up and the fan is running, the cabin air is pulled into the basement (primarily) through the existing heat return vent under the curb side bed, so cabin air is circulated throughout the basement pretty well when this fan is running (all the time in my case). Here's the 6" cabin vent under the dinette seat: And here's the smart fan and duct under the seat: I keep thinking I should make a more permanent mount for the fan, but it's held in there with bungees for over 5K miles without budging, so I've got that on the back burner. I also tapped into the back of the 120V receptacle under the seat right next to the fan for the power. I put the controller for this basement/bilge fan in the back of the cabin out of the way next to my battery compartment fan controller: Here's the smart fan and vent I used for this project: AC Infinity CLOUDLINE T6, Quiet 6" Inline Duct Fan with Temperature Humidity Controller - Ventilation Exhaust Fan for Heating Cooling Booster, Grow Te HG POWER 6 Inch Round Air Vent ABS Louver Grille Cover White Soffit Vent with Built-in Fly Screen Mesh for Bathroom Office Kitchen Ventilation
3 points
-
We went for a morning Oliver Plant tour during May 2016 with Jason, not sure if we were going to buy a new or used Ollie. This tour was very informative on Ollie's construction and systems. There was also a LE2 for sale in the classifieds here at the same time. We drove to Missouri directly from Hohenwald that afternoon to see the used Ollie armed with information we learned from Jason. The previous owners answered all of our questions and let us camp in Ollie on their farm, with full hookups, testing all systems overnight. We purchased Ollie the following day from the couple in Missouri.3 points
-
Picked up our Ollie from Hideaway Storage on Sunday morning. The trailer was just as we left it. No issues. We left the fan on at 10% and it was 79 outside and 74 inside. We were in direct sun and no surprise the agm batteries were fully charged. This worked out well. I would do this again if we needed to store short term again in Naples. We leave Oscar Scherer State Park near Venice Florida for Suwnee River State Park in Live Oak the morning. Oscar Scherer State Park is in an excellent location and is well kept. The spots are a bit tight but private with lots of vegetation between sites and good shade. I would stay here again for sure. Awesome give me a call or pm when you're ready to plan. I think there are 14 or more Oliver owners in Maine. If you are planning anything on the Coast south of Acadia National Park for summer or Fall I would recommend making reservations as soon as you can. This also goes for the state parks especially Sebago lake, Baxter State Park, Wolf's Neck and others. Moorhead and Rangely lakes regions also fill up. There are lots of harvest host locations. We like the HH brewery in Boothbay. We are just up the coast from Boothbay right next to Pemaquid Beach. A hidden gem.2 points
-
I chose the Stepup Baon 797 Flooring and Grey Jay Ultrafabric Upholstery. I did choose the Standard White Countertops because I was going to be changing out everything except the kitchen counter with Foy's wood tops. Foy and his wood tops come with my highest recommendations. Good luck on your choices and let us know what you choose.2 points
-
Having had a Casita before we got our Oliver our delivery time at Oliver was probably a total time of 2 1/2 hours before we were on our way to Davy Crockett State Park, this time did include lunch that they provided for us. Camping close to Holenwald could be beneficial, we had a few issues and a call back to Oliver gave us the answers to take care of the issues that arose, I will say here that Oliver offered to send down someone to take care of the issues, but I was able to take care of them with the info they provided for me. I would recommend a close stay could be of value just because of what could go wrong and Oliver needed to take care of it, I don't think I would let the weather be my determing factor, when it's only rain we are talking about here, plus you can change the delivery date. We found the most needed thing for the first days camping was having a Walmart close by and Davy Crockett State Park has one. trainman2 points
-
We lived in France in the 1980’s and enjoyed Raclette with French friends the years we were there. Our tradition is to do Raclette on New Years Eve. We try to use Raclette cheese, when we can find it (it seems to be getting more common these days), otherwise any cheese that melts well will do. We put small potatoes on top of the grill to keep them warm and then put the meat and cheese in the tray to melt. Then smash a small potato on your plate and scrape the meat/melted cheese on top. You can do whatever sides you like. Some of our best memories of France are sharing Raclette with friends. This was last year when it was just Carol and I on the wine barrel. A couple of years ago…
2 points
-
I think this is probably one of the best , most helpful posts ever about preparing for pickup. You can't learn everything without being in your trailer, but you can certainly prepare to learn what you don't know. I'd add, study all the videos in Oliver University. Thanks, @Mainiac2 points
-
I'll be interested in the responses. We built a metal pole barn on our camping property this summer. I've never had problems getting a Verizon signal, but inside the steel shell, almost zero signal. What I do: put my Verizon phone in a windowsill facing a tower, set it up as a hotspot, and everyone else gets good signal, linked to my phone. If I take my phone out of the window, I get a lame signal. Temporary fix, of course. I'll be looking into an antenna and booster for inside the barn. Runs my battery down, so I have to keep my phone on the charger, on the windowsill. Good news: no tinfoil hat, no standing on one leg. Lol.2 points
-
When our black tank is full, or needs dumping because we’re leaving for a location with no sewer, we dump, close the gate and fill to about 70-80%. Then we dump again and then repeat one more time. I’m outside manning the outside dump activities and Carol is inside watching the level to tell me when we’re at the 70-80% level. Then we drop in a detergent pod and a capful of Calgon water softener. When we’re heading home we also add some Happy Camper to both the black and gray tanks. We’ve been trouble free for the last 6 years. Mike2 points
-
I always encourage folks to take the time and shake out the trailer at a nearby campground. We couldn't. We had a tight timeline from the Orlando builder's show to NC, to Hohenwald, and on to the panhandle to drop my brother for a preexisting plane reservation. If we had it to do over, we would have stayed. But, couldn't. That said, we were seasoned rvers, and so are you. Though systems are in different places, many will be at least somewhat familiar. If the weather really stinks, and you don't have a pet with you, I recommend Fall Hollows bed and breakfast. Nice, clean, friendly midwest people. If they have a room available Our first trip back to Hohenwald was 6 months after pickup, to have solar retrofitted . February 2008, to labor day, 2008. Like you, we can fix most anything. Fortunately, we didn't have anything to fix. Sherry2 points
-
If you’re concerned about lightning, then I understand, but personally I’d consider it a good opportunity to test the weather tightness of the trailer. Plus it’s hard to recommend skipping your shakedown. I only live three hours from the factory but it’s still a pain to go back. Not that I don’t enjoy my visits. 😜 I’d also second what Nancy just posted. If you aren’t used to towing, the first trip can be a little nervy, so planning to do it in the rain and rush hour might not be a good idea. If you’re a seasoned tower though, no big deal. I’d contact your salesperson and ask how long they usually schedule for PDI. I’d also ask how many others are picking up that day. If they’re busy, it might limit the amount of time you have to get used to the trailer before taking off.2 points
-
A lot of forums like to post music video threads and I am one of those people that has music going all the time. Here's what I am listening to: What are you listening to? Post your youtube video link below.1 point
-
Looking for recommendation on RV monitoring system for pets.. (We have a medium size Lab Mix) Marcell, Waggle1 point
-
We’ve found that Raclette cheese doesn’t smell great when you open and slice it. It tastes much better! We usually also do cornichons, salami, pepperoni sometimes, and prosciutto. You can always substitute other meats and cheeses as needed. We’ve made caramelized onions which are good on top of your pile of potatoes, meat and cheese. And, we’ve found that hearty red wine goes well. We do a Cab or Cab Franc. Our various French friends usually served a nice Bordeaux. Enjoy!1 point
-
Very Clever! I'm going to look into this a bit closer. Thanks!1 point
-
I found raclette at my local Aldi, in for the holiday season. Otherwise, Sprouts farmer's market, or the fancier/pricier artisan cheese shop. I bought some baby potatoes today, and already have the cornichons, salami, Prosciutto, and vegetables in the fridge, and shrimp in the freezer. The tuna steak sounds really interesting. I may have to try that!1 point
-
We had the same issue a few years ago. Check for plastic bits or hard water debri in the faucet filter and in the line behind the toilet. Mike1 point
-
What is the temperature where you are camped? The bathroom is usually the coldest place in the camper, and if you didn't have the heater on overnight, or didn't keep the bathroom door open, is it possible that the lines in there froze? Longshot, but you never know.1 point
-
A good thing about Raclette is you can do whatever you want! We’ve had guests put potato on their tray with cheese on top. It’s all good.1 point
-
"Best job in the world. Be wrong 50 per cent of the time, and still keep your job." I didn't have that luxury of being wrong 50% of the time as a pharmacist. When I was a nuclear pharmacist it was readily apparent when the ordered liver scan showed up as a heart scan instead.1 point
-
Very exciting -- welcome to the forum Doug n Dawn -- and the "Chill Pill"!1 point
-
Welcome! February 15th will be here before you know it!1 point
-
Another possible solution... A pair of 300 Watt heaters would draw about 50 amps when on (12V), so it's pretty easy to do the math and figure out how long they could run on batteries. I have 400 Amp hours, so I could theoretically run these bilge heaters for 8 hours with nothing else running. However, the cabin needs to be heated (if you use the furnace, that's taking more battery power to run the fan) and other small things need battery power as well. I came to the conclusion that heating the bilge electrically was not feasible with 400 Ah batteries, so I started looking for options to leverage the propane furnace. I chose a "smart" fan that I put under the front dinette seat with a vent (AC Infinity CLOUDLINE T6). I can run that at various speeds and it pulls cabin air through the heat vent in the back and pushes it back out the front. I've used temperature sensors to ensure cabin air is moving around the bilge. I have also found the bilge helps control the very high humidity in the bilge during summer months. In addition to this fan, I have run some extra heat ducts on the street side and pump a little furnace heat into the bilge as well as a few heat strips on the fresh and city water check valves (prone to freezing and cracking). I liked the bilge smart fan so much that I bought a smaller one (TerraBloom ECMF-100) and I use that to push cabin air through my sealed and insulated battery box to keep the battery temps moderated during both summer and winter.1 point
-
Sure thing: Taoseño Pie Roast, peel, seed and chop: 3-4 medium red chiles Mix in saucepan: 2 T cornstarch ¼ cup sugar (none if using sweetened cherries) Add and heat until thick: Juice from 2 cans of cherries (preferably dark unsweetened) Add: ½ t almond extract 2 cans drained cherries Line pie or tart pan with dough from biscochito recipe, add cherry filling, decorate with biscochito shapes. Bake on convection at 400 for 20 minutes or until golden brown. Biscochitos Cream: 1 cup sugar 1 cup lard plus 1 cup butter Add: 2 eggs 4 t Cointreau 2 t vanilla extract Zest of one orange Mix separately, then slowly add: 1 T baking powder 1 t salt 2 t cracked or whole anise 6 cups unbleached all purpose flour Roll to ¼”, cut into shapes, and bake on convection at 350 for 12 minutes. The biscochito recipe is pretty standard, but you can look online for variations. If I’m making them just for me, then I’ll use all lard rather than half butter, but some people don’t like that flavor and half and half still gives a good texture. I usually sneak in a little extra anise for me as well. The pie is my own invention - I call it Taoseño Pie because I like saying Taoseño …Taoseño… Maybe they’ll name something for me one day. You’ll find plenty of green chile apple pie recipes around NM but I’ve never seen cherry and red chile, which is odd to me because roasted red chiles, especially the native NM varieties, have really strong cherry notes, imo. So I think you’ll find that the flavors meld really well, and to me has just the right amount of heat. Pair it with some vanilla ice cream if you want to cool your tongue. I’ve also made it with a few spoonfuls of green chile added in but that ups the heat considerably. So, experiment. bon appetit1 point
-
We bought our E2 last December with a Nature's Head. Love it and have had no problems - mostly because we did our homework, watched the online videos to see what folks did wrong and learned from their mistakes. No smell except similar to potting soil when we actually dump the solid matter. Saves a ton of precious water when boondocking. Super easy to keep the bowl clean. No scrubbing ever - just the occasional wipe with a big "handiwipe". Fantastic for the quick winter time trips we frequently take where we don't wake up the water system. Not having to handle a black water hose is a a huge plus. If we are going to a campground and going to dump our grey water at the same time that we need to change the solids tank, it's easy to dump the solids in the hose hole first and wash the tiny bit of spilled composting material (if any) into the hole with the grey water we are disposing. The solid matter allows for weeks of continuous use and is easy to dispose of. We put ours in our compost box which gets naturally hot enough to break down for use in our perennial garden beds. Dumping in an open compost pile would do the same. If we turn the macerator a dozen times, it breaks down the solids really well and mixes thoroughly with the coir medium. Truly makes for an inoffensive final product. Anyone who has a dog is dealing with much much grosser material in a much more up close and personal way. From what Ive found on line, it is fine to simply put the stuff in a bag and dump legally in the garbage. We've only done this a couple of times but use a recycled bag. The liquid can be safely poured around the base of a tree or shrubs and the nitrogen feeds their roots. We've been doing that for a year and the plants seem to love it. I've never experienced a strong smell when dumping the pee container even indoors into a toilet. We don't allow liquid to stay in the container for more then three days, so that may help. After a trip, we keep the computer fan running for about a week and then unplug it. This allows enough time for the medium to do it's thing enough so there is no smell. As mentioned above, it's best to keep the coir (we prefer the coconut coir over peat moss for environmental and price reasons) on the dry side so, if it's super humid out, we'll run a dehumidifier in the trailer for that week which dries out the trailer in general and material in the solids tanks. No problem even when stored for extended periods. Saves the hassle and intimate contact of having to clean out the bin. Per instructions from manufacturer, we never clean out the solids tank. The minnimal amount of material (a couple of table spoons worth) when we dump it out is the medium to start the next batch. Kinda like sourdough bread. As to toilet paper, we don't put any in the toilet. I KNOW, I KNOW: Sounds gross but, in reality, not so much. We keep a little, lidded, foot operated garbage can near the toilet. Inside is a plastic container that 40oz of mixed nuts came in. No lid. We line that with the plastic bags you get from the deli for meats and cheeses. A rubber band hold the bag in place. Toilet paper goes in there, as does general bathroom trash and it gets tossed every 3 days or so. Even in hot weather, no smell. Using this system prevents the macerator in the toilet from getting clogged. Nothing gross to handle, look at or smell.1 point
-
Plenty of great first-hand advice on the Natures Head system. In our three years of experience with the composting system we were glad we chose it over the regular system. However, we were often off grid, not in places with dump facilities. I don't think it takes any more work to maintain than the regular dumping of the black water tank - and driving past the other campers in the dump line is kind of liberating.... However, if we were going to stay in one place for an extended time - say a winter at a full-service site- or regularly stayed in such sites, I would choose the regular black water system. That would be the decision point. Otherwise - composting. Happy trails. RB1 point
-
I once raced an airstream to get the last spot at a campground. It was a good spot, too.1 point
-
Here is a draft delivery checklist prompted, in part, by comments regarding a recent inverter-mount failure (see below). This delivery inspection checklist began with one used by NCeagle for his delivery, to which I've added items. The list is almost certainly incomplete -- what other items would you suggest to help new buyers? Thanks to Oliver for providing this educational ad-free forum, and to all of you for your forum posts that have contributed to this list. This open-dialogue forum is IMHO a huge asset to the OliverOllie Inspection Checklist (draft 4-9-2021).pdf travel trailer brand. I divided the list into two parts: (1) the actual delivery day inspection and (2) items for further inspection at DCSP. I plan on testing the list in 3 weeks when we pick up Hull 792, and will refine the list based on this experience (and with your additions, suggestions, comments, etc). The list is in pdf form. Once updated, I'd be happy to send out (or post) an xlsx version.
1 point
-
Here is the Word version of the checklist we used. Again, Fritz and others did all the heavy lifting on this. Inspection Checklist Ver 20211004.docx Now, for the truth....Did we go through EVERY item on the list at our pick-up last month...No . As mentioned above, given the excitement, exhaustion from trip preparation, etc., it was really hard for us focus on every item. But we did take time to enjoy delivery and have fun! We did run through the list, and as I mentioned in our delivery day post, I was totally impressed with corrective actions taken on recent issues. Hanna in Delivery knew of every recent issue I raised and provided a detailed description of what had been done to address it. We I asked about the battery box support nuts, she immediately dove into the rear settee compartment to check them, she mentioned she could not remember having done that on their pre-delivery inspection. And yes, they were tight. So, while we didn't check every item on the list with our own eyes, we asked Hanna about it and discussed it. Other examples include: didn't crawl under the frame to check every zerk fitting, the ones I could see had grease showing in the right areas. didn't check to ensure there were balance weights on the tires, but I did ask if the tires had been balanced. didn't check that the Xantrex inverter had the latest firmware, but asked if it had been updated. didn't get out my ladder and check the roof, solar panel attachments, etc. Now that we are home, we are taking more time to review items. So far, everything that Hanna told us was completely accurate (tires were balanced, inverter had latest firmware, etc). 👍 Given that we were totally newbies, I would add the following to our checklist.... While at the Oliver Campsite (which is very nice!), test every system to ensure you know how it works. We did not try to empty the grey water tank after the first night, even through they have a dump station at the Oliver campsite. A couple of days later when we went to actually drain the tank, we could not get it to drain 😲! We called service, and with calm help on the phone, realized our trailer was not very level at the dump station. Our problem was due to pesky gravity. Had we done this at Oliver's dump site, we would have better understood this issue. 🤪1 point
-
Jim and Frances: I would love to have a Word version of your delivery checklist. I expect that if you post it on this thread, there will be others who will enjoy having it as well. Thanks for putting it together! Ralph Pond1 point
-
So, here's an update. Tried the furnace today and realized no air coming from the vent below the sink. A quick investigation found that the duct was not connected to the furnace. The knock-out hole on the rear side of the furnace was knocked out, and that's where the hot air was coming out. No one in the factory connected it. Since I picked it up in mid-July, here are the other problems I've had. No caulking around kitchen sink, allowing water to seep underneath and drip to drawers below. Put duct tape around sink for quick fix. Need to put silicone around it. Screen door misaligned, with big gaps allowing bugs to get in. Jason suggested tweaking it to try to close the gaps. Haven't tried yet. Lettering on light switch panel rubbed off. Mike sent out new panel. Lettering on Dometic stove knobs rubbing off. Waiting for new knobs. Xantrex inverter shutting off and not rebooting due to improper programming from the factory. This resulted in a new Technical Service Bulletin (Aug. 3), and after Jason helped me change the settings, the problem hasn't returned. In another post I shared an article about the horrible (really horrible) quality of SOB RVs and the nightmares those owners are having. In that post I promised not to complain about anything related to my Oliver, and I'm trying. I guess my point here is to remind new buyers to do a super thorough check of the trailer before leaving OTT. I spent two and a half hours at OTT before leaving and thought I did a thorough check but I missed some things. For example I turned on the AC because I wanted to make sure it really could run off the lithium system, but I didn't turn on the furnace. I will say that I'm very happy with the trailer and all the components. The composting toilet is easy peasy. The lithium pro package works great. The Norcold fridge is big and cold. The suspension takes rough roads like a champ. The KTT bed is super comfy. The windows seal tight. Yesterday and today I gave it it's first wash and wax, by hand. What a job. My arms are sore! But, with a little elbow grease I got all the bugs off and with the marine wax got the hull shining.1 point
-
Try this one. It is specific for my trailer so you need to alter it as needed for your equipment. https://olivertraveltrailers.com/forums/topic/2094-my-tow-camp-checklist/ John Davies Spokane WA1 point
-
There are also pre and post towing checklists in the 2021 model year manual (which can be found on the Oliver University section of the Oliver site).1 point
-
Nice work John. How is the rest of you conversion going? I thought I read on one of the new Li manufacturers sites that the temp window has expanded - hi and low. In the end - is the conversion worth the trouble - I wonder. RB1 point
-
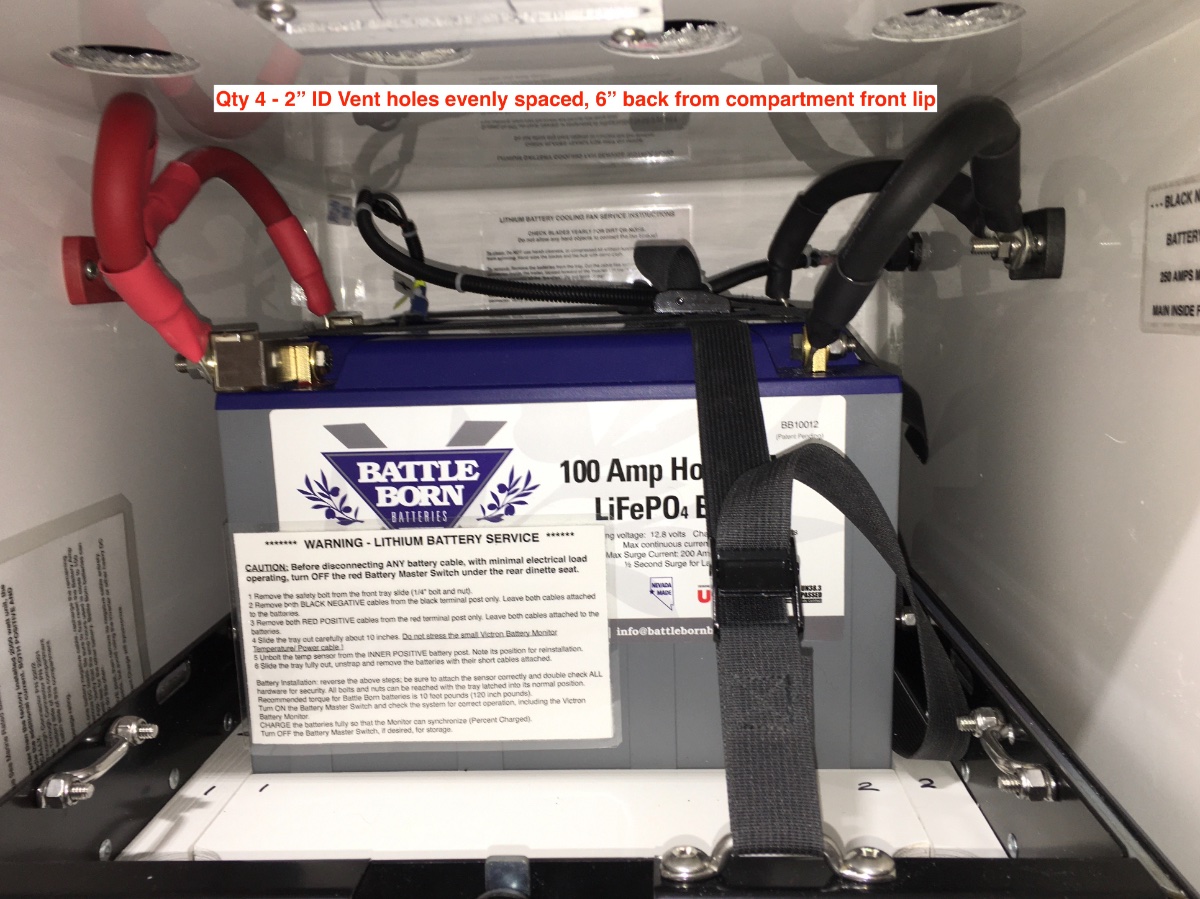
The temperature data I've been collecting strongly suggest that I need to figure something out with the battery box like you did. My target is to keep the box in a sweet spot of 60F - 80F if possible. Given this limited range, I'm convinced that leaving the battery box door sealed and insulated is mandatory. These Lithiums are just like humans when it comes to temperature I guess! 🙂 Here's my preliminary design: Conditioned air intake: A 4" duct vent under the street side bed and another 4" duct vent in the battery box right above the street side wheel well. There's plenty of room for 3.75" holes in both places to install the ducts. Between the vents I'm planning on using a 4" duct paired with an inline smart fan (yes, I like smart fans!) to pull conditioned air from the cabin and push it into the battery box. The smart fan will fit nicely right on top of the wheel well and can run anywhere from 28 cfm to 280 cfm. It also has a thermostat to provide some automation. Battery box exhaust: I am not planning on exhausting the battery box directly back into the cabin. I have another 6" smart fan under my forward dinette seat to move air slowly or rapidly between the entire basement and the cabin if necessary. Additionally, if I leave the fan pushing conditioned air into the box running long enough it will be pushing conditioned air into that basement area and surrounding electronics. I'm also thinking of using a bunch of smaller holes in the battery box to exhaust the air rather than just one or two bigger holes. For example, a 3.75" diameter input is ~11 square inches of area, so if I use 1.5" diameter holes (1.75 sq. in. area), I would need ~6 holes to provide adequate exhaust area. So I was thinking of drilling the 6 smaller holes in somewhat random places on the front and back sides of the battery box, hoping that would give some good cool air mixing in there. I'm wide open to suggestions, constructive criticism, or any other things to consider that I missed. Especially @John E Davies since you have already thought through and executed on your design. Thanks!1 point
-
John, excellent mod. You continue to show how quality work needs to be done. Unfortunately i dont have the skills nor the equipment to do the work but your detailed photos can allow a qualified individual to do the work1 point
-
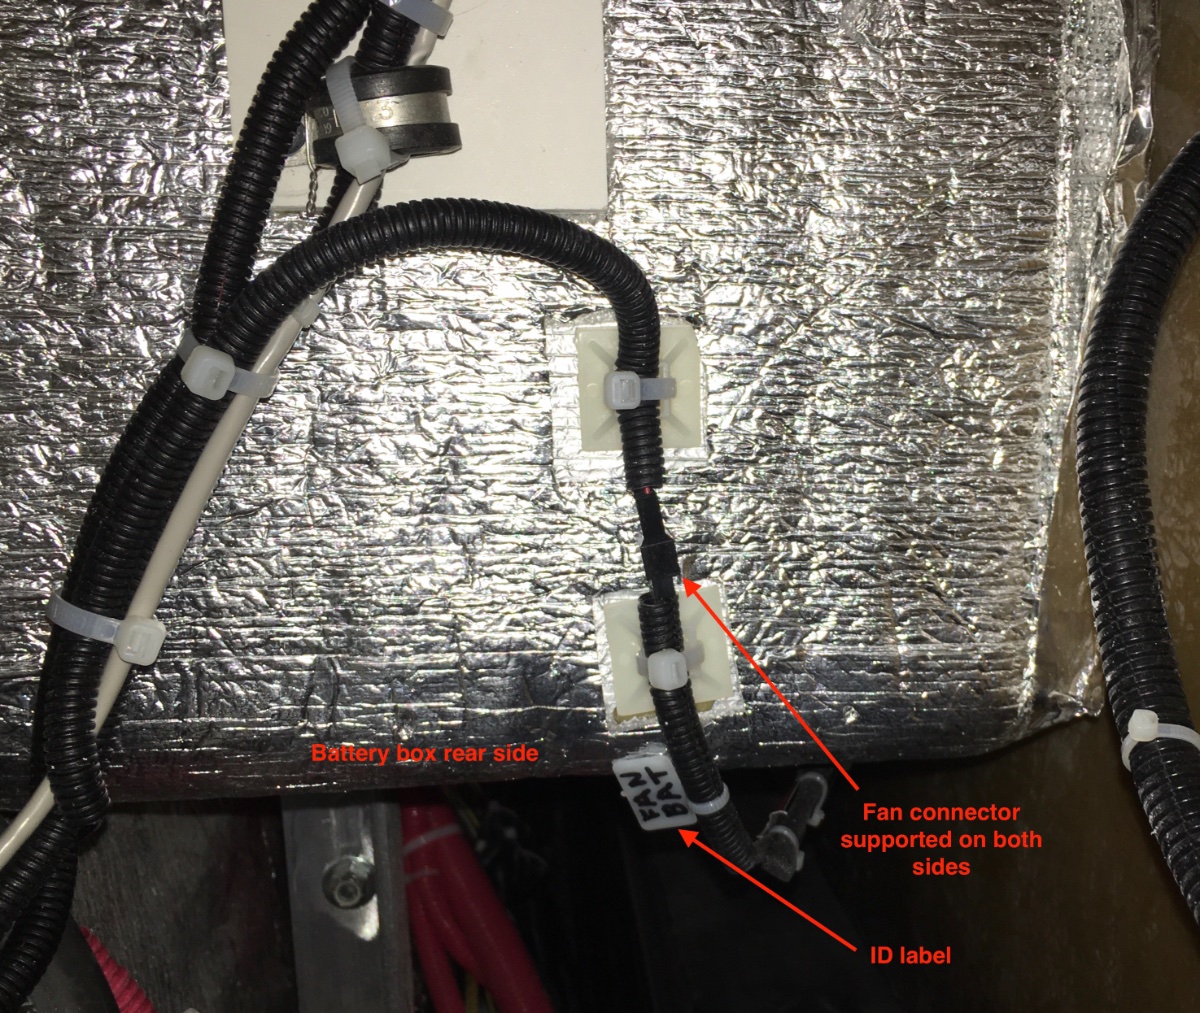
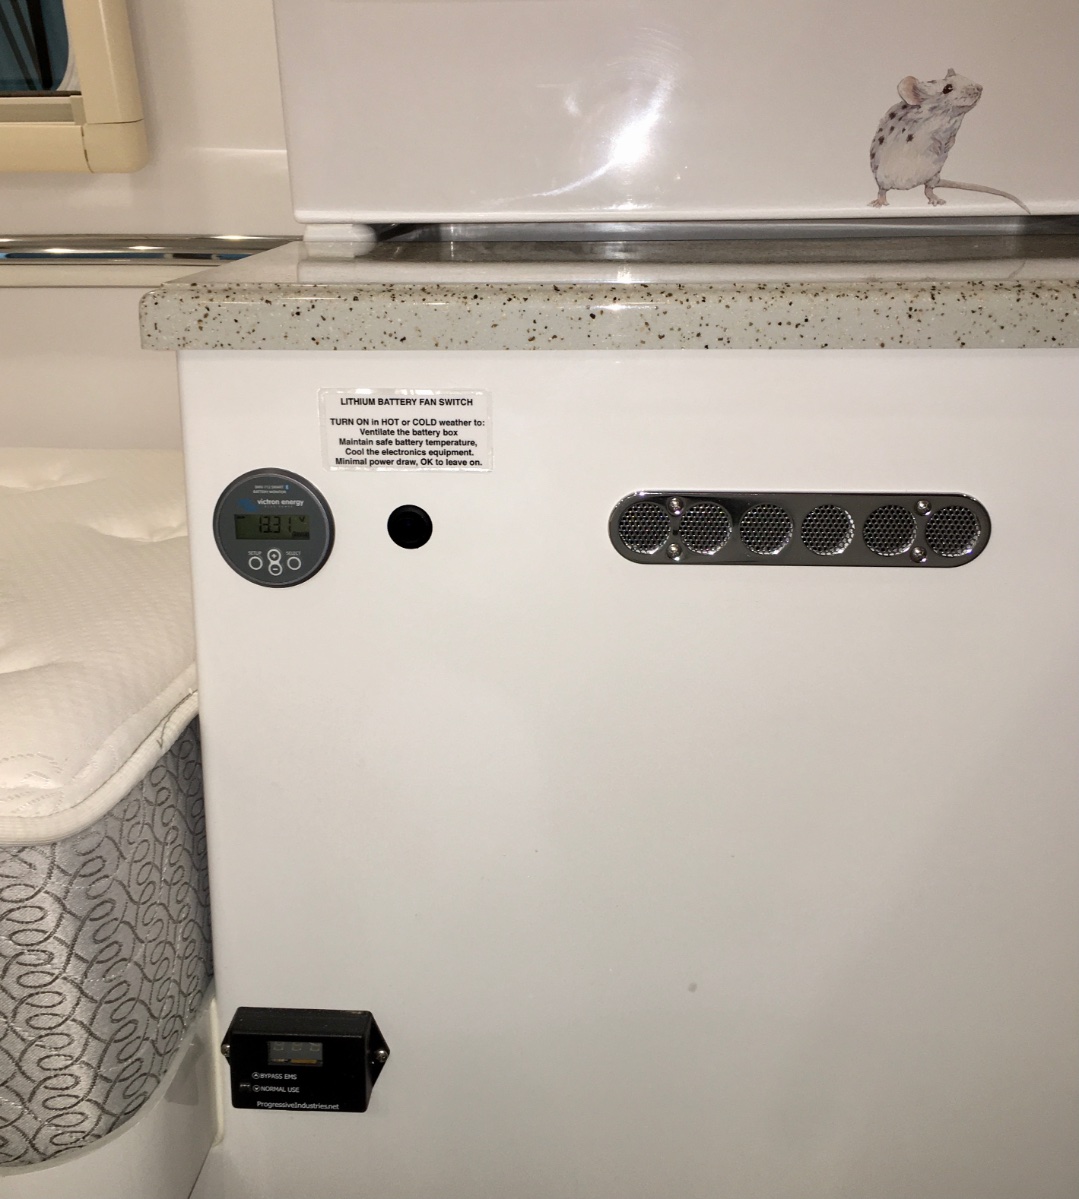
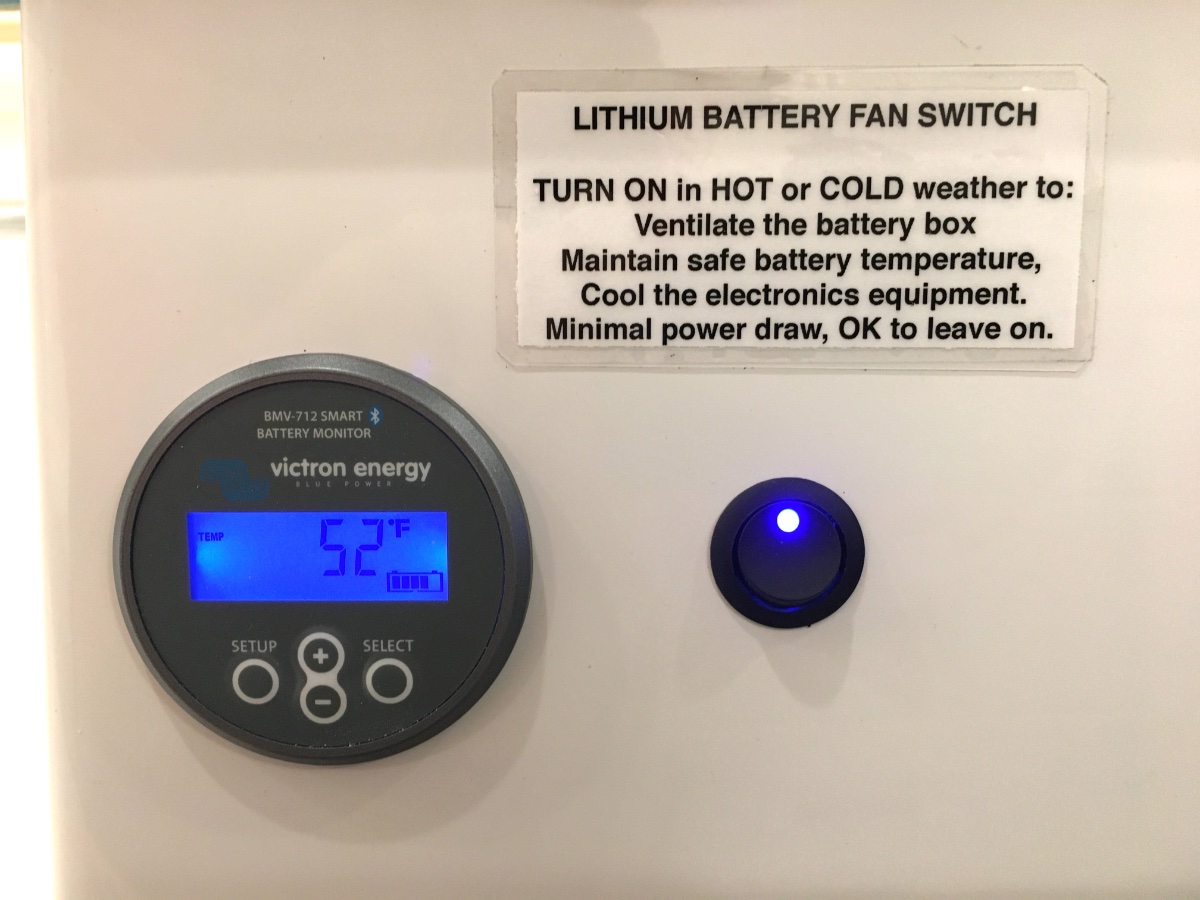
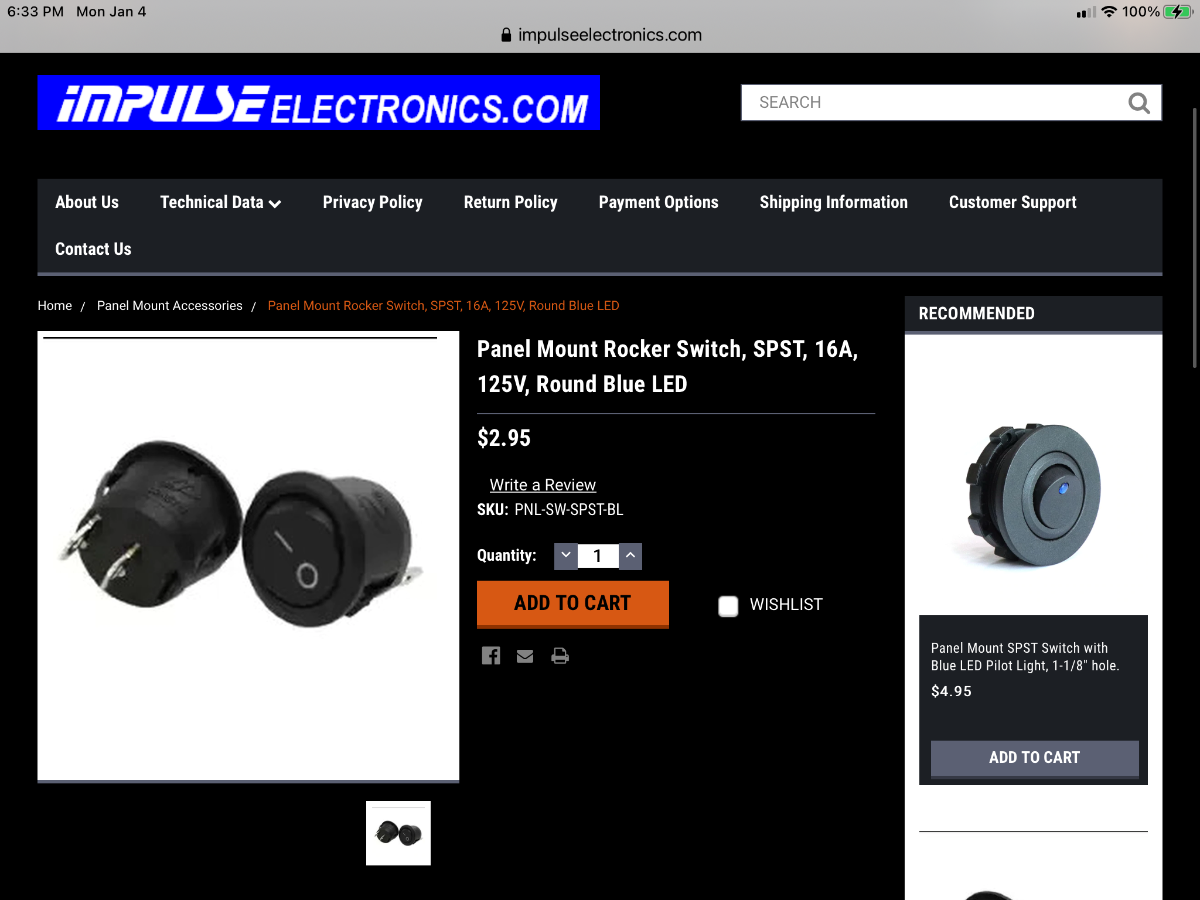
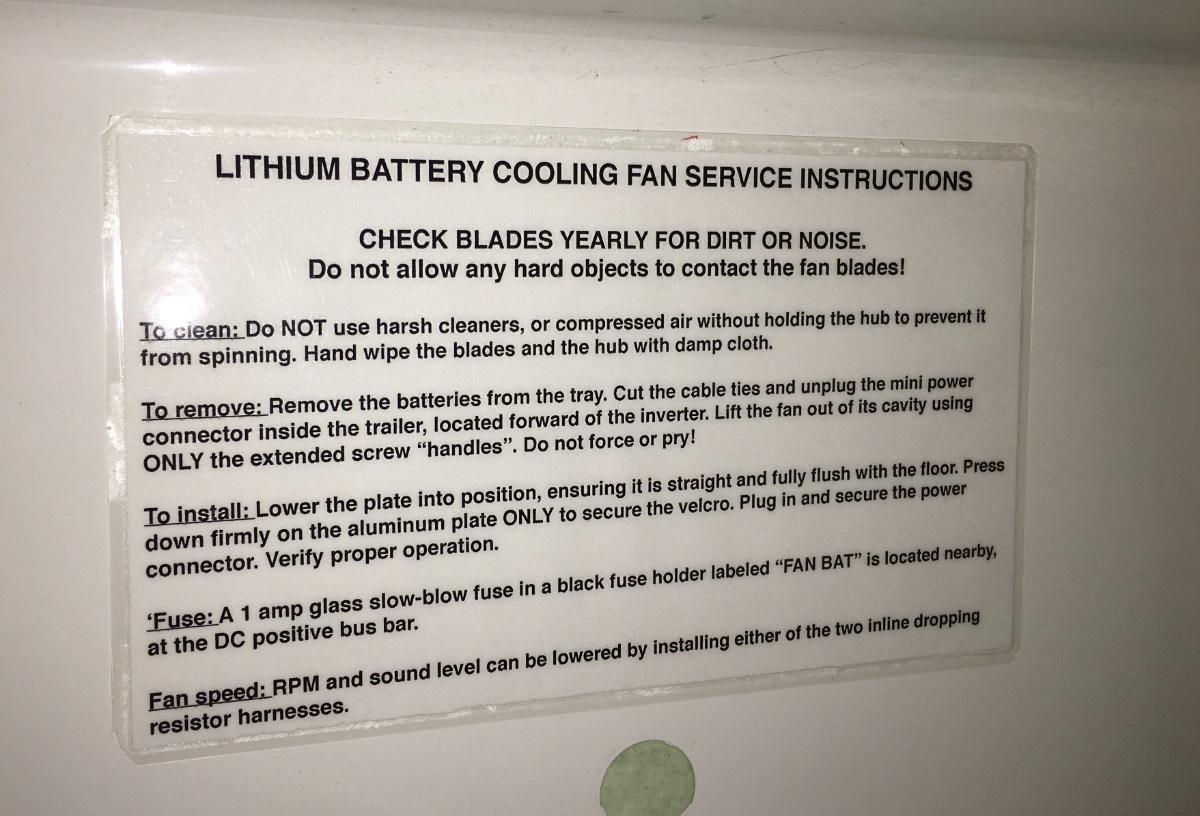
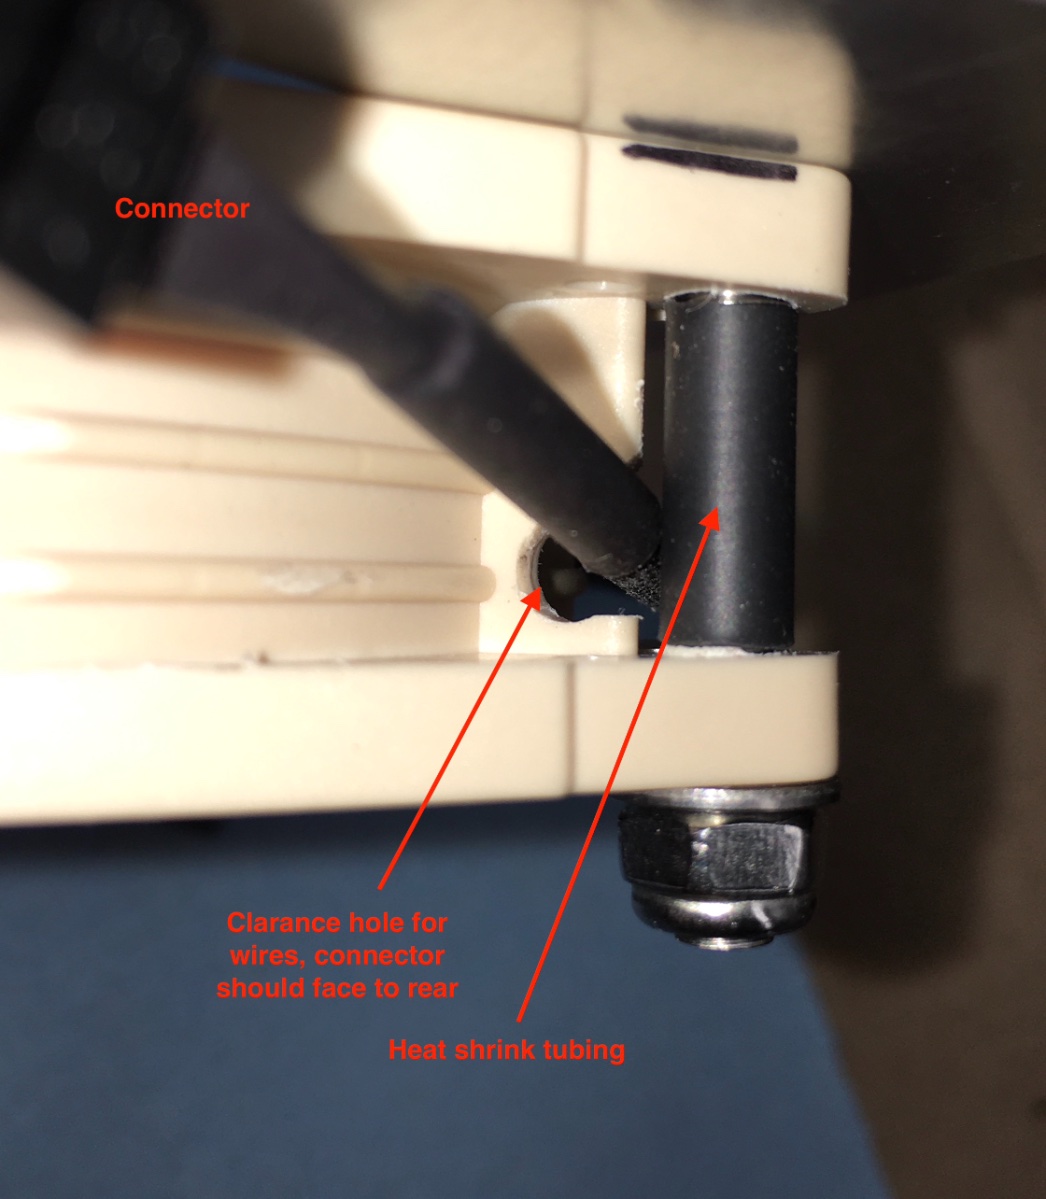
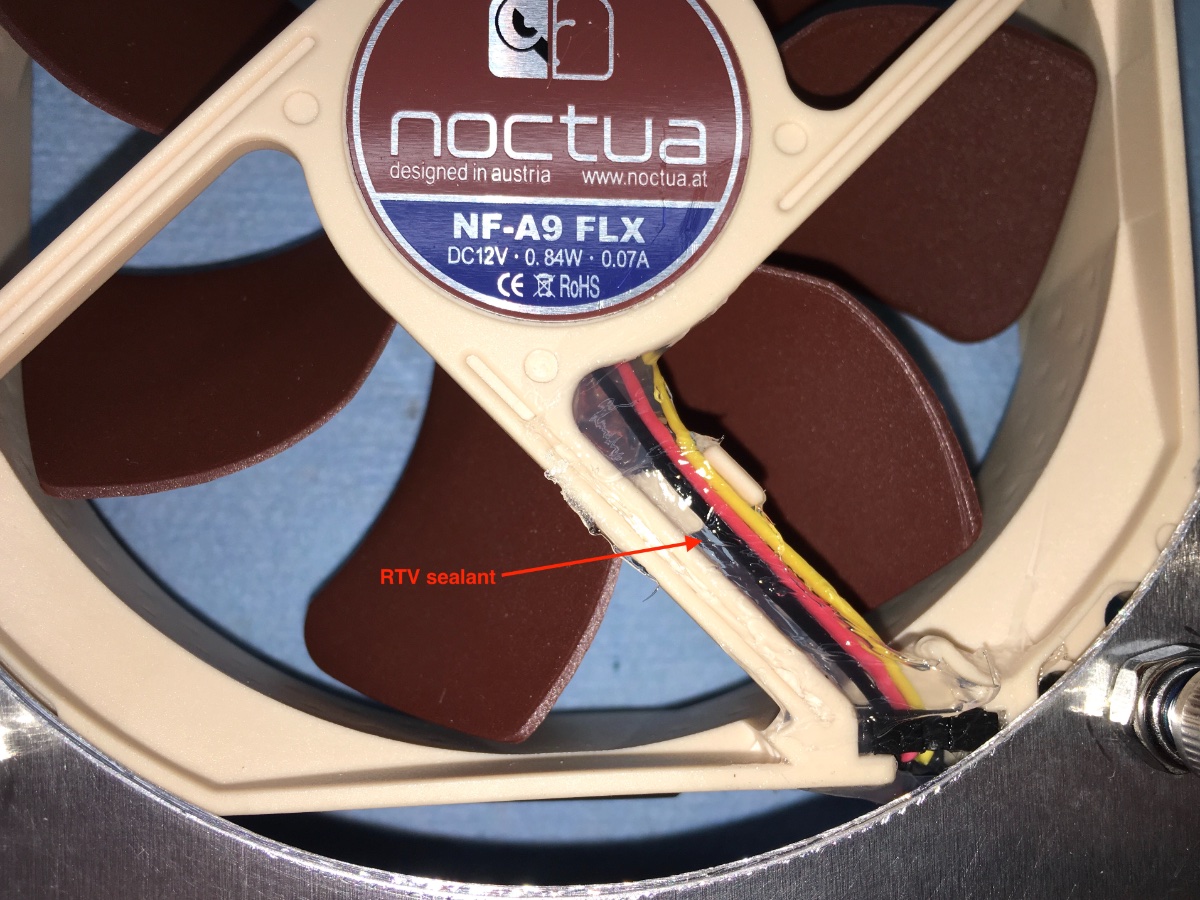
Battery fan wiring and switch. I used the supplied adapter cable and simply cut its 3 pin connector off and butt spliced the wires to a new 18 AWG red/ black wire pair. I secured the connector at the bottom of the battery compartment wall, forward of the inverter: Power comes via a 1 amp inline fuse connected to the rear DC bus. I mounted a switch next to my Victron BMV-712 Smart battery monitor display, below the pantry counter top. An additional ground wire is needed if the switch has an LED (this one is blue, to match the Victron backlighting): Finally, an instruction placard for a future owner or an RV service tech. This is laminated and taped on the rear wall of the battery compartment, and a copy is in the Owners Manual: John Davies Spokane WA
1 point
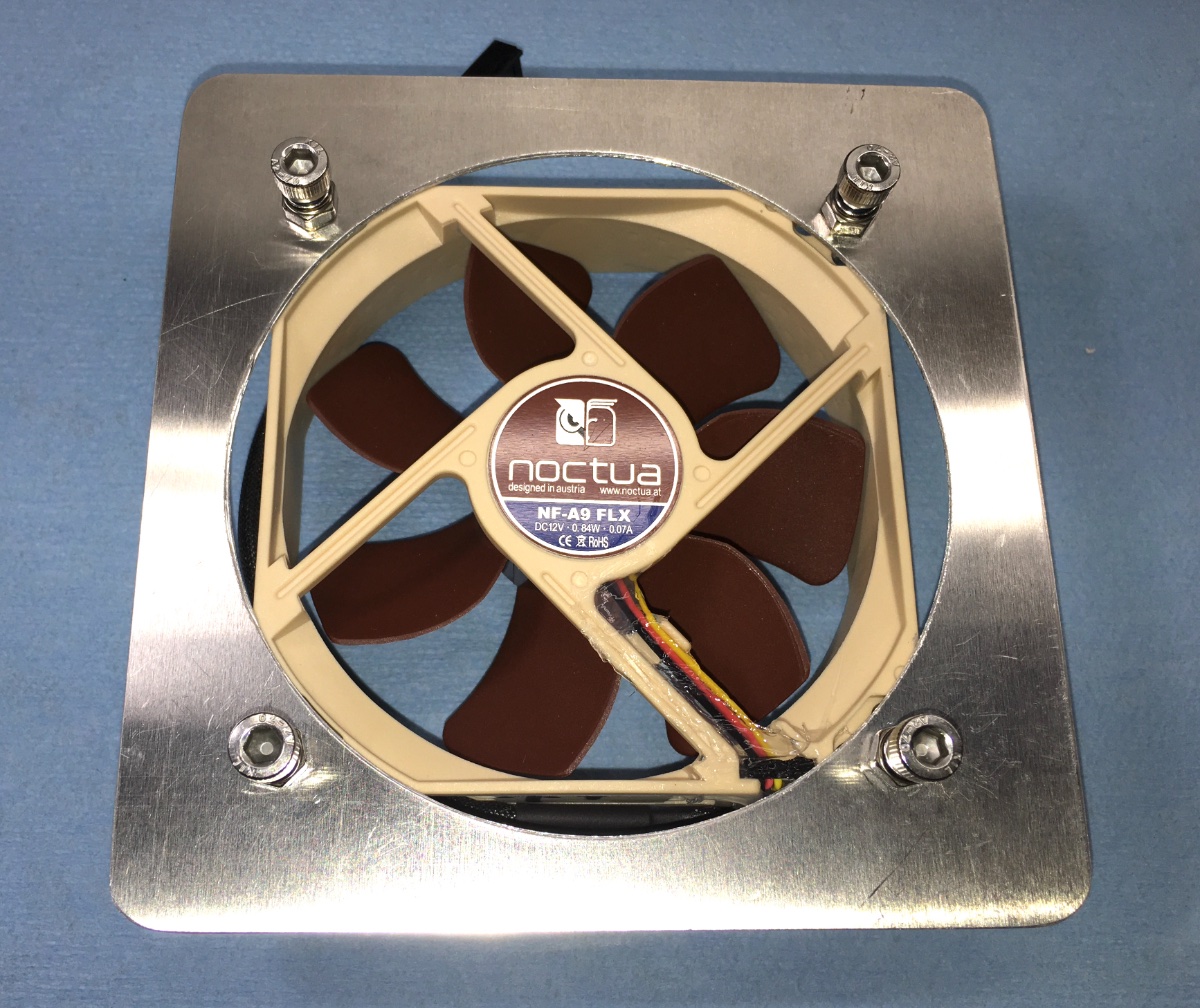
-
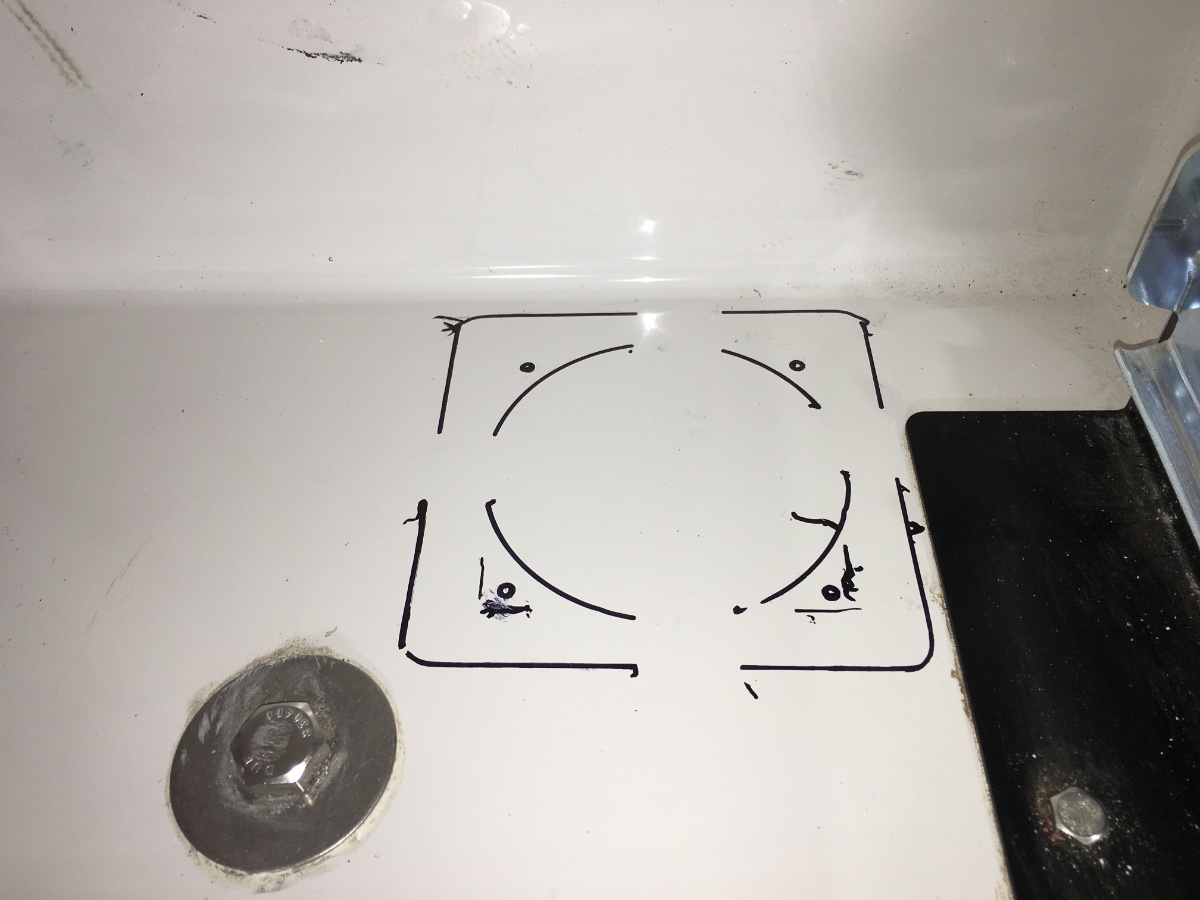
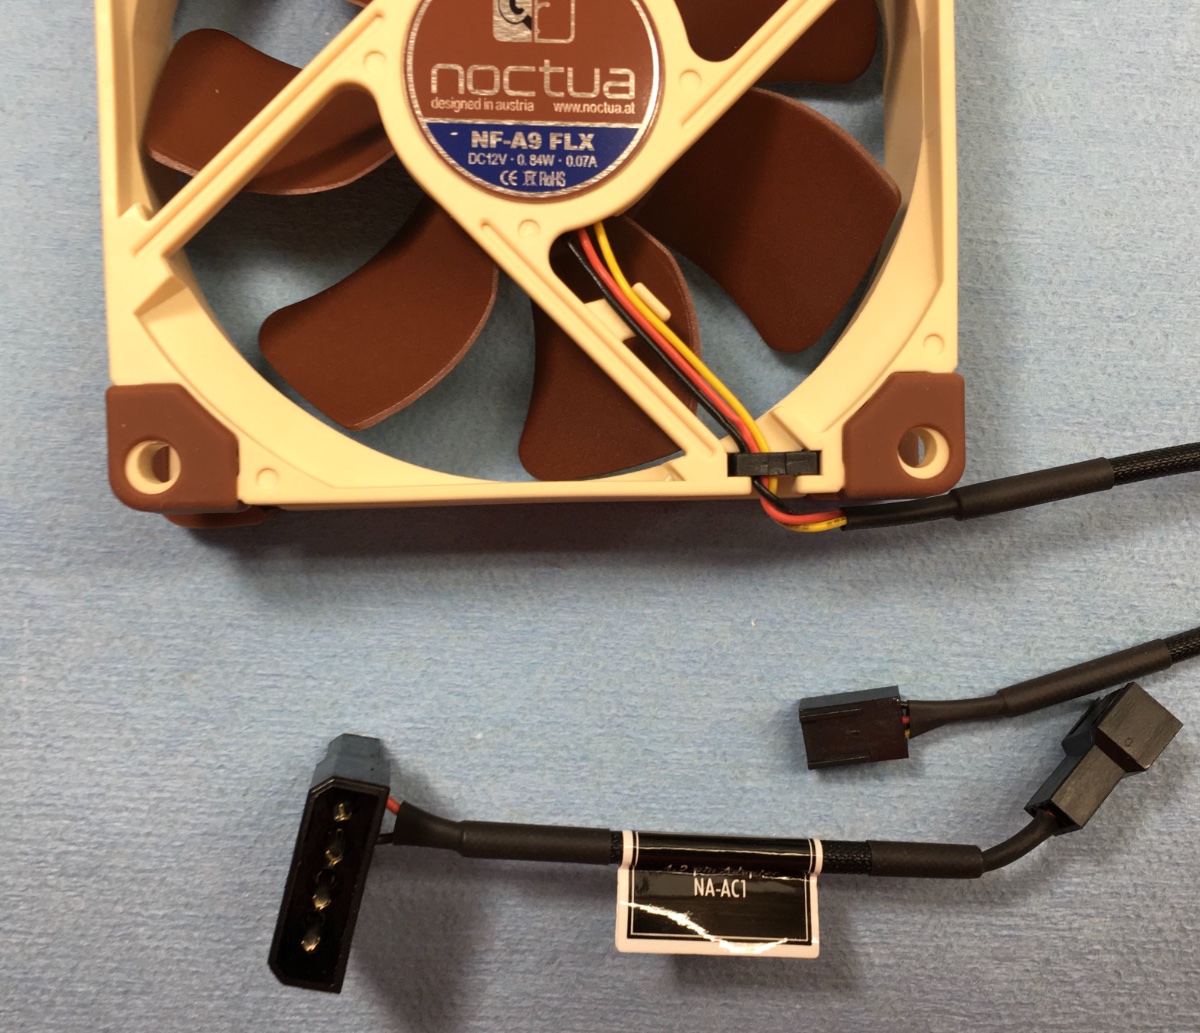
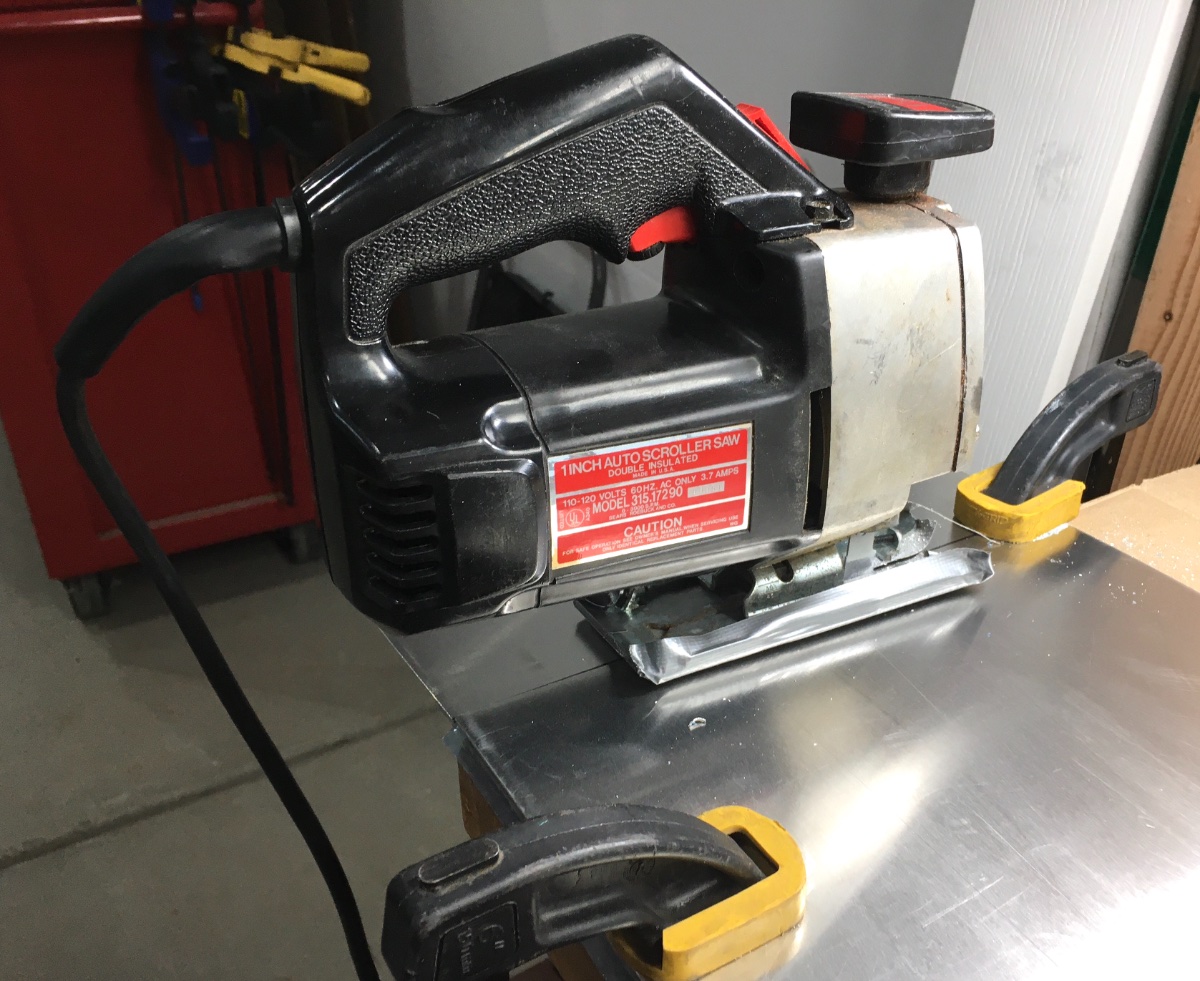
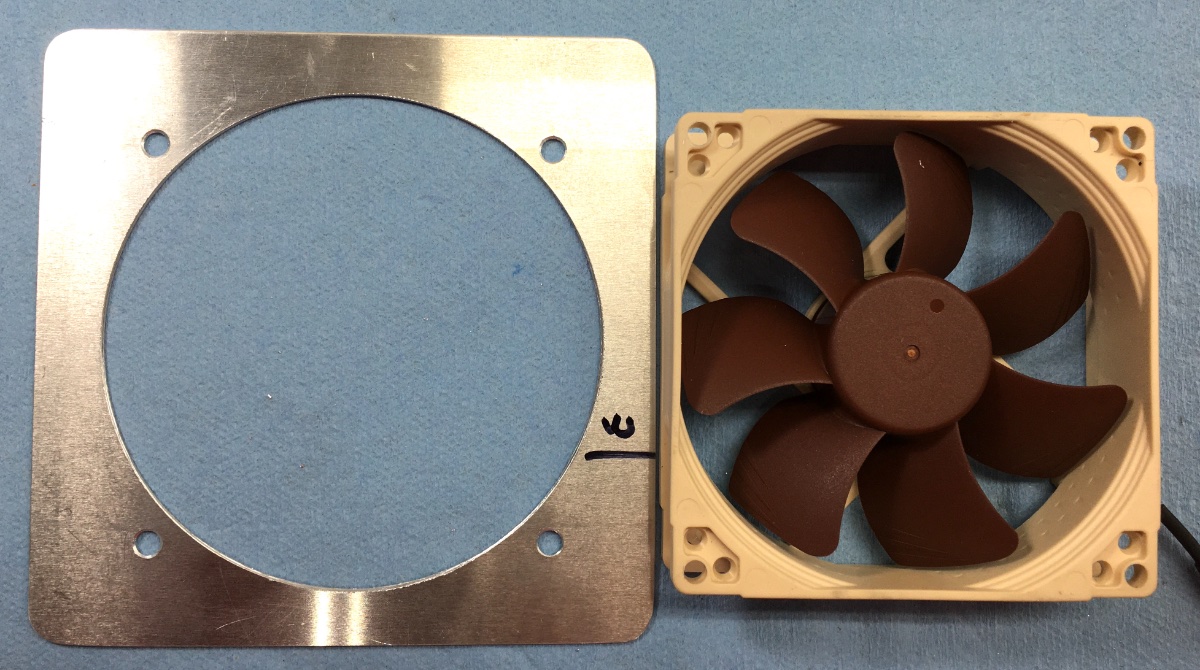
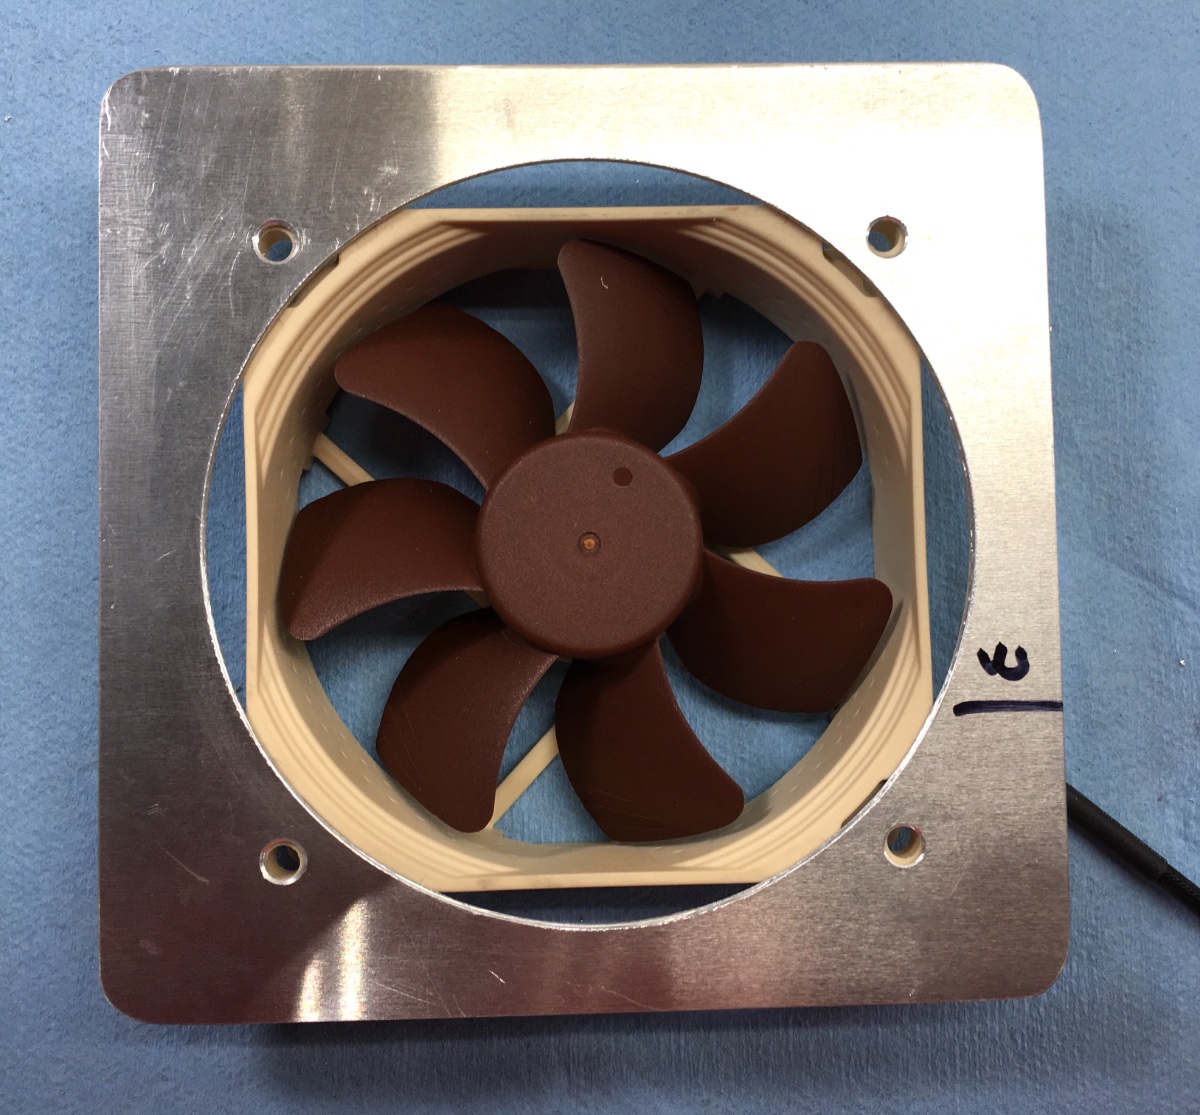
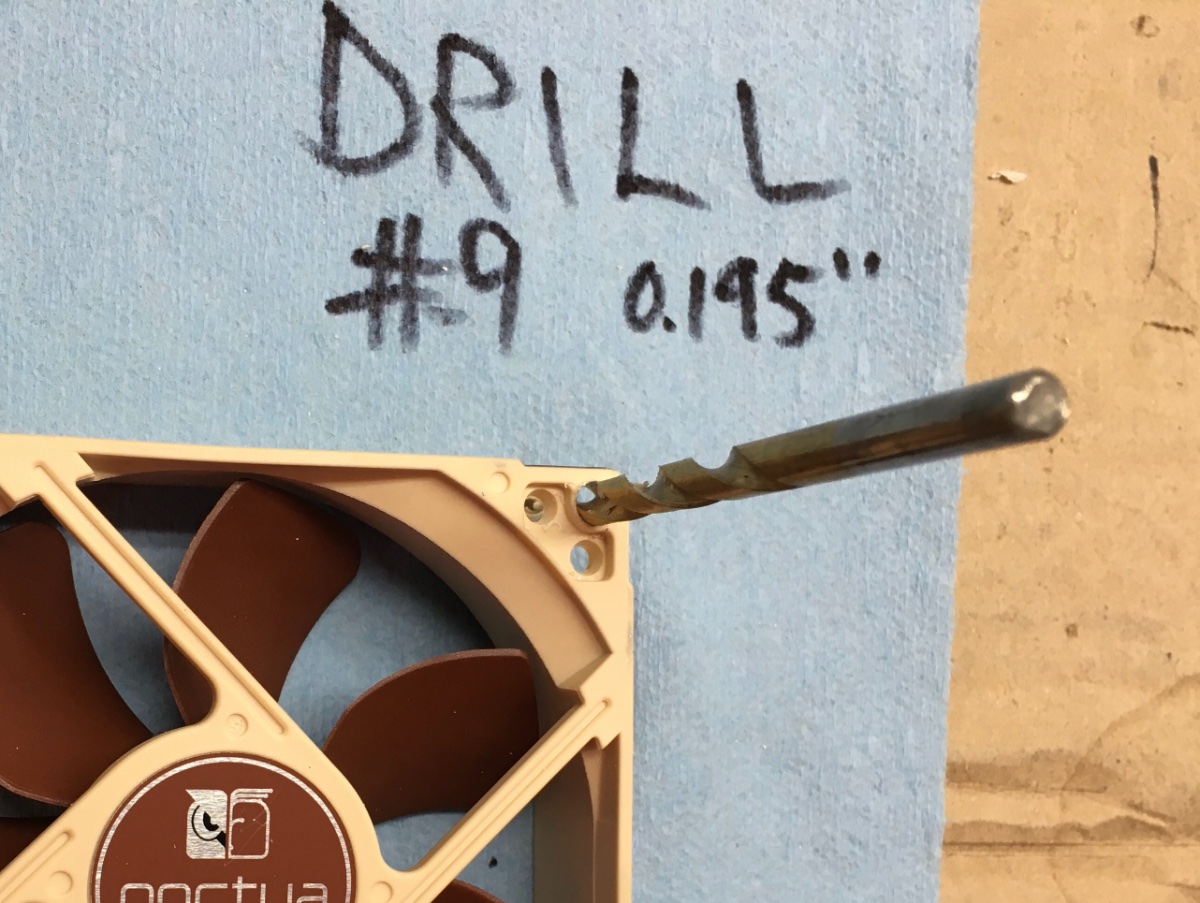
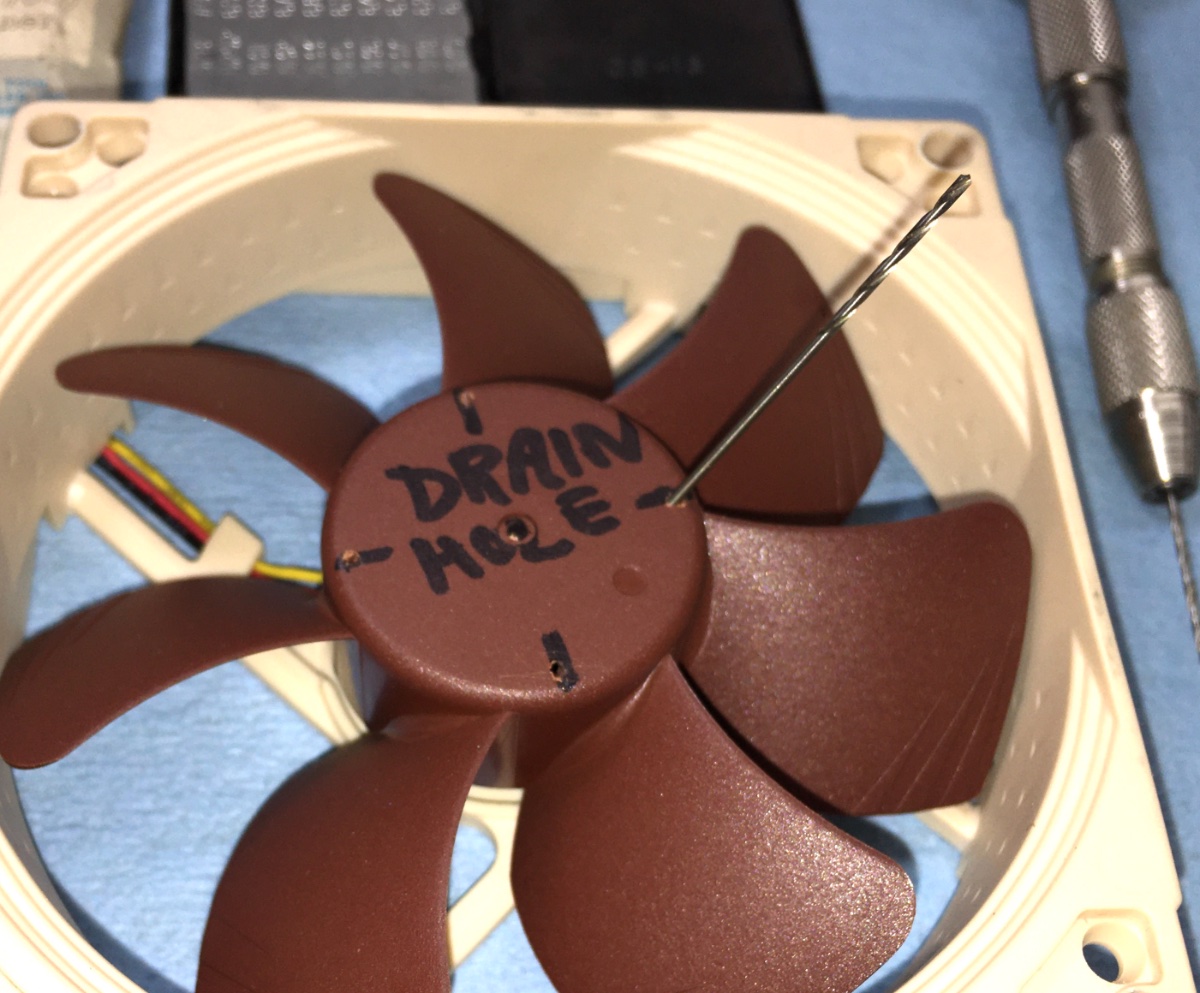
Battery box cooling fan. This one is high quality and well regarded. It has sealed ball bearings and uses just 70 milliamps (0.07 amps), so it can run as long as needed. Flow rate is 38 cfm on high, they supply two dropping resistor harnesses if you want to slow it down to reduce the sound level. It is pretty quiet, though a light sleeper on that side of the trailer might want to turn it off at night. But it is “white noise” which sometimes you do want..... Noctua Fan I really wanted the fan to go in the bottom at the rear wall, so it was centered between the two electronics compartments. The problem is that the floor of the box is not fiberglass honeycomb as I thought, rather it has a hard (6061?) 1/8" aluminum diamond plate bonded in the center! So cutting a large opening was a challenge. If you have access to a scroll saw (pivoting head) it is easy enough. Otherwise, choose to locate the fan at the bottom edge of the rear wall instead! That is thin (1/'8") fiberglass. Screws are 5mm, and are double nutted so that the heads will stick up enough to use as "grab handles", for servicing: John Davies Spokane WA
1 point
-
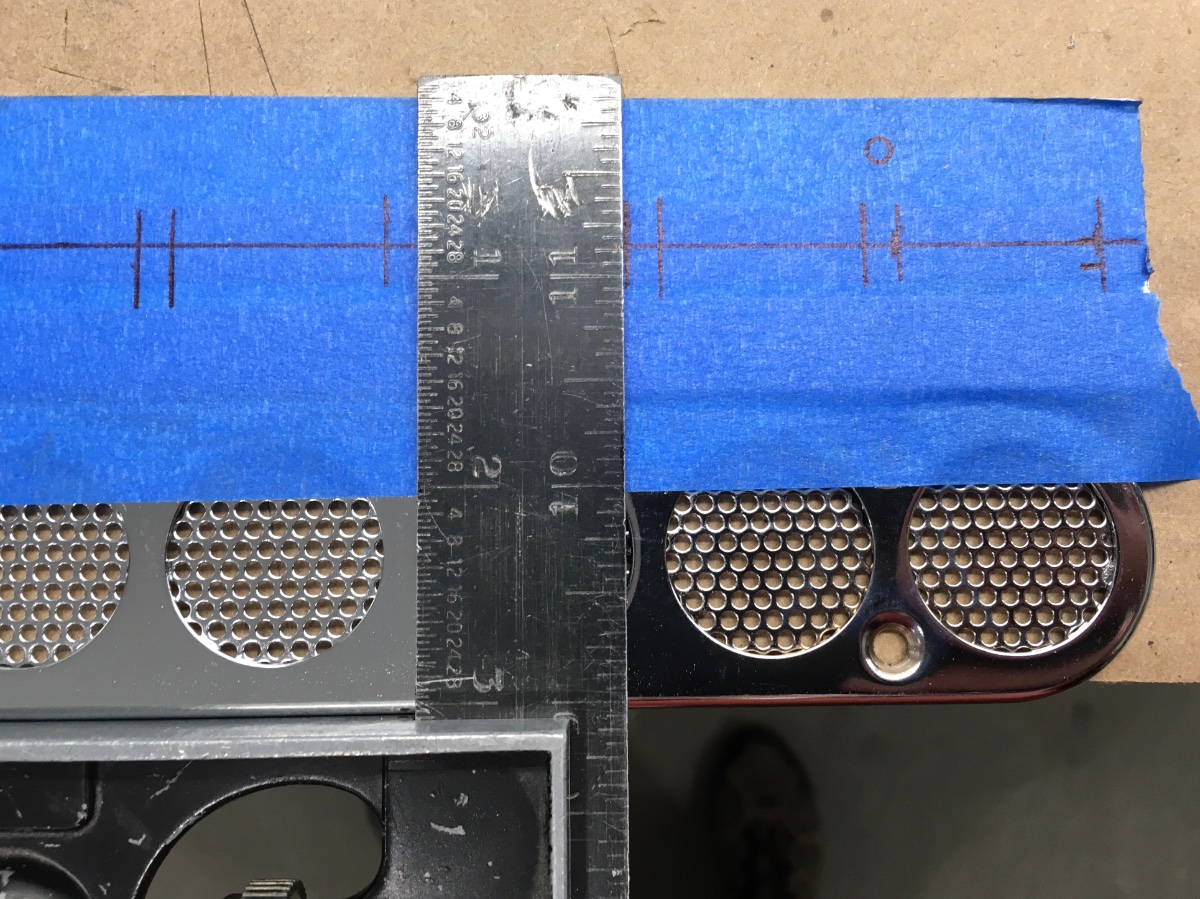
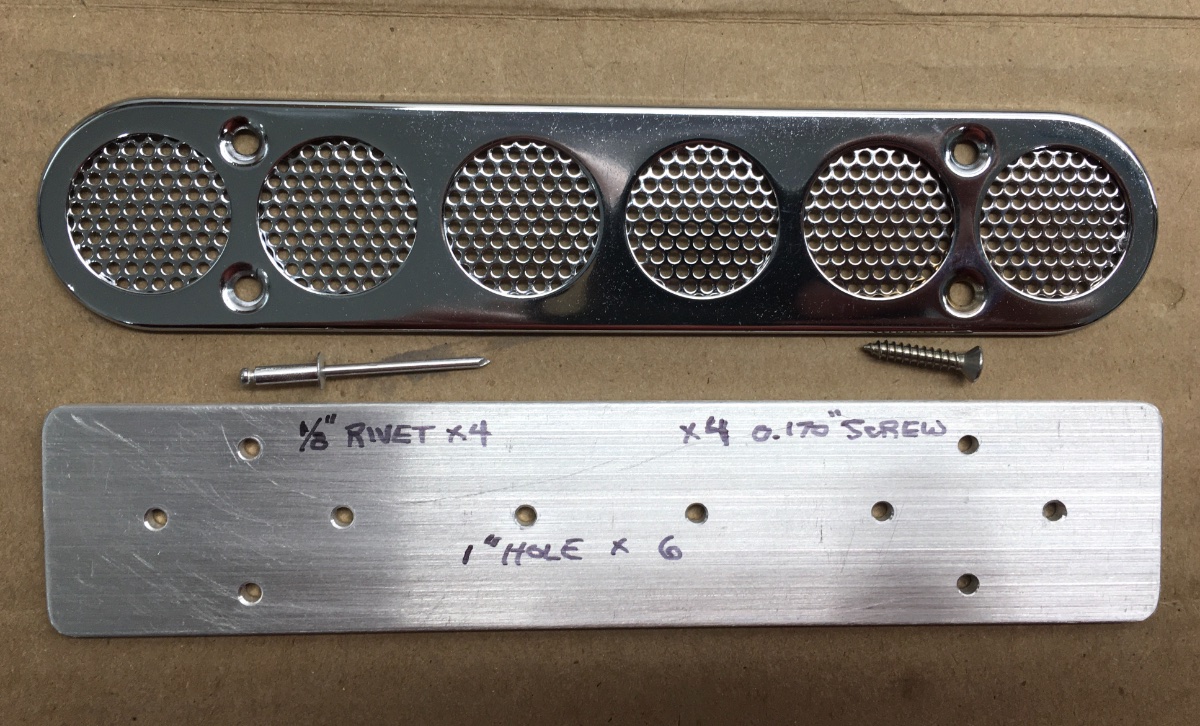
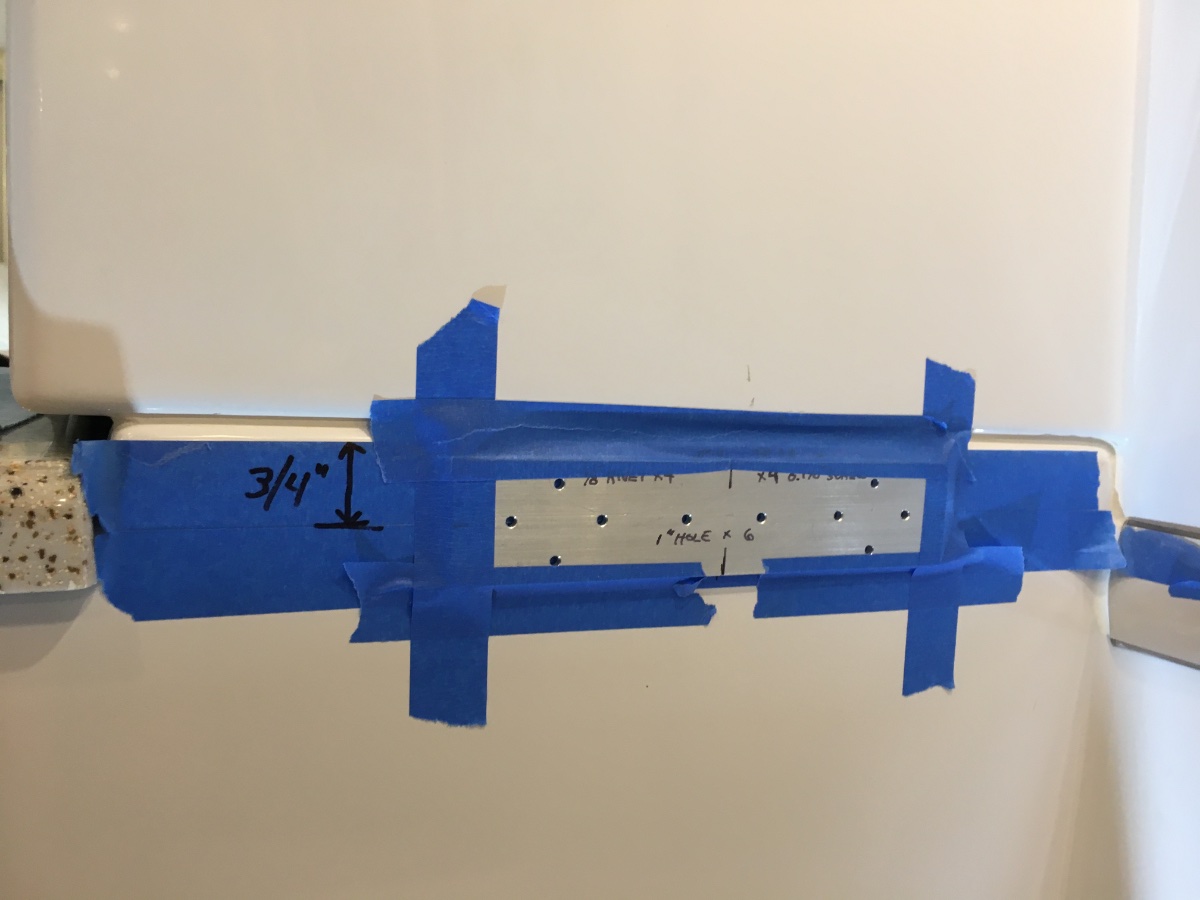
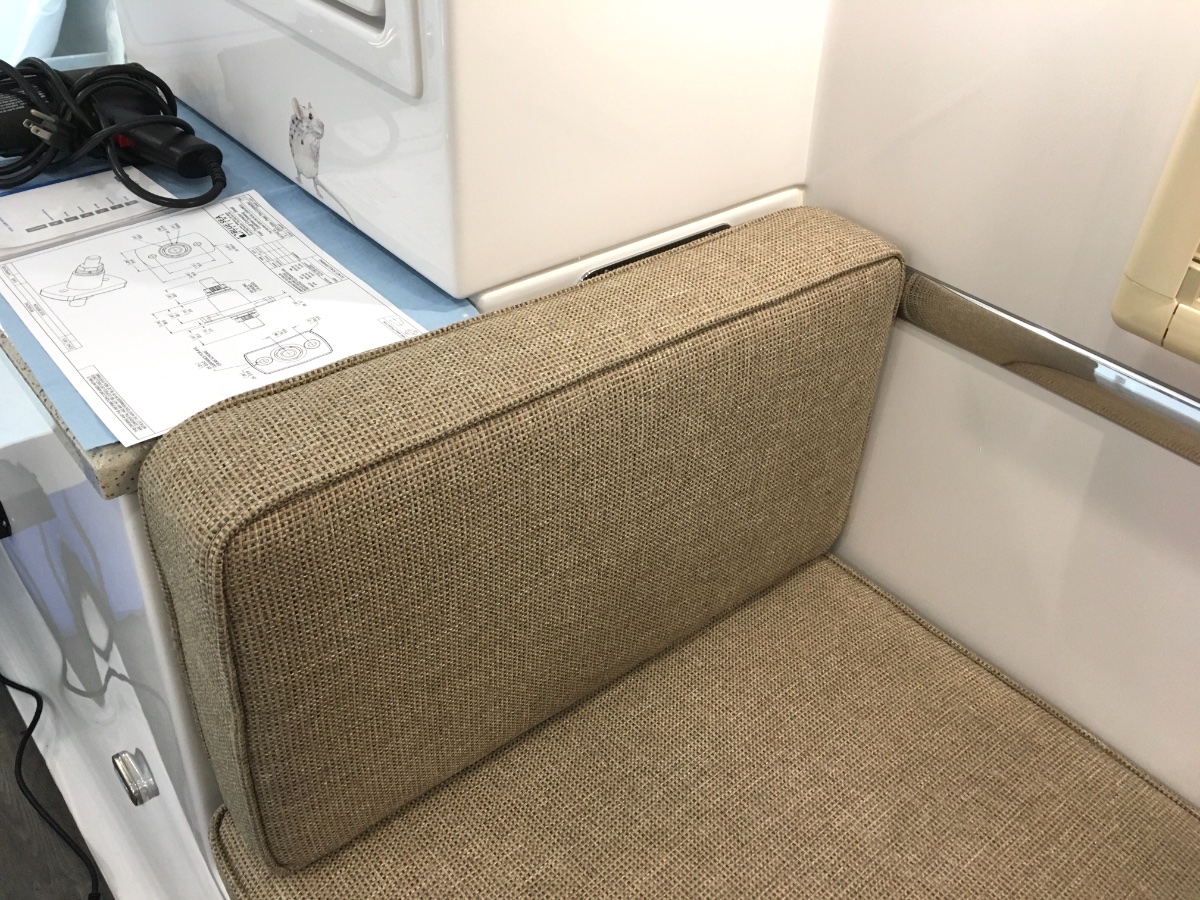
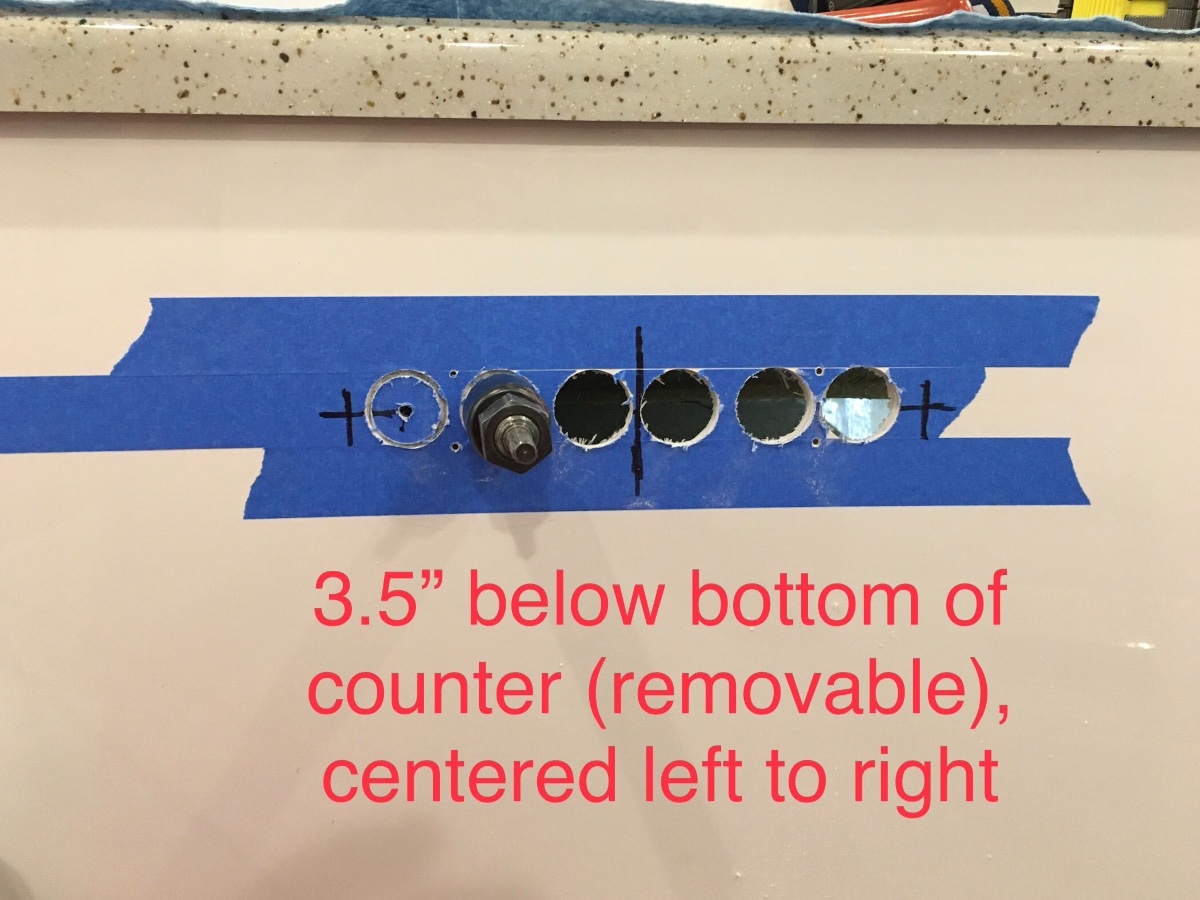
Battery box exhaust vents. Qty 3 - Perko 51840 Chrome plated brass (same part used on the battery door factory vents) ... https://www.go2marine.com/perko-ventilator-vent Make a template - there are a lot of holes to drill: The 4 mounting holes can be sized for 1/8" rivets (not recommended) or number 6 sheet metal screws. Choose the correct size for your fasteners! I chose screws. The front and back vents go here: You will be staring at these for a long time, so be very sure the holes are perfectly straight, measure thrice, cut once. Don't use a bubble level, measure up to the joining line. Here is the reason you can't position it higher: Deburr the holes CAREFULLY with 80 grit sandpaper (wear gloves or you will drive glass shards into your fingers), do not scratch the surrounding gelcoat!!!! Install the Perko cover. Repeat these steps for the rear wall. The optional factory granite countertop keeps the seat cushion slightly away from the wall in this position. If yours does not have the optional ones, the front vent will be blocked with the cushion as shown here.. Here is a view inside the compartment, looking back at the INSIDE of the rear vent. Notice you cannot position it higher or the screws will not clear the top: The third vent goes in the center of the inside wall, directly below the pantry shelf. Having three vents means that one blocked vent (a pillow for example) will not significantly affect the airflow. Finally, there need to be holes in the TOP of the battery box, to let air out from that space. Since I mounted a fan in the bottom, at the very back, I chose to place them in front, so air would move below and across the batteries, leaving no "still air" pockets. All other openings in the box should be sealed with heavy aluminum tape or a similar product. There is plenty of space on top of the box for air movement: John Davies Spokane WA
1 point
-
Oliver makes great products and obviously values supporting a healthy community where owners and interested parties can ask and answer questions, share ideas and otherwise communicate. A big thank you and high marks to the administrators and moderators for keeping the forum on a positive path. Both of these roles can be difficult and often times thankless, but in my opinion are being done consistently well here.1 point
-
Great approach! This will get me started. Thanks a bunch 😊1 point
-
And you must realize some people in sales are salespeople and their job is to sell product. Some are really very knowledgeable about the product and are hands on. Some are what we call sales clerks, and they try to get the paper work right. Usually those that do the walk the though are very knowledge. They are hands on and know what "stuff" does and where it is. Ask who is going to do your walk through. I think Patriot is correct. Instead of asking open ended questions on here, because you might get varied responses, it is best to do an in-depth written forum research. Get two (or more) pieces of paper. On one write down any question you might have. On the other questions to ask at pick up. Go back a year in the written forum and read everything twice until you understand it. It is ok at this step to develop more questions. Once you understand the subject cross off any answered questions. And don't be surprised if you are then able to ask more informed questions at pickup. On your 3rd piece you should be able to write your own check list. List things to do, and things that are important to you. If you want hot water at anytime put turn on heater on your list. If you don't t. no need to list, you can turn on the item when you might need it. Going back more than a year may be informative, but the product is evolving and that may effect the available information. The floor plan in the brochure shows where most stuff is. Put that in your notebook too...1 point
-
As perspective new owners we decided to make the best use of our time (a few months) by reading through the owners manuals during our build. I suggest take advantage of your previous RV experience and overlay that with what you learn here and you can craft your very own great checklist. ✅ This forum, the maintenance videos and Oliver University are great sources of information to begin putting together your new owner checklist for delivery day. Oliver will also provide you with a PDI checklist on delivery day. We have since converted our delivery day checklist to our camp arrival set up and camp take down checklists. Take advantage of the your down time and read and research. Our experience is that Oliver will go well above and beyond to ensure you have a successful delivery day. We had fun, enjoy your delivery day! Happy Camping! ✅ edit for the credit- Credit where credit is due- we are using a checklist that @John Davies has posted on here, it’s a really good one. We have a binder with our quick access checklists and Oliver’s maintenance checklist. All of these started from JD and the Oliver manual and various pointers learned on here. We also were able to draw on previous RV camping experiences.
1 point
-
Everything changes with the weather guys. Best job in the world. Be wrong 50 per cent of the time, and still keep your job We just got back from camping in Western NC on our acreage. The forecast stink, but we went, anyway. It was great. That said, we're in the mountains, where the hills make and break the weather. Sherry1 point
-
WiFi boost would be if you intend to spend most of your time in campgrounds. Cell phone is the way you want to go. Depending upon how you plan to use trailer, if you boondock on the close fringes of society then it will work great as installed. If you are too far out of a boondocker then it will be slightly limited by the mounted elevation in the trailer, at which point a self install on a telescoping pole (which stores away when not used) and is positionable would work better and save some cash from the initial purchase. I have the WiFi and have never used it, use the cell booster all the time.1 point
-
As I research and build my list of possible upgrades in anticipation of purchasing a 2019 Legacy Elite II, the question of purchasing the WiFiranger Skypro pack ($699 option) and Weboost Drive 4G-M Cell phone amplifier ($625 option). My thinking is to use a Verizon Jetpack mobile hotspot service in the trailer as my WiFi (MiFi). Will I need the Wifi ranger and/or cell phone amplifier Weboost to supplement the Jetpack? I do realize having internet connection is only possible if I can receive a signal. Really would appreciate some advice - I readily admit my tech-savy bar is pretty low.1 point
-
I moved our website to a new web host early this week. Has anyone noticed any issues? Is the load time better?1 point


.jpg.caebd13733a18fcb82f87a9a72d56678.jpg)
.JPG.b5419bb6264986c24303fe50c23faa4d.JPG)


.jpg.f834665b7ed999b18cefda64ee77a29e.jpg)


.thumb.JPG.dd838cdb3df463dab6a16861fa23a319.JPG)


-
Recent Achievements
-