Leaderboard


Popular Content
Showing content with the highest reputation on 06/09/2022 in all areas
-
When we purchased our Oliver Elite II last September we ordered it with the Lagun Table. We liked the table but didn't like taking it down when going to bed and putting it back up in the morning. So I made what is a drawer top for the large drawer under the TV. Not as large as the Lagun but gives us a place to set things while watching the TV, etc. The top is a cutting board I purchased at Sam's. The wood is poplar.
 5 points
 -
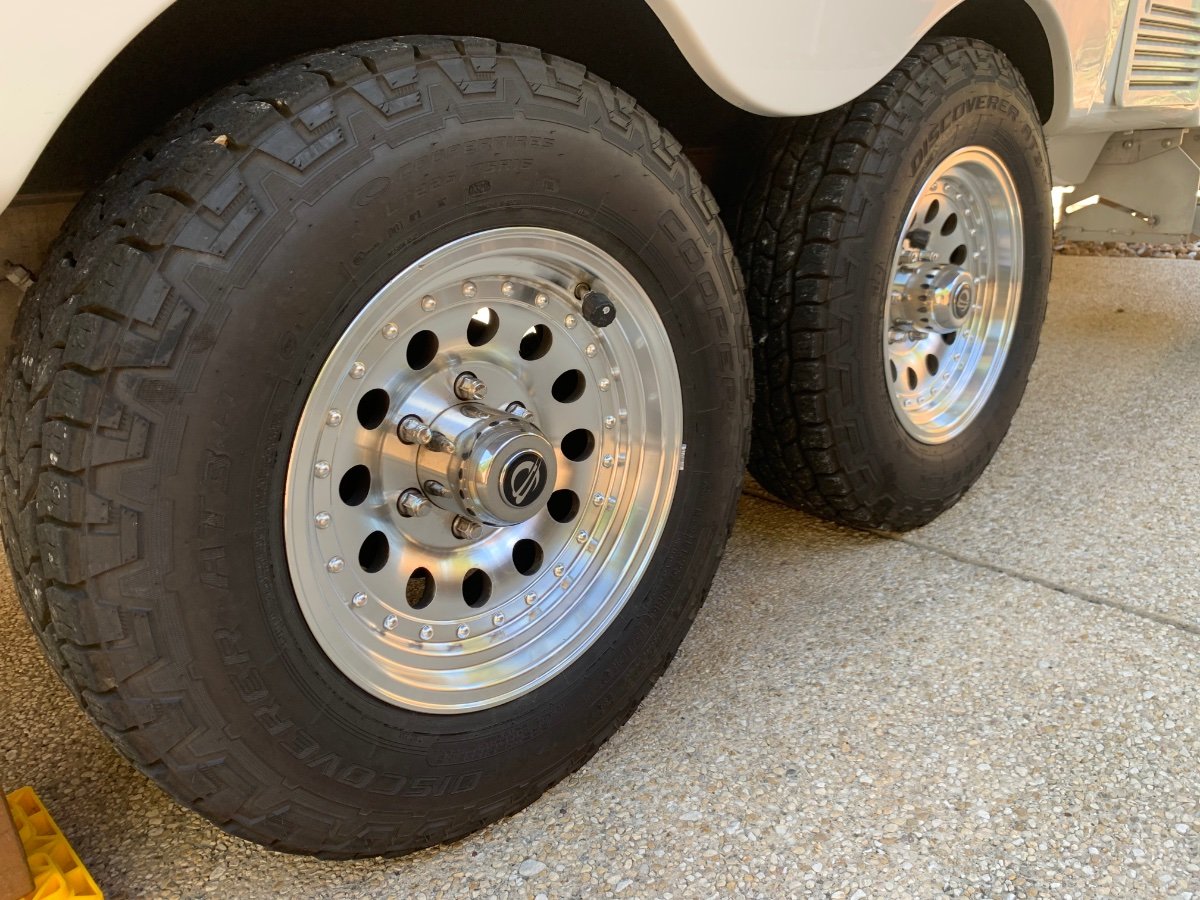
Last I heard Oliver was installing Cooper Light Truck tires. Perfectly fine tires. Most other trailers come with ST (Special Trailer) tires, often of dubious quality. Google "RV China Bombs" and you'll see lots of horror stories. With our 3 previous rigs, the first thing I did was put quality tires on them. I won't be changing out the Oliver's Coopers.5 points
-
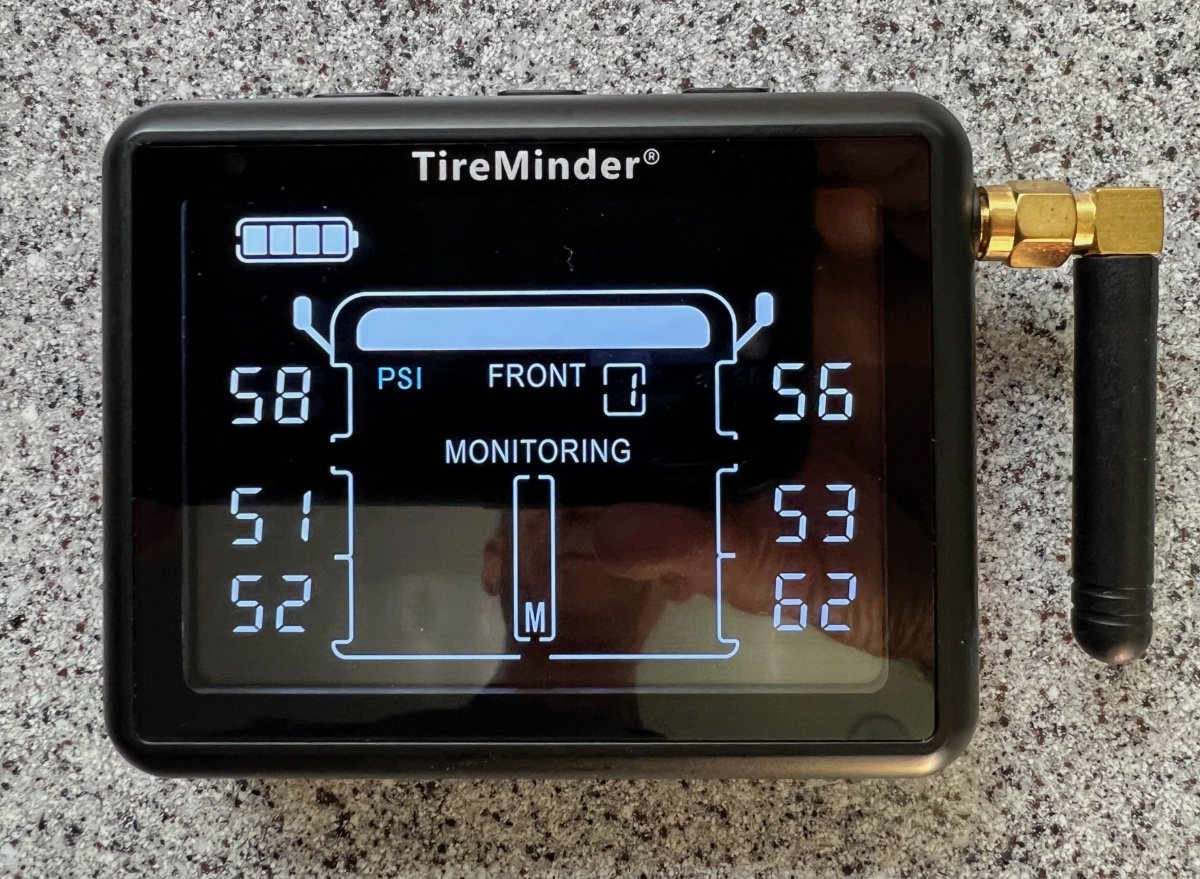
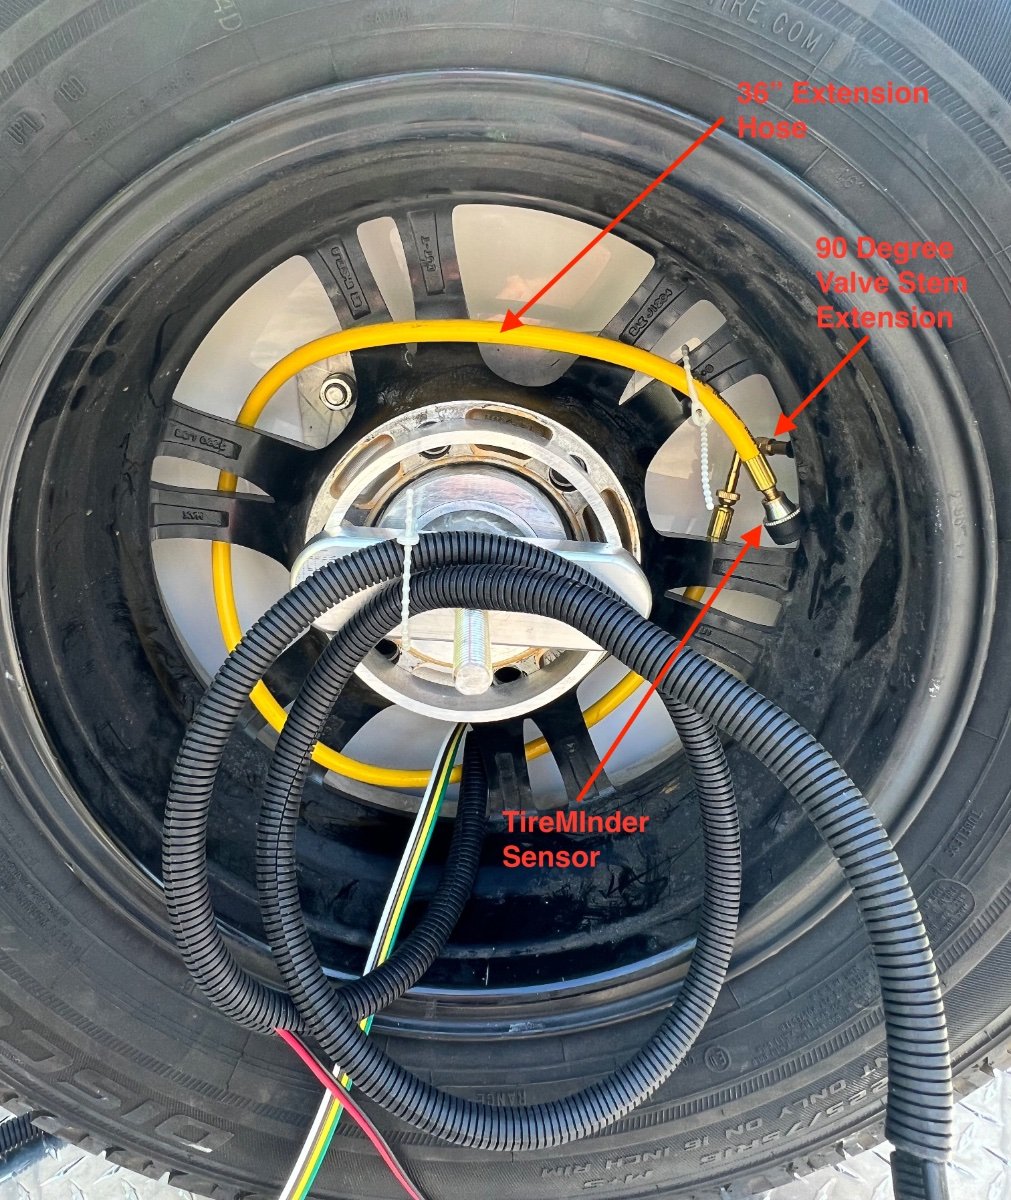
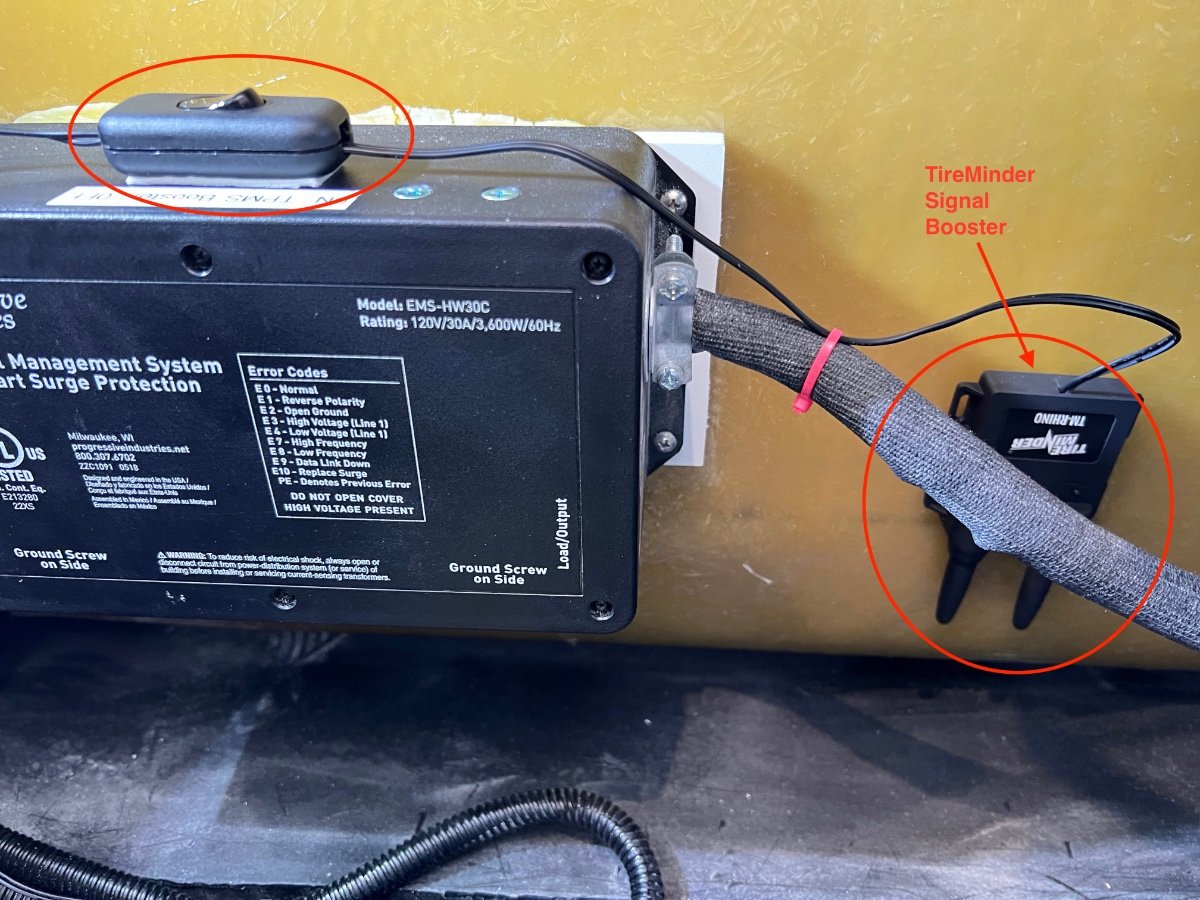
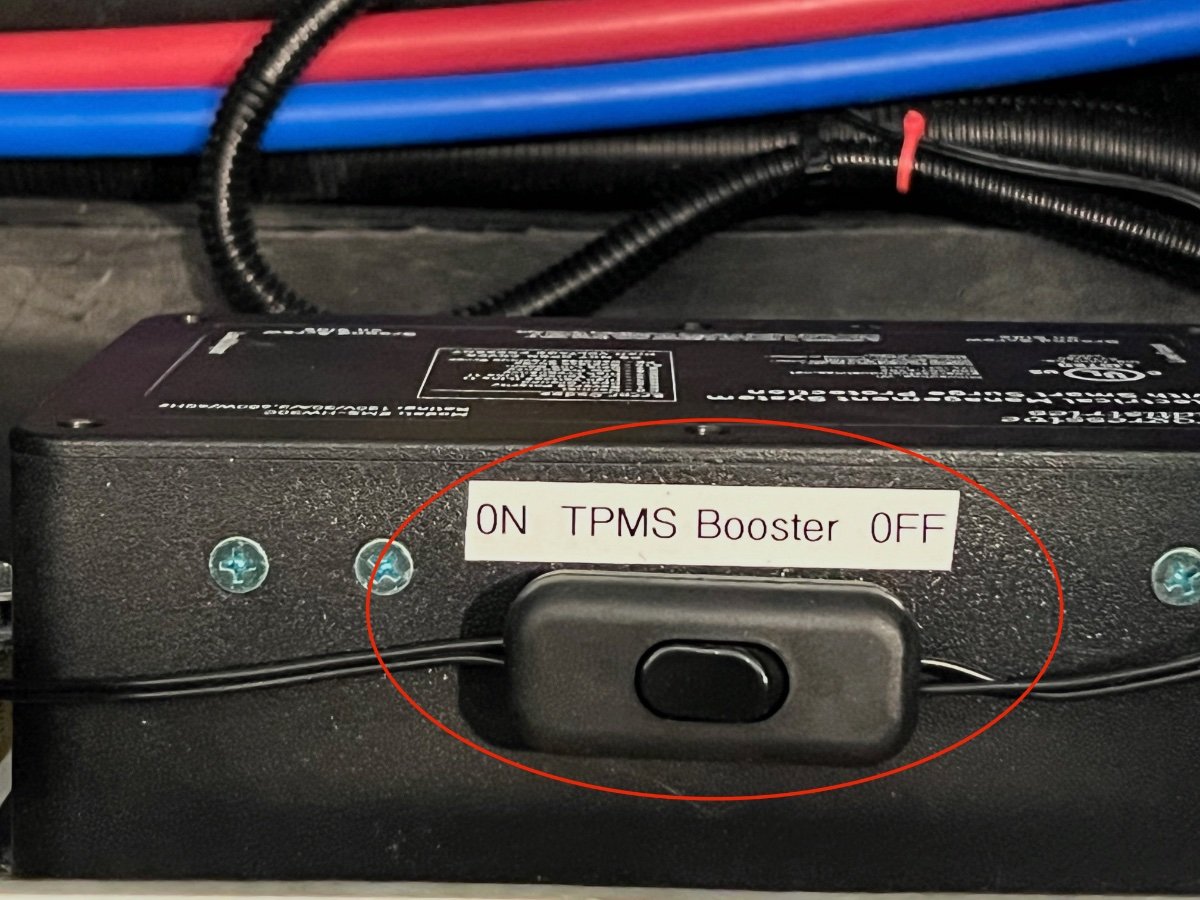
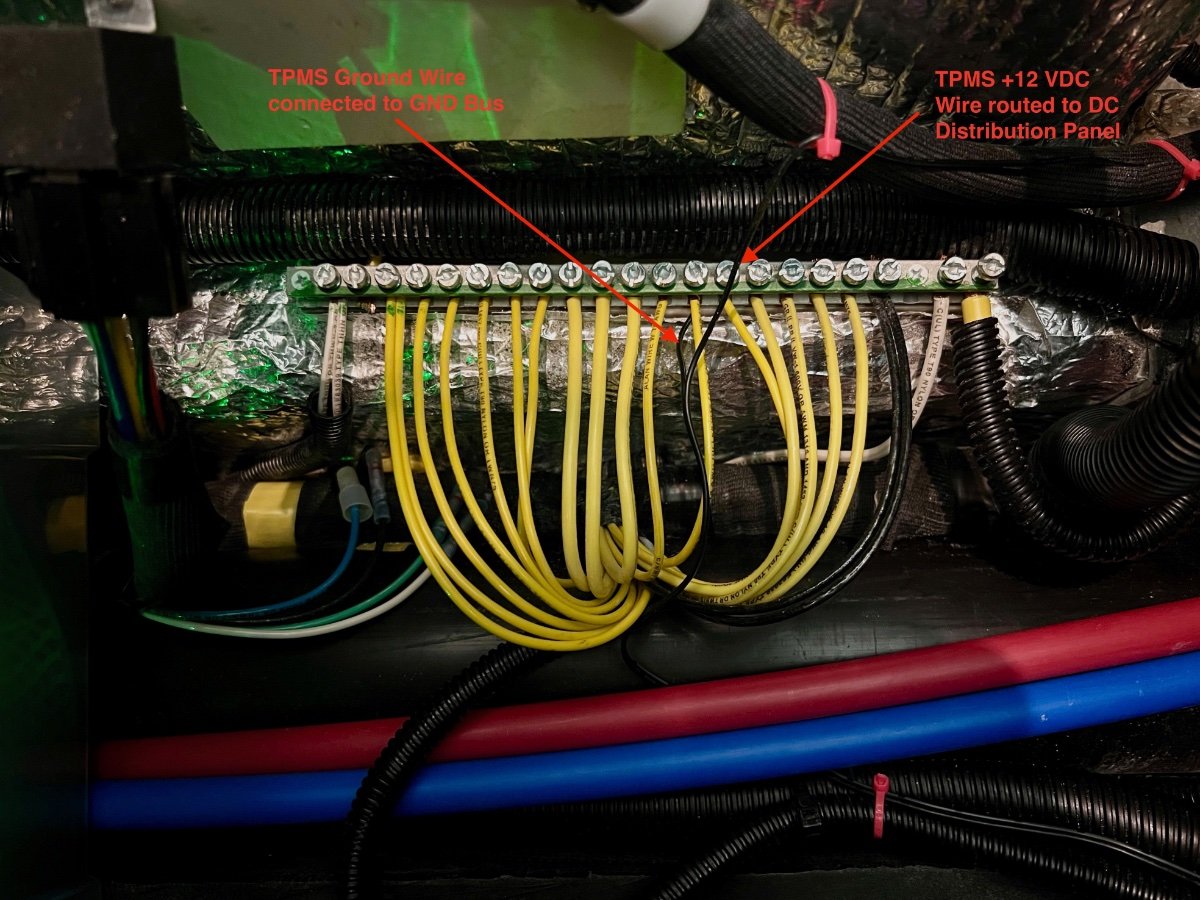
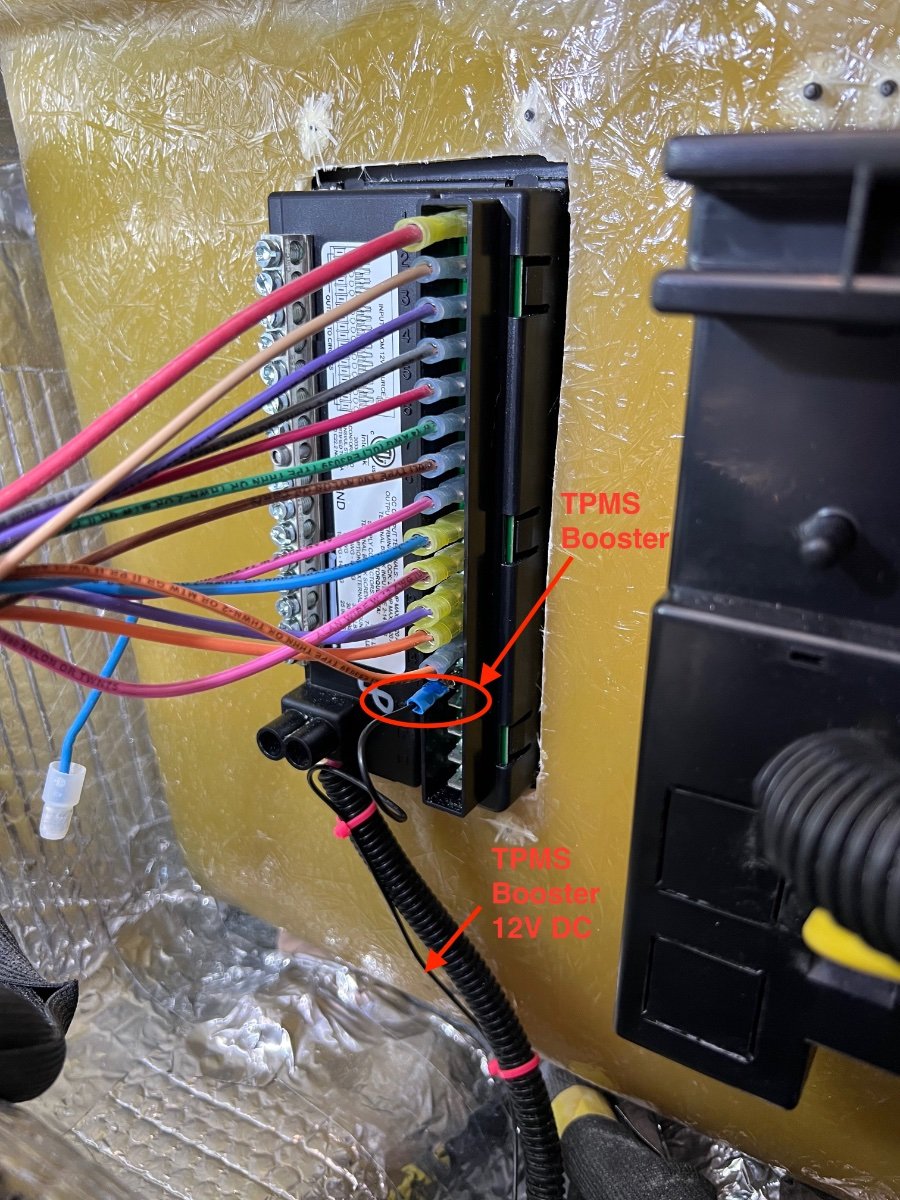
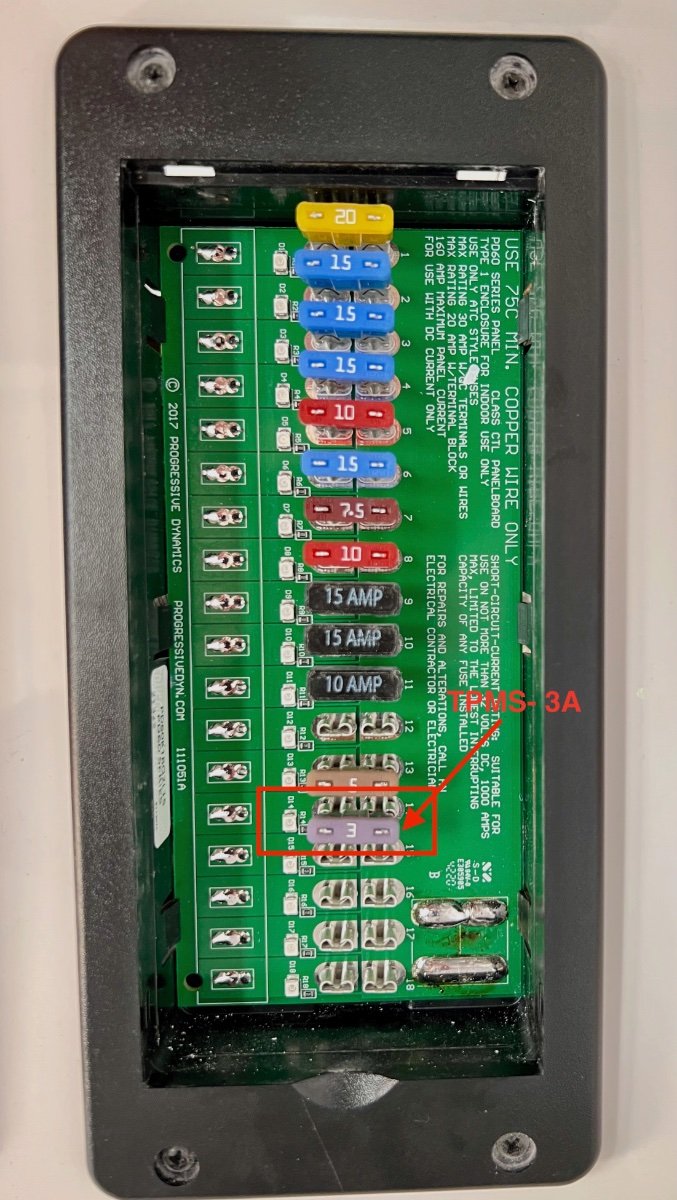
Shortly after arriving home from our delivery trip to Hohenwald, I installed a TireMinder i10 Tire Pressure Management System (TPMS), with six sensors, a monitor and a signal booster (installed later). Four of the sensors were fitted to the valve stems of the four trailer wheels on the ground, one on the trailer spare and one to the tow vehicle spare. The sensors transmit tire pressure and tire temperature status continuously to the small monitor in the tow vehicle. The 433 MHz RF signal booster is to ensure the signals from the sensors reach the monitor. The TPMS is quite configurable and can support up to 10 sensors simultaneously. Thresholds can be user specified and the system is preconfigured to create alerts for slow leaks or catastrophic loss of tire pressure. I first mounted the sensors to all the six wheels. The sensors appeared to have no problem communicating with the monitor in the tow vehicle. I deferred about a month installing the signal booster. Mounting the sensors is quite straightforward, requiring only insertion of provided disc batteries to the sensors, then screwing the sensors onto the valve stems. I like the inclusion of a lock nut to secure the sensors to the valve stems, using a provided small wrench. TireMinder Air Pressure & Temperature Sensor TireMinder i10 Monitor On each spare wheel I added 36" long extension hoses ($11 each) and 90 degree valve stem extensions ($7/pair), based on a recommendation from @John E Davies. The TireMinder sensors are mounted to the end of the extension hoses, which are routed through the wheel spokes to the accessible side of the spares. The valve stem extensions allow the hoses to be attached to the valve stems with no danger of kinking. These accessories eliminate a huge PITA- both spares are stored with their valve stems inaccessible. The trailer spare mounts with the valve stem facing the rear wall of the trailer. The tow vehicle spare is stowed valve stem down in a well under the cargo area at the rear of the vehicle. Now the TPMS reports the tire pressure with no hassle. Even if the spares require addition of air, the access is easy, without removing the spares from their storage positions. I always intended to install the signal booster, but had not settled on the best location. The installation instructions recommend locating the signal booster on the undercarriage, toward the front of travel trailers, with the antennas pointed toward the ground. The signal booster requires 12 volts DC for operation. I searched the OTTO forum seeking information on locations chosen by Oliver LEII owners for mounting such signal boosters. I found references to mounting signal boosters within the doghouse or in one of the upper storage compartments, neither of which appeared to offer ease of connection to a 12 VDC supply. Other owners indicated they had not installed the signal booster, since the monitor seemed to reliably provide tire pressure and temperature information. While vacuuming fiberglass dust from all areas accessible under the interior access hatches, I found what appeared to be an ideal location for the TPMS signal booster. The hatch under the rear dinette seat is the location of the Progressive Industries Surge Protector, mounted to the wall on the aisle side of the compartment. Adjacent to that location is a large area of unobstructed wall. Just below the surge protector is a ground bus and on the forward wall is the rear of the DC distribution panel. I believe this is a very desirable location for the signal booster. It is located low, slightly forward of the axles, in a protected space near the needed power supply. TPMS Signal Booster Location The TireMinder Signal Booster is attached to the fiberglass wall using an Industrial Velcro Coin, which enables easy removal. TPMS 12 VDC Power Switch I chose the top of the Progress Industries Surge Protector to mount a switch to turn the 12 VDC power supply to the TireMinder Signal Booster ON/OFF. The signal booster has a green light to indicate the power is ON. The wires from the signal booster are very thin and are both black (despite the instruction manual indicating one to be red and the other black). I don't believe it matters which is +12 VDC and which is Ground (GND). I routed the wires along cables in the compartment. The pink zip ties appearing in the photos provide clues to the routing. I arbitrarily selected a position on the Ground Bus to mount one of the wires to be Ground. The other wire was routed to the rear of the DC Distribution Panel, mounted on the forward wall of the compartment. Fuse position 14 was unused, so I selected it and connected the second wire from the TireMinder Signal Booster, using a crimp-on connector. Finally, I inserted a 3 amp fuse to the front side of the DC Distribution Panel, position 14. DC Ground Bus DC Distribution Panel (Rear) DC Distribution Panel (Front) Summary Although I had encountered no problems with the communication between the tire pressure/temperature sensors and the TireMinder Monitor, I believe having the signal booster installed reduces the risk of loss of communication between the sensors and the monitor. I have been leaving the signal booster on while traveling and turning power OFF when in storage. The signal booster draws only 75mA (Transmitting) to 14mA (Inactive). I tested the range with the signal booster installed and powered ON. I was able to walk over 300 feet from the trailer with the monitor receiving signals. I have been impressed with the TireMinder TPMS system. I have not mounted the monitor in the tow vehicle, but keep it on the center console, where I can view it as desired, and also hear any alarms which may occur. I purchased the TireMinder i10 and six sensors from TechnoRV (https://www.technorv.com/) for $279.65 (no shipping and no sales tax).
4 points
-
Congratulations on your new Ollie! We just picked ours up in May... so understand your excitement! Just a suggestion: go camping for a while to figure out how you use it... what style of camping works for you, etc.. I spent 10 months making lists of things I thought we would want to buy or modify when the time came. Fortunately we were able to travel for 3 or 4 weeks and now in real use...quickly we discovered some things we hadn't thought of as well as some things that fell off the list. This will help you prioritize projects based on time and money. The Oliver is so nice... nothing is "urgent".4 points
-
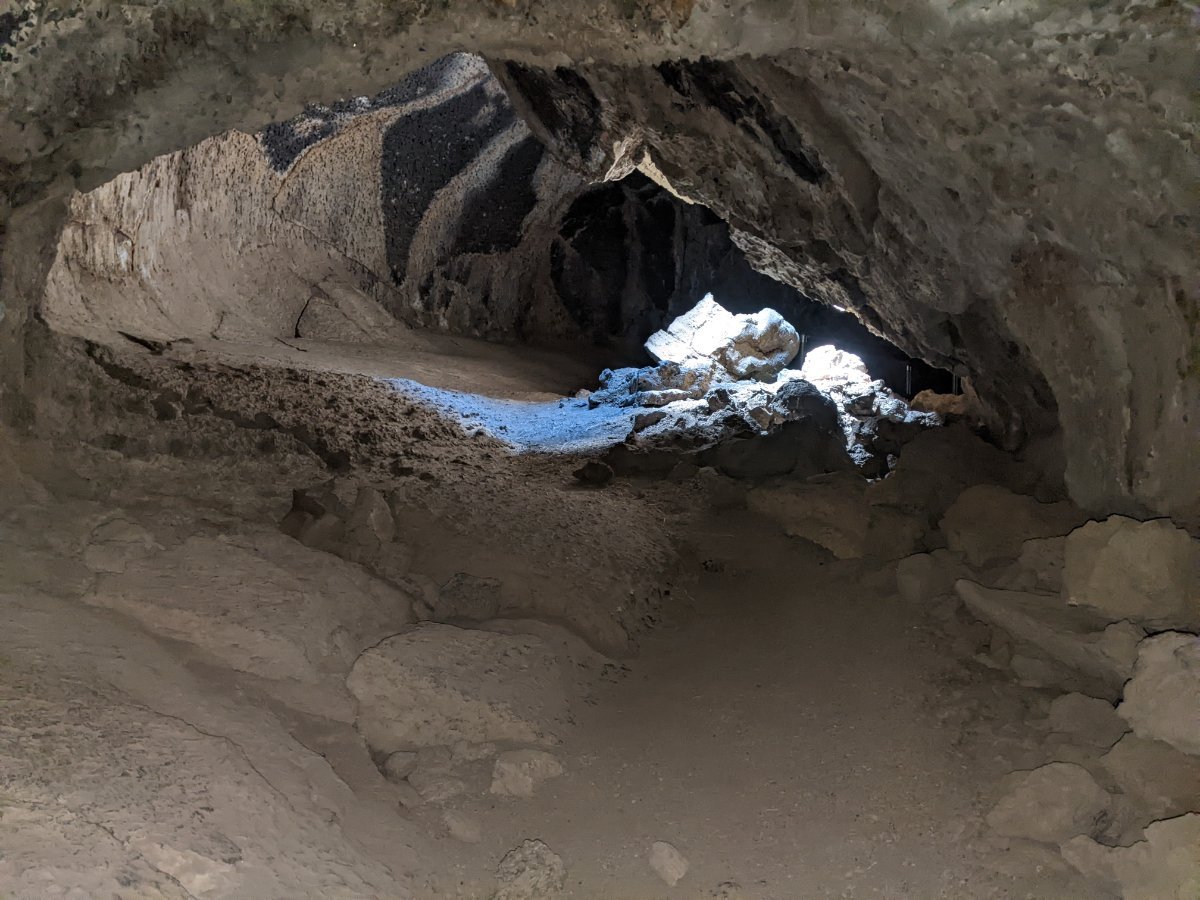
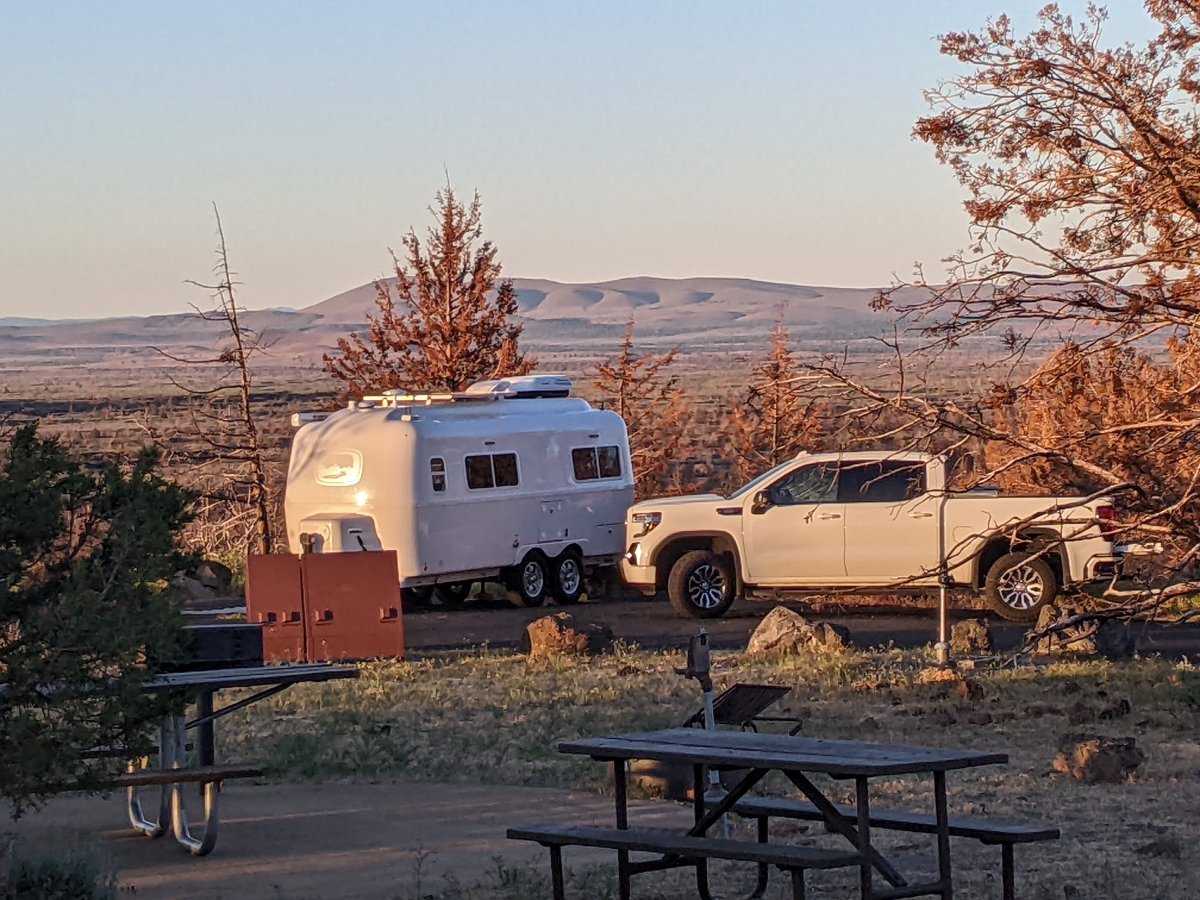
just spent a couple days at the lava beds national monument, hardly anyone there, it's way out in the middle of nowhere, but very beautiful. $10 a night for beautiful flat campsites, water nearby and flush toilets. no hookups.
4 points
-
I discovered that both of my rear jacks were missing two of their three set screws. No wonder my jacks would no longer lift the side of the trailer! I replaced them and now the jacks will lift the full weight of the trailer again. Those rear jacks are made special for Oliver by Barker. There is a side plate welded to the outer tube for mounting purposes and there is no control head. I think the screws will eventually loosen and fall out. I know that’s what happened in my case. I’ve had the jacks in and out too many times for rebuilding and I think I would have noticed them being missing.4 points
-
Yes, Oliver still installs Cooper tires. We have been very happy with our 10 ply E rated Cooper truck tires and see absolutely no need to change out.4 points
-
John, I couldn't find any of the set screws at the bottom. I went to ACE Hardware and got new set screws. Thank goodness for ACE. They seem to have everything. I put them into the motor housing. The one screw next to the water heater was a tough one to get in. I ran the stabilizing jack and it works perfectly now. Missing all three set screws seems a bit suspicious to me. Those screws are set deep into the motor assembly. I could imagine them becoming loose, but for all three to be missing and not able to find any of them makes me wonder if they were ever there. Oh well mischief, managed. I did spray the toggle switch with the silicon spray and it helped quite a bit. The action is much improved but I think a second application may be necessary. Thank you so much for your help John. I can't tell you how valuable your guidance is here on this forum. I will follow up with Oliver. Thanks so much! Carl4 points
-
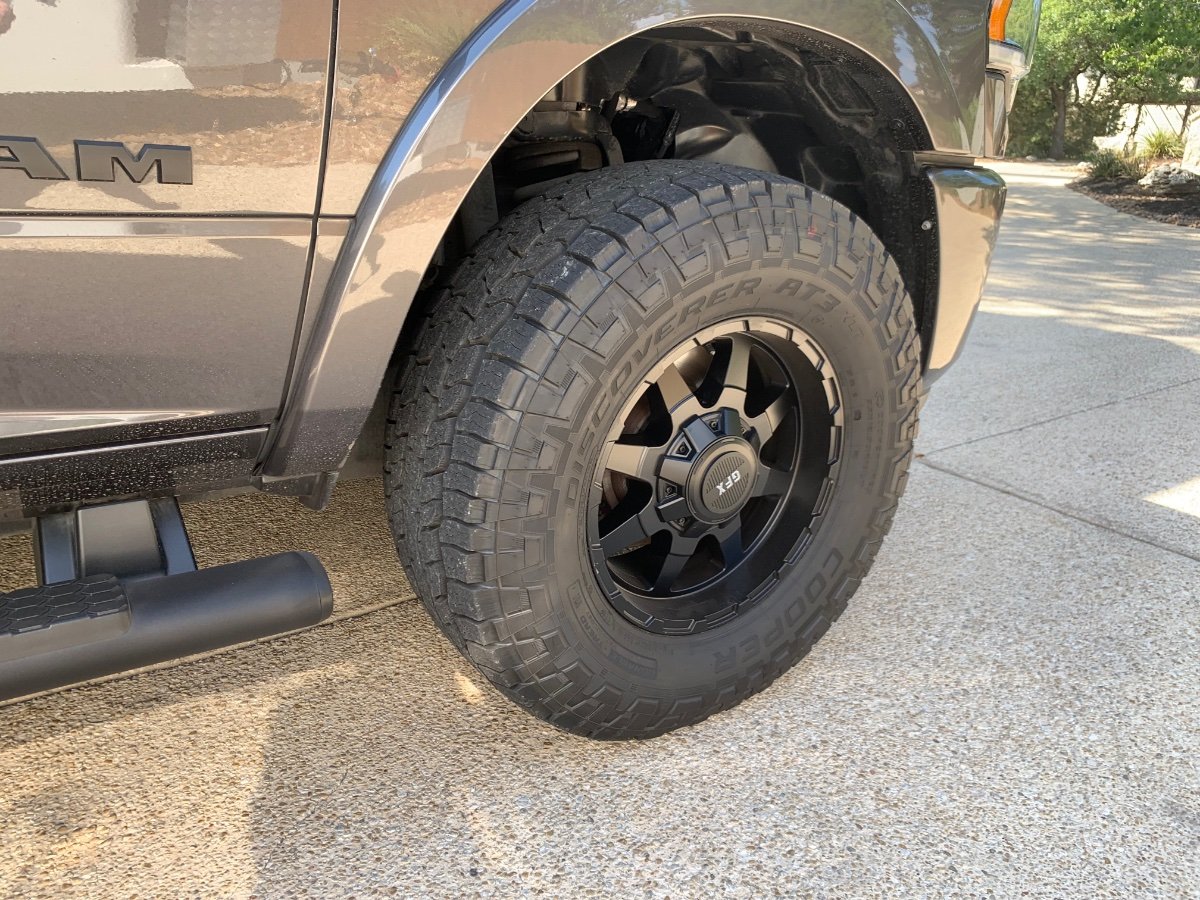
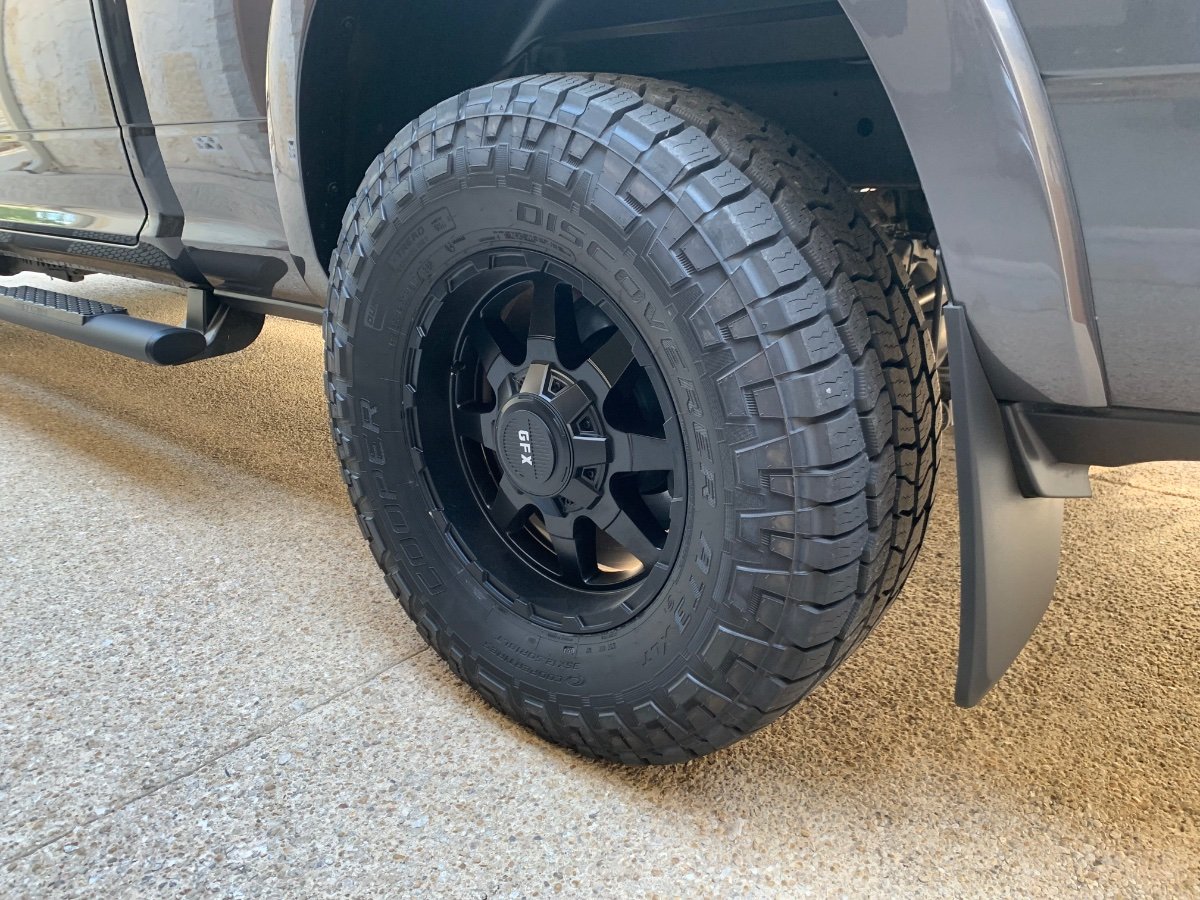
Trailer - Cooper AT3 XLT 225/75-16. Truck - Cooper AT3 XLT 35/12.5-18.
3 points
-
Hi Cameron, After reading your post, I noticed that the panel on my LE2 is not completely flush with the trailer body, but not quite as pronounced as your photo shows. I attached two velcro strips, on the back vertical sides of the panel, to better secure the panel. I suspect that a replacement panel would eventually warp a bit, as the plastic is quite flexible.3 points
-
I would be very reluctant to weld on that subframe, I bet the factory would not approve. it destroys the galvanizing and probably compromises the sealer between it and the aluminum frame. I don’t see any reason why one or two 1/4” stainless roll pins driven through holes in both washer and subframe would not work well. Alternatively, weld a piece of steel 90 degree angle to the washer facing inward, to engage the bottom lip of that suspension hanger. That might be a simpler method, you could take the two washers to a local shop to be welded, then install them at your leisure after painting them. John Davies Spokane WA3 points
-
Yes - but - there are simply too many to mention. Go to the Ollie Modifications section of the Forum and start reading. Here you will find enough to keep you very busy for awhile and keep your wallet empty. Have fun! Bill3 points
-
An interesting video with info on how thieves will use apple air tags to track and steal property. Stay Safe!3 points
-
Click on your name in the top right corner. Another window will open, click on Account Settings. When a new window opens, click on Signature on the left side. Edit the signature section with the information you would like to appear at the bottom of your post’s and click Save. Good luck, Mossey3 points
-
John, Well, it was a good thing that you had me check the mounting bolts. 3 of the 4 internal bolts were loose and needed to be tightened. 1 of the 2 external bolts (underneath) also needed tightening. I only have 7K miles on the trailer. I guess I am going to have to add checking these bolts and screws on a more regular basis. I'm so glad this was a relatively easy fix. I will update the factory and cancel the ticket. Thanks again for all of your help and experience. Carl3 points
-
If you contact Oliver, they can set you up to see both the Elite 1 and Elite II somewhere close to where you live. This is recommended if you can not make it to the factory.3 points
-
Update - Mike Sharpe let me know he is having the parts department ship me a replacement vent frame tomorrow. Yet again, awesome Customer Service by Oliver Service Center Staff. I will post up a few pics after I install the new vent. -David3 points
-
I was looking for a simple way to use my rear storage compartment (the one that opens from the outside) to keep my Starlink router out of the elements / simplify setup and teardown. Running a new AC outlet from the main panel to the trunk is a straight shot but I wanted to review the electrical diagram before potentially ruining something. I contacted support for an electrical diagram and they still don't have one. They mentioned a third party was responsible for the design and this former employee/contractor is unable to provide it to them. They made it sound like Oliver doesn't even have an internal diagram. They did say ones coming off the line today will come with a diagram. For anyone that wants AC in the trunk and has a Xantrex XC inverter installed, I found this part: Xantrex 808-9817 which allows a GFCI outlet to be installed in the back of the unit. It was a nightmare to install but it works after you get the tiny screws back in... It ground faults without the screws and it seems to cut power to the outlet if the panel isn't flush with the unit (safety switch?). The installation requires the removal of the entire inverter or laying on your stomach and reaching deep under the seat to do a blind one handed installation. I opted for the blind install. Amazon link to part: https://smile.amazon.com/Xantrex-Freedom-808-9817-Electrical-Equipment/dp/B0756FZFZJ/ref=sr_1_1?crid=LV42YTTEUUIQ&keywords=gfci+outlet+xantrex&qid=1654812380&sprefix=gfci+outlet+xantrex%2Caps%2C90&sr=8-12 points
-
I replaced my factory original BF Goodrich tires last year with Cooper Discoverer AT3 LTX. It’s a little more aggressive model than what Oliver is using now. I just put them on my truck as well, 35” F rated. Mike2 points
-
On my phone, it's several steps to get to signature. I go to the three bars/"hamburger" button, top right. From the drop down, select account, then account settings, then settings area, then signature. It's quite the treasure hunt to find it.2 points
-
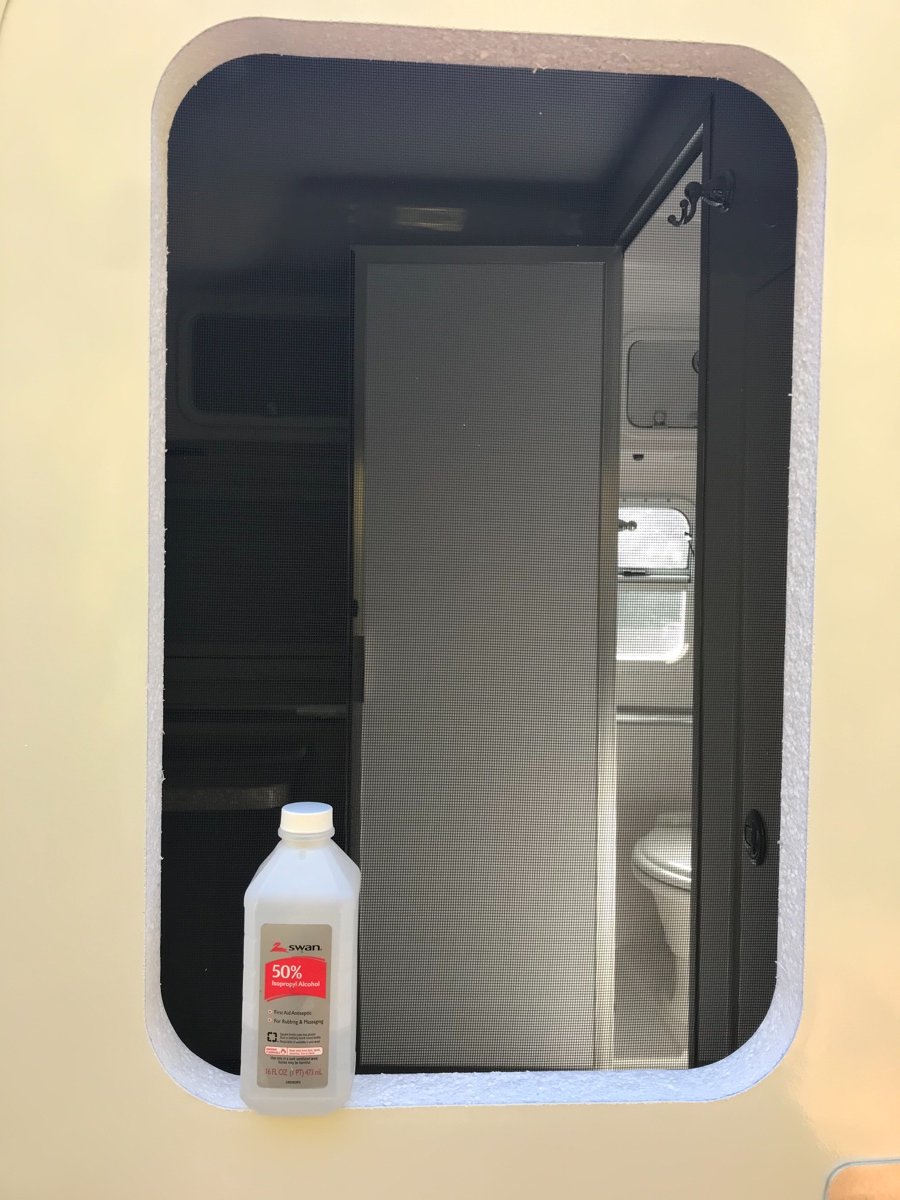
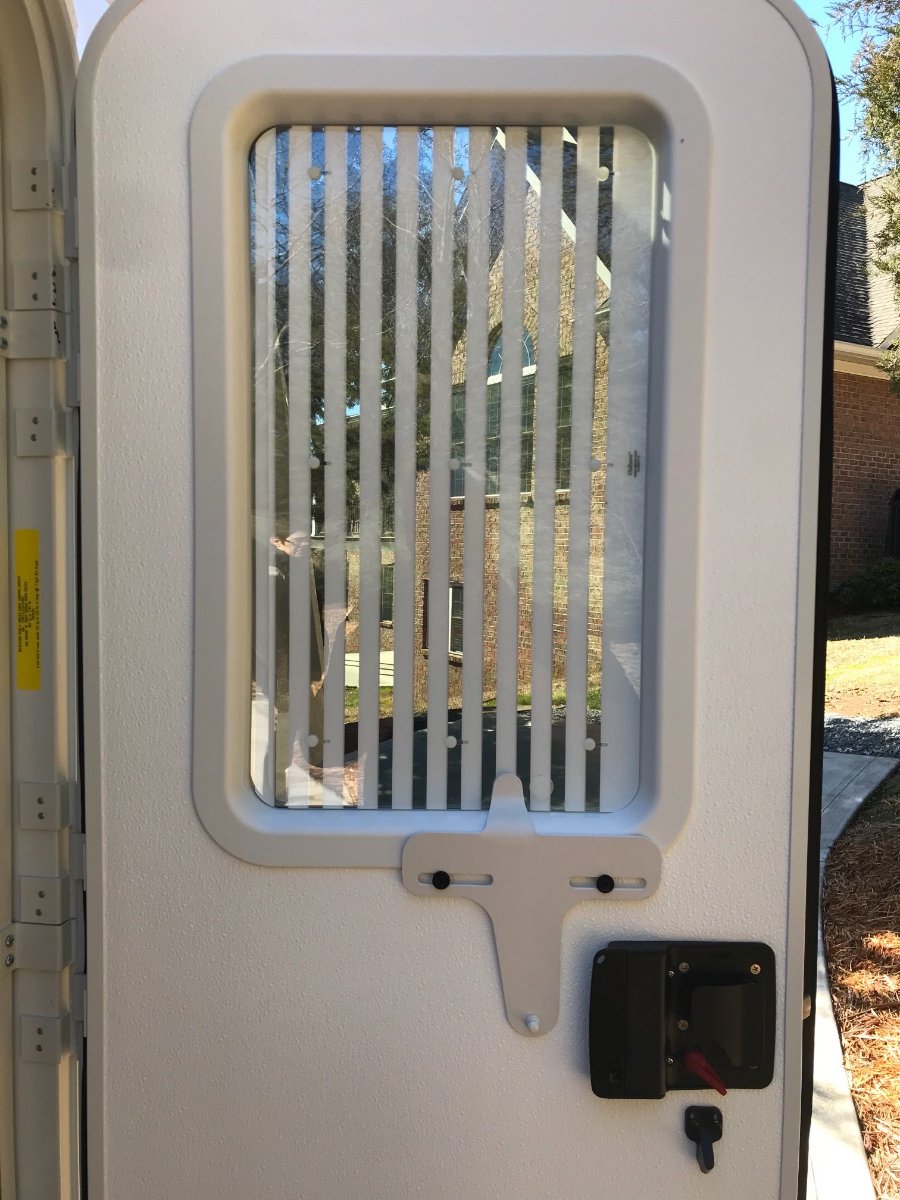
I thought I would bump this post since I was asked about the Zarcor window shade while at this years Rally by a few new owners. It’s a nice mod passed on to me by TopGun and naturally allows us to see who is knocking at the door. As mentioned we ordered tinted glass to match the Oliver tinted windows. A top five mod of ours. Hope this helps those that asked about it at the Rally. Happy Camping!2 points
-
https://taskandpurpose.com/news/coast-guard-helicopter-rv-camper/ Pretty long spread between coupler and axles, I wonder what the TW is? John Davies Spokane WA
2 points
-
I always describe pulling a trailer as moving a 6.0 earthquake through a Cat 1 hurricane. Screws and nuts will loosen over time. You could spend days trying to check them all. Usually I just fix things if they break, hopefully ending up with a better fix than original. There is one item I encourage everyone to check now. IF you trailer has an additional electrical port (for a generator hookup) you will have a transfer switch located underneath the left dinette seat. Unplug the trailer from power, take the top off the transfer switch box and check every screw in the terminal block. If a screw becomes loose, the resistance in that wire goes up and the result will be, at the least, a cooked wire and terminal block. Or it will catch fire a burn the trailer (and possibly any occupants) up. I repaired this problem on a trailer at the rally and it was very nearly at the point of combustion.2 points
-
From Oliver owner Foy Sperring. Link to his catalog below. Or, just search for "Foy" using this forum's search tool. https://drive.google.com/file/d/1xYYE_R9dKxbNapgWqzYcaaDYCtEj_m6v/view?usp=sharing2 points
-
Thanks for the informative video!2 points
-
I recently had to get all the drawers out under the sink so I could replace a leaking faucet. To get more access to under the sink I unscrewed the wooden slats that hold drawer latches. When I put them back on again after replacing the faucet, I had a hell of a time getting the middle drawer to latch even though I had marked where to put the slats back. So what I did was to take the middle drawer back out, take the wood slat with latch of again, then put the drawer back in so it was flush, aligned the slat with the latch latching the drawer and then screwed the slat back again so it was latching. So far so good. It's latching again. I would still like to replace the 2 lower drawer under the sink with cabinet doors but right now I have way to many projects going so I will put this on the back burner for now.2 points
-
I don’t recall if they are stainless steel or plain steel, but if you have a telescoping magnet retriever tool, try fishing around down in that deep recess where all things disappear. You might just recover them. This might help. …https://olivertraveltrailers.com/forums/topic/6781-how-to-service-your-rear-electric-jacks/ John Davies Spokane WA2 points
-
Then the switch may be physically dragging on its cover or the opening, you may have to remove it and perhaps file a bit of extra clearance where it hits. Or maybe just try loosening the screws and shifting the switches a little. The technical term is “fuss with it”. John Davies Spokane WA2 points
-
Your front toggle switches will free up if you spray some silicone lube and work them a little, they get dirt buildup. Get a 3/4” 1/2” drive socket and torque wrench and check the mounting bolts of both rear ones. They should be 43 ft lbs. Recently my right jack seized and I found the bolts that go vertically down through the frame rail to be super loose, like one full turn. Both jacks were this way. They worked fine after retorquing. I suspect the housing was tilting under load and binding the main shaft. The horizontal bolts inside the trailer were fine. https://olivertraveltrailers.com/forums/topic/6812-check-your-rear-jack-mount-hardware-bottom-frame-bolts-were-1-turn-loose/ IF they are loose, please file a followup to your service ticket! John Davies Spokane WA2 points
-
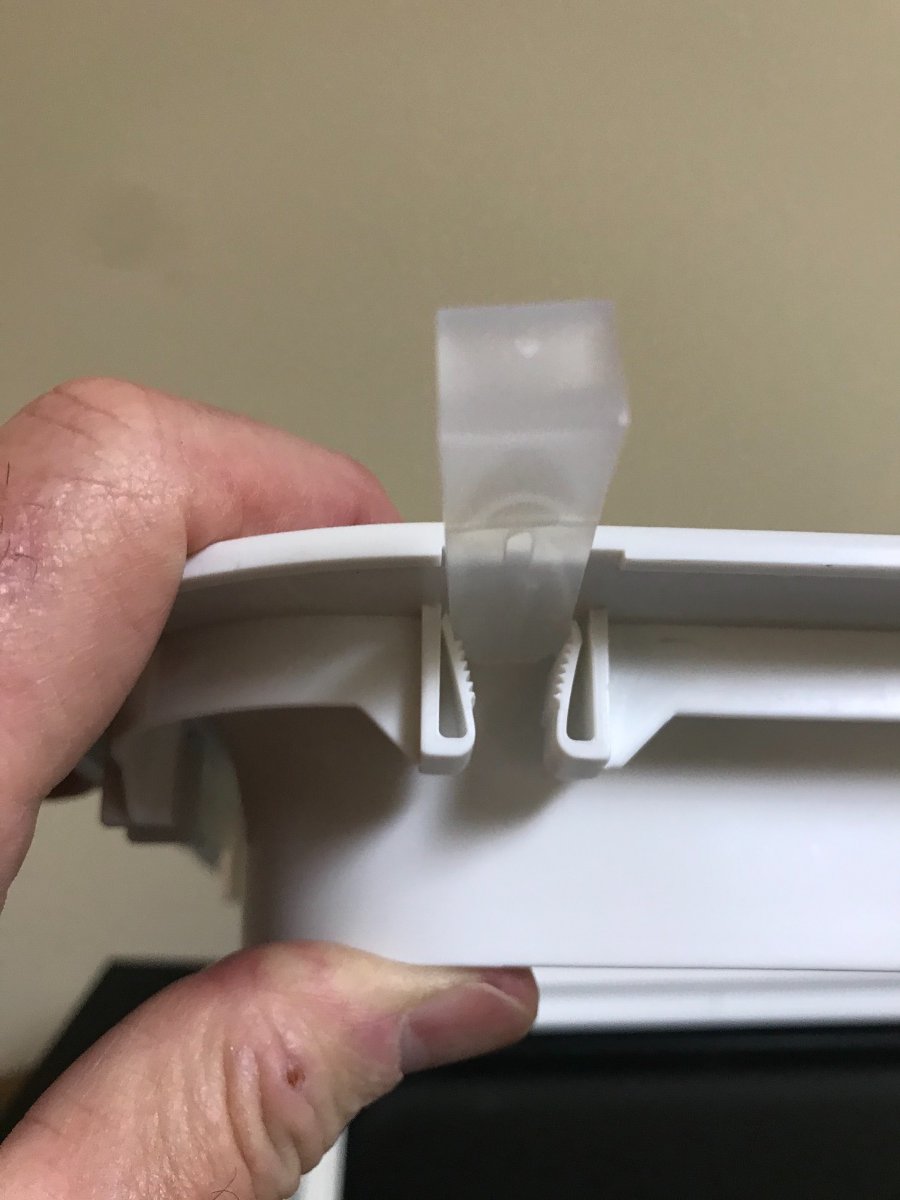
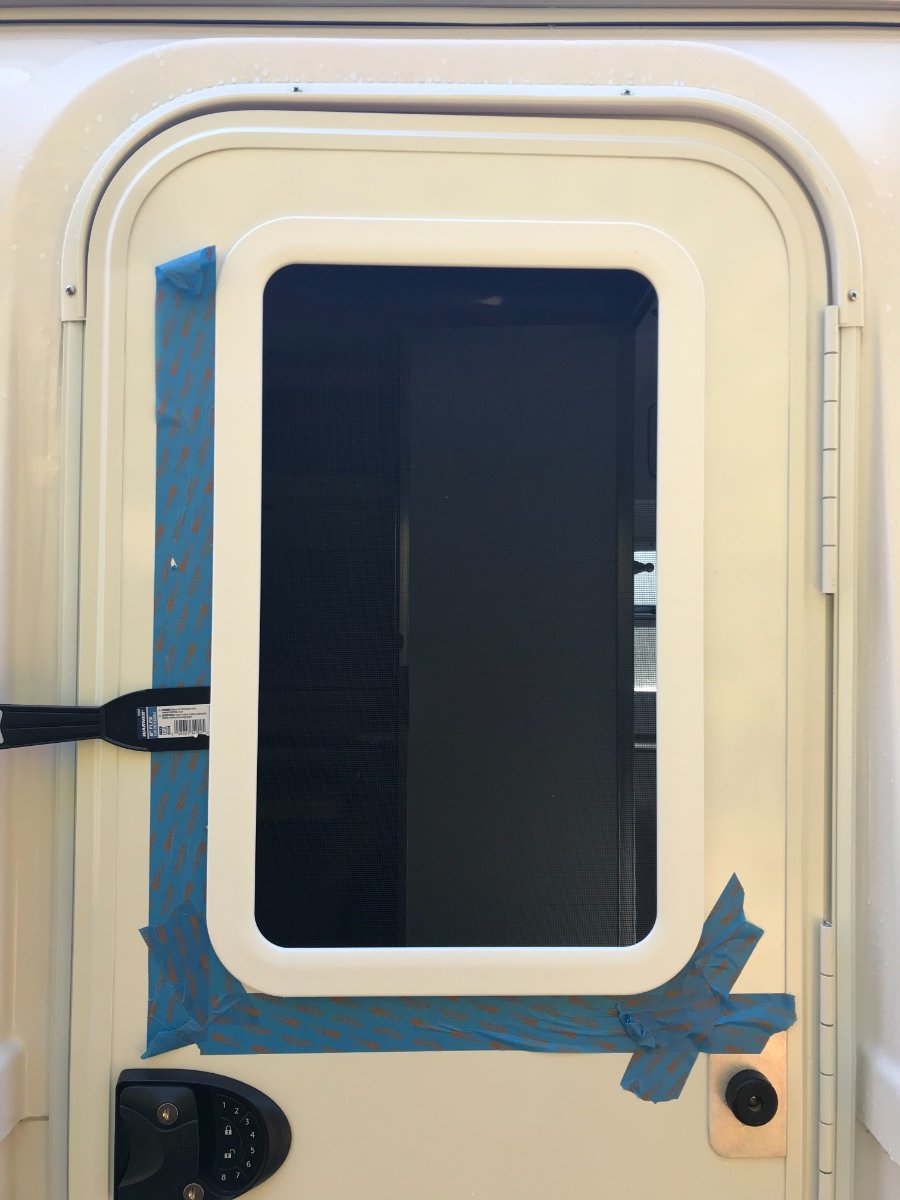
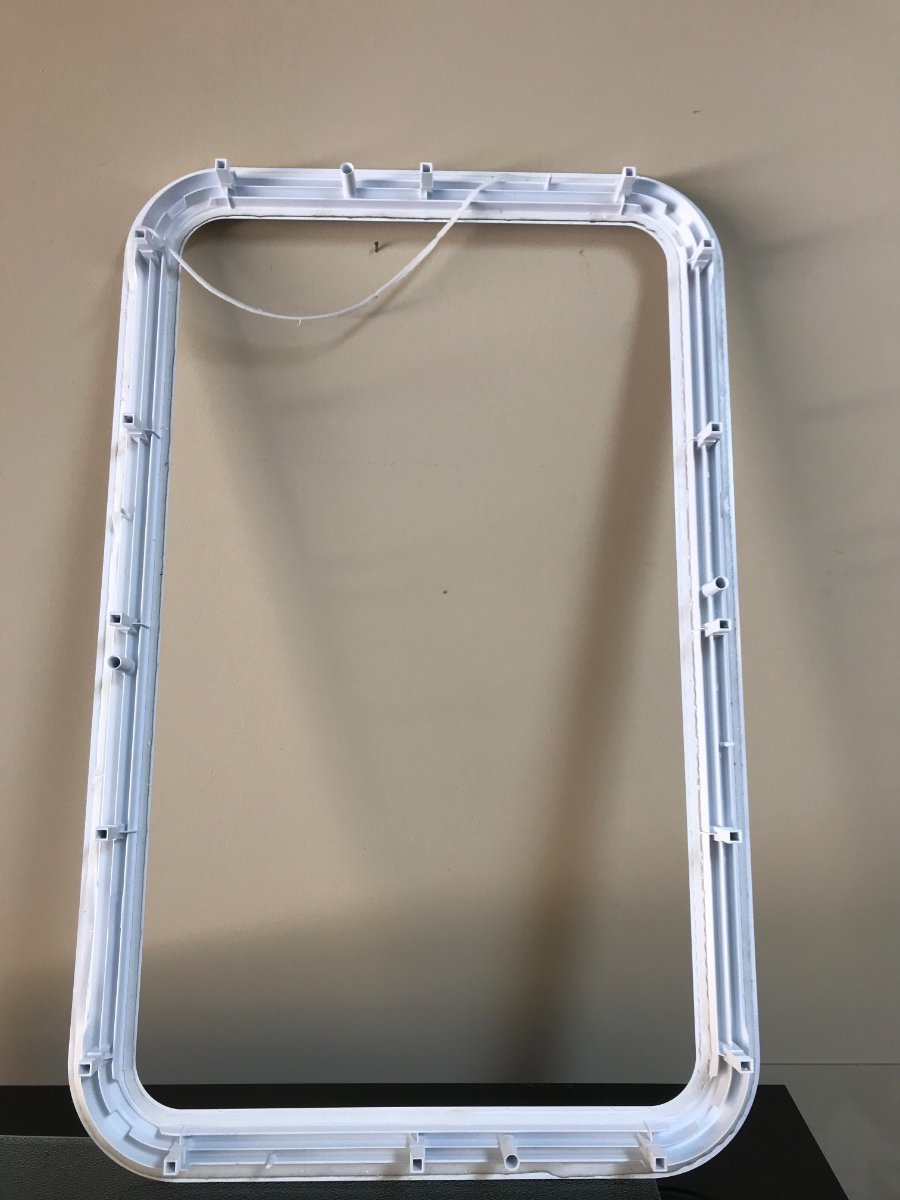
Long install post- I decided it was a gorgeous sunny North Carolina day and just a good day to install the new tinted glass and blind I ordered from Zarcor. I made this a stand alone post as this window install was a bit different from other installs I have read about here. It appears the Lippert now uses a sealant on the exterior window frame which adheres the frame to the door frame opening. They also use a similar sealant on the interior of the exterior frame, which holds the glass FIRMLY in place inside the window. I could not remove the old opaque glass from the old frame. I decided since this really appears to be a one time use sealant that purchasing a new exterior frame would be required. Reusing the old frame and compromised sealant was not an option for me. You will see where the sealant on the old frame came off after removal from the Ollie window door cut out or frame. Some of the old sealant came off on the old opaque window. I was glad I had purchased a new frame through Zarcor to do the install. The new frame was $28 plus shipping. Once I removed the old frame and opaque glass, the install was pretty straightforward. The new window frames use what appears to be a ratchet mechanism which once both frames are sealed together they lock into place. No more rope caulk or screws to tighten down when you sandwich the new window interior and exterior frames together. Zarcor sends (16) little plastic tabs (pics) that release the frames from each other. Without these tabs you cannot remove the frames. Below are a few photos to help describe the process. It’s not terribly difficult; just take your time and read the instructions. We are really happy with this mod and like the idea of seeing who is knock knock knocking on our Ollie’s door. $175.00 for this mod including shipping from Zarcor. The staff at Zarcor made this mod seamless by answering all questions I had before moving forward. Just really great folks to do business with in San Antonio,Texas. This is a fairly easy window mod and I would highly recommend it if you prefer being able to see who is knocking at your door. Take your time and remember be gentle as your working with plastic and glass. link - https://www.zarcor.com/rv_products/rv-door-window-kit/ (16) tabs provided by Zarcor to remove existing frame. You insert equally around slots on the exterior of the interior frame edge. You will see the slots. Ratchet mechanism that holds frames together. Likely to speed up window/door plant assembly production cut costs. After removing the interior frame, a thin bladed puddy knife can be used to separate seal. Old frame and compromised sealant - Another photo of old exterior frame after removal- Throughly clean off old sealant off door frame- Installed new frame, and tinted glass, my bride was a tremendous help with an extra set of hands 🙌 👍🏻. The blind install was again pretty straight forward and it works great! It attaches with several small Velcro tabs. The blind can be operated with the interior screen door closed, just slide screen door plastic opening for access. Finished exterior - we like the way this tinted window matches the rest of our glass. The contrast of the tint vs natural light -
1 point
-
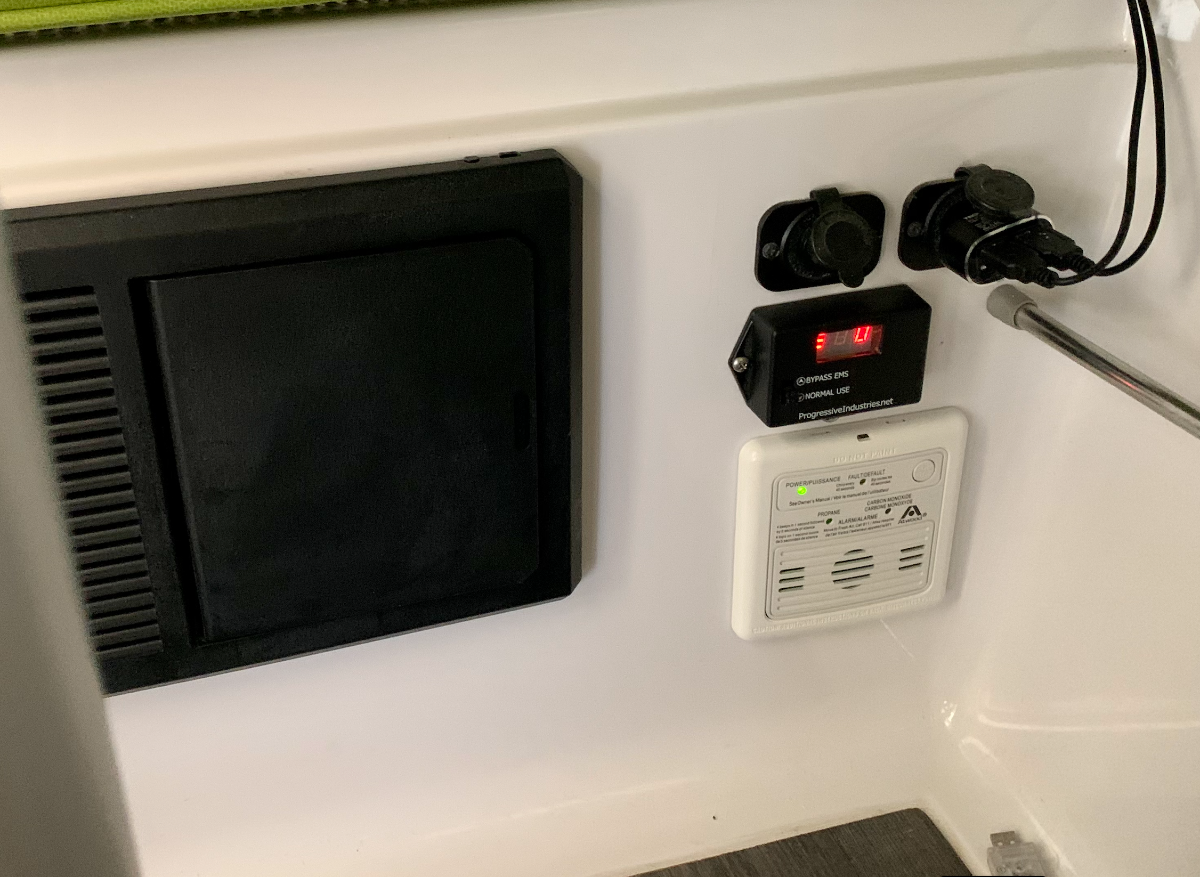
I finally got around to relocating the EMS display. When plugging in I can now quickly see the display.
1 point
-
I'd avoid mounting it. The ground allows for better flexibility if your line of site from the camper is bad. The ground mount gives you a 75ft radius around your camper to work around trees and other obstructions.1 point
-
The ride is smooth and quiet. I wanted something a little more truck-like. The stock Firestones were basically regular street tires. They didn’t wear well either, after 35K miles they were ready to be replaced. Mike1 point
-
Lori, since you specifically asked about the bathroom, I use windex or a mild dish soap and water solution to clean the trailer most of the time. I don't use household toilet bowl chemicals in the toilet, either, as many dump stations are big septic tanks. My toilet brush is a relatively soft brush from dollar tree. Probably more of a bottle brush than toilet brush. All plastic. No metal to rust. For sanitizing and mildew removal, I prefer hydrogen peroxide to bleach based products. Still best to ventilate well, but much less harsh on your lungs (and your trailer, your wallet, and the environment in general) than chlorine bleach based products. You can put regular drug store 3 per cent hydrogen peroxide in an opaque spray bottle, and just spray it on surfaces and watch the mildew and dirt loosen. Wipe it off. I just used some again this morning, on a bamboo dish drying rack, and it worked great. I scrubbed it off with an old toothbrush, wiped with a rag, and rinsed. This time around, I treated the rack (after sun drying) woth food grade mineral oil. ($2 in the laxative section in walmart. It's what I use on all my wooden and bamboo cutting boards and cutlery handles. No need to buy expensive cutting board oil, which is basically the same product.) Btw, once you get your trailer shiny clean, you might consider putting a coat of wax on the walls and countertops. (Unless you have a nonskid shower mat, like foys wood one, I wouldn't wax the floor.) I do this annually, to keep the interior gelcoat shiny bright and sealed. I forgot to do it last year, and for the first time in 14 years, had a couple small spots on the sink counter that were difficult to remove. Firmly convinced that the interior wax is a step i won't forget, again.1 point
-
Cameron, Your welcome, just passing it forward. 👍🏻🇺🇸1 point
-
Thanks everyone for being so helpful! Ford is not helpful at all…or maybe I am not asking the right questions. I will purchase a Marinco adapter ASAP! Also, I have never used a forum and apologize for posting in the wrong place.1 point
-
@Imelda, you shouldn't have had to remove the slats to remove the drawers. Ours are weirdly "tricky," but we've never had to remove slats and fasteners to remove the drawers. The trickiest is the European hardware. I'm sorry you went through this. If you used the same holes, you may need to use larger screws in the future. At the very least, some toothpicks, and adhesive. I'm always amazed at all the "stuff" you tackle on your own. Keep up the good fight. You're a trooper. Ps we run our elite tire pressure 55 to 60, on st tires. No issues with drawers flying open, on crazy mountain roads. I've nicknamed my husband mario Andretti. Me, I drive a lot slower.1 point
-
Thanks all!1 point
-
As previous Airstream owners, we too felt the E2 ticked all our boxes - and eliminated so many problems with other designs. The idea of the cabinets molded into the unit meant never having to reinforce screw holes. When you analyze the many things - so many things - that Oliver has built into their design, it makes one smile. And, as production continues, they seem to listen to those of us commenting on their product. Good choice! Charlie1 point
-
Hi EJ, FWIW, I agree with Bill. You essentially have a family of 4 and from a couple that lived in a Casita Deluxe for 2 years, which is roughly the size of an Elite, we so much appreciate the the extra room an Elite 2 provides. The floor plan is something I can't help with but for the 2 of us we are very happy with the twin beds. BTA we are full timers and want the space. We wish you the best with your decision, Wendy & John1 point
-
Hi, Kristie, and welcome to the family. Your Ollie should have come with a 30 amp rated power cord and a 30 to 20 adaptor for the plug. You could plug into the 120v/20a outlet below the 240v in your first picture. You should be able to run your a/c and some lights from that, though not the microwave or a hair dryer at the same time as the a/c. I was able to run my 13.5 dometic dinosaur a/c (no soft start) on my home outlet in that way, and we do that to plug into our little Honda generator for charging our battery, as well. Congratulations on finding your Oliver! Happy camping.1 point
-
The link that John posted above has this Plug Adapter referenced. It basically uses one of the 120v legs to power your camper through your normal cord RV power cord. The two legs of 120 power (in your truck) are 180 degrees out of phase with each other. They cannot be combined (spliced) and I doubt many/any RV’s utilize appliances that require 240v. The 50 amp RV plug used in larger trailers just distributes each leg separately to different appliances/outlets in the trailer. Ideally generators would like the two 120v legs used evenly as far amp draw is concerned. I’m not sure if this is an issue with the ford truck outlet.1 point
-
I have found it is fairly easy to back off the nuts on the trailer, get slack in the chain, remove whales tail. Do the reverse when hooking up. Count the threads on the bolt so they are even. Actualy really easy1 point
-
Forgot this, if you are running the AC and also another light load inside the trailer, be sure to use a super heavy gauge cord, not any old 14AWG cord. I have been using this 10 AWG one almost continuously for five seasons, I only hook up my heavy 30 amp cord if it is stinky hot and I am stuck at a hook up site with 30 amp power. This cord won’t even get warm with peaks of 18 amps running from my Yamaha generator. It is holding up really well. Write your name on it with a sharpie on it a few spots as a theft deterrent! Polar/Solar 1787 10/3 15-Amp SJEO Outdoor Extension Cord with Lighted End, 25-Foot the lighted ends are a nice touch, they tell at a glance if the other end is “hot”. Did you look at your truck owners manual about adapters? John Davies Spokane WA1 point
-
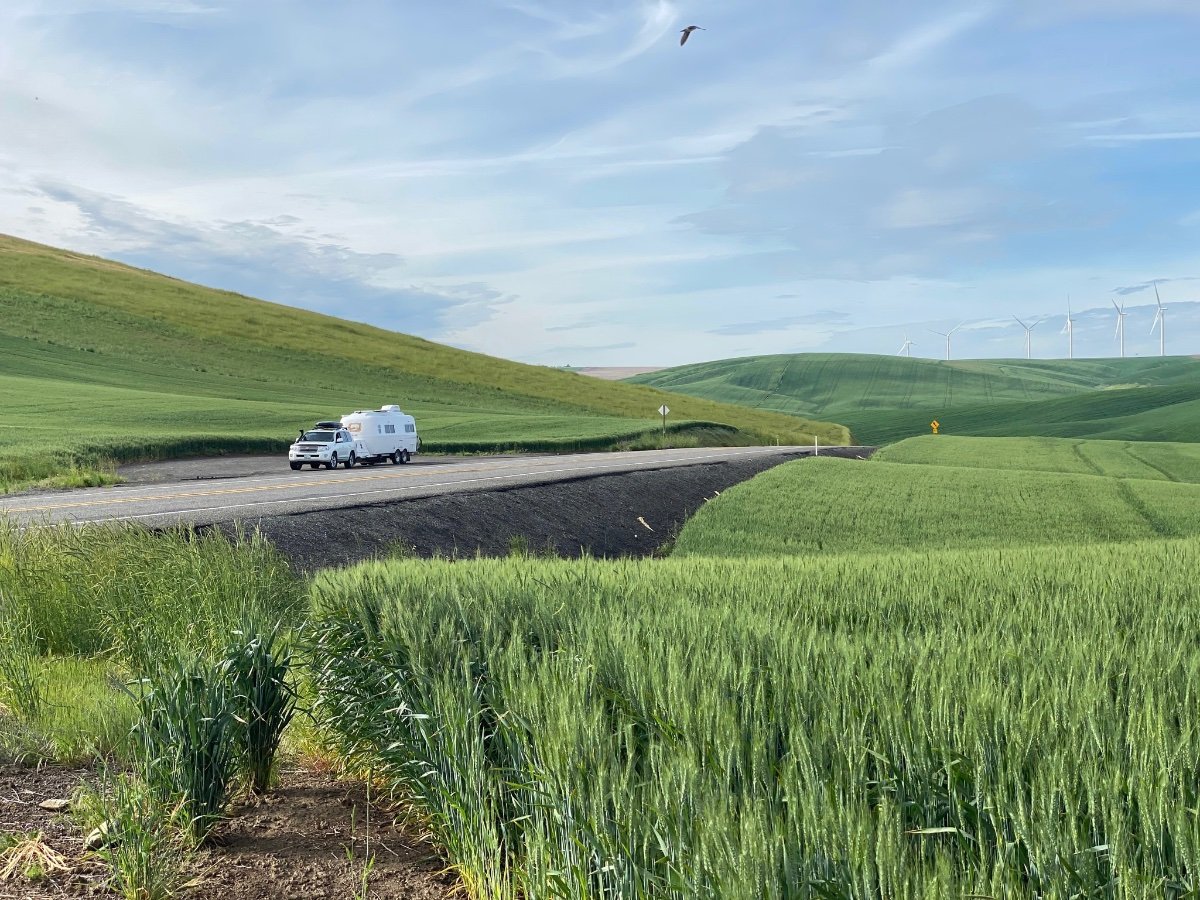
My wife took this with her iPhone 11, no retouching at all except a very slight adjustment of the Brilliance. South central Washington Palouse wheat fields on a WA 127 pass between Dayton and Dusty, the day after a bunch of rain. We had a delayed cold and dry Spring, then it got warm and very wet and the fields just exploded. I have lived here for nearly two decades, have driven through this area many times, and have never seen it so lush and vibrant. The stems are about four feet high and no irrigation is used. Look closely for a couple of cool “Easter eggs”. John Davies Spokane WA
1 point
-
Love this idea, thanks. Paula1 point
-
Command Strip products are awesome in the Ollie. If you havent checked them out yet, Tooletries makes a shower storage line that works in the Ollie as much more than just shower accessories. I have two of the “Henry” holders in the bed area of my trailer to hold all of the remotes. They are silicone so do not scratch and also have several of the “Arnold” hooks around inside the trailer for string lights, keys, etc. In the shower, the “Frank” holds the shampoo and conditioner on the wall and out of the way. https://tooletries.com/collections/shower-bath-organization Also just ordered two of these for the living area https://30watt.com/products/sudski It is fun finding new things to make life inside the Ollie more dialed-in1 point
-
Well, there's the rub. Warranty from recpro voided if ez start installed. Doesn't matter to me, now, as we are now over a year past install, so out of warranty anyway. Plus, I've never used an ac on generator, other than in a motorhome rental or delivery. But, it's not our general practice to modify/void warranty on expensive investments. If I were someone who wanted to try the Houghton, I'd probably try it for at least six months without the ez start. In our experience, most problems show up after install, within the first few months of use. I have yet to find any evidence that houghton has attained an rvia or the Canadian certification, so that may be the reason you only see aftermarket installs. Again, doesn't bother me, with established products. Our truckfridge isn't. Our 2nd set of solar panels aren't. But, when your trailer is your own, and in its 15th year, you can choose your battles. A manufacturer can't, if they desire to keep rvia certification.1 point
-
Jason confirmed that 43 ft lbs is correct, and he forwarded my ticket to Engineering for review. Maybe there will be a future technical bulletin about regular checking. I wonder how many “broken” jacks have been replaced that were in fact still OK - they were just bound up inside from too much side motion at the frame. If the repair was done at the factory, an Ollie guy might have noted the loose fasteners. I doubt that an RV repairman would notice enough to say, “hey, I’ll tighten them up to see if it starts working right…!” John Davies Spokane WA1 point
-
I have had the same issue with the front jack. I am glad you mentioned this because I did not think to check the rear ones yet. I will do that tomorrow. Please let us know if you find get a torque value from Oliver. Thank you.1 point


-
Recent Achievements
-
")


