Leaderboard


Popular Content
Showing content with the highest reputation on 05/05/2023 in all areas
-
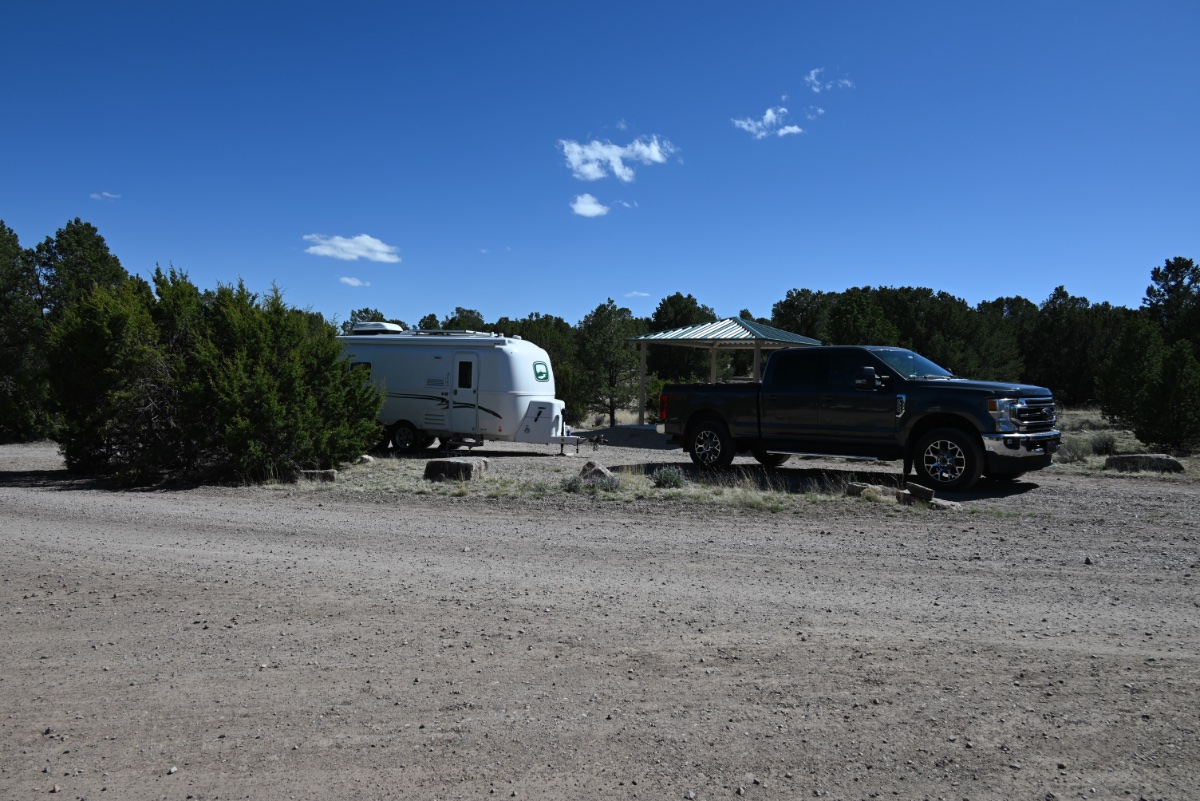
This campground (Datil Well Recreation Area) is highly recommended. Price is excellent at $5 per night or $2.50 per night if you have a National Parks Senior Pass. It has at least three clean pit toilets, a central water supply, back-in and pull-through sites, roof-over picnic tables at each site with a concrete platform, fire pit, decent privacy, beautiful surroundings, and (believe it or not) wifi access. They don't take reservations and there are over twenty sites. There were several sites available when we got here yesterday. A couple of sites have electricity but these are usually occupied according to the campground host. Sites are not all level and are gravel driveways. Handicapped site is level and poured concrete. This is what I would call luxurious boondocking!6 points
-
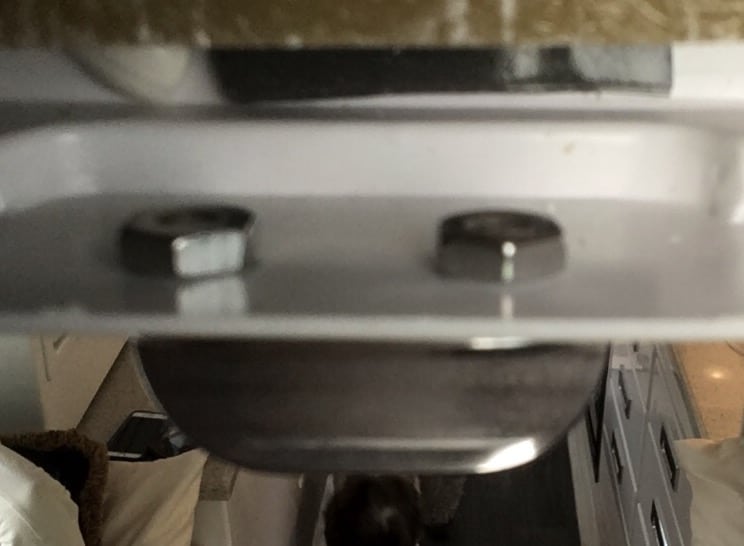
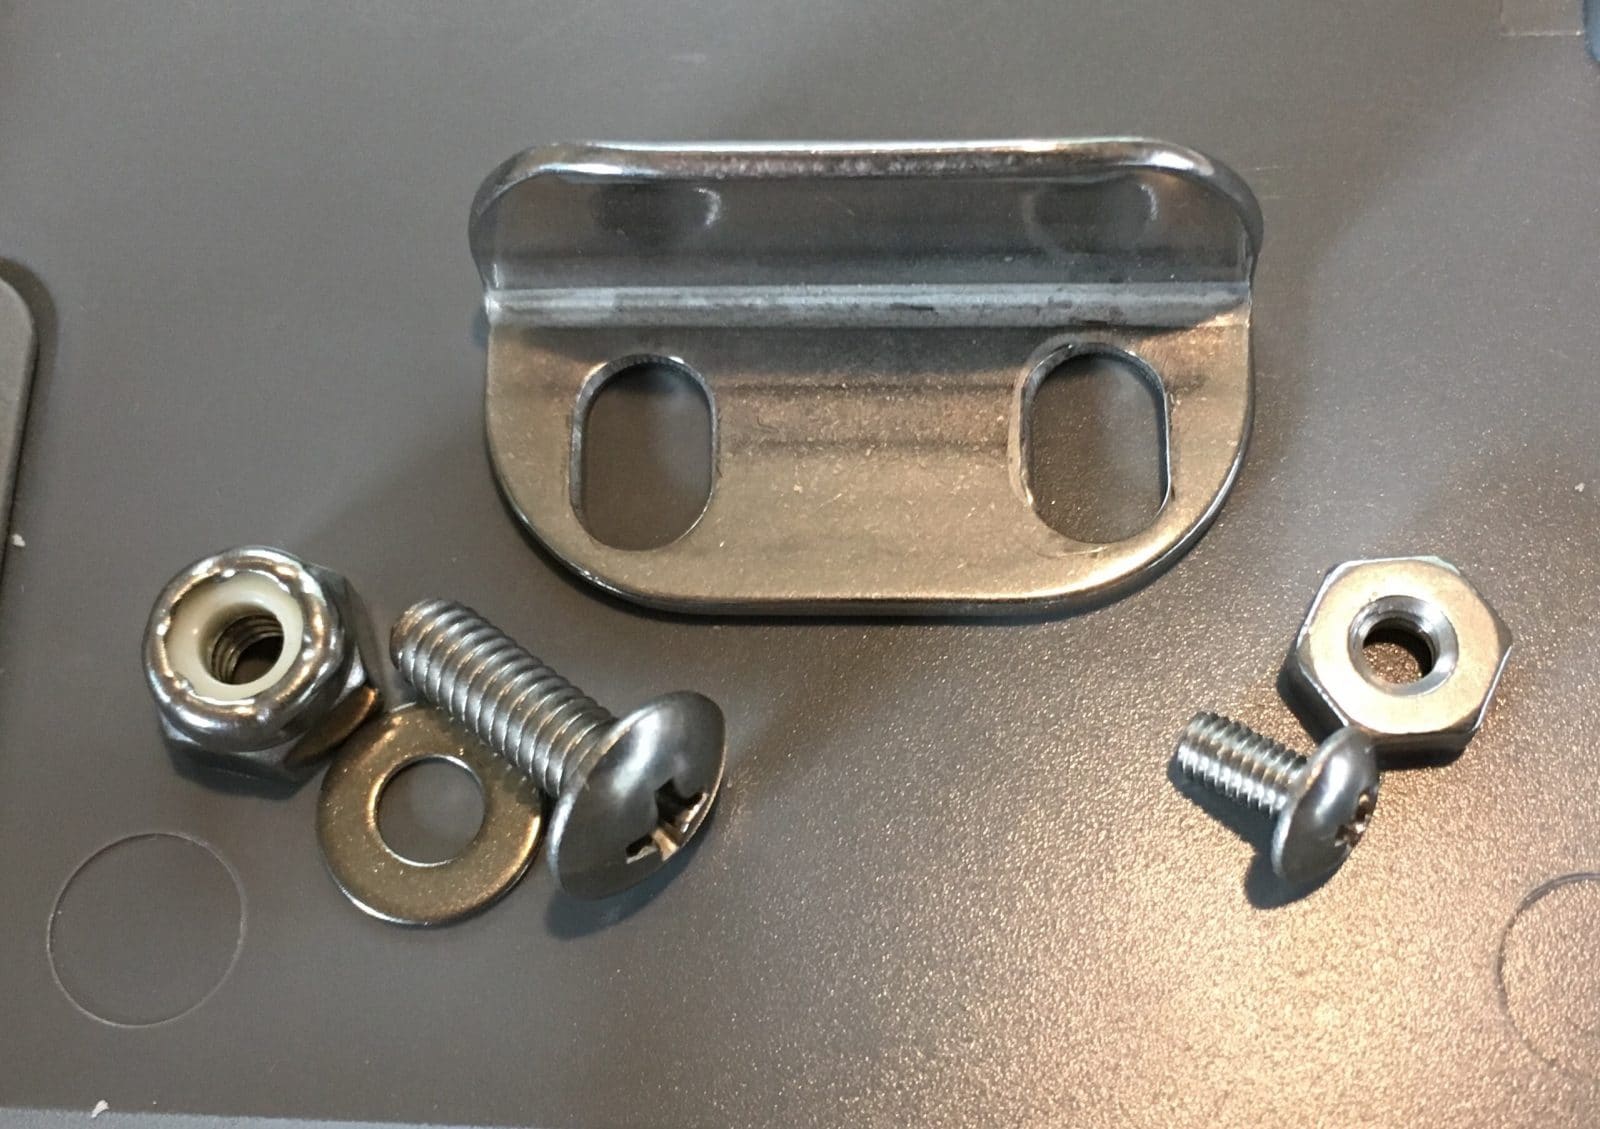
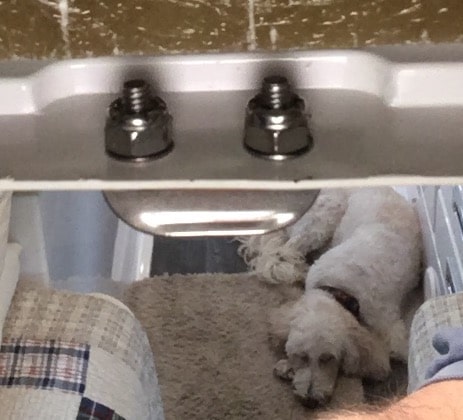
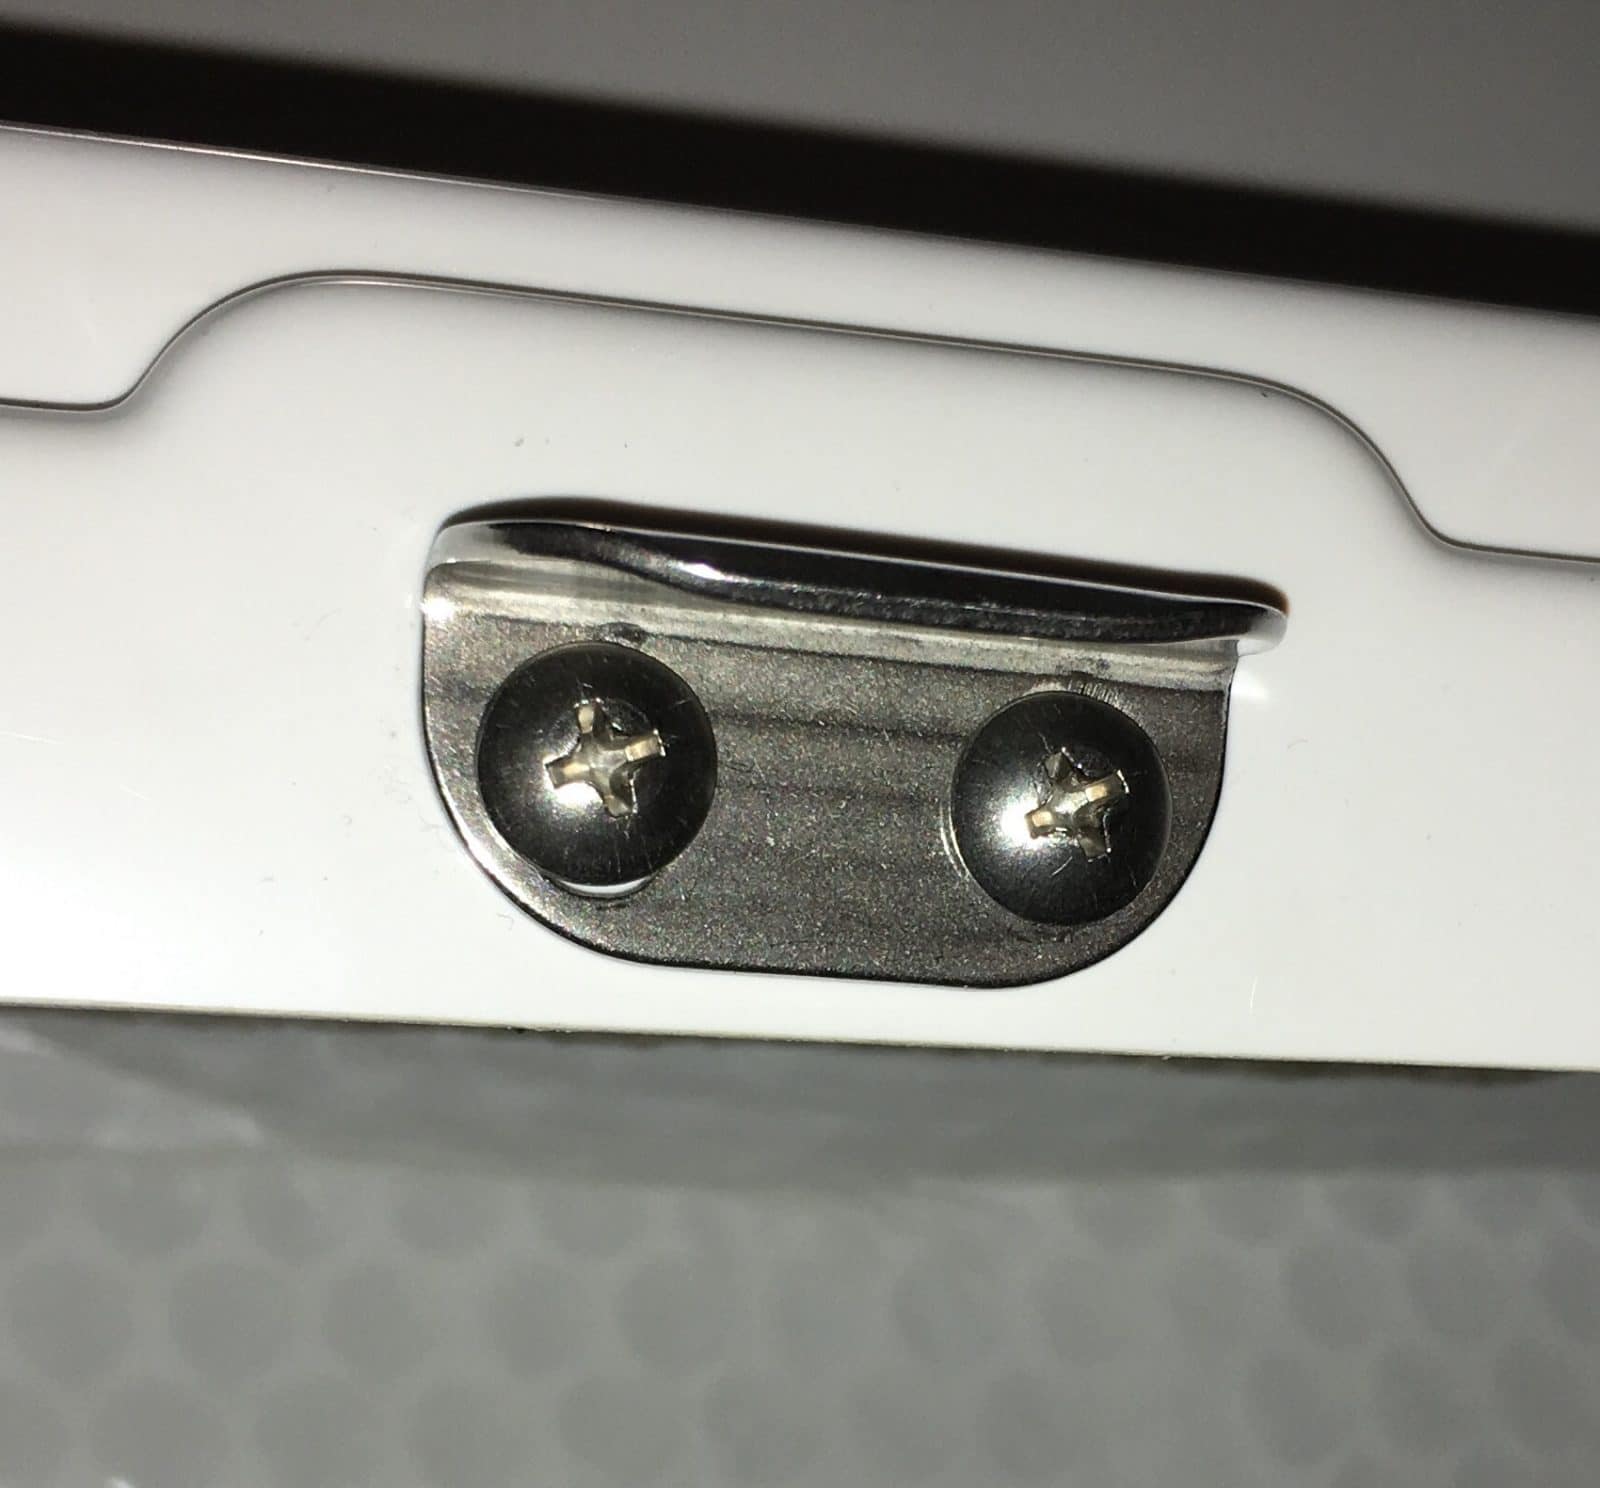
I started finding stray hardware in my overhead cabinets, I took a closer look and found this: The holes are sized for a number 8 screw. The installed hardware is a number 4 FINE thread screw with a number 6 COARSE thead plain nut run down it. Whoever did this had his head in a very strange place indeed. The plain nuts rattle loose and the screws fall out. Then your expensive door can bang open and break out the hinge screws or worse. Simply unbelieveable! Here are the 8-32 x 3/4 stainless panhead screws and nylock (self locking) nuts that I installed. The washers are optional: For most of the latch plates I was able to get them to adjust back far enough to eliminate play. Some ran out of adjustment (probably the reason the too-small screws were installed) so for those I ground part of the head off the screws and also filed the slots in the brackets a little longer, so I could get more travel back.. I also checked and tightened as needed all the hinge screws. Please check your hardware, let us know here if you find the wrong size installed. Thanks, John Davies Spokane WA
 4 points
 -
Four AGM 6V FLA batteries will weigh about 265 pounds. Conservatively, you will have about 200 usable Ah. Three Battle Born 100 Ah batteries (this all that will easily fit into the existing battery tray) will weigh about 95 pounds and you will have essentially 300 usable Ah. One of Oliver's installed GTX12V315A-E2107-CS200 optional battery packs will weigh about 68 pounds and you will have essentially 315 usable Ah.* One of Oliver's installed GTX12V630A-E2112-CS200 optional battery packs will weigh about 128 pounds and you will have essentially 630 usable Ah.* * You should probably limit your use to no more than 90% of capacity4 points
-
I'm kind of loving my 2008 puck switched lights, not "touch lights."4 points
-
In 4 more days an early Christmas, Birthday, Anniversary…. 😳😂
4 points
-
And, is that now balanced port to starboard with the electric (lighter) fridge? It's all a balance game, as we all know. Personally, I'd be more concerned about 160 lbs up forward, on one side/off center, with 160 pounds of water in the closet. . Nothing balancing the other side, on tongue weight , with an elite I. Maybe not as much of an issue, with your 2's.3 points
-
I agree. We have enjoyed most of our post-purchase upgrades for a very long time. The biggest was our solar upgrade, Labor Day week, 2008, to 200 watts solar. What a game changer, for boondocking! It's great that we can continue to upgrade, isn't it? (We now have 400+ watts solar, fixed.) 16 seasons in, we never really feel left behind, unless we want to be.3 points
-
Any batteries, I'd try to balance it. First off,,those 5 gallon containers in the TV. Not possible in the tv? 2 in the closet, two in the shower, all strapped in somehow, or wedged. In our little Elite 1, I'd hate the extra 160 pounds forward adding to tongue weight. Hence, our full water containers ride in the truck.3 points
-
It appears Air Tags worked in this particular tracking situation. Crime never pays. https://www.foxnews.com/us/airtag-helps-illinois-law-enforcement-track-men-accused-stealing-over-1-million-from-armored-truck3 points
-
That weight goes in our truck bed. Like @Katjo the closet is reserved for shoes.. (and jackets) We're always mindful of too much weight in the closet, or shower floor. And, want to keep it balanced.3 points
-
Great, so I can bring all my shoes!😂😜3 points
-
The factory replied. They said the closet has a frame cross beam under the closet and putting 165-lbs in the bottom of the closet is ok. They did caution to be mindful of the additional tongue weight.3 points
-
Picked up my trailer in July 2020. The tap lights were all good. They only came on when I tapped them, whether or not I had flipped the master switch. Then, one day about a year later, they all mysteriously went dim and stayed on. I opened a ticket and service sent me new ones, including a little rivet gun. I removed the old ones and replaced with the new ones. I discovered the new ones always came on whenever I flipped the master switch. Service told me that they'd changed vendors or something and the lights they sent me were different than the ones installed. They also said that they will go on whenever the master switch is flipped, whether or not I've tapped each individual light. That's just the way the new product works. Hope this helps.3 points
-
In the apple orchard at Red apple farm on Rt 2. Our first Harvest Host night. Fantastic
2 points
-
There are six more scattered around the interior… all different, of course. John Davies Spokane WA
2 points
-
I am solo boondocking at a remote site on Lake Roosevelt, and I found this little guy in my attic. Sorry, I can’t say where this is, or I would have to shoot you, it is the best site in the best CG around here. Completely deserted this time of the year, probably because the lake level is 30 feet below the end of the boat ramp. John Davies Spokane WA
2 points
-
I bought similar from a marine store site. I'll see if I can find it, but I did replace one a few years ago. In the bathroom, it really wouldn't be a big deal if it were a slightly different look. I bought a multi-pack. Used some on the sailboat, a few in the trailer (one replacement, one in the new microwave cavity cabinet.)2 points
-
Same here. Only issue I have is the chrome plating is failing on the bathroom light. I assume replacements for these aren't available anymore?2 points
-
Me too.2 points
-
Exactly! We boondock 50/50% of the time - doesn't matter if it's a long weekend or a multi-week adventure, the TV hauls the 5gal treated water containers. We love how easy it is filling the OTT's fresh water tank procedure vs. what we had to do in the AS - no more wasted water after trying to fill the water tank!!! Let's don't forget how nice all the engineering designed features and details we have with Ollie's as compared to all the other SOBs, right?2 points
-
I cleaned our window tracks today. Only the back window had a flexible rubber guide like in the video. The side windows were a harder rubber that I chose not to pull up.2 points
-
I’m always very conscious of how we pack the camper, weight wise I try to keep balance of equal weight front and back, I never want it too heavy in the front because of tow weight nor too heavy in the rear for sway. Most of our heaviest items go in the truck. I agree with @SeaDawg it’s all a balance game.2 points
-
There are a myriad of ways to accomplish our goals. I'm a big believer in using what you already own, if you can reasonably make it work. Congratulations on finding yours.2 points
-
No apologies necessary. Your right upgrades can be spendy! We look at our Ollie as our second home which does take a little bit of the sting out of higher ticket items. 👍🏻😊2 points
-
HA, I found my picture of when I had to charge my house batteries with a Jackery 1000 until the sun came up. LOL. Worked great. Talk about a convenient location for a plug.
2 points
-
That's how we feel, often, on upgrades. Covering all the holiday bases, as it can be so expensive. Sorry I tagged onto a Christmas thread. My apologies.2 points
-
This is consistent behavior with my trailer and also what I was told by Service. I did not, however, have all of my lights go dim - just two of them. I actually sort of like that one light on each side of the trailer comes on when I turn the master switch on. I am keeping my eye out for a better quality light just in case these don't last long.2 points
-
You can try this - loosen the screw on top of the gate that holds the cable. Ensure the outside handle is closed as much as it can then pull the cable from the inside tight, then tighten the screw. If you have time, once you loosen the screw holding the cable on the gate, pull the cable all the way out from the outside. Clean it (I usually use WD40), then wipe some lube on it and reinsert it, feed it through the opening on the gate and tighten the screw. It should operate more smoothly. Steve and Mike M. will be giving a demo at the rally. Steve showed me how to do this years ago. Mike2 points
-
We and our 2023 LE2 will be at the Flagstaff OE this year. The Ollie will be in the Air Force Campground right next door to the expo starting Sunday. Staying with my Brother in law in Flag before that with the Ollie there.2 points
-
connor77, I have replaced (2) one over the sink and one over the stove top. My master switch in my Oliver does not turn on the replacement touch lights after this repair. We still have to gently touch them and voil’a let there be light. Patriot🇺🇸 😄
2 points
-
Yep, that is how I see it works also. Last year while bookdocking, my batteries were approaching 50% soc and Xantrex would not invert. Reading through the manual, I discovered the LBCO soft switch and adjusted the setting several tenths until Xantrex would invert. I was just careful and monitored the soc. I think the value of keeping the Xantrex LBCO at a higher setting is to prevent an unintended battery discharge.....leaving something on or not realizing you're drawing so many amps. It would be unpleasant to discover the soc at zero....might invoke a few frowns...or worse! You can experiment to discover the relationship of soc to LBCO readings on your system and then determine the LBCO to fit your comfort level. If inverting for an extended time, I would also carefully put my hands on battery/Xantrex/other cables to determine if there is a heat build up issue. That might help identify any loose or corroded connection. There can be a corrosive buildup on a connection that is not seen without disassembly for inspection. Steve2 points
-
It will probably be fine as a static load, just don’t hit any potholes or washboard. Check with the factory, I bet they say no. Maybe 10 gallons sitting on an extra piece of 3/4” plywood… John Davies Spokane WaaA2 points
-
Unless you have FLA batteries, you’re putting an additional 160 pounds on the already heavy side. The floor will easily hold up the weight.2 points
-
I don't know if conner77 will have it ready before the end of the rally. We plan on leaving the Alabama Oliver Rally and immediately start slowly heading North to the Maine Oliver Rally. But, I'll be happy to show you how to do it while we're in Booth Bay in June, maybe others will be interested as well.2 points
-
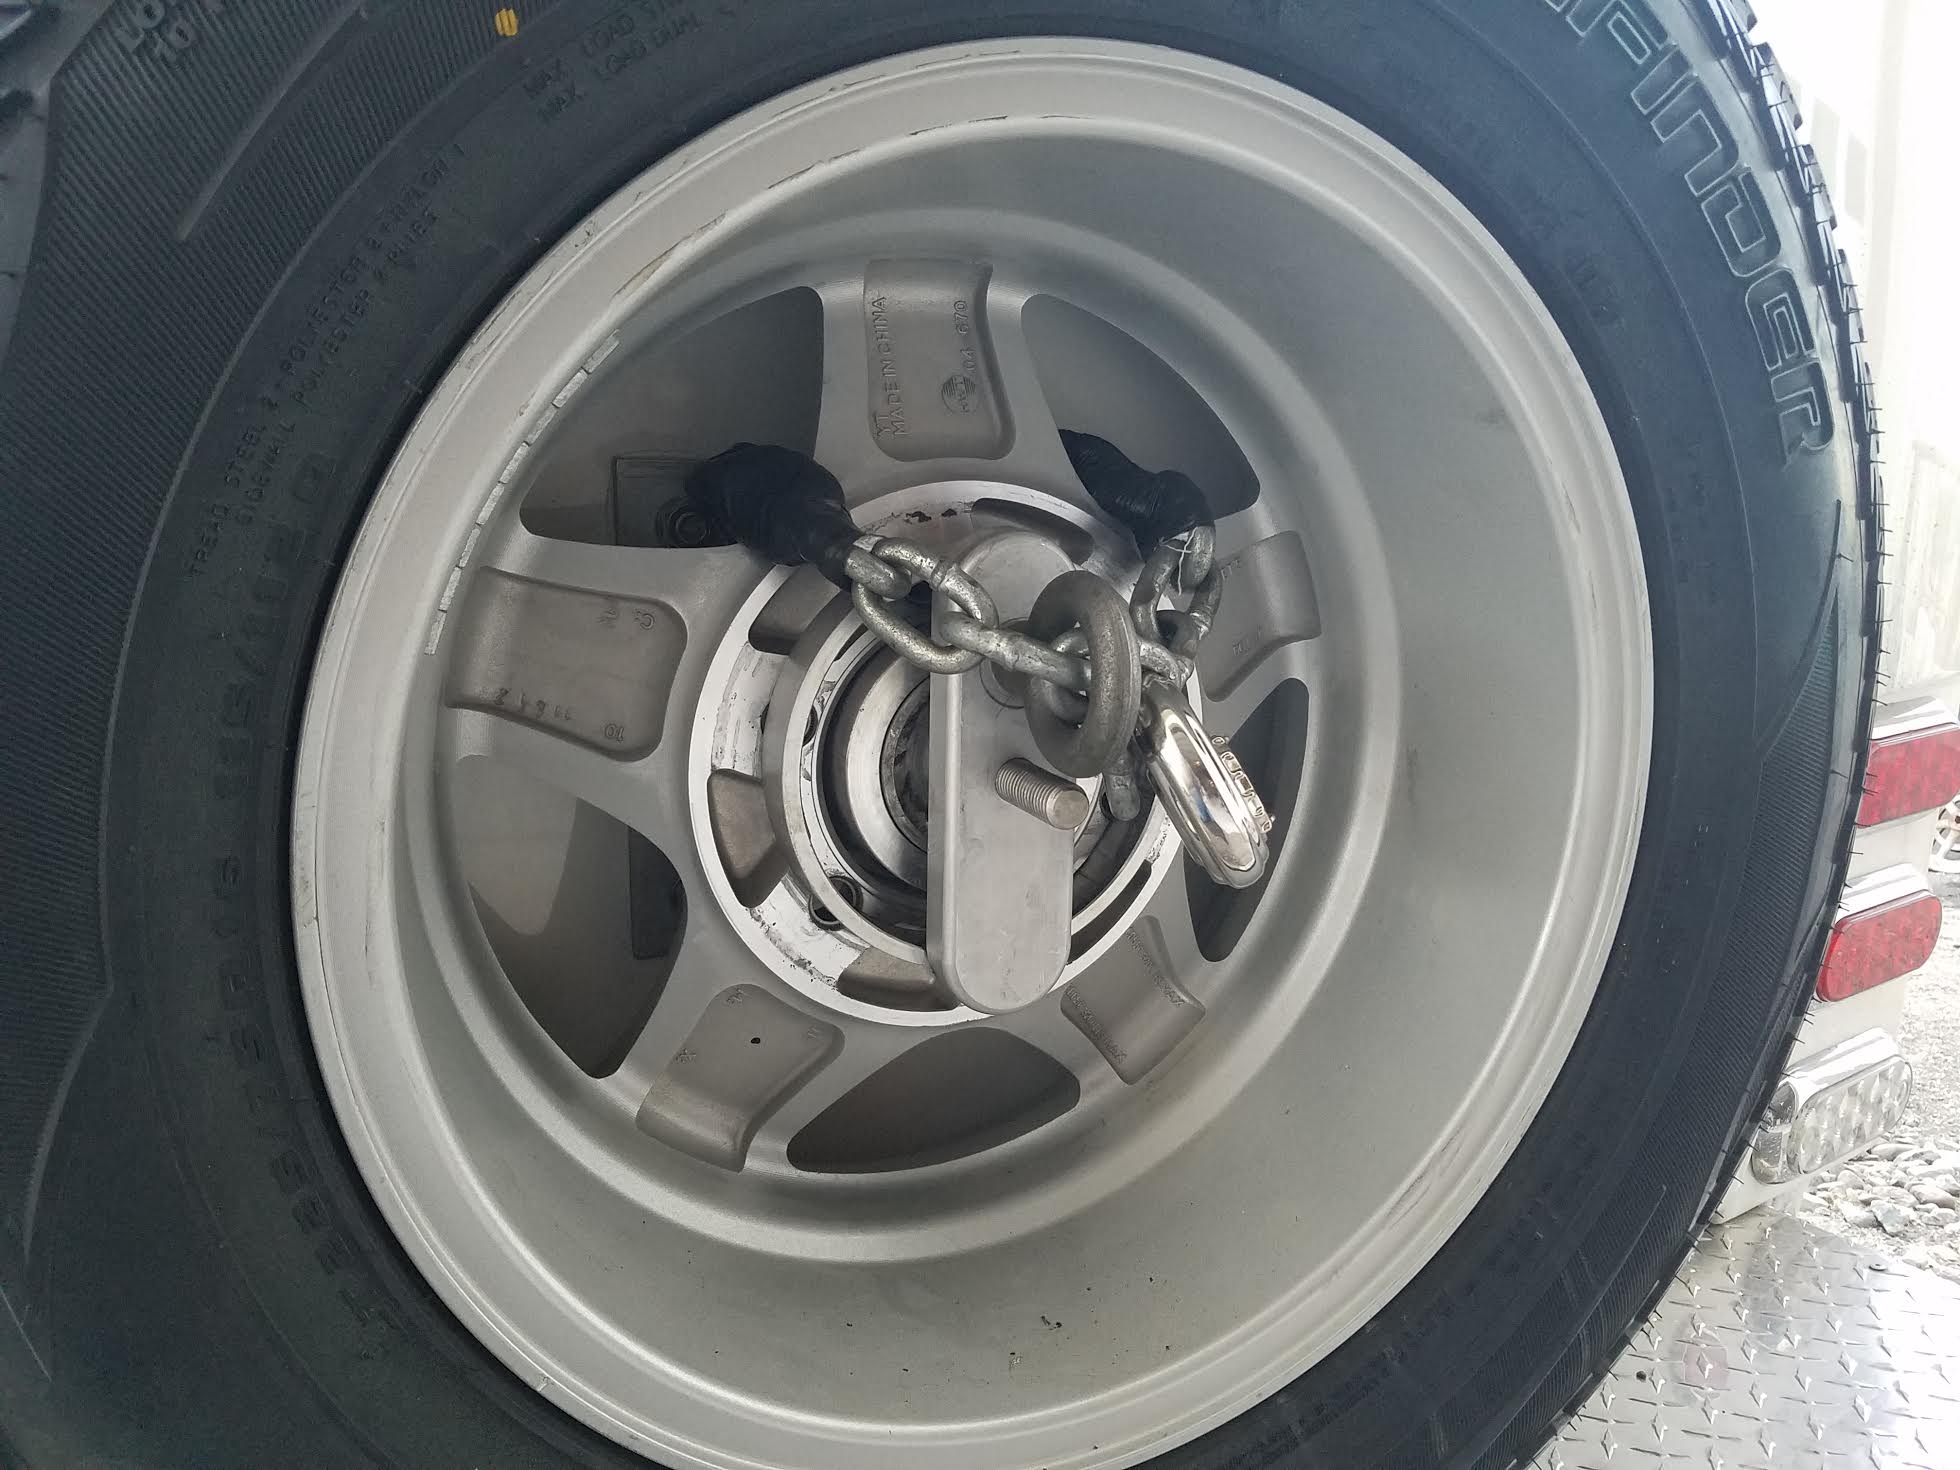
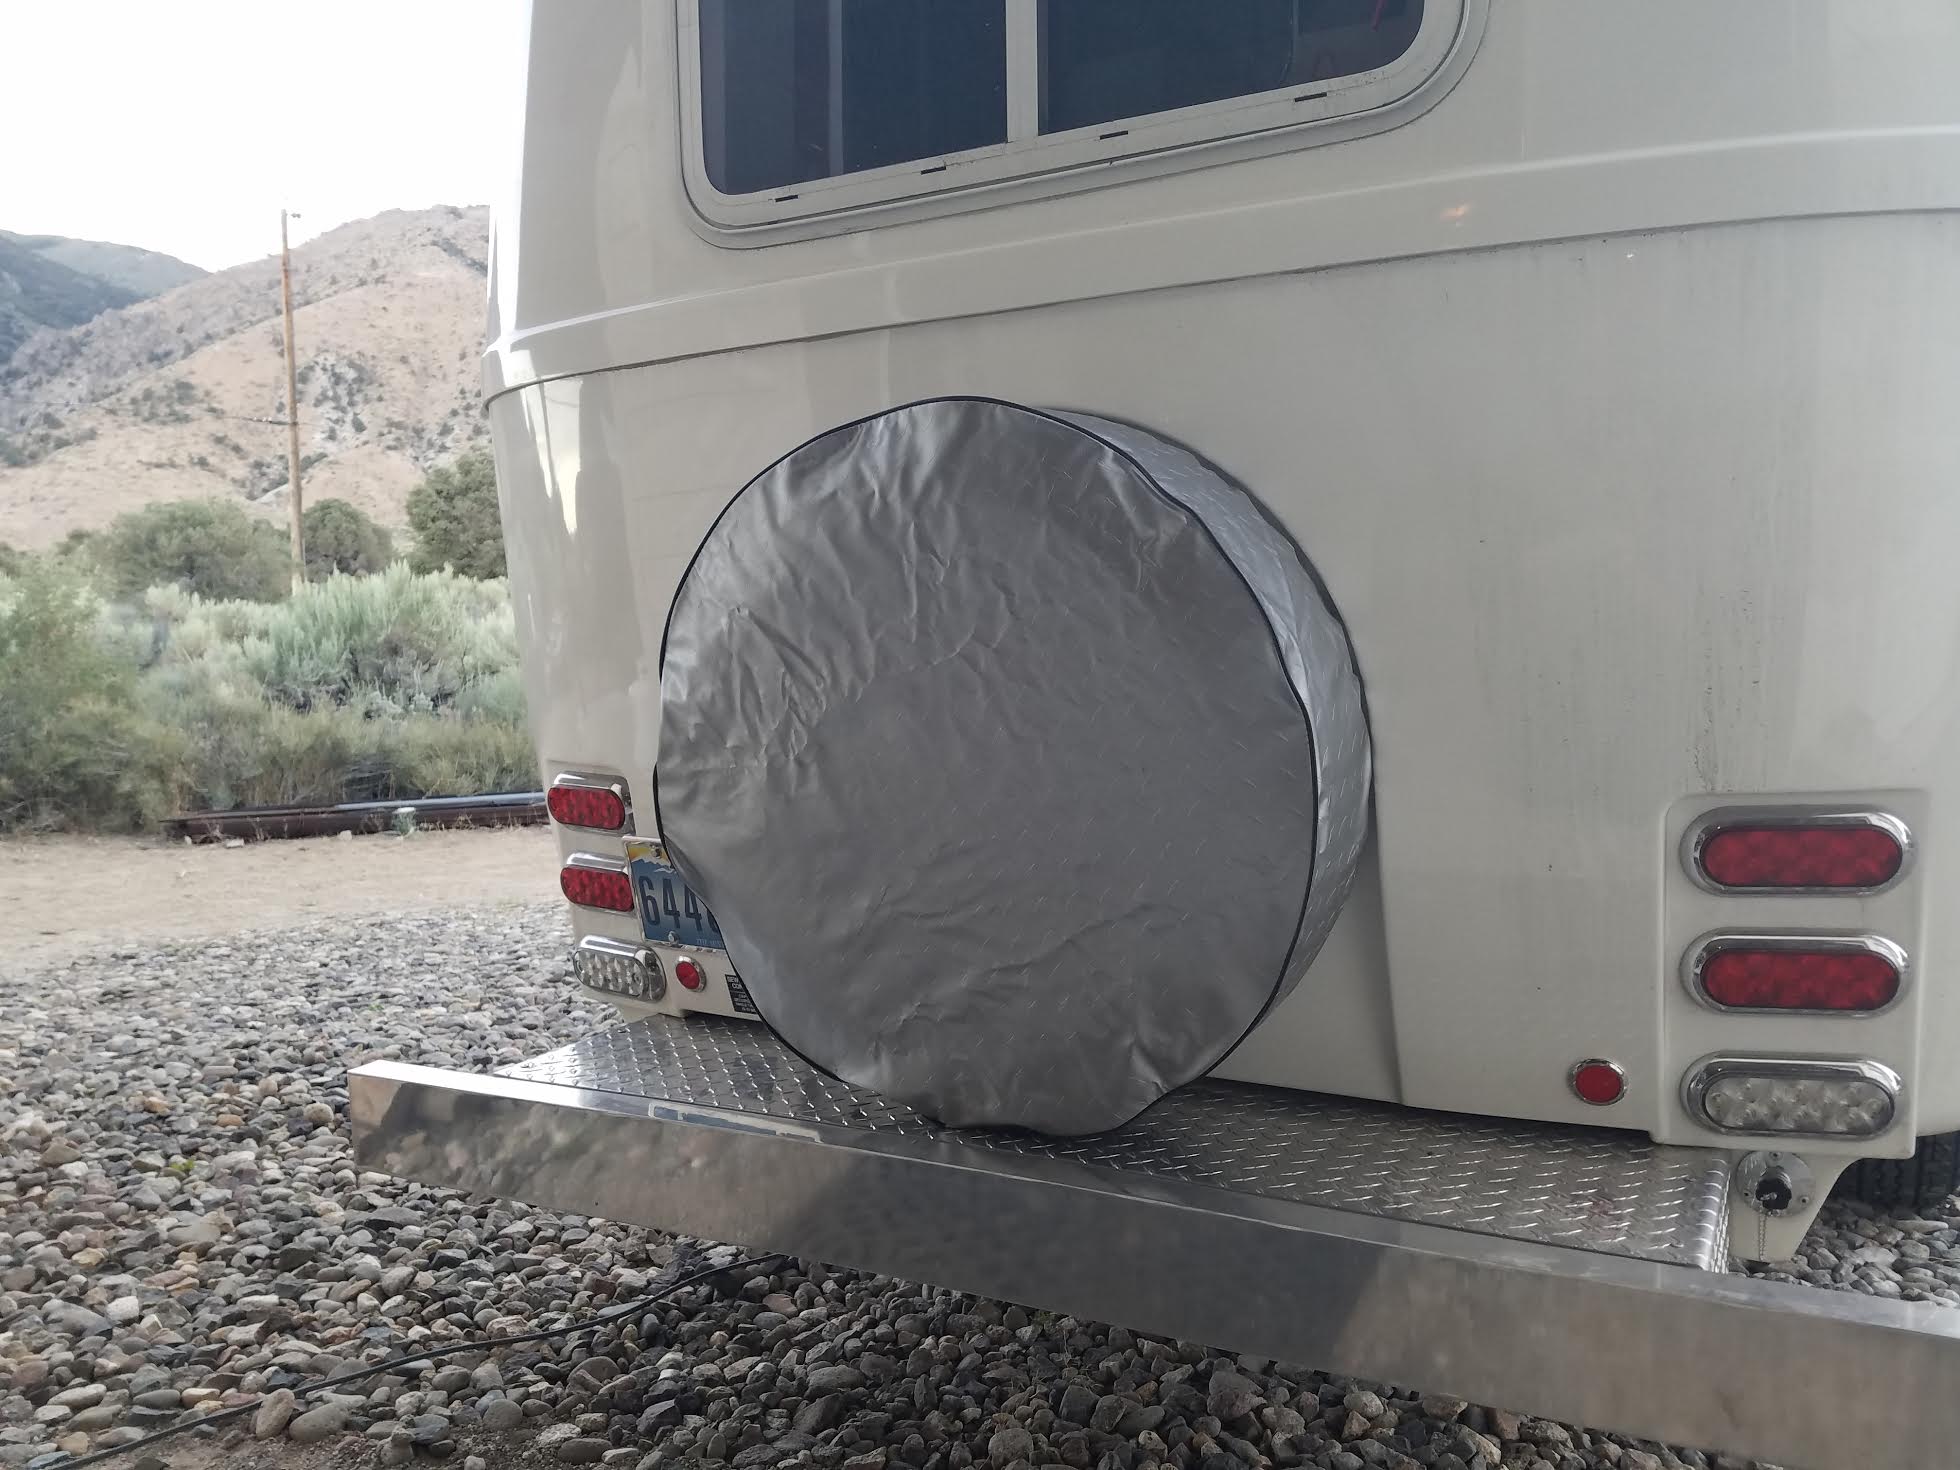
I finally got some pictures of my spare tire modification. Since my trailer had the small sized spare tire and cover, I can not run the fiberglass cover over the full sized spare I now have. There is just enough room under the full sized tire to slip on the cloth tire cover. One slight advantage of the soft cover is that it doesn't stick out beyond the bumper like the fiberglass one does. I also upgraded all five wheels to the star wheel design in the pictures. The locking chain is fixed to the bracket behind the tire and goes through an eye bolt in front that will not allow the wing nut to be removed. If the tire is turned around, the wing nut and locking setup will stick out beyond the tire and the wing nut piece won't tighten up against the wheel to hold it securely. It might be better to change this whole bracket to a more conventional spare tire bracket that would mount the tire with the front out. This would allow for easy tire pressure checks and easier installation of the soft cover.
2 points
-
My LBCO level is set at 12.1V, per Oliver specs.1 point
-
I was under the impression that the new version of the tap lights use a capacitive sensor instead of a mechanical switch...?1 point
-
I believe that Oliver recommends that the Xantrex LBCO (Low Battery Cutoff) to be set to 12.1V for systems such as mine that have the Lithionics battery system. My system suffers from a significant resistance in the high current DC line between the battery and the Xantrex whereby the voltage that the Xantrex sees at it's input terminals is less than the actual voltage seen at the battery terminals which is a problem. The result being that the Xantrex reaches it's LBCO and shuts down prematurely ( because it sees a lower voltage than what's actually at the battery terminals). In a perfect theoretical world there would be zero resistance between the battery and the Xantrex and the voltage at the Xantrex input would be exactly the same as what's measured at the battery terminals, however in the real world there will be some resistance and voltage drop but the system should be designed such that the resistance is as low as possible. To achieve this all the components have to be selected for the lowest resistance possible which includes selecting the proper gauge cables, low resistance circuit breaker, proper grounding, and properly assembled contact surfaces. Given that the Lithionics battery has an internal battery monitor that sets it's "Never Die" voltage (the voltage at which the battery shuts itself down to prevent destructive discharge) at 12.0 V it makes sense that the Xantrex LBCO is set to 12.1V however by doing so it is extremely important to keep the resistance between the battery and the Xantrex as low as possible. It is possible to lower the Xantrex LBCO setting to something lower than the recommended 12.1V since the Xantrex sees a lower voltage than what actually exists at the battery terminals, doing this will allow the Xantrex to operate at higher loads for a longer time , however I do not recommend doing this because it masks the real problem which is an accumulated resistance in the high current DC supply line from the battery to the Xantrex.1 point
-
I use to store it upright in the right aft corner of the closet, but last season I started carrying chairs, MaxTrax, shovel, rake etc in a roof cargo box on the Land Cruiser, so the pole goes up there now. John Davies Spokane WA1 point
-
I went back and reread JD's post about his drawer restraints and replacing the drawer front with the pantry style latch and I now see the relevance between the 2 posts. I will admit to not reading JD's post in it’s entirety as I had previously read his, yours and Reed's version of drawer restraints. So I thought I was up to speed, which reminds me of father's axiom "don’t think, you’ll weaken the ball club". And that reminds me of another of his many axioms, "never resist the opportunity to keep your mouth shut"- nuff said, Mossey1 point
-
Like many I tend to "hope" the products I purchase from known suppliers - like a Fastenal- are better quality -but unfortunately, it appears quality cannot be inferred by the supplier - sad. I use thread lock and never thought about the reduction of torque values - so I learned something here. But I never had a failure either. Were I JD, I would likely replace the bolts, and go at it again. Might do a failure test - may even use a thread lock nut. A fastening engineer, and I've had way to much experience with their "type" :-), would probably start at the calibration and lube issue, then go into some sort of bolt/nut investigation, an on on on on.... Just replace it, and check it regularly is my SOP. Like others, I don't know why Oliver would respond, not their problem, this was a customer installed upgrade. A sensational header would be something like - Warning! Bulldog coupler bolt failure! - Oh wait, that's what I thought was the subject when I first clicked.... Oh well we all know better now. Thanks JD, I did learn something here. keep us in the loop.1 point
-
John had it right @ 80 FT LBS, Found the Fastenal Torque Value calculator: SAE J429 Grade 8 bolt 1/2" coarse thread: Recommended torques: 79.8 FT LBS WET 106.4 FT LBS Dry https://www.fastenal.com/en/83/torque-calculator1 point
-
Taking a look at your thread on replacing your coupler, I see that you used anti seize on the bolts. I’ve always been told that when you do that you have to lower your torque setting by 20%. So that’s possibly the answer.1 point
-
Update..... when you raise the back of the frame by lowering the jacks, the hull flexes, which is completely normal, and the clothesline sags. Thus: ***** It is MOST IMPORTANT that you never remove that droop by further tightening the turnbuckle! ***** Doing so would probably cause damage to the front or rear attach points when you raised the jacks back up and the hull settled back into its normal shape. Just saying... please use some common sense if you do this useful mod. John Davies Spokane WA
1 point
-
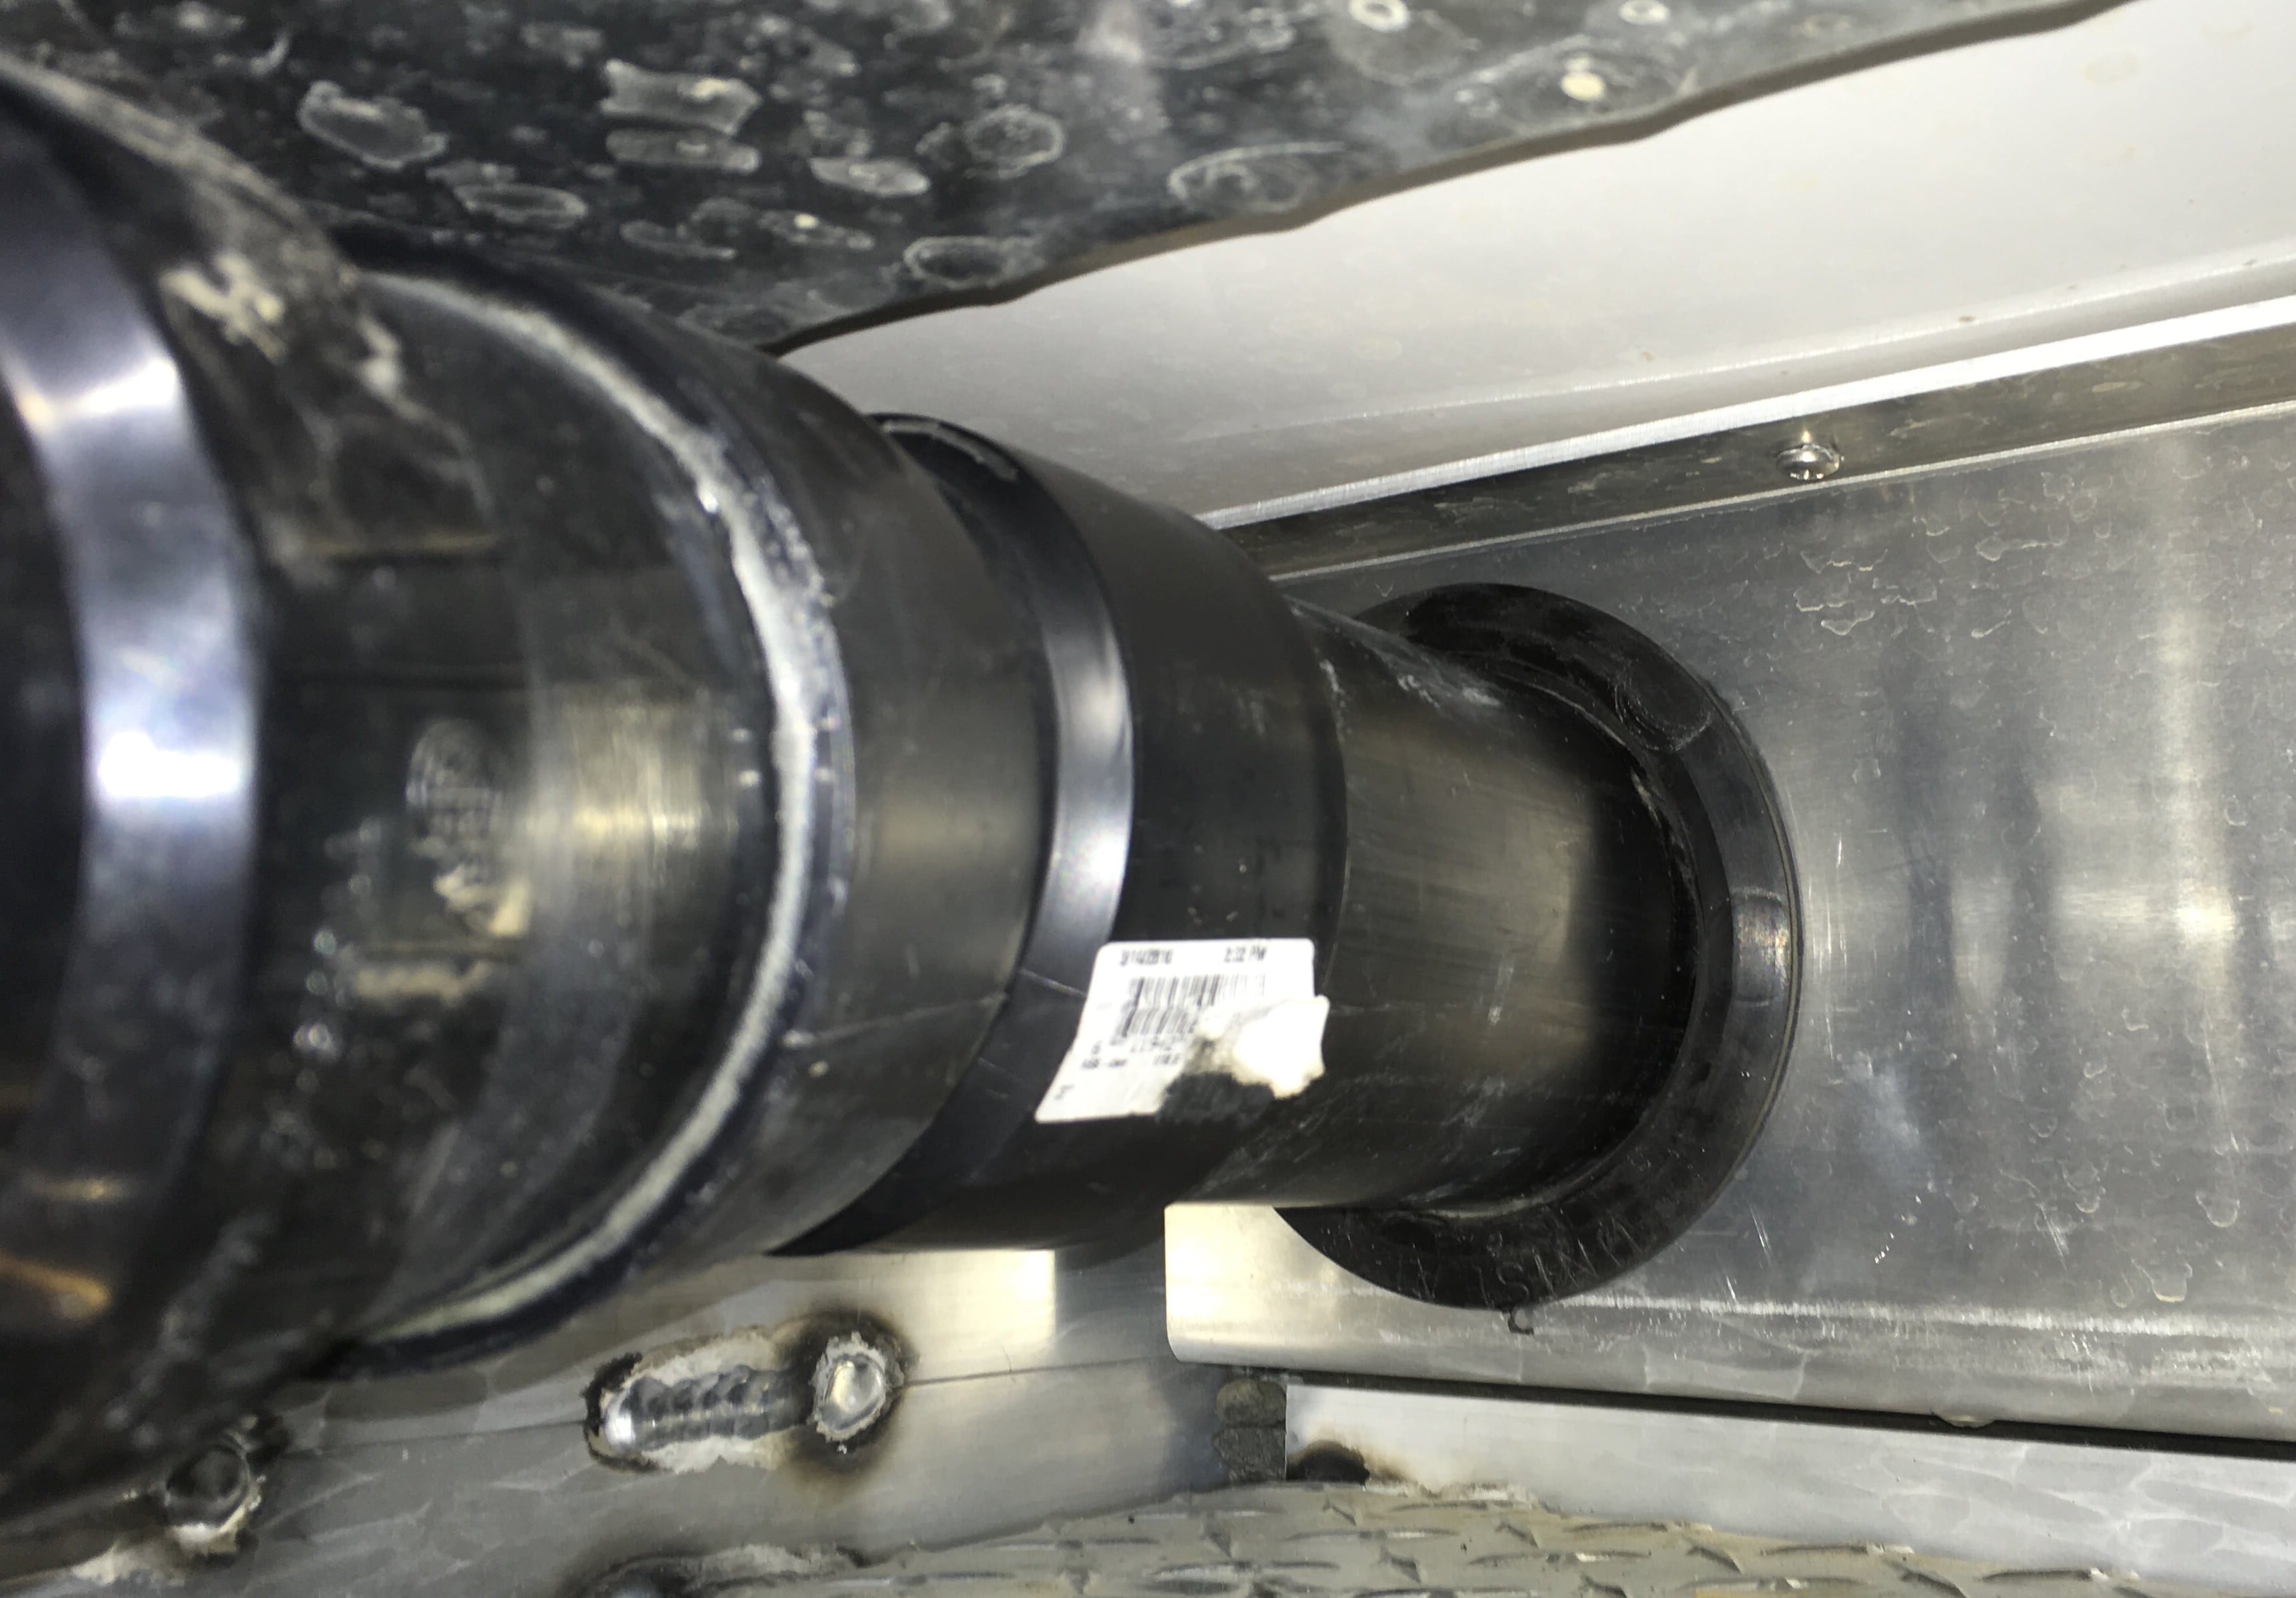
This really embarrasses me because it took 18 months to finally figure out what was going on. The waste pipe has always flopped around and it never occurred to me to get on my knees with a strong flashlight for a close look. I discovered that at the very front (dark) end of the hose compartment is a 5” hole where the 3” pipe exits the trailer. There is supposed to be a big flanged plastic grommet inserted into the hole to seal it. Mine was two inches back on the pipe. It had never been pushed into place. I drove it into position with a wood stick and a big mallet. The last little bit at the 6:00 position was tough, but I wedged a 2x4 under the pipe and finally got the last 30 degrees of grommet to snap firmly into place. Now the pipe does not move, nor will huge amounts of road dust enter there. If your pipe moves at all, check the grommet. It should look like this, fully seated all around. You can feel with a finger if there is a gap anywhere: Fixing it should RADICALLY slow down the nuisance dust buildup in my interior compartment: I will vacuum the dust out once more to see if it is stopped for good. This is what typically comes out of that rear compartment after dusty roads: John Davies Spokane WA
1 point
-
Stainless steel Banjo TC-331 just snug. Not tight. Bill
1 point
-
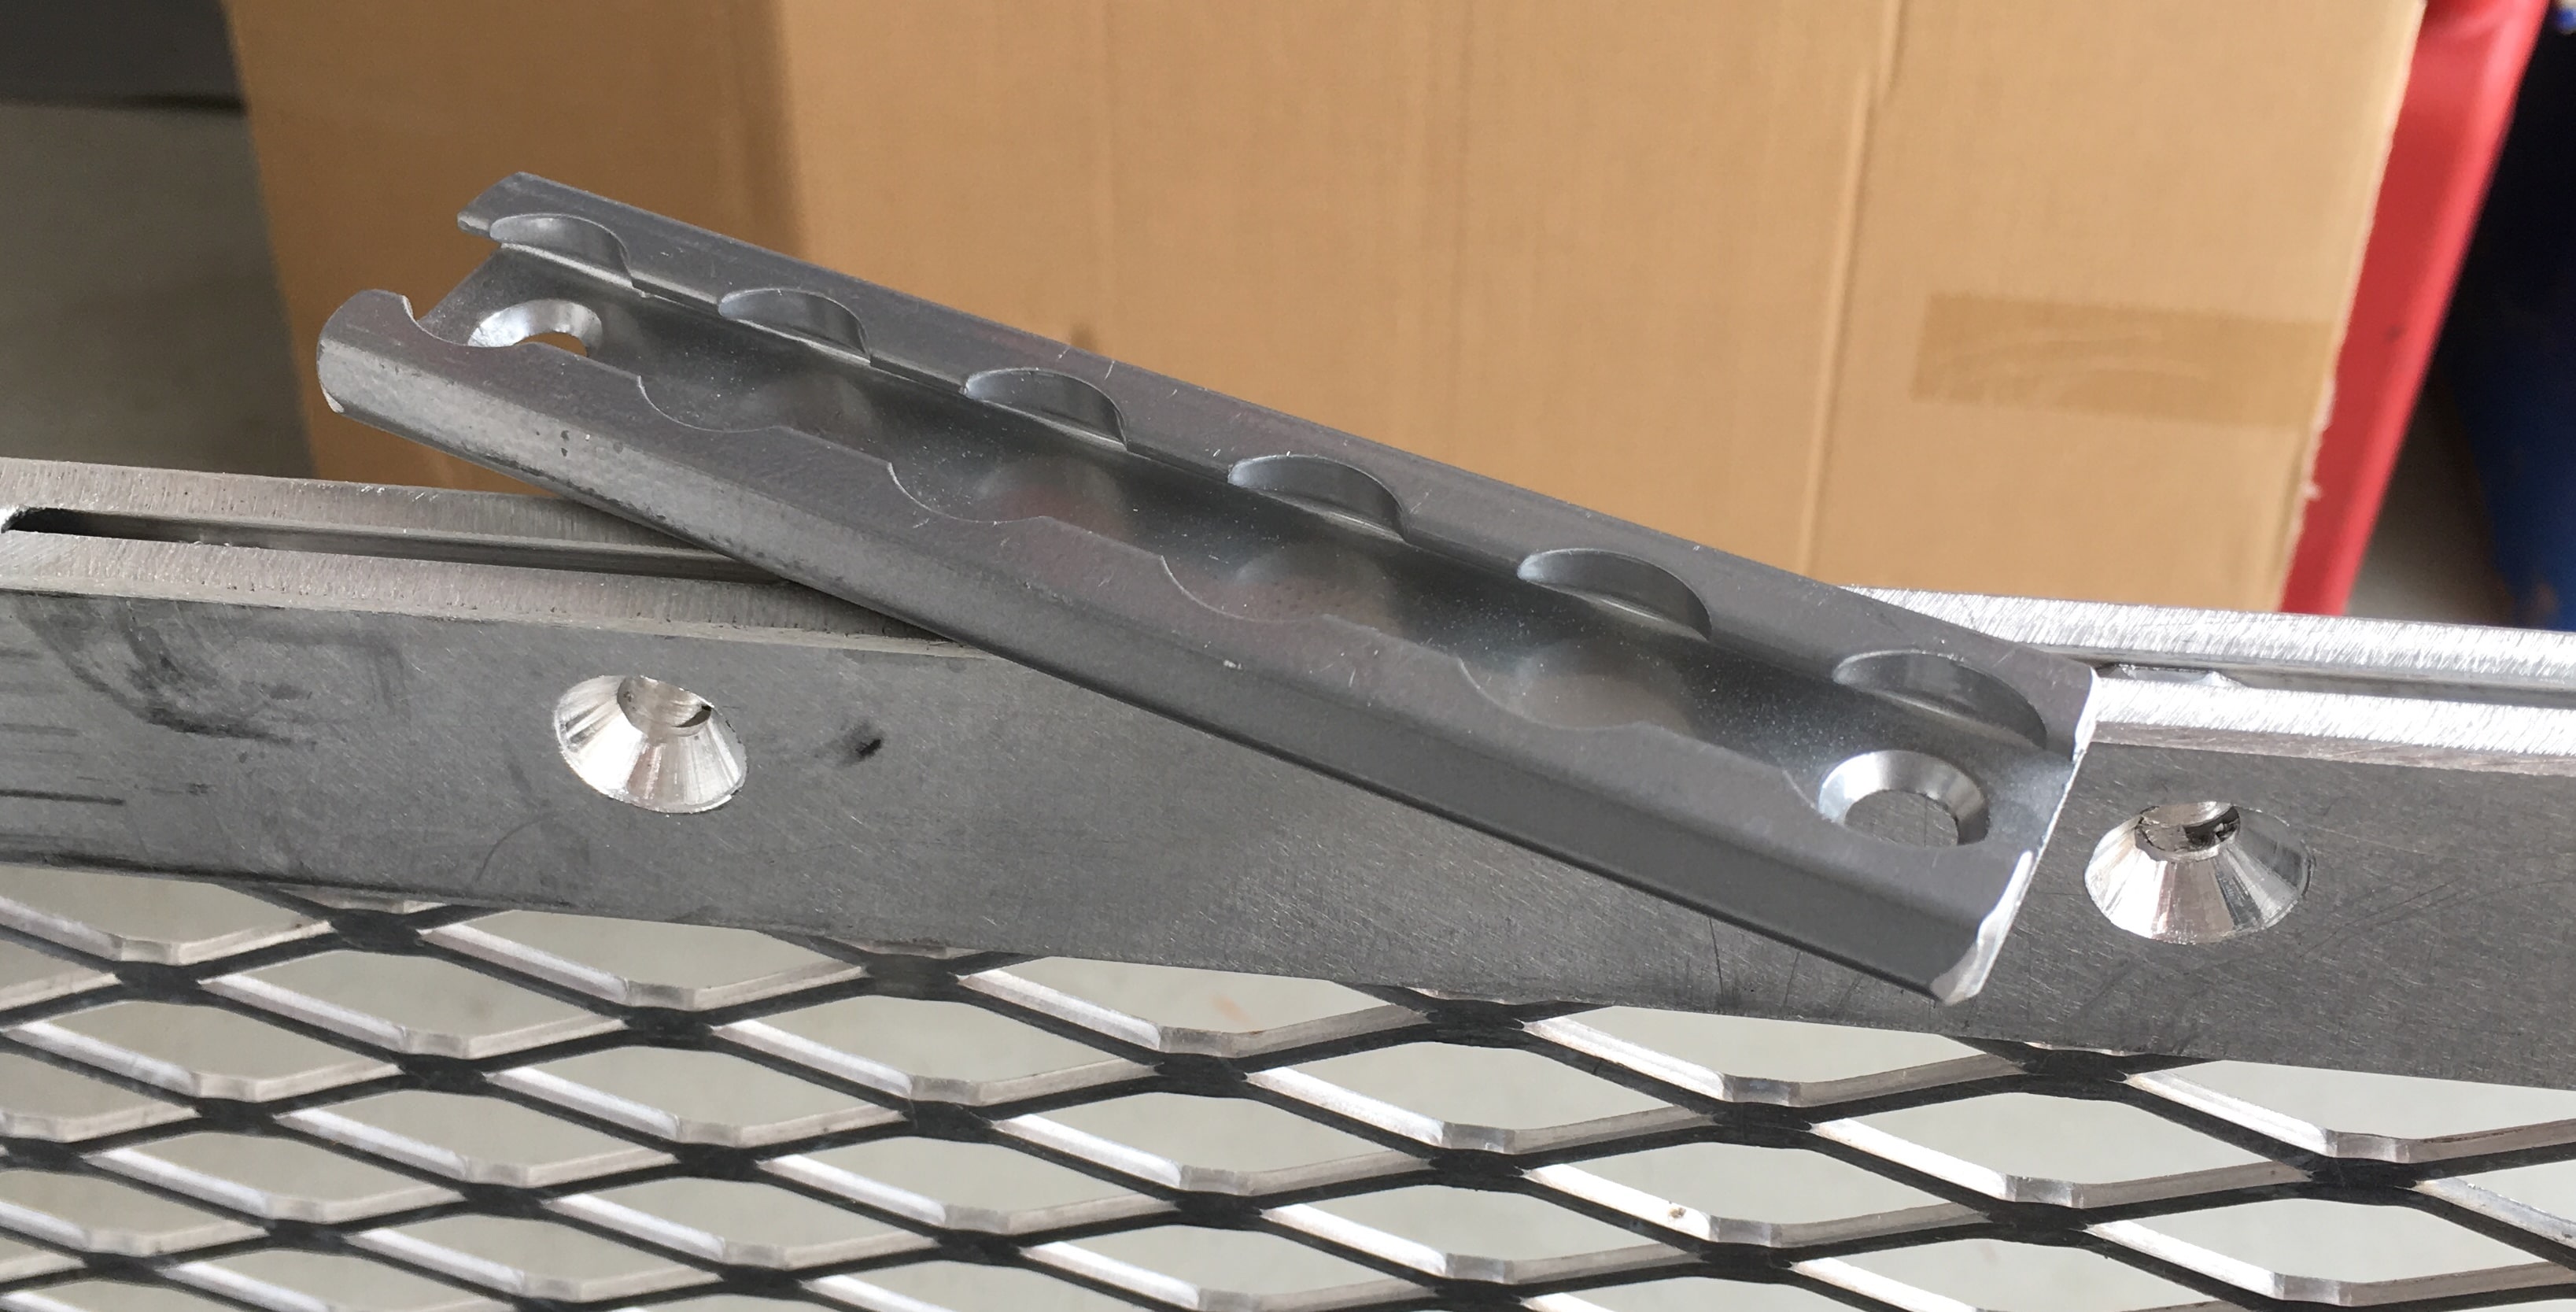
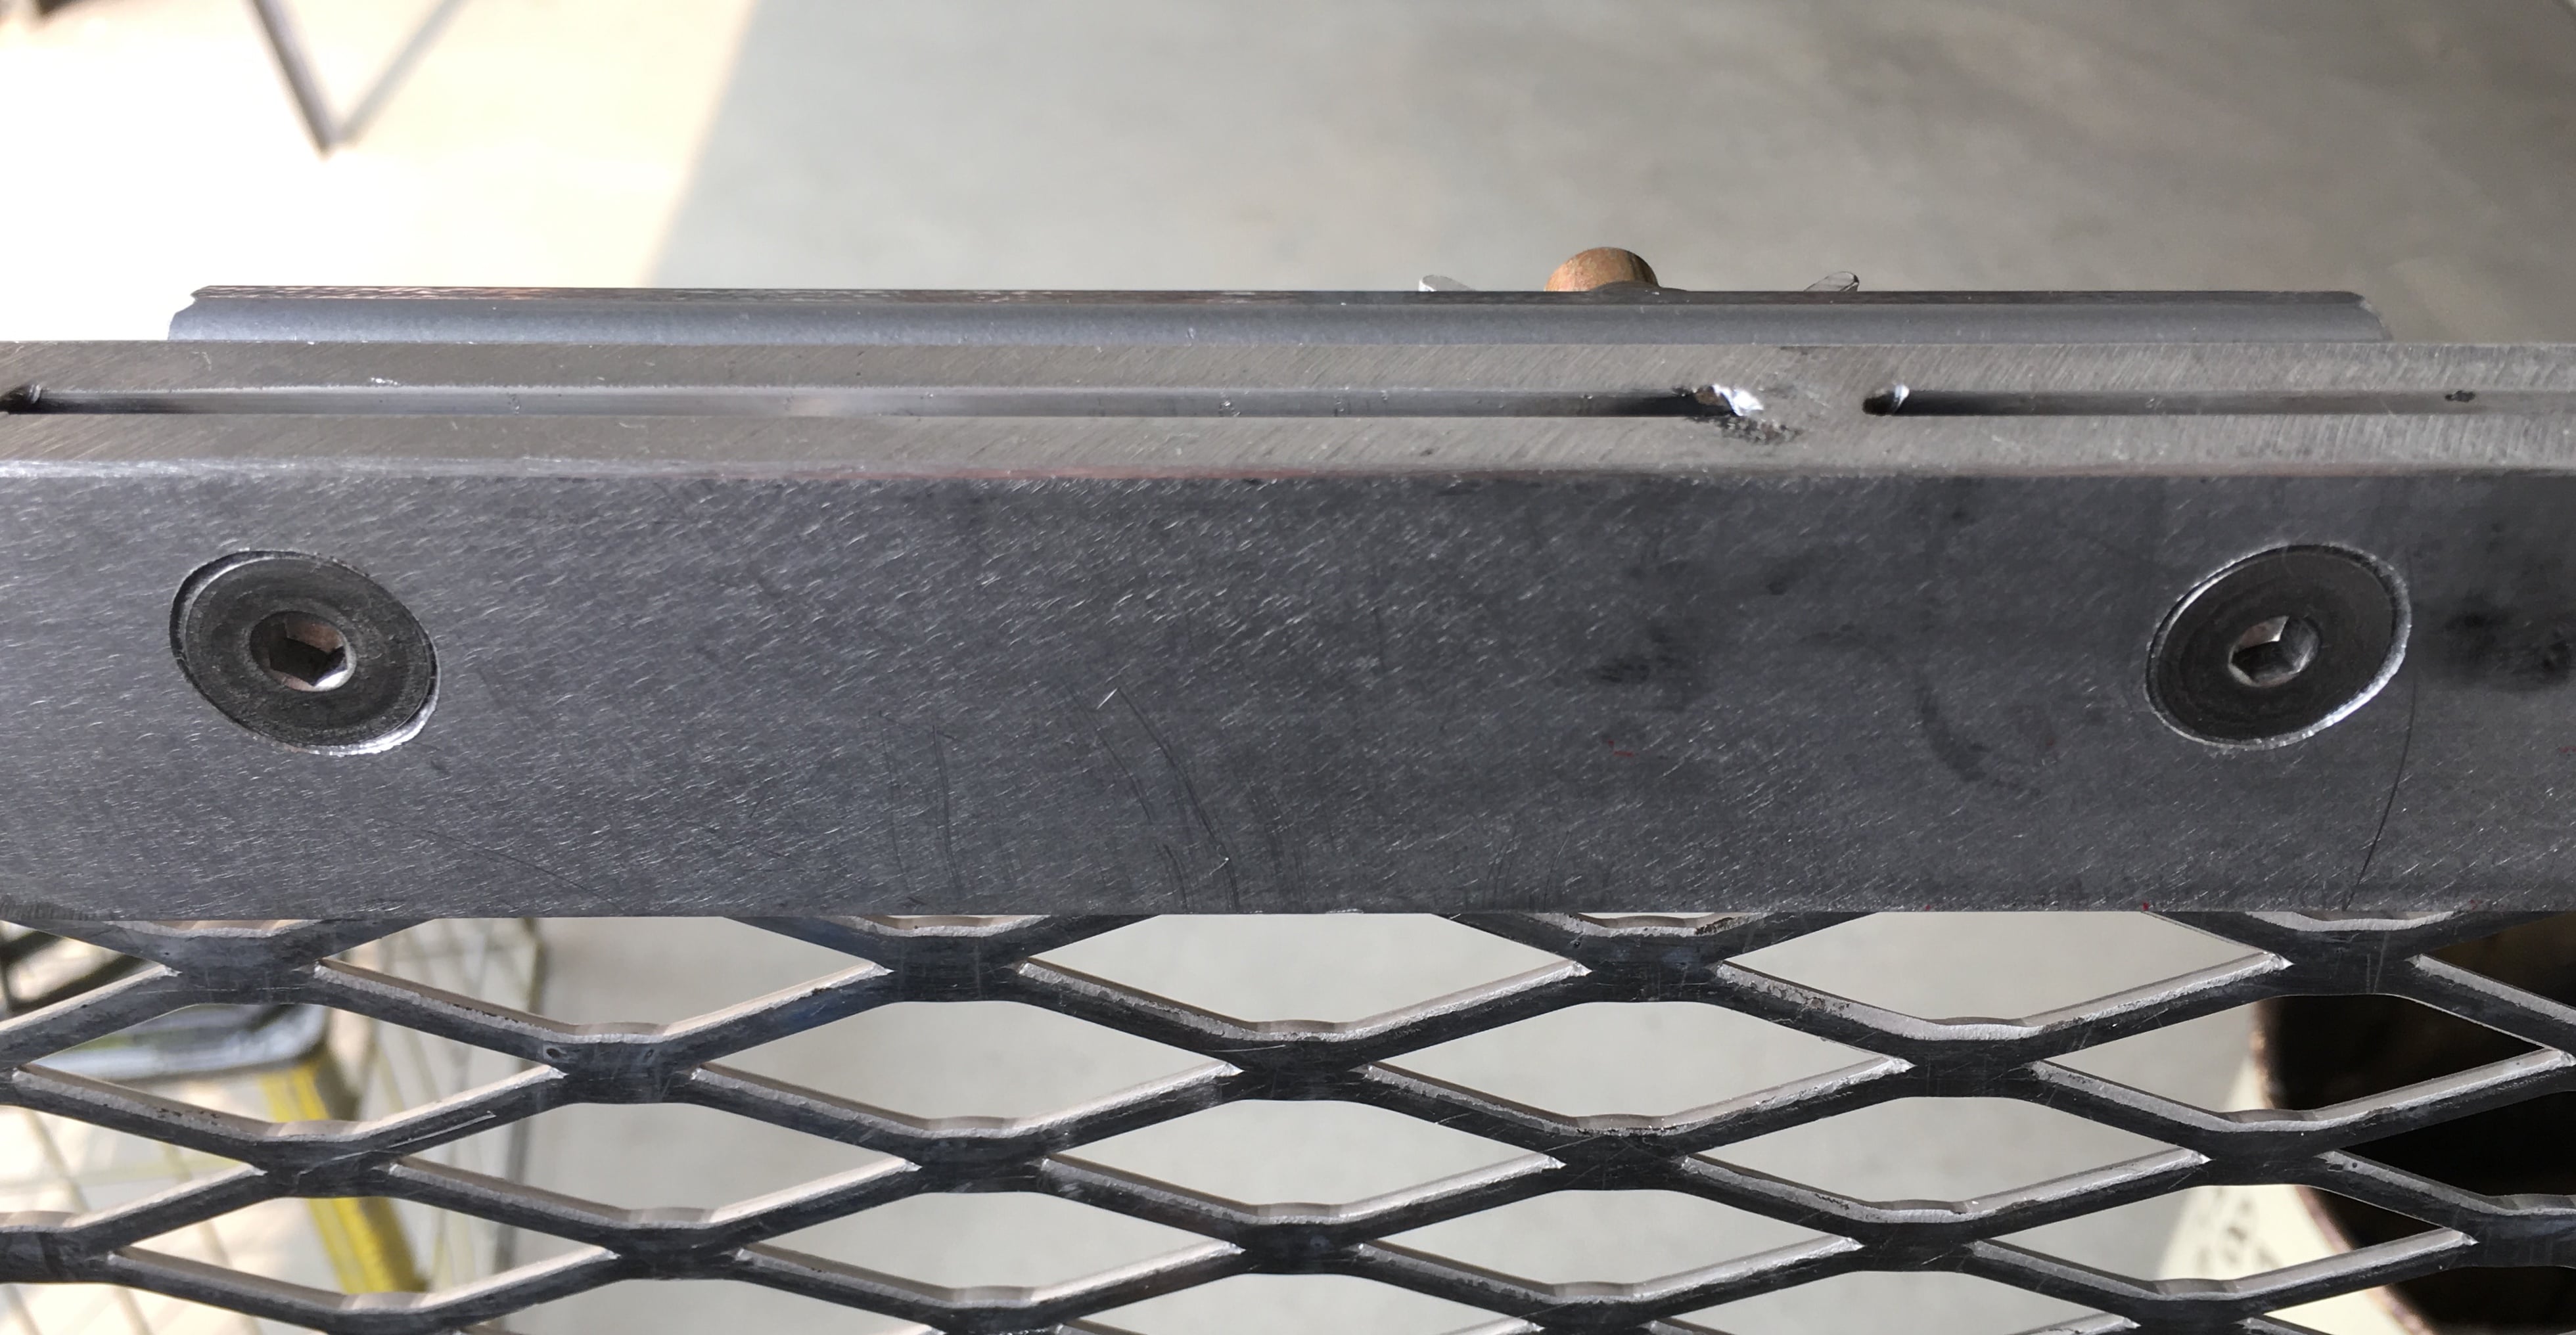
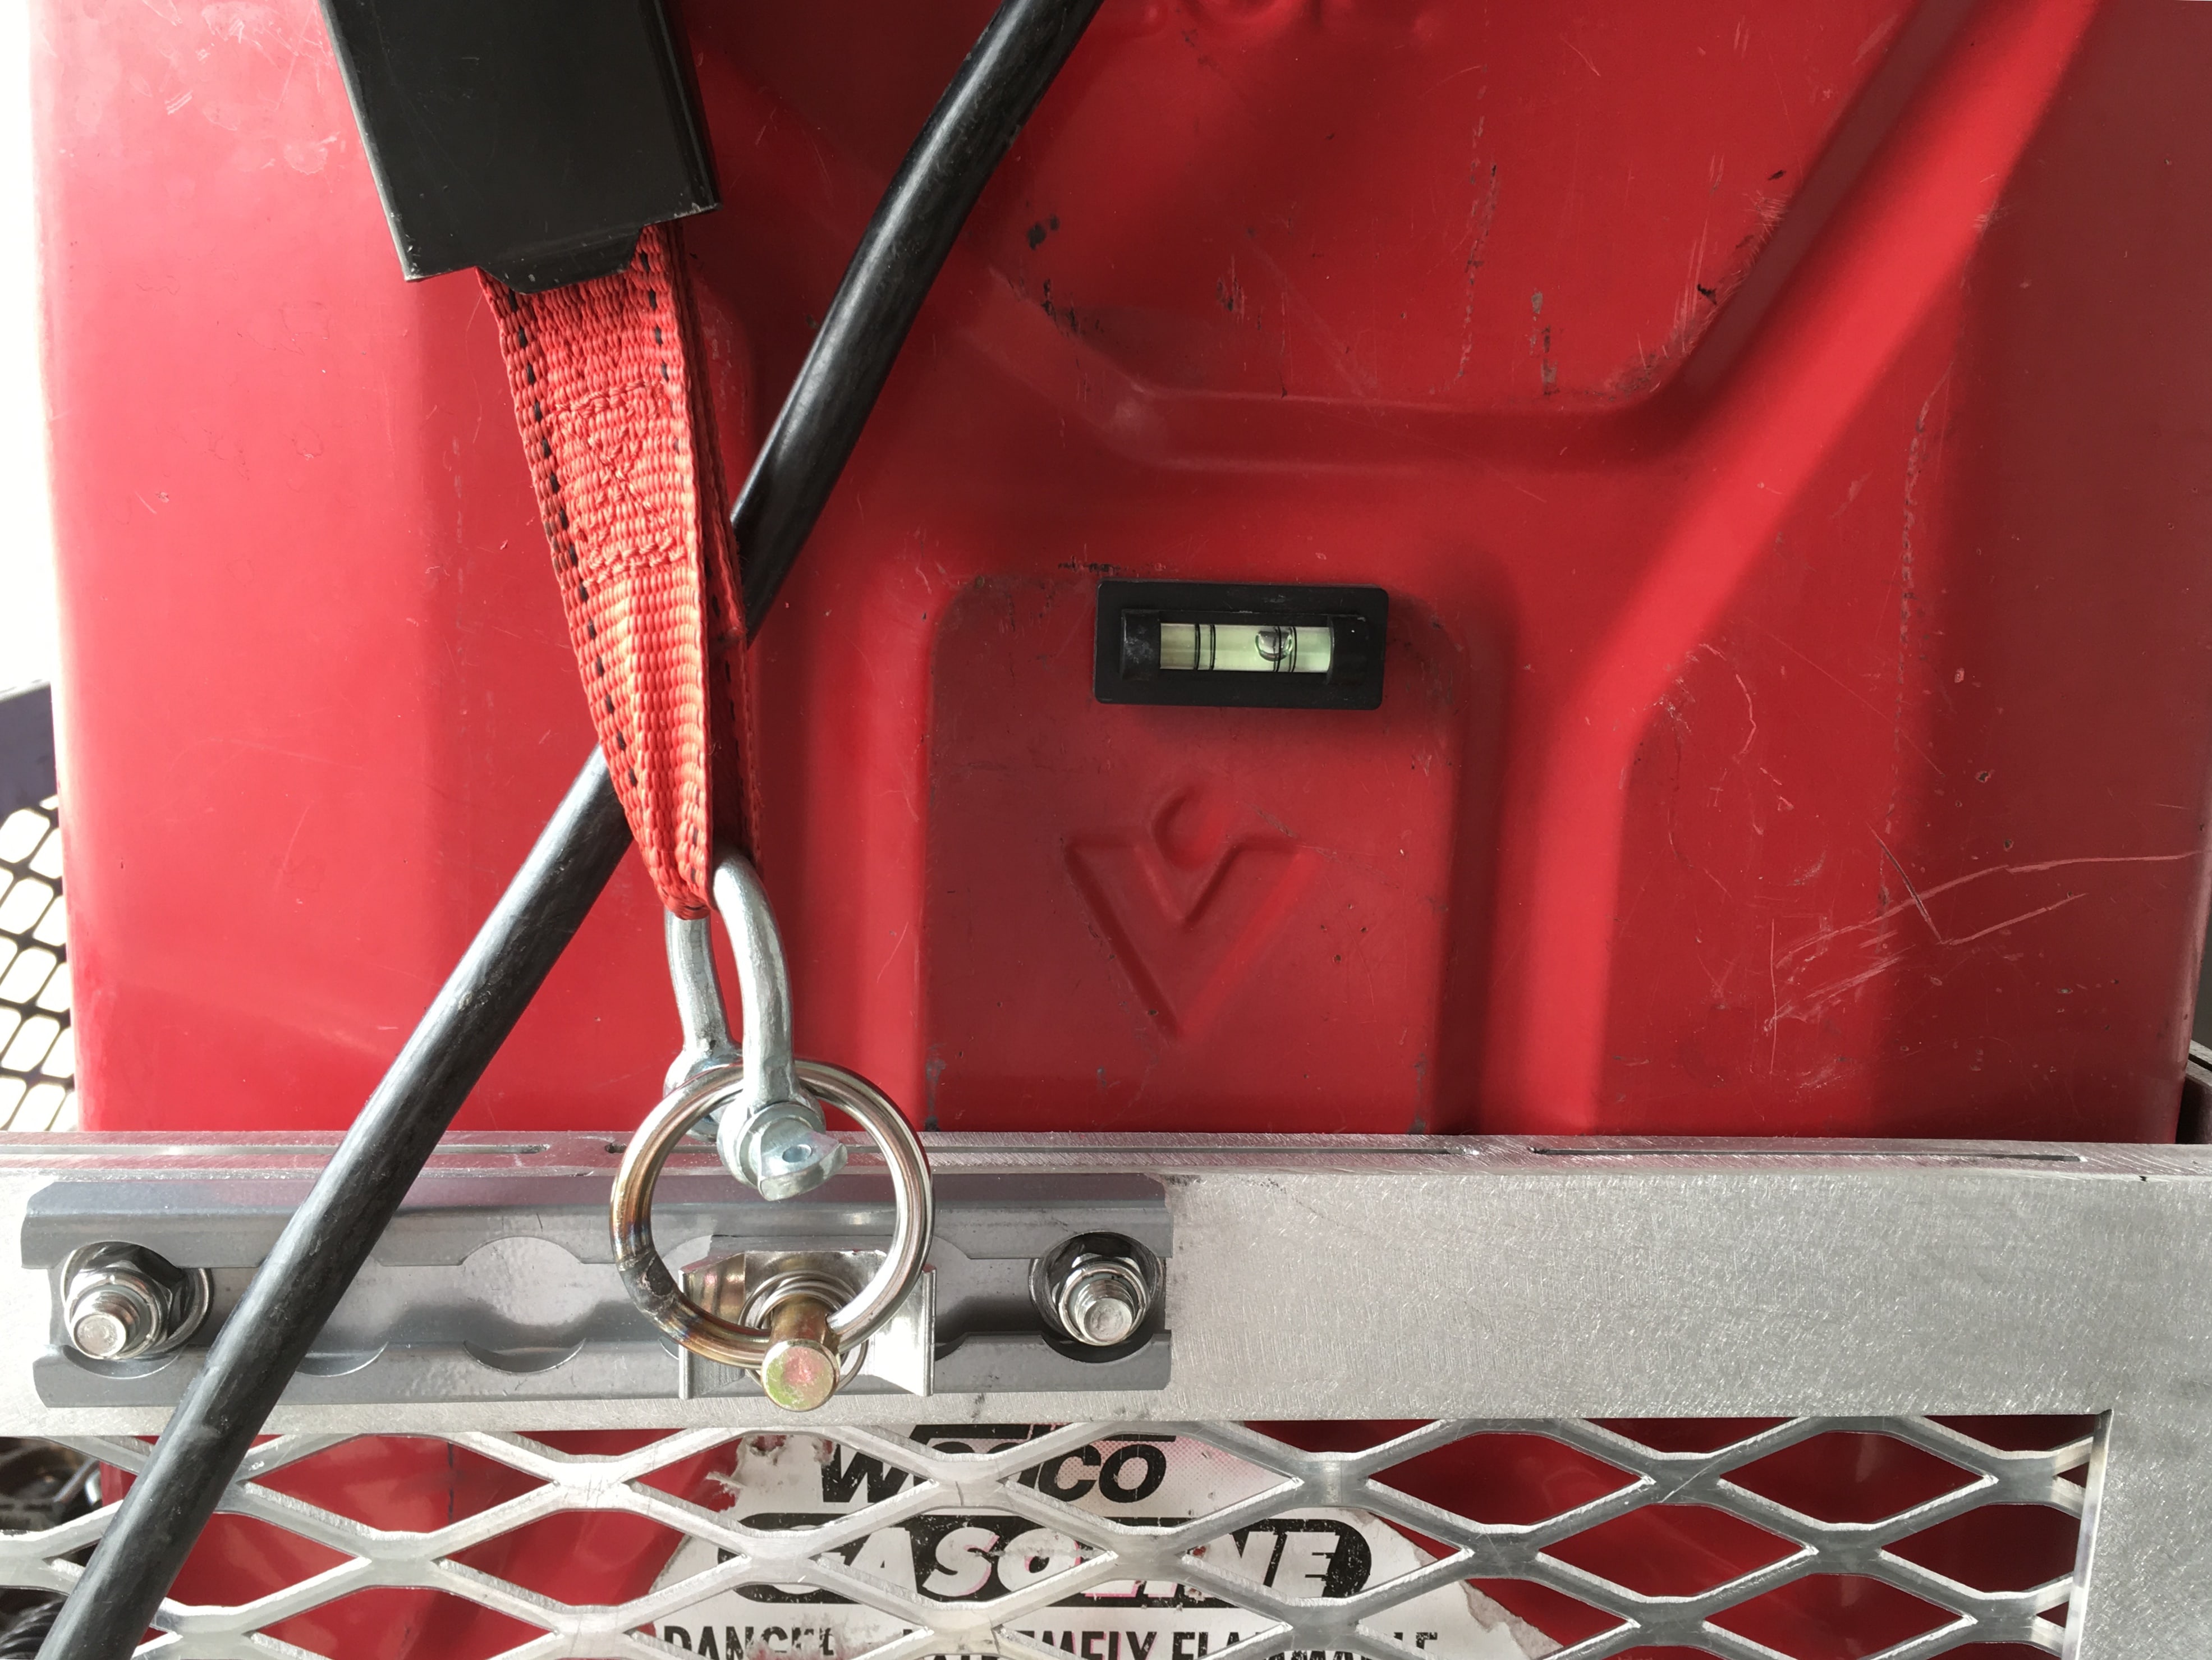
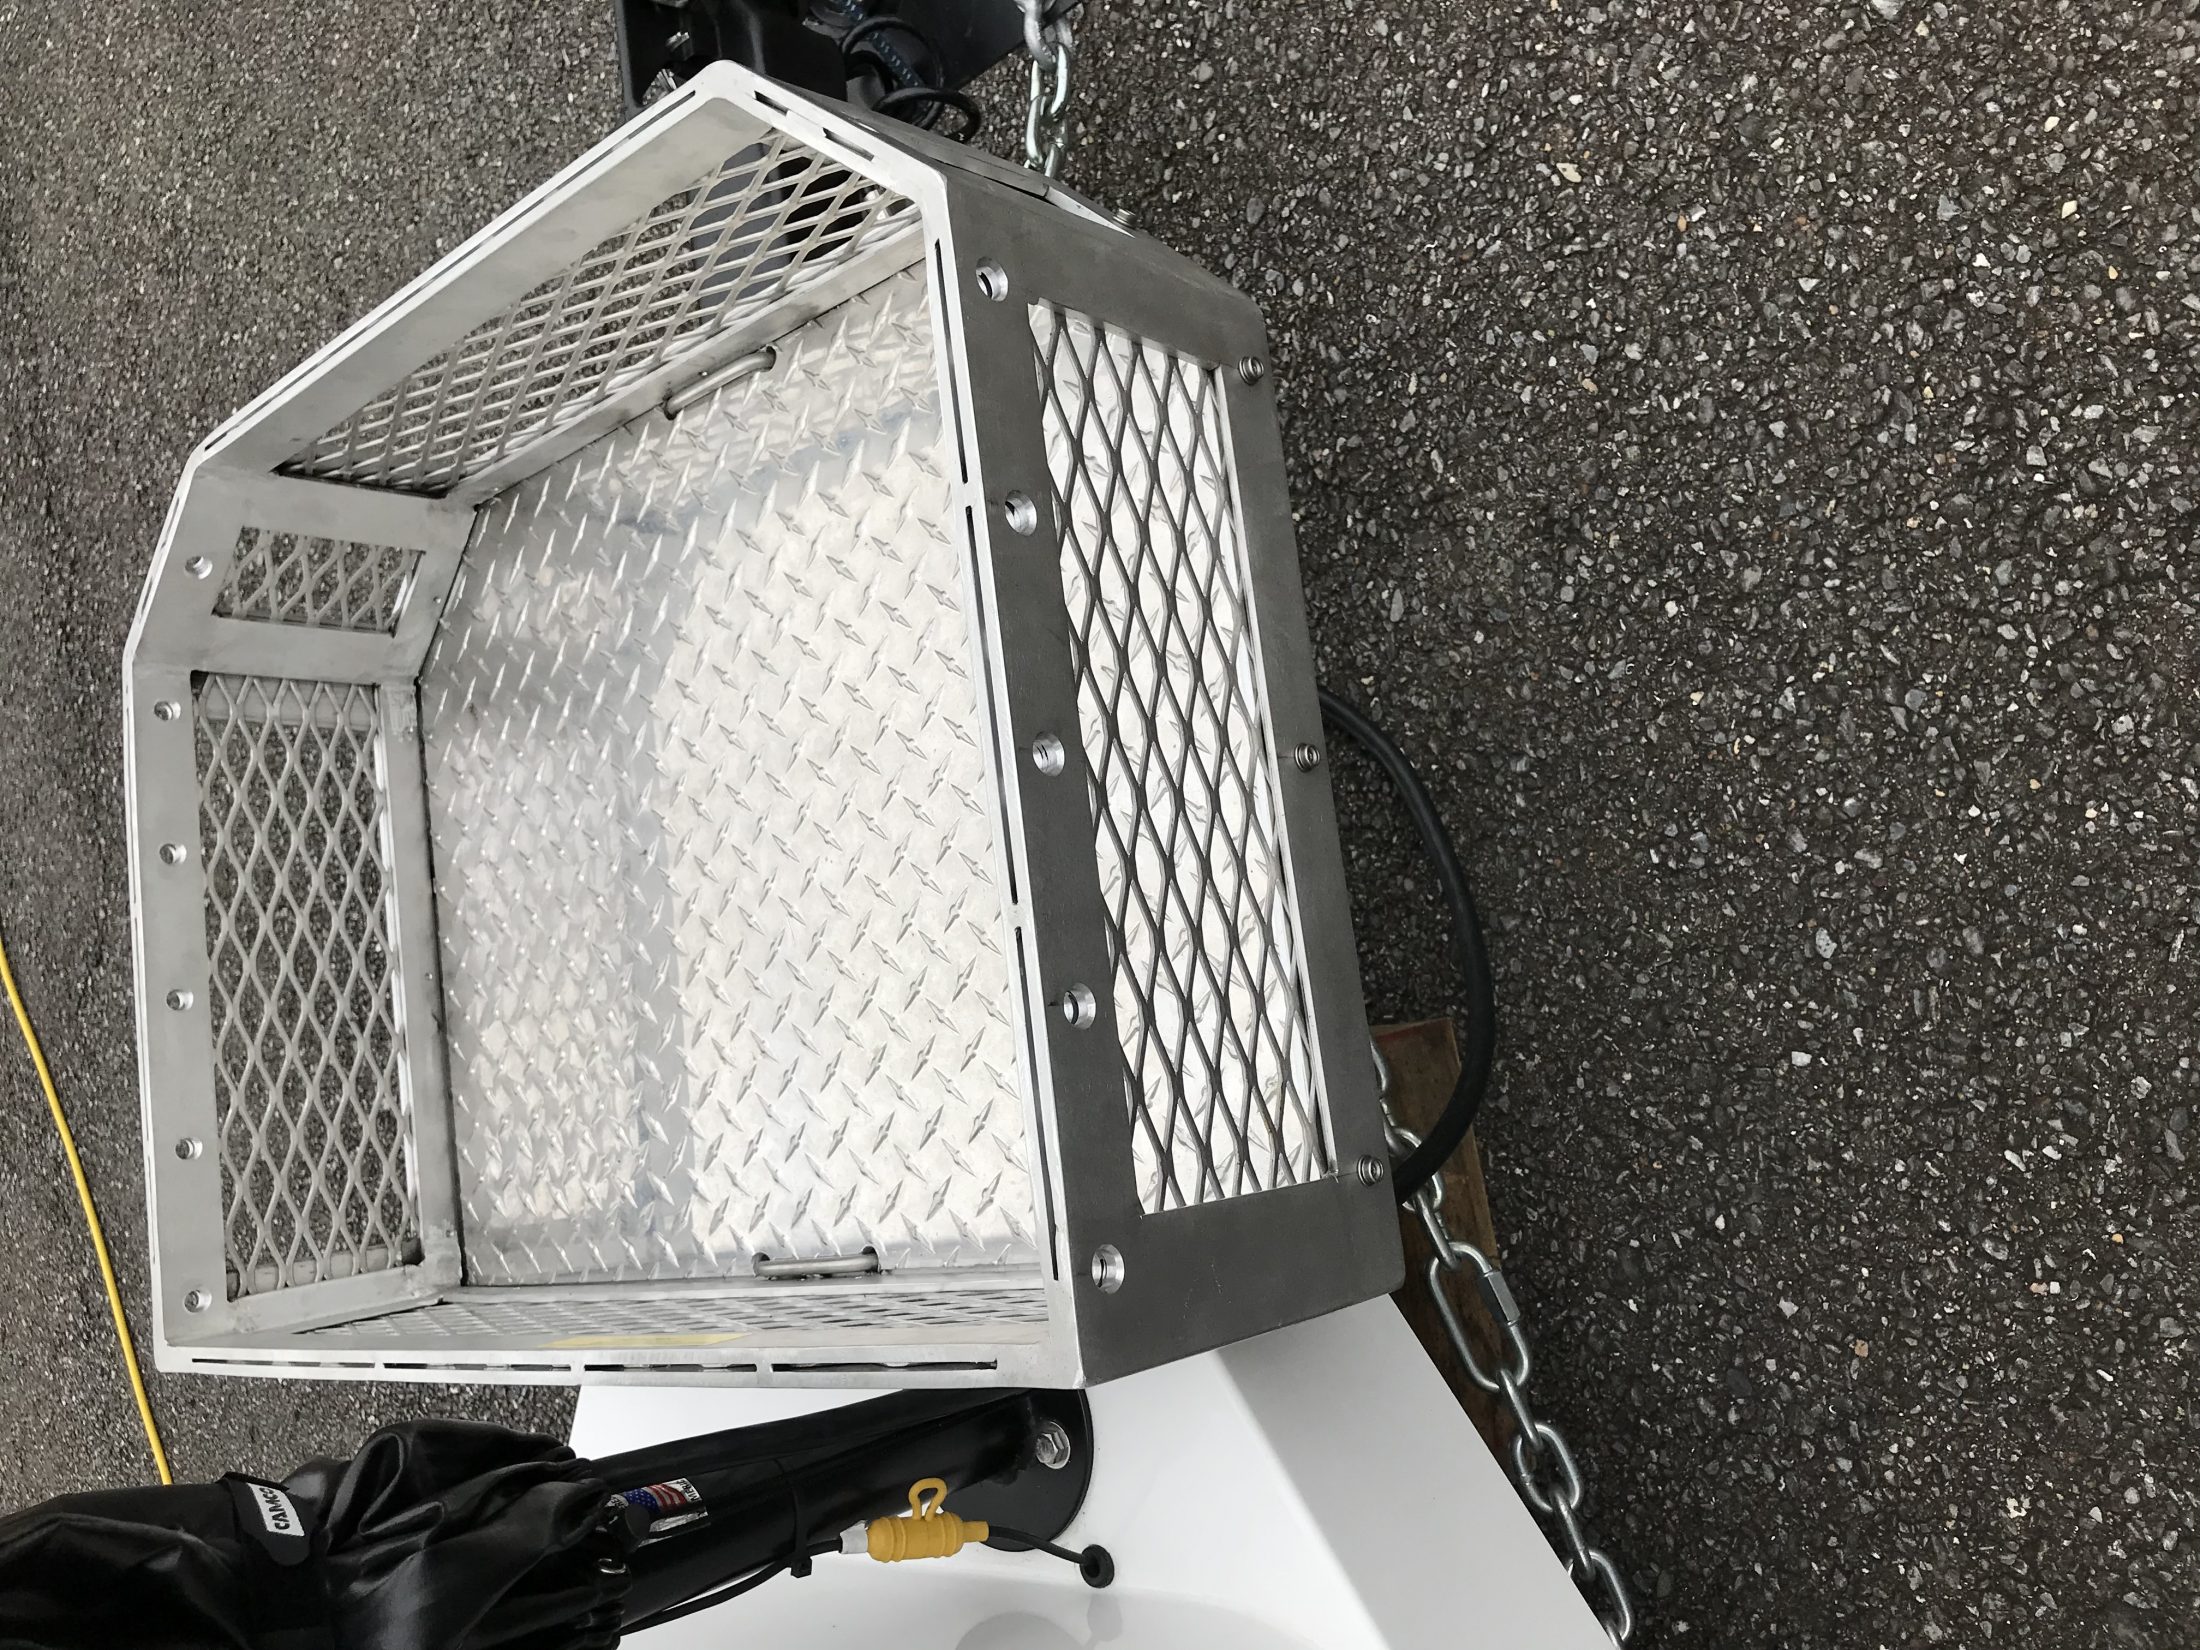
I added four small sections of track and adjustable tie down rings. These came from Mac’s Custom Tie Downs, and the tracks were scraps I already had. You can buy track for about $8 per linear foot. .... http://www.macscustomtiedowns.com I used stainless countersunk Allen screws, 5/16 x 1”. The hardest part was countersinking the inside of the tray, it required a 5/8” 82 degree countersink. There is an Easter Egg in the last pic, do you know what it is for? I like this setup a lot more than just hooking the straps to random parts of the expanded aluminum sides. It looks professional and it is really strong. The rings are rated for a 1000 pound working load, like a motorcycle. John Davies Spokane WA
1 point
-
I just drilled 1/2 holes evenly spaced on the top rail/both sides of the basket. I then used a counter sink on both the inside and outside of each hole. Standard ratchet tie down hooks fit nicely with no extra hardware needed. I carry a 2000 watt Honda generator and a 5 gallon Septer fuel container. Both tightly tied down and locked in with a cable/lock arrangement. I also have 14 large stainless steel snaps evenly spaced all around the base for holding a custom fit truckers vinyl cover in place.
1 point
-
John, your engineering on this is amazing! It would be much easier to install during the initial build. I would not be surprised if Oliver offers this as an option.1 point


.thumb.jpg.e34bf01ef7f7d5e99ad31856d45afbeb.jpg)


-
Recent Achievements
-
")


")


")


