Leaderboard


Popular Content
Showing content with the highest reputation on 08/30/2023 in all areas
-
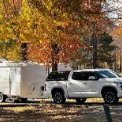
Would never tow Ollie on the highway with our 2003 4 cylinder Tacoma, but it helps the Tacoma’s confidence moving Ollie around home. It has 0” sag with it’s airbags inflated to 30 psi. When towing Ollie with our 1/2 ton 2022 Tundra, the Timbren rear suspension enhancement system helps our Tundra handle Ollie nicely without ever exceeding any of the Tundra’s capacities. Have to admit we are minimalist how we load & camp. I understand why folks here like 3/4 & 1 ton tow vehicles for Ollie towing duty. For our style of camping a 1/2 ton TV with suspension enhancement works fine towing our LE2.5 points
-
All ok here. I don't get it either, @CRM. People need to make a plan, and stick with it. Evacuate when necessary, not after the water is high. Emergency personnel are often unable to help in these sad situations. Let's all give our thoughts and prayers to those folks with the biggest (and continuing) impact of this huge storm. Idalia is leaving a path of devastation across the southeast.4 points
-
M & C, Are you getting the notice via your Dash Messages? We did, and here is what it was. (I am working on a Post about this). JD had a similar post about Brake wire issues, which I found informative. https://olivertraveltrailers.com/forums/topic/2685-how-to-brake-wiring-is-undersized-some-answers-and-partial-solution/#comment-25131 There is a 2-wire pair (mine looked like old brown table lamp cord) which travels through the front and rear axles that bring the current for electric brakes from the Drivers side to the Pass side. It is a common way RV manufactures do it. That wire has slack and sits inside and rubs inside those tubes. Ours rubbed/abraded to bare wires on a couple of surfaces, causing an intermittent short that soon became a constant short. I basically just cut the old wires off and ran a larger insulated 2-wire pair 12awg across the outside of the back of the axles at the rear so to prevent rock strikes, once I had it all connected. WE HAD BRAKES AGAIN… I found that removing the wheels made it easier to get in and work at each hub, where green brake wires go into back of the plate to get to the brakes. Before you cut your wires, maybe test the green wire going into brakes with a meter to make sure. If you pull the "Brake break-away" cable and then measure the current where the brake wires come in (inside driver side wheel well) you might get a reading, but I am not sure what an electrical short might do to that reading. I was told 80% of the time it is the 7-pin (which it was not), so I naively replaced it, before I found out what the real issue is; now I have a “bugly” 7pin, which is not sealed to the weather like the OTT factory one... Best of luck. B~Out
 4 points
 -
ScubaRx, is absolutely correct about devices that increase stability and ride performance not raising towing capacity. Steve Morris' reference to his permission to modify his Land Cruiser in Australia (if he wanted to) for increased capacity is interesting. But let's not stray afield from the OP's original posting about devices which can enhance ride stability while towing our trailers. Read your individual tow vehicle's manual. Stay within your limits. Safe equipment for the best towing experience is what we are about here.4 points
-
"Just your opinion and I believe you sold your trailer and no longer having a dog in the fight..." To be kind and civil, I'd say your remarks regarding John are insensitive and off base. From at least my perspective, John long ago earned the right to say whatever he wants here for as long as he wants. His list of fixes, his experience and his willingness to help and advise others has made him an invaluable asset to this forum. He would be missed should he withdraw from this forum.4 points
-
I'm okay (I'm on the road) and my home is okay too -- reports from home base in Lee County FL are of minimal flooding, nothing compared to last year. My brother reported that the wind was not bad either.3 points
-
Just tighten down that loose zerk - if it still accepts grease, there is no need to replace it. However, hopefully the threads are not stripped. If they are stripped then you hopefully you have the taps and dies necessary to fix this. Bill p.s. the dried out rubber on the shocks has been discussed here on the Forum before. I would not think yours are a issue before you get to the Mothership. Once there you can ask Service about them but I'd guess that they will not replace them.3 points
-
When the brake pads on my 2008 Tundra got thin, the "Brake" warning light on the dash started to light up intermittently. Like you, I knew the pads were near the end of their useful life because I check them when rotating tires. But, I thought the pads still had some life left, so I didn't immediately replace them. The brakes continued to feel solid, so the light made me wonder if there was another issue with the braking system. When I finally got around to replacing the pads on the 2008 Tundra, the "Brake" warning light went out. Lesson learned: when the light comes on, even intermittently, replace the pads (or in case of Oliver brakes, the shoes) sooner rather than later. I concluded the Tundra must have a sensor that activates the warning light when any of the pads get too thin. Please post what you learn after your Oliver brake shoes are renewed.3 points
-
"Turn around - Don't drown"3 points
-
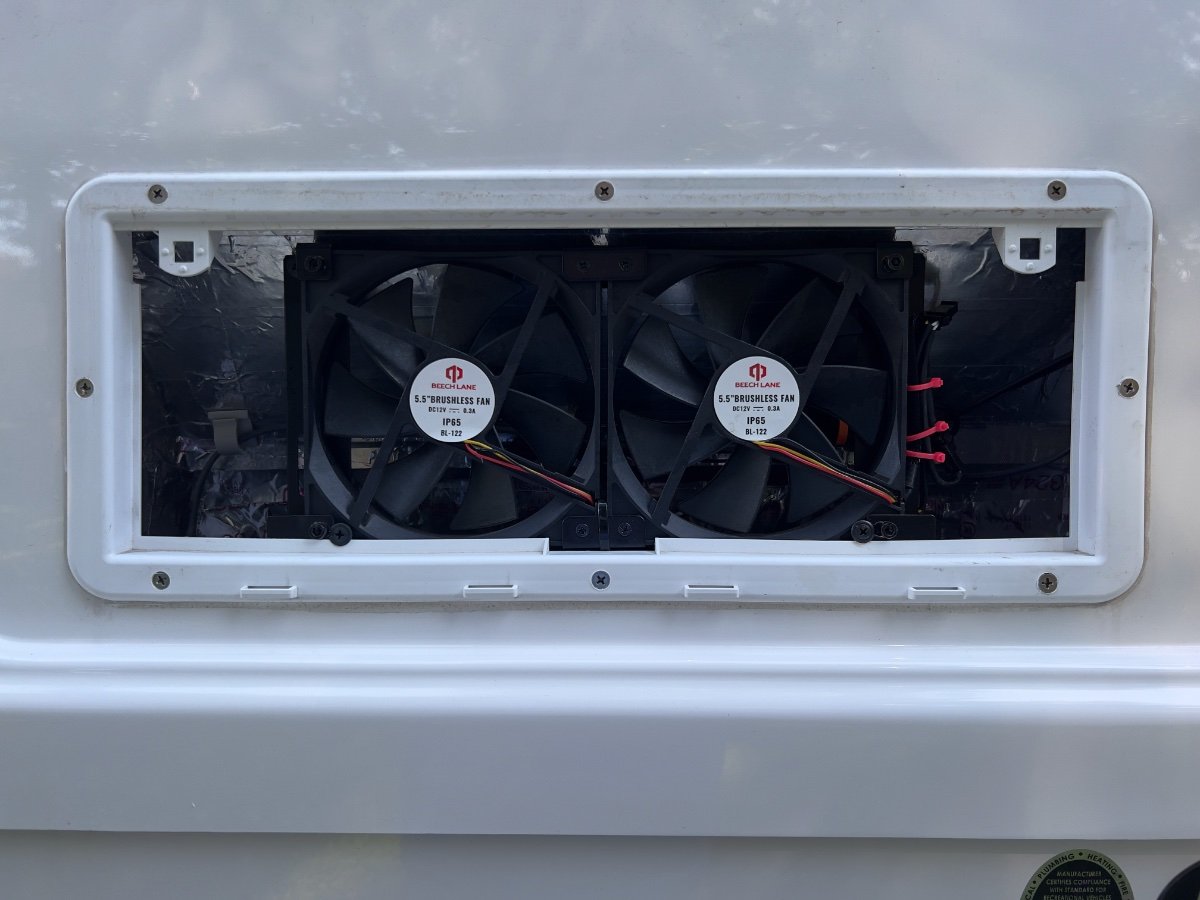
Nice work, and I'm sure you'll see a performance bump with the addition of fans.. I also added a couple of them recently, and with the arrival of Idalia I finally got to see how the fridge performed with them of the course of several days. Not too bad for a 13 year old fridge considering it's been running in 90+ deg temps during the day. IMO, these fans should be standard equipment on absorption fridges.
3 points
-
Given the activity on this thread, it seems that this is an issue generating big interest with Ollie owners. How could it not? We're all connected on a deep emotional level to our trailers, and by extension, the company. I understand that this development makes good business sense, and that a business has to grow or die. I'll admit that I'm often resistant to change. Many of us remember this and this as our first experience with OTT. Now, this is the first experience for newcomers So, the company has already been growing and changing. The challenge for OTT is to carefully thread the needle on this development. Reputation is gained slowly and lost quickly. If a RV service center in, say Boise, can provide the same knowledgeable, quality customer care as Hohenwald, then it's a win-win. If not, the average Ollie owner may simply want to deal directly with Jason Essary and his staff, which would defeat one of the goals of this plan. I'm guessing that the sales and service people at OTT are so fantastic because it's their company. They're invested. I simply can't believe that a contracted RV sales and service center will have that level of investment. The Oliver will be just one of many RV lines they sell and service. If the company is looking for more exposure, they could push the "See and Oliver Near You" program. Existing owners are the best salespeople the company could ever find. They could also continue to take the trailers to RV shows around the country. SOB sales and service have such a bad reputation, I just don't want that to rub off on the Oliver. It might be interesting to consider the Airstream model. Airstream is one of the biggest competitors to the Ollie. They don't sell from the factory. They do have independently owned authorized dealers who only sell Airstreams. I'm not saying that's what I want to see, but it allows those owners to trust that when they take their trailer in for a service, the staff will know what to do.
3 points
-
You sound as if you think Oliver Travel Trailers, as you know them, is going away. I don’t think anything is going to change. They are just trying to get more exposure to their products.3 points
-
Fixed that for you. 😉 Which is funny, because with something like my Land Cruiser, in Australia I could add an relativity inexpensive rear end kit that’s been government certified to increase the legal cargo capacity by about 1200 pounds, resulting in a 2600 pound capacity. That’s nuts, and I’d never do it. But doing the same thing here and getting in an accident, I’d loose my home to some lawyer…3 points
-
I completely agree. We looked at fiberglass trailers specifically because they were not sold through dealerships. If Oliver had been at a dealership, I wouldn’t even have considered it, based on the sleazy treatment we got at all three Cleveland Ohio area dealers a couple years back. No way would I ever take my trailer to one! It is bad enough taking a 30k disposable car to a dealership where the service guys come and go weekly. Imagine taking a $100k trailer to your local car dealer and expecting proper care and workmanship. And I respect auto service guys much higher than RV service guys. Bottom line is that if our Oliver had been at a local dealership, I probably wouldn’t be here now typing this, because I’d be in an Escape.3 points
-
This. So many stories about shoddy work by dealer-based service centers, including our own experiences. There are lots of good independent service centers and mobile techs that might reflect well on Oliver, but I'm not sure many dealerships can. Their focus is on sales, not service.3 points
-
I’m throwing this in just to make sure everyone understands that there is NOTHING you can add to a vehicle that will increase its cargo or towing capacity. Not air bags, springs or anything else.3 points
-
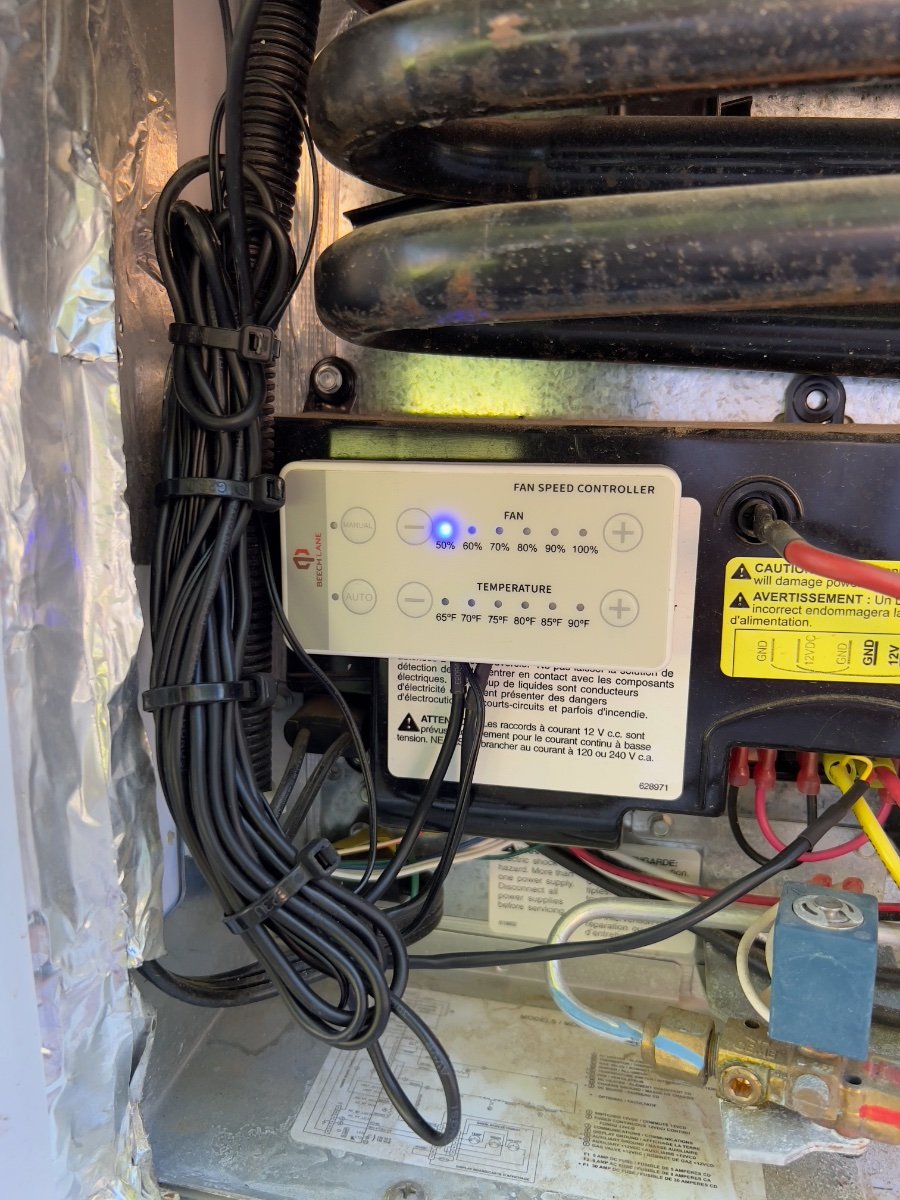
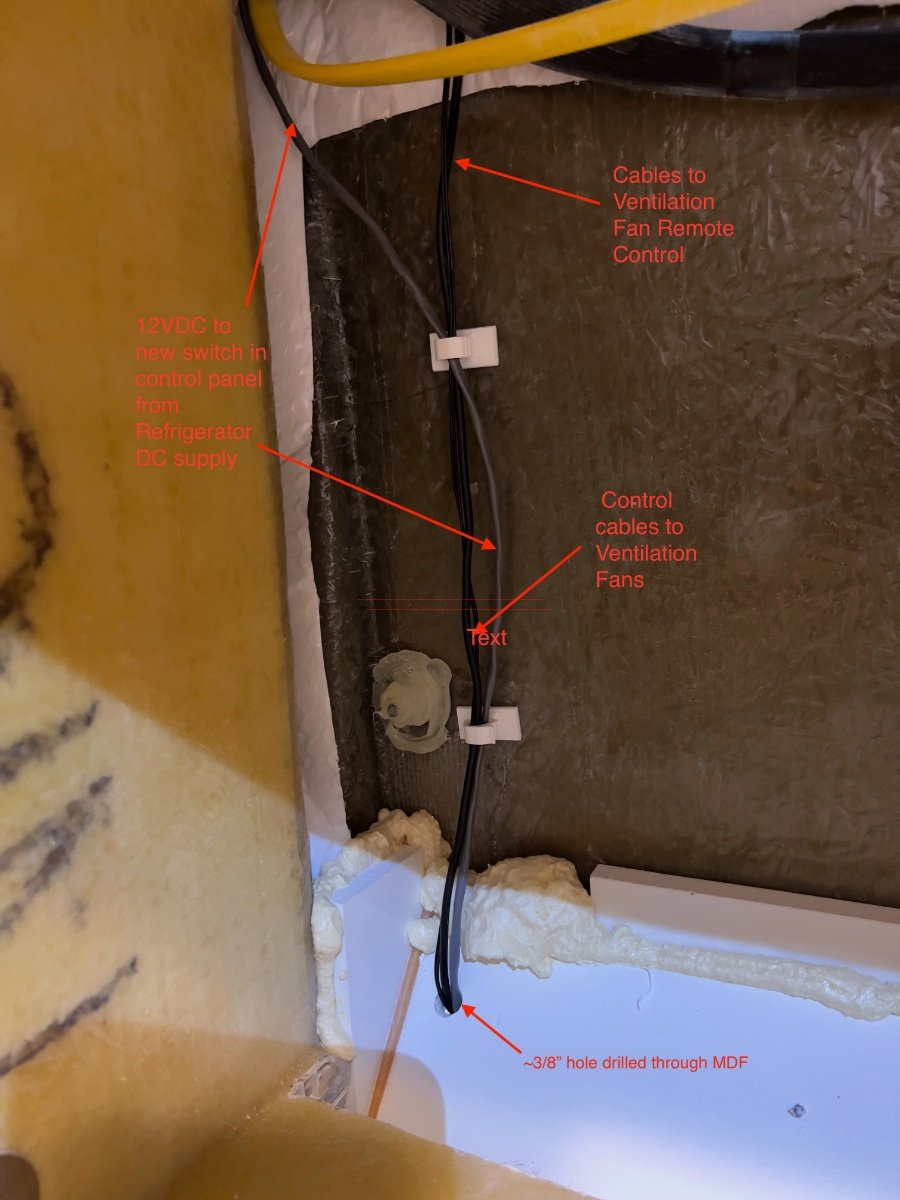
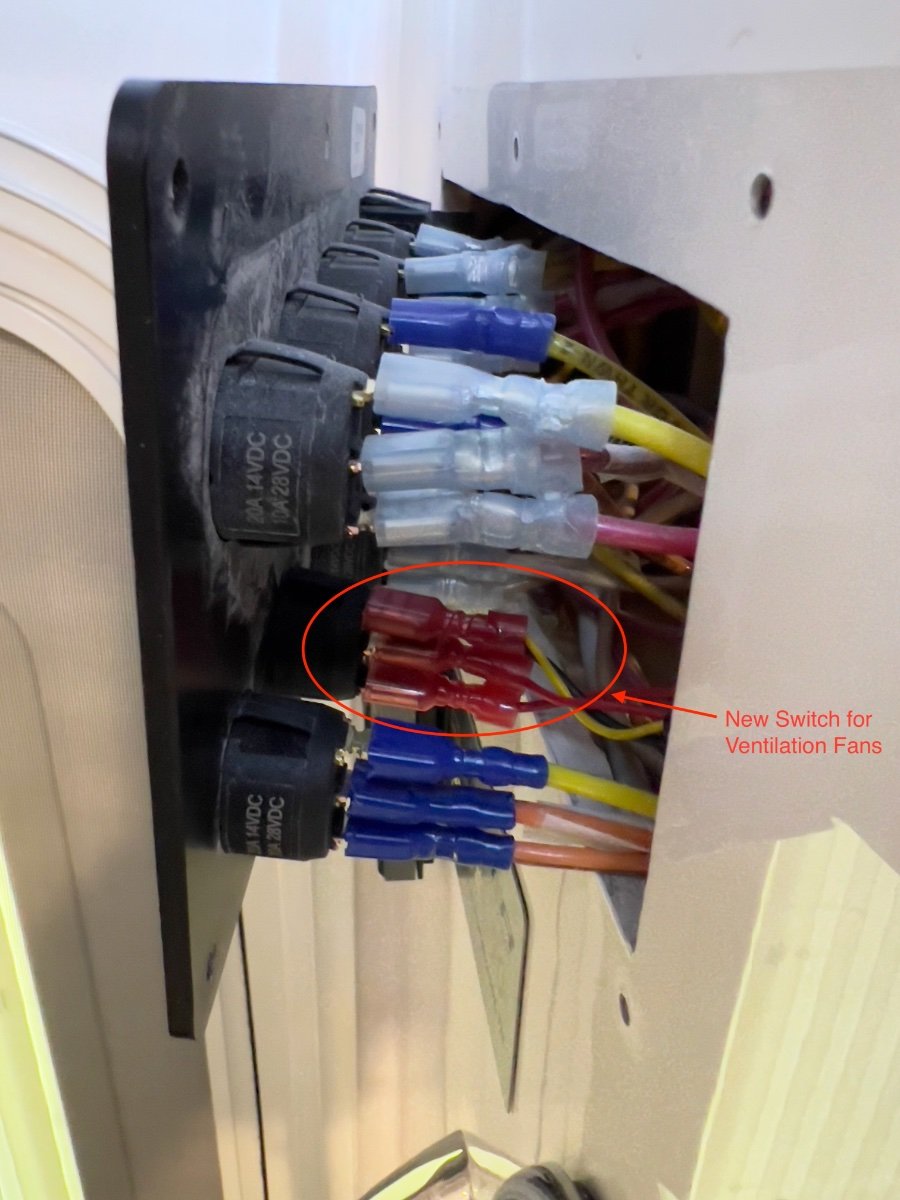
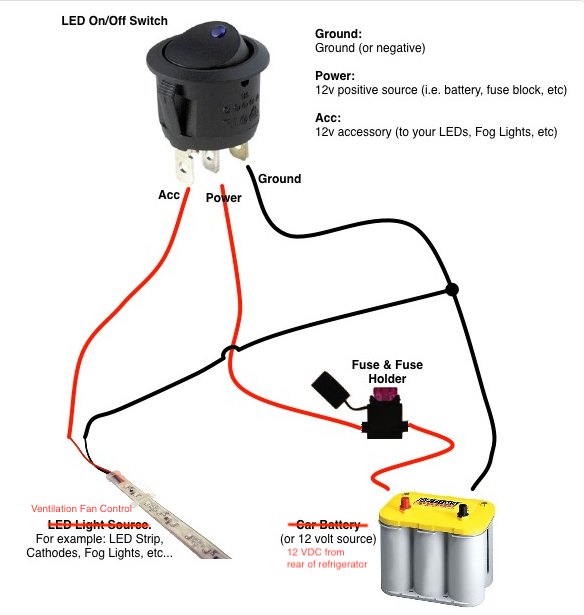
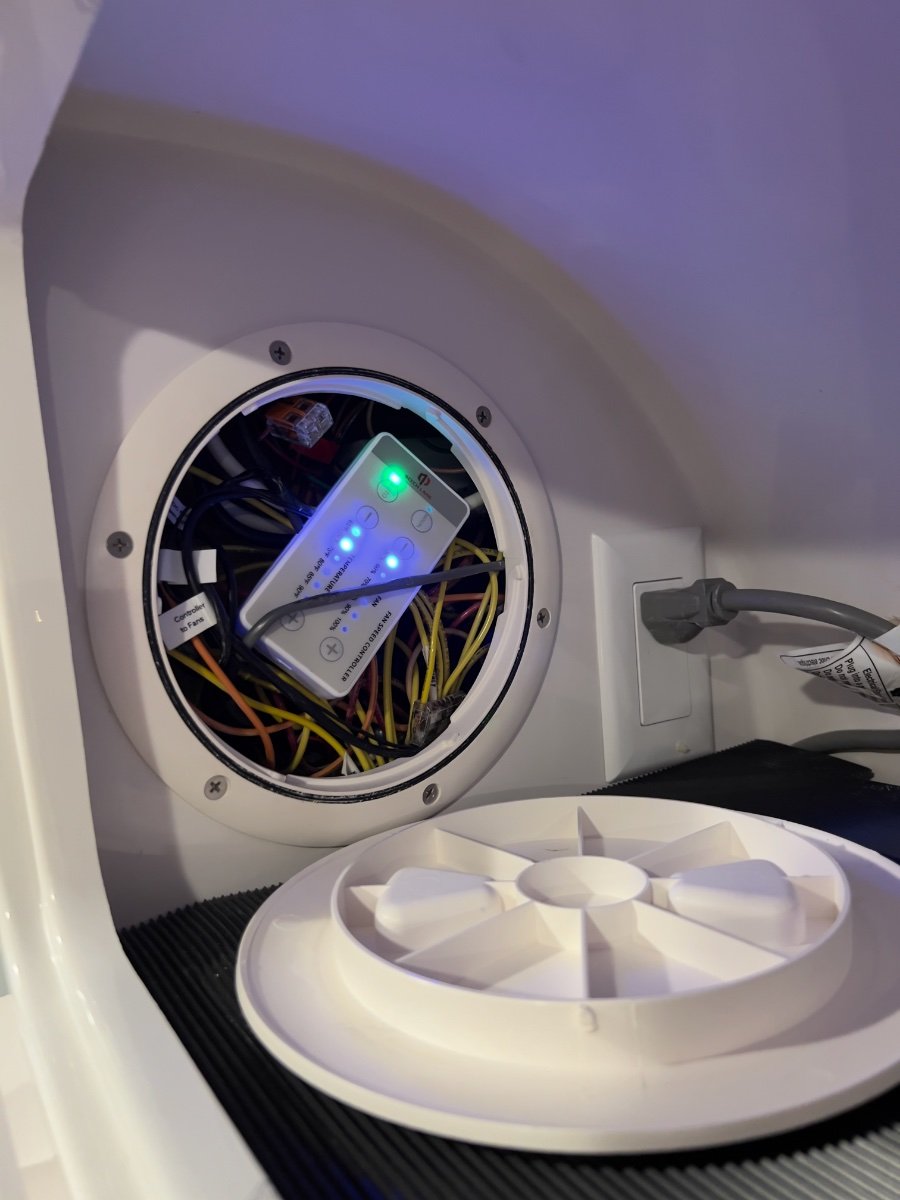
From late May to mid-June my wife and I took a loop trip from our home in Dallas, TX to: Greenville, SC; Asheville, NC; Asheboro & Seagrove, NC and back to Dallas. The trip covered approximately 1900 miles, with significant temperature variation. During the trip we experienced erratic performance by the Norcold Model 412 refrigerator, standard equipment in our 2022 Oliver Legacy Elite II trailer. The refrigerator would not maintain food safe temperatures in either compartment, except when operating on AC current. This problem occurred mostly on the second half of the trip, as daytime temperatures exceeded 90 degrees (F). Especially when in transit, operating on propane or DC current, the refrigerator temperature would climb to approximately 60 degrees and the freezer into the mid 20s. We contacted Oliver Service and made an appointment to have the refrigerator problem assessed in Hohenwald. We later decided not to divert from our trip plans and to deal with the problem when we returned home. Upon our return home to Dallas, TX, on June 20, I began a series of tests with the trailer parked in our driveway. To monitor the temperatures in the refrigerator and freezer, I used an AcuRite Digital Wireless Fridge and Freezer Thermometer, which we had purchased to monitor the Norcold refrigerator and had been using since September, 2022. I also used an Etekcity Infrared Thermometer 1080 to compare readings with the Acurite thermometer. The AcuRite and Etekcity thermometer readings agreed closely. With the refrigerator empty, I recorded the time required to go from ambient temperature to food safe temperatures using AC, DC or propane. Using AC, the refrigerator/freezer would reach food safe temperatures in 6-7 hours (low 40s F for the refrigerator; 0 degrees F for the freezer) with ambient temperatures ranging from 87 to 99 degrees F. Once achieved, when on AC, the temperatures on both compartments would hold in a food safe range. Conducting the same test on propane, the refrigerator and freezer would reach only 62 degrees and 19 degrees F, respectively after more than 12 hours of operation. This test also was done while ambient temperatures ranged from 87 to 99 degrees F. Similar results were observed while operating the refrigerator on DC. I again contacted Oliver Service and was recommended to take the trailer to an authorized Norcold service provider. Blue Moon Mobile RV (Blue Moon) was determined to be the closest available Norcold service provider. I arranged an appointment to bring the trailer to Blue Moon for troubleshooting of the refrigerator. Technicians at Blue Moon confirmed my observations of the behavior of the refrigerator. They also confirmed the cooling function was working properly, since proper temperatures were achieved when operating on AC. They also confirmed the single, small fan located at the rear of the refrigerator was operational, but providing insufficient air flow for the refrigerator to operate properly when ambient temperatures were high. Blue Moon conferred with Norcold technical support on their findings. Blue Moon and Norcold recommended additional fans be installed to dissipate warm air behind the refrigerator. Having anticipated installing additional fans, I had done online research and chose a dual fan assembly from Beech Lane 12V RV Fridge Ventilation Cooling Fan 5.5" (140mm). These fans come with a remote control with which fan speeds and threshold temperature may be set manually or automatically. These fans were installed by Blue Moon in the upper vent opening of our LEII. The 12VDC power supply to the refrigerator was also used to power the fans. The remote control was mounted to the cover over the refrigerator circuit board using double sided tape. The excess length cables provided with the fans were bundled with zip ties and secured nearby, as shown below. Blue Moon tested the operation of the refrigerator following the installation of the Beech Lane fans and reported food safe temperatures were being achieved and held, with high ambient temperatures. On July 19 I picked up our trailer from Blue Moon and returned home to repeat my prior tests to compare results running the refrigerator on propane and on DC. The trailer was parked in the same location in our driveway as previously. After installation of the ventilation fans, using propane, the refrigerator and freezer compartments achieved safe food temperatures in approximately 8 hours, with the refrigerator control set to 7, despite ambient temperatures ranging from 93 to 105 degrees Fahrenheit. Once safe food temperatures were achieved the refrigerator control setting was reduced from 7 to 6 and allowed to run overnight. The following morning both the refrigerator and freezer had slightly warmer temperatures, but still satisfactory for safe food storage. We have not yet had an opportunity to utilize the Norcold refrigerator on a trip to observe how effectively safe food temperatures are maintained when full of food and under changing environmental conditions using the three power sources. Based on the test results using the ventilation fans, I expect the performance of the refrigerator to be significantly improved. We should now be able to use DC to power the Norcold refrigerator when in transit, and avoid the use of propane. Performance running on DC appears to be similar to running on propane. While I was pleased with the significant improvement in the operating temperatures achieved by the Norcold refrigerator, there were three aspects of the installation I chose to change, all related to access to the remote control: The remote control for the Beech Lane fans has very bright blue LEDs which are ON whenever 12VDC power is ON. At night, we noticed a bright blue glow emanating from the lower refrigerator external vent cover. Accessing the remote control to change settings required removing the refrigerator external vent cover. When we store the trailer we typically turn OFF all DC power by turning OFF our lithium batteries. Upon the next use of the trailer, when DC power is restored, the refrigerator ventilation fans must also be turned ON manually. There was no switch to turn OFF DC power to the remote control. To address these issues, I relocated the Beech Lans fan remote control to the interior of the trailer and installed a switch on the control panel located at the entry to the trailer. I chose to have the remote control inside the access hatch in the storage cabinet located over the microwave oven, directly above the Norcold refrigerator. To re-route the cables to the ventilation fans, I had to remove the microwave oven. To install a new switch in the control paneI I had to loosen the panel from the wall. I had to add approximately 10 feet of 20 AWG twisted pair cable (gray) to reach from the new switch on the control panel to the 12VDC power supply at the bottom rear of the refrigerator. The photo below shows the routing of the remote control wires (black) and 12VDC power supply behind the microwave cabinet. I had to drill a ~3/8" hole in the angled MDF panel behind the microwave cabinet, directly above the refrigerator. I caulked around the cables after routing them through the hole and behind the refrigerator. Fishing the wires into the area behind the control panel was not difficult. The yellow Romex appearing at the top of the photo below supplies the AC outlet for the microwave oven. I contacted Oliver Service and ordered a single pole switch (with blue light) to match the others in the trailer control panel. The cost was slightly over $7, including shipping by first class mail. The new switch was installed in an unused location on the control panel which previously had a blank cover. I added crimp on spade type connectors to the twisted pair cable to connect to the terminals on the new switch. Although the new switch is single pole, there are three terminals on the rear with the wiring connections listed below: Ground (dissimilar color) DC Power IN (center) Switched DC Power Out I found the wiring diagram below which shows an analogous circuit. The switch and the ventilation fan remote control both require a ground connection. The Switched DC power terminal is connected to the DC+ power connection for the ventilation fan remote control. The new switch needs a ground connection in order for the blue light to operate indicating the switch is ON. In the diagram a car battery is shown as the 12VDC source. On the trailer, the 12VDC source is located at the bottom rear of the refrigerator. This DC circuit is already fused at the DC power panel located below the rear dinette seat. I chose to locate the Beech Lane fan remote control behind the access panel in the storage cabinet above the microwave oven. I made this choice to avoid having the bright blue LED lights on the remote control illuminating the interior of the trailer. The access panel is easily removed when there is a need to access the remote control, to turn ON the ventilation fans, or to change the fan speed or threshold temperature. The Beech Lane ventilation fans are very quiet. With the auxiliary fans running, the volume of air exiting the top exterior vent is noticeably greater than with the small, single OEM fan mounted to the rear of the refrigerator. We have not yet tried sleeping in the trailer with these fans running. There is no chance of hearing the fans inside the trailer with the Dometic A/C running. They are not noticeable when they are running unless you are standing close to the upper exterior vent. I recommend these fans to anyone having similar difficulty maintaining food safe temperatures in the refrigerator when ambient temperatures are high. Regards, Don
2 points
-
You look good to go to me. The only argument for more grease coming out is that it "helps" flush out any old stale dirty grease that may be in there.2 points
-
Same thing happened with our first trailer. The wires were actually folded inside the axle tube and chafed until they shorted. Dumb design. Same repair. Never had another problem.2 points
-
Have you thought about using a butt connector with heat shrink and solder using a heat gun instead of a soldering iron? I also use the method below for connections where a stronger connection is needed such as pulling a wire that I have lengthened. Mossey
2 points
-
I know many are aware of the LE2 giveaway in support of the Tennessee Wildlife Resource Agency, but I was unaware of their appearance on the cover of the state published hunting guide. Just wanted to share this with anyone interested. https://www.tn.gov/content/dam/tn/twra/documents/guide/TN-Hunting-Guide.pdf2 points
-
Funny you should show the bags you brought. My wife can not pack light. I will have one bag and a backpack. My wife will have 3 bags, a backpack and a large canvas carry bag. We hope the hurricane does not cause a lot of hardship. Good Luck out there.2 points
-
Good to know! Thanks, John!2 points
-
Maybe in Australia but not in the United States. The final say is that sticker affixed to the driver’s side door post. If you know of a way to have the manufacturer reissue that sticker with increased weight capacities based on ANYTHING that you have personally added to the vehicle post delivery, I’m sure there are lots of folks here that would be interested in you explaining how it’s done.2 points
-
My only experience has been horrid. Sadly, I will make sure to show the OTT home team some of the damage from the only service center I dealt with.2 points
-
I suspect those quality folks will be the future partners. Those mega dealers, who partner with mega manufacturers, aren't likely candidates, from either side, imo.2 points
-
Don’t stress out over a non-issue, these LE2 trailers tow perfectly well with light tongues. as long as your suspension is tight and your tires are in good shape and inflated, nothing bad will happen. The Aussies run their caravans with very light TW. The 10-12% is a USA rule of thumb for SOB stick and staple trailers with boxey, rickety bodies, sagging worn-out suspensions, feeble frames and bald tires. One configuration of “Mouse” had a 480 pound TW, it was completely fine. John Davies Spokane WA2 points
-
@Rivernerd: This isn't the best ever photo of our rig after installing AirLift bags because of the uneven approach onto the apron of the "Cave" - but judging by the front/rear fender/wheel clearance, it looks very close to yours. This is running 25psi in the bags... As reported in an earlier thread, we noticed a reduction in the "porpoising" at slow speeds and an overall better ride (handling-wise) under tow. I'm thinking you'll be liking your airbag mod in the long run... Safe travels - cheers!
2 points
-
Concur, 100%. Oliver-owned regional sales/service centers that have employees trained by the OTT Corporate/Factory Team that can deliver "remote Hohenwald-level" customer satisfaction would establish the brand nationally, IMO. We've had nothing but frustration and heartache over the years anytime we've had an RV dealership "touch" our previous travel trailers.2 points
-
It's a good idea to let wax cure at least 8 to 24 hours between coats. Good job!2 points
-
While I'm waiting for my Mystic Grease and tools to arrive for the Zerk maintenance, I forged ahead with the full beauty treatment on my Oliver, using the products that I believe were recommended by @SeaDawg earlier in this thread: Washing: used a Boat Wash that won't strip the existing finish (hand washing with a light spray hose, no pressure washing) Drying: used my favorite tool, "The Absorber" towel (I have one for the outside and one for Oliver's shower walls that I use to dry them down) First Wax: Collinite No. 870 Marine (the liquid all-in-one wash and wax) -- used about a half of one bottle. Second Wax: Collinite No. 885 Heavy Duty FleetWax (the paste in a can) -- used a bit more than half the can. I washed, dried down and did the first coat of wax on day one. Took a day off. Did the second coat of wax on day three. It took me about 6 hours on each of those days, but well worth the time. It's a thing of beauty. My neighbor complained about being blinded. Hahaha2 points
-
Microfiber cloths and pads. By hand. Wax on/wax off. Really good for upper arm exercise. Lol.2 points
-
We are in the process of locating qualified and reputable RV maintenance facilities across the country. The goal is to provide our owner's with outstanding service within reasonable distance. If you have had a good experience with a third-party maintenance shop, please let us know here so we can do additional research and add them to our database. Thanks!1 point
-
Bryan, I haven’t checked that wire - will do so in the morning when the weather is a bit cooler. Thanks - Mike1 point
-
We bought a white plastic paper towel holder 15 years ago. I, too, was hesitant about drilling, first year. I used industrial velcro first season to make sure I was happy with the location. Permanently installed with stainless steel bolts, washers and nuts after we decided we were indeed happy. We mounted it over the bed. I didn't care for the idea of paper towels over the cooktop.
1 point
-
To be on the safe side, check with Oliver. I believe if you have LIthium batteries, yes you need to make the adjustment on #28, and set it to 20 amp in your case.1 point
-
I like this idea 🙂 Apparently the guys at CGI detailing liked the idea too and are making the most out of it. Starting this Labor Day CGI will be here in North Carolina making Olivers shiny and bright. Bill1 point
-
Me too. So far, my choice has worked out about as well as I had hoped. Our Elite II has not been trouble free, but the persistent help I have received from the Service Department, which has enabled me to address all issues so far, has been far superior to what is reported on the Airstream forums.1 point
-
Like many others here, I don't have a dog in this hunt as I already have my Oliver and do my own maintenance. I wish Oliver the best with this change as avoidance of "slick" dealers was a big deciding factor in making my initial purchase directly from Oliver.1 point
-
As part of the Oliver Service Department's outstanding responsiveness to issues with its trailers, the Service Department frequently refers Oliver owners far from Hohenwald to RV service centers for warranty service. I wonder if, given the increased sales volume, Oliver is hoping to identify, and develop relationships with, better-operated RV sales and service centers nationwide (and perhaps in Canada?) to help the Oliver Service Department keep up with diagnosis and repair needs? This could result in a short list of qualified RV techs familiar with Oliver's build quality and service standards, who could take some of the load off of Jason Essary and his staff. Surely their workload has grown as production volume has expanded.1 point
-
I'd be totally surprised if the original business model "went away", completely. I'd suspect (though I don't know) that the limited, vetted dealer network would simply amplify the great network we have today.1 point
-
I hear ya! I have my expectations set very low for the mechanical thermostat but it's already purchased with a custom 3D printed backer plate to cover the factory holes from the Dometic CCC2. I will only need to use this when the temps get low enough that I need heat around the holding tanks. Apart from that, I'll use the heat pump or an electric space heater.
1 point
-
We’ve had great service at Kline RV Center in Madison Heights, Mi.
1 point
-
John at what size shelter are you getting those quotes of $350 per month. Where I live there are enclosed 12x30 storage shelters for $185 per month. For the last 6 years I have rented an open but overhead covered shelter for just barely over $100 per month, but this past year the new owners have increased the prices twice for a total of a near 60% increase in one year. I told them to take a hike and left, but still looking for an appropriate place to store especially during the winter months. I don't have the option of building an onsite storage where we live in the downtown historical area.1 point
-
In case anyone is interested. This company came inadvertently recommended to by Jason over at Oliver. The detailer he recommended uses their products so this is why I say inadvertently. I spoke with Christian on the phone, who can be seen in this video using Glidecoat's cermaic coat on a 12 year old RV. He recommends the 30' DIY kit and says that it is pretty simple to use. I mentioned to him my hesitancy about doing this DIY and he assured me that it would not be too difficult + would not need to worry if I also used this buffer, as it wouldnt be powerful enough to damage the Oliver clear coat easily: https://www.autogeek.net/porter-cable-buffer-value-kit.htmls DIY Product link: https://www.glidecoat.com/product/rv-ceramic-top-coating-kit/ The total price to do this DIY would be around 700-800 dollars including the buffer. Then, every 2-3 years it would require me doing the re-coating which he told me should not be as labor as intensive after the first round.1 point
-
I was on board until I got to this part. He is trying to rip you off. You can get an awful lot of regular exterior detail jobs for that money, a local shop charges about $250 for a small egg trailer (or similar boat). I would rather put that cash toward something tangible like 300 AH of lithium batteries….. The very best thing you can do to keep your Ollie looking great is to get it under cover, not a cloth one, to keep the sun, ozone, sap and critters off it. An extra $1200 annually might help pay for covered storage. How much does that cost where you live? Around here it is $350 per month, if you can even find a place, which is one (small) reason I had an RV Bay attached to our new home five years ago. It was a $30,000 option, but I got insulated and sheet rocked walls there and in the garage too. I have already saved over $20k compared to a rental, and that doesn’t include gas money and my wasted time driving back and forth to the storage lot. John Davies Spokane WA1 point
-
As our Oliver has the same type of marine gelcoat as our boats, we've stayed with the marine paste wax we use on the boats, 3M Marine Ultra. It's not inexpensive, but one can lasts for several applications, and it's formulated for fiberglass and the harsh marine environment . It's worked well on the sailboat ( now over 40 years old) , the powerboat and the Oliver. The wax lasts, even in the Florida sun. It's been one of the top two paste wax products in Practical Sailor's testing over the decades. Sherry1 point
-
Yep - as far as I'm concerned Bruce and Cheryl get the credit for this one. I'm not sure just how they came upon these products from Duragloss other than the Duragloss Company is located in North Carolina. I'm also not sure how they came up with the detailer/liquid wax combination, but I do know that it really works on all surfaces (yes, that includes the mirrored surfaces) inside the Oliver. A light spray, wipe with a micro-fiber cloth, flip the cloth over and wipe again and you're done without streaks and/or haze- its so easy.1 point
-
I think that the most recommended polish here is Duragloss, which I can personally attest to, but also many owners have had good success with other products like 3M marine wax, Maguires, etc. Some people really like Rejex, but I personally didn't care for it. Some searching will probably provide you with a handful of threads on the topic. Many of us use a mixture of 4 parts Duragloss 923 and 1 part Duragloss 952 in a spray bottle for cleaning the interior and as a touch up spray on the exterior, cleaning off bugs and such. I don't know who first came up with that mixture, but it really makes the interior shine. On the exterior, I think waxing twice a year is the typical recommendation, adjusting for use, climate and storage conditions. I don't know if I remember a discussion here on which type of pads to use.1 point
-
I can also vouch for Boerne RV. They are located about 20 miles north of San Antonio, TX which is also a nice place to visit and see the sites. Over the last 9 years, they have helped me with The Wonder Egg (Elite I) and the work has been done professionally. They have experience with both the Elite I and Elite II. The owners, Ron & Debbie, are very personable and easy to work with. They can be reached at: 830-816-3883.1 point


.thumb.jpg.e34bf01ef7f7d5e99ad31856d45afbeb.jpg)


-
Recent Achievements
-
")


")


")