Leaderboard


Popular Content
Showing content with the highest reputation on 03/07/2024 in all areas
-
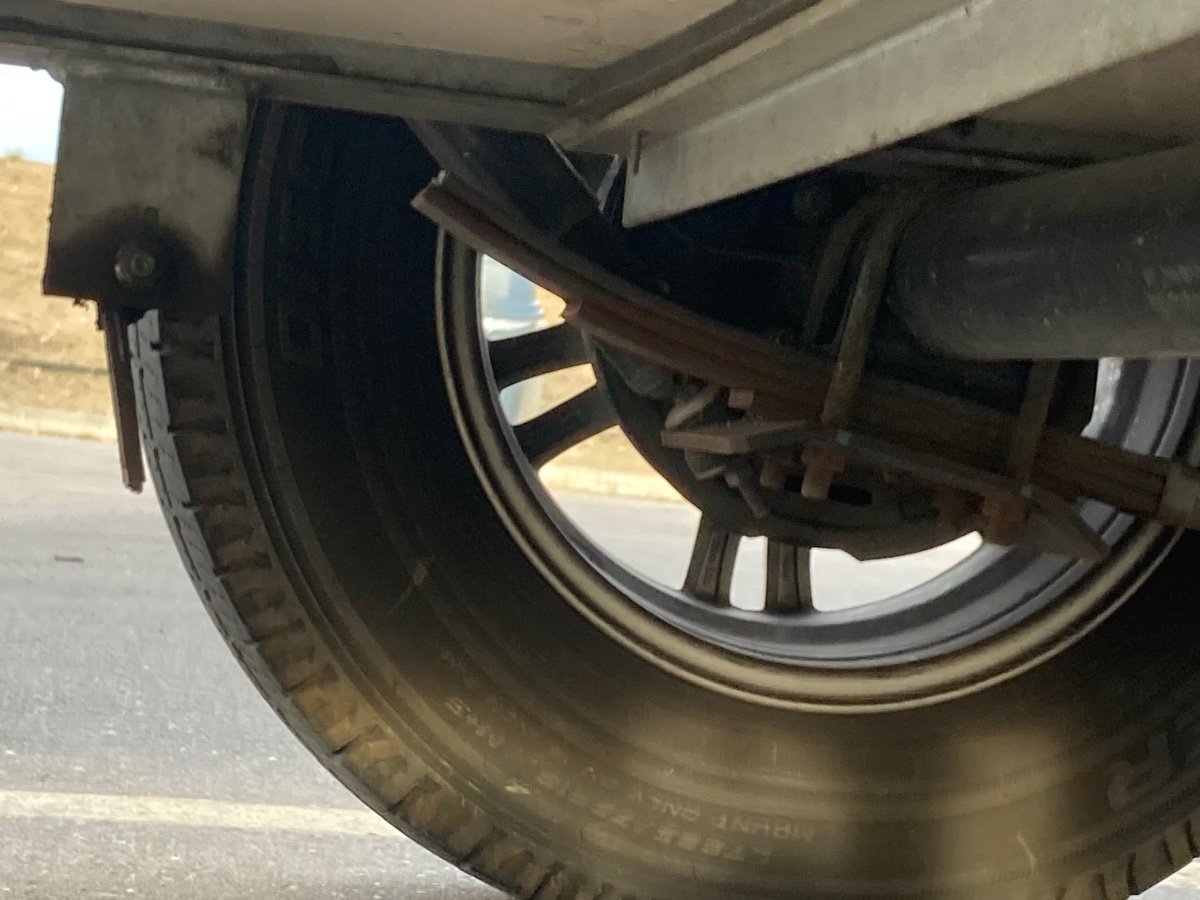
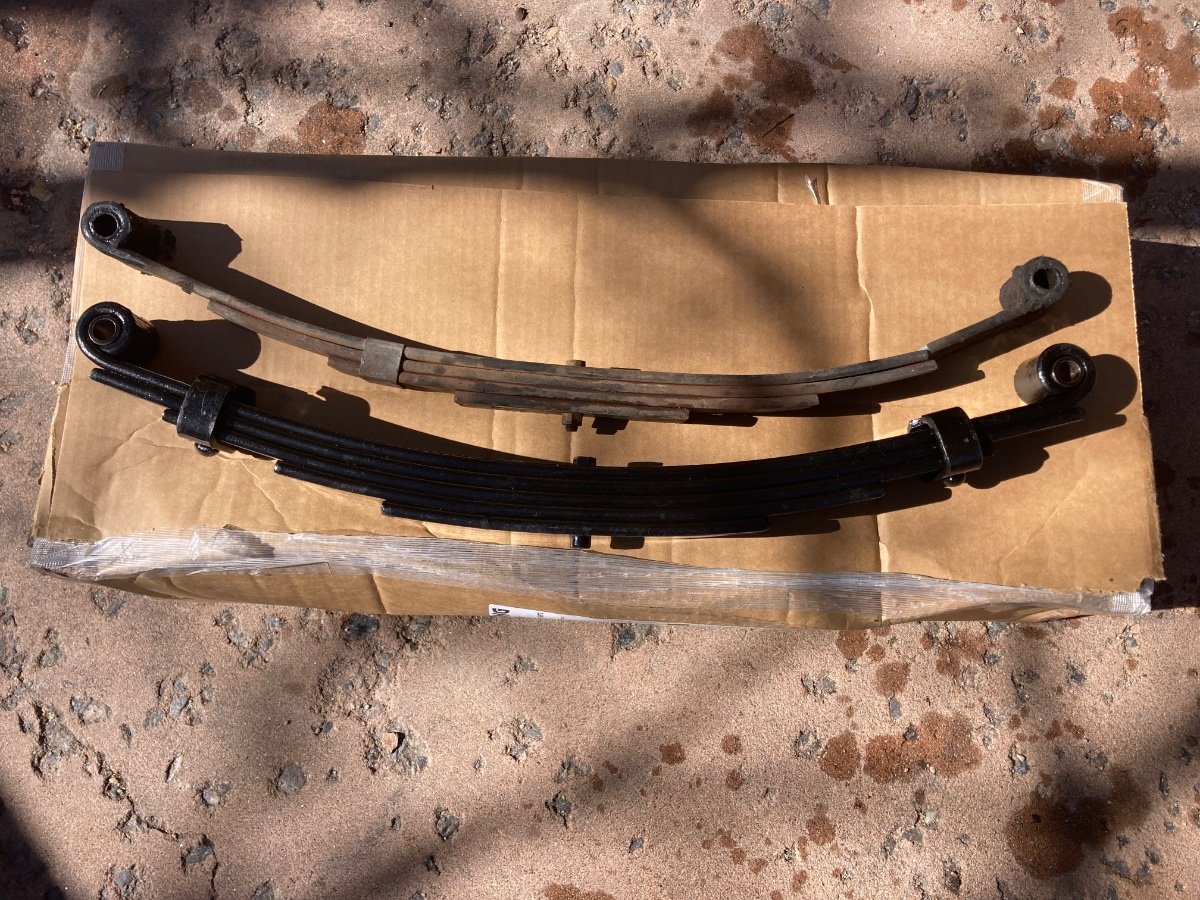
When we were in the early build stage of our Hull #050 back in late 2013, I asked Jim Oliver what he suggested for axles for our new Elite II. We were coming from a 2008 Elite that had a 5200 pound axle with five leaf spring packs under it. He quickly said that he would want the same ones we had on our first trailer. So that's what we went with. The plan at that time was to use 2 x 3500 pound axles with four leaf spring packs on the regular production Elite II's. With the exception of a few trailers built in 2015 with the 5200 pound setup for the reason stated previously by @rideandfly this has been the standard on all production units since the first 2014 models rolled off the line and continued that way through model year 2021. The 2022 to current Elite II models saw a change in their axles. The Elite's axle remained the same as they had always been but, In an effort to streamline production and simplify their inventory, the decision was made to use the same size axles on both the Elite and Elite II trailers. All trailers delivered since 2022 have been supplied with two 5200 pound axles with the Dexter Nev-R- Lube hubs on them. However, they stuck with the 3500 pound 4-Leaf spring packs that have always accompanied the 3500 pound axles rather than the 5-Leaf spring packs that are standard on the 5200 pound axles. Their reasoning is that the stiffer springs would cause a rougher ride and could lead to drawers coming open or cabinet doors opening up while under tow. This why the GVWR remains at 7000 pounds. In addition, Oliver has also changed from 16" wheels with LT tires to 15" wheels with ST tires. There has been some recent owner interest in obtaining the Dexter Nev-R- Lube hubs. This requires a complete axle swap as they are not compatible with the axles all the older trailers (pre-2022) are equipped with. If you are contemplating ditching the OEM 3500 pound axles for the new setups with the higher rated axles, be aware of this spring issue. I can personally attest to knowing of at least 10 spring failures on the 4-Leaf spring packs on both the older trailers and a few that have recently been delivered over the past year or so. All of these springs have broken in exactly the same place. Also, I have never heard of a single failure in any of the trailers that are equipped with the 5200 pound axle with the 5-Leaf spring pack. This includes all the Elites ever built and, to my knowledge, none of the Elites II’s that were originally built with the 5200 pound axles and the 5-Leaf spring packs. My predication is that the 4-Leaf spring packs will continue to fail no matter which axle they are installed with. My advice is if you are changing out your four leaf springs for any reason, consider a stiffer spring that the originals and to purchase and carry with you at least one extra spring pack. If you’re going to Alaska carry two sets. One owner was up around the Arctic Circle when he discovered his were broken. Not the ideal locale for a FUBAR.8 points
-
A couple of months ago I posted about wanting to flip the cabinet door above where the coffee pot is. It's finally done (almost). Every step was a two person job. Three wonderful people helped me. I dragged my feet a bit because, honestly, I loved having it open. But it was a pain when moving. Scrapped the old calking and glue off with plastic blades. Cleaned off lingering stuff with acetone. Removed the door from the frame. Flipped the frame upside down and glued it back on using 3M 4000 adhesive. Note, the frame is flexible and wanted to sag, getting it right was tough. The door fits tighter than I'd like but it closes. Screwed the door back on. What a pain. Tiny little screws that aren't magnetic and there is nothing to brace the door on while trying to get the screws started. Because of the curve of the ceiling, the hook had to be placed out aways. Right now it's just being kept open with a couple of bent paperclips until I figure out what's best to use. Here's the finished product:
 4 points
 -
A different suspension design would be great going forward but I doubt that it actually could be retrofitted at a reasonable cost. Right now I’d be happy with USA made springs. That small change could make a huge difference. Maybe Oliver could start buying just the axle assemblies from Dexter and springs from a different manufacturer. I know that none of the other mainstream trailer manufacturers would ever do anything so bold or even consider out of the box thinking but Oliver often thinks out of the box, that’s the very reason we have such a great trailer and they’re in such high demand!4 points
-
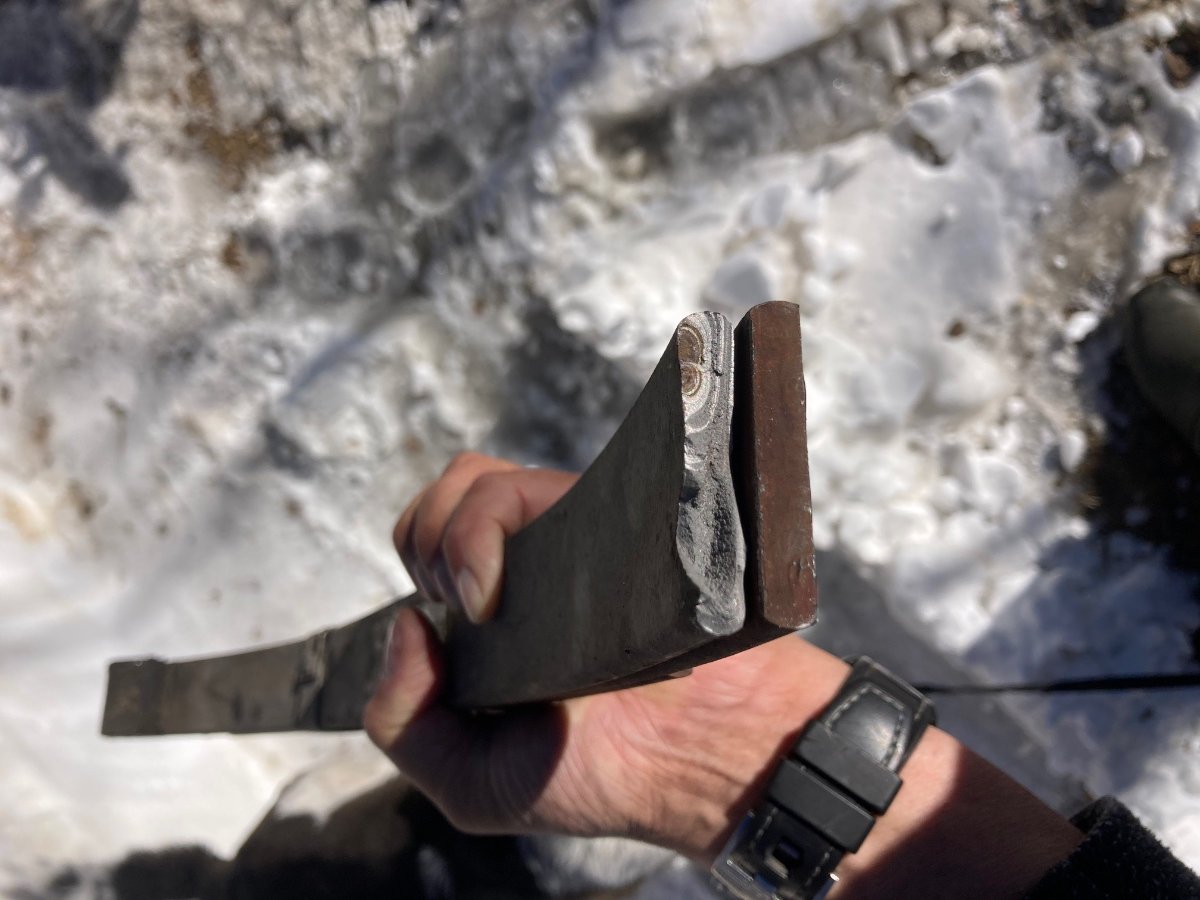
On the way home from the SW this year, I had the pleasure of experiencing a broken LR leaf spring while underway. It broke in the usual place (see pic). Fortunately the broken spring was noticed quickly and I found a safe place to overnight and perform the repair the next day. Unfortunately, I was not carrying a spare spring. After finding a pair of springs locally and installing them I made it home the next day. What I found when inspecting my broken spring was what appeared to be a defect in the steel (see pic). In no way do I blame Oliver for this failure as the trailer spring market is monopolized by Springs made of Chinese steel and Oliver, like all other manufacturers source from the same pool of components. In fact, after opening a service ticket, Mike was extremely helpful in getting me the specs and info I needed. I decided that once I got the trailer home I would replace all four springs with the best springs I could find. Preferably from a US company, made in the US and with US made 5160 spring steel. What I did not appreciate was that there did not appear to be any trailer parts sources which met this criteria. This was not proving to be a simple task. Everything I could find in the RV aftermarket was sourced from China. No exceptions. The only good news I found was that Chinese springs are cheap ($35-55ea). I remembered a Spring Company from my offroading days and gave them a call. They had a set of four springs which fit the measurements provided by Oliver Service and were made in the US with US 5160 spring steel. Cost is $150/ea spring but since I had already spent a fair amount of $ upgrading to stainless lugnuts and US made Timken bearings this did not prevent me from placing the order for a set of four springs and new ubolts. New springs should be here later this week. I will update with pics once I get the springs and also once I install and of course again after towing a few thousand miles.
3 points
-
Larry: This really is significant. It appears that the heat treatment was not consistant across the cross section of the spring. This would set up the spring to have force concetrations and/or embrittlement fractures. I have been contemplating various ideas to stiffen up our OE2 suspension, and the higher rating for the spring rate with a small air bag may be a step in that right direction I think. Once you have a chance to install, if they work out as hoped, I am thinking that there will be a significant number of us that will want to replace ours. With commitment for a lot of sets, it becomes possible to negotiate a group purchase at discount. Paid in advance of the production run with an option to pick up at the factory or shipped to owners desires address with additional cost. I know more than a few of us could be in their fine city later this summer. Do they have a facility suitable for installation on our trailers? The would be helpful for those of us on the road. Your thoughts? GJ PS: I OFTEN take posts of significance and turn them into a condensed word document. Hope you don't mind, but my version is attached. I find it handy having an electronic copy for down the road, and having the info you posted is GOLDEN! Made in USA leaf springs (6 FEB 2024).docx
3 points
-
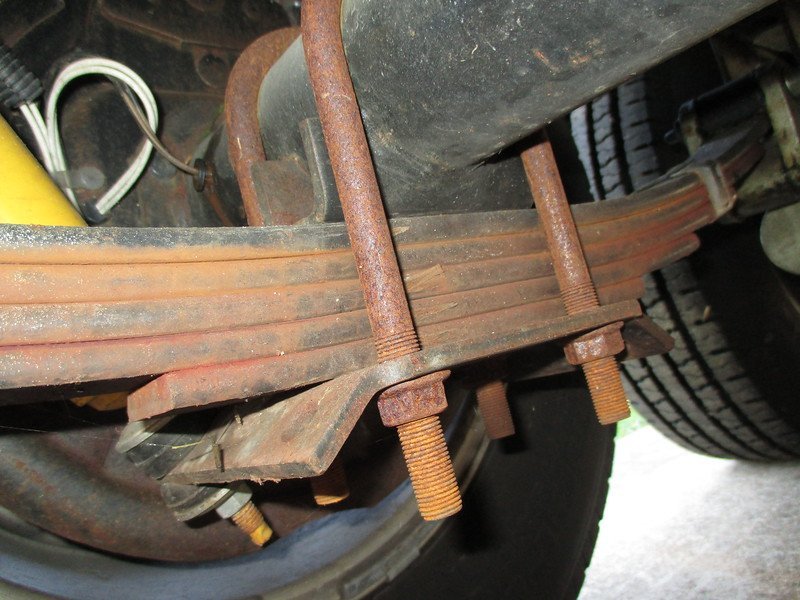
John, Our 2015 LE2 #75 has 5200 pound axles and springs. Understand at the time Oliver ran out of 3500 pound axles, so Legacy Elite axles/springs were installed on our Ollie. 99% highway use with no spring issues. Here's the springs on our Ollie:
3 points
-
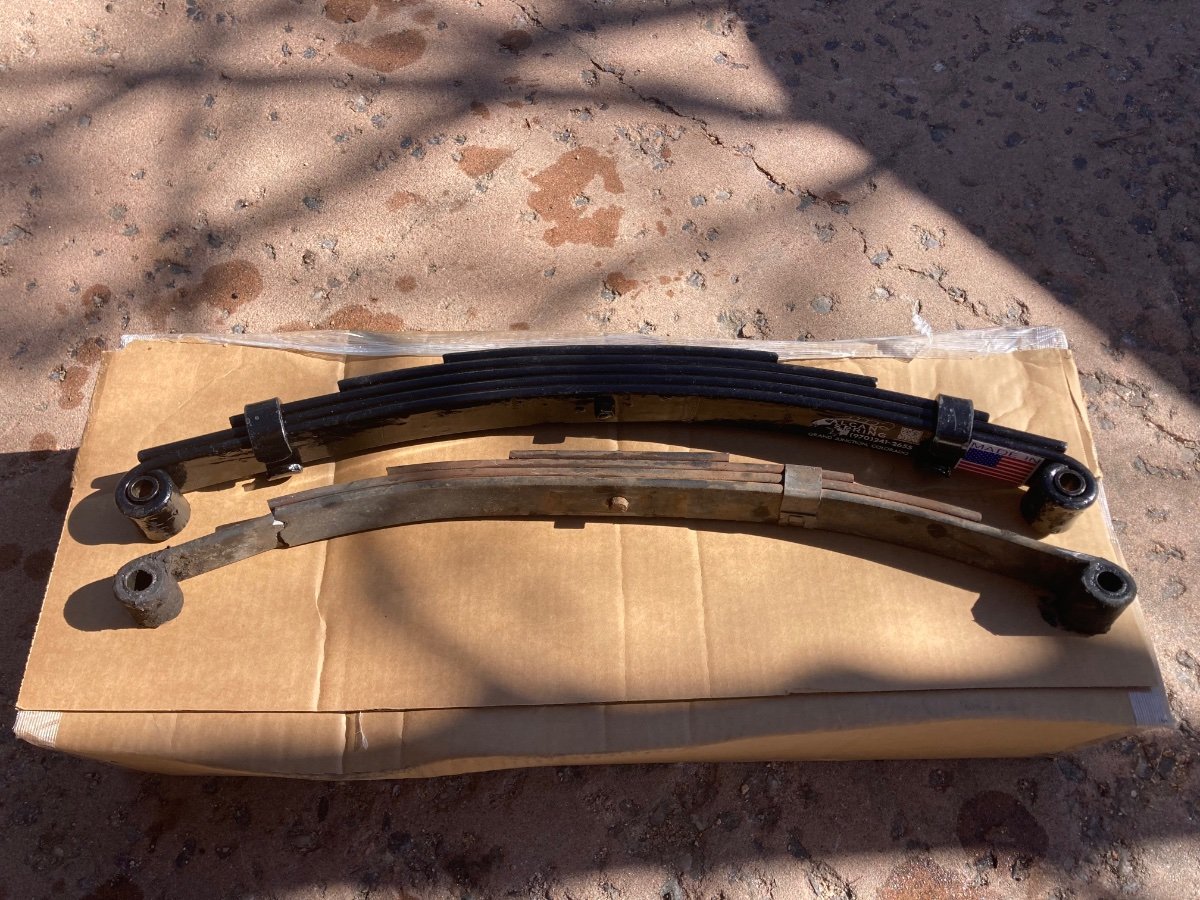
My new springs arrived today. I confirmed measurements are correct and that they are the same size as what my E2 had when it shopped from the factory. Should be a direct bolt-in. Here are the specs on the new springs: -Made in USA with USA sourced 5160 spring steel -Bronze eye bushings vs. plastic -2,750lb rating/ea vs. 1,750 (will not change gvwr as axles/bearings remain determining factor) -5 leaves vs, 4 -second leaf extends underneath eye on each end (protecting common break area) -steel, bolted spring keepers (one each end) vs a single, sheet metal band -width = 1.75" -drop = 3” -length (eye-to-eye) = 25.25” The company I sourced them from is ALCAN. They are known for durable offroading springs and have been building custom springs for rock crawlers and overlanding vehicles for decades. Attached below is their contact info. Ask for Mike and tell him you are interested in the 1.75” wide trailer springs like he sold to Lance from Colorado. I will report back when I have them installed, but that may not be for a couple months until after the snow melts up here in the Rockies
3 points
-
We were traveling on I-8 in Arizona heading eastbound to Organ Pipe Cactus NM and spotted 2 Oliver’s Westbound and 2 in the campground when we arrived. On road spotted: Westbound, before Yuma, Blue & Grey logo towed by grey F150 Near exit 67 I8 Az , Gold logo pulled by white Mercedes suv Two others in Twin peaks CG , Gary Foy Lin a 2022 pulled by F150 hybrid. tbd other unit. tgats more sittings in one day than the whole time from Sept 2023 to today Craig hull 505 - Galway Girl2 points
-
Just how long is that wish list?🤑2 points
-
This was the case with ours, fiberglass dust had gotten into the panel switches; the blue indicator LED would flicker along with the cabin lights in our case.2 points
-
Always a treat to spot one or be spotted and see a post about being spotted. We were at Galveston Island State Park and an Owner with their Oliver drove by and posted seeing our Oliver. We saw the post and replied back😊 The best was having a phone conversation with Steve Landrum while we were both on I-20, Steve East bound and we were West bound. We all waved passing each other in a blur.2 points
-
Rumor is there is one more on the way…2 points
-
Most of the sleuthing will have to wait until we get home. Dust may be a culprit, we had gusts to 70mph, blowing talc fine dust at Mesquite Springs, DVNP. Getting rained on at the moment.🤷♂️2 points
-
I am sure there are other US Spring manufacturers that use US made 5160 spring steel. I encourage people to do their own research and let the group know if you find other sources. In my week-long search I found only two manufacturers that returned my inquiries. I knew previously of ALCAN and their offroad spring Creds and they had the springs in stock so I went with them. St. Louis Spring also replied to my inquiry but required that I purchase a new replacement spring of the specs I wanted and send it to them to replicate. I have included their response below in case there are owners local to St. Louis and for whom this requirement would not be such a obstacle. Note in their response they also recommend adding a fifth leaf. Best of luck in your own sourcing. Please post any concrete updates on places which meet the "made in USA with USA 51560 steel" criteria. It is always good to have multiiple sources from which to choose. Also, perhaps Oliver may wish to follow this path for suspension on future trailers. Our legwork may help facilitate this as a future upgrade, placing Oliver even farther up the quality metric amongst the pool of RV mediocrity. As far as running a set of 8,000 springs vs. 7,000 I am prepared to run even lower tire pressures to smooth out the ride in order to avoid the roadside PITA of a broken spring, instead having a potential trade-off of quicker tire wear and lower towing mpg. I was lucky that my issue was noticed at a Love's with a newly built, adjacent RV Stop RV park which featured large, newly poured cement pads, new luxury showers, power and quiet sleep. Also, a local, Good-Ole Boy RV shop/contractor who had the pair of springs to get me home and did not bend me over the cash register. Your mileage may vary should this happen to you. I am doing everything I can to make sure I do not end up in this predicament again. At minimum, I recommend buying a spare spring (or two) to carry with you on every trip. Ironically, ScubaRX and I had this exact discussion not more than two weeks earlier (after meeting another E2 owner in Quartzsite who had broken a spring) and I was planning to order a pair of springs to carry as spares once I got home...UGH. Best wishes, Lance Spring Team <springteam@saintlouisspring.com> Fri, Mar 1, 9:06 AM (6 days ago) to me We can definitely makes this for you and would be made here with American steel, however we would need a sample to duplicate and a lot of times on these travel trailers we make them heavier by adding a leaf to each. Thanks The Spring Team St. Louis Spring Company Tel: 314-533-2132 Email: springteam@saintlouisspring.com Web: https://saintlouisspring.com2 points
-
Our daily OTT spotting record is 2. One was @Mike and Carol on I-10 westbound near AZ/NM border in JAN. We also had a unique OTT spotting experience last MAY in CO - while northbound on I-25 in the right lane near Trinidad, we had silver 2022-ish Tundra (same as ours) pass us in the left lane towing an Oliver of unknown pedigree... I immediately woke up D and said, "Hey baby, that's what we look like when we're passing another Oliver!"....2 points
-
You are correct, Generation 3 uses RJ45 connectors and I have confirmed that everything must be shielded. While I am thinking about it, for others ....... I first tried a hole drill on the outside connection but had good success with a router blade for my Dremel, very easy. One other thing for those considering this. I want my Starlink to be powered by 12 V and there is now a relatively inexpensive device that means you don't have to cobble together different devices -- https://www.trioflatmount.com/shop/p/gen3-12vconversion, the company claims it used 4.5 amps. So, all my stuff is due today so I will see if I can get it to work, thanks for answering.2 points
-
Please post the eTrailer link if you have one. Thanks2 points
-
This is the direction I would like to see as well. One of the US Spring manufacturers (St. Louis Spring) said they would replicate the springs on my E2 with USA sourced 5160 spring steel if I would send them a new one to copy. Knowing what I know now, I certainly would have paid a premium at time of purchase of my Oliver for USA made springs. I would like to see Oliver investigate this path. Now that they are at dealers, it would certainly further set them apart from the rest sitting on Chinese suspension. I cringe now knowing that my trailer went 25,000 miles supported by a $150 set of springs (again, not Oliver's fault. The entire RV components industry has gone to the cheapest possible cost model without regard to quality or safety).2 points
-
Nice, I spotted one on Sunday around 12:30ish EB on Hwy 401 in the Whitby area (Canada, Ontario). I was WB on Hwy 401 otherwise I would've made an attempt to stop it for a chat! Seeing another Oliver up here is vary rare, probably just a handfull up here in Canada. It was towed by a black PU Truck.2 points
-
How about an individually adjustable pneumatic airbag type suspension for Ollie? No axles - lighter, smoother ride - less damage to OTT and components, no more broken leaf springs, more ground clearance by adjusting air pressure, enhanced braking, and "drum roll" please.... no more zerks! ...screenshot taken from an earlier thread on "Aussie Quality RVs": ....just say'n
2 points
-
If you're on shore power and your converter is working correctly (batteries stay charged, etc.) when this happens that lowers the odds it's a voltage problem, but it would still help to get a voltage reading when your furnace kicks in. You could use either a multimeter or a volts readout from a monitor in your cabin (not sure what monitors your year trailer had). Other options would include a bad connection, with the furnace observation being just a coincidence. First thing I would look at would be the switch. The contacts may be worn or oxidized, or you could have dust in there. Do the lights function correctly when switched on/off? No flickering or delay after you flip the switch?2 points
-
I most certainly will. Waiting to see and touch them first and confirm the measurements and specs are right (should be no issue). Once I have confirmed this I will share the info and contact details.2 points
-
No. We have the Oliver-installed shower curtain, which keeps the toilet area, including the return air vent location, fairly dry during showers. And, like you, we squeegee the shower walls to speed up drying of the wet bath. Given the amount of air flow whenever the furnace is running, we have experienced no moisture issues in the underbelly. I believe the more abundant source of any moisture in that area comes from condensation when outside ambient temps are low and humidity is high. The flow of return air through the underbelly, which is enabled by the return air vent in the shower, actually helps dry out this condensation.2 points
-
In my business, we call that Rolling Wave Planning!1 point
-
LOL. Mine was so long, I had to make two lists: 2024 Do List Future Years Do List GJ1 point
-
Thought I'd wrap up this discussion with some more test data. It's been around freezing here the past few nights so I wanted to verify past results and include a baseline test with the original OEM setup with just the return by the furnace. Pretty much all original results (OEM return blocked, and two 6" returns added at the rear of trailer) were confirmed, with some minor variances, with curbside rear temps increasing on average 15 degrees, street side rear temps increasing on average 20 degrees, and the under sink area increasing on average 12 degrees. Floor temps at the rear of the trailer increased 14 degrees. These increases were from a cold start in the morning. To start, all under floor areas were about 5-6 degrees warmer than the outside temps, and 11+ degrees colder than the inside temps (I keep a small space heater running in the trailer in the winter). Interestingly, when I put the heating system back in its OEM configuration, and closed off my 6" test returns, this showed only 3 degree temperature increases in the rear curb and street side areas. So not so great there! Under the sink, however, had similar gains (12 degrees). So I think some return air must travel in through the spaces between the cabinet drawers and back to the area under the sink. In my 2015 E1, the cabinet box is open in the back so return air can pass through to that area. All this may not apply to some of the newer trailers, but there are a lot of older ones out there that could benefit from this mod if you travel when it's cold out. Just how cold one can go I can't say yet, but this mod will certainly help a lot and is very simple to implement. The E1 will be different than the E2 as the furnace locations are different among other things. The same principles will apply however, with high pressure (cabin) moving to low pressure (under floor), and the returns will just be located in different areas. Preferably, but not always, as far away from the furnace and supply outlets as is practical (depending what path you want the return air to travel). Thanks. Now I have some big holes to drill out...yikes! 🤯 Dave1 point
-
Given 5200 LB axles have been used (x2 = 10,400 LBS), then if these custom springs rated for 8000 GTWR might be exactly what the doctor ordered! Just reviewed your Word doc @Mountainman198. Nice work and as soon as it's time to spend on the Oliver AGAIN, I have these now on my wishlist.1 point
-
Ditto for our hull. GJ1 point
-
Best to call them and ask. Their specialty is custom leaf springs, based upon owner provided specs. You will need to provide them with msmts, loaded weight, likely gvwr and perhaps more details. I would be surprised if they would be unwilling to make something custom to meet your specs1 point
-
Those are the same reasons I plan to replace my springs, now that I know there have been a number of failures with the cheap Chinese 4-leaf springs. I had a leaf spring fail on my raft trailer many years ago in the "middle of nowhere," and it caused a logistical nightmare. Even after spring upgrade, the amount we load onto the trailer will not change. But I will have greater peace of mind when towing Hull #1291 far from home!1 point
-
I like the idea but it seems that just looking at this picture with my tired eyes; there are as many pivot points as with the OE set-up. Maybe more.1 point
-
A bolt head of the right size is a suitable substitute for a very large Allen Wrench. GJ1 point
-
Yup, if Oliver came out with a bigger unit, a true 23’ or even a 26’ and dry bath they will kill that market!1 point
-
Yes it might be check valve, but look into the inlet of your fresh and city water connectors, you will see a hex. (I think its 1/2”) fitting like the below piture, tighten that hex. fitting and hopefully that will solve your proble. .1 point
-
@Ollie-Haus - agree with your assessment. The tradeoffs would need to be thoroughly evaluated for a particular owner's camping needs, for sure. Just thinking that a world-class travel trailer like the OTT would be better served with a world class suspension such as earlier discussed and presented in the Peregrine video. We haven't done an analysis at the PRO/CON level - but we would definitely be interested in examining a suspension such as the ATX (designed for the Aussie Outback) for our rig. Price Point? The Lippert air suspension starts north of $2,100, for example.1 point
-
4x6VDC AGMs, on shore power at the time. Batteries are in good shape.1 point
-
Thank you for the information. You are at least the fourth Oliver owner to have broken springs. Some trailers are newer and some have been older so certain ages of trailers don’t (at least so far) seem to be more or less prone to failure. Also as you stated, this is not an Oliver issue in any way. I believe that all trailers of any make are prone to spring failures.1 point
-
I had one quit working last August at my annual state inspection. Auto parts stores have them. Just in case I ordered some more from Amazon. (PSEQT 3/4 round LED side marker clearance lights, front rear marker indicators tail light waterproof for trailer truck car bus van pickup RV ATV wrangler. 10pcs red & 10pcs amber) These come with the rubber grommets and chrome rings as well for under $20. Be sure to put a little bit of silicone on it before you install it. They just push through a rubber grommet from the outside. Nothing else holds them in place.1 point
-
Does anyone happen to have a picture of a return air vent in the bathroom? Is there is a corresponding vent under the dinette seat, or does it return the air through the underbelly? I'm unclear if this was something that Oliver was now doing, and/or, if it's only for Truma units? Adding a return vent in the bathroom seems like a worthwhile modification, although it also seems like it could create a draft when the heat is not on.1 point
-
Trust me, they do. Think of it this way: the furnace blower creates positive air pressure in the trailer's main cabin. If you left the closet door open all the time, this positive air pressure would push warmed air into the closet. The two vents work in a similar way: the positive air pressure pushes the cold air near the floor level of the main cabin through the lower vent (i.e., a hole with louvers) into the closet. As the warmed air rises, it exits the top vent (hole), creating a convection current in the closet.1 point
-
My interest in this mod is two fold. First, to create more even heat distribution within the cabin area. Second, to keep the basement above freezing as we like to camp in the early Spring and Fall. I think Oliver has overlooked the benefits of proper return air placement and what it can do to increase cabin comfort and durability of the plumbing systems between the hulls. As for between the hulls, yes, there is reflectix insulation on the floor of the outer hull, but it is also mostly an unconditioned dead air space and it gets cold down there! Especially the rear corners where there is a lot of vulnerable plumbing. The beauty of placing the return air ducts far from the furnace is that it turns this under floor space into a giant plenum where conditioned cabin air flows from the return grilles back to the furnace warming the entire area, not to mention more evenly heating the cabin itself. My test showed a dramatic increase in temperature below by moving the vents further away from the furnace. There was definitely more air flow from the vent on the same side as the furnace. But that's not surprising and could be adjusted for if one was so inclined. Just remember that your furnace has a minimum cold air return volume requirement, it's in your owner's manual. I think if you have properly sized return air vents, then outside air being sucked in through the drainage scuppers wouldn't be a issue, but this needs to be tested. This is also a simple passive setup, no fans or other support needed for it to work. I will say that if I was out in extreme cold for long periods, I might need to employ other measures. Time will tell. Now that I have these sensors, I can keep track better of what's going on between the hulls. I'll also probably add a 4" return vent in the bathroom on the side of the vanity under the TP holder. Not a lot of flat wall real estate in the E1 to place a vent but I think I can just fit one in there. More testing to do, but may have to wait until next winter unless some Arctic blast hits us again. Cheers. Dave1 point
-
Wondering how this is better than the standard twist-lock. Reviewers talk about standard cords with melted connectors or arc damage on standard cords. Melted connectors are usually caused by operating large draws like the A/C with low campground voltage (a problem addressed by the Progressive EMS), or by loose connections. The standard twist-lock should provide ample connection surfaces if it is used correctly (twisted to the locked position). As far as arc damage, that will happen to any connector that is disconnected under load. The pedestal breaker should be opened before disconnecting the cord. The same would be true with the Smart Plug. With a special plug like this, you'd have trouble sourcing a quick replacement if something happened to it, while standard cords are available at every RV shop and replacement plugs/receptacles at any Home Depot. And what is "The retro-fit connector...designed to be used with your existing cord"? If it's an adapter that goes on the end of your regular cord, you still have a twist-lock in the system. I'd need a lot more convincing before purchasing.1 point
-
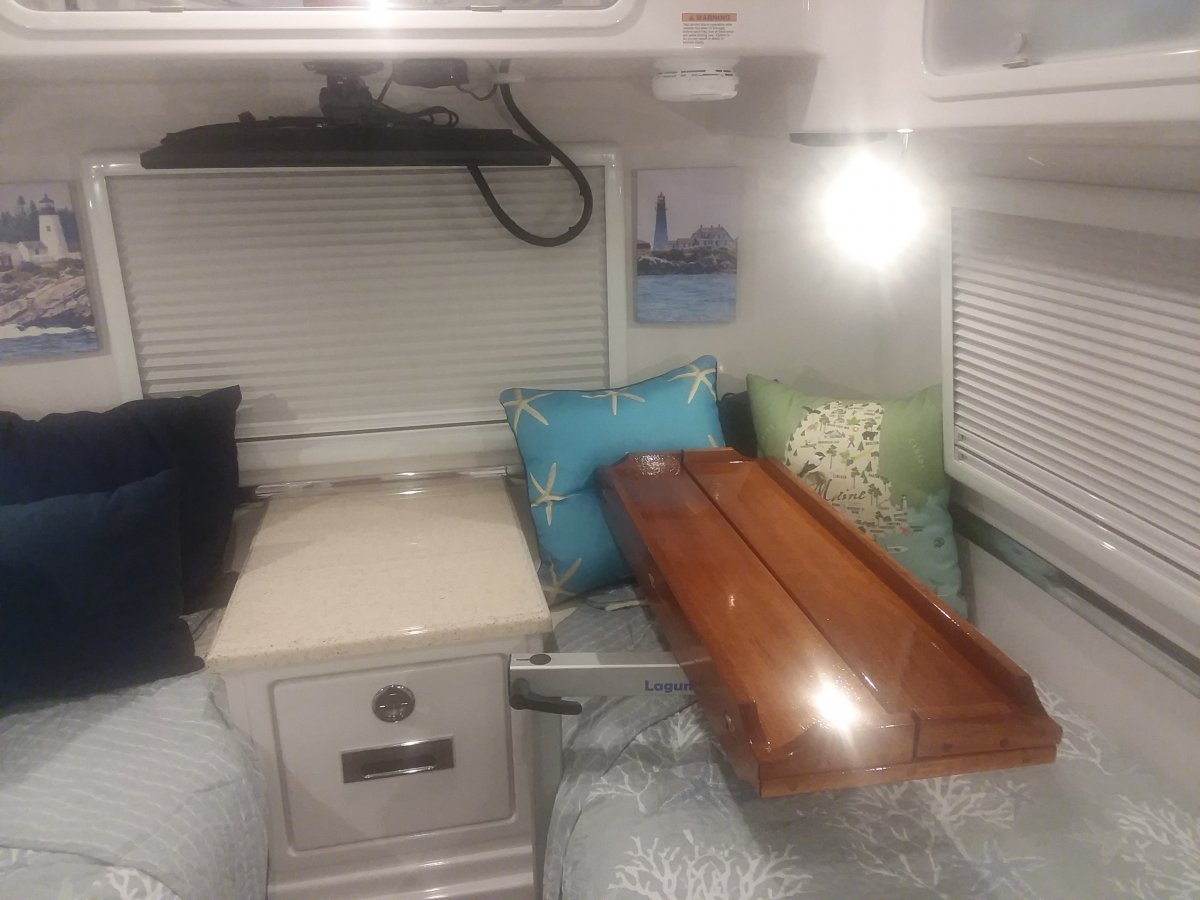
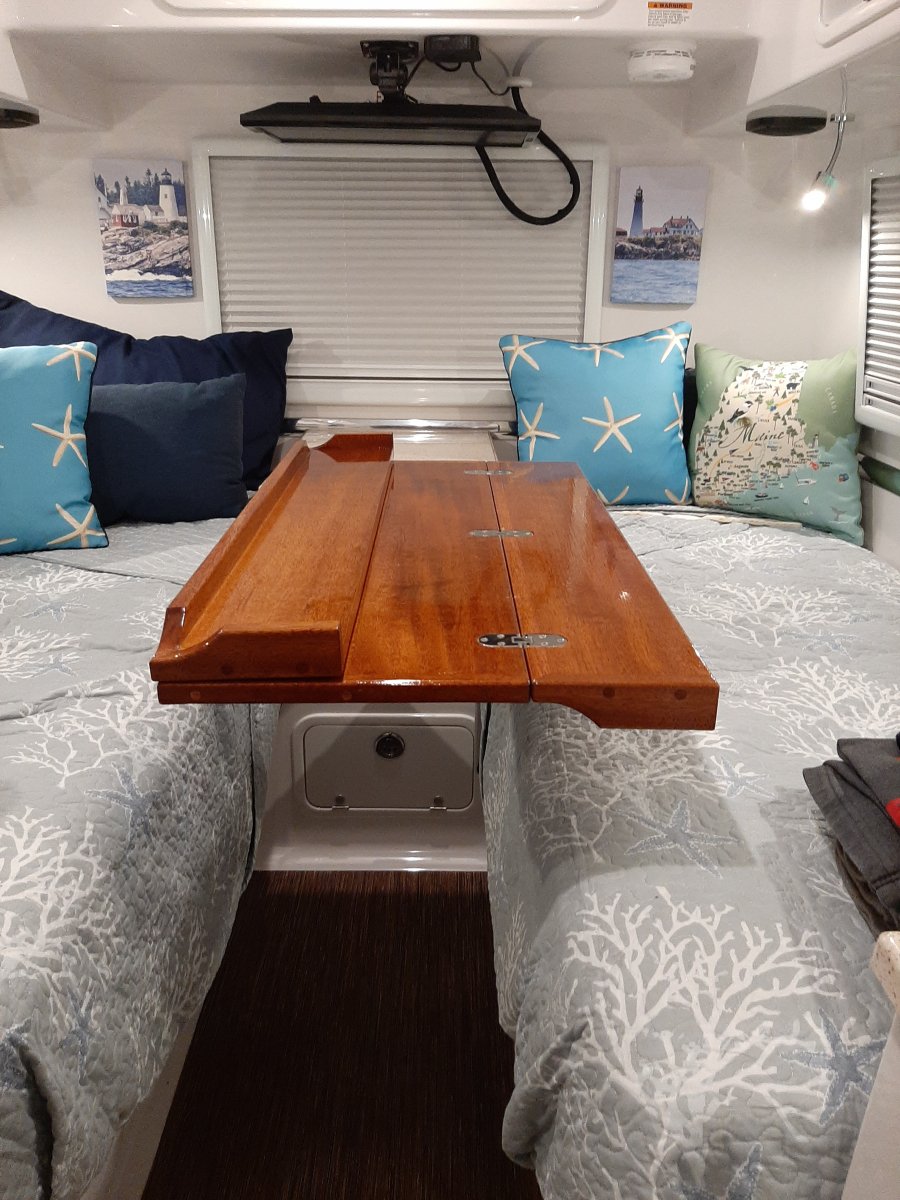
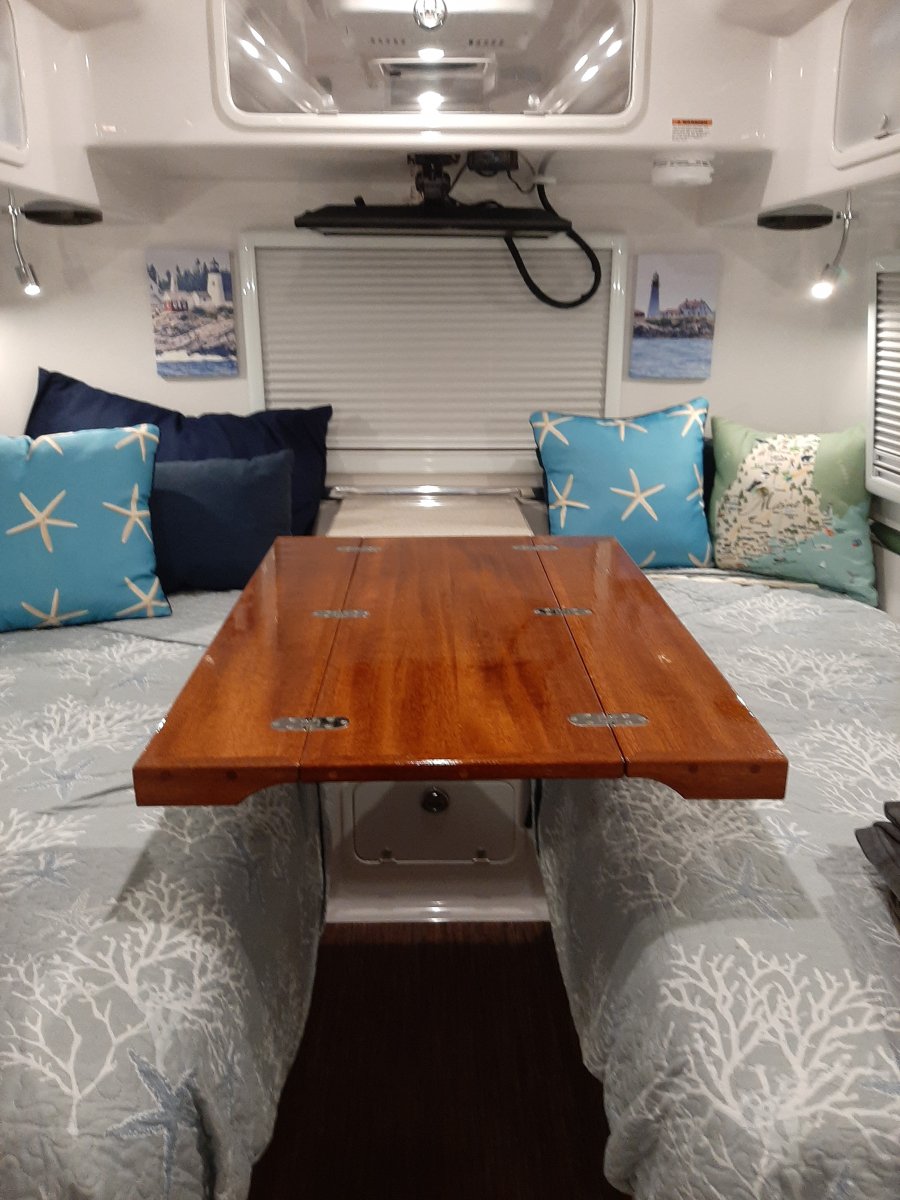
I installed the Lagun table following Overland's instructions. I did use some aluminum backing plates. We had our table made buy a local craftsman with slightly narrower dimensions. We can fold everything up and put it in our front closet easily. We are very happy with this and we can leave the table up and position it to allow access to the twin beads, basement, and overhead cabinets. Overland's plan was really terrific. We have the basement door too. Just a thought---- You might want to consider Oveland's method for your dining and game table and I have seen some folks have added a fold down counter top extension to the right of the cook top for extra prep area. There are treads on the countertop extension on this forum somewhere. Good luck please share pictures of what you do. Hint ---- by not centering the Lagun bracket in the table you can gain significant flexibility in how you deploy the table. Ours is mounted closer to a corner of the center section. Done through trial end error using a cardboard mock up. It is a fun project.1 point
-
I got so busy finishing my project before trying to see some spring training baseball early in the month that I neglected to post my pics. Thanks Overland and ALL for the suggestions. I initially fabricated a bigger table top but it was bigger than I needed and the finish didn't come out as hoped, so ended up buying a workbench top from Home Depot. I was able to use it on my 13 day trip from home in Colorado to Mesa, AZ and back. Very happy with the results. Since it is just me in the trailer, the size works. If there were 2, perhaps a bit to small. PS - saw spring training game Tuesday. Wednesday rained out. Thursday rained out and minutes later got word that MLB had cancelled the rest of the spring training season due to the COVID-19. 😞 There's always next year! Go Rockies! E6677BB9-5C8C-41B6-AD36-75D63147A3CE.heic 6D37C146-D66F-4FDE-B970-4CDEF60C6D96.heic1 point
-
When we had mattresses, it did just feel like sitting on the bed, so it was ok but not perfect. Once we swapped out our mattresses for cushions, however, that changed and it feels like true sitting area. It’s a little tight on the street side for two, since the leg of the table takes up some space, but it works. The curb side is fine for two. So I’d say it’s perfect for two or three, a little cozy for four, and doesn’t work at all for five or more. We haven’t tried it, but I don’t see why you couldn’t use a camp chair in the aisle for someone, so long as the chair is tall enough. Heres a photo of how it looks now with the cushions:
1 point
-
Here are some photos. When we travel we fold up the top and lower it on top of the bed and tighten up the adjustments. I surround the top with bed pillows incase vibration loosens the adjusters. That has not happened. We have the table set up all of the time. Overland did a great job with this. Thanks for sharing. Our custom table is a little bit narrower than Overland's. We mocked up the size we wanted using cardboard.
1 point
-
Hi we made this modification using Overland's instructions. I finished installing the mounting the bracket last Saturday. We made one slight modification in that I added aluminum backing plates. (overkill). I am having a folding table made out of mahogany by a local craftsman. I hope to install the table top this weekend. I believe this project will really enhance the usability of our trailer. Thanks Overland you came up with a terrific idea and execution.1 point
-
Once we pick up our Oliver, one of the first improvements will be this table mount. Following is a good price for the complete table mounting system, in case someone else is thinking about this mod. Now $138, was $235. https://www.rv-table-mount.com/shop This product excludes the table top. Thanks for the great idea and instructions.1 point
-
Yes, we started off with the king bed table in a twin bed. That was a hare brained idea of mine that Jason tried to talk me out of. It worked O.K., but I should have listened because the table is heavy and bulky and I could never find a place to store it when it wasn't set up. So in practice it was awkward and it didn't make it past the first trip.1 point
-
This is better than the factory solution because you can open the drawer with the table installed. Not to mention also have the basement access door. Color me jealous!1 point


-
Recent Achievements
-


")


")


