Leaderboard


Popular Content
Showing content with the highest reputation on 08/14/2022 in all areas
-
Final Update: Upon factory inspection by Truma of the failed unit. They reported back to Oliver that the issue was with some improperly torqued connections inside the water heater, caused by improperly calibrated production tools at Truma. So they have fully refunded the cost of my repair. I don't know if NHTSA is taking any action, but I'll report back the results I heard from Oliver and Truma. CS7 points
-
No trailer yet, but for jobs like this here in the rust belt, I use Eastwood’s original chassis paint. I see that there’s now an extreme and ceramic, but I’ve never tried them. https://www.eastwood.com/search/?q=Chassis Before: After: 14 Years later:
 4 points
 -
Hello, my wife Sondra and I joined the forum last month. After reading through many posts, we reach out to a couple of you directly to ask specific questions about your rigs, but, now that we have placed our order, we felt it was a good time to introduce ourselves to the community. As you can tell from my display name, we live in NC. I’m an NC native, who grew up in Mukilteo, WA, and Sondra is from Tinton Falls, NJ. We’ve been looking for a retirement RV for a couple of years and knew from the start we wanted something small, reliable, and reasonably four season capable. Our journey will probably sound familiar. We started with class Bs and smaller Cs, but quickly moved to truck campers then even more quickly to molded fiberglass ones. We really like Northern Lite and Bigfoot, but their weight meant we would likely need a 1 ton dually, which we didn’t want. That led us to molded fiberglass travel trailers and we narrowed that down to Bigfoot, Escape, and Oliver. We really liked how Escape allows for a great deal of customization. We were able to view a couple of them and until last month, we were certain that’s what we were going to buy. But, before placing an order with Escape, we wanted to at least take a look at the Elite. @Brian and Maria graciously opened their trailer to us and we knew we had found our retirement RV. Oliver being a family owned business and being relatively close to home were also big for us. Our Elite will be ready this March and we are looking forward to meeting you on the road. I guess we need to put our reservations in for Hiawassee 🙂3 points
-
The SeeLevel monitor must be an industry favorite because in the past, when I was deciding whether or not I wanted a trailer, I rented a Jayco and also an Airstream. Both had the same SeeLevel monitor. It definitely wasn't accurate with those two trailers tanks. I like your advice John, and I'm going to do that just because I'm curious. If it turns out that I can pull out 30 gallons and the SeeLevel still says I have 20% left, I won't be surprised. That's why if I'm going boondocking I always have extra water jugs.3 points
-
There may be an error in your gauge, the only way to really know is to look at the water level in the tank, using a strong light, or do a bucket test - fill the tank completely, then pump it all out using the outside shower into a five gallon bucket, dump, then repeat, to measure the real volume. If you are not getting most of the water, the suction tube may not be down all the way.. that would mean opening a service ticket. And make sure the trailer is really level, do not trust that little bubble on the jack, use the frame or the floor with a 12” or longer carpenters level, not your phone. If the hitch is even a little low it will make it hard to get out that last bit of water. The tank is long and short in height. John Davies Spokane WA3 points
-
Well, is there any good time to hit a deer? Wow. Some very good things to check! We know the pin that attaches the whale tail was at a good 90 degrees. We are confused because we have successfully hooked up on this driveway often. I will check the chains flipping over. Thanks!3 points
-
Dog Camping Gear just added to my YouTube Oliver Legacy Elite II Series.3 points
-
Thank you for sharing your experience at the Oliver plant and all the photo samples.😃3 points
-
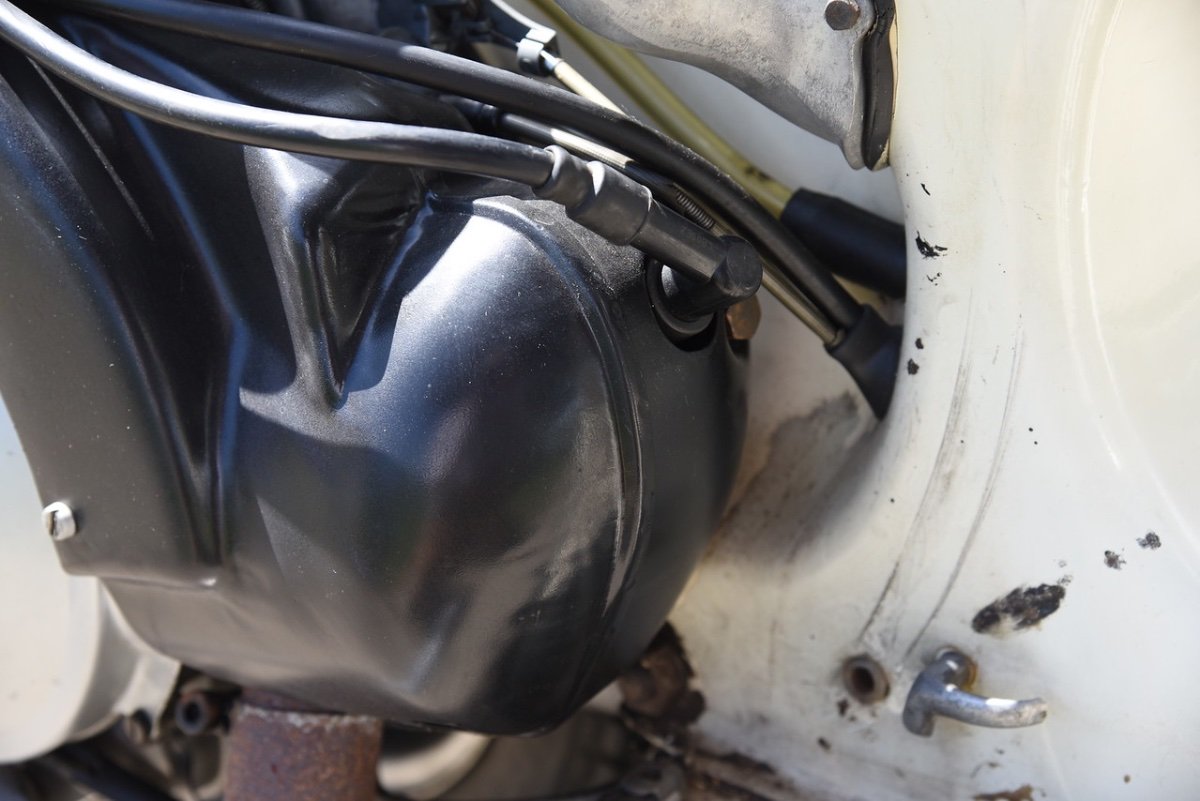
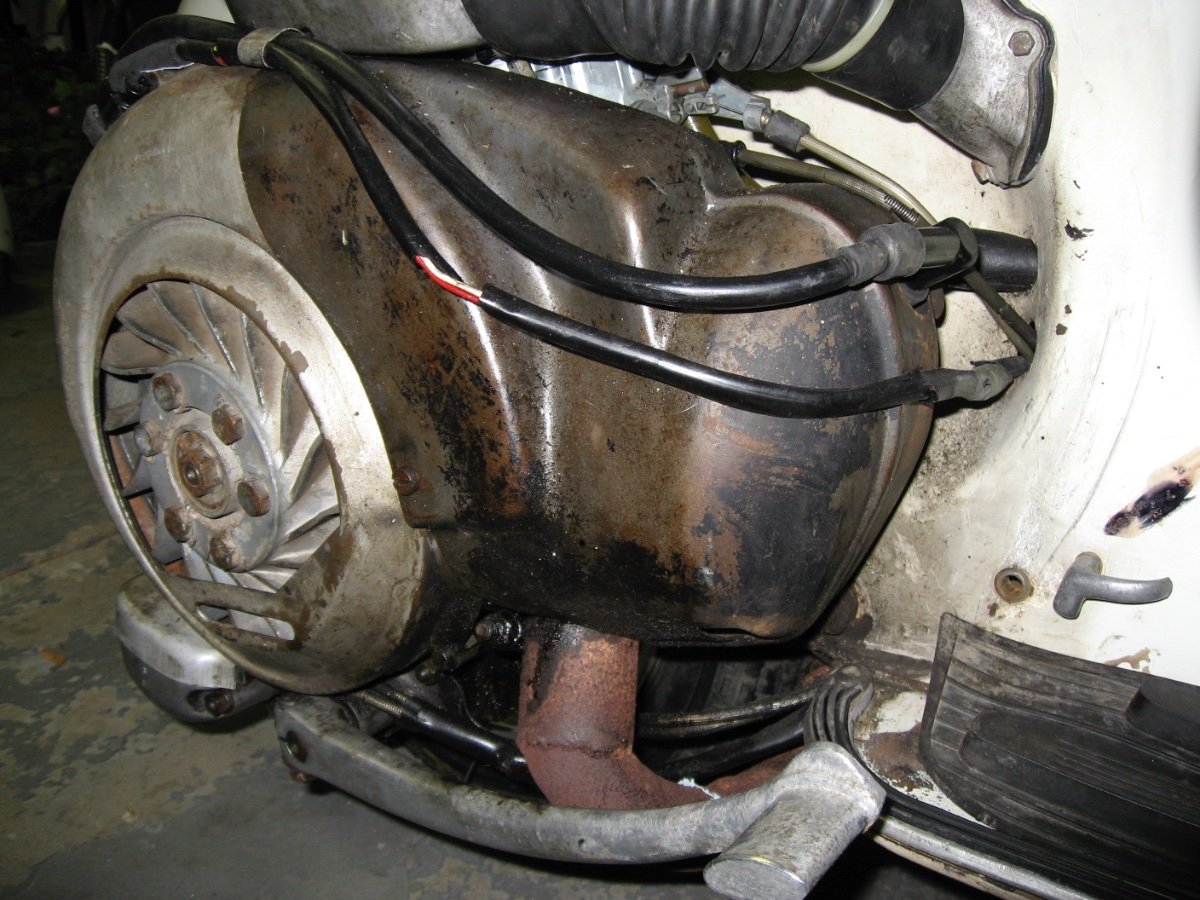
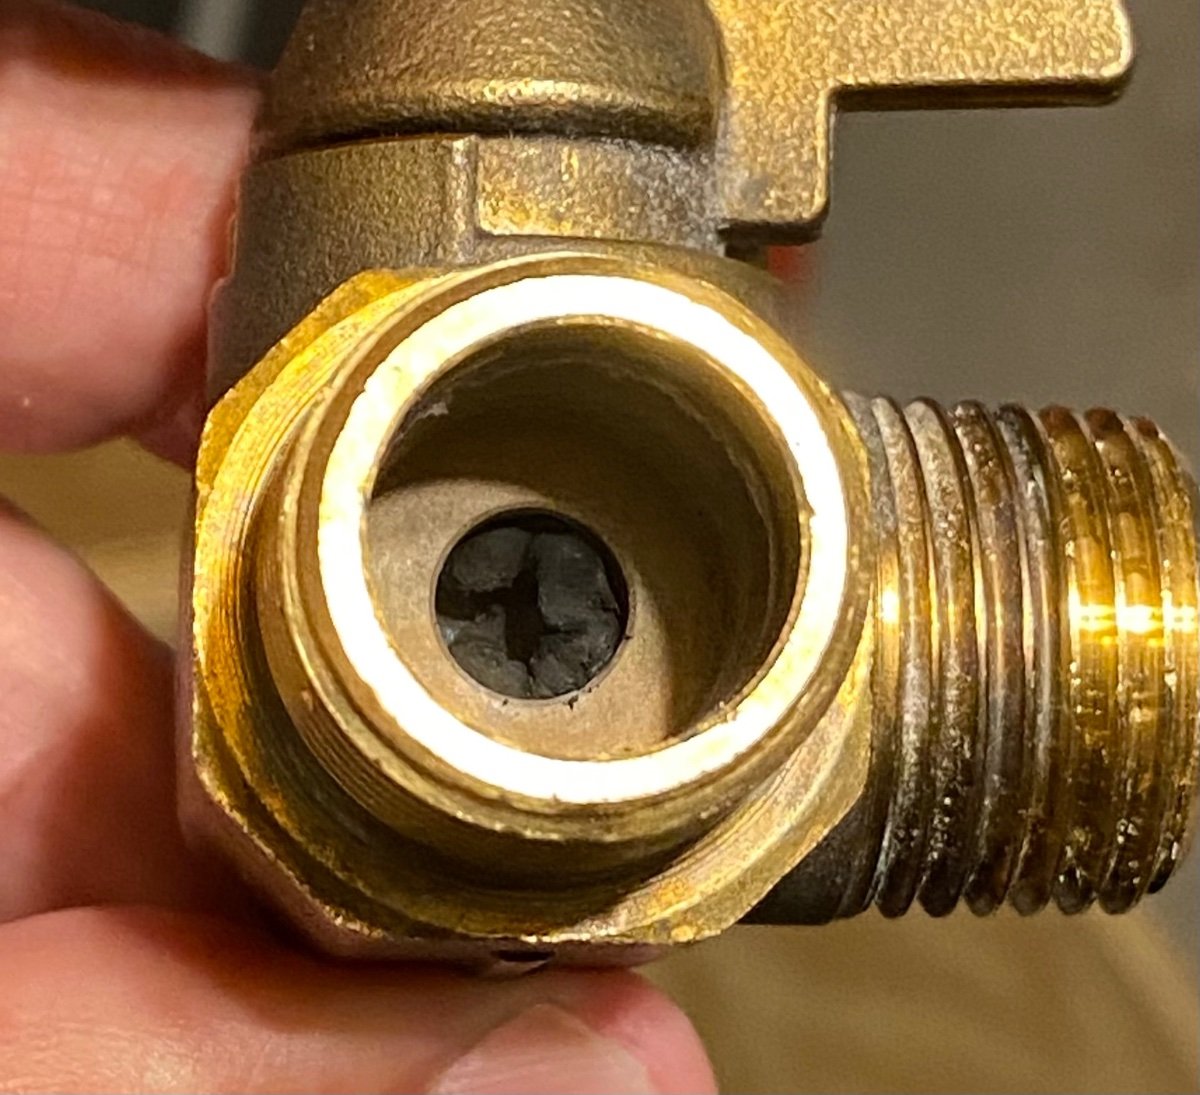
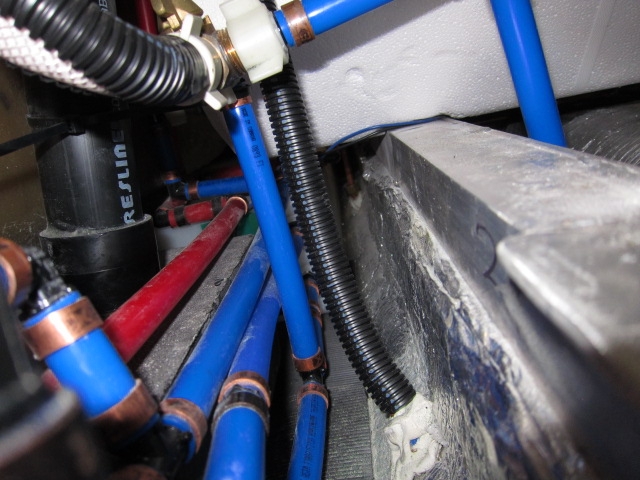
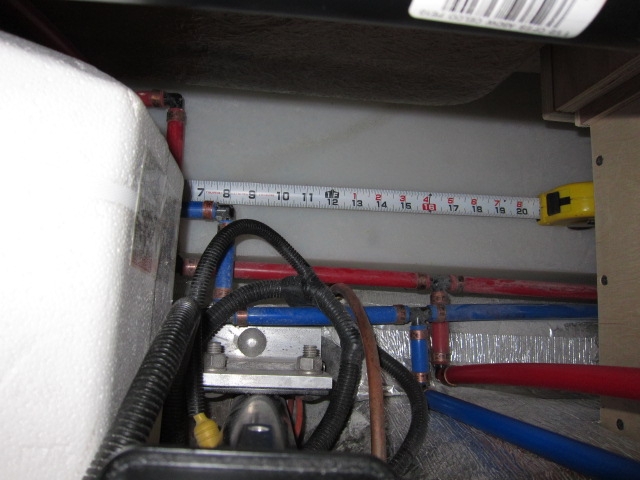
Not a Truma problem but the issue did manifest itself as very low HOT water flow at all faucets. Problem of low hot water flow was the same whether on city water or using pump & fresh tank. COLD water flow was good at all faucets. And I’ve done the decalcification/cleaning process annually. Did some troubleshooting and was initially thinking it was a Truma problem because flow to the hot side of all the faucets was good if I bypassed the Truma at the bypass valve on the Truma cold water inlet. Fearing a very expensive Truma repair, I dug a little further. Opening the Truma drain lever and removing the Truma screen filter, and turning the bypass valve back to normal operating position, and I saw very little flow emptying out of the Truma drain. There really isn’t much inside the Truma on the inlet at that point to even get clogged up, it’s just a direct port into the screen filter, so low flow draining out pointed back to a problem at the plumbing going into the Truma. I removed the bypass valve and found the rubber seal inside had degraded and swollen (see photo), restricting the flow in the normal position. Found a CAMCO replacement on Amazon that’ll be here tomorrow. Hopefully the seal on this CAMCO one holds up better than the original one (different valve manufacturer). I really think a lot of these plumbing components aren’t tested with the chemicals using for RV maintenance like the anti-freeze winterizing solution, or vinegar/water or bleach/water sanitizing solutions, leading to issues with degradation of the seals. A pretty easy replacement of the valve but I’m also going to use this opportunity to redo the cold inlet and hot outlet plumbing connections on the back of the Truma to change to stainless braided flexible supply lines. Not a fan of the rigid plastic connections used by Oliver initially in those locations. Some owners have had the plastic hot water PEX fitting break at the brass TEE on the Truma outlet. With all the bouncing down the road, and thermal expansion and contraction when using the Truma, I want flexible connections there like some of those other owners have upgraded to. Camco bypass valve link to Amazon: https://a.co/d/eGqkhrA
2 points
-
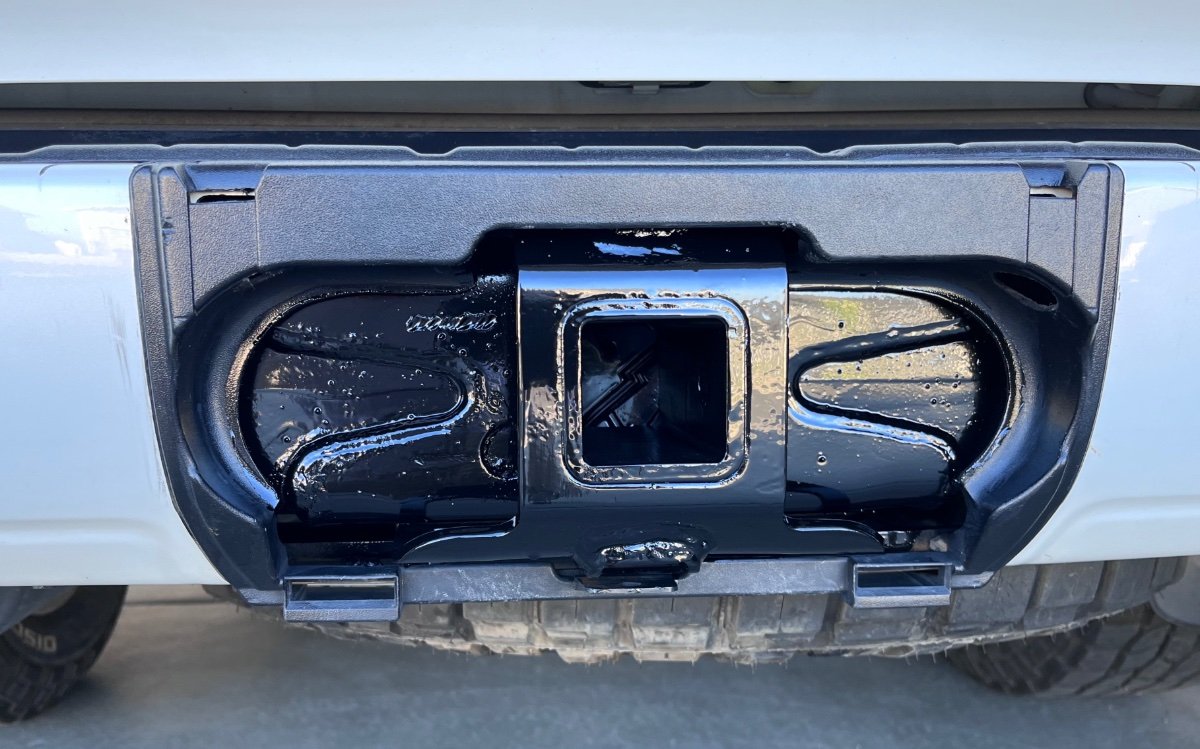
You might also consider securing the backof the water heater to the frame with a strap or L brackets. My water heater had an issue which included a fire, and one of the requested steps upon repair from Truma was to firmly attach the back of the water heater down to the frame it's sitting on. (The back of the Truma is sitting on a frame member for the trailer.) After about 3 months, I heard back that the water heater I had was found to have an improperly torqued internal gas connection from the Truma factory. They told Oliver Service that upon tear down they found the torque issue was linked to a manufacturing line situation where their Torque tool wasn't properly calibrated. Not sure what batch of units that impacted but they eventually fully refunded my replacement unit.2 points
-
Doggy poo bags work well also. The ones we use come in a roll which we keep in an old pill bottle sitting in the bathroom.2 points
-
Great ideas for the kilo-niners! Our three approve with paws up. Love the mudbusters one. Thank you for your continuingly great tips!2 points
-
what was the issue?2 points
-
Got it working!2 points
-
We used Rustoleum black also with no clear coat over.2 points
-
I just use Rustoleum black after cleaning the rust. Clear coat may cause the paint to last longer. Let us know if you try it. Mike2 points
-
did the whale tail get flipped 360 degrees when it was removed, resulting in the chains getting twisted and thus effectively shortened? Easy to check. Are the links in the chain aligned in a smooth, straight path or are the links twisted?2 points
-
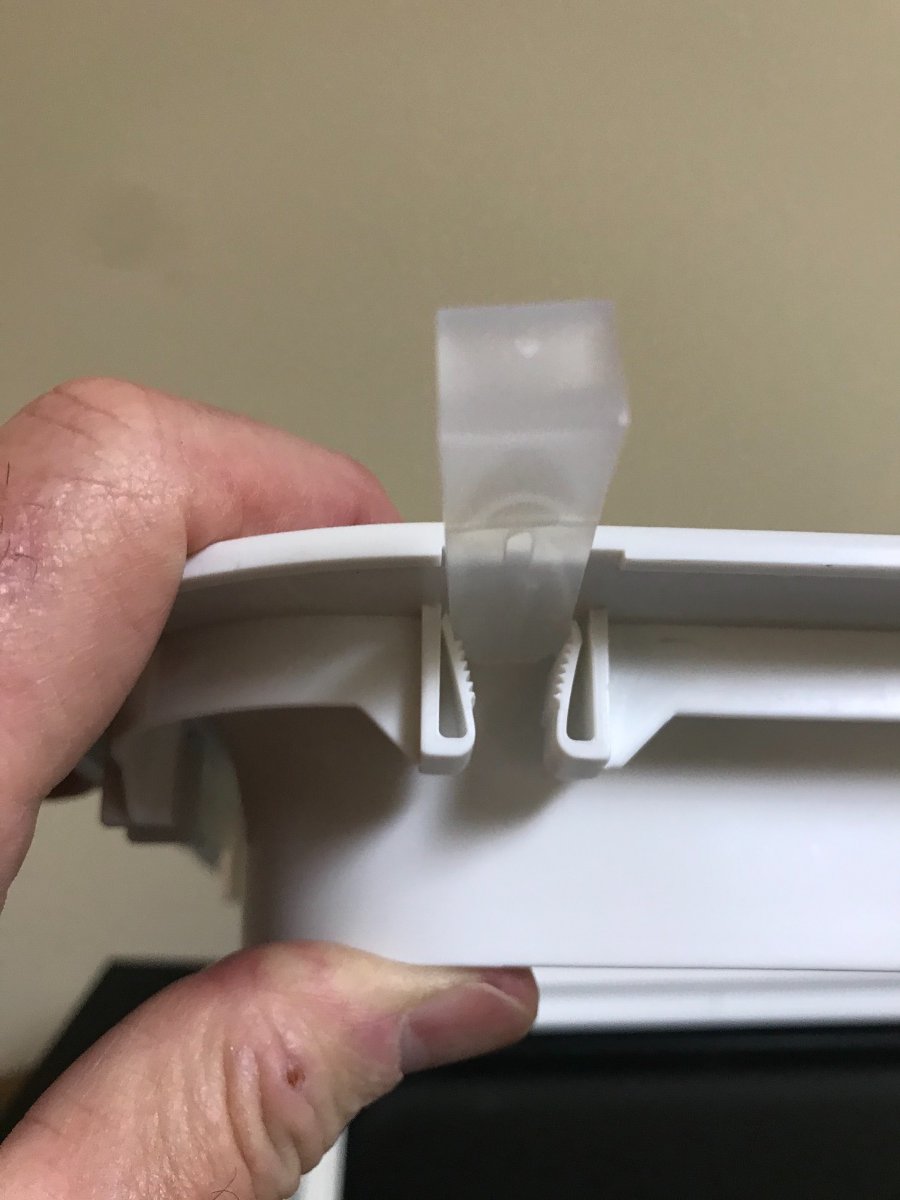
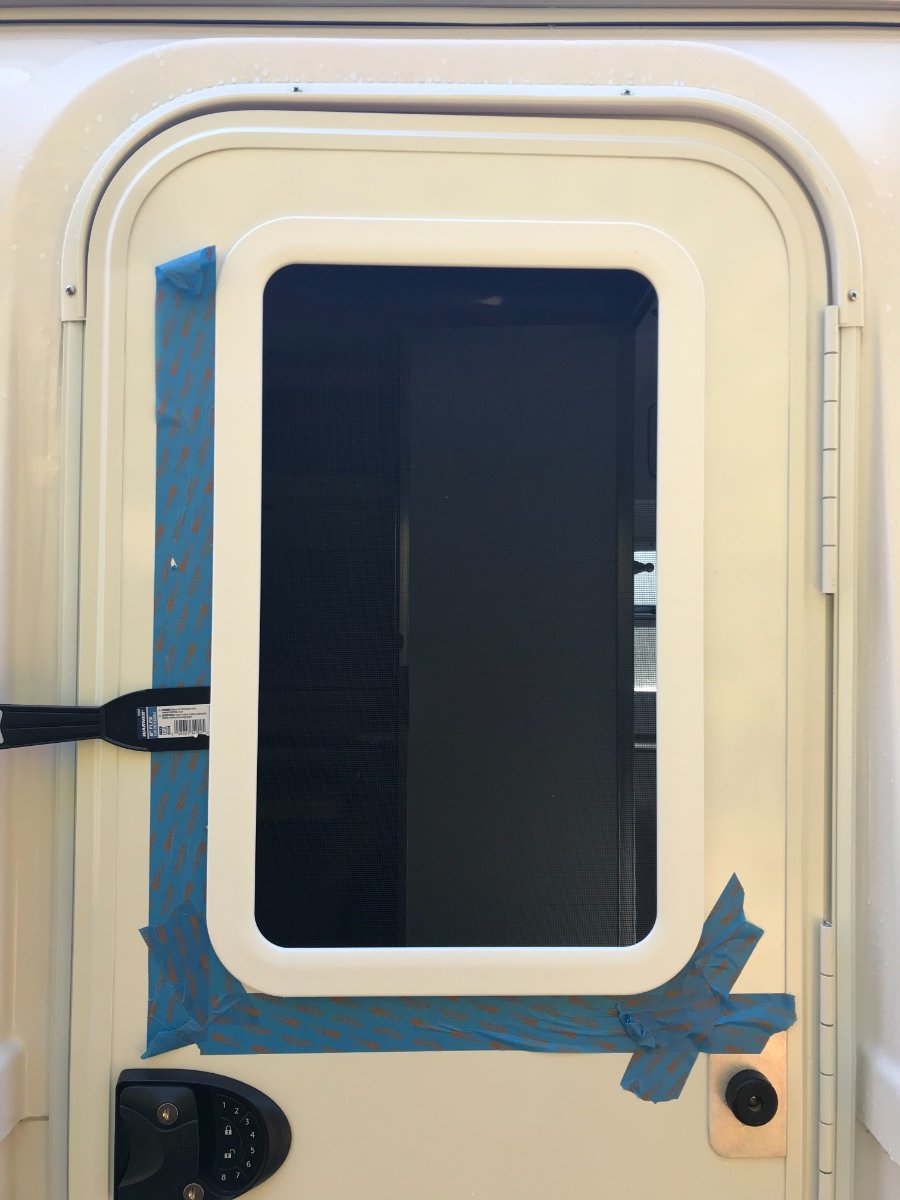
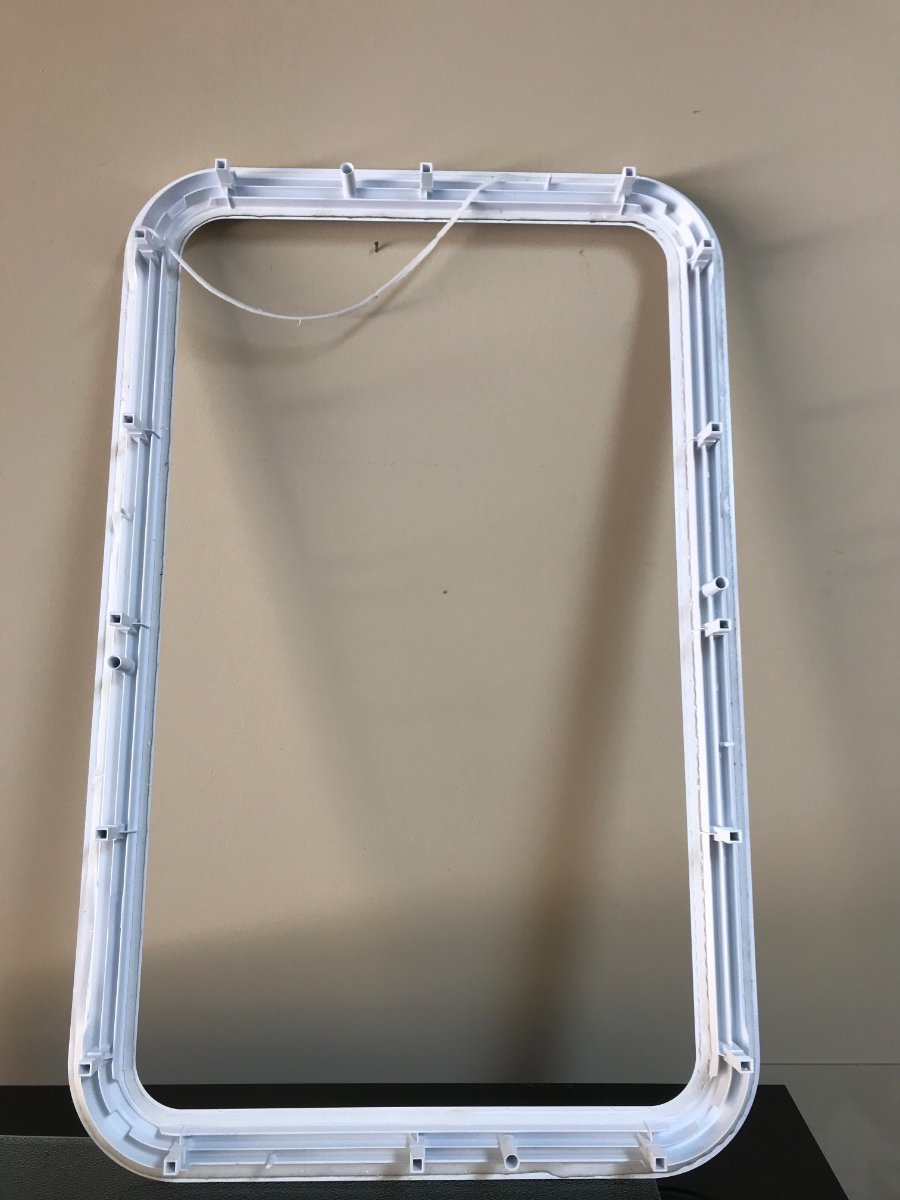
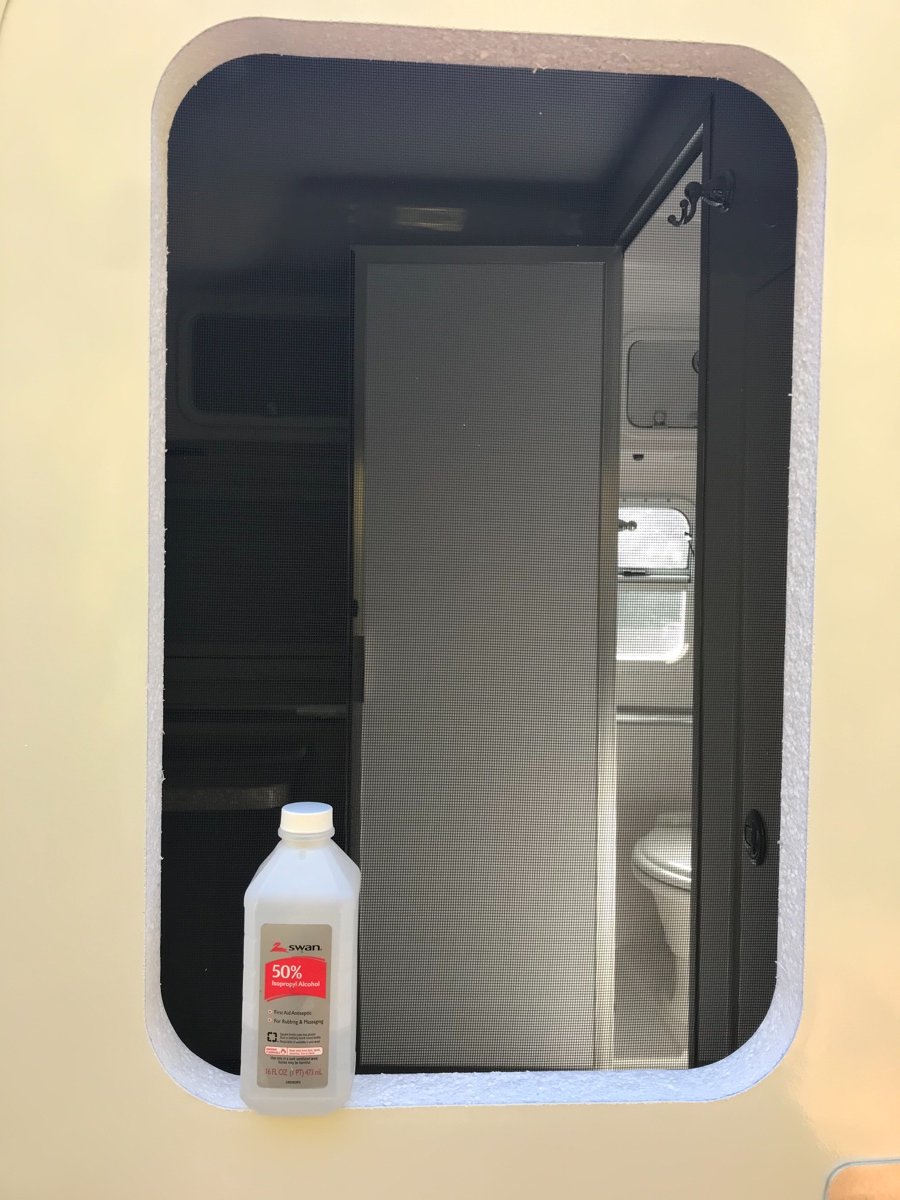
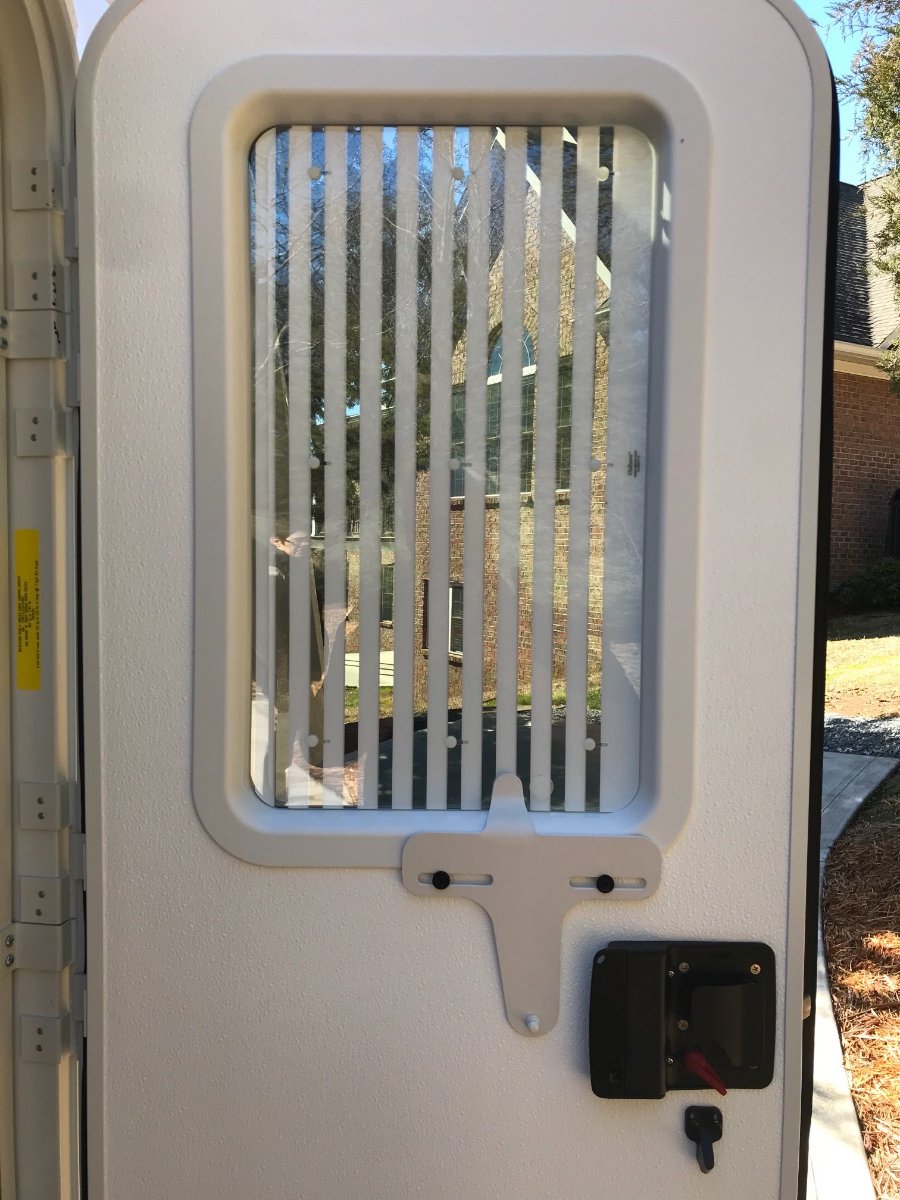
Long install post- I decided it was a gorgeous sunny North Carolina day and just a good day to install the new tinted glass and blind I ordered from Zarcor. I made this a stand alone post as this window install was a bit different from other installs I have read about here. It appears the Lippert now uses a sealant on the exterior window frame which adheres the frame to the door frame opening. They also use a similar sealant on the interior of the exterior frame, which holds the glass FIRMLY in place inside the window. I could not remove the old opaque glass from the old frame. I decided since this really appears to be a one time use sealant that purchasing a new exterior frame would be required. Reusing the old frame and compromised sealant was not an option for me. You will see where the sealant on the old frame came off after removal from the Ollie window door cut out or frame. Some of the old sealant came off on the old opaque window. I was glad I had purchased a new frame through Zarcor to do the install. The new frame was $28 plus shipping. Once I removed the old frame and opaque glass, the install was pretty straightforward. The new window frames use what appears to be a ratchet mechanism which once both frames are sealed together they lock into place. No more rope caulk or screws to tighten down when you sandwich the new window interior and exterior frames together. Zarcor sends (16) little plastic tabs (pics) that release the frames from each other. Without these tabs you cannot remove the frames. Below are a few photos to help describe the process. It’s not terribly difficult; just take your time and read the instructions. We are really happy with this mod and like the idea of seeing who is knock knock knocking on our Ollie’s door. $175.00 for this mod including shipping from Zarcor. The staff at Zarcor made this mod seamless by answering all questions I had before moving forward. Just really great folks to do business with in San Antonio,Texas. This is a fairly easy window mod and I would highly recommend it if you prefer being able to see who is knocking at your door. Take your time and remember be gentle as your working with plastic and glass. link - https://www.zarcor.com/rv_products/rv-door-window-kit/ (16) tabs provided by Zarcor to remove existing frame. You insert equally around slots on the exterior of the interior frame edge. You will see the slots. Ratchet mechanism that holds frames together. Likely to speed up window/door plant assembly production cut costs. After removing the interior frame, a thin bladed puddy knife can be used to separate seal. Old frame and compromised sealant - Another photo of old exterior frame after removal- Throughly clean off old sealant off door frame- Installed new frame, and tinted glass, my bride was a tremendous help with an extra set of hands 🙌 👍🏻. The blind install was again pretty straight forward and it works great! It attaches with several small Velcro tabs. The blind can be operated with the interior screen door closed, just slide screen door plastic opening for access. Finished exterior - we like the way this tinted window matches the rest of our glass. The contrast of the tint vs natural light -
1 point
-
That is a valid concern, but easily fixed for very little cash: Driving any trailer into tight spots is super easy from the front, as long as there is physical room for the bigger one at the parking area. However the Elite does have a number of other advantages over the larger trailer, especially for boondocking and those small National Park and forest service campgrounds. Watling Engineers Front Towbar Demonstration John Davies Spokane WA
1 point
-
@AZ Wonderer You’re welcome! The Mudbuster will definitely come in handy for cleaning your pugs paws. Excited for you to get the Magma pans, they are such good pans! Way to go on scoring them at that lowest price!👍🏼👊🏼😃1 point
-
Thank you for that update. I'm happy to hear Truma acknowledged its error and refunded the repair cost. Hopefully the issue has been fixed for future units.1 point
-
Thank you for another great video. I travel with 2 Pugs and they definitely take up way more of the bed than their small bodies would suggest. I've never seen the Mud Busters but have them on my Amazon Oliver list. Also, I just ordered the Magma stackable stainless steel cookware set. They're apparently at the lowest price on Amazon in 30 days. Thank you for that recommendation.1 point
-
@rangerk9 Thank you! Love that all 3 of your dogs approve…12 paws up!! Lol🐶1 point
-
Thank you for the heads-up!1 point
-
Thank you @John E Davies. I left in 79 when I joined the army, but I've been back twice, in 86 and 97. The somewhat isolated house I grew up in was still there in 97, but was surrounded by a much larger neighborhood. I heard there's even a commuter rail between Mukilteo and Seattle now. It was lumber mills and Boeing when I left. Now it's a bedroom community. We were going to look at the LE2 as well, but the timing with the owners didn't work and we had already seen the Escape 19 and 21C, the latter being about the same size as the LE2, and decided it would be more of a challenge backing it up our narrow, curved, uphill driveway and squeezing it next to the house. We've done some camping in our friends and family's RVs, but this will be our foray into owning one.1 point
-
Thanks John. I’ve read and bookmarked that thread when I first joined here. Similar posts on MUD, too. Definitely two separate lines instead of two combined. Seems common sense. :shrug: I appreciate the input!1 point
-
Picking up trailer on Sept. 7. Heading back to Washington State on a southern route through Texas. Never been to Texas. I see there is a Alabama/Texas football game in Austin. Wondering if anyone knows if you can stay a night around stadium, tailgate, and walk to game. Don’t know campus layout. Will call school on Monday for info, also. Definitely, won’t wear our Huskies or Cougar stuff!1 point
-
We have been to the Toyota FJ Summit twice and over both passes you mention, plus a lot more. Like you said, don't drive off the road and you'll be fine. I, personally, would not tow over Beartooth Pass. Been over it in my F-250 and my Harley Ultra Classic and not interested in towing anything over it. Great videos, we have some similar ones! Brian1 point
-
Thanks John. I’ve already had the Firestone link as well as Redarc’s brake controller bookmarked for months. 😉 As noted on MUD ( I’m Slow paddler), the HE model has very slightly larger wire diameter for the coils, but I think one fewer turns. Consensus is a barely stiffer spring. My fridge is mid-ship, so the only weight aft is just junk. No rear seats, and the 60% second row seat is out. So no stiffer springs unless I get a 24 gallon tank down the road At least two more outings planned for the Hiker this year. We may keep it and let our daughter and her fiancé use of if they store it for us. Else sell it to them. I could sell online for about 30% more than we paid for it, but theyretent camping now and would appreciate the enclosed box.1 point
-
I don't think clear coating flat black is necessary, nor IMHO would it look very good, I use Duplicolor Ceramic Brake Caliper Paint, gloss black, no primer is needed like regular spray paints, it flows out beautifully, is dry to the touch in five minutes, and after a week it cures rock hard. This paint is now my "go to" product for just about anything that needs one of the six available colors. Any good auto parts store should carry it. https://www.duplicolor.com/product/caliper-paint/ I just painted the receiver area on my LC200 a couple of weeks ago. The "spots" are weld splatter, that doesn't look so great with a gloss paint.... maybe next time I will grind those all away. And use the Satin Black instead.
1 point
-
Sorry, no worries, this is why you should always use the Quote feature when you are commenting on somebody else's post, especially if you are referring to one on a previous page. I naturally assumed you were responding to the post directly above yours. I see that I am not the only one who was confused... John Davies Spokane WA1 point
-
It’s a boy! Due March 28, 2023. There was really no indecision. I knew what we were going to do before we arrived. Deb pretty much was set to order, too. It was more about taking the hour to sit there relaxed and make the final decision. I’ll be half a year shy of 70 at delivery, with Deb two years behind. We deserve to enjoy ourselves while we can. A big thanks to everyone who has offered advice and encouragement! We really do appreciate the input.1 point
-
Today’s the day!!! To say we are excited would be an understatement. 🤪 2-1/2 hours left until we meet Anita for our plant tour. Then time to examine the floor models and get down to business! I’m feeling positive as to whether we leave with one less check than when we arrived. 😉1 point
-
I am very glad we ordered the rear view camera. With it, I have no need for extended side view mirrors. I can always see what is behind me and I can also always see when it is safe to change lanes as it is sometimes hard to tell if you have enough clearance when looking in the side view mirror (objects may be closer than they appear!). The rear view camera is especially handy when you need to change lanes quickly and/or merge in dense traffic. I don't find it all that helpful for backing up.1 point
-
I have had the adjusting bolt on the end of the chain get turned wrong when it goes into the bracket on the trailer, thus the chain does not go all the way up inside the bracket. All that is needed is turn the adjusting bolt a 1/4 turn or so and it will now slide up inside correctly. This doesn't happen very often, but it has once, or twice and you will notice it when you insert the adjusting bolt and it seems too short. Like someone said, make sure the chain wing is at a 90 degree angle to the hitch, this will make one side longer and the other shorter when hitching, easily corrected if you know what to do. trainman1 point
-
How long have you had the trailer? Have you learned the tricks for hitching, like not reversing the truck at an angle? Or was this a maiden voyage? Please add your trailer type and hull number and tow vehicle info to your signature, that is very helpful. I can’t imagine any part of the Andersen that could slip and render BOTH chains too tight. If the “whaletail” is misaligned, one chain will be slack and the other too short. We need more information, pictures help too. John Davies Spokane WA1 point
-
Did the brackets locking the chains to the trailer move?1 point
-
Ouch, not good hitting deer especially while towing. Couple of thoughts regarding hitching, have you raised the TV enough after connecting the hitch mount to trailer so that the tension is eliminated? If not you’ll never get it connected because essentially you have your weight distribution fully engaged. Also uneven or out of level ground will exacerbate this situation based upon my experience. Keep us posted on how things go.1 point
-
The Mothership repaired the unit that the Dometic service tech said needed to be replaced. Seems a screw came out and keeping the fan from running. Two days out from repair and alls well! Living happily ever after in our Oliver. THE END1 point
-
Did this last July, Ouray to Silverton, first time coming home in my L2. I had just done some seriously exposed 4x4 trails so was probably a bit desensitized, but wasn't difficult. Just pay attention and don't let the exposure transfix you. Like the trail leader said as we went over Imogene and Black Bear passes...when is the last time you just drove off the road for no reason. 😉 Better than when they created it... 127105122_ImogenePass.mov
1 point
-
As a relative newbie, I'm not sure how this works, but perhaps Oliver could upload videos on the Tech Bulletin section? It's certainly something everyone (including future owners with Truma) should be aware of and able to inspect.1 point
-
Two things come to mind about this. One, I really wish that people would post about failures like you did. I realize that not every owner is on the forum (of course, they should be); but if someone who had this failure is on the forum, shame on them for not posting about it. Two - more importantly, if this has happened more than once and Oliver knows about it, then every owner with a Truma should know about it.1 point
-
Thanks for the update. Are those supports able to be inspected at all from the front of the unit? I haven’t looked on mine but it seems like the burner is pretty well hidden. We bang our trailer around enough that if those are something that are prone to break then I’d want to regularly check them if possible.1 point
-
I haven't seen that here before, and didn't find that failure on a quick Google search. Truma is known for long tests before market introduction. Glad you are ok. Let us know the results.1 point
-
I also could not open the videos. It looks like the picture is of the Truma Instant water heat. My 2018 Oliver with the Truma instant water heat has run without any issues. Let us know what Truma says happened and what the fix is. Good Luck and Stay Safe1 point
-
Yikes I can't get your videos to load but the photo looks pretty scary. Glad you noticed quickly and got it shut off. Did just turning off the unit close the valve or did you have to turn off the gas? It would have been reassuring if the unit had detected the problem and shut itself down on it's own. Maybe with a little more time it would have? It does look like the flame was contained within the box so that's something I suppose. I may have to remount my little Atom smoke detector back in that compartment. To answer your question, I don't think anyone here has posted about mechanical failures on the Truma - could be wrong, just don't remember. But nothing like this for sure. They had a software issue a few years back on some units that required swapping out the control board. And mine I managed to break on our first outing, but that was almost certainly an installation issue and Oliver dealt with it. And there was another plumbing error that made me think the Truma wasn't working right (again not really a Truma issue) but once I fixed that, I've had nothing bad to say about it. That's a pretty serious failure, and I definitely want to hear Truma's response. I'd let Oliver know also - not that I think it's any of their fault, but I think they'd want to know and maybe they can help you with Truma. On the videos, I don't know if others can see them, but the most reliable way to post them I've found is to upload them to YouTube and then just paste the YouTube link into the post.1 point
-
Bumping a four year old thread. It might be of interest to folks who have not fixed their tanks yet. My mod is still working well, with no leaks, though air gets into the plumbing more readily than with the old almost “bottom of the tank” location. I can live with that. John Davies Spokane WA1 point
-
I talked about this, in another thread. Rv awnings are principally designed only for shade, not rain. The old school manual awnings can handle some light to moderate rain, but even those stretch over time. We stretched ours, an older dometic made by fiamma, manual awning, using it in the rain. . I take full responsibility. We replaced it three or four years ago. Because the manual awnings can achieve more pitch to spill the water, we still use ours in light to moderate rain. I know it may suffer the same stretch as the old one. And, I'll live with the consequences if/when it does . I wouldn't do that with an electric awning. The rvs we deliver to Alaska have electric awnings. We Always roll it in if it rains .1 point
-
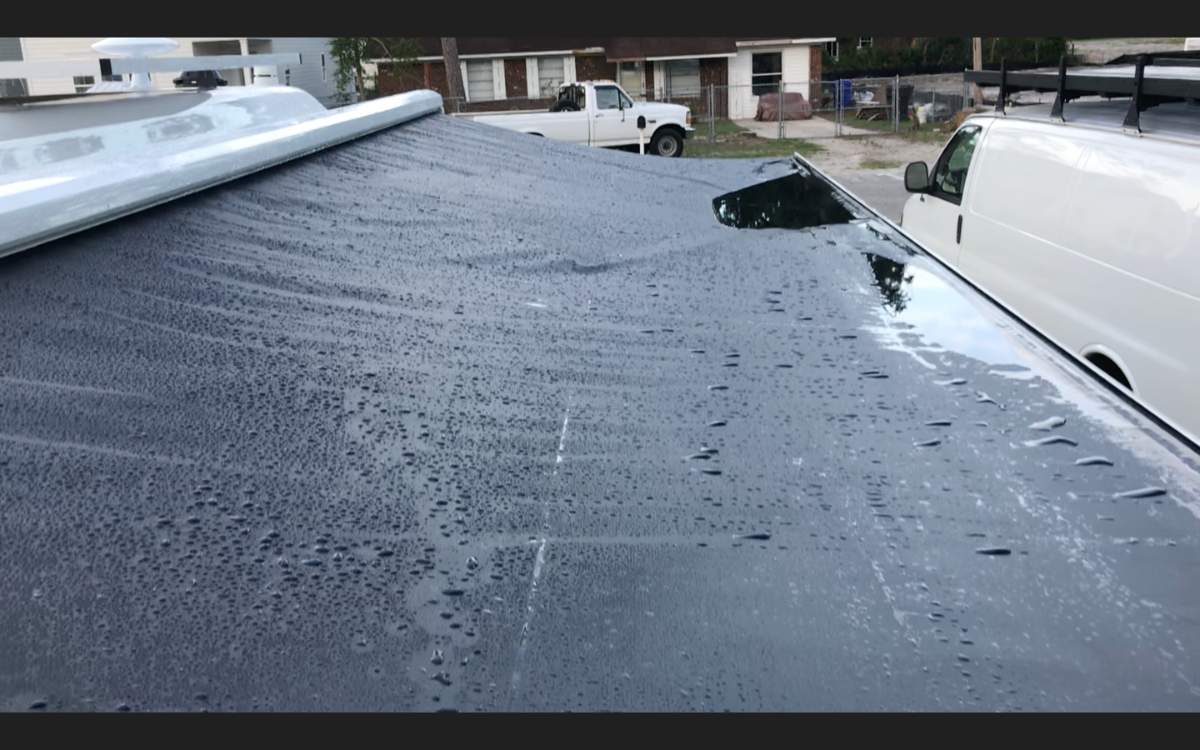
Awning Wrinkles: Suggest contact Girard :: " May I please speak to someone in technical support" No good reason to have such wrinkles . . . . fabric was not pulled tight when installed on/in the roller. To try and understand what's up . . . See excerpt below from pp43 of manual for our Girard GG750 , which is the cheaper of the 2021 Oliver awnings. Note that the fabric on the GG750 is apparently different from the fabric on the fancier model. Different Awning Issue: Our fabric is bagging and because of the water ponding it so far seems nearly unusable in any rain at all unless extended fully so as to better drain, which is scary with out a method to secure/support in case of wind gusts. It was my fondest hope that the awning could be used in the rain when extended about 3 to 4 feet of the 7 ft total extension but even with such a modest extension it creates heavy ponds that stretch the fabric and when it is rolled in the pond dumps right at the front door. I need to call Girard 'tech support' myself and have my expectations calibrated. ********************************************* Awnings: 949-259-4000 . 800-382-8442 The Girard Group 1361 Calle Avanzado San Clemente, CA 92673 ********************************************* Manual for GG750 Girard : pp43 C. INSTALLING THE NEW FABRIC IMPORTANT: REPLACEMENT FABRICS ARE ROLLED AND FOLDED FOR SHIPMENT. THE SEAMS MUST FACE DOWNWARDS AS THE FABRIC IS INSTALLED. THERE IS A SMALL WHITE POLY (POLYESTER) ROPE INSERTED IN THE FABRIC THAT WILL SLIDE INTO THE LEAD RAIL. The old fabric's trim insert will need to be removed from the roller tube, it is held on by clear tape along the length of the tube and black duct tape on each end. Take note of how the trim insert sits in the channel of the tube as the new fabric trim insert will need to be inserted correctly and then taped in the same fashion as the existing insert was attached. With the new fabric attached to the tube, roll up the fabric as even and tight as you can in the correct direction. (The fabric should roll from the bottom of the tube when the awning is extending) Slide the tube with the motor and fabric assembly back into the case of the awning as it came out. Confirm the non motor side of the roller tube is correctly in the bushing that is mounted on the non motor side endplate. 3. Repeat steps 1-10 of motor installation section B. *********************************************
1 point
-
I've been learning a lot here. Lots of great ideas and techniques posted and many thanks to all who have contributed. Having looked hard at my Elite and considering all that has been presented here, I can say for certain that the only way forward for me is to spin weld a fitting on top of the tank. There is just no room at all to work with the existing fittings, even using John's technique. The water heater tank mostly centers on the back of the FWT, completely covering its fittings, there is no room. Even if I was to remove the hot water tank, which would be a huge project for me, there still would be minimal room with high chance of failure. You can just make out the back of the FWT in this pic: There is a clear area on top to spin weld a fitting but it is about 12" forward from the rear of the tank. I guess this means I would have to use a longer siphon tube that would reach to the back of the tank, which is where I believe it should be located. Tape is hooked on back of FWT above fittings. I sure wish Oliver was a little more supportive about this issue. At least identifying shops that could do this work for us folks who live very far away from Hohenwald. I told them about this issue 04/15 when we kept loosing prime on our trip home. It didn't take long to discover the problem. I still am in disbelief that, as well conceived as the Olivers are, that this PITA water system ever got off the drawing board. Sure glad we all have each other to help make our Olivers what they should be- the very best! Dave
1 point


.thumb.jpg.91ab93de4a01f9040d89cc75c92a3115.jpg)


-
Recent Achievements
-


")


")
")


