Leaderboard


Popular Content
Showing content with the highest reputation on 05/06/2022 in all areas
-
Today was the day I got to do the fun messy job of replacing the China Bomb wheel bearings/seals on the ILOVHER on over to USA made Timkens. This was quite the all day project as we also changed out the shocks and lubed the EZ Flex suspension. We beat the rain by a mere ten minutes! My only experience prior to this, was replacing entire preloaded hubs and manual brakes on my Casita which was easy compared to this. After figuring out the best way to jack the side of the trailer up. (Yes, we used multiple floor jacks, and safety jacks stands, chocks and wood cribbing all while being attached to my truck) All I can say is, Thank God my son was here to teach me and to remove the seals in those hubs! (His father owns an excavating company so he knows a bit about trailers/brakes) There is no way on Gods green earth I would have been able to remove them by myself. We had a puller and they would not budge. I think they were permatex'd in there. He somehow was able to use his strength, ingenuity and multiple tools to get them out without scoring. Here are some observations and or questions we had: 1. My son thinks that the shocks look too large for the application. We used the exact replacement that Oliver uses (Monroe 555025) He says they're nearly all the way compressed with the way the suspension sits and that is why potentially two of them were blown. His opinion is that they'd do more if they were just a bit smaller. I have no idea or opinion but it was the one job I was able to complete by myself so I'm good with it. 2. It was quite the surprise to see that the axle spindle did not have the Dexter EZ lube feature. My understanding is that this was not an option on an LE2 in 2017? I did not know this and bought new grease caps with the rubber insert. As much as I learned today, this was sort of disconcerting. Even my Casita had EZ lube axle and it was a 2007. I greased my bearings every year and it made it easy. All those great suspension features like shocks and a EZ Flex but no way to easily grease bearings?? What gives? I sort of dread doing this again. 3. What's with grease guns? OMG..I wanted to throw and shoot them with a real rifle like skeet. I used two separate guns and they both were being unruly and messy. I could have bought stock today in rubber gloves and shop towels! LOL 4. Bearing grease packer seemed like a great idea. Who knew you'd have to use all 200# of human body weight to press down in order for the thing to squeeze grease into the bearings? 4. I took the advice on the forum and replaced a few zerks with 90s and 45s and used plastic cap covers but OMG.. crawling under the trailer is not for the faint of heart or my elderly bones! I think I want/need a creeper. 5. Thank God for Harbor Freight! I now have all kinds of fun new cheap tools, like impact driver and a torque wrench which I properly learned how to use! I now can afford to go to the Rally. 6. The Nev-r-Adjust Brakes looked good but I think I'm going to go with manual brakes next time. I don't feel confident about what I learned about them today and how they actually DO need adjustment. We greased the important parts with a good brake grease. At least we didn't find any loose parts. springs or worn pads floating about. 7. Found four cracked lug nuts. Son says the sheath on the outside is cracked and I should consider solid replacements. Any recommendations? 8. Beer never tasted so good. Thank you for all of the forum help I've received, without you guys, I'd be dead in the water. See y'all safely at the Rally !
 9 points
 -
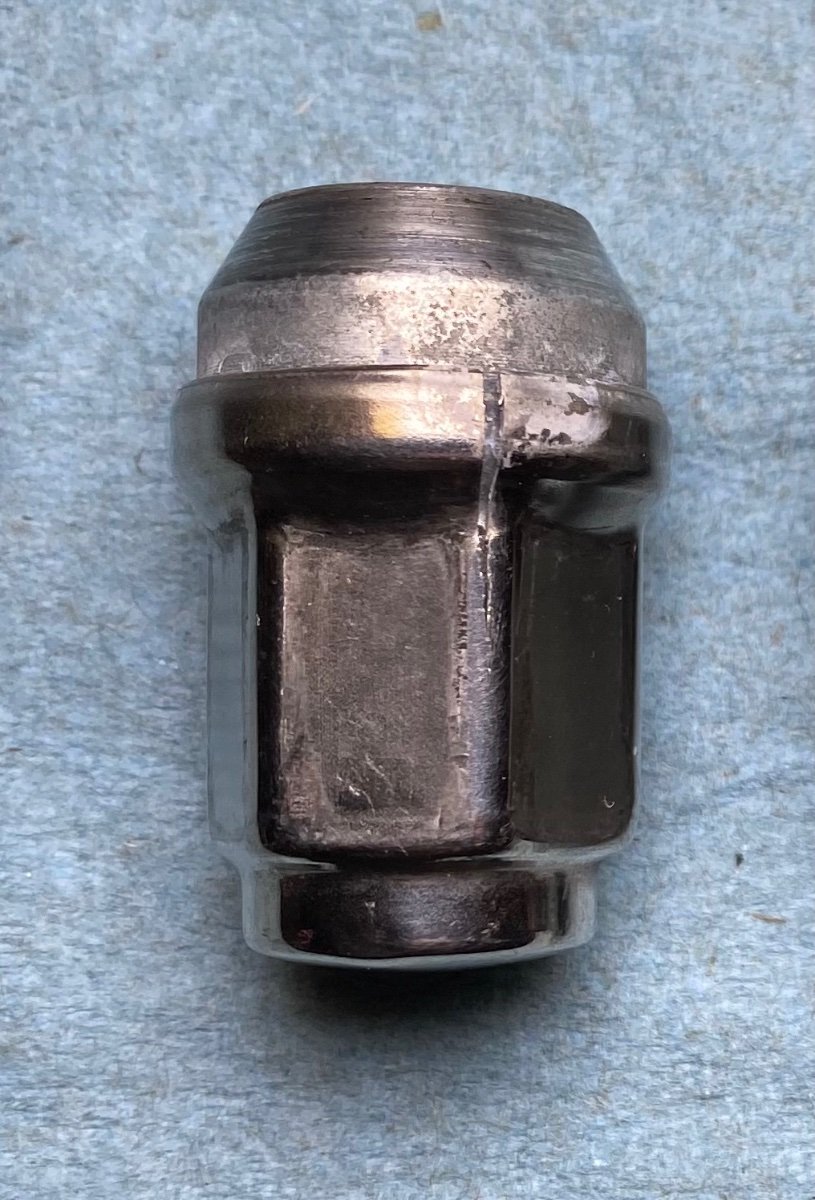
That is not a prudent method! Two things come to mind. A compete drum with bearing will be REALLY heavy and awkward to store. If you have a big truck bed, that may not matter. A brand new drum will NOT work correctly on worn brake shoes, the diameters are different. This is why you always replace brakes in pairs, on the same axle. The situation where this would work great is if you have disk brakes with slip on rotors, like on your car. Then you could carry a complete hub and bearing and it wouldn't matter because you would be installing the old rotor onto the new hub and everything will match nicely, in terms or wear. Just get the bearing assembly, any decent shop in any little town can easily replace it. John Davies Spokane WA7 points
-
There are a bunch of "pro's and con's" concerning the EZ Lube feature. Bottom line is - yes - there is no easy way to properly grease bearings and that certainly includes the EZ Lube. Once you know how to do the job - it really isn't very difficult. BUT - it is always very messy! One can grease those zerks without jacking up the camper at all - at least if one is your size 😇. It is a little tight and you have to learn to move like a snake, but, knowing that the camper isn't going to fall on you helps a bunch with the "peace of mind". No easy way of getting the grease COMPLETELY in and around all of those little bearings. I still use the tried and true hand packing method. Once you get past the idea of how long its going to take to get your hands degreased, its not so bad. Besides, for the next day or so your hands will be soooooo soft and smooth (assuming that you're not wearing gloves). Yep! I've always felt that now that you know how these things work and how the job is supposed to be done you are in a much better position to know when and/or if things are not "right" - " the way that they should be". Knowledge is a great thing - it is a shame that sometimes it is so difficult/messy to earn/learn. You should take great pride in the fact that you tackled this job and now "know". In the immortal words of "Ice", "you (Topgun) can be my wingman anytime". Bill6 points
-
Good for you for tackling this work! I will swap out the bearings on my trailer in the not too distant future and you (and FrankC) have inspired me 🙂 I dislike most of the grease guns in the marketplace so I did a bunch of research and bought this kit. It's a really well made gun (made in Germany, not China) and doesn't leak. The only disadvantage to LubeShuttle is you must buy their grease but it is very high quality and they have a full synthetic (KH150) if you want to avoid a lithium based grease. I bought some of the LubeShuttle empty tubes and filled them up with Red Line CV2 grease. That was fun. 🙄 https://store.advancedenginetech.com/collections/greasing-kits/products/lube-shuttle®-travel-trailer-greasing-kit I also recommend getting a longer hose (30") from LocknLube so that your grease gun isn't dangling in the air if you need both hands to put the coupler on the zerk. As RiverNerd mentioned, get the LocknLube coupler. You'll never go back to a conventional one after using the locknlube product even with the 45's and 90's you've installed. I got a few of the accessories from this page and the 30" hose. https://locknlube.com/collections/greasing-accessories You may want to consider a good creeper if you're going to continue to work on your trailer yourself. https://www.griotsgarage.com/cadillac-of-creepers/?sku=38912&code=PPCPLG&adlclid=ADL-9f22e23e-58b7-4742-aea5-e4b8f85474d2 Safe travels to the rally!5 points
-
We'll be picking up our EII in a few weeks. When I was looking for a tow vehicle I was set on the Tacoma for many reasons. It's a very nice truck and being a Toyota means a lot, not least of which is it's the highest rated tow vehicle on consumer reports as far as customer satisfaction and reliability goes. That said, with an Elite 2, the load carrying capacity of the Tacoma is dismal. After accounting for the tongue weight, two adults, dogs, basic travel gear, add a truck cap, and a full tank of fuel, now you have a vehicle that MIGHT be able to carry 100-200 pounds in the bed before you reach capacity. I finally started looking a 3/4 ton vehicles and after much research decided that the least worst vehicle that wasn't the Tundra was the Ford F250 which I bought (2017 model). The advantages are: 1) load capacity of almost 2,800 pounds which means I can have a truck cap on my bed AND carry things in the bed 2) (MOST IMPORTANTLY) Braking capacity. You can tow anything with a small vehicle, the question is, will you be able to make a panic stop while coming down a steep grade in Colorado (where we frequently drive). By maxing out your vehicle's load and towing capacity you risk having precious little wiggle room if you need to stop the rig while coming down a hill. Stopping is the bigger question. Opting for a larger tow vehicle will (generally) decrease your fuel economy and increase your maintenance costs, but it also markedly increases your safety margin. I believe that if you are carrying so much stuff that you need to consider shifting your load to the back of your trailer in order to keep your TV within its limits, then it is reasonable to consider that maybe your TV is undersized for your needs, marginal at best. While towing with an SUV certainly is more comfortable, the newer trucks really ride well. I think a 1-ton is over-kill for an Oliver but at the same time it completely removes the concern of having to do a "weight and balance check" every time you change something in the gear you're carrying to determine if you're within the limits of the tow vehicle...Just toss it in the back and be on your way. The 3/4 ton by-and-large is the same, but at some point I certainly could overload my F250 If I just keep loading stuff in without regard to how much weight I'm adding. I have to be aware, but not like if I had gone with the Tundra. The Tundra would have required a close look every time and then some shifting or possibly leaving stuff behind. The 2022 Tundra's numbers are a bit improved from the previous model years, the problem there is they won't be available when I need it and I also wasn't in the market for the price of a new one. Ideally I'd like a cyber truck, but no telling when they'll become reality. Good luck with your search, I hope to see you on the road. Happy trails!!!! albert5 points
-
I found grease guns messy and frustrating too, until I bought a Lock-N-Lube spring-loaded grease gun tip. Expensive, but worth it for me when greasing about 30 zerks on my small tractor. https://locknlube.com/?gclid=EAIaIQobChMIgcmI1PjK9wIVTsLCBB1yzA0JEAAYASAAEgJIGPD_BwE4 points
-
EDIT 05/15/22 see related thread: ... https://olivertraveltrailers.com/forums/topic/6892-how-to-connect-a-standard-sae-4-pin-harness-or-4-pin-with-backup-lights-to-your-oliver-factory-7-pin-wires/ This is just a teaser, I took a video today and it is very cool. I wanted to make very sure my connections were good before putting the rear cargo area back together. I haven't finished the job yet. I will add to this in a couple of days. Video - OLIVER Bike Rack LED Light Bar Initial Test What a pain, the Oliver 7-Pin wire color coding is very different from the industry standard. I figured it out on the first try, and nothing smoked or melted. More later. John Davies Spokane WA
3 points
-
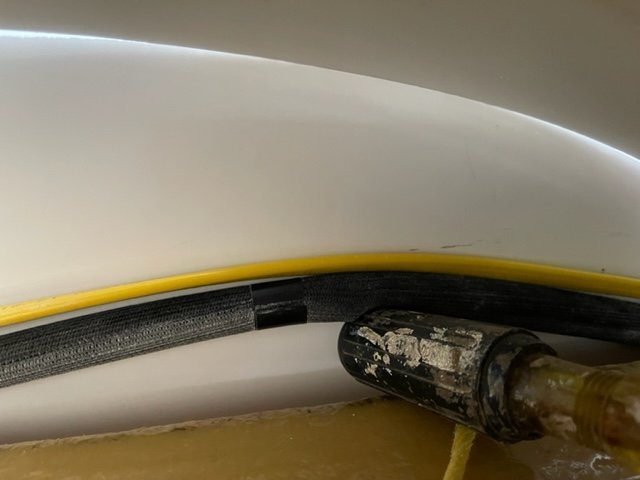
Thank you Bill. I finally figured it out. There was a another electrical line (black conduit) along with a yellow one running back there blocking the access hole so when lifted them both up with a screw driver I was able to wiggle power cord out and get the new microwave power cord in. see attached pic. I used a piece of string tied to the plug to pull it through. I got the new microwave in now. It's working but I haven't got the trim back on yet. Fingers crossed.
3 points
-
WOW - you are really trying to test my memory! It has been a couple of years since I had the microwave out and in - but - as I remember it - I pulled the rubber mat out of the cabinet above the microwave, got the plug through the hole on the inside of the microwave cabinet and then gently pulling on the cord while moving the cord back and forth, I found that there was one spot that allowed me to get that plug up into the upper cabinet. Note - I did not have to force it but it was snug. In reversing the process I basically took a wire coat hanger, again through the hole in the microwave cabinet, up through the "slot", wrapped the new microwave cord and coat hanger together and brought the cord back down into the microwave cabinet. Hopefully that will get you where you need to be. Bill3 points
-
I found several lug nuts with the cracked stainless clad cover (see pic) when I did my wheel bearing service recently. So I replaced all of my lug nuts with Gorilla lug nuts from Summit Racing. So far they’ve worked great. https://www.summitracing.com/parts/gor-41187htb
3 points
-
I think the bearing assembly is $150 plus, but i'd want to keep a spare. We carry very few spare bits, but we do carry a spare bearing kit. Last time we had to replace one (at home, urban area) , it took awhile to find it. Imo, better to have it, sealed, and never use it, than be stunk in podunk , without, for days . Good shops are everywhere. Parts, these days, not so easy, and never were in some areas that we enjoy . ..3 points
-
No litter of kittens available as a prize, but we have reached 70,000 posts today. Thank you to all of our valued members who keep the fun and info flowing. I'm camping, 15th season in our Ollie elite, 2008. Hope you all are too, or planning next adventures. WNC spring has been spectacular this year.
3 points
-
I wrote to Dexter today and they said the bearings have a five year warranty. I will still ask Jason, but at least the warranty sounds reasonable.3 points
-
When I repacked my 2021 E2 bearings (hull #709), I found a heaping amount of grease still intact in the bearings/races and also a fair amount in the space between then, fwiw. Doesn't mean there wasn't a systemic issue that may have effected other units, but FTR I didn't see it on our trailer. As an aside this strikes me as a job that I'd be more than happy to pay a reasonsable fee to have someone else do for me in the future (not my idea of a fun day, and I don't think I'll ever get super efficient given how infrequently I'd ever be doing it), but I wanted to learn how this stuff all fits together and how to do this myself in case I find myself needing to replace bearings on the road (I didn't replace the cones/cups this time but I thin I'm pretty clear on how to deal with that part of the job and have the relevant tools along with spares for the travel kit).3 points
-
An hour ago, we gained member number 7,000! Welcome to the board, @SusanJ. And thank you, to all the folks here who make this forum such a great place to learn and share.
2 points
-
A less expensive option is a front hitch on your truck. You can thread a needle in this configuration.2 points
-
Hi Csevel, You remind me of me, lol. I seem to use every tool I own to get a project done. I might as well empty my tool bag on a blanket next to me, it saves a lot of up and down time 🙂 Hope to see you at the rally, safe travels.2 points
-
It’s a messy job! A creeper is an essential tool for us elderly mechanics. I need to check my lug nuts when I pick up the trailer for the rally next week. Mike2 points
-
There is more info on replacement lug nuts in this thread:2 points
-
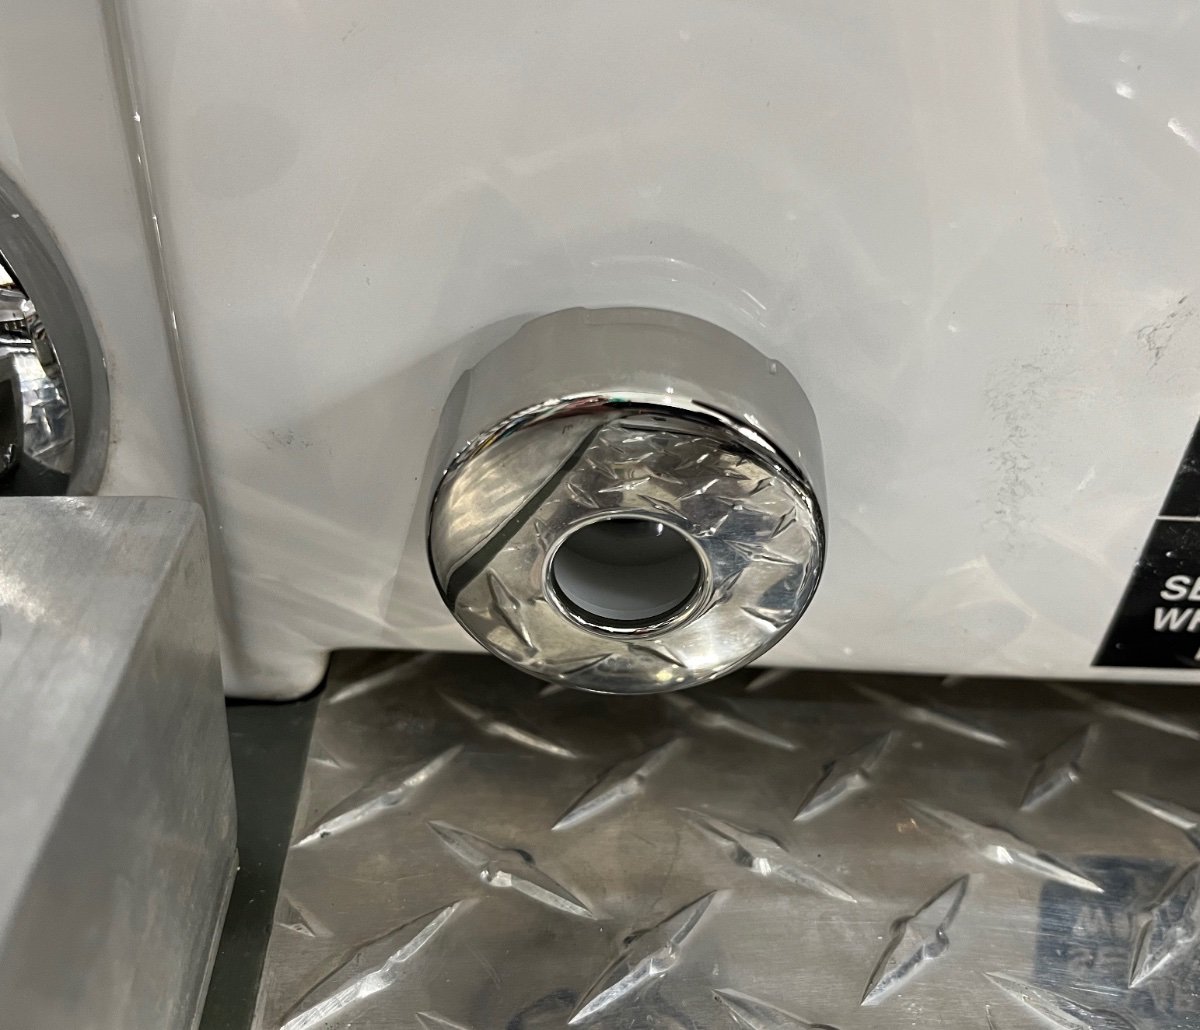
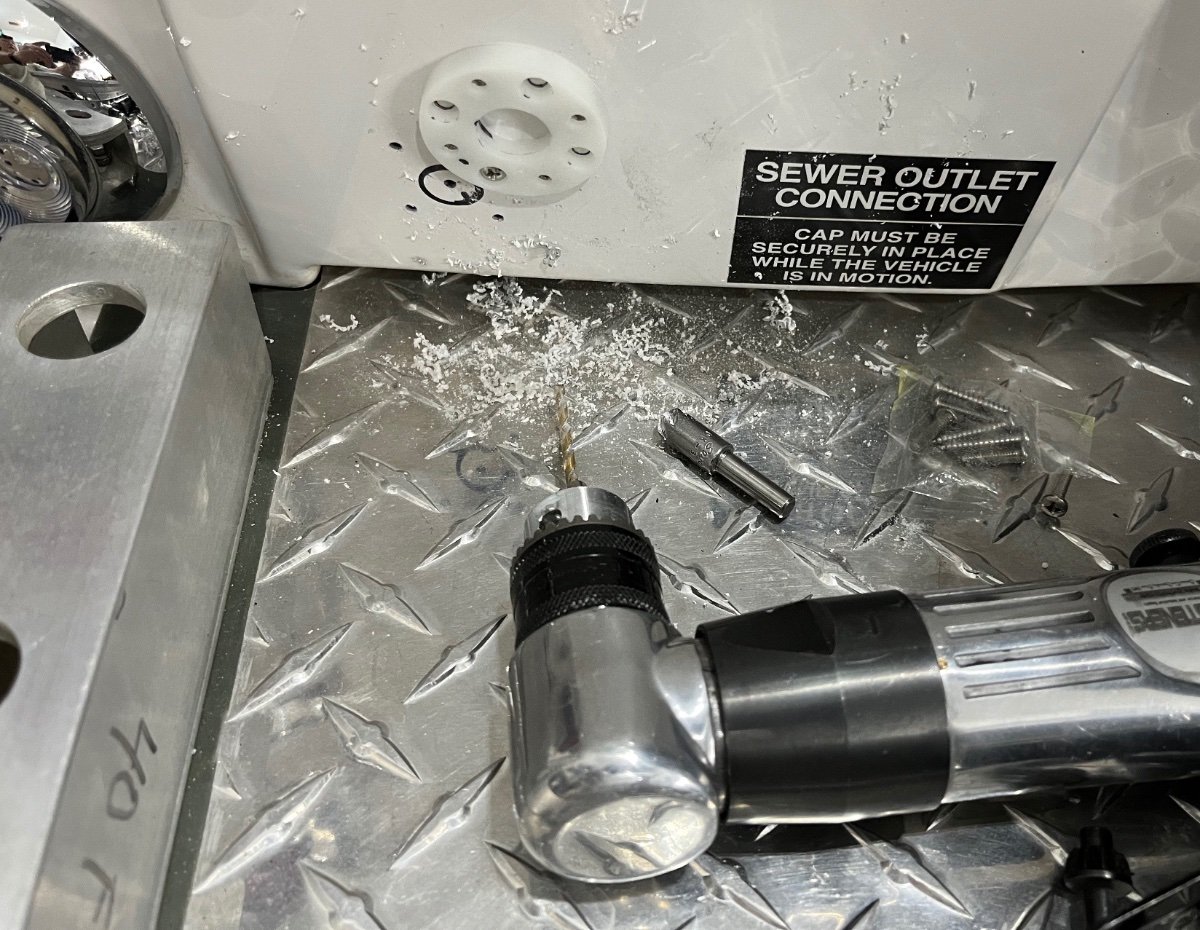
No drain holes = lazy technician. I drilled 1/8”: holes in my bumper at each end, and also in the bottom of the entry steps where water pools. My DIY rack is wide open on the ends so water cannot get trapped, and I can blast inside when I wash the trailer. You can use a drill guide block to get the top and bottom holes to line up. It isn’t as precise as a drill press, but it is good enough for this kind of project. I bought this one, it is super well designed, but $$$. There are some adequate ones with fewer features for less that $20. 30 45 90 Degree Angle 4 Sizes Drill Hole Guide Jig with 4 Drill Bits for Angled and Straight Hole, Portable Cable Railing Lag Screw Drilling Template Block for Cable Wood Post, Wire Metal Handrail John Davies Spokane WA2 points
-
I've read 5 years or 100k miles. I agree, pretty good.2 points
-
Probably the best idea to quickly get back on the road is buy a spare hub with a new bearing installed. With some simple tools and a torque wrench you could easily be back on the road in short order.2 points
-
And...for being the 7000th member, you have won a free litter of kittens. Just let us know where to send them.2 points
-
Since the wine is usually boxed it fits about anywhere! I need to add that to the list!!2 points
-
Where do you guys store/carry the cases of wine? ☺️2 points
-
When I took my first camping trip with the new to me Oliver I was thrilled with the experience it gave me, and as I added more trips I started a mental list of things that I could tweak or add to the Oliver that would make that experience even greater. Today's post is addressing one of the items on that list concerning the windows and how they are limited to only being able to be open in fair weather conditions. Because they lean inward at the top of the window they can create problems in rainy conditions whether the window is opened or closed. When closed they have to deal with all the water that runs down from the roof and sidewalls, this can overload the drainage holes in the window frames which can result in getting the bedding wet. Many Oliver owners have installed rain gutters to help alleviate that problem, but there's still the problem of having the windows open while it's raining to mitigate high humidity or that closed in feeling. What I came up with for a solution I'm calling window eyebrows. I created a list of design parameters or considerations that I wanted to hit for this project. The first one was I did not want to alter the Oliver in anyway, that included the drilling of hole to mount the eyebrow to the windows, this really slowed my project down. I'm the type of guy that builds it in my mind before the prototype is built, I went through many different design ideas before I settled on this one. I designed a mount that clamps into the window frame and to spread the load out over a larger area I utilize three of these mount per window. The mounts are inserted into the window frame and the screw on the bottom is tighten which draws down the 5/16" diameter rod in the tapered slot which then spreads the mount to engage the ribs that are formed into the window frame that hold the rubber molding in place. I inserted a still picture in the following video showing that process. To remove the mount you have to take that screw out with the 5/16" rod and there is a hole on the bottom where that same screw is inserted and when tighten it releases the mount. The eyebrow itself is made of 3/16" thick x 5" wide x 29" long aluminum which has 3/4" of the outer edge turn down. I used a neoprene edging trim bought from McMaster-Carr along the length that mated with the Oliver, my hope was that it could be pushed tight enough to seal the water from coming between the eyebrow and the side of the Oliver making for a easy instillation. When I tested this in the rain it looked like it was going to work but after about ten minutes I noticed each window developed a drop of water by one of the mounts and it would fall and hit against the screen about every couple of minutes. So plan B I was forced to use a 1/4" wide weather strip tape between the neoprene edging and the fiberglass wall of the Oliver. There was one more problem, I had to incorporate a drip edge to the eyebrow to keep the water from following around the edge and falling towards the window. This eyebrow is fastened with two stainless steel 1/4-20 button head hex drive screws to each of the three mounts. This makes for a quick install or removal of the eyebrow, Here in Minnesota we had a warm up and it rained one day so that is all the testing I have been able to do, so time will tell if all is well with the design. As far as the rigidity of the eyebrow I'm extremely pleased you can literally grab onto them and push and pull with no flex of the eyebrow. EYEBROW.mp41 point
-
Just a quick note for those interested in the lithium platinum package, which we have on our 2022 Ollie. We took our maiden voyage in VellOllie this week, about 4.5-5 hours from home. Because I knew we would have an electrical hookup at our campsite, I decided to run the regrigerator on DC for the entire trip down. We started at 100% battery, according to the Lithionics app, and ended at.....99% battery on one, 100% on the other. It was sunny the entire trip, which helps of course. On the return, we ended at 99% and 98%, and were in cloudy conditions for the entire drive. I'd say that's pretty good performance, and have confidence in running the fridge on DC while traveling, even when I know we won't have electrical hookups at our final destination. Pretty cool...and part of why we went with the biggest solar/battery package we could get.1 point
-
Mark, I run a Weber Q1200 grill and when needed an LP campfire ring. It beats looking at the ground. 😄Both of those required me to remove the factory regulators and just install quick connects. I simply attach my LP hose to the Oliver quick connect and use the grill or the campfire ring. I also have a Honda eu3000is which I converted to LP using the HutchMountain.com conversion kit. This conversion requires a separate regulator to an independent LP tank so that I can push a button on the regulator and start or prime the LP into the carb. I really like the Hutch Mountain tri conversion and carrying zero gasoline and it burns cleaner. The gen will use three different fuel sources - LP, LNG, or gasoline. I have not tried running the Honda off the Ollie yet as it is newly converted. I hope this helps. Others may chime in with further knowledge. David1 point
-
I’ll add to that lock n lube another expensive tool dewalt battery operated greese gun matching the two on your first use. No more 🤬🤯🥵 worth every penny.1 point
-
Nothing to change when switching to AGMs. The PD only has a single charging profile for lead acid batteries. Your 2019 may not have the updated converter with the Li mode switch. The only way to tell is to pull the front off and look at the circuit board.1 point
-
Thanks John. I was hoping for your input. I considered some of your concerns, but the wall thickness on the tube was something I hadn’t considered. Worse case they’ll go on the truck roof.1 point
-
That is a really hazardous location for gas cans. I used to carry two 5 gallon steel NATO cans in back, before I removed my cargo basket entirely. Those are super tough and can take a big impact without rupturing. I think you could mount the Rotopax vertically in the same spot, with the thin sides facing to the rear so they don’t block the lights. But you will have to fabricate brackets. Rotopax offers an L Bracket but it weighs 20 pounds! …. https://www.amazon.com/Rotopax-L-Bracket-Single-Mounting-x13-95/dp/B01LRDVZHA You also need to consider security, is there a way to lock the caps? Unfortunately that diamond plate sewer cover is not designed to support any weight, it has a single thin piece of reinforcing angle running across the back. You could beef it up, so it could actually support the gas cans. I made a long tie down rail for my ebike, it is a 2”x2”x0.188” section of 6061T6. I riveted it down with common 3/16” aluminum pop rivets at 2” spacing. It is hell for strong. If you were willing to get rid of that tire cover, you could easily fabricate a double can mount that attaches to the center threaded rod, I think it is 3/4” diameter. That would put them up out of the way and would look cool! John Davies Spokane WA
1 point
-
As some of you said upon removing the batteries they were totally dry in the cells. I did fill them with distilled water, but so far they have not taken a charge and are totally dead. This was probably my fault as I did not check them as I was thinking they were like automobile batteries in todays vehicle and were a sealed battery and you couldn't add fluid to them, I was wrong on that. So I will be buying new batteries this week. Thanks to all who gave input on this matter, trainman1 point
-
Another question, why do I need two batteries when we really don't ever use the battery power. We don't Boondock and like I said before, only battery use might be using the tongue jack, or water pump when traveling on the road. We traveled with our Casita with only one battery and never had a battery problem over the years we owned it, so I see one good battery as all we probably need, plus you are plugged into the vehicle power plug which takes care of what little power you would need, but I do want the battery system in operation, it could disrupt the system in general without a battery in the system. This is not because of two battery expense, it just make good sense to me when we really didn't get much use of the two battery system. I know the hotel option as always there for a nights stay if things become unbearable. trainman1 point
-
Thanks! They are amazing indeed and there are literally thousands of these artifacts in the 4 corners region.1 point
-
I suspect you'll be okay if you thoroughly rinse that tank.. and drain and fill it a few times, before you turn on the heater.. I suspect a lot of people use more chlorine bleach than necessary. More is NOT better. It leaves a chlorine residue, and is more corrosive, with no added advantage . When I had my restaurant, I had one delightful health inspector who loved to teach. If he found an over-chlorinated sanitizer bucket, he'd ask everyone around to show how to achieve a proper level, and then stick his finger in the bucket and lick it, to prove proper levels were human safe, but effective, testing with ph strips. Great guy. We use purogene instead of chlorine bleach, in our trailer. I don't love the smell of bleach, and it doesn't agree with me. How much bleach did you use for sanitizing?1 point
-
Congratulations and welcome to the Ollie family!!1 point
-
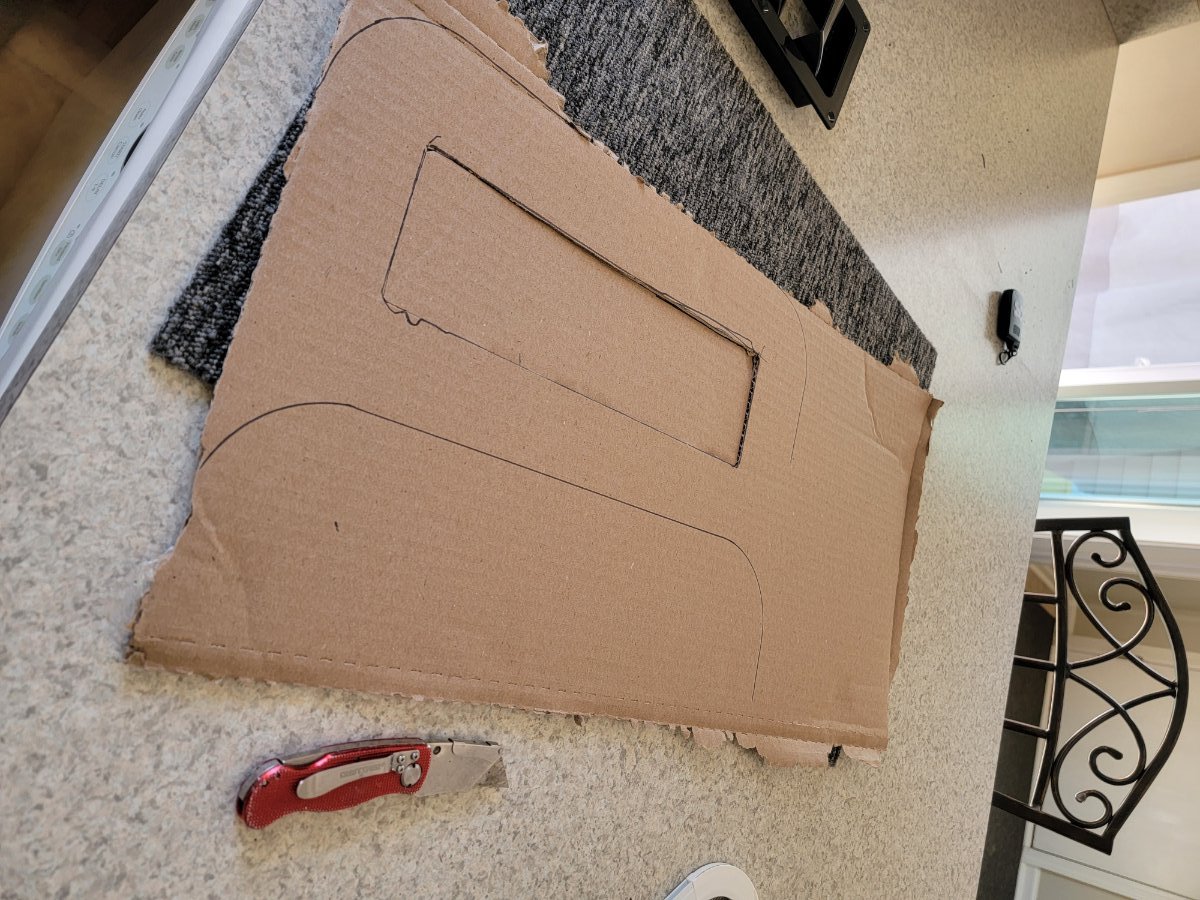
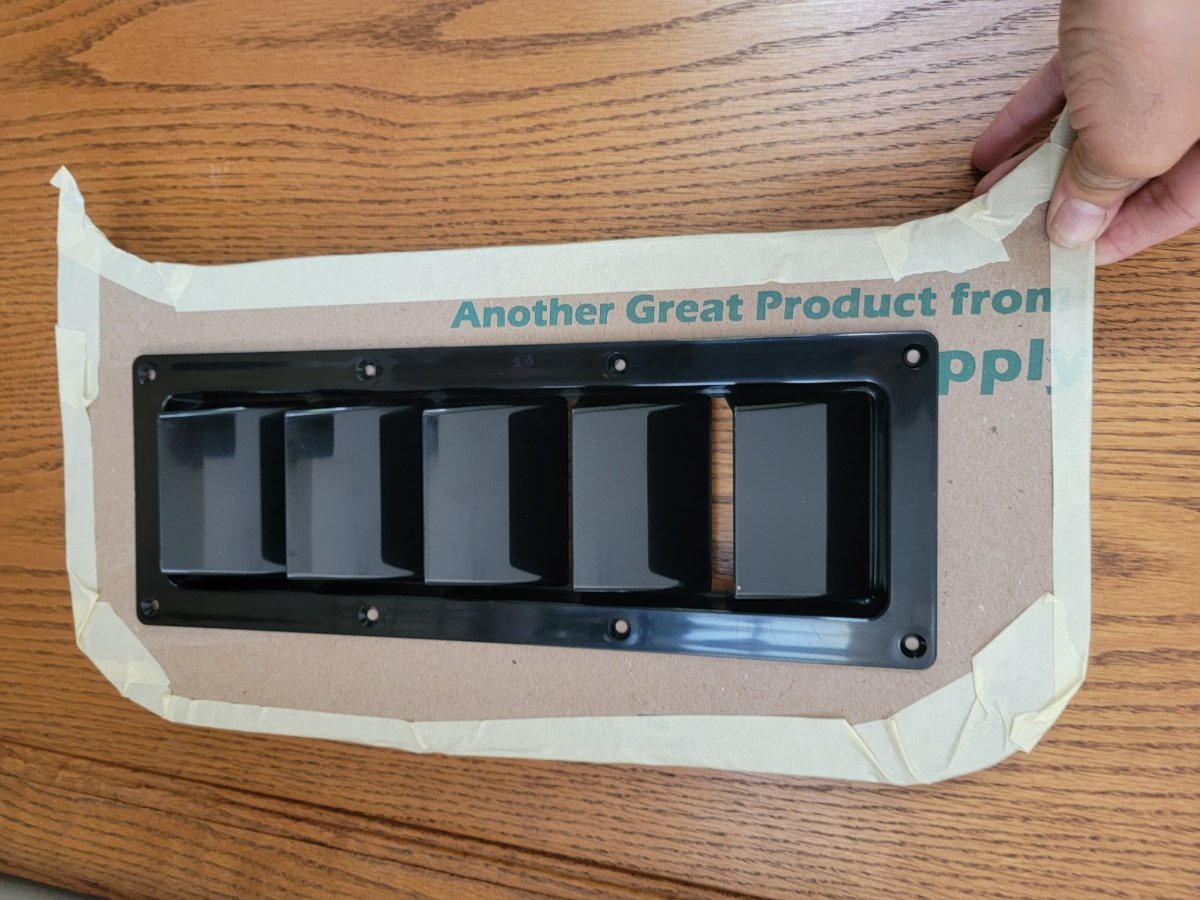
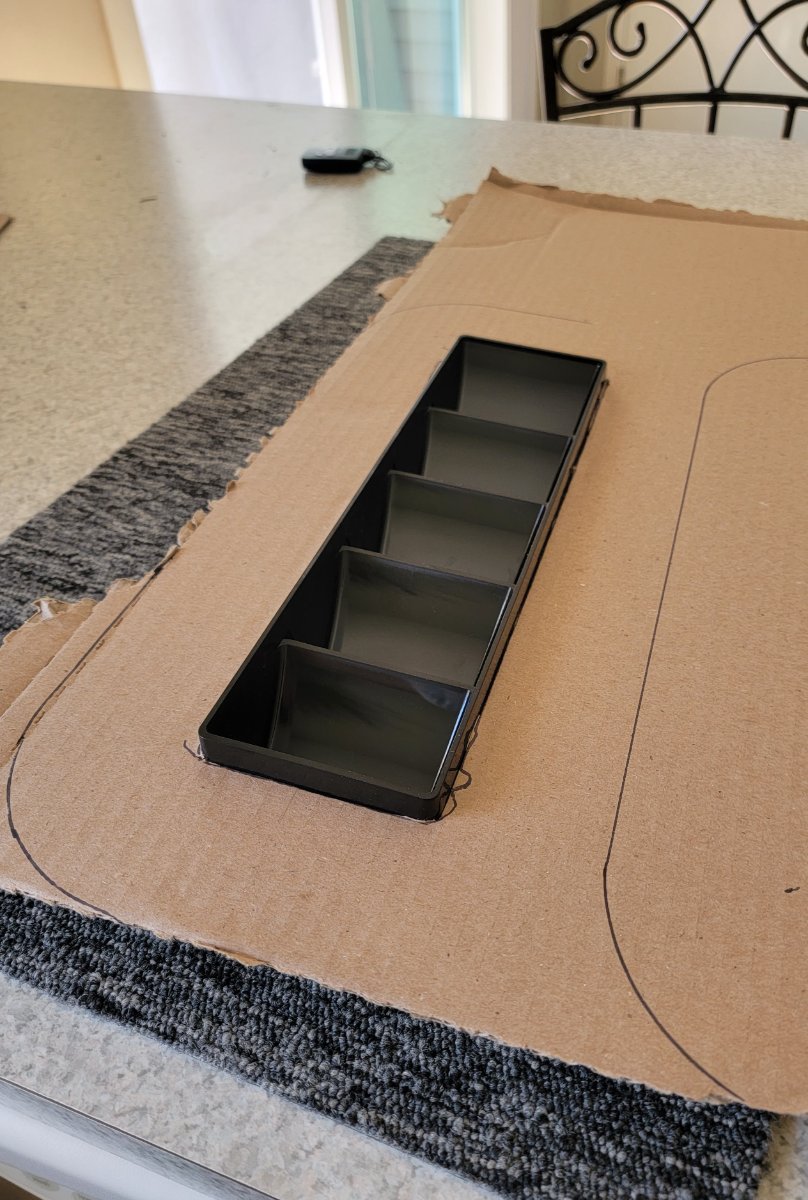
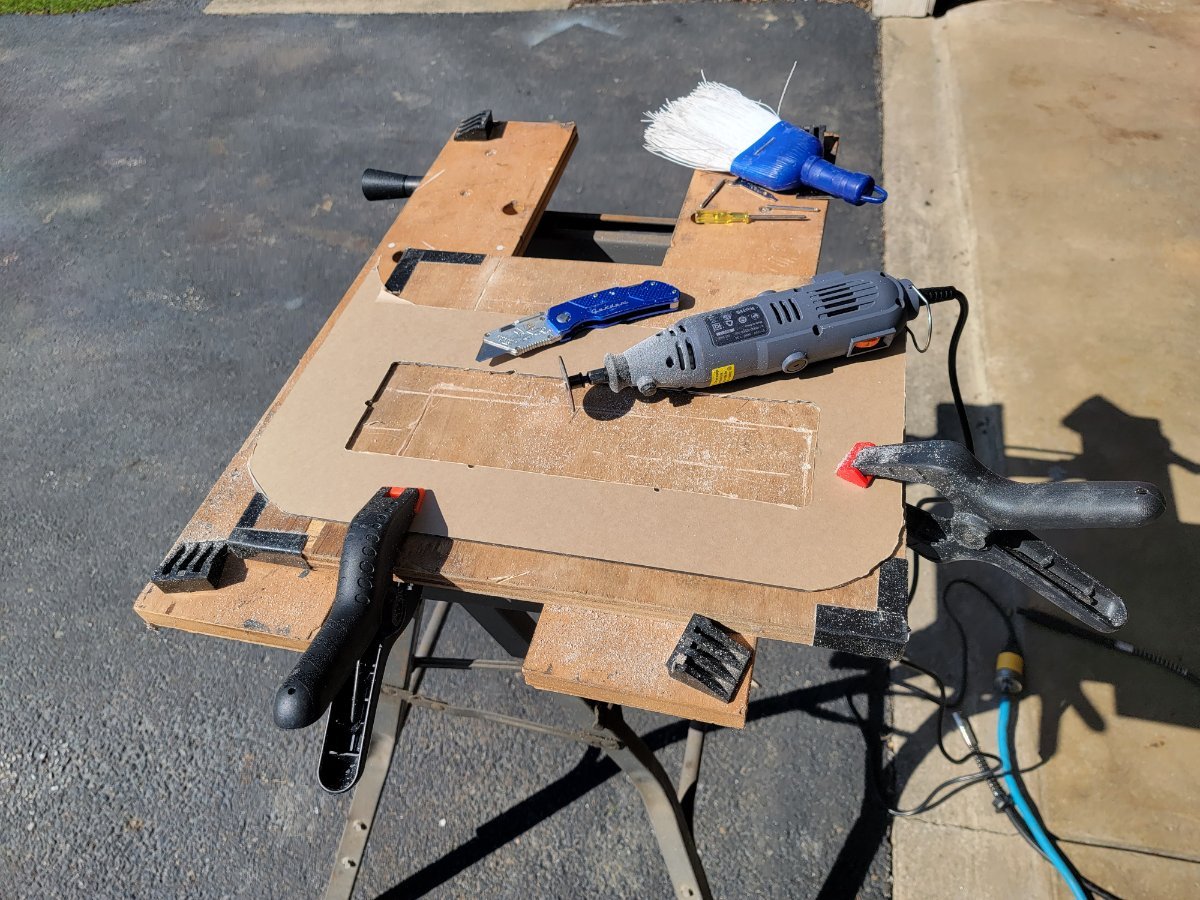
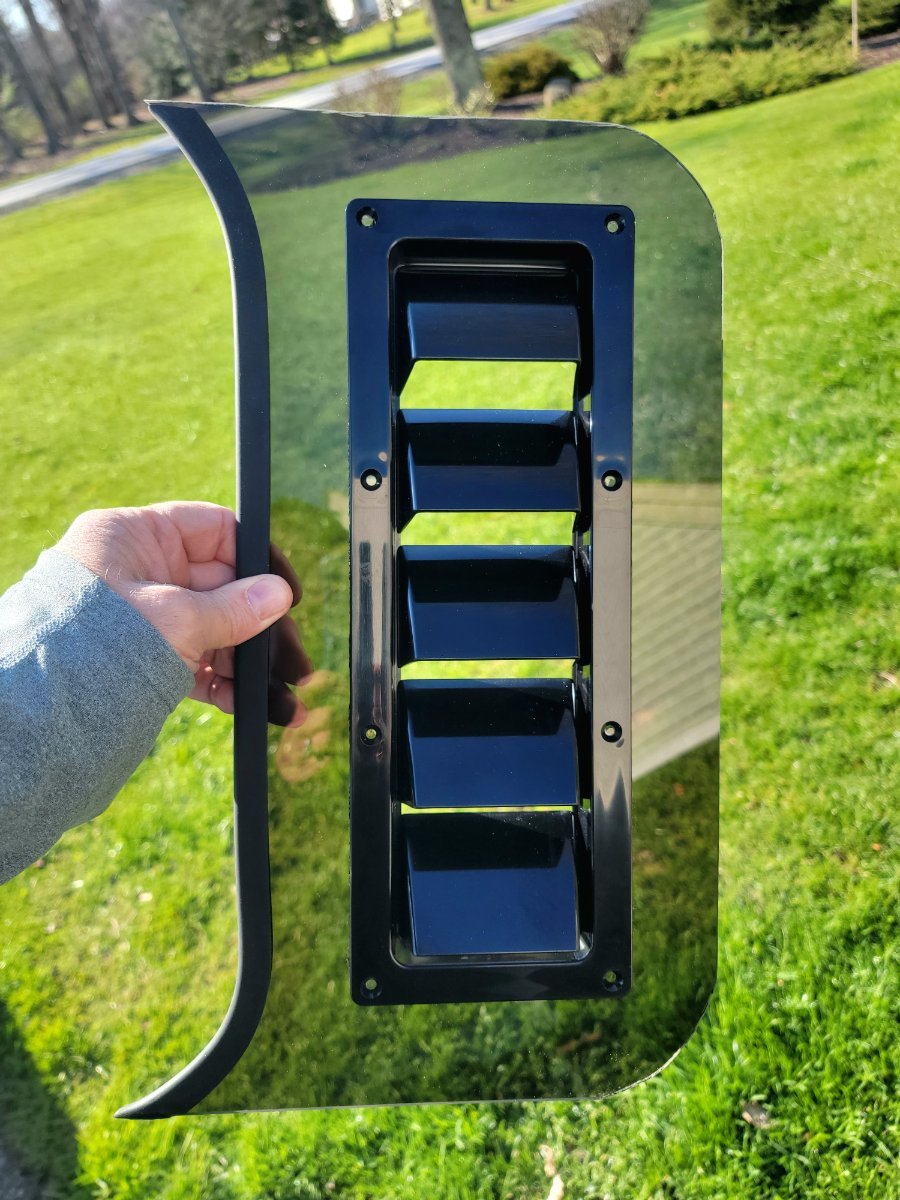
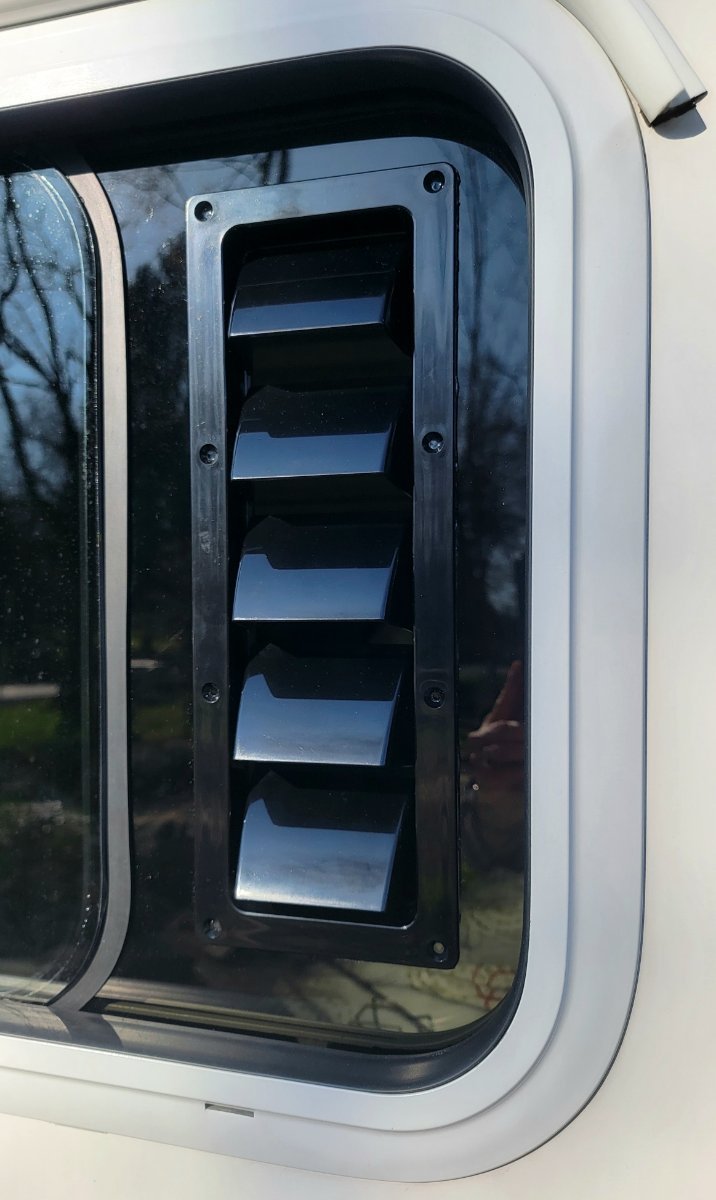
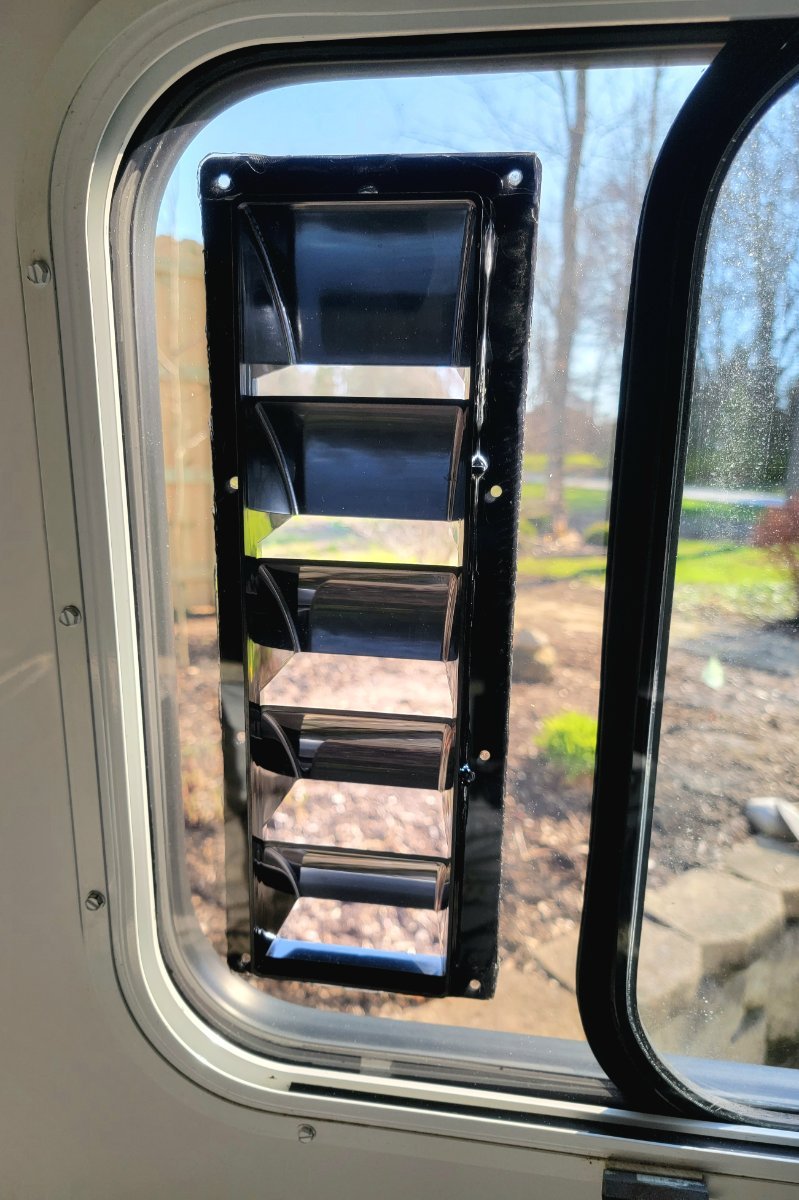
I don’t even know when Airxcel (makers of the Maxxair Window/Maxx Louvered Window Vent) stopped production (maybe 2015) but I was one of the lucky ones who purchased a couple from Little House Customs for use on my Casita. Right before putting OCD for sale, I removed them for use on the ILOVHER. I consider myself lucky as there are still current threads about owners with radius style sliding windows who want the ability to open the windows in the rain for that much needed airflow. The company apparently doesn’t see the need to start production and maybe our fiberglass market is just too small to justify a rebirth. Occasionally, I’ll see a couple pop up on Ebay but they go for a mint..sometimes upwards of $150 plus shipping! I have followed the topic with interest because one of my vents is spider cracking..probably from UV exposure and vibration over ten years. It’s still hanging in there with a bit of FlexSeal tape! I stumbled across a gentleman on Fiberglassrv who was 3D printing a drop-in two piece vent in three colors and sent me info on his prototype. Here is the link to the discussion and a picture of his 3D design: https://bit.ly/3JNotT5 I was emailing him back and forth in September of 2020 but my understanding is that he’s dropped off the planet. He was charging right around $80 for one. I’m not sure how many people were able to purchase one but I never did. I decided to put my mod brain to work and came up with the design below. I will eventually make another one for the curbside. I really enjoyed the process and it wasn’t terribly expensive to do! (about $50) in materials. PM me if you’re interested in the material list.. The vent is made out of a black boat louvered ventilator. I got the idea from a friend who had something similar on the hood of his ATV. I used a piece of ⅛” smoked plexiglass and the window screen as a template. The plexi was cut with a standard Dremel tool cutting wheel. The edges were trimmed with rubber edge trim and the vent is seated with a waterproof nanotape. The only downside is having to install the vent when it’s raining outside and removing it before travel…that’s where the Maxxair vent had the edge! You simply slide the whole thing upwards into the upper track and it fits snug and water-tight. The other bonus was that I didn’t have to add screening as the current screen still closes with it in place. This was really fun to do and I’m super stoked to test it out!
1 point
-
These questions about what charges/discharges during various conditions can be answered by simply installing a smart shunt. Then you can "see" the changes when things turn on/off - start/stop - connect/disconnect. It's the best money you'll ever spend on your electrical system. I use the Victron Smart Shunt with the bluetooth app to monitor ALL energy flows via the negative buss. Charlie.1 point
-
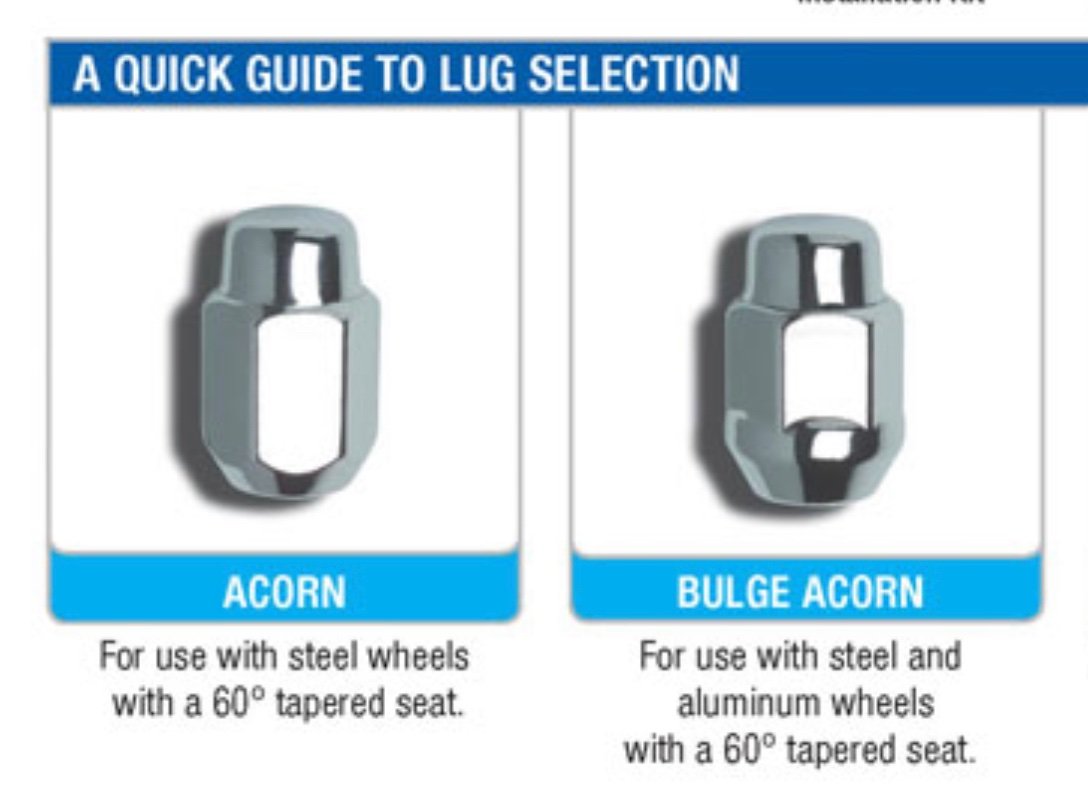
For anyone getting replacement lug nuts, make sure you get the proper type for aluminum wheels. The correct ones are the “bulge acorn” type which have a larger conical seating surface for use on aluminum wheels. Aluminum wheels are softer than steel wheels and require the larger seating surface. The ones installed by Oliver are the correct bulge acorn type so get the same style. “Acorn” type have a smaller conical face and are for steel wheels.
1 point
-
I was concerned about possibly affecting wheel balance, but Oliver told me that wouldn't happen or be very slight. I was also concerned about the shape of the nut being correct to seat in the rim, but a careful comparison between the old and new showed that the new would fit properly. I have towed about 300 miles since with no issue. When you get your Oliver, check the nuts against anything you might buy. Mine is a 2021 LEII. I do not know if they changed the wheels on later years. The threads inside the nut should be at least as deep as the lug bolt. Some nuts are multi-piece with a welded cap, so the threads do not go as high as needed.1 point
-
I have owned my 2020 LE II for 18 months and towed about 10,000 miles including 2,400 miles from Hohenwald to Oregon when I picked up the trailer. My vehicle is rated to tow 7,000 lbs. Horsepower is about 245 and torque about 320. Payload is a dismal 1,120 lbs. I couldn't afford a new tow vehicle and the Oliver at the same time I have been mostly satisfied with my towing experience but certainly look forward to getting a beefier tow vehicle at some point. I definitely feel safer towing the LE II with my current vehicle now than I did towing my former 3,000 lb tent trailer with terrible towing manners. If you can afford more tow vehicle, then don't hesitate to get a new one. If it comes down to no Oliver, then you can start out with your Tacoma with the Anderson hitch and upgrade your tow vehicle later. It seems that many have done that. Oliver will set up the Anderson hitch properly when you pick up the trailer. If you pay close attention to loading and leave the toys at home to stay within all specs, you will not be unsafe on the road. The double axle LE II tows extremely well without sway. Look to adjust tongue weight to no more than 9% and plan on a mostly empty truck bed. Pack any extra weight in the Oliver on the floor or bunk centered over the axles as much as possible. Move this weight to the pickup when you set up camp. And don't travel long distances without first emptying the blackwater tank which adds considerable tongue weight. When loaded for a week of camping, my LE II weighs about 5700 lbs with 520 lbs tongue weight (plus 60 lbs for the Anderson hitch) and my tow vehicle is usually pushing its GVWR of 5,700 lbs. I limit tow vehicle payload to one driver, one passenger, one dog and less than 100 lbs of cargo. (If I had young children, it wouldn't work). And yes, I need to stop for gas every 200 miles or so. Note that to achieve the full GVWR safely, it is critical that the weight be properly distributed over the front and rear axles of the tow vehicle. That is what the Anderson hitch is for. My current tow vehicle is a 2004 4Runner V8 Limited with 220,000 miles. The 2004-2006 V8 4Runner is the only 4Runner ever built with a V8 engine and a towing capacity of more than 5,000lbs. I am the original owner. Eying the 2023 Sequoia as a possible replacement.1 point
-
We don't yet own our Ollie (scheduled delivery in September), but I have loaded and towed raft trailers for 40 years. I agree with NcEagle 100%. About 60% of trailer weight should be forward of the axle(s) for safest towing, and best on-road handling. I would never consider loading heavy stuff in the rear of a trailer to reduce tongue weight. If you can't "make tongue weight" when loading your trailer a bit front heavy, either leave some stuff home or get a bigger tow vehicle. Life and health, including not just yours but that of those on the road around you, are too precious to risk loading any trailer tail heavy. My 2 cents.1 point
-
At least "boxed" is lighter than bottled. Look at the weight savings - particularly after you drink it!1 point
-
We may carry more than most camping, but it would be way too "borderline" for us with a payload capacity of 1395 / towing capacity of 6800 - well, maybe if I was alone I could squeeze it out. For example, here's our weight calculations for what we carry in our 3/4 ton pickup on a typical ~2 week camping trip: Essentials: Ollie tongue weight - fully stocked with food / clothing / full fresh water tank + other essentials (620 lbs), Passengers (300 lbs) + BIG doggy (100 lbs) = 1020 lbs. Various tools (58 lbs), Emergency gear (39 lbs), 20 gallons drinking water (166 lbs), Clam tent, stakes, hammer (49 lbs), Camping chairs & table (42 lbs), propane fire pit (24 lbs), outdoor rug (11 lbs), camp chef propane stove (8 lbs), hiking gear for two (23 lbs) = 420 lbs. Non-essentials (combination of following depending on type of trip): Generator + generator stuff (70 lbs), extra full 20 lb propane tank (36 lbs), spare solar panel (41 lbs), 2 e-bikes (100 lbs) = 247 lbs. Sure, we could jam more into the Ollie with heavy stuff near the rear to reduce tongue weight and payload, but it becomes even more dangerous and not fun (imo) when the overall trailer weight is approaching the tow vehicle weight / limits. John1 point
-
21 gallon tank getting 13 miles/gallon gives you a range of about 270 miles. You’ll want to fill up before you get below 1/4 tank (I usually start looking to fuel up once I start getting below 1/2 tank). So, every 200 miles you’ll be looking for a gas station. If it’s windy or lots of hills expect gas mileage to decrease 3 or more miles/gallon. As far as payload goes, Carol and I combined are about 270 lbs. But we carry more than 80 lbs of stuff in the truck which is your 950 lbs. Grills, Clam, chairs, fire pit, portable table, rug, extra propane tank, Tupperware with spare parts, ladder, sometimes a generator, etc. I always say start off lean and add what you need. 950 lbs might be a good start point. You’ll know after camping a while! I think there are several owners that tow with a Tacoma. Just realize that your margin of safety is much less than a larger truck, especially in hills and mountains. Mike1 point
-
Not knowing what engine or even vehicle you are talking about makes this a bit difficult. However, as a ballpark estimate you could expect you "normal" gas mileage to be cut in half while towing. If that is correct then you are looking at about 9 miles per gallon and a maximum range of about 180 miles given the size of your tank. Of course anything like mountains and/or head winds will cut into those numbers dramatically. For instance - several years ago I was towing a camper across Kansas when I encountered a 40 mph head wind. My gas mileage with my Tacoma dropped to 4 miles per gallon and I was right at 60 miles per hour! Add to this that the camper I was towing weighed right at 3,500 pounds. To be fair - this camper was shaped like a brick versus the Oliver with its smooth lines. Bill1 point
-
I towed with a 2012 Toyota Tacoma for 6 months and about 6,000 miles. 6,500 lb and 650 lb tongue weight limit. It towed fine. I was at or over my payload limit and I had to stop for gas every 150 miles or so. Not really a pleasant towing experience. You need to check the payload capacity for a light weight vehicle (add tongue weight -600lbs plus passenger weight plus whatever you will carry in the bed and cab that will approximate your payload). Also check the size of the fuel tank. A smaller engine tow vehicle won’t get very good mileage and that can be a factor depending on where you tow. Also, hills and mountains can be a white knuckle experience with a small tow vehicle, both uphill and downhill. Uphill you’ll be spending time in the slow lane with the big rigs and downhill becomes a safety issue as you have a 6,000 lb trailer pushing down hill and around curves. Mike1 point
-
A couple of things I've recently observed about the 890 - 1. Just yesterday I found that Garmin has released BOTH a software and a map update. These do not take too long to download and install but if you have an 890 you might want to think about getting these updates. 2 - The 890 has a "red light or traffic camera" alert feature. I don't normally pay a bunch of attention to this - particularly when towing - but a recent article I read said that some locals are using Covid relief monies to purchase and install these types of cameras. Apparently the logic behind this is derived from statistics showing that during the Covid pandemic fatal traffic accidents have increased and these cameras would be a way of slowing or stopping this trend. Bill1 point
-
Pretty simply, actually. We treat the trailer, as likely you do, as a hard sided tent. We minimize our impact. We live on solar. We pretty much live the same, at home. Solar powered home. Solar powered boat. At home, we collect rainwater, and filter it for use everywhere. As I think you do, we believe in treading as lightly as possible on our planet. We try to use the fewest resources possible. Mess up as little as possible. Leave a very small footprint, if we can . I don't love the desert, like you apparently do. More power to you. Room for everyone. I love trees,mountains and water. Green and blue are my favorite colors. 😁 well, I like all the colors of the ocean...and the mountains. Last year, we actually counted, and 152 days, camping in our 2008 Oliver. It takes some thinking and planning, as you know. Some years more, some less, probably. Is what it is. Happy camping.1 point


.thumb.JPG.dd838cdb3df463dab6a16861fa23a319.JPG)


.jpg.e487fb93989a0ed2f1cd97a65cac9fe5.jpg)
.jpg.1838d6eb0f0c9fdc36d12f5d4c5baf74.jpg)
.jpg.acbfa6336a415fed9ee10889023bcb96.jpg)
.jpg.545f36a4110db19a8aa99ab70042e82c.jpg)
.jpg.19fad7e3f5f2ac34b11f4c916b938c6d.jpg)
.jpg.fa09406d864220321cf729fde0d4a2e0.jpg)
.jpg.20fe0cd48c1264c0e1103298d5012524.jpg)
.jpg.9e364cdec4abe105ea196acc9b90d93c.jpg)


-
Recent Achievements
-


")


")


")
