Leaderboard


Popular Content
Showing content with the highest reputation on 10/13/2023 in all areas
-
On our way from Santa Rosa, NM to Amarillo this morning we just had to stop at the Cadillac Ranch and rattle can paint a Caddie. We then had a great Texas style steak dinner at the Big Texan…the steaks were excellent. I highly recommend the Big Texan for dinner if you are ever in east Amarillo. It was nice to be back in Texas if only for a brief time. Onward east to Oklahoma tomorrow. Patriot🇺🇸 Spot our Oliver.
 4 points
 -
Dates for 2024 as posted to the Casita forum on the fiberglassrv.com site: 2024, Feb 5-11: 2024 Quartzsite Gathering The annual Quartzsite Gathering will be February 5th thru 11th, 2024 at Dome Rock! Once again this will be a "No Host" get together and everyone can do as they please, visit with friends, make new friends, ask questions, see mods, sit around a campfire, tell jokes, sing whatever you want to do! The town of Quartzsite is only 3 miles away and has pretty much all you need, gas, food, places to eat, dump facility, trash dump station, and lots of RV vendors. Come when you want and leave when you want, find a spot you like and set up camp. This is a total dry camping get together so come test out your boon docking skills! Best of all it is on BLM land and totally FREE and the most gorgeous sunrises and sunsets you will see anywhere! The 2023 Gathering was a great success after the pandemic with about 125 trailers attending so 2024 should be even better. See you all there! Location-- GPS: 33.643617,-114.304752 Last year was my first year and I met and camped with several other great Oliver Owners as well as many Casita, Scamp, Escape and Bigfoot owners, I am hoping to attend again. Anyone else planning to be there this year?3 points
-
That's what I've found on two occasions with our Platinum Pro package. The first time I ran the AC exactly two hours, and the batteries were at 81% after. This was in May, and using solar only, it took 48 hours to recover. This was using the factory 400W panels without my additional 200W portable panel. In August I ran the AC for about six hours (untimed) and the batteries were at I think 38% after. I was at an electric site a couple days later, so didn't check to see how long the solar would take to recover. So, AC uses about 10% per hour of running time with the Platinum Pro package, and takes about 24 hours per hour of running time to recover using 400W solar only.3 points
-
Two different systems, and never the twain shall meet. However, the same black gunk you talked about may very well have caused your Truma problem, as well. If I remember correctly, you bought a 2019 trailer. Did you drain, refill, and sanitize the plumbing system? No matter how meticulous previous owner tried to be, gunk can grow. You don't know how long ago it was sanitized. When you get home, I'd do the sanitizing routine at least twice. And rinse all the crap out of the water heater. After sanitizing twice, fill tank with fresh, and run all faucets (not at once) to drain. Get that gunk out.3 points
-
Simple Path Idea: Can we intercept the thermistor wire from the underside. Extend the wire as JD has suggested. Then route the wire through the OTT drain line back to the attic. Cut the drain line and pull the wire and thermistor to the street side cabinet surface. Drill a small hole to poke the thermistor end into the cabin just above the Smoke Detector. There it would not be much of a visual issue. Your thoughts? GJ I second JD's suggestion this T-stat works exceptionally well to fire up the OE2 furnace. GJ3 points
-
I carry a spare pump as they do sometimes fail. I have it stored in a case and setup so it can be used to fill fresh water through the fill port. (An alternative to using the house pump.) Project here: https://4-ever-hitched.com/ggs-blog/f/transfer-pump-project Craig - Hull 5052 points
-
John is right on the money here. The YouTube videos don't give you the whole story and those people aren't you. We rented before we bought our first trailer and it was very instructive as to what we needed and wanted. RVing has as many problems and frustrations as regular house living (maybe more) and those problems are different than the ones you're used to.2 points
-
You still need to do a LOT of research before you start checking options in the order form. This is a good start: https://olivertraveltrailers.com/forums/topic/6629-how-to-find-happiness-with-lifepo4-lithium-ion-batteries-solacity-article/ I **** STRONGLY ***** recommend that you delay your order and rent a small travel trailer for a few weeks. You will learn more in a single day than you will thru months of videos. You may even decide that you do not like the whole concept, or that you are uncomfortable with towing. You might prefer a Class B or even a truck camper, neither of which will work with your new truck. The basic rule is to buy the camper first, then the truck that works best for it! Doing it the other way causes lots of heartache. And it is so very common. There have been several excited Oliver newbies that discovered that they just could not adapt to the lifestyle and the many technical challenges, and they sold their trailers shortly afterwards. This is very preventable. Take it very slowly and be sure you know enough to make educated decisions. John Davies Spokane WA2 points
-
I really like your trailer’s name. So fitting for the curiosity of us Oliver folks.2 points
-
https://olivertraveltrailers.com/forums/search/?&q=Access&author=Overland&search_and_or=or You can add or subtract key words.2 points
-
Drain it and sanitize it. Bill p.s. glad the "switch thing" worked for you! Unfortunately, I don't have an explanation as to why "flicking" that valve switch has anything to do with the Truma. One could argue that if it now works then all is good, but, I'd like to know why it now works. Sometimes those "simple" switches will have an "issue" with contacts or the little motor that they activate will get confused and just needs to be "reset" and/or the contacts get "cleaned" by the flicking. But, as far as I know, that switch has absolutely nothing to do with anything concerning the Truma.2 points
-
Thanks for all the advice!! Bit the bullet and bought a 2024 gmc 2500 diesel.2 points
-
#665 was picked up in Aug 2020. We have an "threaded adjustable" rubber foot (similar to a table foot) at the upper left rear within the microwave enclosure. When you turn the rubber foot clockwise it extends it down until the microwave does not move. You do have to remove the face plate as shown above, to see/adjust that rubber foot. "And/or you have been down some very rough roads." Yes, lots of that. Sorry no pictures. B-Out2 points
-
Our 2023 came with these vents, shows you Oliver listen to their customers! 😊
2 points
-
No problem - your location makes the situation even more interesting at 3am!😁 But, the switch mod is basically the same.2 points
-
By the way Oliver did not have the size molding I needed. So I contacted the company who manufactures them directly. The are Coutoure located in Florida. Info@countoureusa.com or 888-656-9317.2 points
-
I expect yours is an absorption fridge. The 2023s come with compressor fridges. This is another reason to consider solar and lithium: a compressor fridge requires a fair amount of power, and very few RVers get along without a fridge. Also, many campgrounds limit the hours you can use a generator. If you plan to rely on a generator, I hope we don't end up camping next to you! (with all due respect) Yes, the lithium upgrade is pricey. But, unless used nearly full time, Lithionics LiFePO4 batteries should last at least 10 years, likely more like 15. Wet cell or AGM batteries must be replaced every 3-5 years regardless of use. Over time, the marginal cost differential between lithiums and lead/acids is not that great.1 point
-
You can't run the A/C off any of the non-lithium OEM packages. With the Platinum lithium package you can run the standard A/C for a few hours. But, you still have to put that energy back in the batteries somehow. That leaves you either running the generator or going to full hookups to recharge. In actual usage this summer we ran the generator on the Platinum battery system for about an hour before bed on a few nights of a 2 week trip. The solar wasn't able to to completely replace those watts the next day but we had enough total capacity to get through the trip without needing the generator. In other words, we were able to run the A/C off battery for short periods on the really bad nights. I think each hour used roughly 10% of our total capacity. When I get a chance, I'll check my notes.1 point
-
I keep having people ask what a "Curiosity" trailer is. When I tell them it is our name for the trailer, and that it is an Oliver, they've generally never heard of the brand before, either. 🤷♂️ From this weekend; Halloween weekend at Mosquito Lake State Park in Ohio:
1 point
-
B flat, A, C, B natural p.s. DUH! wrong composer!1 point
-
Thanks all! Ended up with Progressive...$500.00 year.1 point
-
Try "flicking" that valve drain switch a couple of times to see if that gets it going. If that doesn't work then open up the dinette seat hatch that is nearest the bathroom. When you look down into that hatch area you should see two black pipes running from the general direction of the bathroom towards the rear of the Oliver. The smaller of those two pipes is your grey tank. Next in looking at that smaller pipe find the valve. It should look something like the pic below except that there will not be a "handle" on the top. But, it will have a cable on top. Reach down and pull up on the piece where the cable is attached. That should move the "blade" that opens and closes the valve. Sorry but I can't help you on the Truma since I do not have one. Bill1 point
-
We had a brief false alarm while in Fruita, CO last week.also in the middle of the night. We have the RV Safe model and the fault cleared quickly. Maybe the air there is different! lol1 point
-
When the clamp that holds the black tank sewer line to the rubber connector piece under my dinette seat broke a couple of years ago I spent a fair amount of time even finding where "THAT" odor was coming from. Once found and the clamp replaced I had the same basic problem that you now face. After trying the usual Pine Sol scrubbing thing I resorted to waiting for a hot dry day, parked the Ollie in the sun and then I hosed out the area in question. Note here that I didn't go crazy with the hose or the pressure. Just a nice steady stream to make sure that everything in that area got thoroughly rinsed. Then more Pine Sol and repeat the spraying. Finally, about three days in the hot sun with all things opened up and fans blowing I was done. Good luck! Bill1 point
-
The answer to this question has a bunch of variables - the time the pump is run, how many times is the pump run, what is the pump being expected to "pull" and from how far, etc. I've never had a water pump fail under virtually any circumstances while others have had them fail after only a short period of time for a myriad of reasons. Having said all this - under the circumstances you describe, I think that you should do fine and that the standard water pump should serve you well for a number of years. But, if you are planning to really be way out in the boonies and/or don't want to take the chance on the pump failing, then simply by a "spare" to cover that base. I've virtually always used a 25 foot hose for the purpose you describe and the draw has usually been from the back of my tow vehicle or from a container located right at the inlet port. However, on two occasions I did draw from approximately 50 feet without difficulty. And, I've drawn from the back of my tow vehicle through a 25 foot hose while using a Camco water filter. If I understand your question correctly - the standard procedure is that the port draws water into your fresh water tank and you must configure the water valves in order to do this. Then you must reconfigure those water valves in order to pressurize the water lines inside the Oliver. I've never actually tried to draw directly from my tow vehicle and use that water inside the Oliver at the same time. My guess is that you can't do that. Bill1 point
-
NP Scuba Steve, you're the best and the Guru of all things OTT! Elegant in a way yes, though it will soon be improved to be more shock resistant. Ordered my bus parts and will share soon. I'm going for solid copper busses at both +/- terminals. Thanks1 point
-
Well, those grommets aren't doing a thing for you, right now. Nylon or some other type of plastic, useless if not seated in the opening. Rough fiberglass is abrasive. Now's a great time to replace with a barbed grommet, or cable glands, that will stay put, since you're pulling the batteries, etc.. Material of your choice. Also, carefully inspect the cables for any apparent abrasions in the sheathing. Hopefully, none, but you do want to know. I'm always inspecting ours, as battety compartment is pretty much under our heads. Btw, in Florida heat, we inspect water levels in the sailboat (fla batteries) monthly, or at least every 6 weeks, in summer. I would certainly do the same in Arizona. Use distilled water only, as you know, of course. Winter, we can check every two to three months, and seem to be ok. Our trailer has agms. As @John E Davies suggested, I would definitely check all 4 batteries. Your system will only charge to the level of the weakest, and if you have a bad cell in one, you'll have issues. If I were you, I'd still check in with Ryan at bluesky/sunforge, and make sure your settings on the charger are correct for your type of batteries. I do agree with you, that for many of us, fla or agm, is plenty, if we limit power consumption. By the way, not for you, but for future readers of this thread, do NOT go over your skill level zone , with electricity, and electronics. If unfamiliar with making connections, get a professional to help. Make SURE panels are covered and turned off before attempting work . Better to be double safe, than sorry, and fry something. Or, hurt yourself.1 point
-
The cable lugs with the spacers have been address, but I have to say I was shocked, no pun intended, to see these kind of connections. This is grossly out of standard and a serious problem. It's hard to tell from the overhead photo, but it appears there may be additional spacers at other connections as well under the cable lugs. As was mentioned above, you need to have sparkling clean connections and all lugs should be stacked together against the lead base of the battery terminals, no spacers if possible. Any resistance at any and all of these connections will play havoc with your charging control system and it's efficiency. I firmly believe this could be a root cause that needs addressed before you trouble shoot other components downstream. I would systematically check/correct every connection in the system as a starting point. I wouldn't replace any component without verifying it's function first. Doing otherwise just introduces more variables to the problem, and of course adds undue cost.1 point
-
We've found the Blue Sky equipment to be almost bulletproof (we did manage to short out our 2512ix around 5 years ago, but it was completely our fault.) Are any of the lights lit up on the 2512 controller? What does the indoor (in pro) panel tell you about charging? Do you have a battery disconnect switch, and is it on or off? If you don't have the manual you can download it on the sunforge/blue sky site. There are also great videos to assist you in troubleshooting. You probably want to look through the manual, and the videos, and send an email to Ryan Gurin at Blue Sky, or give him a call. He's an amazing tech, and very helpful. Ryan really knows his stuff. (Watching the videos and reading the manual first helps you gain familiarity, and you can probably eliminate a few troubleshooting steps before you speak with Ryan next week.) https://sunforgellc.com/learning-center/ Solar panels don't often "go bad." They may not generate all the power they once did seven years ago when new, but degradation would likely be less than 3 to 5 per cent. Because of the reliability of Blue Sky, and Ryan's great customer service and technical support, we kept our Blue Sky gear, and added to it when we upgraded from 200 to 400+ watt panels a few years ago. Before you do any actual "work" on the system, other than checking with your meter, I'd cover up those panels, as they are undoubtedly producing power. We use dark blue packing quilts to cover ours.1 point
-
Wet batteries need to be checked when fully charged, using a cheap electrolyte hydrometer. Each cell should be close to each other. The acid should be clear, not dark grey. Even one low specific gravity cell will cause the other two to discharge. The two front batteries are probably damaged beyond repair - they must be strapped down solidly to prevent motion, which causes major internal damage to the lead plates. The exception is if the trailer was parked all the time, but if that were true, why even add a bungee? When you service them you should make sure that all the terminals and cable ends are very clean and all the hardware is tight. Clean the batteries with a baking soda mix to neutralize any vented acid. Never add tap water, distilled only. Have you read through the battery owners manual? All your manuals are available to download. Wet batteries are insanely heavy, a continual PITA to maintain, a risk of corroding your battery tray and the aluminum support structure, and are really are not suitable for RVs any more. This isn’t just my opinion. Consider replacing them with SLA. Upgrade the system right, don’t band aid fix an “older” design that isn’t ever going to provide peace of mind and low maintenance. Unfortunately lithium$ are very inappropriate for your hot desert location, if the trailer is stored outside, they do not tolerate lots of heat very well. It should be easy to relocate the remote solar display to head height. It will tell you exactly what is going on with the panels. There may be a loose or corroded connection up top. The terminals on all these parts should be cleaned, including the hidden ones inside the controller and under the master switch. Blue Sky is uber high quality, marine grade hardware. Better than consumer grade stuff from Zamp or Renogy. Have you verified that the solar switch is in the ON position? John Davies Spokane WA
1 point
-
Just glue it back on and forget about it.1 point
-
I think they are more of a gimmick than actually a device to chock the trailer. Nothing chocks better than a big chunk of wood or rubber. I don’t think they do much to stabilize the trailer, they are just another step in setting up and taking down, and they are just something else in the way. The simpler you make the process the better.1 point
-
Mark, First off welcome to the forum NC neighbor and congrats on your new Oliver. Yes, you presently have a truck that will tow an OLEll. As to whether you will be comfortable enough towing in the mountains only you can decide this. No questions, you will absolutely notice and feel a huge night and day difference when you bump up to a 3/4 or 1 ton TV. When we initially took delivery we started towing our 2020 OLEll with a 2014 5.7 Tundra Crewmax Platinum. It towed our Ollie ok but not great especially in the mountains. You will know you’re towing the Oliver. Based on our needs and what we carry and how we travel “ready to camp” our Tundra was not suitable for us. Our 1 ton F350 diesel has been a game changer in safety, long range driving comfort, cargo capacity, mpgs, and we really like the diesel engine brake. With an 3/4 or 1 ton you won’t need to use an Andersen weight distribution hitch which is highly suggested for most 1/2 ton trucks. No regrets bumping up to our Super Duty. Patriot🇺🇸1 point
-
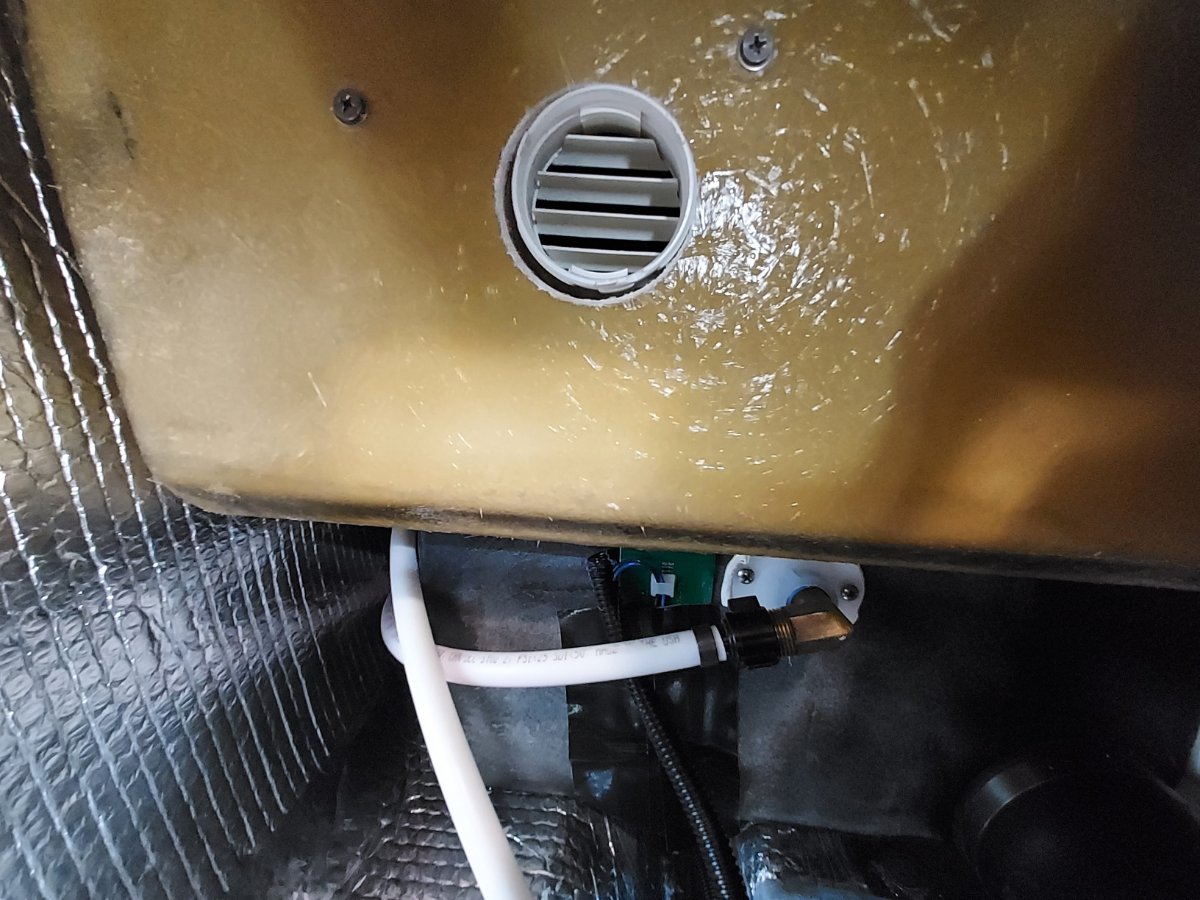
Rivernerd, From my mad scientist experimentation, there are four things you can do to improve this situation. 1). The column of the leveling jack and, most especially, the metal flange the column is attached to, makes for a great cold radiator. some creative work with reflectix and silver tape would go a long way 2). unscrew the ext shower head, bring that line into the compartment and reattach the head. Pull the hot and cold knobs. Now there is enough room to add a block of closed cell foam under the little door to the ext shower compartment 3). cut two layers of reflectix material to cover the entire exterior access door. Cut to fit around the latch but wide enough so it gets pinched by the rubber door gasket to make a seal. Adjust the latch enough so it squeezes the reflectix to close gaps but not so much that the hinges to the door are straining when door is closed. 4). add a small return vent under that bed. Mabey do this last to see if required as it's the most invasive. I went entirely overboard there and replaced the most rearward heat vent on the curbside, snaked under the floor, pst the inverter and fed out to the isle across from the existing galley heat vent. Had to insulate the hose from existing electronics. It works great and certainly heats the battery compartment but bet if I had started with the points above, would not have been necessary. Hope this helps.1 point
-
The overnight low last night here in central Idaho got down below 0 F. So today, I took advantage of the cold temps to test the performance of the Varioheat furnace system, with the additional return air vents I added on the aisle side of the front dinette seat and the closet last week The results? First, the good news: The closet and the area under the front dinette seat were significantly better warmed by the Varioheat furnace. With cabin temp at 62 F, the area under the front dinette seat was 6 degrees warmer than before the addition of that return air vent (an increase from 38 to 44 F). The closet improved even more, a total of 10 degrees (from 44 to 54 F). Now the bad news: My hopes that the increased airflow overall would also result in significantly warmer temps in the vulnerable area on the street side by the external shower controls, were not realized. The temps in that rear area of the trailer stayed above freezing once cabin temps got above 60 F, but only 2 degrees higher than before adding the new return air vents (40 F now vs. 38 before). Thus, there was some measurable improvement, and maybe enough to keep tanks and pipes from freezing when ambient temps are in the single digits, but not as much as I was hoping for. Conclusion: Installation of the new return air vents in the front of the cabin and the closet significantly improved the ability of the furnace to warm those areas. But, that installation only marginally improved warming of the sensitive rear underbelly area of the trailer--maybe enough to keep that area from freezing down to single-digit ambient temps, but likely not below 0 F.1 point
-
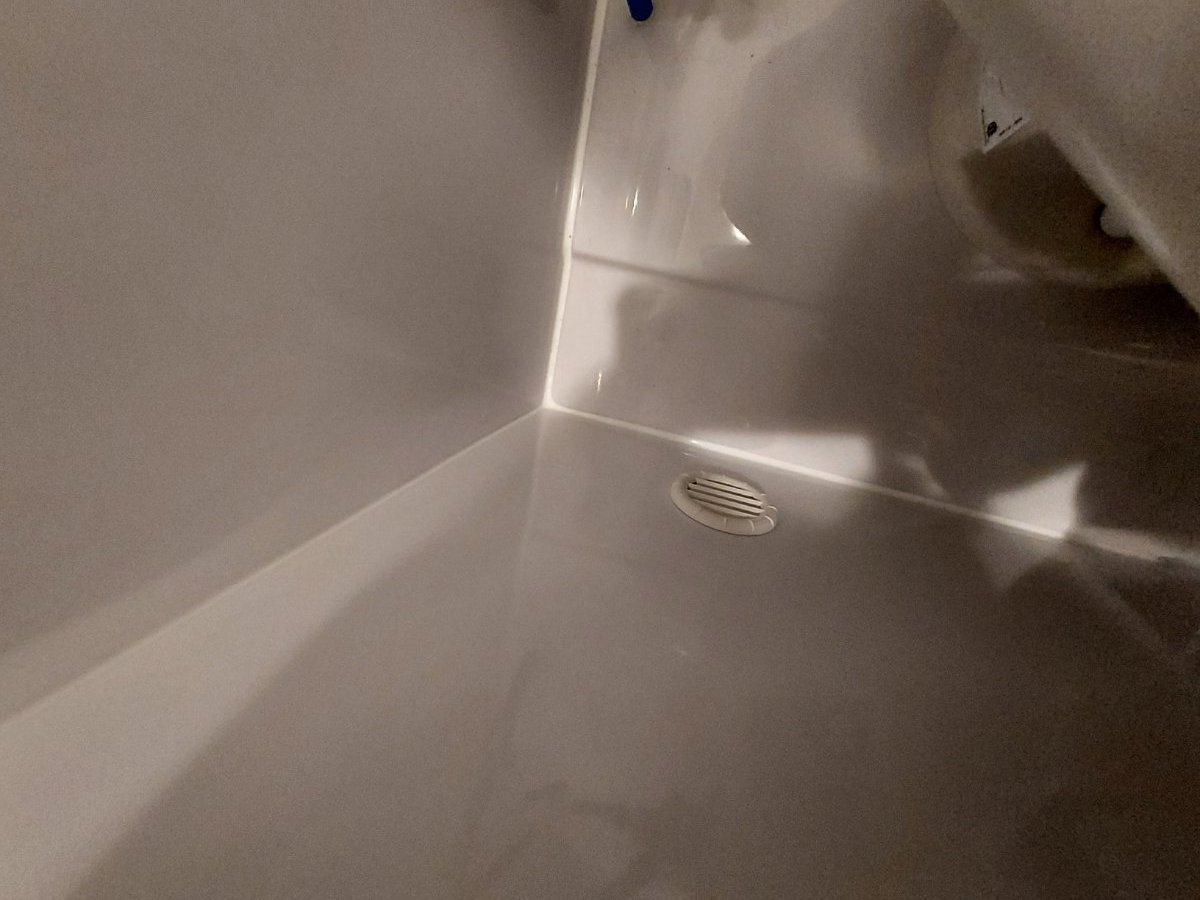
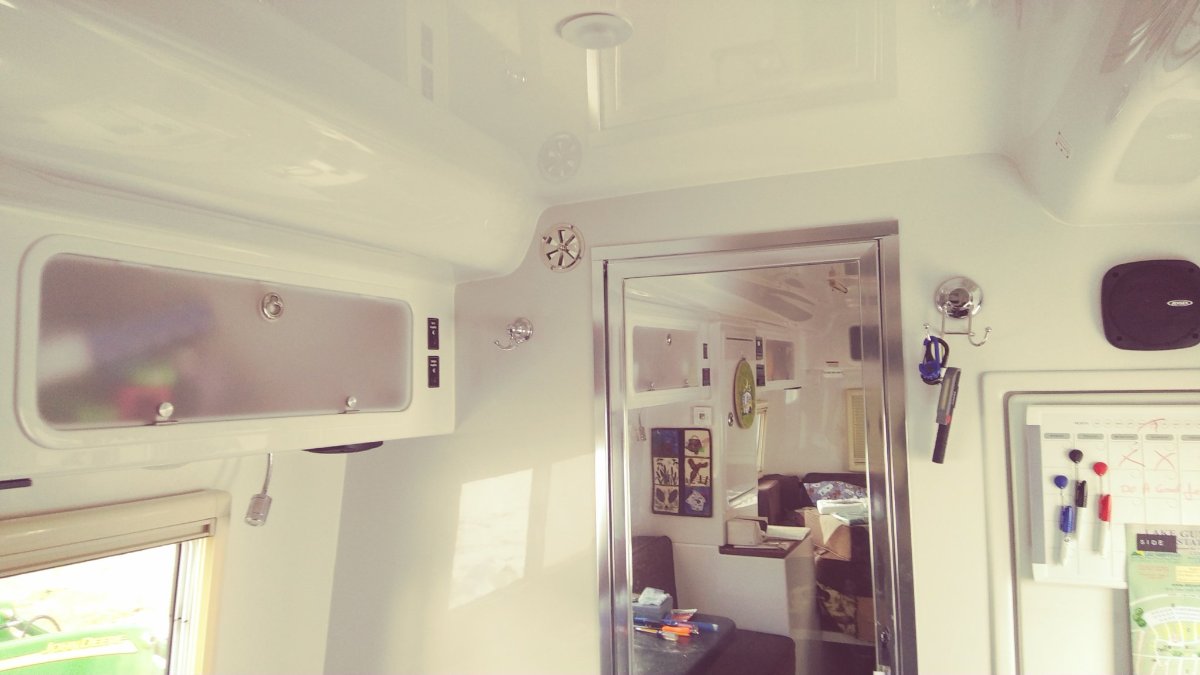
Low on the wall between the toilet and the dinette. The photo below was shot looking down. The toilet is visible on the right side of the frame. That return air vent allows airflow into the area under the forward dinette seat, which connects to the under-floor area.. Data gathered during our return trip from Hohenwald to Idaho last November indicated that this 2" vent made a notable difference in below-floor temps on cold nights in the single digits and teens, F. Based on those observations, if one had not been installed in our Hull #1291, I would install one.
1 point
-
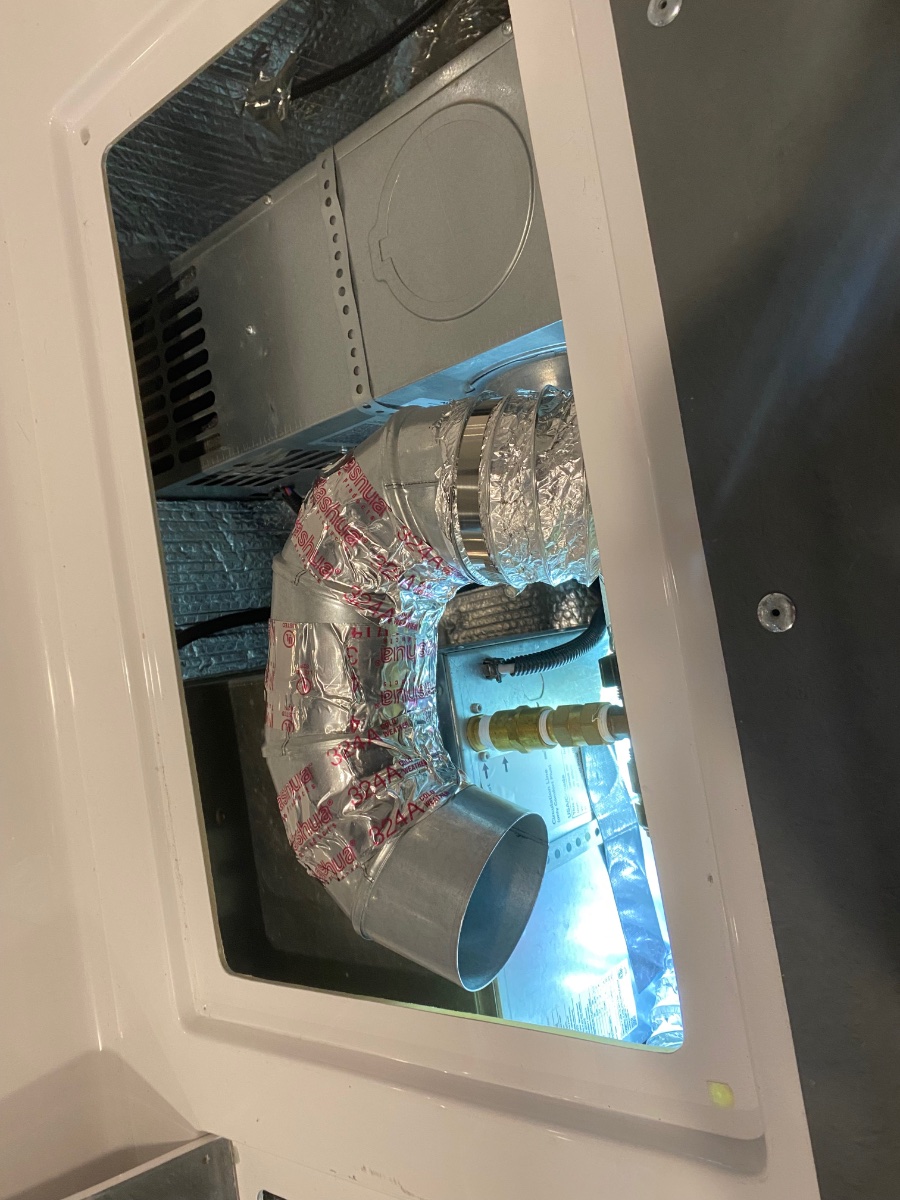
John ,et. al. I bought two of the suggest elbows and they are little bit of a tight fit getting by the water line once past the line everything slid in easily. The only problems I had was the vent tube from the defuser under the bed was a couple of inches short to make it to the rear outfit with the elbows on. I have to get a replace the tube and make it about 4-6 inches long. I hooked everything up above the access panels and then just slid them in place. This is a picture before I slid it in.
1 point
-
Jason, Thank you for the update and clarification! It is always good to hear explanations concerning changes to Oliver Travel Trailer production from the service department. Mossey1 point
-
I requested that production swap the furnace & water heater locations because the furnace ducting was running right over the top of the water heater bypass valve. This made locating the valve difficult for new owners as well as having to move the duct aside with the potential to tear it. Hopefully this change has made it better for access and does not cause any issues. I have also requested the return air vents as well and they did start putting a return vent in the bath where the air can return below the dinette about a year ago. They are still working on getting one placed in the closet which should be one on the top & one on the bottom for better air circulation through that area. The return air vents is something that can be easily added on older models if you choose to.1 point
-
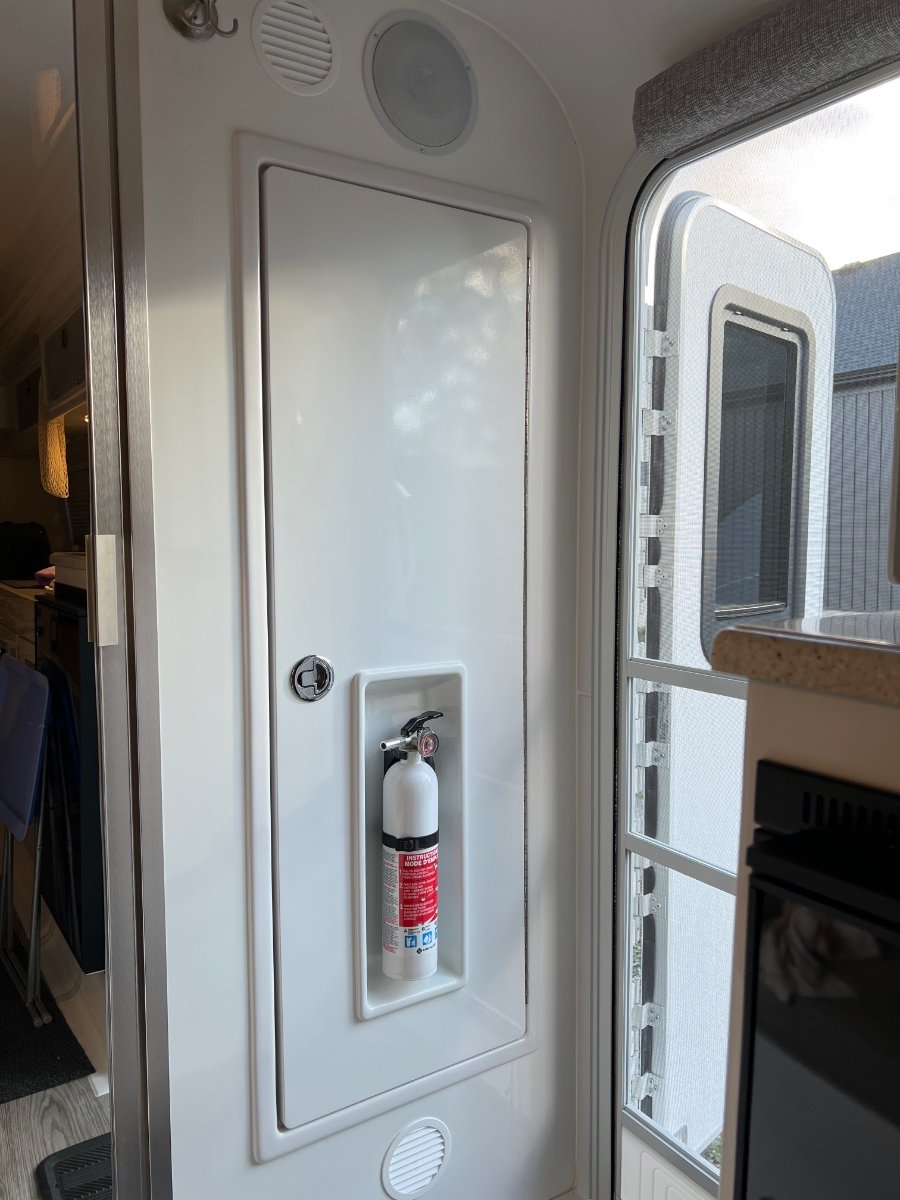
I encourage you to place your new return air vent in the wall between the toilet and the front dinette seat, as shown in the attached photo. This location enables return air to flow through the street side bottom of the trailer, under the battery box and eventually back to the furnace on the curb side. To be most effective, return air vents need a minimally-obstructed path back to the furnace. A return air vent in the recessed front of the vanity would have quite a tortuous path back to the furnace.
1 point
-
This is why I like our Owner's Forum, different ideas on how each owner has improvements for their trailer. I am 100% in the "Increase air flow to the Bathroom" team. I like both Maniacs' high adjustable vent, and the low vent to the basement proposed by Rivernerd. I really like the idea of adjustable vents for both. Summer, use only the high vent to avoid putting mosture into the basement. Cold conditions use only the low vent to help heat that area a bit. GJ.1 point
-
Thanks. We put it up high so that any chance of stray water wouldn't get into it. In our year the wall is wood core. We did seal the core before screwing them together...1 point
-
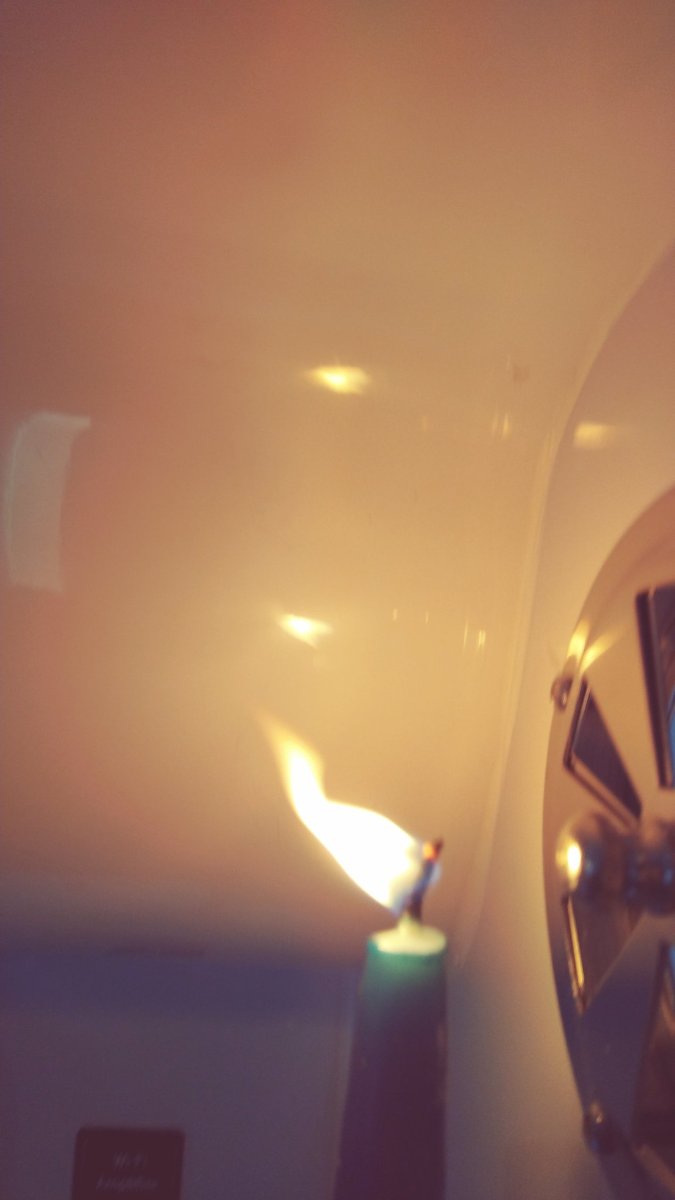
As you can see from the candle flame the return vent increases air flow. The inverse is true when the bathroom vent is on, with the door closed.
1 point
-
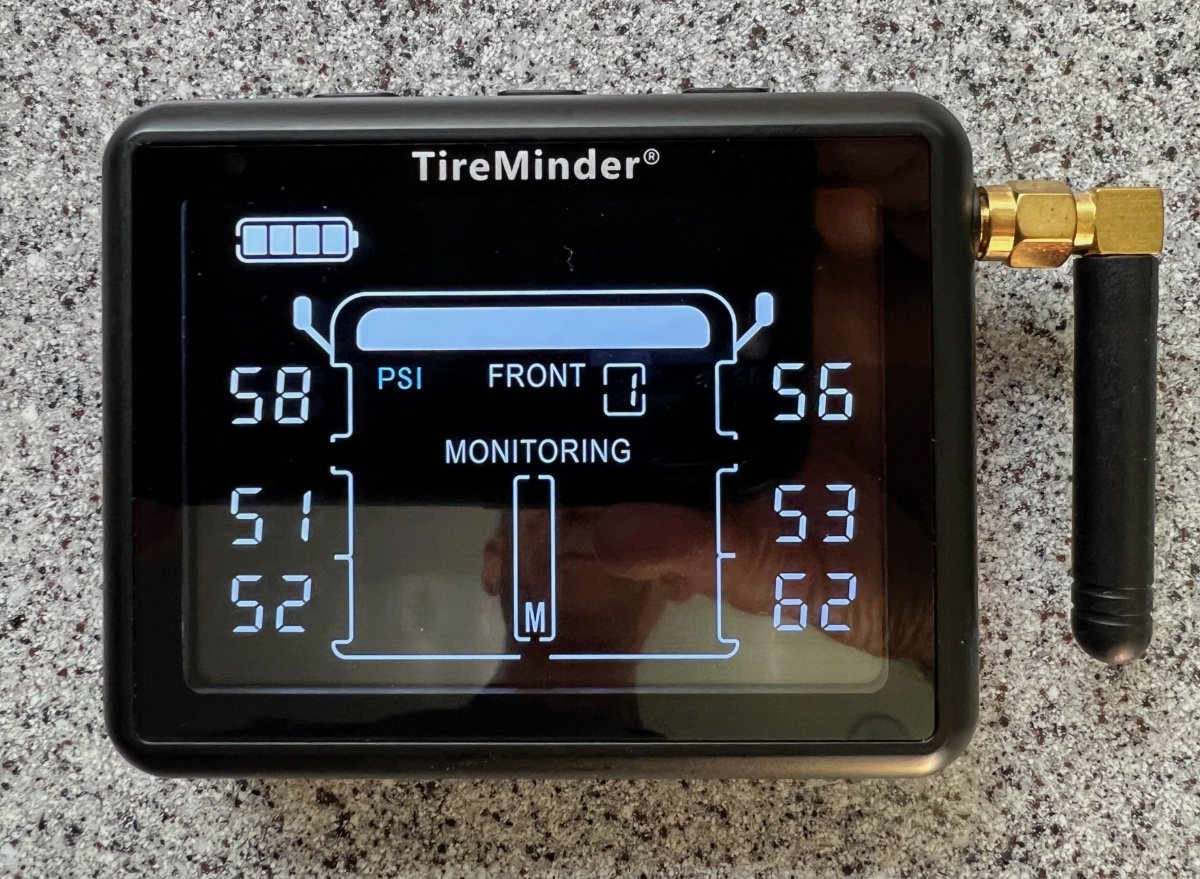
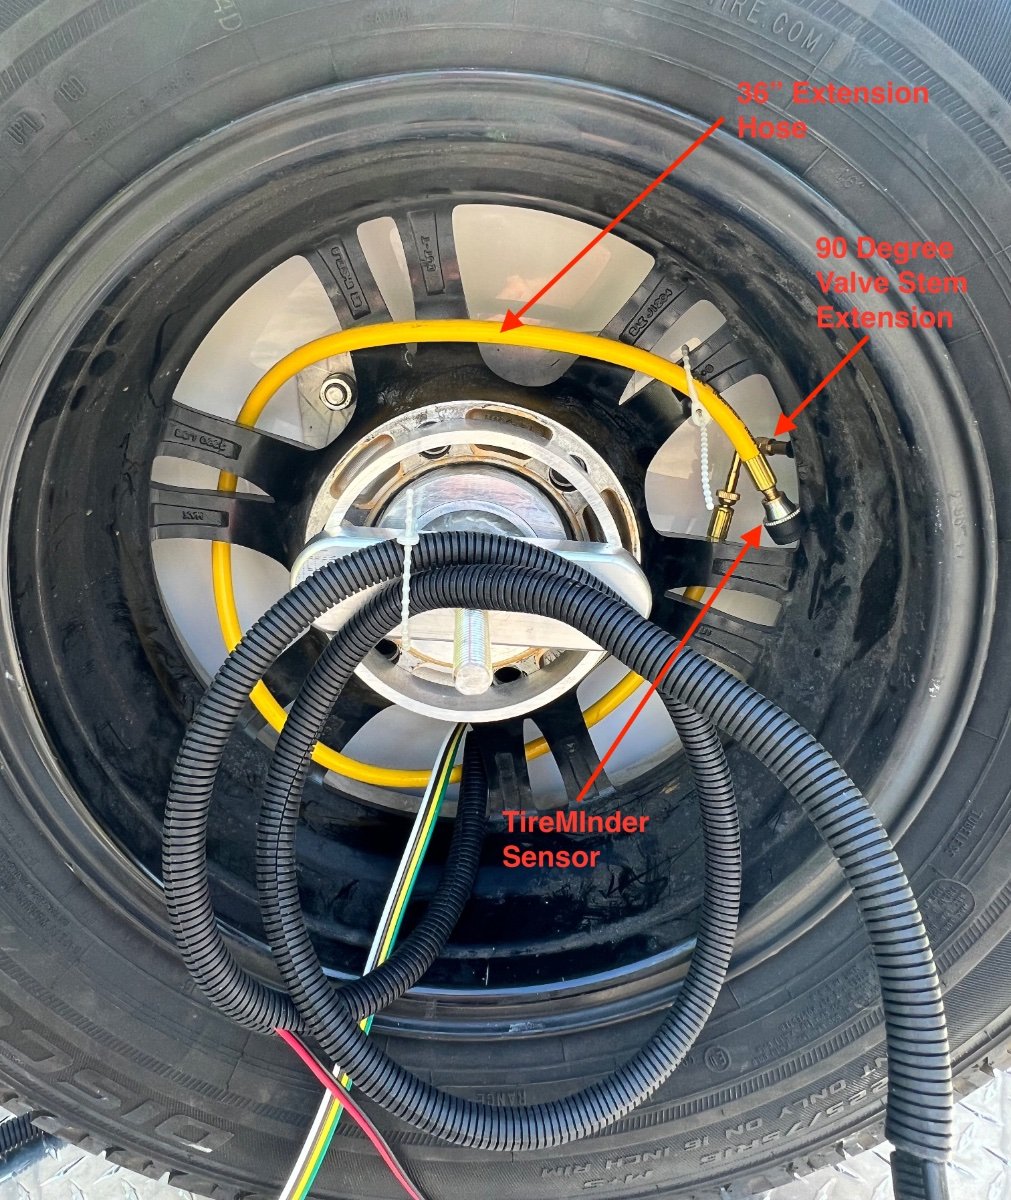
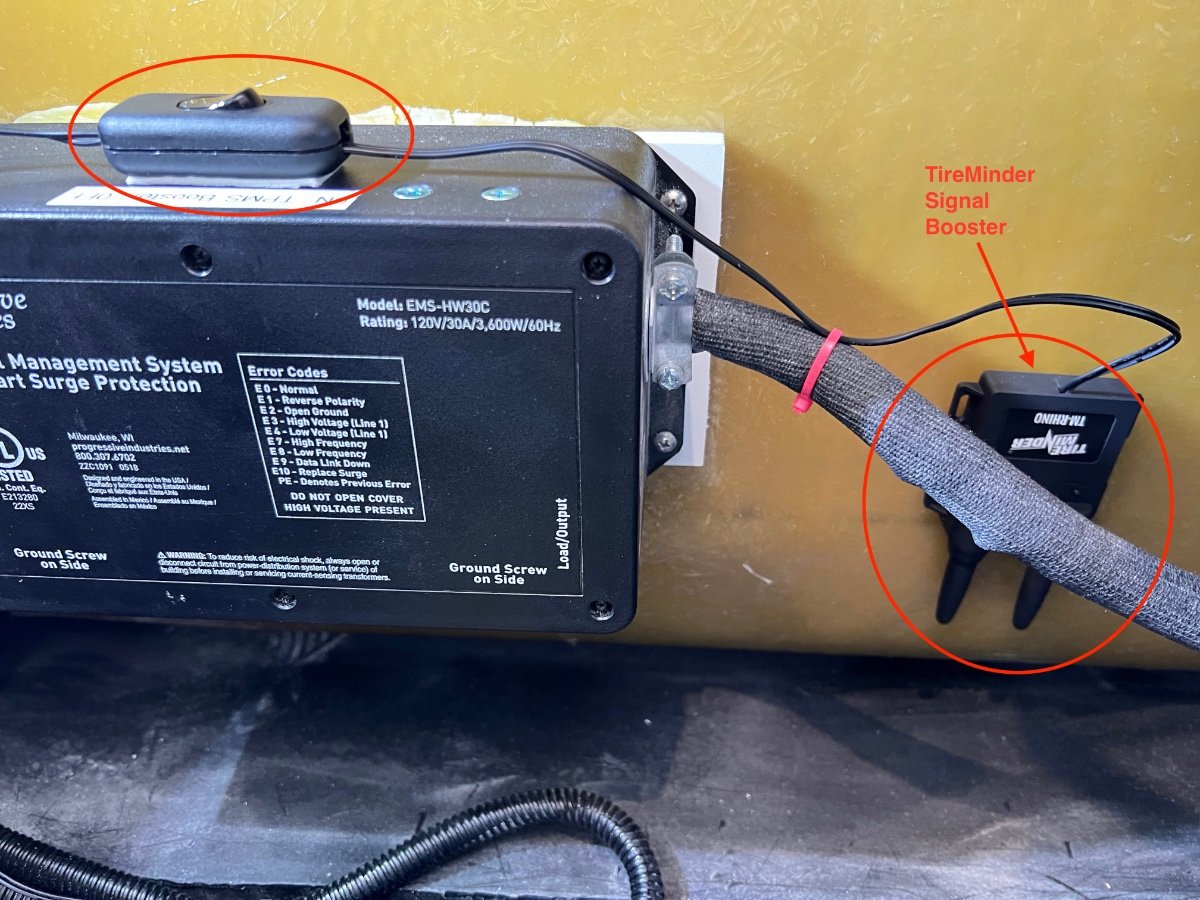
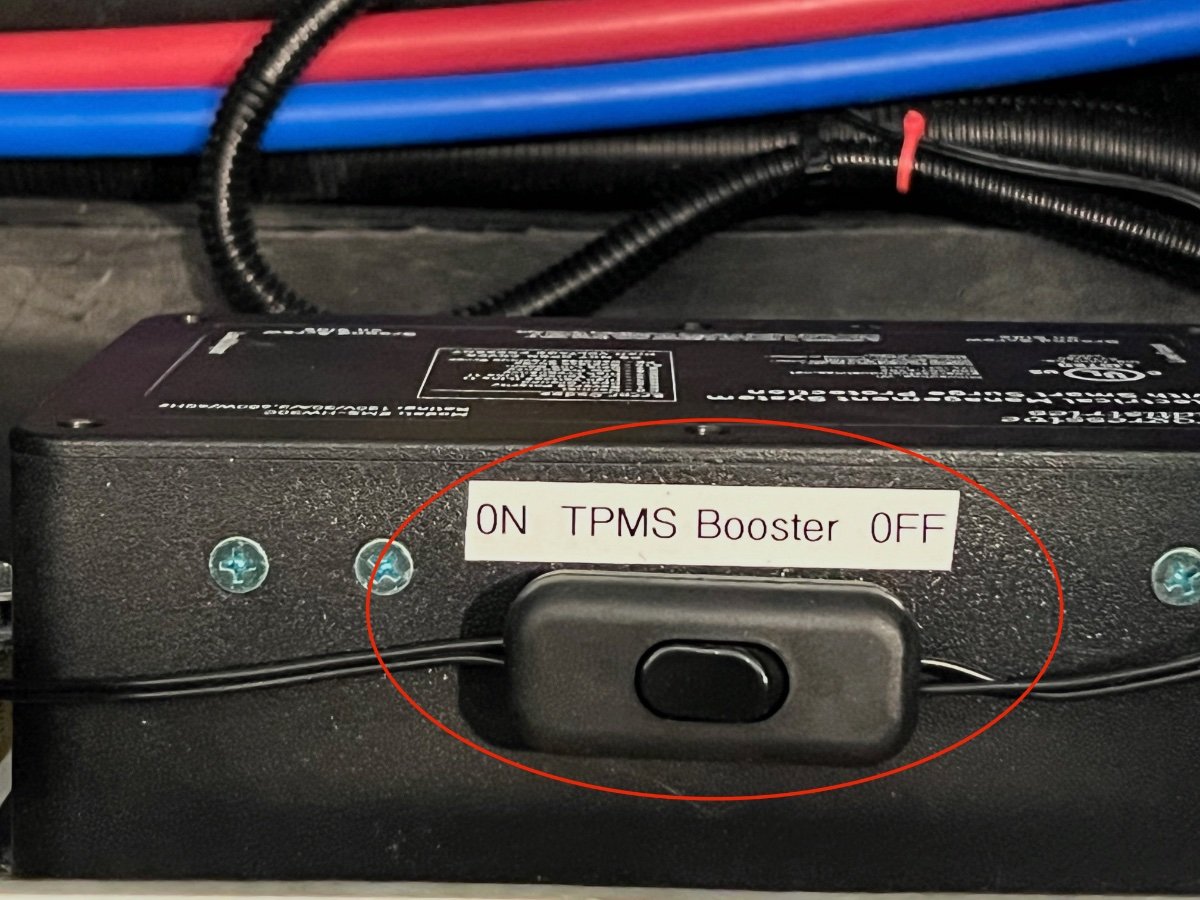
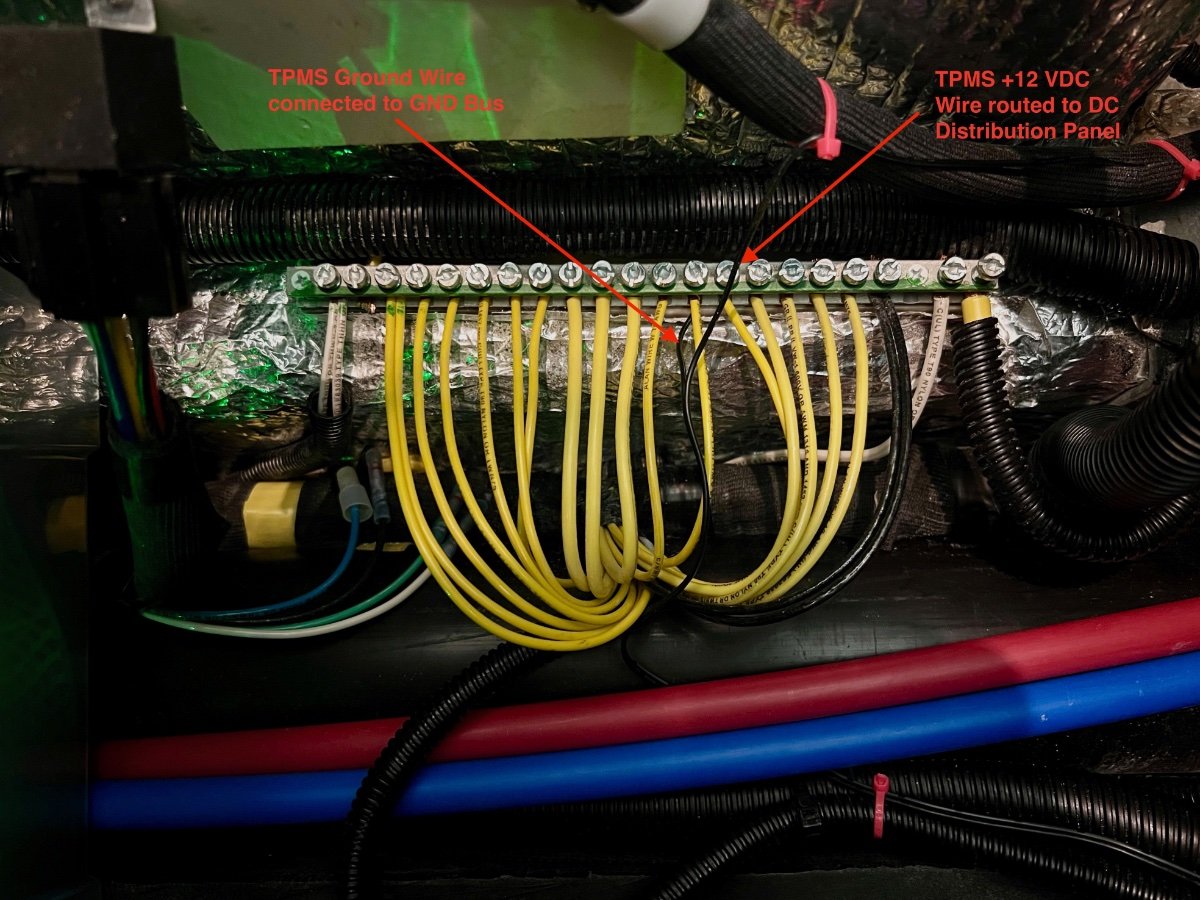
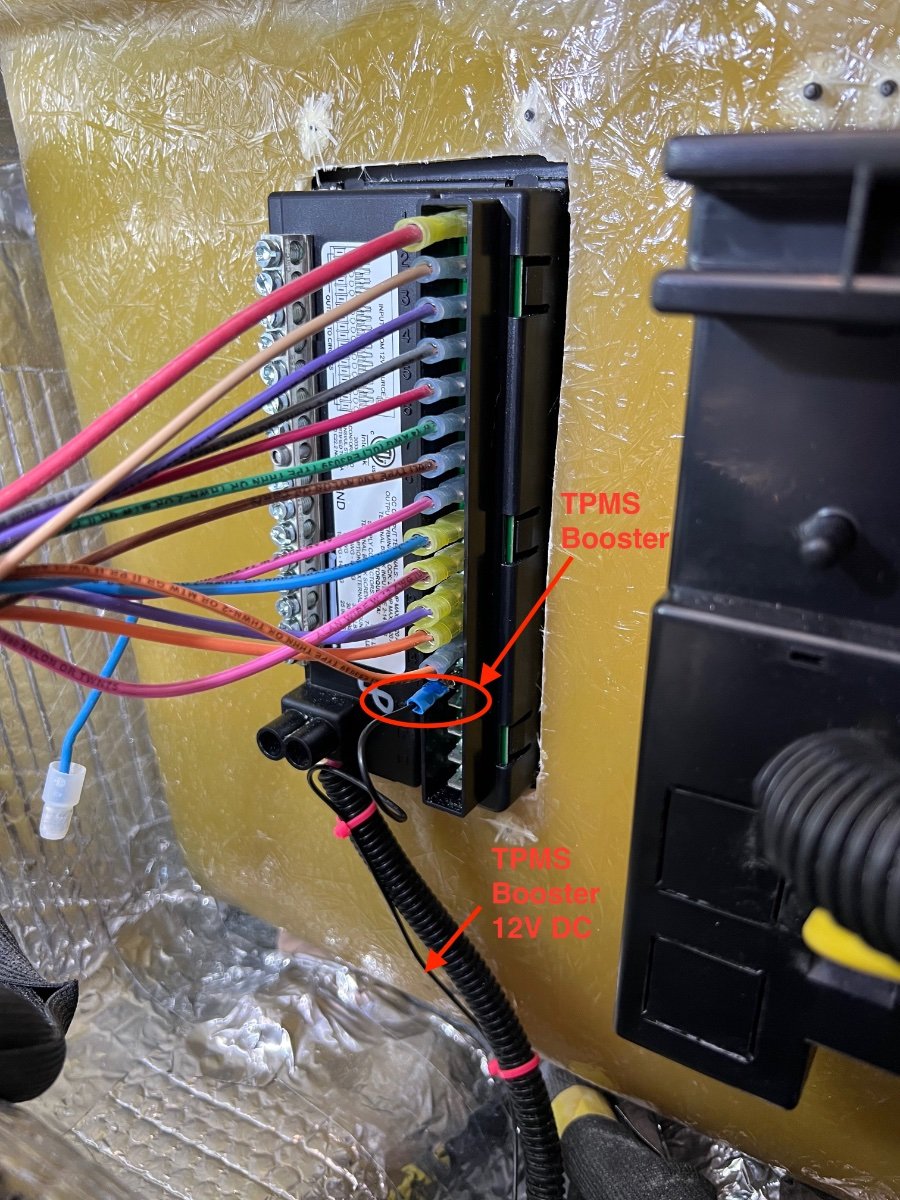
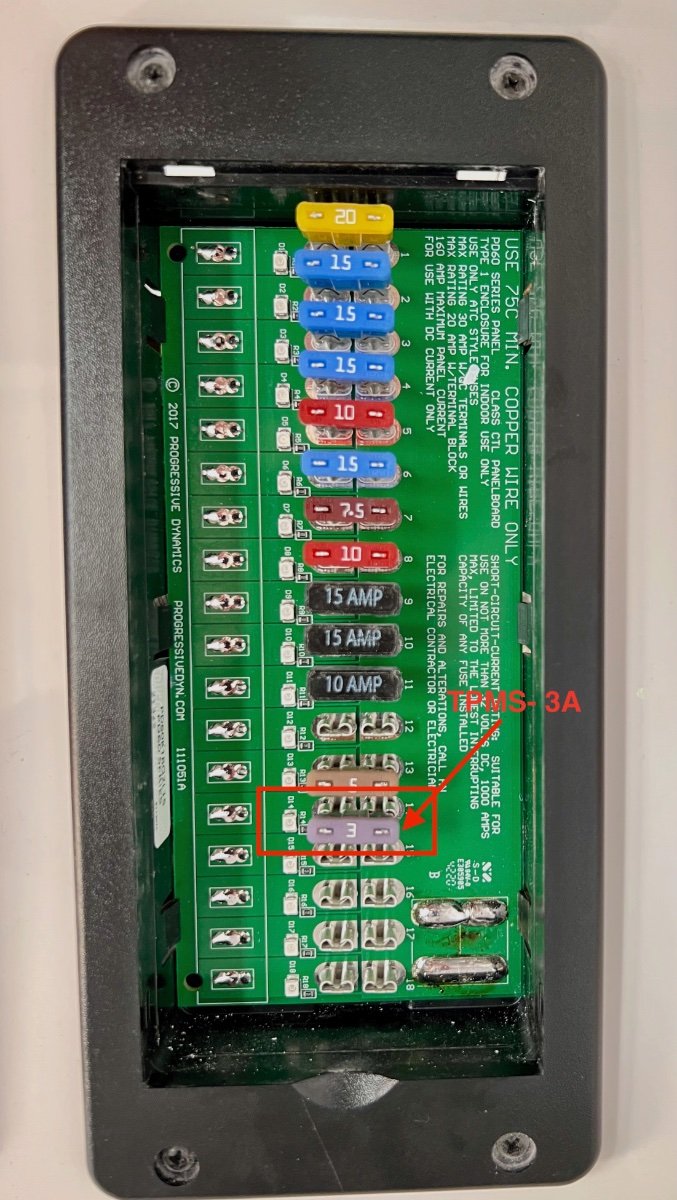
Shortly after arriving home from our delivery trip to Hohenwald, I installed a TireMinder i10 Tire Pressure Management System (TPMS), with six sensors, a monitor and a signal booster (installed later). Four of the sensors were fitted to the valve stems of the four trailer wheels on the ground, one on the trailer spare and one to the tow vehicle spare. The sensors transmit tire pressure and tire temperature status continuously to the small monitor in the tow vehicle. The 433 MHz RF signal booster is to ensure the signals from the sensors reach the monitor. The TPMS is quite configurable and can support up to 10 sensors simultaneously. Thresholds can be user specified and the system is preconfigured to create alerts for slow leaks or catastrophic loss of tire pressure. I first mounted the sensors to all the six wheels. The sensors appeared to have no problem communicating with the monitor in the tow vehicle. I deferred about a month installing the signal booster. Mounting the sensors is quite straightforward, requiring only insertion of provided disc batteries to the sensors, then screwing the sensors onto the valve stems. I like the inclusion of a lock nut to secure the sensors to the valve stems, using a provided small wrench. TireMinder Air Pressure & Temperature Sensor TireMinder i10 Monitor On each spare wheel I added 36" long extension hoses ($11 each) and 90 degree valve stem extensions ($7/pair), based on a recommendation from @John E Davies. The TireMinder sensors are mounted to the end of the extension hoses, which are routed through the wheel spokes to the accessible side of the spares. The valve stem extensions allow the hoses to be attached to the valve stems with no danger of kinking. These accessories eliminate a huge PITA- both spares are stored with their valve stems inaccessible. The trailer spare mounts with the valve stem facing the rear wall of the trailer. The tow vehicle spare is stowed valve stem down in a well under the cargo area at the rear of the vehicle. Now the TPMS reports the tire pressure with no hassle. Even if the spares require addition of air, the access is easy, without removing the spares from their storage positions. I always intended to install the signal booster, but had not settled on the best location. The installation instructions recommend locating the signal booster on the undercarriage, toward the front of travel trailers, with the antennas pointed toward the ground. The signal booster requires 12 volts DC for operation. I searched the OTTO forum seeking information on locations chosen by Oliver LEII owners for mounting such signal boosters. I found references to mounting signal boosters within the doghouse or in one of the upper storage compartments, neither of which appeared to offer ease of connection to a 12 VDC supply. Other owners indicated they had not installed the signal booster, since the monitor seemed to reliably provide tire pressure and temperature information. While vacuuming fiberglass dust from all areas accessible under the interior access hatches, I found what appeared to be an ideal location for the TPMS signal booster. The hatch under the rear dinette seat is the location of the Progressive Industries Surge Protector, mounted to the wall on the aisle side of the compartment. Adjacent to that location is a large area of unobstructed wall. Just below the surge protector is a ground bus and on the forward wall is the rear of the DC distribution panel. I believe this is a very desirable location for the signal booster. It is located low, slightly forward of the axles, in a protected space near the needed power supply. TPMS Signal Booster Location The TireMinder Signal Booster is attached to the fiberglass wall using an Industrial Velcro Coin, which enables easy removal. TPMS 12 VDC Power Switch I chose the top of the Progress Industries Surge Protector to mount a switch to turn the 12 VDC power supply to the TireMinder Signal Booster ON/OFF. The signal booster has a green light to indicate the power is ON. The wires from the signal booster are very thin and are both black (despite the instruction manual indicating one to be red and the other black). I don't believe it matters which is +12 VDC and which is Ground (GND). I routed the wires along cables in the compartment. The pink zip ties appearing in the photos provide clues to the routing. I arbitrarily selected a position on the Ground Bus to mount one of the wires to be Ground. The other wire was routed to the rear of the DC Distribution Panel, mounted on the forward wall of the compartment. Fuse position 14 was unused, so I selected it and connected the second wire from the TireMinder Signal Booster, using a crimp-on connector. Finally, I inserted a 3 amp fuse to the front side of the DC Distribution Panel, position 14. DC Ground Bus DC Distribution Panel (Rear) DC Distribution Panel (Front) Summary Although I had encountered no problems with the communication between the tire pressure/temperature sensors and the TireMinder Monitor, I believe having the signal booster installed reduces the risk of loss of communication between the sensors and the monitor. I have been leaving the signal booster on while traveling and turning power OFF when in storage. The signal booster draws only 75mA (Transmitting) to 14mA (Inactive). I tested the range with the signal booster installed and powered ON. I was able to walk over 300 feet from the trailer with the monitor receiving signals. I have been impressed with the TireMinder TPMS system. I have not mounted the monitor in the tow vehicle, but keep it on the center console, where I can view it as desired, and also hear any alarms which may occur. I purchased the TireMinder i10 and six sensors from TechnoRV (https://www.technorv.com/) for $279.65 (no shipping and no sales tax).
1 point
-
I have had great success with the Mequiar’s Flagship wax. Been using it for years. Holds up great and gives me some exercise. I will apply twice a year.1 point
-
I use mine all the time. With two dogs, something always needs cleaning or rinsing off outside. Sometimes when the weather is nice and we’re boondocking in a private spot, I’ll take a shower or wash up outside so I don’t have to prep or wipe down the bathroom or dry the shower curtain. I found a suction cup shower head holder on-line. I stick the holder on the outside of the camper so I can have two free hands. Works great. The one improvement I’d like is to add a longer hose. The stock hose is too short. Also wish I could close the basement door once the outside shower is set up. I’ve gone to bed several nights with the basement door still open. Someone posted a how-to on adding an outside shower privacy curtain to an Oliver, so others are showering outside too. I use the outside shower often.1 point
-
1 point
-
A shutoff/bypass for the outside shower would be a simple solution1 point
-
We've many times camped into the teens, maybe upper single digits in the older elite. But, we don't intentionally seek out winter weather. It finds us, in the mountains in shoulder season, and sometimes in fall in Canada. .I know the insulation is different in the newer models (we really don't have a lot). And, the furnace location has moved. If it's in the 20s or low 30s when we go to bed, I usually open the bathroom door, and open the lower drawer a bit. So far, so good. It was below 32 twice this past 2 weeks, during the night. I did nothing extra. Left the bath door closed. Ran furnace on low. We were fine. Toasty, actually. But daytime highs were in the 50s and 60s.1 point


-
Recent Achievements
-
")

")


")


")


")


