Leaderboard


Popular Content
Showing content with the highest reputation on 10/31/2023 in all areas
-
Camping World description for Dometic Freshjet 3 states that Dometic heat strip accessory can be added with Universal ADB. It also mentions that Dometic SmartStart can be added to allow 2000W generators to be used. As already mentioned, the unit bolts right on without mods to the trailer body, uses the existing condensate drain lines, ADB, and thermostat, and is very quiet. Extensive dealer service network. I don’t need the heat strip as I use a small portable heater when on shore power. This checks all the boxes for me. Comments? Dometic Freshjet 33 points
-
For those that like to Boondock out West, Benchmark Atlas are the best, IMO, for showing BLM, USFS lands and campgrounds. We have Wyoming, Montana, Colorado, Idaho, and New Mexico. The detail is amazing.2 points
-
It will be very interesting to see how this plays out. I hope it ends up benefitting both Oliver and us as owners with expanded service locations. It could be a challenge for the network to gain the trust of those who are used to dealing with the experts in Hohenwald (it's REALLY nice to be able to get solid information when there is a question or issue) so top-notch, maintained training at these facilities will be so important. And having the service department remain at the mothership would still afford us options as well as an opportunity to visit Tennessee, which we have come to love since our purchase and trips there.2 points
-
Roger on the root cause of the plastic shards. But "Never" is one of those really big words that "always" get me in trouble. In this case, I would say "much less often" or maybe "rarely". 🙂 GJ2 points
-
From Camping World- NOTE: For those who require a non-ducted heat strip application on the FreshJet 3 AC, it has been approved that you can use the Dometic Non-Ducted Heat Strip Kit (item 72431) installed in the Universal Air Distribution Box (item 69943). Camping World FreshJet 3 Series product info2 points
-
We've never owned a truck or a trailer. My wife and I are retiring in 6 months and diving in with all 4 feet. Tell me what we don't know please. We looked at lots of trailers and are finally pulling the trigger on the LEII. I've read a bunch of threads on here over the last year. Very helpful. But if you can point me to some that have already discussed this sort of thing, I'd appreciate that, too. We prefer simple: Everything we need, but nothing we don't. So.... LEII - starting the ordering process today 🙂. Scheduling factory tour soon. Standard except as follows: Twin Bed Floor Plan Two Upgraded Foam Mattresses Hypervent for Twin Bed Floor Plan Front & Rear Propane Quick Connects Backup Camera with 4.3” display Aluminum Storage Basket Inside Basement Access Door Auto Drain (push button drain valve) - What is this? Door lock (do I need the electric one?) TV - bought yesterday 🙂 Ram 1500 Laramie, 5.7L 8 cyl hemi, 4wd, max tow, air shocks, class iv hitch, 9 pin connector, rear video Approx 1,700 load capacity Locking hard tonneau cover, bed liner Miscellaneous side purchases (yet to be made) Generator that runs on propane - to be carried in Ollie's storage basket Surge protector (no idea what sort of electrical equipment I need for generator or shore power) TPMS for trailer Screen house carpet for under awning hoses, leveling blocks, antitheft? tools? Storage - We intend to use these toys a lot. Maybe even 6 months a year. But, inevitably, they will get placed in storage when not in use. We live in a FL subdivision, with no garage space for this size stuff. So, I thinking I buy a cover for both.1 point
-
Just passing along: Heard back from Rodney Lomax, Sales Manager at factory about a few minor changes to 2024 model year: No big changes as many happened last year. 1) Delete both street side water ports from side of trailer Simplify down to just 2 ports for water. ( These side mounted ports get lots of grime and road abuse. Moving to rear should help.) 2) Move current street side fresh tank fill to left side of rear bumper. (Like the current boondocking port on right (curb) side.) 3) Change right rear boondocking port valves so it is both the regular pressurized input line….and a boondocking port. (In 2024 Only 2 ports for water on rear of trailer) 4) Rework body moulds to remove the inset used for upper fridge vent. New fridges don’t need that vent. The trailer will then be streamlined all the way to the door on the upper hull. 5) The exterior solar port will no longer be standard but will be a dealer option for customers that wish to have it. (Note: Several owners added their own solar ports in the past.) 6) There is a possibility of a bathroom door change but that is still in the R & D phase and may not pan out.1 point
-
@NCeagle, I really like your 2 mods, just a few questions..... 1) Why did you go with AC fans and not DC? 2) If you had to do it all over again would you use the same 2 smart fans? 3) Are you still happy with the design/results, would you change anything? Thanks!1 point
-
The extra items like bulldog coupler upgrade are considered a service dept upgrade and on a separate price list.1 point
-
2024-Elite-Build-Sheet 07072023.pdf 2024-Elite2-Build-Sheet 07072023.pdf1 point
-
So is my FLSTC1 point
-
I just ordered that. I suspect NG and RM are both good, but I picked the NG.1 point
-
They’re extremely detailed topographic maps, great for planning exploration of a state. Another atlas is published by DeLorme, but I believe Benchmark is better. For countrywide route planning, I use a free atlas from State Farm Insurance, but would prefer something like the Rand McNally because of the spiral binding. Edit: I just saw the post by @Patriot, and in general really like their guide books.1 point
-
On our recent 6000 mile 42 day trip this Atlas served us extremely well along with our Garmin 890RV.
 1 point
 -
They're taking deposits now. Some ideas mirror the recent electric Airstream prototype but in a very different implementation. Specs on their site (2nd link). Will be interesting to see if they succeed. https://www.cnet.com/roadshow/news/pebble-flow-electrified-camper-hitches-itself-pulls-its-own-weight/ https://pebblelife.com/pebble-flow1 point
-
GJ, there was only one option for my truck and likely the same for an F150. I believe mine are the RED, since they were colored red on the surface of the pads (the break-in surface). Red makes sense as the best option for most trucks, unless you're racing a HP truck! It states low dust, excellent hot friction (brakes certainly get hot with downhill braking) and good life, which are the best choices for any truck and TV. Mine was a major upgrade, because I replaced both the stock 16" wheels and rotors with 17" (Dodge Ram OEM 2nd to 3rd Gen). The upgrade added a 1/2" radius of contact surface around the perimeter of the rotor, and the pads (see pic above) appear to have about 60% more contact area. Every year in the auto industry, stuff gets bigger and heavier. The curb weight of my 2001 Ram is 750 LB less than the weight of the a like 3rd Gen truck. So, I have brakes made for a considerably (12%) heavier truck. The EBC product is A+ premium, all manufactured in the UK or USA! I have done 20-30 brake jobs in my life, and I was grinning ear-to-ear as I unwrapped the parts. 😀 So, just putting new rotor and pads will be better. Can you upgrade your F150 with what is installed OEM on the F250 Super Duty? That would be added stopping power. I do not know what is involved in such a Ford upgrade, but there are forums for that. All I had to do is buy this kit and purchase left and right caliper mounts (Cardone reman for $20 ea). Just the mounts, as the calipers are the same. How cool is that?! The new mounts merely hold the calipers 1/2" further out. There is a similar upgrade for my '08 Lexus GX470. Many off-road enthusiasts prefer the older GX, as it had the dependable Toyo 4.7L engine, was lighter (600 LB less), slimmer and better looking! You can mount the new model brakes on the older GX. Same kind of thing and when mine needs front service, or I run out of things to do 🤣, l will make this upgrade too. Hope this helps and thanks for asking!1 point
-
There are at least 22.5 opinions about how many BB's to pack into an OEII, and how to hook them up. One nice, but expensive and time consuming to do idea floated and done by several owners is to clean out as much as possible wiring from the battery compartment. I figured that since LifePO4 batteries are pretty much maintenance free, I would not go that route. My DYI install considerations were: Ease of installation and inspection. Leave space for a master cut off switch Minimize changes to existing wiring Use as much existing wiring as possible. In the battery box, install three Battleborns, the Smart Shunt and a Master Cutoff Switch (350 Amp BlueSeas) To do this I also used two terminal blocks (Red and Black) and some poly cutting board. When all said and done, the master cut off switch had about 1/4" clearance. Here is a picture. it shows two heavy duty straps. 'll be adding a third this summer. As you can see, there is no room for a 4th battery. One important consideration of any layout is keeping all the connections easily visible for both mechanical and thermal check-up every once in a blue moon. For the thermal check, I use the John Davies recommended IR detector that works well with wheel bearing and brake checks at road stops. GJ
1 point
-
I can’t answer the “best” question, but I prefer the individual Benchmark Road and Recreation Atlases for each state I intend to visit.1 point
-
For what purpose?1 point
-
Nope not on mine Like @Patriot said, on the newer models we need 4-5 pumps to sufficiently protect the new flush port system. I remember reading somewhere this change was put in place to meet new codes for the black tank system, something to do with ensuring no backflow of waste water can get inside the water supply line. Here's a pic of the new layout with longer flush system.
1 point
-
@Fritz this is exactly what has been bugging me! I have the lithium platinum package and could never understand why my batteries, when fully charged, show 13.6V and not 14.4V on the Lithionics app. BIG thanks for clarifying this!🙌1 point
-
I have used DampRid 1 gallon containers for years. I keep everything closed and install one in the rear and one by the dinette with the bathroom door open. I keep EvaDry charcoal packets in the closet and another in the bathroom. Very happy with the job they do1 point
-
I use the 3000W inverter/charger that came with the solar/battery package. There are several ways to monitor voltage in the batteries in our 2021 LE2: solar controller, inverter remote, and Lithionics battery app. The only one that lets you see a precise voltage (in my experience) is the battery app. With a 2020 trailer you may have the LifeBlue (?) batteries, which may have a different charge monitor or different battery app. When charging, the batteries slowly approach 14.4V, and once they reach this voltage will remain there for a minute (or even seconds), then slowly revert to a resting voltage closer to 13.6V. It's very easy to miss the precise point when the batteries reach 14.4V. To confirm that they've reached 14.4V, you have to watch the battery voltage continuously as the batteries approach 14.4V. One way to confirm that the voltage should be reaching 14.4V might to check the Xantrex inverter's charge settings. The default custom absorption voltage is 14.6V, which, as I understand it, allows the batteries to charge to 14.4V. See link below. Hope this helps.1 point
-
Great! Now - mine is on my shop floor, can you come over and finish it for me?😃 Bill1 point
-
Thank you. I have it apart and I think I have it figured out.1 point
-
Correct. Bulged acorn nuts are for aluminum wheels, whereas straight lug nuts are for steel. Bulged has more surface area where they contact the wheel, reducing wear.1 point
-
The outside Black Tank fill connection is down low on the street side, between the bathroom and dinette window on my 2017 LE2. Which puts it in front of the axles. Mossey1 point
-
You likely have aerator screens on your faucets and shower. Removing and cleaning them, and then flushing with removed may improve your water pressure and flow rates. GJ1 point
-
Good News! I am happy to report that the auxiliary thermistor I bought from Amazon works as a replacement to the factory thermistor. These two things are critical to the success: locate the new thermistor away from the air distribution box and away from the airflow. For me, this will be around the corner of a cabinet and likely in the same location as the original Dometic CCC2 thermostat that controlled the original Dometic AC and gas furnace. I tried multiple experiments with the thermistor in the same area as the air distribution box with varying degrees of shielding from the airflow. But it just wasn’t good enough to suit me. This would have been the simpler solution and I wanted to rule it out before moving on to something more involved. I think there’s just too much air movement everywhere around the distribution box and it tricks the thermistor into thinking it’s a different temperature than it really is. The test that pleased me the most was when I stretched the cord out as long as it would go and I taped it in a location near where I hope to set it permanently. The cord isn’t long enough to get me there right now. But when taped to the wall around the corner from the airflow the AC set temperature of 70 was reached and three other temperature devices in the RV measured between 70 and 72 in different locations. The on/off cycles were fairly short which concerns me a little bit and I’m hoping this will improve when I have the thermistor in the final location which will be more shielded from airflow and at a more reasonable vertical location. In heat mode this morning, there was a greater difference between the set temperature of 66 and the actual temperature of 72. Cycles were short and I think if I had let it continue the interior temperature would have gone higher than 72. Perhaps this will also even out more once the thermistor is not as close to the ceiling. I’m less concerned about an accurate reading with heat than I am with AC. I use the RV more in the warmer seasons than I do in the cooler ones. Also, when I turned on the heat this morning, there was a great deal of humidity pumped into the living space. The windows fogged and the moisture on the interior aluminum skin (this is an Airstream instead of an Oliver) was visible. I was surprised to see this and I wondered if it was due to residual moisture still on the evaporator fins from the prior day’s AC testing. Overall, I’m pleased with the testing knowing that I can relocate the thermistor elsewhere and get reasonably good results. If I have to adjust the settings to reflect the differences between set temperatures and actual temperatures I’ll learn that over time and adjust. I feel like the two major wins in this obsession of mine are: 1) getting the additional relay installed to allow the interior fan to cycle with the compressor (solves humidity issue with AC), and 2) finding an easy path to get an auxiliary thermistor from the rooftop control board location to the interior sealed area without much effort. For those interested, this is the thermistor I am using right now. It has the two-pin connector on the end that fits the control board. https://a.co/d/dV31de21 point
-
An important bit of info I left out! It will be sitting in the driveway uncovered. We’ll be in Florida for the Egg Rally in January and then visiting my brother in New Smyrna Beach afterwards. We’d planned on bouncing around Florida for a bit until I found out all the campgrounds are booked solid a year ahead. Then a stop in Murfreesboro to seem some guys about ceramic coating and then home until spring. Bill, I saw the refillable tubs, and will use those in the future if this works out okay. Chris, I can imagine how fast my electric meter would spin leaving an electric heater going all winter! 😳 I do that in March this year instead of winterizing for just a few weeks, and could almost feel my wallet getting lighter. I’ll close the vent. Thanks for the help, gang!1 point
-
This is how I ended up buying my Oliver, very sorry to hear this news. They just seem to slowly be getting away from what has made them special.1 point
-
For better or worse Oliver’s reputation will be measured somewhat by that of their associated appointed sales / service centers. Hopefully things will improve in the RV industry but currently there is a lot of distrust in this market, Oliver being the exception. Oliver provides a very unique purchasing, support, and quality experience which is what brought most of us to Oliver over the rest of the manufacturers. Oliver is growing as a result which is fantastic and things will have to change as a result understandably. Hopefully they’ll find a way to maintain a bit of that exceptional user experience.1 point
-
They had a nice little launch video. Interesting concept and loaded with a huge battery. Not sure how needing a level 3 charger to charge that huge battery will pan out. Hopefully the 1 kw rooftop keeps it pretty topped of as no way do I want to pull that into and try and charge at a level 3 power station while on the road. Good luck finding a way to get that into a spot. Also since it has its own electric motor. how much of that solar power you gain while underway is just eaten up by the trailers electric motor? They are still pretty sparse on details. The idea of using privacy glass to help increase the feeling of space is interesting but feels more gimmicky then anything (although I do think privacy glass is really cool).1 point
-
My thought in buying the Waste Master was that if it lasts 2X longer than the leading competitor at twice the price then nothing lost, right? My Amazon purchase three years ago was $133, double the cost of the former Rhino Extreme setup. Now get this, I listed the Oliver Camco (still in the box) and the Rhino Extreme (used one year) on Marketplace, and sold for $17 and $80, respectively. I should mention the Rhino also went with an orange garden hose (for black tank/sewer hose rinse) and a Valterra Twist-On waste valve. That said, in actuality my upgrade was not that expensive. No regrets, the upgrade resolved a year’s worth of frustration trying to stuff the ‘uncooperative’ Rhino into its’ cage and other cumbersome antics, and having a single connection with the very secure CAM lock is unsurpassed satisfaction. Another worthy note, there is less anxiety at the dump station that ‘all will go well’ as either dump valve is opened; think sewer hose staying in place and/or hose end jumping out of position at the sewer receptacle, thus resulting in a much dreaded unintentional release, yuk! I can now open the ‘primary’ dump valve at the OTT, then hold in place the sewer hose terminus as the ‘secondary’ valve is opened. WOW, I never imagined this task being fun as opposed to just a chore, but I’ve digressed! NOW. when curious drive-bys slowly pass while dumping, I’m never certain if they’re checking out the Oliver or the Waste Master!1 point
-
...getting a bit "stinky-slinky envy" going on here 🤪1 point
-
Yep, in good keeping; Oliver owners ‘spare no expense’!1 point
-
Dang! I missed that part. Perhaps I'll have to change today's schedule and run out to get one before they are all gone.😇1 point
-
Let’s not hear complaints, after all… it’s Lippert, and it’s on “sale”. 😳1 point
-
Wonder if you could ride inside it? Wife took the truck into town and you want something from the camp store? No problem! Just drive your trailer down to the store! LOL! I'd do it just for the reactions. Drive it down your row of campsites and watch the look on your neighbors' faces as the random trailer rolls past. Probably best that I don't buy one......1 point
-
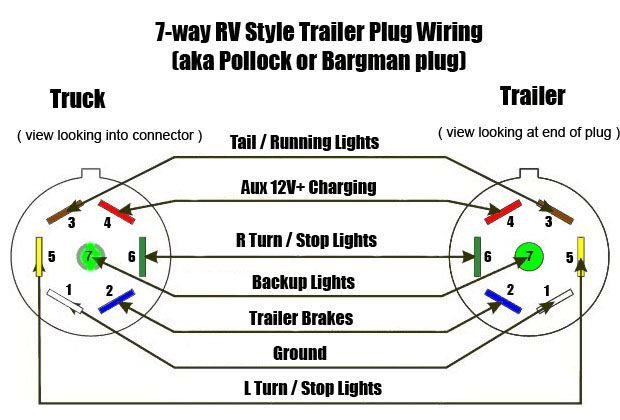
The most common cause of failure is the 7 pin plug and connector between the truck and trailer. Check the contacts on each for bent connectors or corrosion. (I've been able to resurrect a trailer connector in the past by gently bending a prong back into place with a flathead screwdriver, but with a trailer so new yours shouldn't be that worn.) CAUTION: Pin 4 on both truck and trailer may be "hot" (connected to the battery) at all times in some installations, so don't short that one out.
1 point
-
I like your use of pipe insulation to support the water lines and protect them from vibration during rough travel. I use the same thing (think small diameter pool noodles) to protect knife blades while stored.1 point
-
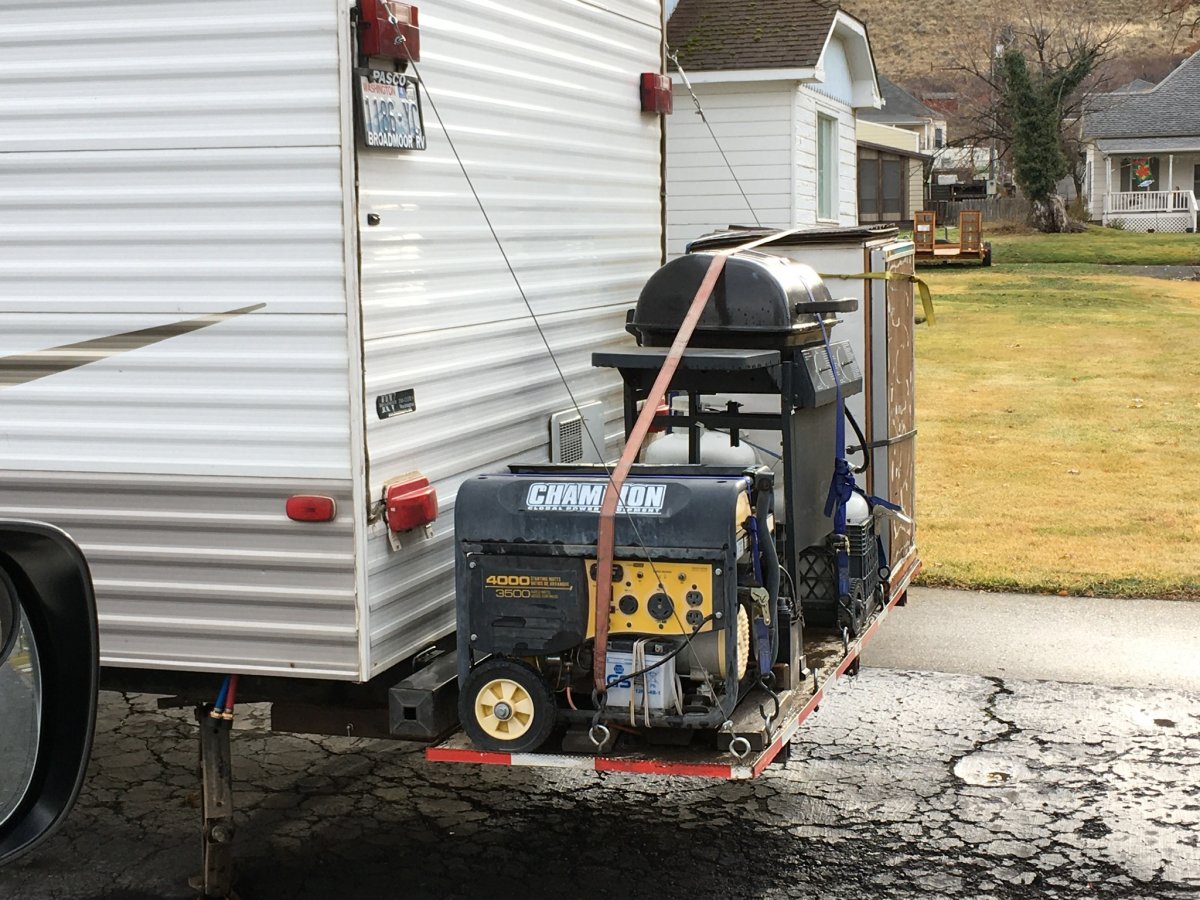
I encountered this stick and staple tandem axle trailer and was impressed with the rear bumper rack. It appears to be attached to the frame and has three steel support bars. I am not sure how much weight is there... the generator with battery is probably about 100 pounds. A couple of full propane bottles, a home sized bbq grill, a big box full of unknown gear..... Any guesses on how much total weight, and what effect it has on the tongue weight? I especially like the cheap open style hardware store eyebolts ( with a working load of 150 pounds, if that) and the dinky steel cables going up to the trailer corner uprights..... which are probably 2x2” pine. And the small sun rotted straps holding everything down. At least he used a lot of them. Yikes. John Davies Spokane WA
1 point
-
Ah, I didn't catch that in your earlier post. If Oliver has moved to an integrated inverter/charger then that's a big upgrade. edit - well I thought it was a big upgrade. It doesn't look like that Xantrex unit has power assist, nor the networking of a Victron system. It looks like it has slightly faster charging @80 amps, but unless I'm missing something, the only advantage I see for the buyer is the switchable lithium profile. It'll be easier for Oliver to install, of course - at least from scratch. It'll be a bit of a pain as an upgrade. Come on, Oliver - you're just one step away from a modern electrical system. You can do it!1 point
-
Yea, I saw that upper eyebolt right off. Ughh. You want to keep well away from rigs like that. Really, I think any passing Police Officer should ticket the owners of such negligent and dangerous setups. Dave1 point
-
I can't imagine Oliver being able to tell someone how to "recover" their trailer without knowing the specifics of the problem. For instance, up to the frame in sand, one side in a mud hole, one side off the edge of the road, etc. And if someone is asking Oliver, the owner must have an idea of the problem. If you have an idea of the problem, you can likely avoid it in the first place. The tow vehicle is a huge part of the recovery. If you have a 4X4 truck, you can pull very hard compared to a 2WD SUV, for instance. If the truck is stuck too, a winch is probably your best friend to extract both at once. A winch can also be used to turn the trailer around in it's own length if you have a tongue wheel like boats use. Just disconnect and then hook the winch or a tow rope to the tongue to pull it around. If, for some reason you have to pull the trailer out backward, and you already have the truck out, the best thing would be to wrap a chain around the axle/spring/Ubolt area. Then attack a tug-em strap to pull with. Don't get a run at it, but just increase the pull until the trailer moves, either with a winch or a truck. Beast would be to attach on both sides and make a bridle. A long tow rope could also be attached to the hitch and lead back under the trailer to a assisting truck. It's also very affective to attach a come-a long to a wheel to act as a radius arm. This means the trailer or truck cannot slip farther off an edge when moving forward. Once hooked up, you just drive forward and the trailer comes back up on the road. So, basic recovery stuff is likely to be: A shovel and pick, good quality come-a-long, several chains with grab hooks, tug-em strap, several shackles, a snatch block, some heavy yacht braid or nylon to pull with, a few smaller pieces of yacht braid for tying off the snatch block to a tree or rock, or for tying the come-a-long to the trailer wheel, various pices of 2X6 and a wheel for the front tongue jack. If you have to disconnect from the trailer and are worried about it rolling while you are recovering it, just pull the emergency disconnect cable to activate the brakes while you work. The tongue wheel should be as large and as wide as is practical. I have already removed the "foot plate" on my front jack and I don't use it. This is quite easy with a 5/8" wrench and allows the front jack to slip into the wheel socket. This wheel will allow the trailer to roll along without being attached to a tow vehicle, or turned around in it's own length. It can be dragged along with a come-a-long or tow strap. The rear frame members are not designed for heavy recovery or any pull not directly in-line with the frame. I would never install any kind of recovery "eye" for such use. Only apply force where it is designed to handle such forces. The wheels, axle mounts and hitch are the strong areas designed for heavy forces from different angles.1 point
-
The Oliver Elite II trailer was not designed or ever intended to be any kind of serious off road trailer. If that's what you wanted, perhaps you should have chosen one of these or maybe some of these. Just sayin'...1 point
-
I discussed this at length with Jason and he didn't have an answer for pulling from behind. The frame just isn't made to be pulled in different directions. Best shot is probably to pull from the axles if you have no other choice but to pull from behind. If you're going to try to move it at all with tow straps, I strongly suggest a strong jockey wheel like the XO Jack, and a hand brake. I don't have a brake hooked up to mine yet, but I've maneuvered the trailer around a bit on a flat site. It doesn't take much to get some momentum going.1 point

.thumb.jpg.e34bf01ef7f7d5e99ad31856d45afbeb.jpg)


-
Recent Achievements
-


")


")


")


