Leaderboard


Popular Content
Showing content with the highest reputation on 04/30/2024 in all areas
-
I finally had a chance to try out the Bulldog HD shocks I put on the Oli. I put 300 miles on them this last week. Most of it was on small 2 lane roads that had some rough areas. I did go over a 40 mile stretch that I did last September, It made a world of difference. The trailer did not sway all over like it did before. I could feel the difference in the drivers seat of how the trailer rode. I truely think the shocks where pretty much shot when I got the trailer 3 years ago and it was 10 months old at that time. I remember following the trailer for about 20 miles and you could see the top of the trailer swaying side to side about 4-5" going down the freeway with small road imperfections. Now on rough roads the sway is less than 2". The price was comparable to online Monroe shocks. if the Bulldogs last 4 years, I will be happy and buy them again. here is the link to where I bought them: https://www.4statetrucks.com/bulldog-hd-shock-absorber-replaces-555001-19-050000007 FYI: At the same time, I replace the the Oliver's shocks, I replaced the original 1999 shocks on the F250 SD with Bilstein 5100 shocks. The truck does ride a little stiffer but handles what little front to back movement I get on the trailer better. I did have to nail the brakes really hard this weekend when someone cut in front of me and then slammed on the brakes. The TV and camper acted as one, and handled great. Now I will go for the Alcan springs sometime in the next year, before we start the long cross country trips.11 points
-
I can certainly follow your rationale. We've had 6 gallons, and currently a Girard instantaneous, installed by Oliver 7 (?) years ago. (Their first instantaneous install, before they were authorized by Truma.) It's been so far trouble free, and not hauling 6 extra gallons of water cuts our weight by almost 50 pounds. However, I'd likely go back to a traditional 6 gallon if it failed. We almost never camp with hookups, so "endless hot water" is pretty meaningless for us, though a nice advantage for those who do. Our Girard runs strictly on gas, which is also ok with us, since we rarely have hookups. But, the also electric of a 6 gallon is a plus for those who do. We all have different camping styles. Glad you found what's right for you. PS add yet another engineer to the list of many. I think Oliver attracts the engineering minds because of the quality engineering of the unit. I know that's what sold my husband, the engineer in the family. I'm just the 40 year apprentice. 😃7 points
-
Not much to do about those cracks - that I know of. However, when my exterior switch covers (for the 110 volt outlet and the rear jacks) started to yellow, I took them off, cleaned them up, rubbed them down with 70% alcohol and then used Krylon gloss white "rattle can" paint on them. That was 3 years ago and they still look new. Bill4 points
-
I'm coming very late to this party but posting because we broke a spring January last year on hull #124. We ran our tires hard for a long time and do a lot of off road driving. We replaced both springs on the axle with the damaged spring. This information about all the bad springs mades me uneasy because we are headed for an extended trip with lots of off road driving this week. We now run tires at 45psi and will check the springs each day. Will replace all when we return home. Grateful to all for sharing this information.4 points
-
To stop the crack from lengthening, you can do what's called "stop drilling." Just drill a 1/8" diameter hole just past the ends of the crack. This hole will relieve the stresses placed on the material (plastic, fiberglass, metal, etc.) and keep the crack from expanding. Use something like JBWeld on the backside to strengthen the area of the crack and also apply it around the area of the cracked screw holes on the panel. It might last long enough for you to save up for a new replacement from Truma. Good luck! Just say'n....3 points
-
Thanks for the walkthrough. Both screws from underside one burner came out...very fortunate Wendy found them both and we were able to use your help to fix everything. I did have to disconnect the gas line and after using gas thread tape and follow up with a "sniffer" all turned out well. We did use blue locktite on the screws. No evidence of previous locktite application Thanks, John3 points
-
Going Costal: 1000% agree with all! Your post reminded me to get a spare thermocouple! Thanks. GJ3 points
-
I posted previously about our Truma with busted tank and circulation valve due to me not draining and winterizing. I went with suburban due to: 1. Truma will not sell you spare parts. Truma requires you to take their products to one of their authorized dealers. I prefer to fix my own stuff. I'm an engineer as well (structural) and a bit of a control freak. 2. Cost. To have the tank replaced at closest authorized dealer (2.5 hrs away) was $1000. Didn't make much sense to me to spend that much and some other part could fail on a 7 year old water heater. I could buy like 5 suburban water heaters for the cost of one truma. 3. Redundancy: gas and electric vs. gas only 4. Simplicity: There is not much to a tank WH...I pulled out the Truma and took it apart to consider repairing (epoxying the tank and circ valve). Truma is far more complex. 5. Past Experience: Had 6 gallon tanks in past 3 trailers...never had an issue...and I have never drained them for freezing (live in the deep south). The only PRO (for me) that I can think of for the Truma would be the ability to stay in the shower as long as I wanted, but my wife and I can both take a shower on 6 gallons and not have an issue. Thanks!3 points
-
We purchased our LE2 Ollie used eight years ago with no regrets. We used to let Oliver do some of the maintenance since they were only a day trip from home, plus we enjoy camping in TN, too. We plan to do most of the maintenance on Ollie in the future except for fiberglass and welding repairs. We had aluminum welding done by a local race car shop recently and with a large lake close by, there are plenty of quality boat maintenance facilities for fiberglass repairs. This forum is a valuable resource for repair and upgrade information, too. Many valuable post have been made here that are needed for current and future Ollie owners making DIY repairs or learning more about one of the best campers ever built!3 points
-
Found this helpful thread by John Davies on Suburban hot water heater maintenance, only thing I have replaced were thermostats, so far:2 points
-
Exactly right on! If you've got the dual mode tank-type, recommend getting spare thermocouples for both the AC and DC side of the system. They're cheap and simple to replace. Keep 'em in your spares compartment, at least that's what works for us... Cheers12 points
-
And do we hear 15 pages?! 🤣 Going once, goin' twice, sold to a future post!2 points
-
Can you cut the duct, move the blue pex line(s) out of the way (pex lines are fairly flexible), and then reconnect the duct, incorporating the duct Tee?2 points
-
This subject has been an "interesting read". I started when it was only about 10 pages long... reading all of the opinions and results from the beginning. I want to say thanks to all of you for your hard work and leading the pack on this rather significant upgrade. I'll be watching to learn how you feel after some road testing, but I suspect its going to feel much better. It's definitely on my list of things I want to do before too long. We've got better than 20K on the trailer now and despite "most of the time" on reasonable roads I've hit some hard bumps and such and definitely would like the peace of mind from an upgraded suspension system. I just greased the 16 zerks and noticed the tell-tail marks of the U-bolts hitting the frame on a few occasions. PS- We travel well under the Max of 7k lbs.... until we stop at Costco on the way home where I'm certain we've always exceeded it because the pantry at home was empty.2 points
-
7000 LB GTWR is enough, as this limit is truly difficult to exceed. Any suspension upgrade is for performance and safety, not additional trailer capacity. I imagine full-timers would go a little over this number. We would have to take everything out of the bed of my TV (spare the full 35-gallon water tank) and load it into the center aisle of the OTT to get over the GTWR. I measured ours during a first trip at 6000 LBS "travel-ready" and a Fresh Tank full. Now after 4 trips it's likely close to 6400 LBS. There aren't enough cubic feet of actual storage space onboard to exceed the limit unless you fill all those little overhead cabinets with GOLD!2 points
-
We also had this issue while up in northern Canada last summer. We believe it was a problem for a couple of years, we just were not aware of it until it was loose enough to start coming apart. When we returned home I got ahold of Dometic and received the following email reply. ===================== From: CustomerSupportCenter [mailto:customersupportcenter@dometic.com] Sent: Friday, September 1, 2023 9:46 AM To: BryanB Subject: RE: Dometic.com Support Form - US - productsupport - rv - b2c Hello Mr. Bjornstad: I was able to reach out to our engineering department. The engineer indicated the information directly below: “the bolts used to secure the burner caps are common M3x24mm socket head screws. They can be found at most hardware stores. He should apply blue Loctite to the screws before putting them in.” ===================== Yes, there are threads in the underside of the burner caps. The burner cap is made of 'pot metal' so if the screws are not of the exact sizing and ARE NOT 'Loctite-d' in, they may vibrate out again or worse yet, they may strip (as ours did) out of the soft pot metal burner cap. There was no indication (blue) of there being any Loctite around our screw heads when we were taking it apart to repair it. So the Loctite comment above may be a revision based upon customer experience. The following is what we did to fix the issue. We only had one screw per element and no Loctite at the time so we were at a less than ideal situation. turn off the gas at the tanks, remove the stove from the countertop, disco your gas fitting, turn stove upside-down and, make a note of the 'ignition wiring' if you have to disco more than one of them, remove the underside heat shield, (you have to cut the zip ties to remove it, replace zip ties to reduce vibration on re-install), re-insert the screws, apply Loctite where the screw head comes in contact with the assembly, then re-install the stove ‘Check Gas fitting for leakage’. We actually became quite proficient at this and I would be able to do it (less Loctite) as Maggie was doing 'meal prep', so I was done when she needed the stove. That is until the loosening of the screws and vibrating caused the 'burner tube' coming into the mixing bowl to break. At that point the stove was UNSAFE to use. So I put it in the back of the truck, got a brass plug for the gas supply line and covered the area with the 'Oliver supplied' sink cover, and taped that down. That gave us a larger meal prep area, and more outside cooking. Our final resolution when we returned home (because stove was basically shaken apart) was to replace our D21 (AMZN Dometic outlet), because we were unable to find the replacement parts that broke as a result of the ‘burner caps’ coming loose, and shaking/breaking apart the internals of the stove. When the new stove arrived, I took it apart at the bottom and made sure all 4 screws were there and sure enough, signs of blue Loctite on the screw heads. I have discussed using Red (hi-heat) Loctite thru PM's with others on the forum. The caveat is 'if you want it to stay put, Red would not hurt, if you have need to get in there and remove those screws and do other work, Blue would be better'... So I will stick with the Blue for now, as I do not believe that the original stove had any Blue on it. In fact, I do not believe we had two screws in each burner cap to start with. Never did find the two missing screws and I searched the entire enclosure and behind the false back of the drawer area. We can now look back at it as a learning adventure. Yah, may not take as many 'wash-boardy' roads less travelled, and will probably even go slower than we did... We learned a lot about the Oliver, Appliances (lost the WH too), about repair in remote locations, phone conversations with SeaDawg & Outlaw Oliver, and our own tolerances to experiences when dealing with and overcoming unexpected issues that arise, but GAWD, did we enjoy the adventure even with the adversities. So much so, WE ARE GOING BACK again this camping season, with the intent to make it to AK this time. Cannot wait to try (after a local shake-down weekend) our new Dometic stove and WH (another thread)... the adventure continues. B~Out, First edit, if others end up purchasing a new Dometic D21 Stove... the Brass elbow attached to the stove is now pointed 180 deg. opposite the supply line. So I just disco'd it, put on some YELLOW Teflon tape and then tightened it up to the orientation of the old one, and hooked the gas line back up. Second edit, Some of your appliances are going to have 'Metric' in them, especially if they are used outside the US. Just be Aware. Third edit with pics: once you have the stove exposed, you remove the heat shield screws (sm. red circles), notice wht. zip ties.. Your burner cap screws pass thru here (black arrows). The large red circle is the broken supply tube between control knob & mixing bowl. I tried to get some aluminum tubing to repair it. Even thought of sacrificing the stem to the coffee pot... I was told, that was NOT an option.
 2 points
 -
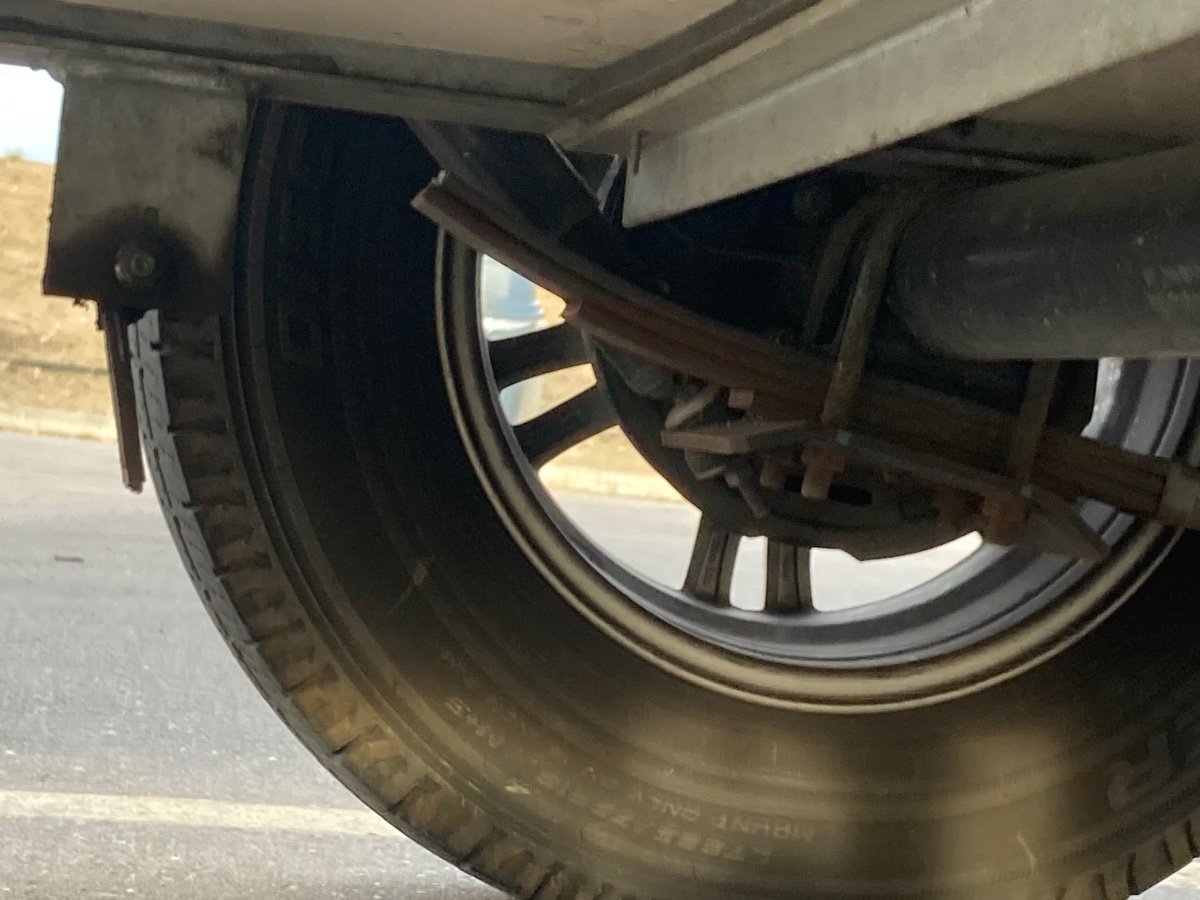
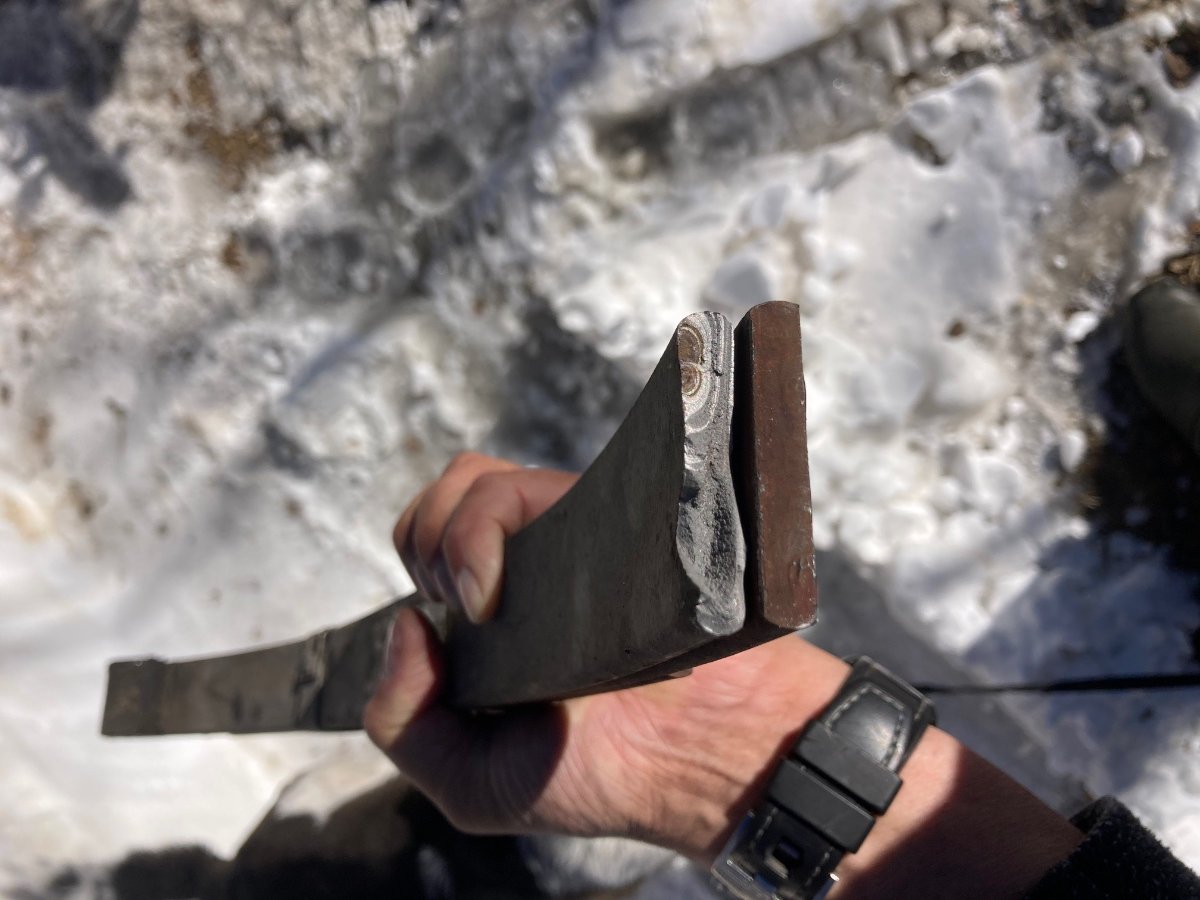
On the way home from the SW this year, I had the pleasure of experiencing a broken LR leaf spring while underway. It broke in the usual place (see pic). Fortunately the broken spring was noticed quickly and I found a safe place to overnight and perform the repair the next day. Unfortunately, I was not carrying a spare spring. After finding a pair of springs locally and installing them I made it home the next day. What I found when inspecting my broken spring was what appeared to be a defect in the steel (see pic). In no way do I blame Oliver for this failure as the trailer spring market is monopolized by Springs made of Chinese steel and Oliver, like all other manufacturers source from the same pool of components. In fact, after opening a service ticket, Mike was extremely helpful in getting me the specs and info I needed. I decided that once I got the trailer home I would replace all four springs with the best springs I could find. Preferably from a US company, made in the US and with US made 5160 spring steel. What I did not appreciate was that there did not appear to be any trailer parts sources which met this criteria. This was not proving to be a simple task. Everything I could find in the RV aftermarket was sourced from China. No exceptions. The only good news I found was that Chinese springs are cheap ($35-55ea). I remembered a Spring Company from my offroading days and gave them a call. They had a set of four springs which fit the measurements provided by Oliver Service and were made in the US with US 5160 spring steel. Cost is $150/ea spring but since I had already spent a fair amount of $ upgrading to stainless lugnuts and US made Timken bearings this did not prevent me from placing the order for a set of four springs and new ubolts. New springs should be here later this week. I will update with pics once I get the springs and also once I install and of course again after towing a few thousand miles.
1 point
-
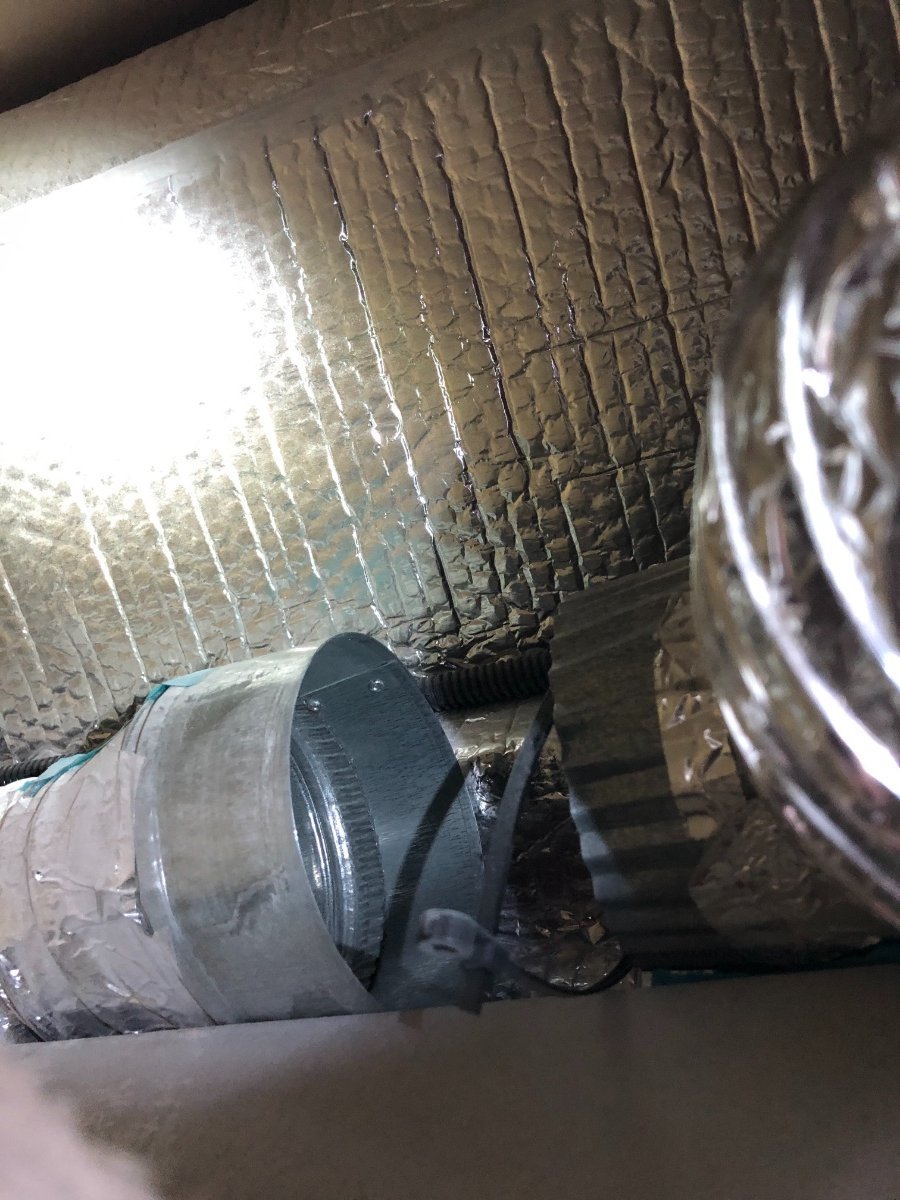
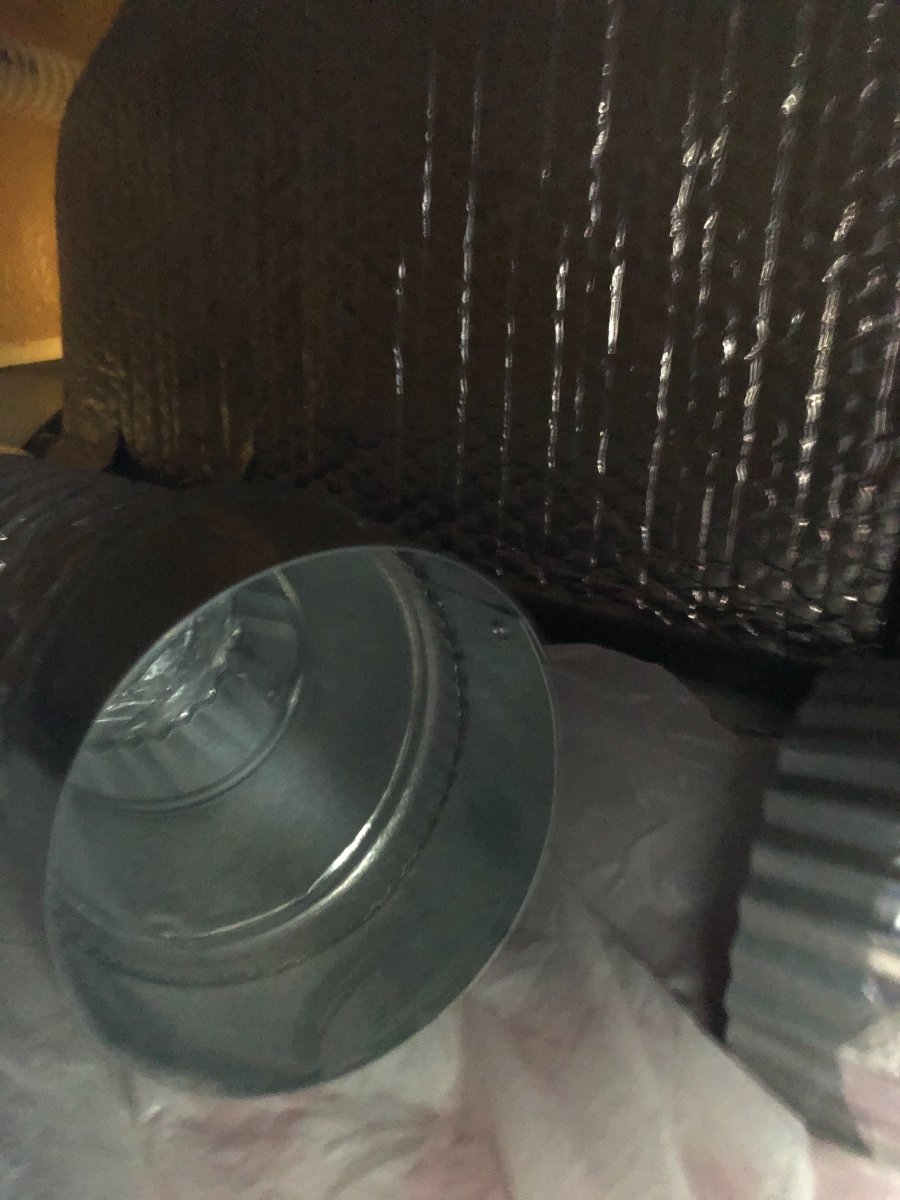
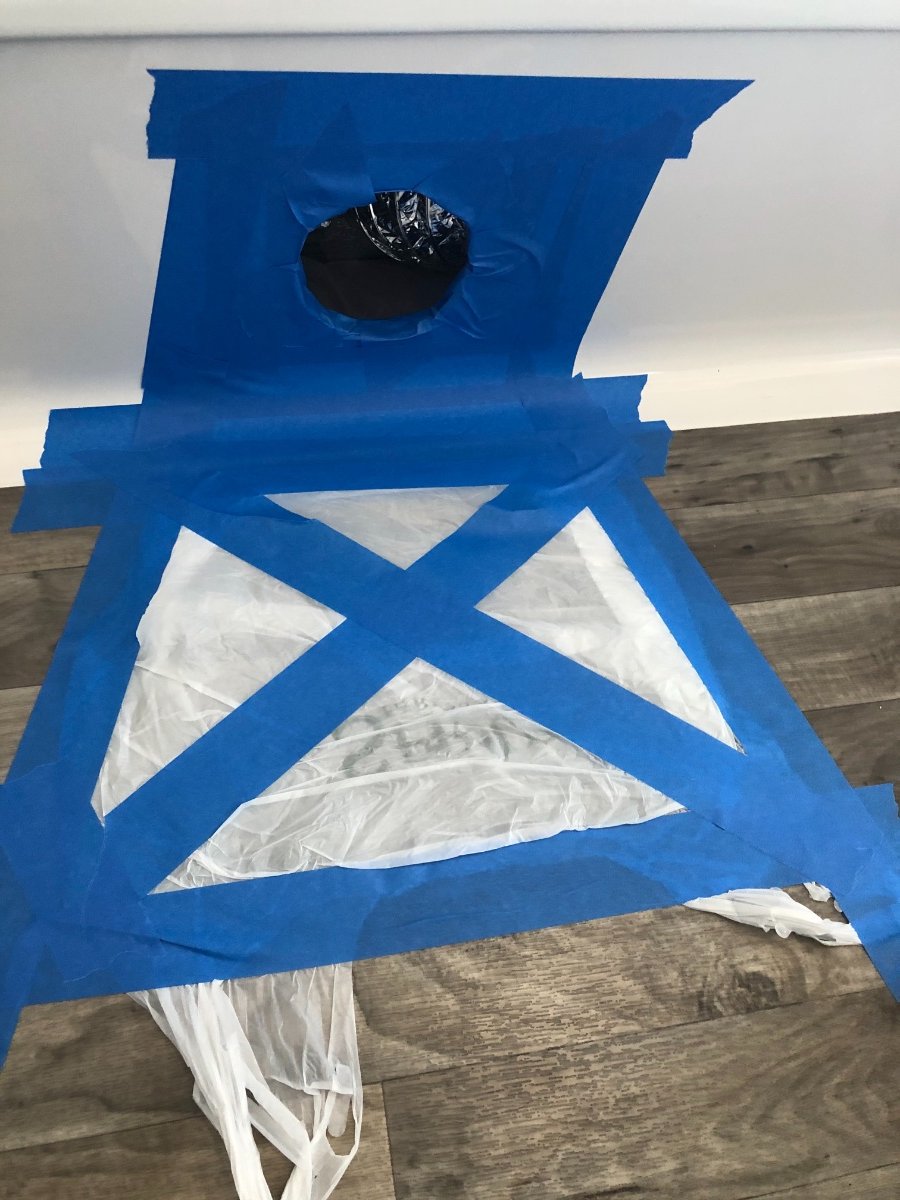
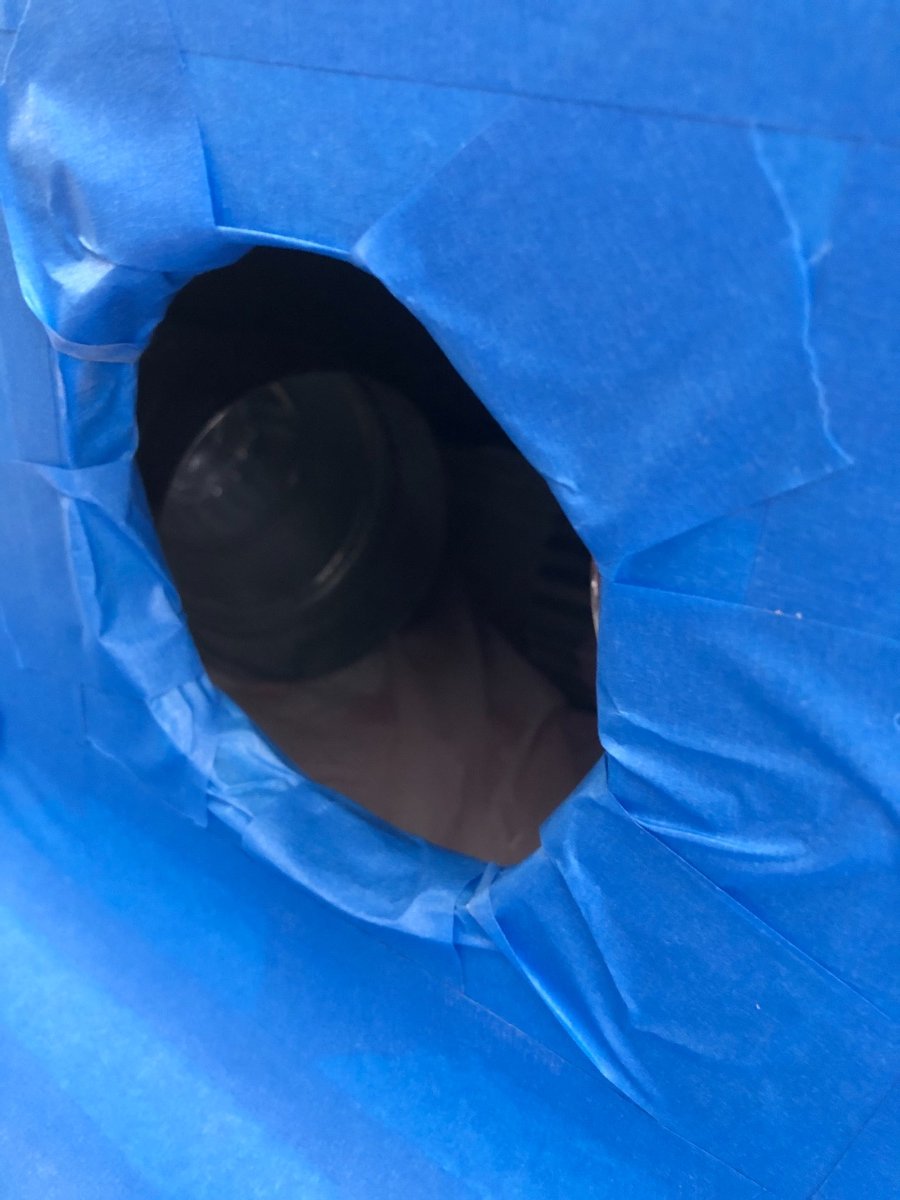
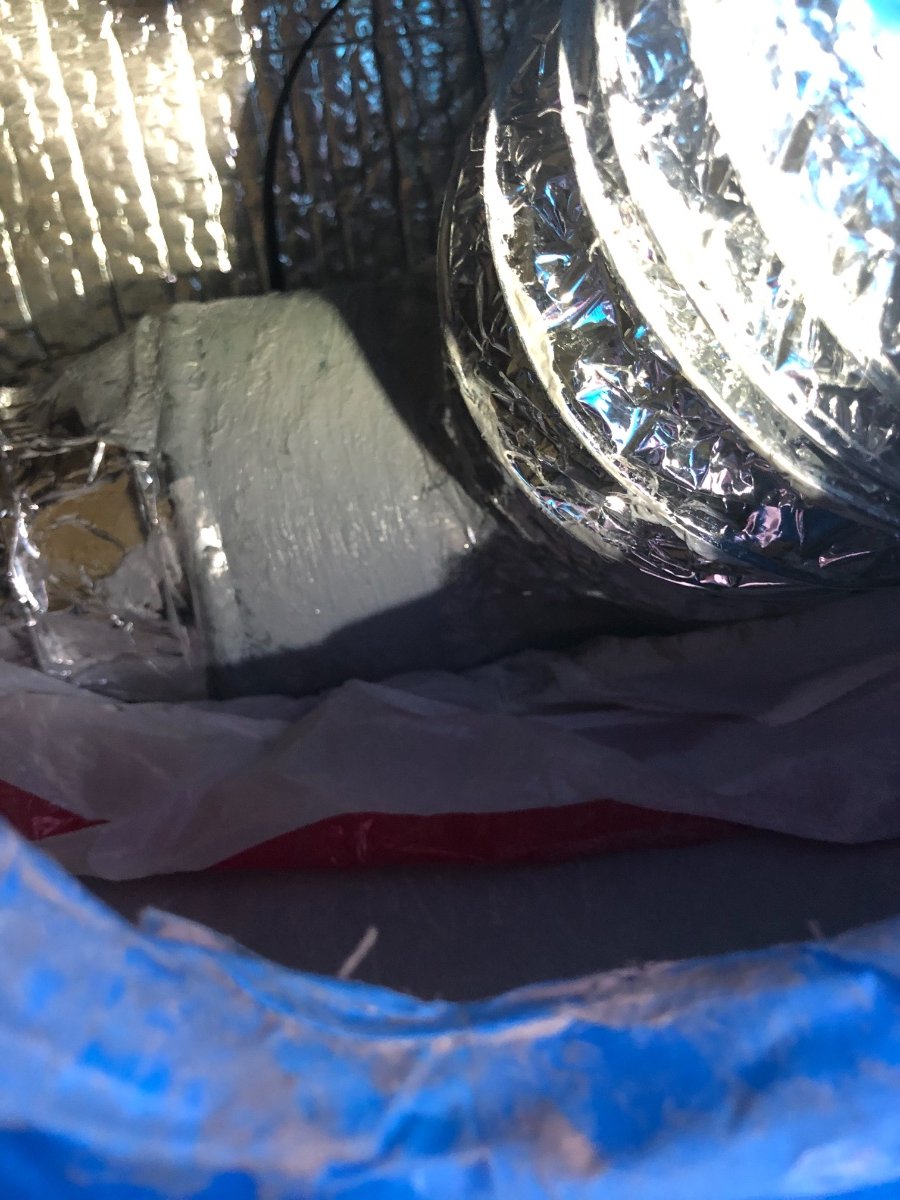
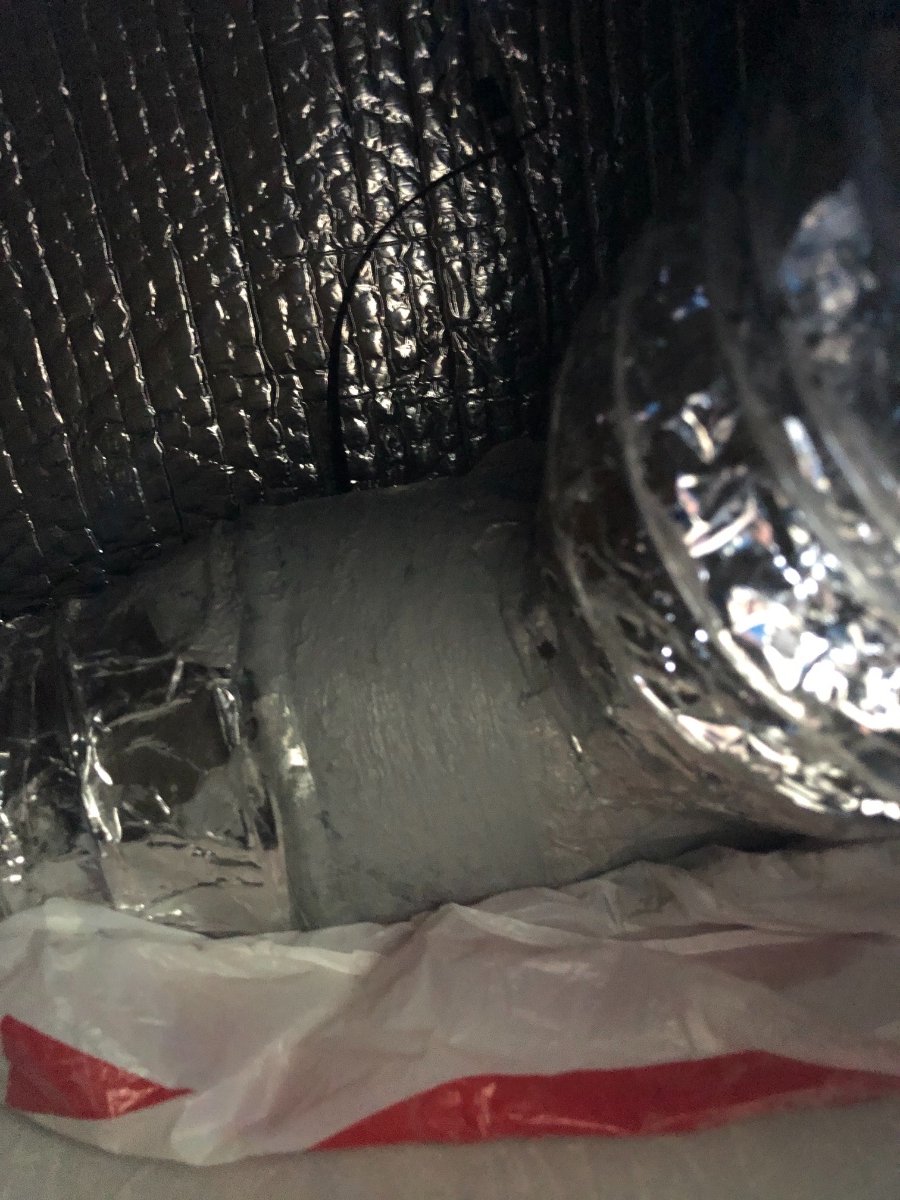
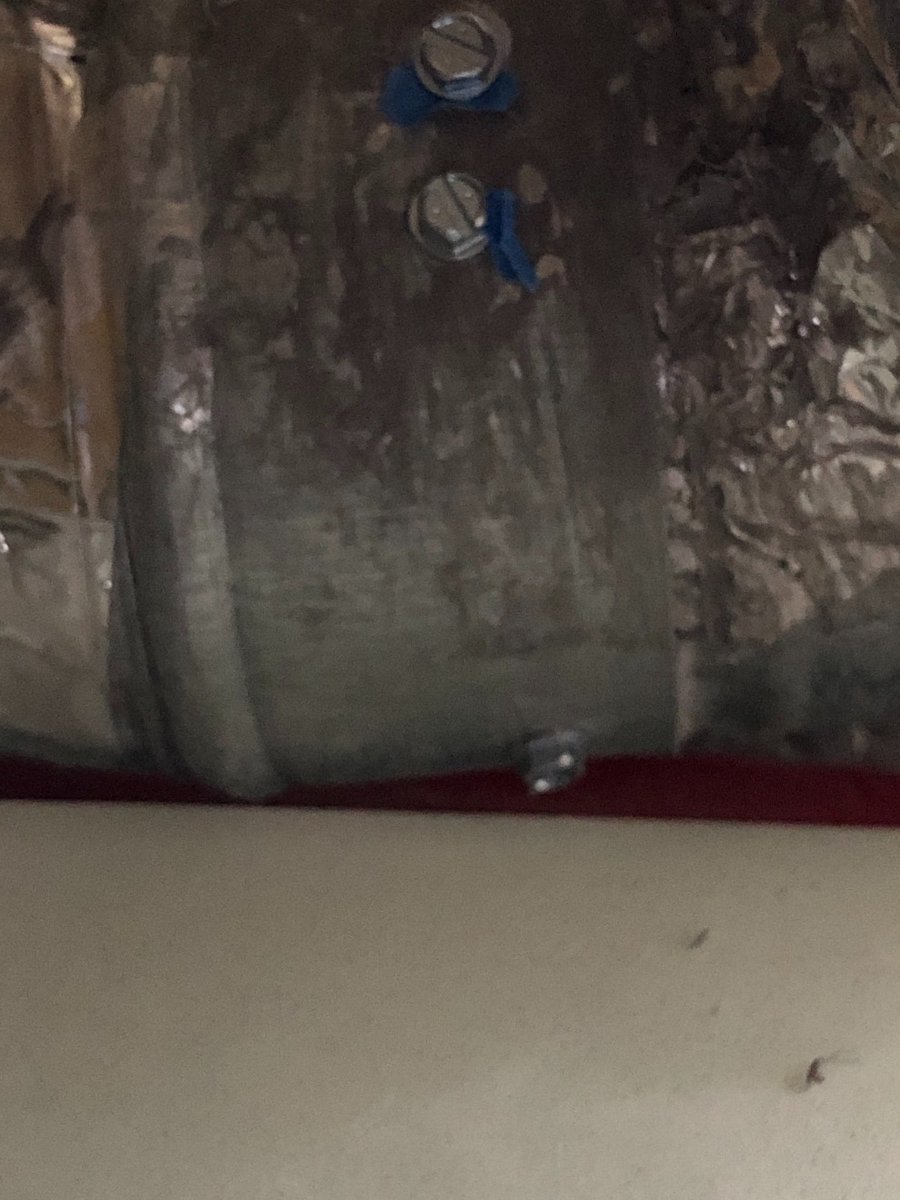
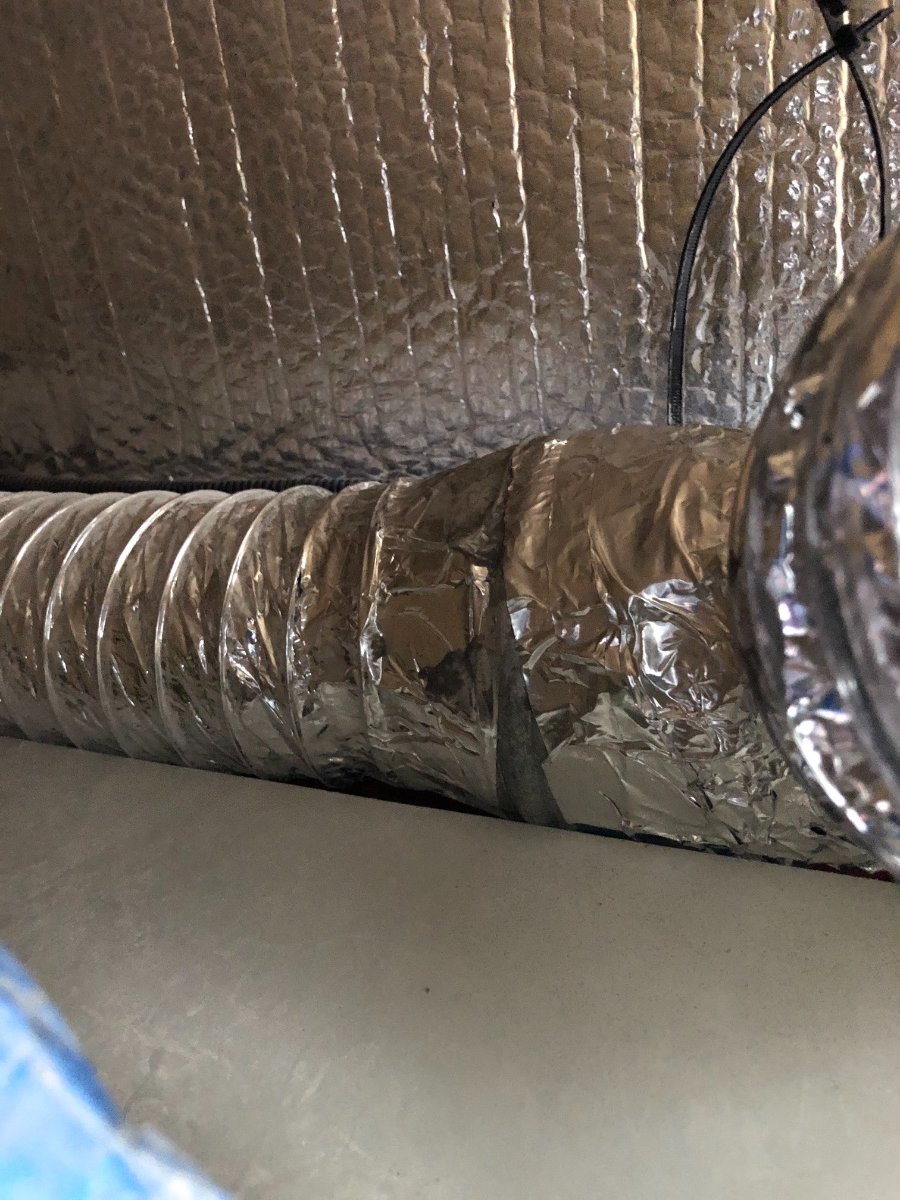
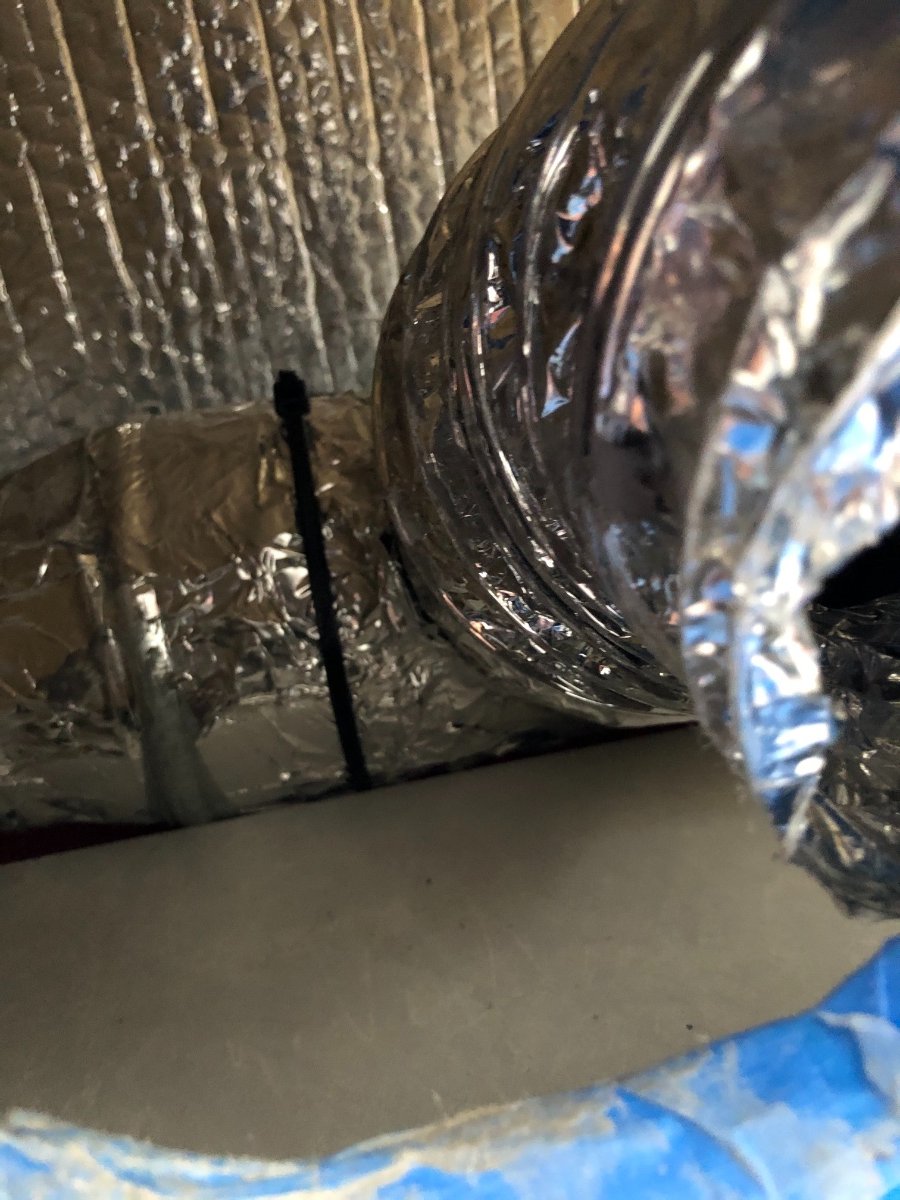
Hi Everyone! In the past, I've seen talk in the threads regarding the low flow from the furnace to the bath vent, well, I experienced that too. Here's what I found after a little detective work... Well no wonder! It helps when you connect the duct together. Yes, it was never connected, no wonder I only felt a very faint breeze from the bath vent. This shot was taken looking toward the kitchen sink, directly under the galley sink. The only way I could access this was to remove the plastic vent cover under the galley sink to connect the duct together. If this had not been possible, then the ONLY way would be to destroy the cabinetry to gain access to it. This was my first view, not touching anything and snapping this photo after I gained access. As you can see in this shot, there is no duct sealant or sheet metal screws, only a lone zip-tie that could not have possibly held this together properly. Notice, I put a plastic bag underneath to get ready to apply duct sealant. This blue tape was on the duct in two locations, possibly to note that this needed to be corrected before this area was closed up? Prepping the floor so I don't get duct sealant all over the place. Here's a look inside through the vent access directly looking at the disconnected furnace vent. The proper solution... three (3) sheet metal screws to follow. Keeping it neat and clean and getting a good bond. All dry, ready for the sheet metal screws... Due to the extreme limited space and only able to work with one hand, I had to tape the screws to the vent and use a hand driver to get the three sheet metal screws in the vent. It was impossible to access the other side however this is more than sufficient, especially with a generous application of the duct sealant and what is to follow... Ah yes, after the duct sealant completely dried and three sheet metal screws, I wrapped the joint with real duct tape and finished it with a fresh zip-tie to complete the surgery. And there you have it ladies and gentlemen... mission accomplished! I later purchased some inserts for the vent ducts that allow me to open and close the amount of flow that I want from the furnace in the bath. I simply adjust the two in the galley to my desired comfort and I'm a warm, happy camper! BTW, the awesome folks at Oliver Travel Trailers were very kind and reimbursed me for the materials, so we're both delighted with the result! For anyone experiencing low/no flow to their bath, this is the very first place I would look. Simply remove the vent cover under the galley sink, carefully disconnect the duct and see if your distribution tee is properly connected. If it is, I would strongly recommend the adjustable registers that can be purchased for these vents, my Ollie did not come with them. You only need two (2) for the sink vent and the bed vent. They are approx. $10 ea. When I run my furnace, I adjust them and can get a good flow of warm air in the bath. Problem solved!
1 point
-
Thank you I admit being a little "slower" than the average Ollie person and after reading your post I checked my overheads ... EUREKA...I would never have thought to look there for a replacement. Mine are not threaded but they are a direct match and we now have a "new" hatch for our dog house. The 3 little tabs on the original broke off and I was lucky to have it not blow off while traveling. I used some of my high dollar glue I got at Quartzsite this year to fashion some tabs to keep the hatch in place in the overhead. John1 point
-
@Steve and MA, have you made Truma and Oliver aware of your disappointing door issue? I also think that's a ridiculous price for a replacement door. I just looked up a replacement (metal) door for our Girard. It's less than $60 on Amazon.1 point
-
Thanks, that's exactly what I did, the fix is now completed. Happy with the improved airflow.1 point
-
Yet another use for this!
1 point
-
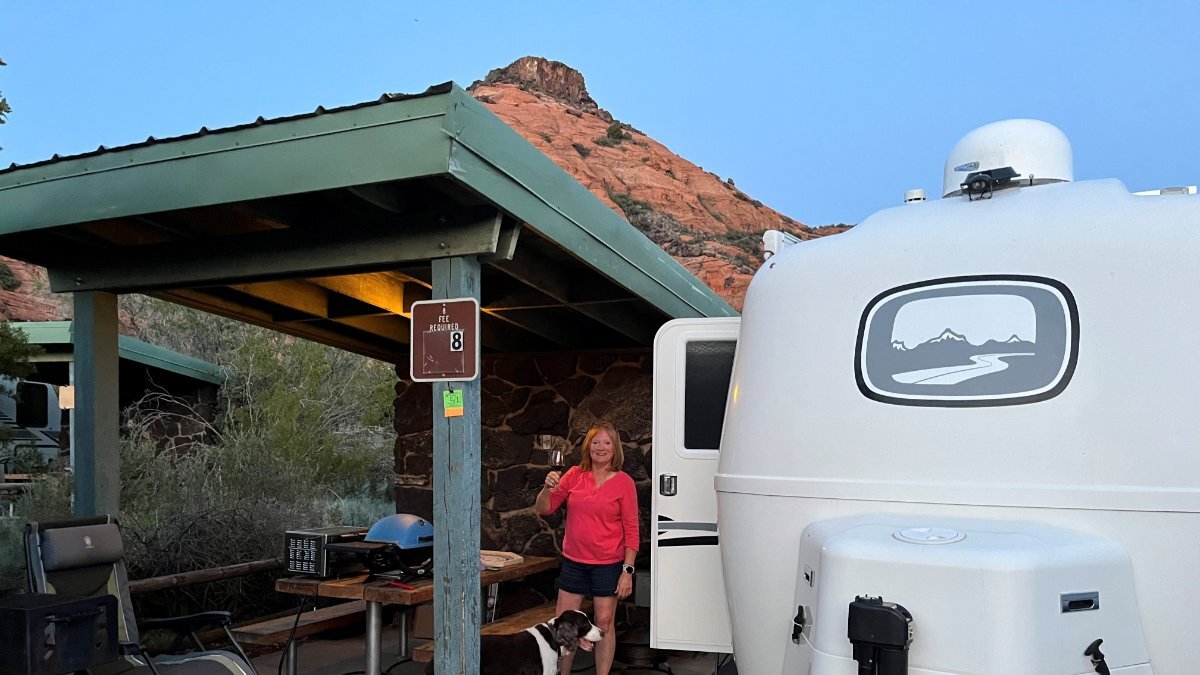
New campground for 3 nights at Snow Canyon Utah State Park. Got here yesterday, several tight spots in a row with water and electric. Pretty place and everybody we meet is so nice, guests and staff. You can just barely pull through to our site #8 and at first the streetside was 6" low. Using our LevelMatePRO+ we got that number down to 3.5" and the Andersen Levelers took care of the rest. Enjoyed our first night here!
1 point
-
I think a disconnect is a good idea whether it is required or not. My Furrion external solar port, which I installed, does not have a dedicated disconnect, but it does have a 10A inline fuse. My Renogy100W suitcase panels with onboard CC are foldable as the name suggests and that’s what I do. I work the cable connections from the external solar port out towards the panels with the MC4 connections last. I think the MC4 connectors are less likely to arc, but I still like the manual breaker solution. Now you just need to figure out where to put it. Mossey1 point
-
The upgrade from 10" to 12" trailer brakes is huge! Your braking efficiency will improve significantly. Are disc brakes better performance? Yes, better precision. Less maintenance? Yes. Extremely expensive, considering it's for a trailer! Yes!!! You will have new dual 5200 LB axles, new 12" brakes with new bearings, new HD Alcan springs, shocks, wet bolts, U-bolts, etc. basically a new suspension. Very nice! 😂1 point
-
Our Oliver is parked at Snow Canyon UT SP tonight and for three nights!
1 point
-
Concur 100%, Rodger. Whether working on an Oliver yourself or choosing to have a trained RV technician perform the effort, the Oliver meets a wide range of owner expectations due, IMO, to its superior design, quality materials/systems, and overall "fun factor". Like many owners, we've transitioned to Olivers from the Aluminum Cloud RV community and have never regretted it for a second. Ollie falls into a category similar to the sailboat and GA aircraft owners enjoy - which is basically an overall product quality that is not shared by the "SOB" RV market enjoys as described in the article @Wandering Sagebrush recently posted. If you like traveling with a peace of mind that yields a confidence that you'll get there without worrying about what going to fail next, an Oliver may be perfect solution. Sure, the big Tiffins, Newmars and Provosts may meet that confidence level, but at what price point? What style of camping? More systems - greater probability for failure over time. The OTT keeps systems fairly straight forward to operate, troubleshoot, and repair - not so with what we consider the "General RV Community" of stick-builts. FYI: We've logged north of 5k miles since JAN in our 7 year-old rig without (knock on wood) an issue... just say'n. Additionally, the OTT community on social media is unusually supportive of owners' questions, issues, and trouble shooting efforts. A real family atmosphere and we're proud to be a part of it. Not so true with other brands. So, keep us posted on your path to acquiring what we consider the penultimate in RV'ing, at least for our style of camping and traveling. TWO thumbs up from us, brother! Cheers!1 point
-
Four years ago when I was considering buying an RV (I bought a certified gyroplane instead two years ago for the price of a gas Newmar motorhome), Before I bought my plane I spent a lot of time/two years in a lot of trailer and motorhome forums talking with owners and learning through the vicarious experience of others rather suffering the realities by just jumping in. I remember someone accusing me of being a procrastinator and encouraging me to just do it. Well, anyway....bygones. What the writer talks about is barely submerging below the surface of what I learned from others. The upshot was I went out and got an rv maintenance license and an RV electrical specialist license, then put about six months into working at rv dealerships to gain hands-on experience. To cut to the chase, I did that because I had concluded that it was a favorable proposition to 1) do as much of the work for myself as possible, and 2) to focus on quality based on the experience of owner/forum members. Then I ran across a YouTube video of a gyroplane and bought my gyro. Now that I am divorced and have a girlfriend in Thailand, I am considering buying an Ollie. So if I follow through and buy an Ollie this year, it won't be because I went to an RV show and fell in love with a cute floor plan, or decided to be an early adopter. I consider the Ollie to be the kind of trailer a mechanic would buy who actually wants to enjoy traveling. Thumbs up.1 point
-
I'm in the middle of my conversion. I have removed the Kitchen/Bathroom T and attached the duct to the front of the furnace. I'm going to have a problem putting the T at the bedroom location due to waterlines in the way. (I'll include a photo) I didn't want a plumbing job. thinking of just going to the Kitchen and eliminating the sleeping area. Was your duct restricted like this?
1 point
-
Mosquito Lake State Park in northeast Ohio for the Casitas of Ohio Spring Kick-Off Egg Rally. Three Oliver’s, four Escapes, a couple Scamps, two Cortez, a Trillium, and 20 Casitas. Deb was fiddling with “night mode” on her phone. Next up is a weekend with Tearjerkers and then head to Alabama!
1 point
-
Unfortunately, the disk kits are the long pole in the tent - out of our price point range... The larger 12" drums will suffice for our needs for some time. The additional/high cost for disks doesn't make up for the benefit gained in braking performance, maintenance, and overall peace of mind, IMO.1 point
-
Maybe for the male version, the female is a costly upgrade; some things never change!1 point
-
Water supplies that are not chlorinated will do that. Tanks that sit full for a long time without use especially so. Change the anode, flush well and treat. Drain, remove anode, flush and flush again, treat and flush again, install new anode, fill and burp (TP Valve on Top) before turning on!. Here is one I have used often in facilities maintenance: "Using a hydrogen peroxide solution of 2 pints 3% peroxide to 40 gallons of water, treat tank and run some of the solution into water lines. Let the peroxide solution set in tank and pipes for 2 hours. Solution is not toxic and requires no rinsing It kills off the bacteria." it says no flush necessary... but I flush it anyway. Safety John (AKA GJ)1 point
-
Craig, Sorry this happened. It could easily have happen to any of us. Posting this is a really a great reminder to all of us. Glad the damage was minimal and the good folks at Oliver Service got you back on the road. Safe Travels!1 point
-
Nor has any other facility I've ever been to. Trailers in repair centers often get moved around, a lot. The most I've ever seen is a scrap of 2x6, to protect the center's floor, or asphalt in the parking lot.1 point
-
That makes sense, and with only 15' of 8 AWG wire connected directly to the panels the voltage drop before reaching the CC will be minimal.1 point
-
To reduce voltage loss, here are a Couple videos explaining it. …….and1 point
-
Why not just cover the Victron or lay it face down so it is not producing power before disconnecting, if you are concerned?1 point
-
@Geronimo John - That's a Phase-3 upgrade for us down the road, amigo. The electric over hydraulic disk brake conversion kit's price point has skyrocketed over the years - a decent setup using the preferred Dexter K71-651-00 1600PSI brake actuator runs north of $1,100/wheel; can you spell, OUCH ? We're thinking the larger 12" drums on the new running gear will meet our braking needs and RV camping style for quite awhile. That said, the disk conversion will still stay on our radar, for sure. OBTW: We never come close to the 7k# max GVWR for our camping style, even in the winter months when carrying more gear. We encourage others to do the same, no matter what suspension upgrades are present. "Roll-On" and have fun out there, All! Cheers!1 point
-
Following is rabbit hole conjecture on my part for your amusement: The G-forces on loads behind the center point of the twin axles are lineally amplified by the lever arm distance. It therefore is good design to have more structural supports behind the axles than in front of them as reported. As the EZ Flex raises and lowers the axles based upon up/down road bumps/holes/trenches, it could also be adding additional loads to the areas in front and behind the axle center points. If those are in-phase with the road induced G-forces, the structural member loadings would be increased beyond that mentioned above.1 point
-
We departed the ABQ area mid-morning and are now boon docking near Amarillo, FYI. Even saw another Oliver enroute, "Buck and Ollie"! This thread has been very informative for us regarding spring packs. Perhaps owners will become more attentive to the "dirty side" of their Olivers - as the undercarriage and specifically, the running gear, might be overlooked for some. It's definitely not as sexy as other areas of the OTT, for sure. But, it's where the rubber meets the road that concerns us. It would be good for everyone reading this thread to crawl underneath an learn what type of axles they may have. We learned that 3500# axles can be either 2-3/8" or 3" diameter at the same weight rating. Each takes a different size of U-bolt. As noted in an earlier post, each has a different torque specification as well. As responsible owners, we should know what U-bolts we're riding on and what the respective torque specs are. Here's a good one: During our spring-pack R&R, we noticed that on the last set of U-bolts, there weren't any washers! At some point in our Oliver's life, the U-bolt nuts were installed and torqued without them. You can't get an accurate torque value without washers. We never noticed this condition until just last weekend as we were finishing up. Just another thing to look for when you're crawling around under there... @Patriot's well thought out approach to have a spare spring pack/U-bolt kit on board is rock solid. Especially, considering the Dexter 5-year warranty implications. Good on you, brother. Please note: If U-bolts are replaced, either by emergency durning on the road conditions, or by modification/upgrade in controlled conditions - please mind the torque procedure. Specifically, re-torque after first 50 miles, then at 100 miles, finally at 500 miles. Check torque settings annually - easy enough to do at the same time you're servicing your EZ-Flex suspension, wheel bearings, and doing your shock absorber inspection. We completed the first 2 torque drills today while headed eastbound on I-40 towards Amarillo. New U-bolts actually stretch until finally torqued after the 500 mile check. We'll be doing the 500 mile check tomorrow. It's amazing how much additional tightening was needed to meet the torque specs on the first 2 inspections. Bottom line, loose U-bolts can cause spring failures. Very strong left to right wind conditions while towing today, the Casablanca was rock solid back there - like always. The peace of mind is well worth the effort we went through over the past several days performing this mod. Happy Campers all! Cheers...1 point
-
When I installed suspension wet pins and bronze bushings on another forum member's Legacy Elite a few years ago, found several welds cracked, not broken. He took his Ollie back to Oliver and they welded the cracked areas without any additional problems to my knowledge.1 point
-
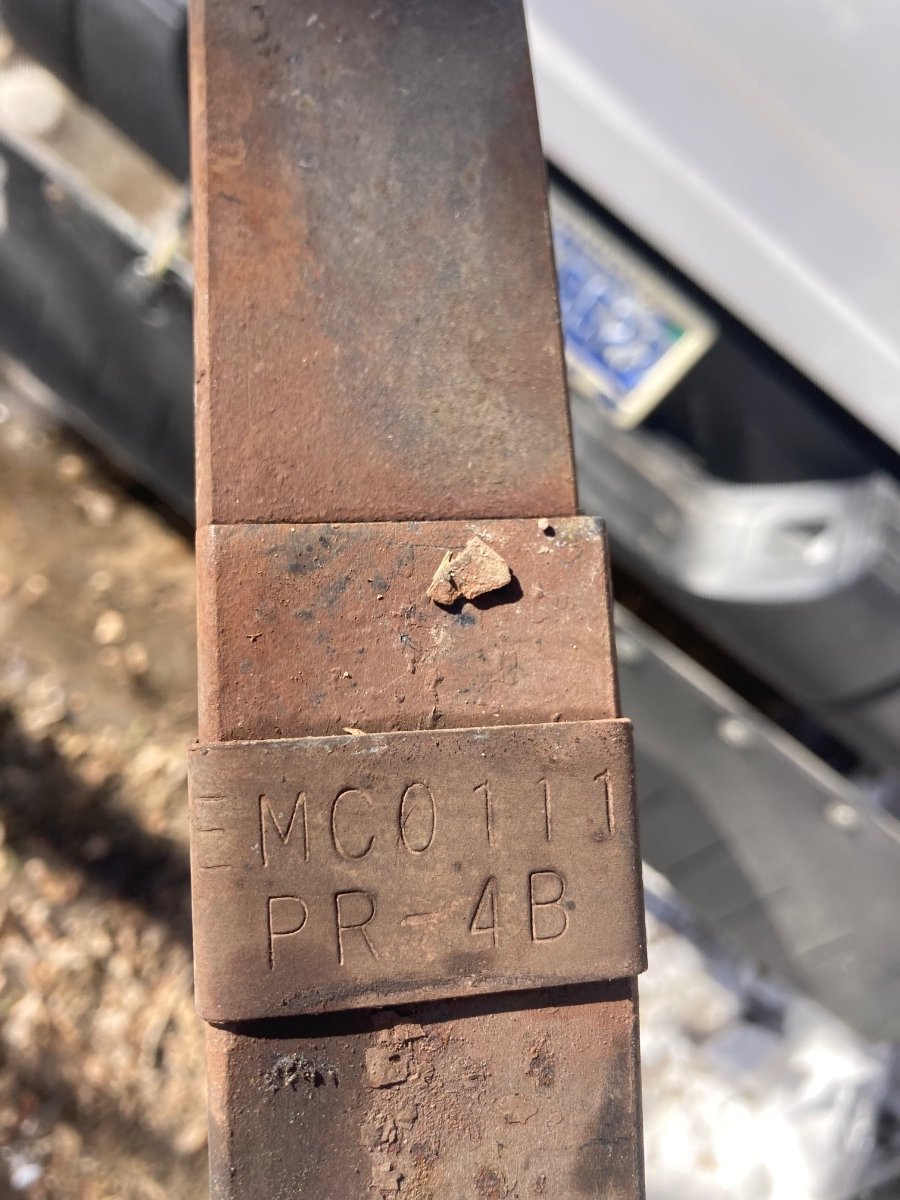
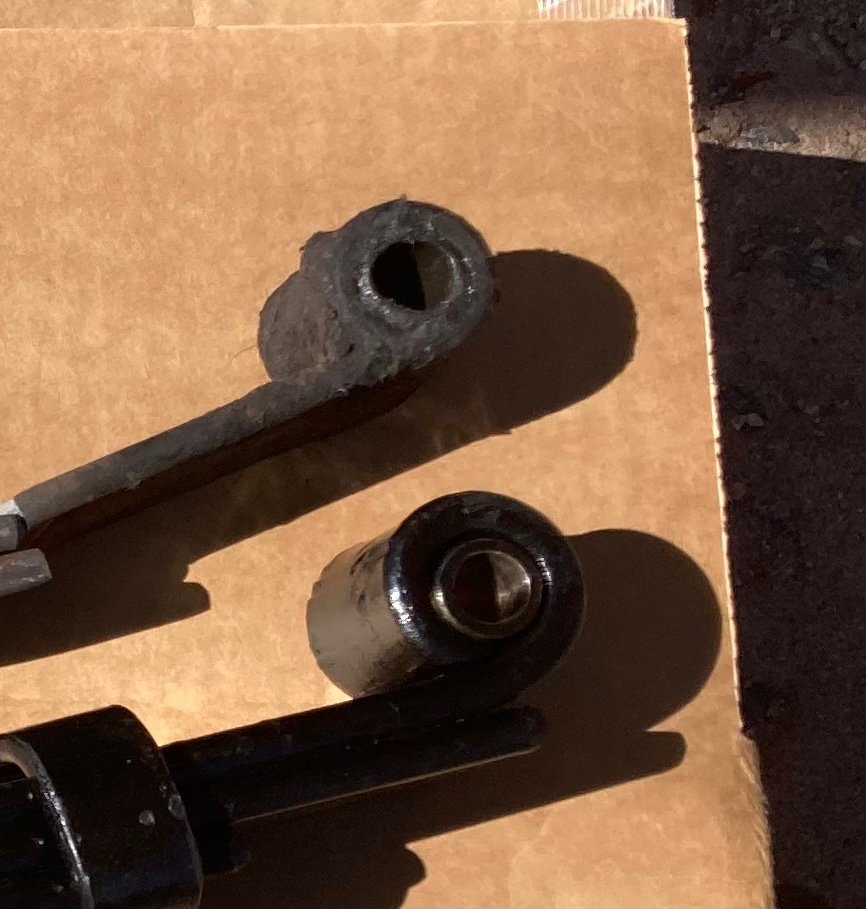
I can confirm that these measurements match the OEM brand/model spring specs for Hull #898 as well as match the published specs for the replacements spring brand/model provided by Oliver Service for my trailer. I encourage owners to confirm the specs of their OEM springs to know what they are replacing before proceeding with replacement of any part as we know certain differences exist between out trailers based in hull# and date produced. My OEM Spring make/model was conveniently stamped into the retainer band towards the end of each of my leaf springs (see pic). From this info I did a google search and found the specs. The springs installed at the factory on Hull #898 were made by EMCO and are model #PR-4B. The specs match what Steve provided above. Added to the specs Steve provided is the bushing spec provided by Oliver. The bushing is inserted into the spring eye and our wet bolts ride inside of them. The specs for these bushings (whether plastic or bronze) is 1.75”L, 11/16 O.D.(outside diameter) and 9/16”I.D.(inside diameter). It should be noted that the bronze bushing on the ALCAN springs is thicker walled than standard such that while it still has a 9/16”I.D., the spring eye into which it is pressed is larger than 11/16”. The 9/16”I.D. Of the bushing is important on these metrics as our wet bolts (which are 9/16” must fit inside the bushing eye) I hope this makes sense. I have attached a pic for comparison OEM spring in top, ALCAN on bottom.
1 point
-
OK, a little more information provided by "Mike" at ALCAN relative to a four spring setup vs the five spring setup. I specifically asked Mike about simply swapping out our cheap, Chinese produced Dexter 4 spring set with a quality 4 spring set that they produce. He highly recommended going with the five spring set. In his opinion, the 3500 springs used by Dexter are inadequate for our trailers. That's good enough for me. I had asked about their 4 spring set as by yesterday (Friday) morning (the morning after Mountainman198) had posted the vendor source note, they had already sold out of the last 3 remaining stock of 5 spring sets to other Oliver owners. I was the first call Friday morning and he advised they were producing more next week (11-15 March) but wouldn't ship until NLT than Friday the 15th. Well we're departing on the 22nd of March for a six week trip and that schedule was almost a guarantee that at best, I might receive the shipped springs in time for the trip but wouldn't have time to install them. I of course would order them and have them with me just in case. So I locked in my order at 0700 yesterday morning. When I talked to Mike later yesterday he said based on my somewhat immediate need, he discussed with his production folks and they said they could have a set produced for me by next Wednesday (vice Friday) and they would be shipped that day. That's GREAT customer service. He also mentioned to me to me that in the time between having talked to him in the morning (0700), and when I called back at around 2PM, he had sold five more sets to Oliver trailer owners. He said "You Oliver trailer owners are a really tight knit group". He actually was so impressed, he went on line and investigated Oliver Travel Trailers. I have my RV mechanic on standby to replace my springs once they are received. He's having me bring in my trailer once I get the "shipped" notice so that it's already there in his shop the moment the springs arrive. To that end, my new springs should be installed before our departure on Friday, 22 March. I'll report back my findings once installed. Thanks again to Mountainman198 for all his efforts. Paul & Donna (2 HOBOS) hull 414 (last trailer produced in 2018)1 point
-
Keep in mind that four wheel alignment becomes a periodic maintenance requirement with independent suspension. There's always trade offs so depending on your style of camping. Also there are a lot of other possible fail points with that system. It's a very complex system. I wander what the cost of a conversion would be? Edit: PS - The beauty of the current suspension is you can pick up replacement parts rather cheap, albeit not lifetime quality, at any local farm store and be back on the road in hours. The high end suspension would likely require sourcing parts long distance that would have at least a few days lead time. I think I would be hard pressed to consider this type of upgrade.1 point
-
How about an individually adjustable pneumatic airbag type suspension for Ollie? No axles - lighter, smoother ride - less damage to OTT and components, no more broken leaf springs, more ground clearance by adjusting air pressure, enhanced braking, and "drum roll" please.... no more zerks! ...screenshot taken from an earlier thread on "Aussie Quality RVs": ....just say'n
1 point
-
I’ll try … it’s the black one. (The blue one was provided in my spare fuse kit from OTT.) I tried a local hardware as well as NAPA, neither carry it or know about it. It’s in the fuse box, with all the other fuses. I don’t believe it’s blown, but I want to understand how it differs from the other fuses, and how to gauge when it is blown.
1 point
-
Yep, you nailed it on Viasat/Hughes vs Starlink sats. Starlink sats are like 250-280ish miles up. ViaSat/Hughes have geosync sats - they're stationary about 22k miles out. Round trip on Starlink is like 500ish miles - round trip on the others is 44k miles. There's also like 30 of their sats or so at geosync for traffic vs like 1400+ for Starlink (will eventually be MUCH more). Looking at my emails - I paid on the 23rd and the email claimed it could take 2-3 weeks to actually ship due to heavy volume. It shipped only a week later - on the 30th, and arrived 6 days later (from Hawthorne, CA via FedEx, no signature required). The mount/install accessory stuff on the other hand...were much more delayed/backordered. Would recommend checking out - https://www.reddit.com/r/Starlink/ if anyone has questions or would like more info from owners.1 point
-
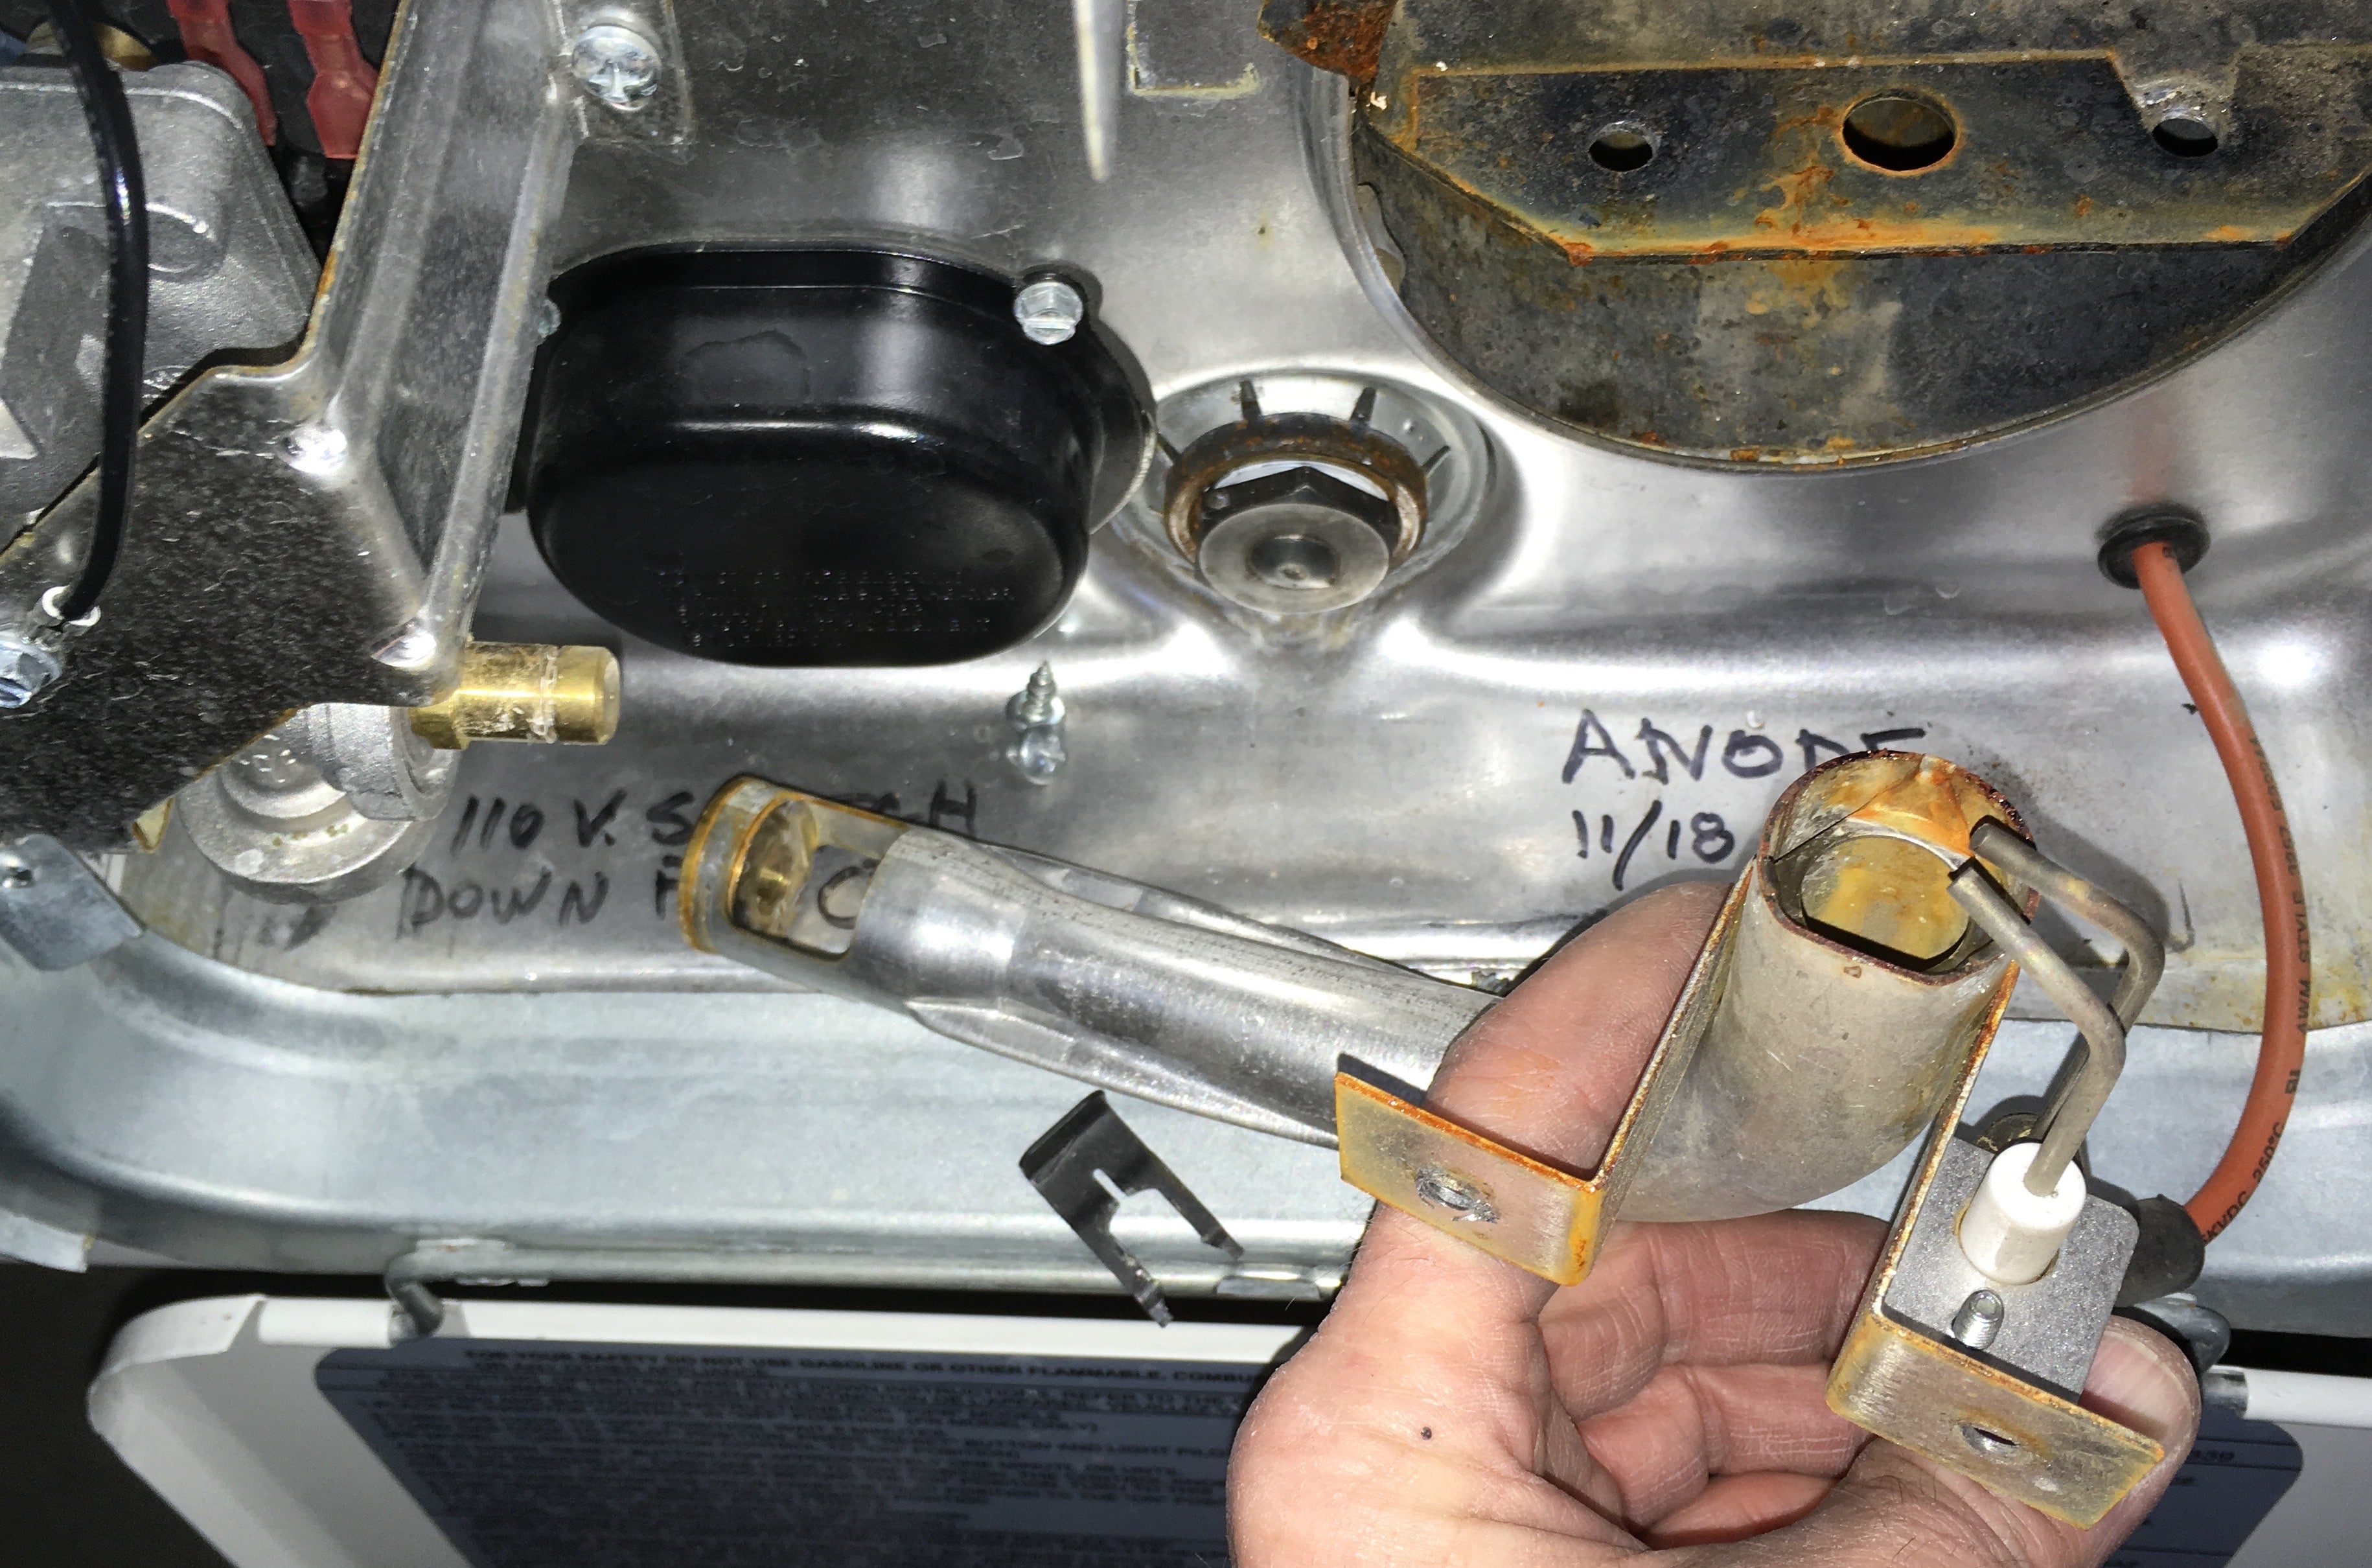
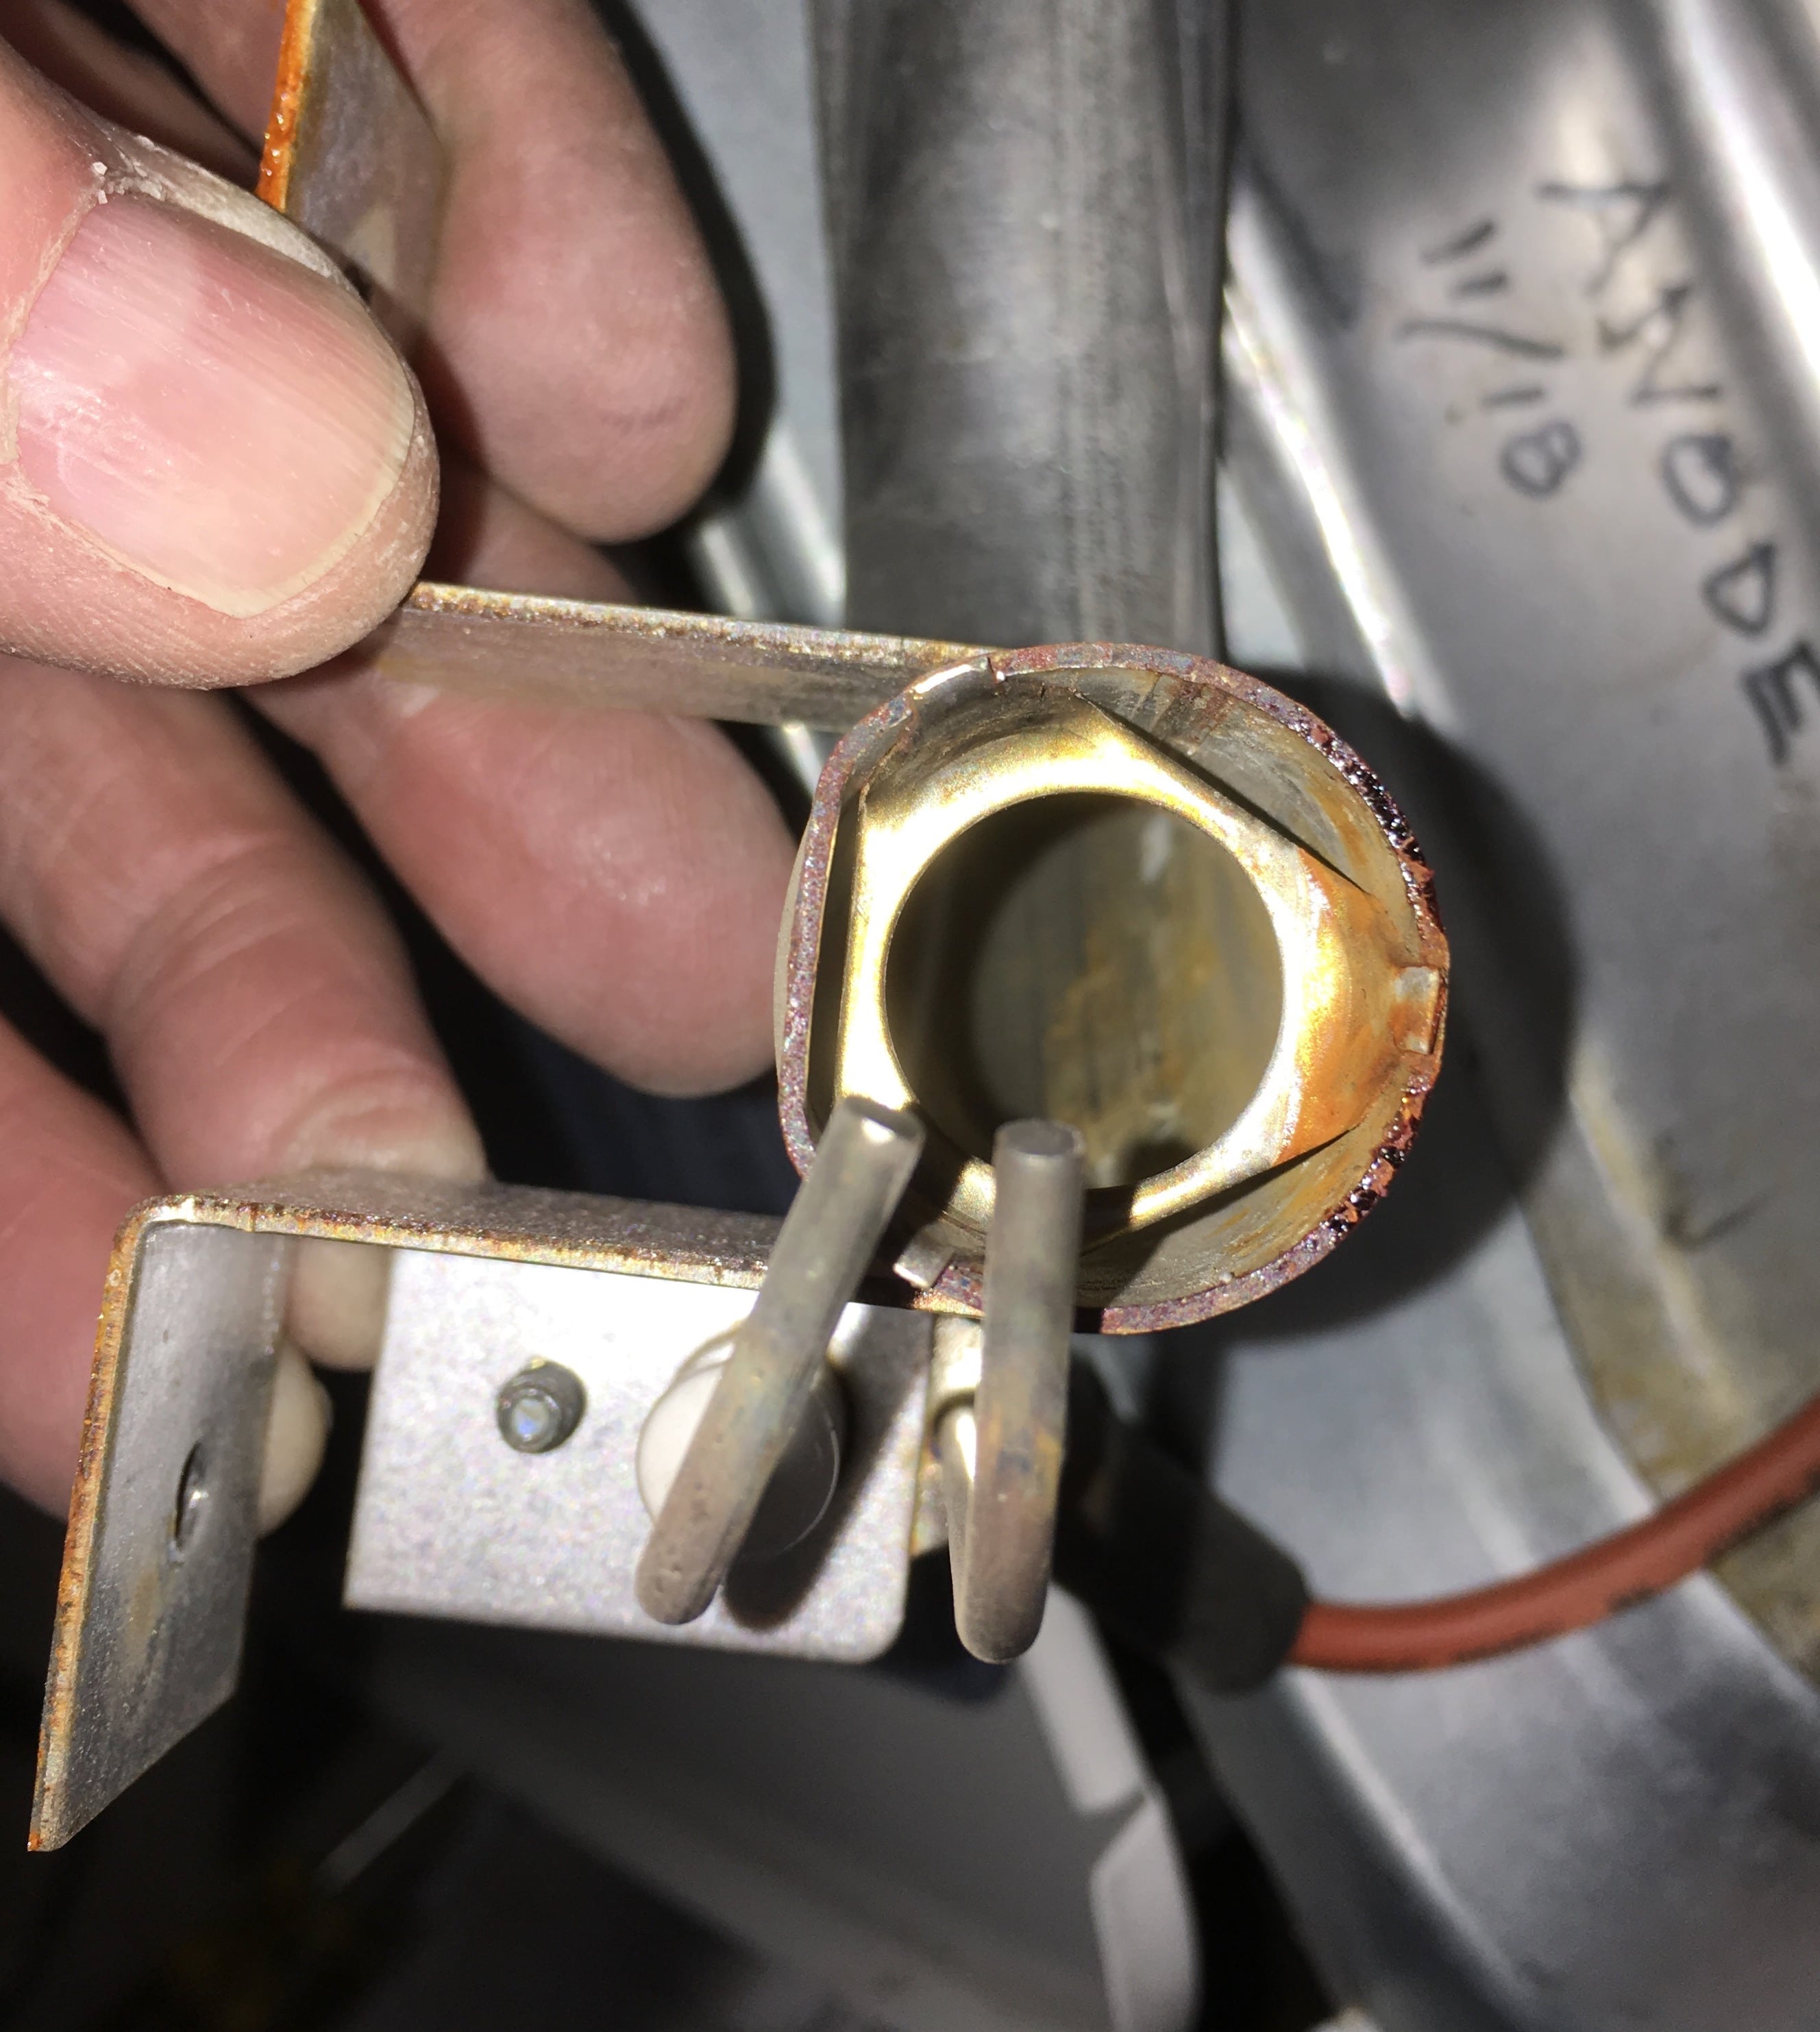
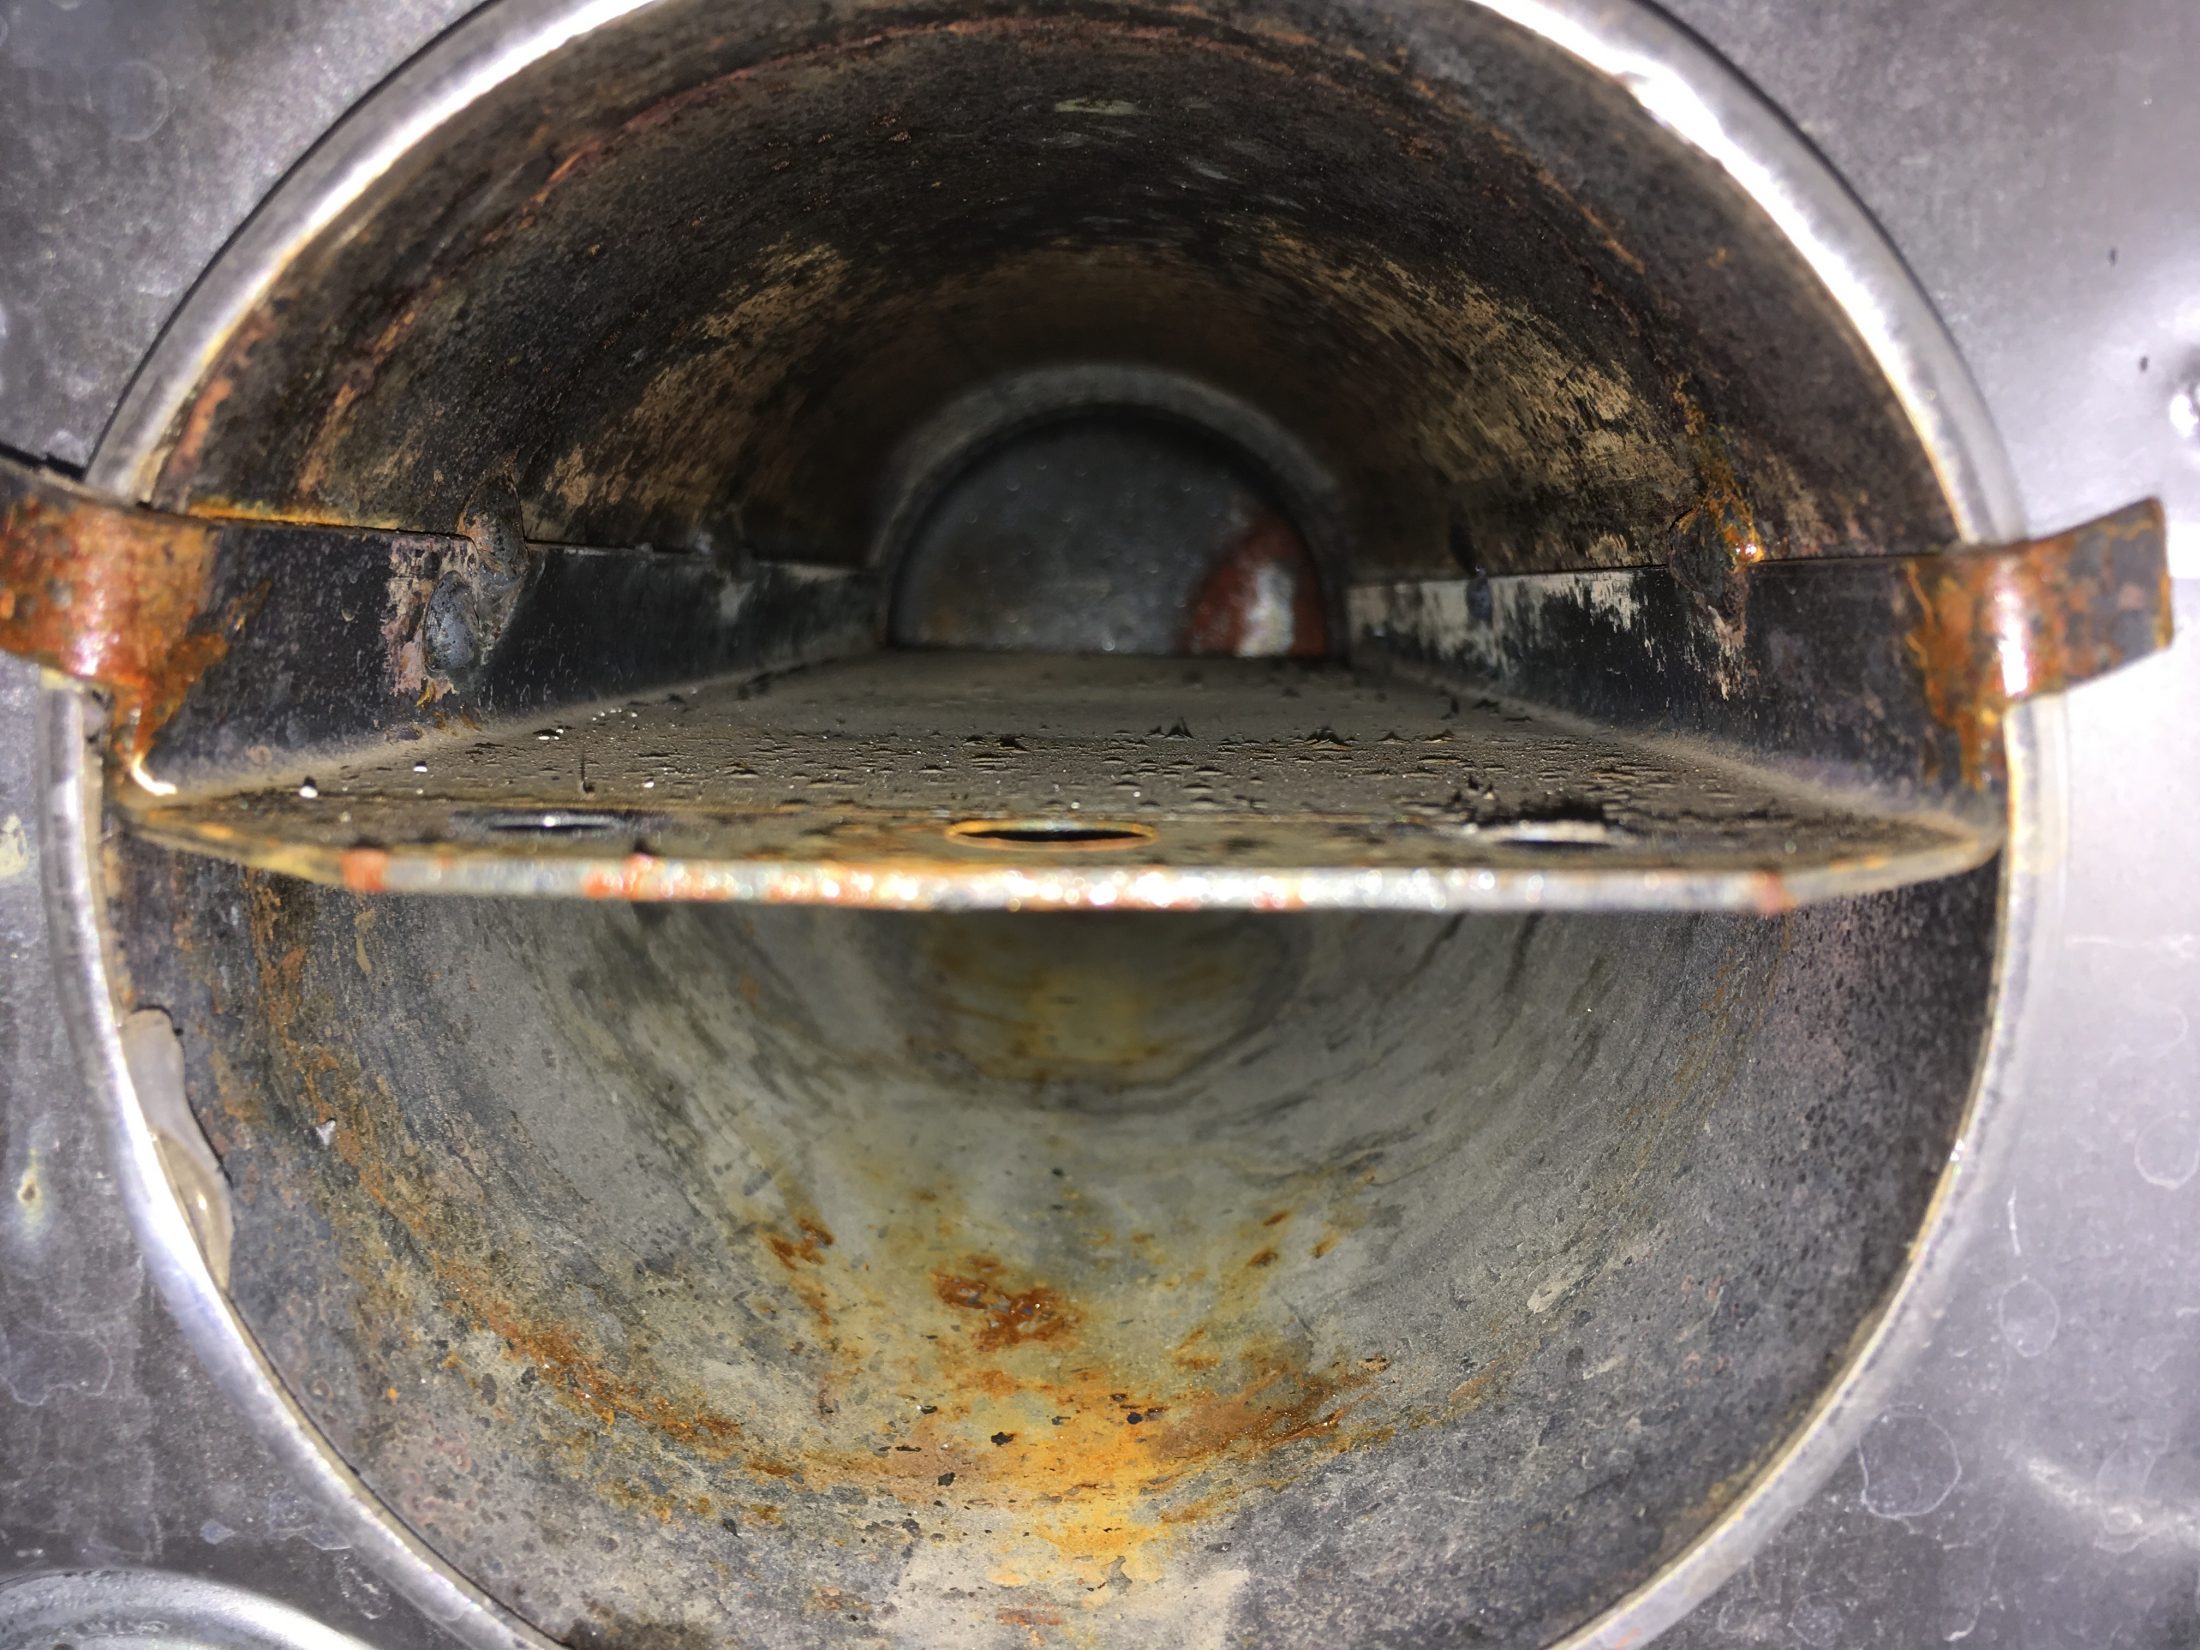
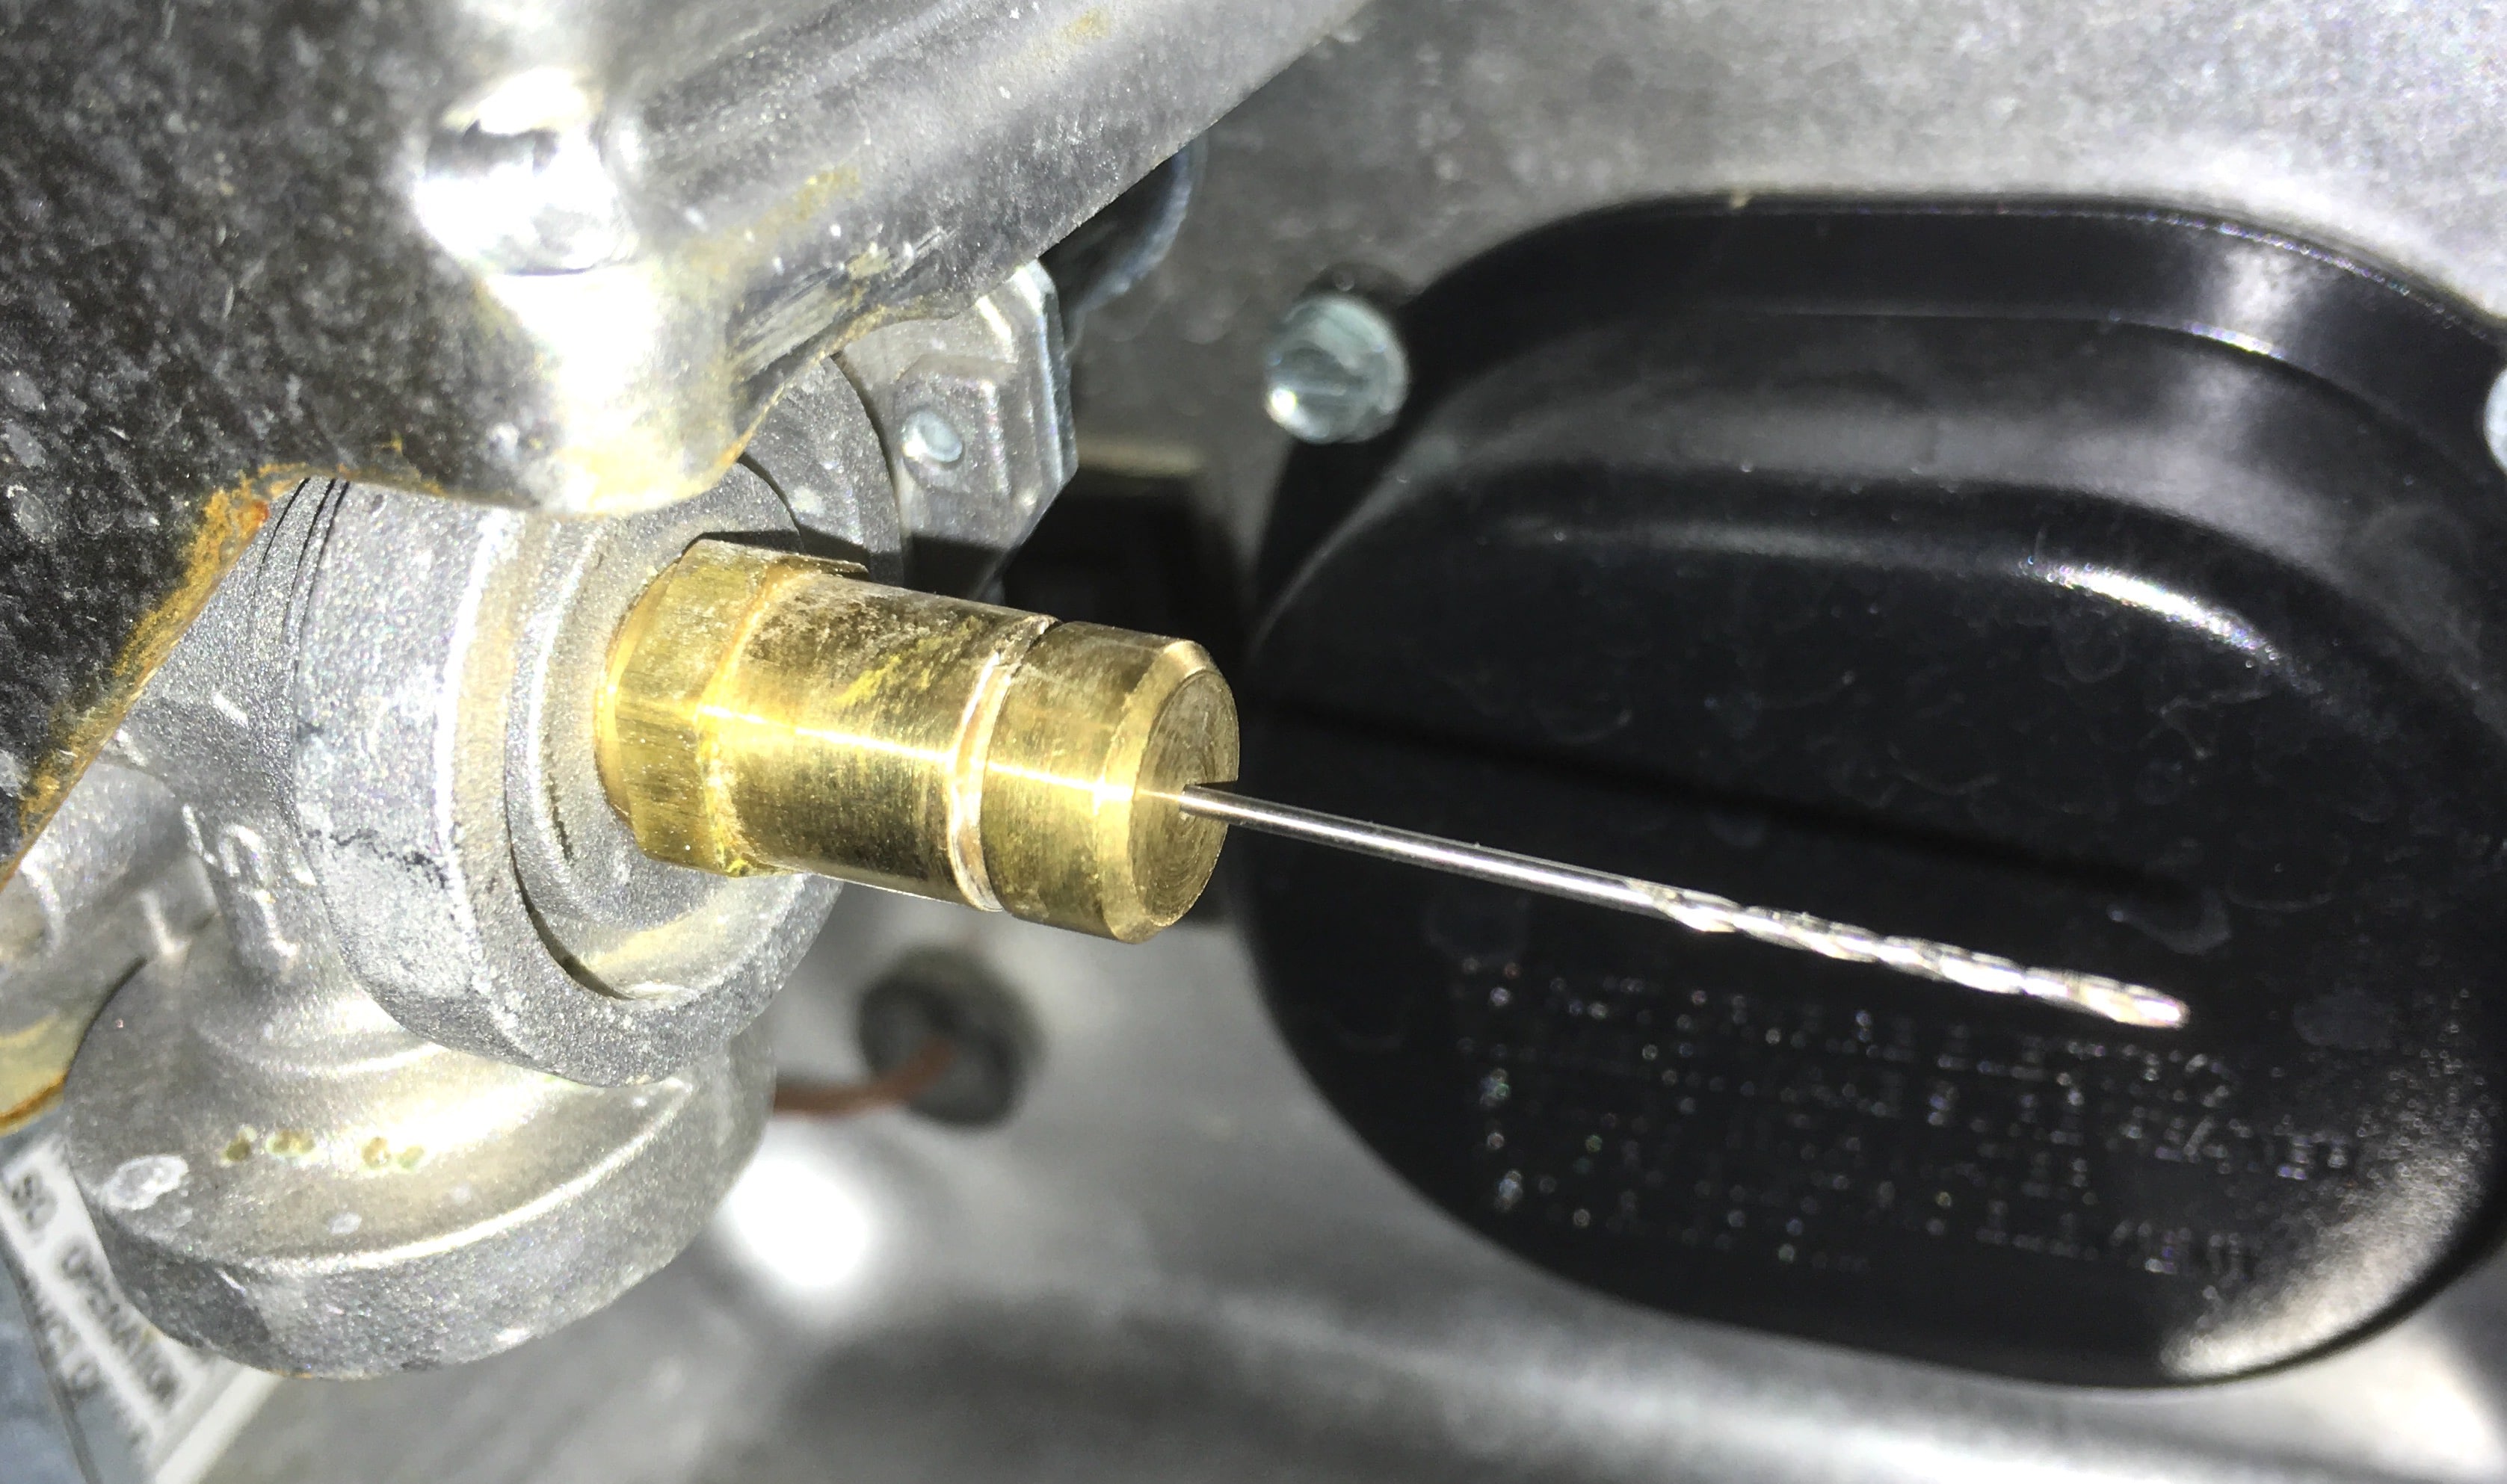
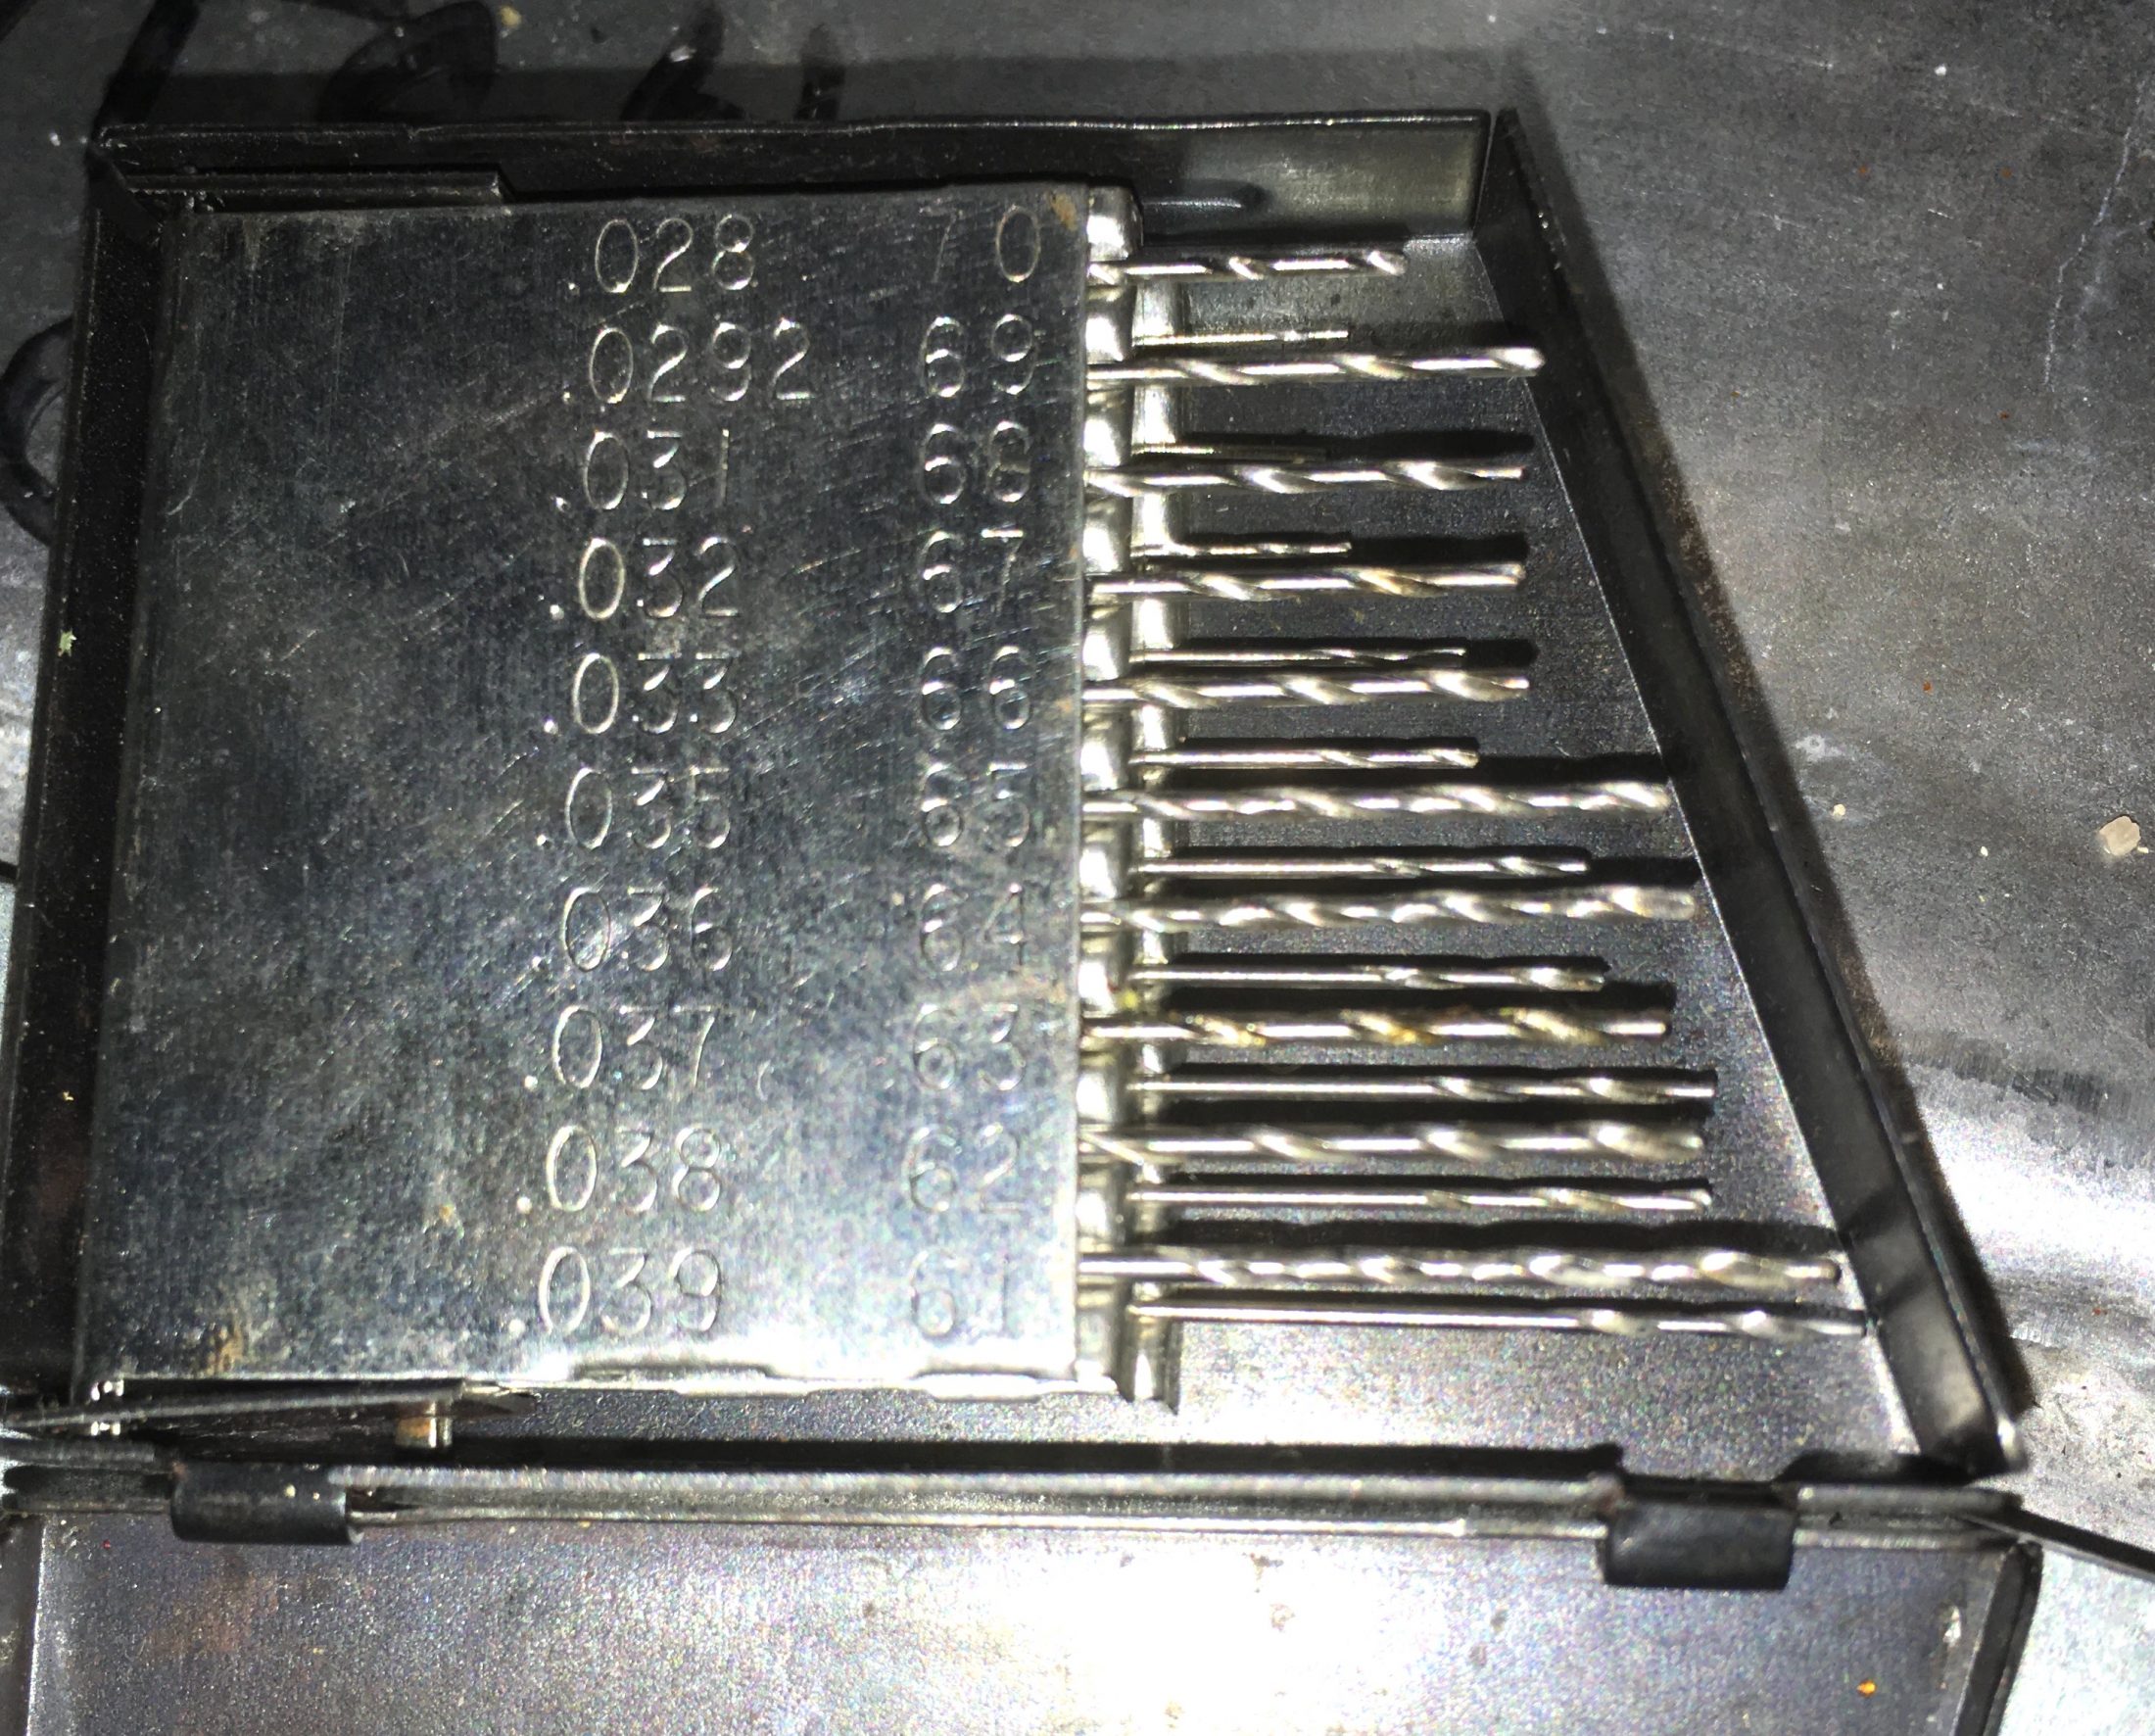
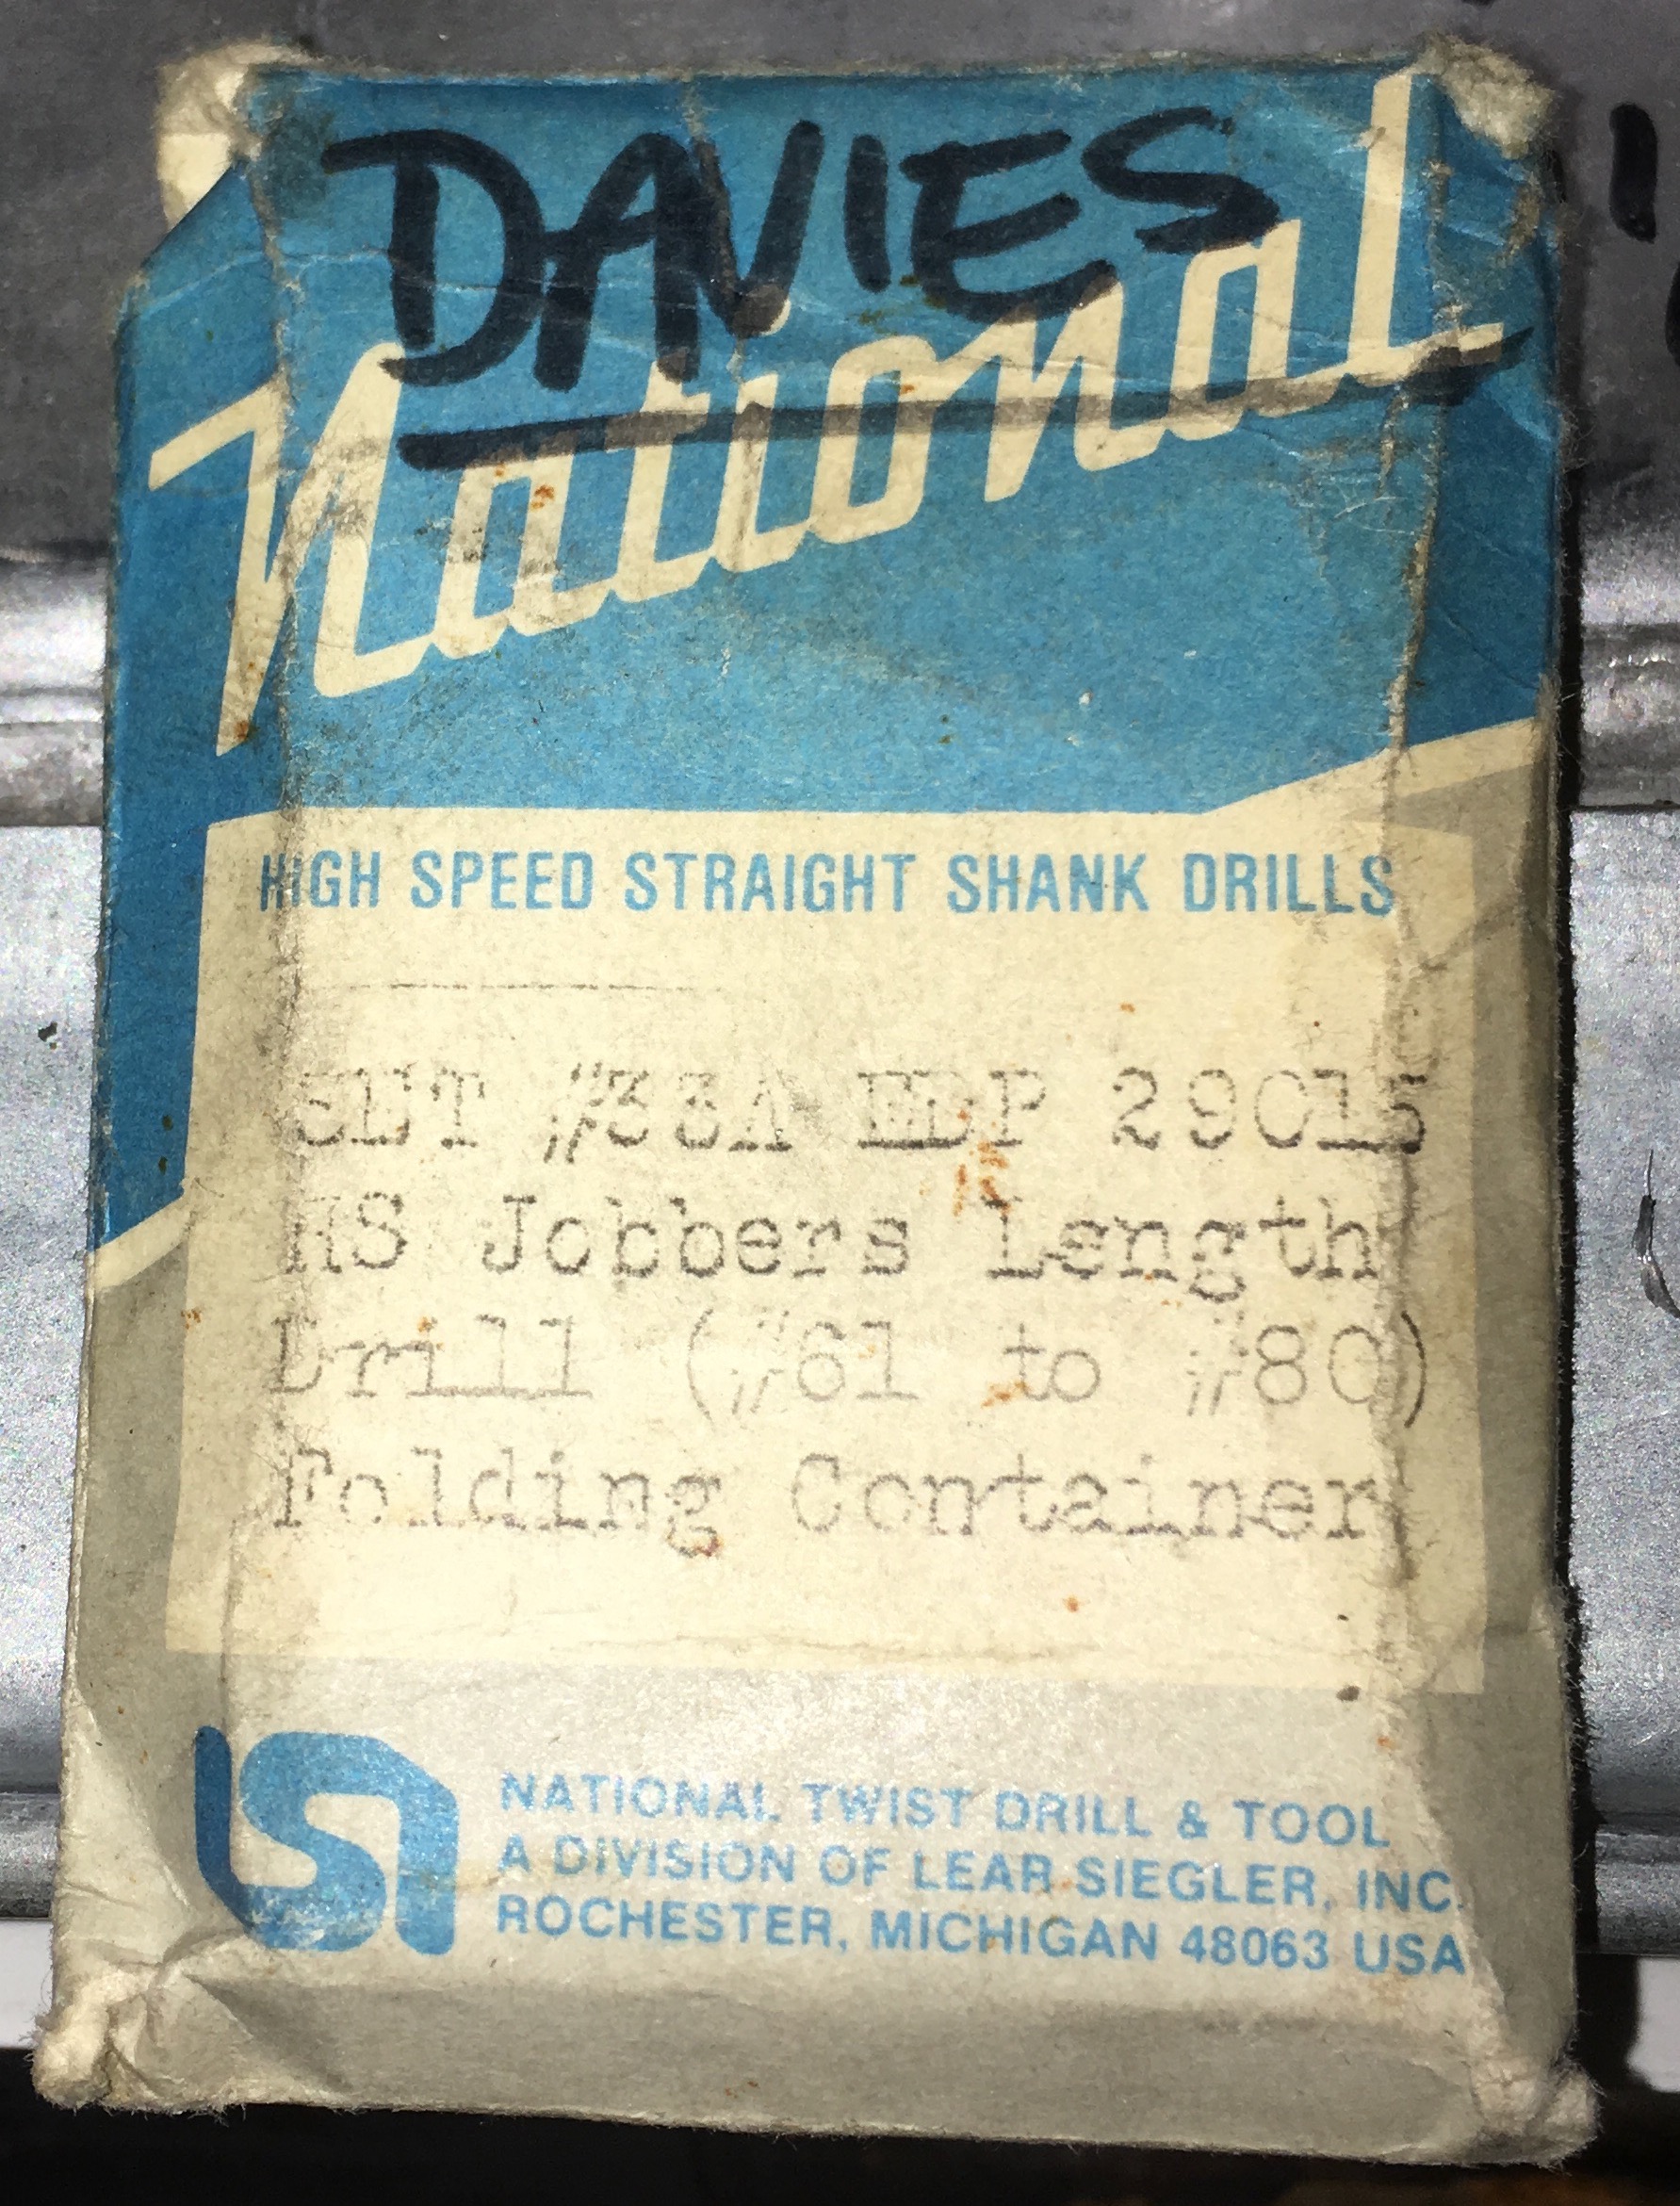
Here is the bracket with the attached parts. Here is the gas jet. And the thermocouple and ignitor, on the left. The rust is typical and nothing to worry about. Make sure everything looks in good shape and the boot on the ignitor wire is not coming apart. Make sure that there is not an insect nest inside the tube, which would restrict air flow. A look into the burner can. The horizontal divider forms a path for the burning gas, it shoots into the lower section and then turns and comes back on top. Pretty crude actually.... and not very efficient. Make sure there are no signs of leakage or birds nests. Now for the jet. Propane and natural gas are both a little dirty. They contain impurities that will actually build up in the small jet opening and restrict it. Any appliance like a home furnace, fireplace or water heater that has a pilot can develop problems due to reduced flow through a restricted jet. The service manuals tell you to look for a "hard blue flame". A weak pilot will show as a flickering, unsteady yellow flame, and it may not stay lit. (I once had a home furnace that would blow out the pilot on windy days. Cleaning the jet cured that.) Since this water heater has an electronic ignition, you don't need to worry about a pilot light. But you do need to make sure the jet is clear. FYI: [attachment file=Troubleshoot pilot flame.png] The manuals tell you to NOT do what I did. Don't stick stuff into the hole and wiggle it around, since you might alter the size or create a burr. However, I have done this for just about forever and never had a problem. I use a set of tiny "jet drills" which in olden days were used by tuners to change jetting in carburetors. Carefully insert the shank of a smaller drill bit, NOT the sharp end, straight into the opening. Increase the size until you can no longer get it to enter. I found that there was some restriction and it went away as I got up to a number 61 bit. When you push in the bits, the crud breaks away and falls back into the hollow cavity inside the jet. Here are the bits, with the sizes listed, both in the drill size and the decimal equivalent. Drill bit numbers are wacky, the smaller the number, the larger the diameter. My jet seemed to be a number 61, or 0.039" inside diameter. Here is the package of bits. These are 35 years old and I don't know what the cost would be today. If you use this method you don't need to remove the jet. I did, just for a look, using a 7/16" box end wrench. And I found that the jet was stamped with its size, "61". How cool is that? More... John Davies Spokane WA
1 point
-
In the original design stage of the Oliver Elite II, the plan was to employ molded-in ductwork. Unfortunately, the RVIA nixed that idea. Personally, I thought it was a great idea.1 point


undersideofstove12vdccomingin..jpeg.79ea61d199dd8b4e33a78f44d289b461.jpeg)
afterheatshieldremoved.jpeg.f146698fa58116135949f641b71669a2.jpeg)


-
Recent Achievements
-


")


