Leaderboard


Popular Content
Showing content with the highest reputation on 07/08/2022 in Posts
-
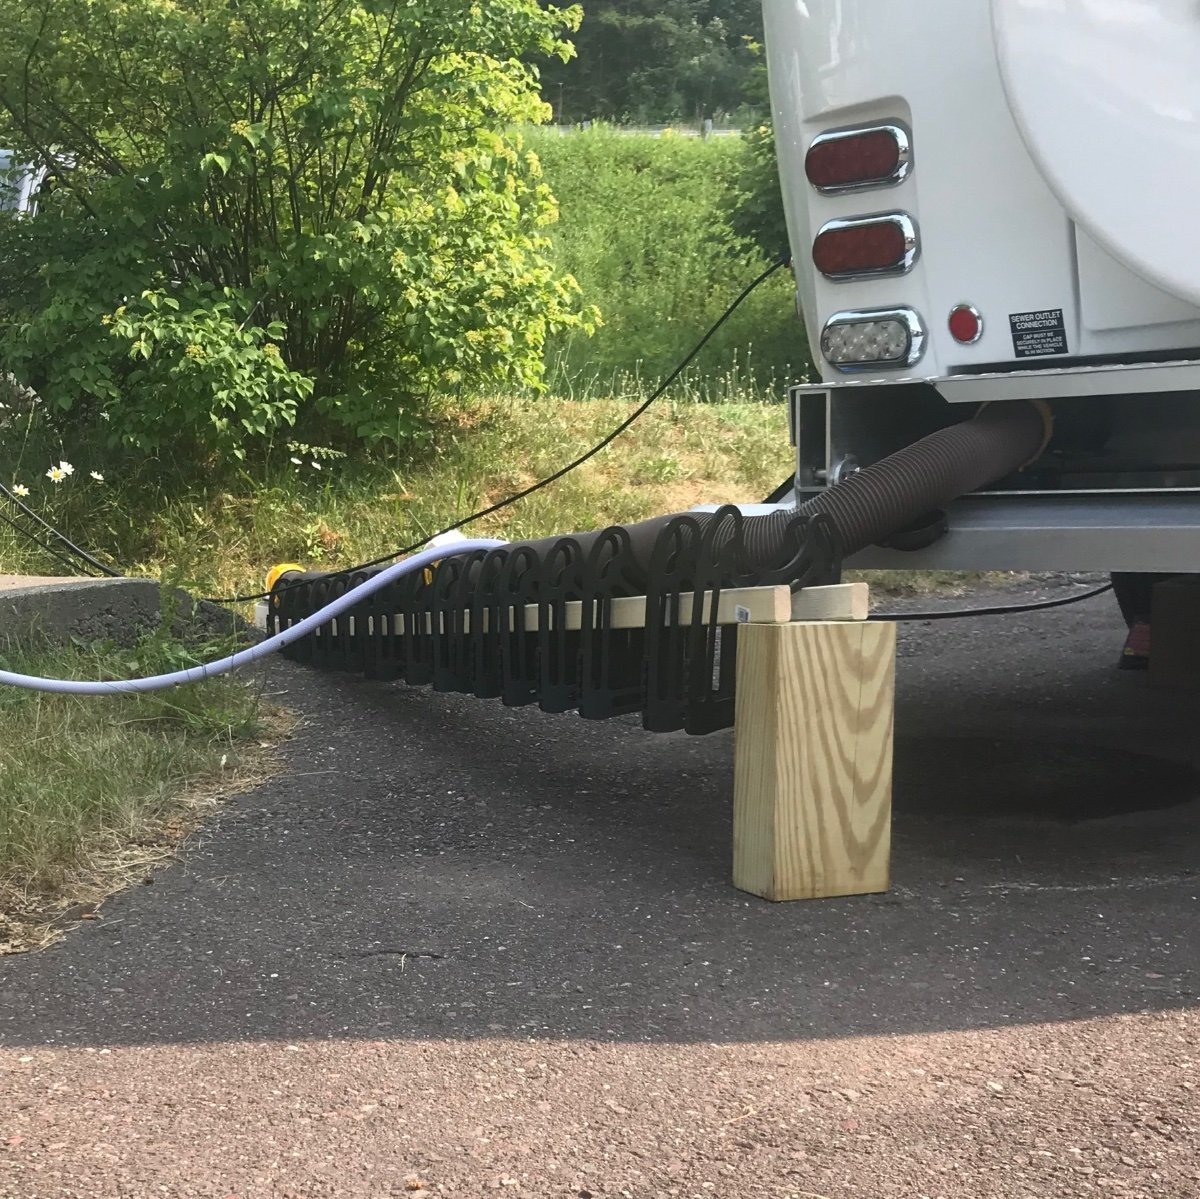
Campsite sewer connections are placed for RVs with mid vehicle dump valves. Olivers have the dump valves in the bumper. I used this setup at a campground on the Keweenaw Peninsula so that I could dump up hill And at another campsite where the sewer connection was too high to allow proper flow
 9 points
 -
We run the rear tires of the truck up on leveling blocks when we pull into a dump station (to raise the front of the trailer) then put the tongue jack down for another inch.9 points
-
Dave and Kimberly, Are you disconnecting the sewer dump hose after every dump? If you are, my suggestion would be to leave the one length of the hose connected with the cap on the end of the hose. This will keep you from having to bend down and reaching in. When you remove the cap on the end of the hose, to dump, make sure you are holding the end of the hose above the outlet. This will insure there is no leakage from the hose. For best results dumping, I always raise the front of the trailer. The grey tank is very shallow and will not drain well otherwise. I hope this helps. AndrewK8 points
-
Yep, there’s no need to disconnect the black hose from the connection in the bumper. I have a 15’ always connected and another 10’ section behind it in the bumper space. If you’re getting some “liquid” in the hose after dumping you might try manually pushing the valve closed under the dinette seat. Sometimes a bit of debris or paper can get caught preventing the total closure of the valve. Another advantage of keeping a hose connected all the time is that if you can feel a certain heaviness when you pull the hose out just hold the end up while you connect the right angle end piece then quickly insert it into the sewer. Mike7 points
-
We always left the hose attached in the bumper, but after getting a full hose surprise a few times, we made sure to check the valve under the dinette seat and give it a firm push down to make sure it was set. After adding that to our dump routine, no more surprises.6 points
-
I feel your pain. Trying to get your hand in that small bumper space to attach and detach the sewer hose from the trailer outlet pipe is a real pita. So, like AndrewK, I never detach the hose. Makes life easier and far less fussing around. Never had any issue doing this. Just be sure to cap the end of your sewer hose, which you can only do after you have collapsed most of it into the bumper area. If you cap first, you won't be able to fit the hose in there as you'll be compressing trapped air in the hose with the cap locked in place. I also use one of these, and wouldn't be without it: https://www.amazon.com/Camco-Sidewinder-Support-Lightweight-Plastic/dp/B000BUU5WW/ref=sr_1_2?crid=205BE4AEGCSY8&keywords=rv%2Bsewer%2Bhose%2Bramp&qid=1657242718&sprefix=rv%2Bsewer%2Bhose%2Bramp%2Caps%2C137&sr=8-2&th=1 Very simple and really helps get a continuous slope down to the sewer inlet. Take a little time to set up your hose and all will drain well. Tanks drain best when they are near full. If you have time, drain the black tank, refill to 50% with the black tank flush inlet, then drain again. Then drain your gray tank. And like others have said, tip up your trailer for a better drain! It does get easier! Dave6 points
-
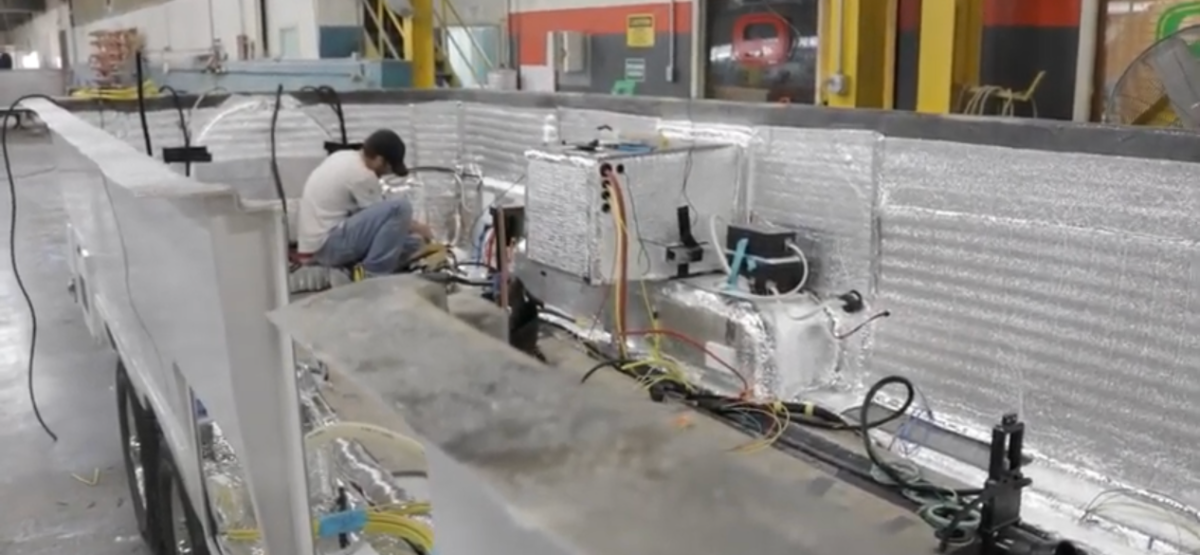
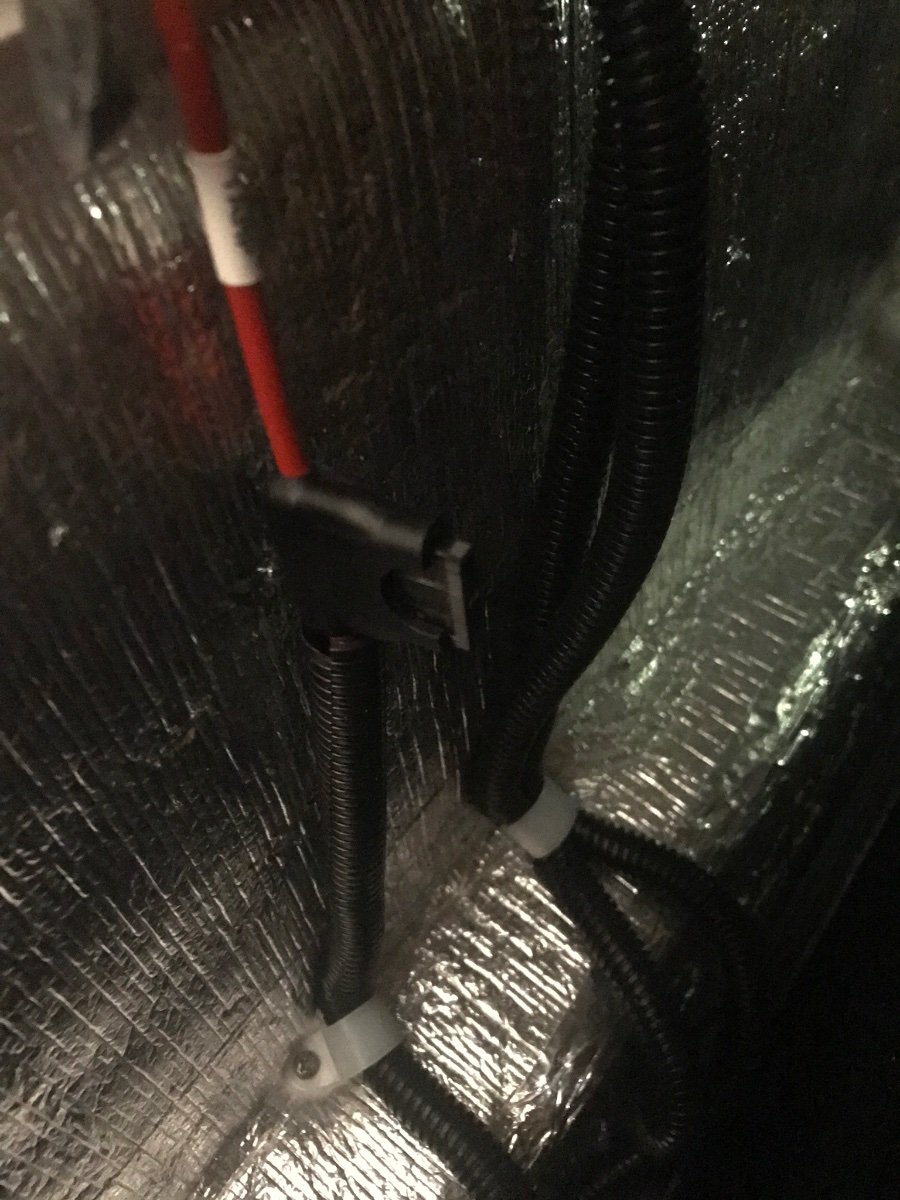
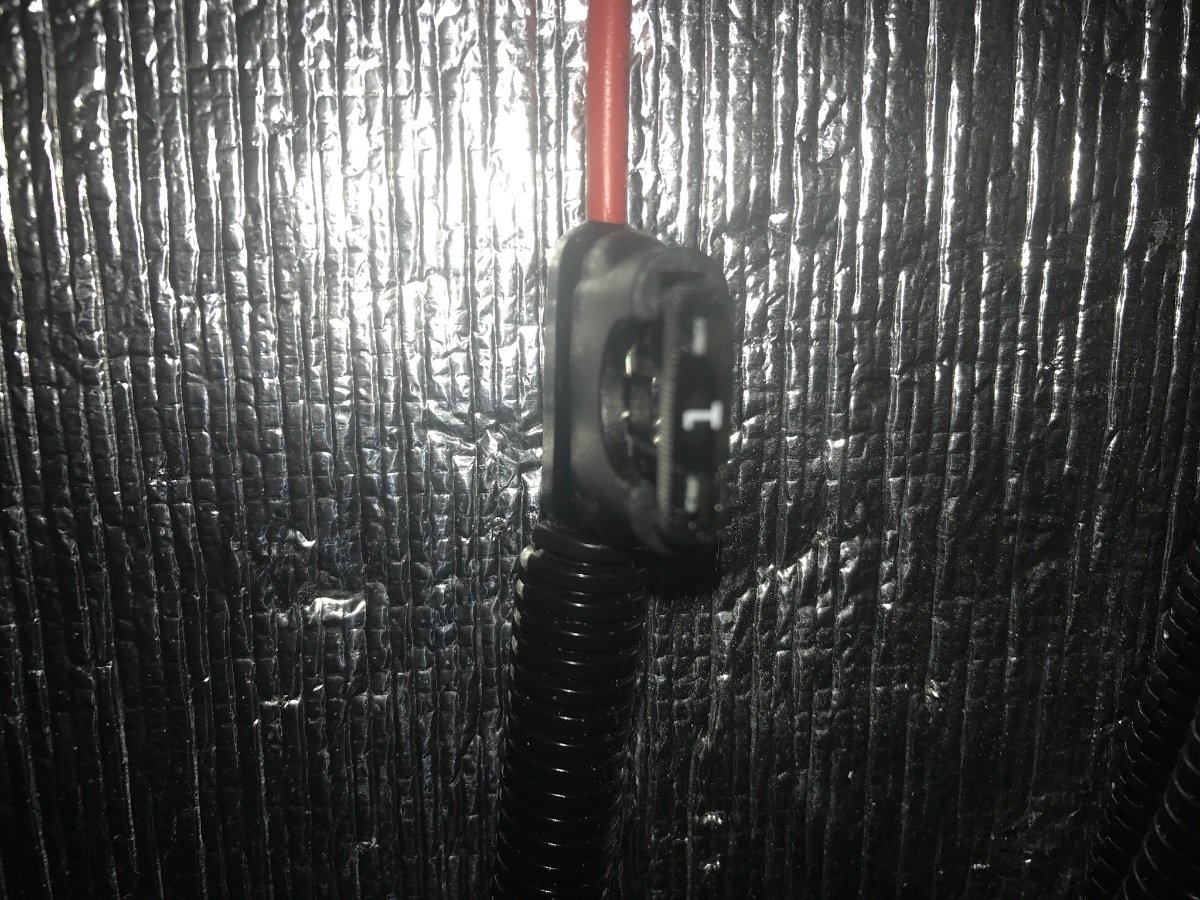
This is a screen shot from a tour video showing how the battery box is internally mounted. Once the trailer is assembled there is no way to reach the area where the battery box is joined to the sidewall of the outer hull. After final assembly the box is buried deep under the pantry area of the trailer. According to Oliver Service, after insertion, the box is supported by the outer hull by, by the wheel well and by a support arm that is bolted to the box on the top and the frame of the trailer on the bottom. The only way to get backer washers, or backing plates onto the rivets (or bolts if desired) is during the manufacturing assembly process. An owner cannot reach back into that space from the inside of the trailer. For those of us experiencing sheared pop rivets, I'm not sure there's a much better solution than maybe stronger stainless rivets and perhaps some 3M 4200 Sealant/Adhesive to help hold the box in place. I'll keep track of the repair and review it with Oliver the next time I get to Hohenwald and report back any updates. Craig - Hull 505
5 points
-
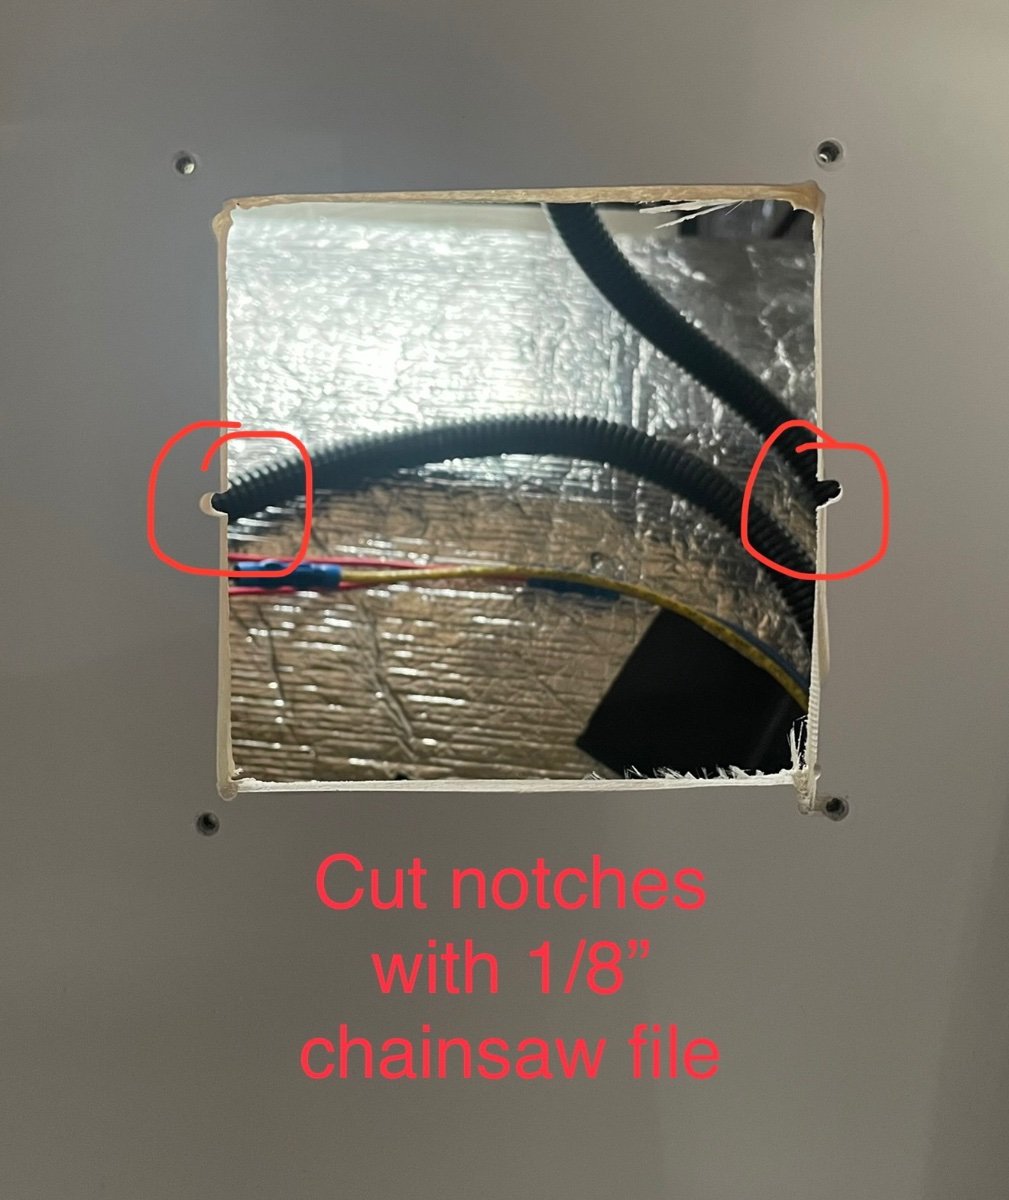
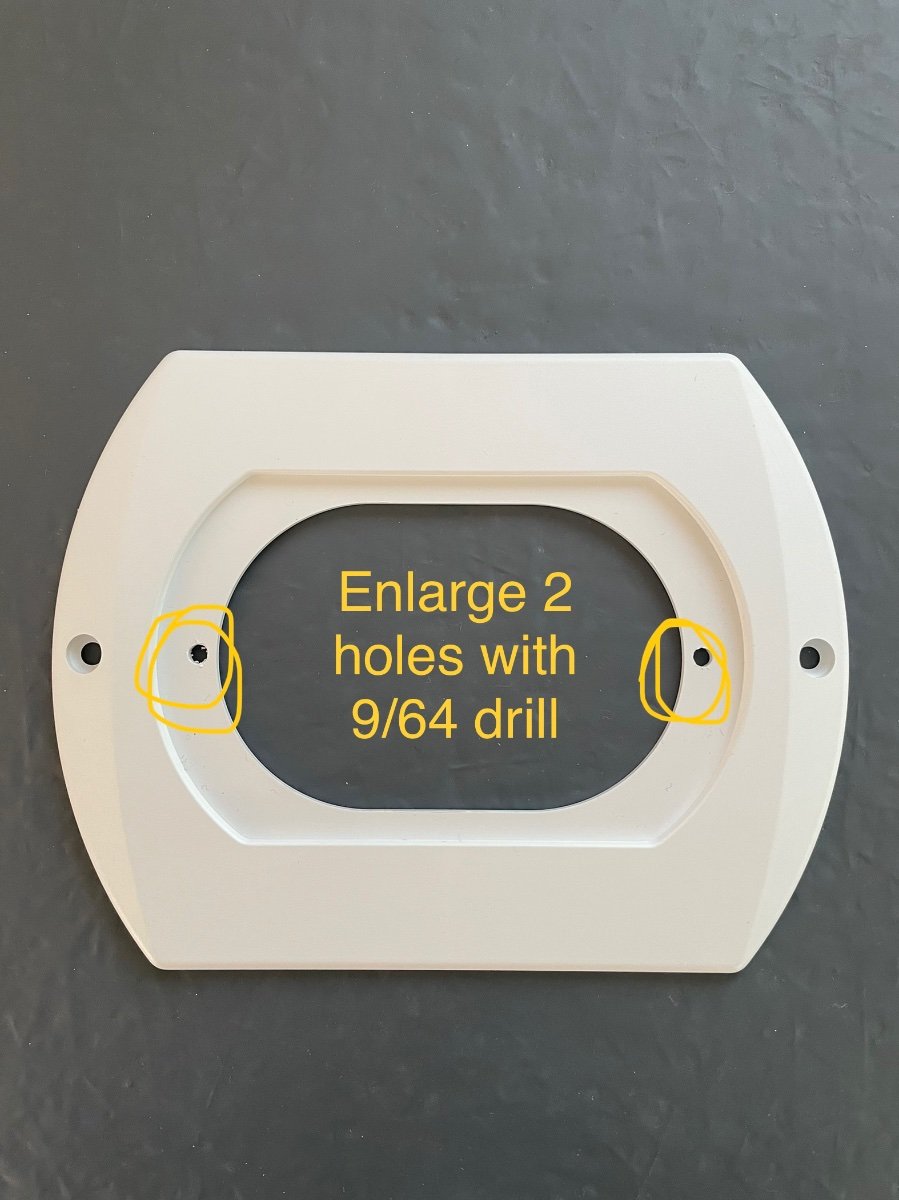
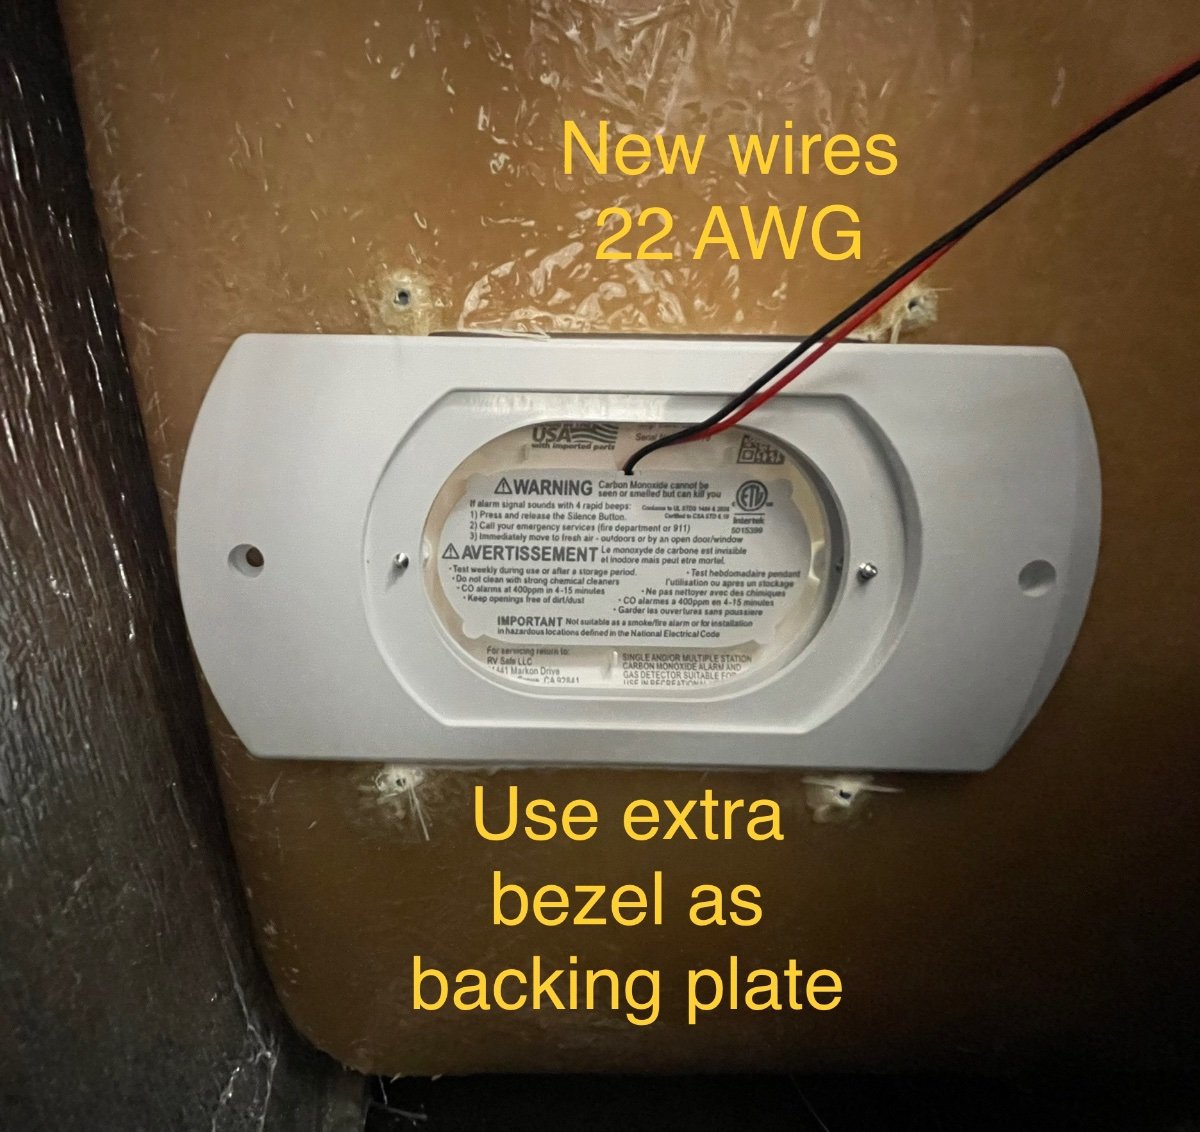
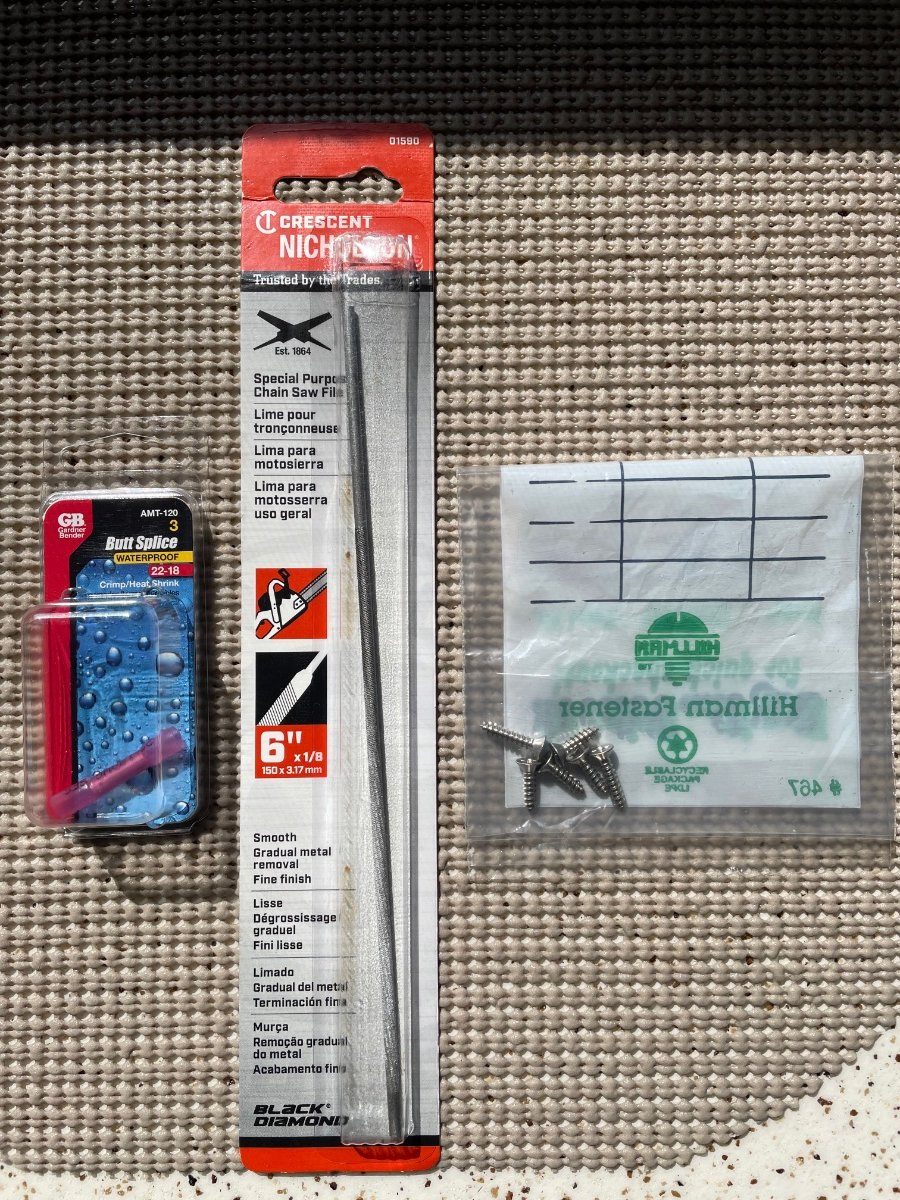
I didn’t want to drill any holes so I used an 1/8 inch chainsaw file to make a small notch on each side of the existing hole I enlarged the existing holes on the large bezel provided in the box and used the small bezel provided as a backing plate for 2 (#6 I think) flat head SS screws inserted into the 2 enlarged holes and through the notches and used 22-18 ga butt splices to attach the wires since the old monitor had 18 ga wires and the new one has 22 ga wires stuff you’ll need -(2) 18-22 ga butt splices -(1) 1/8 inch chainsaw file -(2) #6 x 5/8 inch SS flathead screws
5 points
-
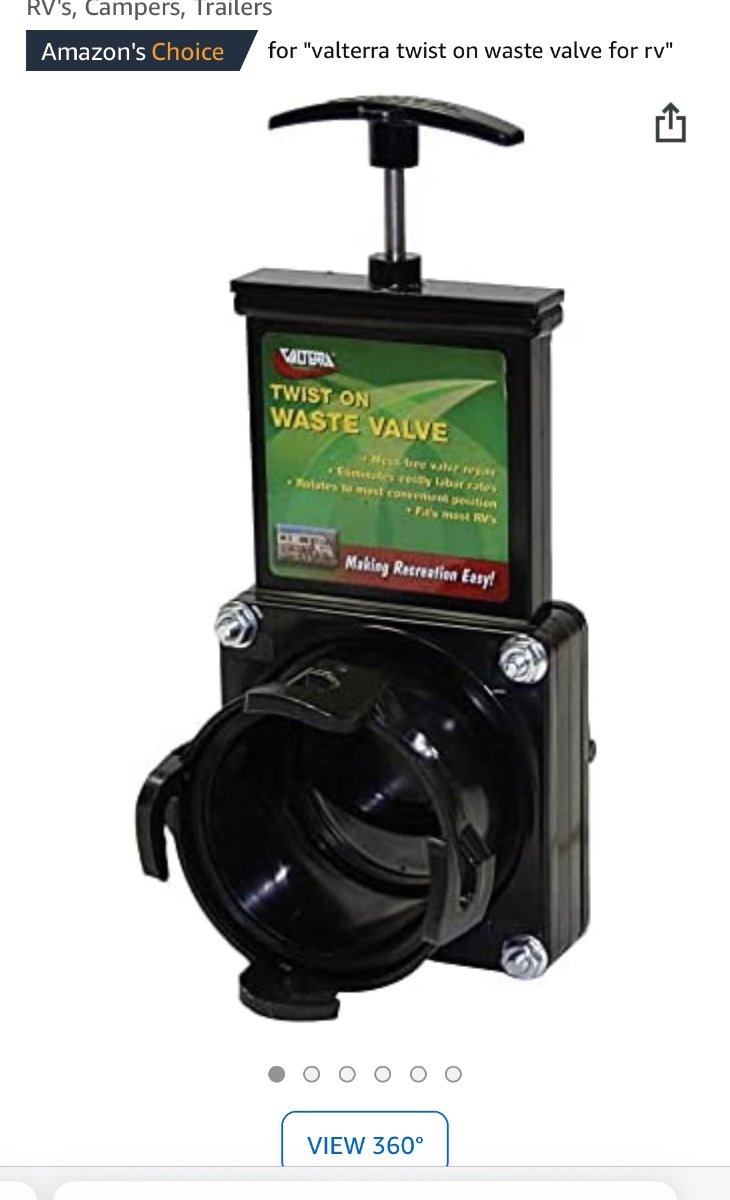
Valterra has a twist on waste valve that you can attach to the end of the pipe in the bumper to provide a “last line of defense”. I carry one in case I have a valve failure upstream, but you could use it all the time. https://www.amazon.com/Valterra-T58-Twist-On-Waste-Valve/dp/B000BGHYJS/ref=asc_df_B000BGHYJS/?tag=hyprod-20&linkCode=df0&hvadid=312128189269&hvpos=&hvnetw=g&hvrand=18049546831347238612&hvpone=&hvptwo=&hvqmt=&hvdev=m&hvdvcmdl=&hvlocint=&hvlocphy=9013575&hvtargid=pla-448831038926&psc=1
4 points
-
We keep a 3' section of hose connected to Ollie's black/grey water drain at all times. Also have room for a 5' and 10' sections of hose in the bumper. Always look at the dump station grade when arriving to see which direction will give Ollie a higher nose up attitude while dumping. We use Camco leveling system to level Ollie while camping, also use these two leveling wedges to lift the rear wheels of the TV and lift Ollie's nose in situations when the dump station is lower on both sides of the dump drain pipe in the ground causing Ollie to be nose down in both directions to get better draining of the tanks. One campground has a dump station with much lower ground on both sides of the dump station drain pipe, making it difficult to completely drain the tanks, even using wedges under the TV rear axles. In this case we use a Camco 15 gallon dump tote and don't take Ollie to the dump station except for fresh (potable) water. This campground has the only dump station before getting back home, so I want to empty the tanks completely before leaving that campground.4 points
-
And yet another reason to upgrade - We are camped today at the Medora campground, parked next to a very nice Airstream with two Dometic Penguin air conditioners. We had hoped to sit outside to eat, but the external noise from the Dometics made that undesirable, so we ate inside instead. You can barely hear our Houghton outside over ambient noise. Being a good neighbor is another positive!4 points
-
We purchased ours in March of 2020. Ours went bad last month. I contacted Oliver and was directed to file a warranty claim with Dometic. I got the new one in this week and will install tomorrow.4 points
-
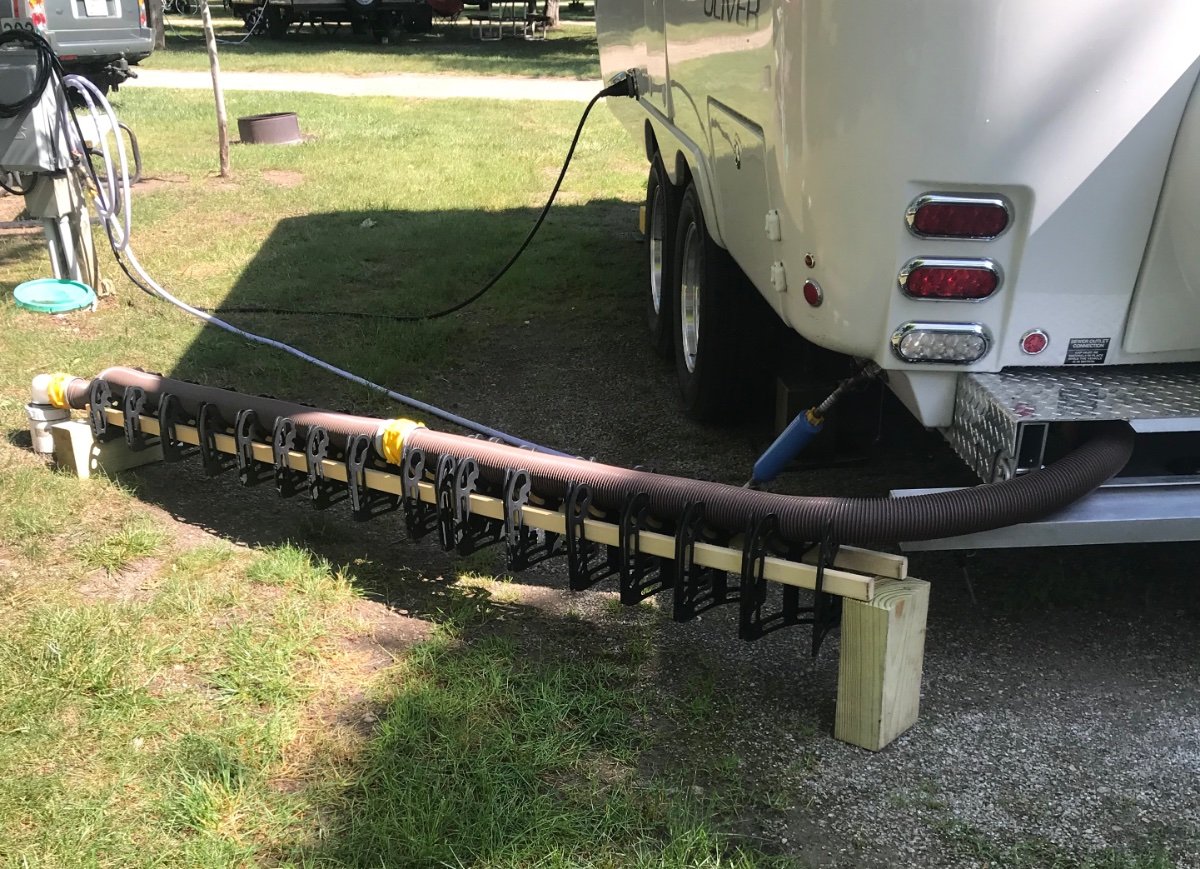
@Townesw, Kudos on the creative solution to supporting the Sidewinder where sloping terrain near the sewer connection is encountered. I don't know where you store the long pieces of wood, but I don't have any easy storage location for what appear to be 8 foot lengths. This caused me to think of alternative supports. I recently posted about constructing an external towel bar, using ¾" PVC tubing. Since I am already carrying three pieces of ¾"x 45" PVC tubing, I can add a fourth piece and 2- ¾" couplings and I should be able to achieve an equivalent support mechanism for our Sidewinder. Thanks for the idea! )3 points
-
As always... some great ideas from the group! When I see confirmation from so many others it is affirming what all of you have said. I will keep a section connected to the Oliver and capped on the other end to eliminate the reaching in under the bumper. It will be especially nice to have "fair warning" from any weight found in the sewer hose before I uncap it. Adding a check under the dinette seat to confirm the valve is seated all the way is a good idea too. In a pinch... and assuming there isn't people waiting, I'll try to put the front jack down enough to raise the trailer up a few inches. Not unhooking, but just taking the weight off the truck should be enough to get some extra fall from front to back. Thanks again! I hope this newbee question was helpful to some one else too!3 points
-
I just replaced the one in our new older trailer with a alternate brand. The one used in the 2017 Oliver was hard to find (Atwood) and about 40% higher in price. The installation was easy enough as one of the two supplied faceplates covered the existing hole and only required a pilot hole for the new screws. Below is the link to the one I installed. No more alarms in the middle of the night! https://www.etrailer.com/RV-Gas-Detectors/RV-Safe/RS34FR.html
3 points
-
Ditto to what AndrewK said. I just leave one 10’ section of sewer hose always connected to the drain connection inside the rear bumper, and then just cap the end of the hose. That way there’s no need to be getting on your knees to cap or uncap the drain fitting inside the bumper every time you empty your tanks. Extra hose sections added as needed (I carry 30 feet of hose total) depending on the sewer connection I’m trying to reach.3 points
-
UPDATE: OTT connected me to Dexter and Dexter was excellent to work with. The problem was the NevrLube spindle washers. A batch of them were not heat treated properly and were brittle, which can lead to total bearing failure and wheel loss. Dexter overnighted new washers to me and I found a mobile tech to come out today (http://certifiedonsiterv.com/ if you need service in central CT). Eric, the tech, was excellent and made quick work of the repair. (Our washers looked fine. No damage done.) Ready for the next trip! 😃2 points
-
There are no questions or problems about your Ollie that can't be brought to this group of fellow owners. No matter how stinky a problem you might have. We are glad to share our experiences, thoughts and ideas. I've circled the drain with minor issues regarding this important system in The Wonder Egg over many years. I've even installed two different macerator systems thinking I'd get real fancy. Well . . . they both failed over the years and I have reverted back to good old gravity. It's always there to help in a pinch. Yeah, our grey tank profile does not provide much motive flow without a bit of elevation on the front of the trailer. If I am at a full hookup site, I will leave the grey valve cracked open just a bit, providing a regular dribble of grey water from the slinky. This eliminates the need to do a full grey dump and I will have minimal soapy water left in the grey going down the road. Since I have the black tank clean out valve, getting a good flush of the black system until the water runs clear is easy. Of course, while boondocking, I keep the grey valve closed to use it for the stinky slinky rinse. Townesw, thanks for the information on the twist on waste valve. That device looks like a great addition to our trailers! Perhaps OTT would consider making it a regular feature.2 points
-
Bill and Martha- the more I look at your sewer hose arrangement around the side-winder... the more I like it 🙂2 points
-
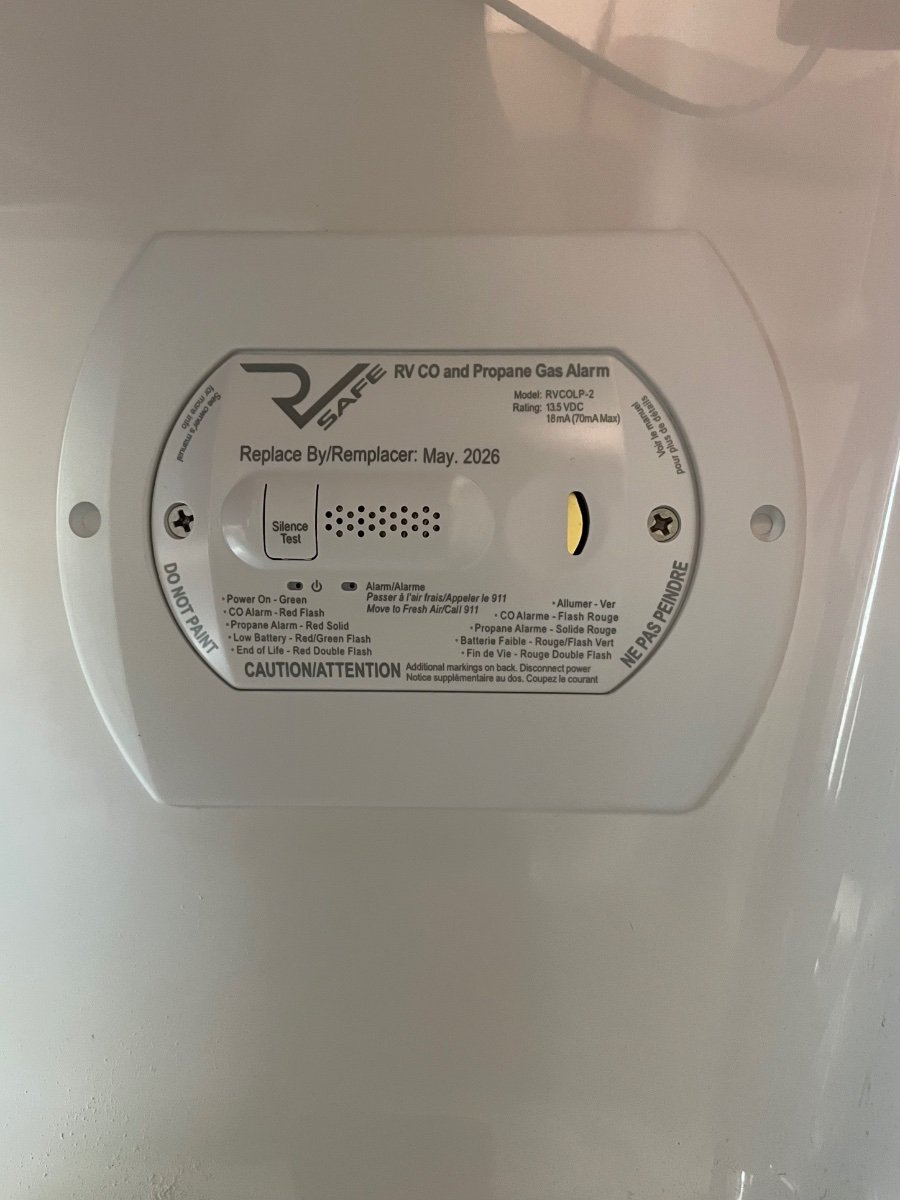
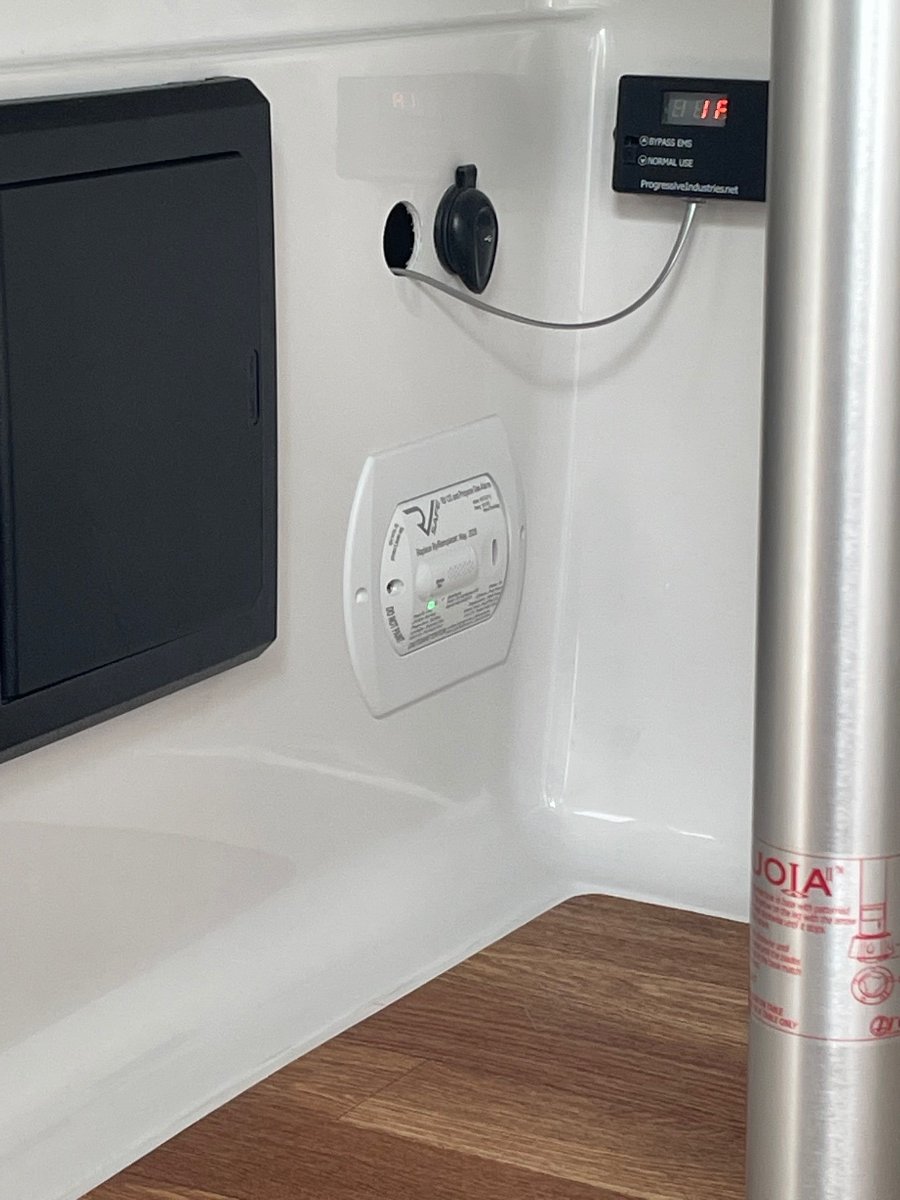
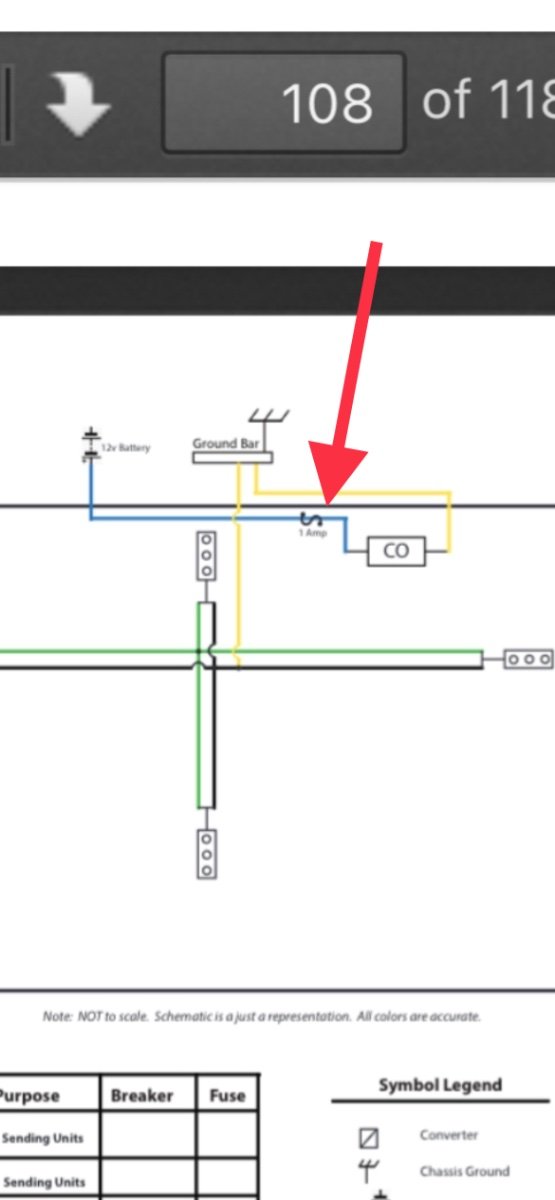
https://olivertraveltrailers.com/forums/topic/6780-how-to-replace-the-propane-co-detector-with-a-gas-only-one-and-a-digital-co-detector/ John Davies Spokane WA2 points
-
As I recall, it screws in from the front. Wires pass through to reconnect where you cut. You can add a fuse there if you want to. Mike2 points
-
2 points
-
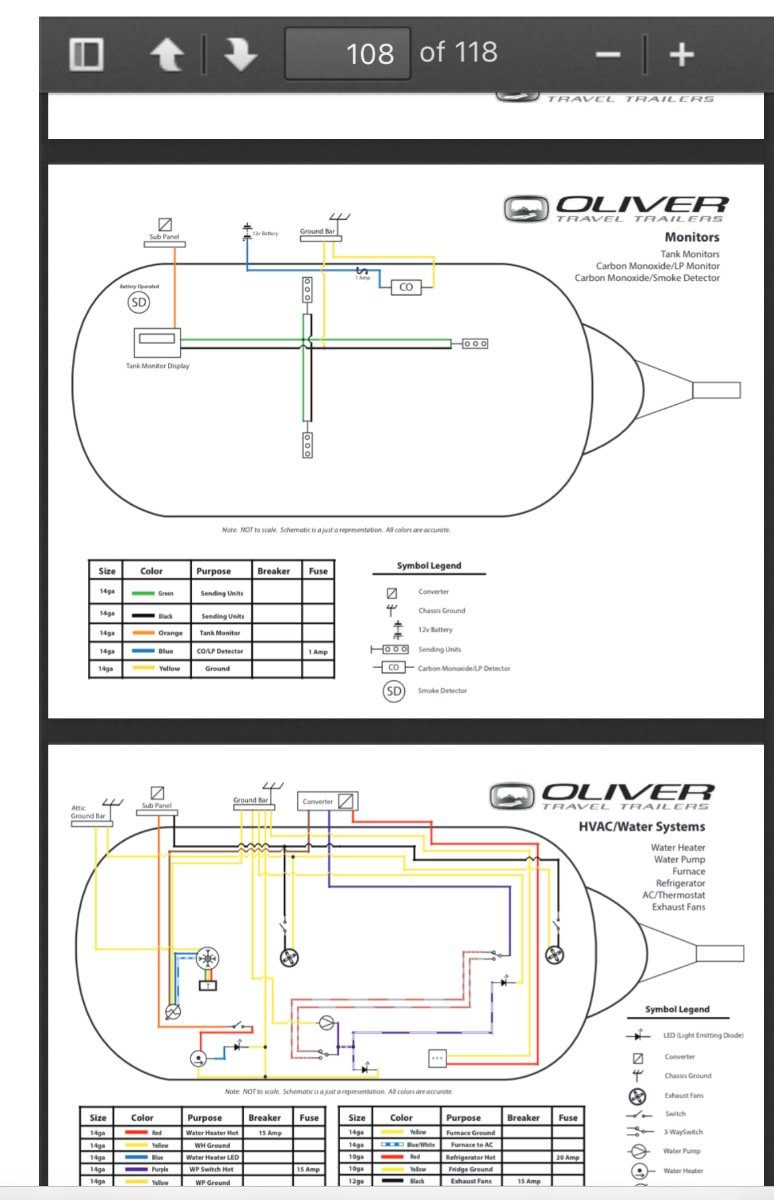
In the owner’s manual for a 2018 Elite, the schematic for the monitors shows a 1 amp fuse for the LPCO detector.
2 points
-
These Rhino Fitting Wrenches (camco.net) work for us.2 points
-
If you’re referring to the LP/ CO detector under the dinette there is a 1 amp fuse located under the street side bunk. At least there is in mine. Pull that fuse and put it where you can find it later.
2 points
-
Now that I've installed a Houghton AC to replace the Dometic, I need to sell the Dometic but I cannot find the Dometic model number. I have looked in the owner's manual and Oliver University but cannot find the actual model number. For anyone that has a 2021 Elite 2 and you know the Dometic AC model number, would you please share it with me either by responding to this thread or PM'ing me. Thanks.1 point
-
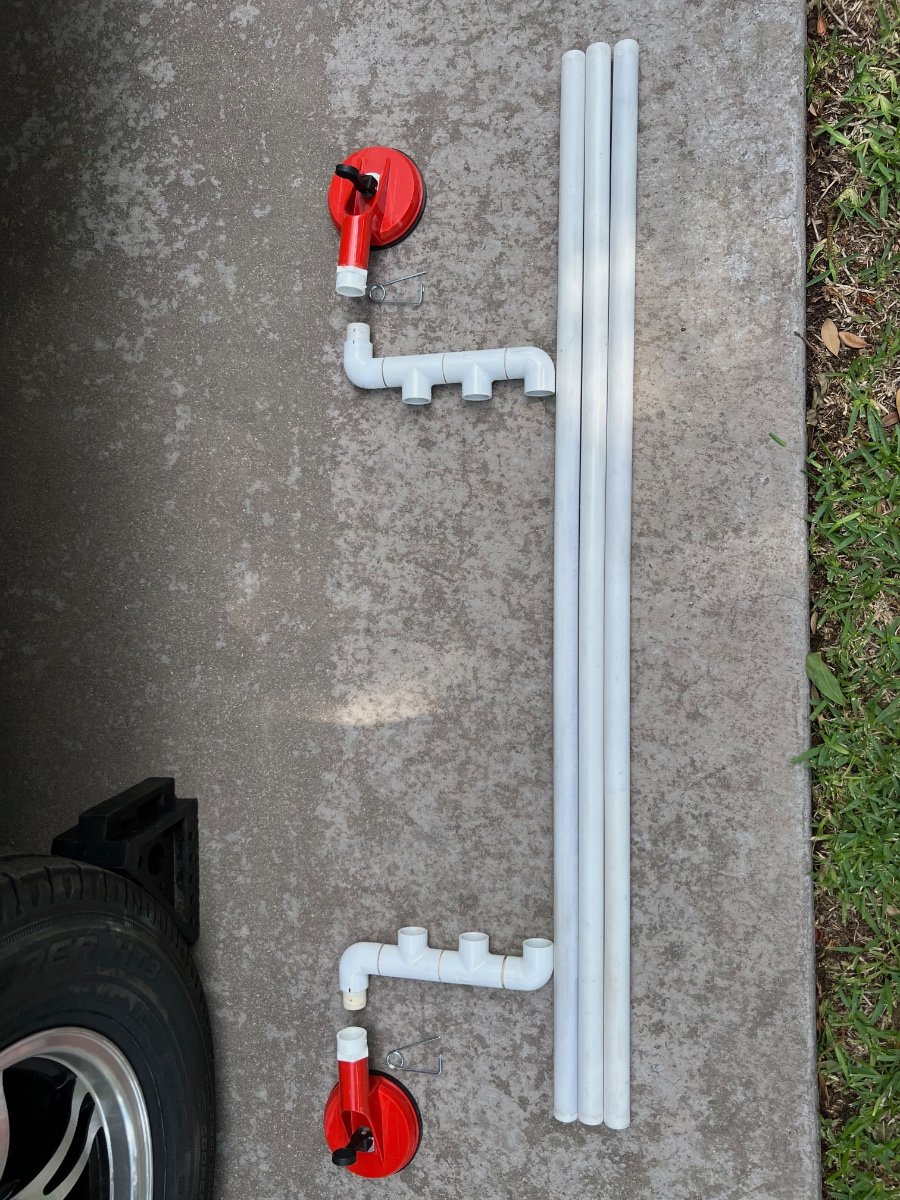
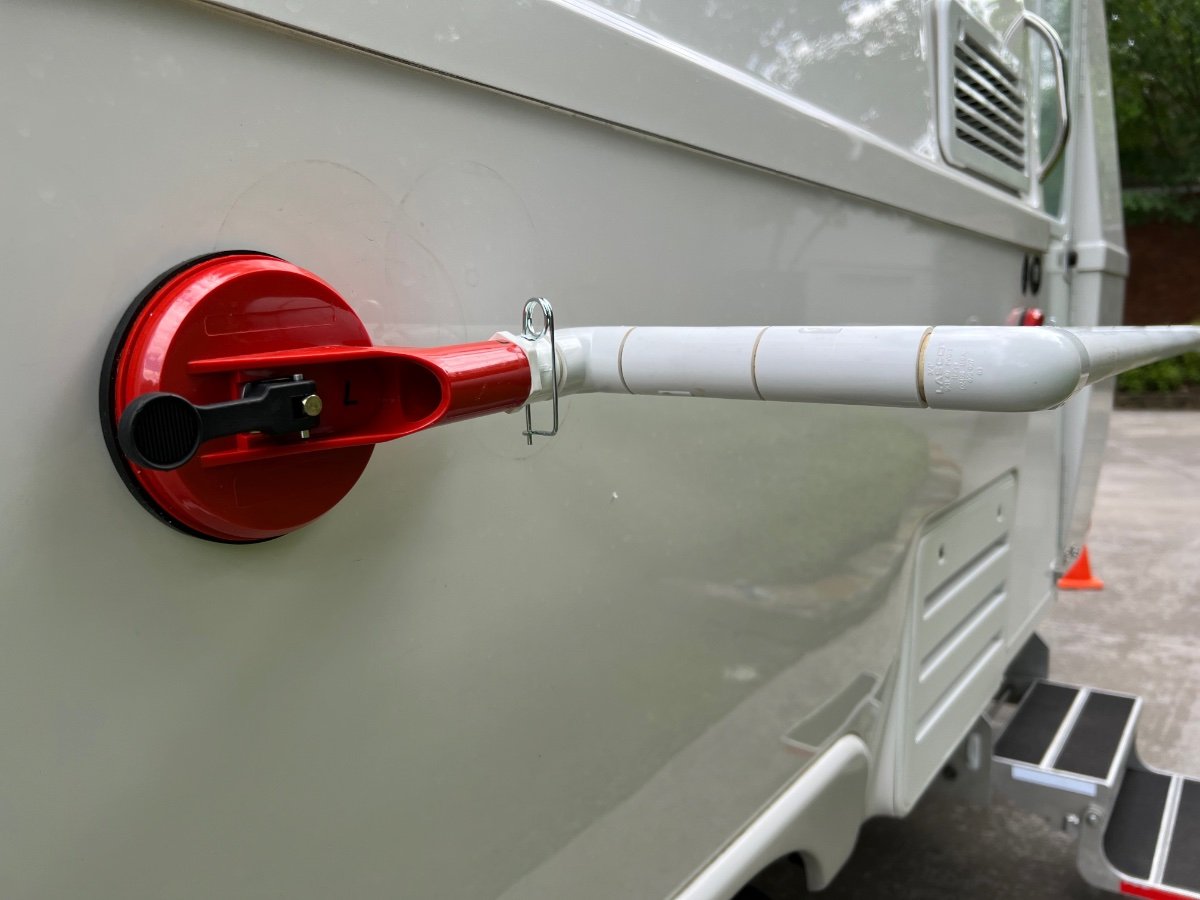
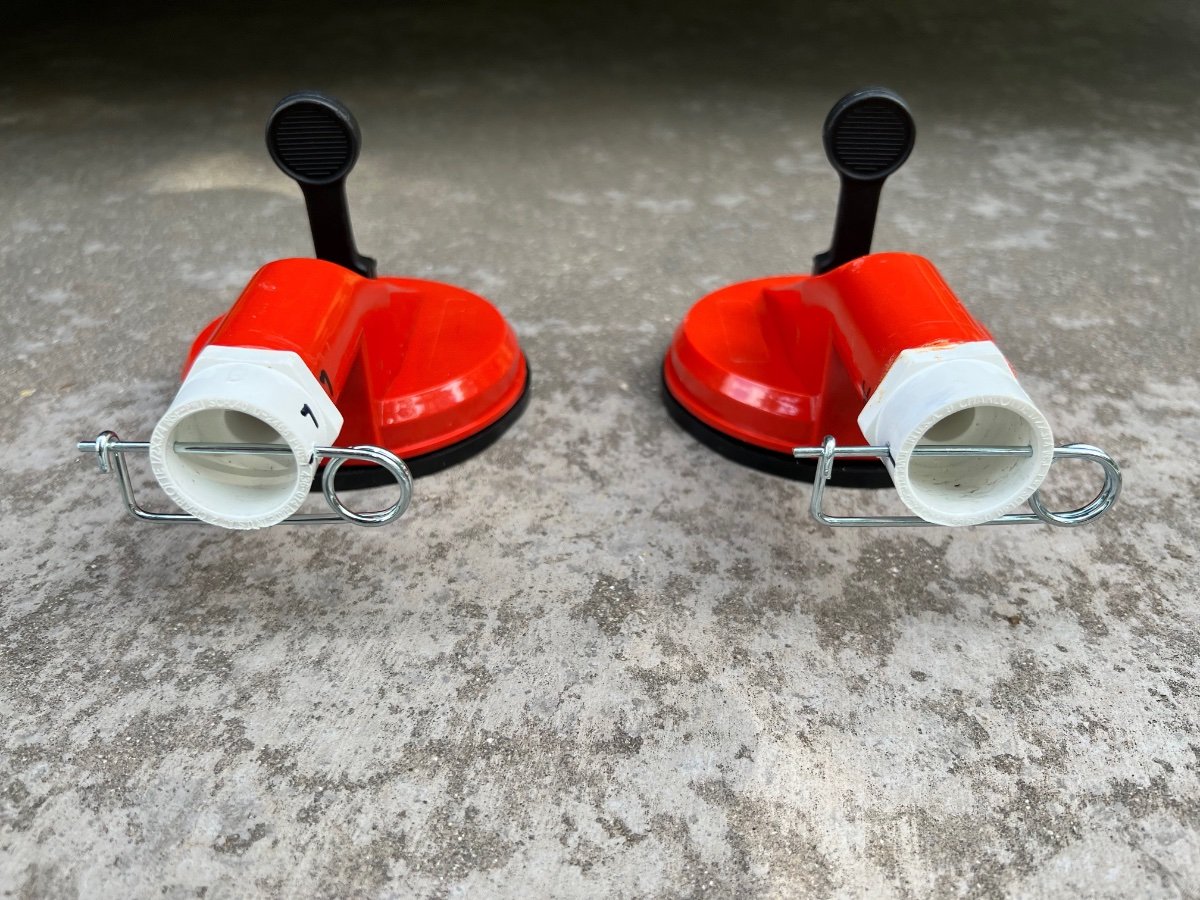
I had seen the posting on 4/22/21 by @Calypso showing an externally mounted towel bar on the side of Hull #520. The towel bar was made from a suction cup lifter and a piece of ¾" PVC tubing. I thought this a great idea and made one for our LEII picked up on 2/17/22. Due to nearly constant downpours in central TN the week we picked up Hull #990, we had immediate need for an external towel bar. We recently returned from a two week trip during which we also encountered several downpours. We used the towel bar nearly every day, often not having enough space to hang damp items. Upon our return I was about to make a second towel bar. I was thinking of adding an improvement to offset the bar/tube further from the hull of our LEII, to avoid having towels in contact with dirt on the hull. After mulling over a design for several days, I had an Aha! moment. I could modify my existing PVC towel bar assembly and add additional tubes for greater capacity, while also moving the tubes further away from the hull. Below are photos and a description of the result. Materials (Quantity, Description, Source, Cost, URL) 1- 4-2/3 In., 125 Lb. Dual Suction Cup Lifter (Harbor Freight, $8.99, https://www.harborfreight.com/4-23-in-125-lb-dual-suction-cup-lifter-57501.html?_br_psugg_q=suction+cup+lifters) 2- 3/4 in. PVC Schedule 40 MPT x S Male Adapter (Home Depot,$0.71/each, https://www.homedepot.com/p/Charlotte-Pipe-3-4-in-PVC-Schedule-40-MPT-x-S-Male-Adapter-PVC021090800HD/203811638 4- 3/4 in. PVC Schedule. 40 90° S x S Elbow Fitting (Home Depot, $0.75/each, https://www.homedepot.com/p/Charlotte-Pipe-3-4-in-PVC-Schedule-40-90-S-x-S-Elbow-Fitting-PVC023000800HD/203812123) 4- 3/4 in. Schedule 40 S x S x S Tee (Home Depot. $0.85, https://www.homedepot.com/p/Charlotte-Pipe-3-4-in-Schedule-40-S-x-S-x-S-Tee-PVC024000800HD/203812197) 2- 3/4 in. x 10 ft. PVC Schedule 40 Plain-End Pipe (Home Depot, $6.98/each, https://www.homedepot.com/p/Charlotte-Pipe-3-4-in-x-10-ft-PVC-Schedule-40-Plain-End-Pipe-PVC-04007-0600/100348472) 1- 0.091 in. x 2-3/4 in. Zinc-Plated Safety Pin (2-Piece) (Home Depot, $2.31, https://www.homedepot.com/p/Everbilt-0-091-in-x-2-3-4-in-Zinc-Plated-Safety-Pin-2-Piece-815408/204276312#overlay) The finished towel bar/drying rack shown in place below. The disassembled parts are shown below: I chose NOT to cement the entire assembly, since it would be much harder to store when in transit. Construction Cut the handle of the HF Dual Suction Cup Lifter in half transversely. A hack saw or bandsaw is recommended. File/sand the cut edges to remove burrs. Use PVC primer and cement to fasten the threaded end of each 3/4 in. PVC Schedule 40 MPT x S Male Adapters to each of the cut ends of the handles of the Dual Suction Cup Lifter. Cut the ¾" PVC tubing for the hanging tubes I chose to make 3 hanging tubes, each 45" long. This length easily fits in our rear cargo carrier and sags very little Adjust length to suit yourself. Cut 8 pieces of ¾" PVC tube to 1-½" in length. These short pieces serve to couple the elbows, tees and adapter together. Using a belt sander I slightly beveled the cut ends of the hanging tubes and the connector tubes so they would more easily slide into the tee and elbow sockets. Assemble the two "manifolds" as shown above, each having: 2 elbows, 2 tees and 4 of the 1-½" connector tubes. Use PVC primer and regular PVC cement to assemble one joint at a time. Be sure to align the open sockets of the tees and elbows. Hold each joint until cement prevents movement of components. The manifolds should be identical. NOTE: do not put PVC primer or cement on the short connector tubes which will be inserted into the adapters cemented onto each handle of the Dual Suction Cup Lifter. When the manifolds are assembled insert the hanging tubes into the three open sockets on each manifold. Again, I chose not to glue the hanging tubes to the manifolds for ease of storage. Insert the connector tube on each manifold into the adapters cemented to each half of the Dual Suction Cup handle. Again, do not use PVC primer or glue. With all components assembled, do a test fitting on the hull of your Oliver. Slightly dampening the suction cups significantly improves their grip on the hull. The hanging tubes and manifolds assembled should largely support themselves horizontally. I had leveled my trailer and used a level to also level the towel bar/rack. When the towel bar/rack is level drill a 7/64" hole vertically through the adapter coupling joining each half of the Dual Suction Cup Lifter to the short connector tube of each manifold. The purpose of the hole is to permit insertion of the zinc plated safety pin which will prevent the towel bar/rack from sagging, while still permitting the rack to be disassembled. Insert the zinc plated safety pins through the holes drilled into the adapter couplings to maintain the towel bar/rack in a horizontal position extending from the hull. I marked the suction cups and manifolds Left and Right to avoid difficulty later inserting the pins through the connectors. I also put an index mark on the adapters and manifold connectors for easier alignment. I have not yet tested this assembly in the field, but am confident it is strong enough to hold as many towels and clothes as will fit. I expect it could also support wet shoes or hiking boots. I hope this is useful to other owners. I welcome suggestions for improvements. As a final note, update your departure checklists to include removing and stowing the towel bar/rack.
1 point
-
Ok... after reading and agreeing with some concerns about the difficulty undoing the Black and Gray drain cap, I feel compelled to dump another question on the group about the "Dump process". Yes... I also think the placement of the cap is difficult and I feel like I have to get down on my knees... in an area I'd really rather NOT do that in. To further compound the frustration... three times I've discovered that the tube already had some liquid behind the cap (and yes it was, before you even ask). After each of these nasty episodes... I'm careful to check and make sure that the valves are completely closed after finishing at the dump station. To further test the valves' integrity for a tight seal, I've filled both the black and gray tanks with clean soapy water (now that we are home for while)... and leaving the cap off... I'm looking for any water draining despite the closed valves. Of course when it's clean water - nothing, not a drop is coming out! A further note... getting home after picking up our new Ollie on May 2, I've lowered the Andersen WDH Ball hitch one hole, which is 1 1/2". I did this in order to make the Ollie a bit more flat when towing. It's still 1 1/2" tongue high while towing. I say this because I'm wondering if I'm not getting a thorough drain down the length of the tube when at the dump station. And one more note while I'm "venting"... is that every dump station seems to have a different grade... which adds another complication to the whole stinking conundrum! Thanks to this forum... I think I can confidently fix just about everything imaginable on our Ollie... so I'm hoping for some group wisdom on this topic as well!1 point
-
Best fuel prices I have seen in our area lately, photo taken today, Newton, NC:1 point
-
Pete, we bought one of those years ago. It didn't fit in our 2008 bumper, as I recall, and we had to return it. I think the new bumpers have a larger cavity.1 point
-
Perhaps a telescopic flag pole would work?1 point
-
By the way I have a 2018 and there is no fuse, unfortunately.1 point
-
Thank you all. Mike did call back and I cut the wires. How hard is it to install a new one?1 point
-
Get a can of silicone spray lubricant it should help mitigate this issue.1 point
-
Ours did that on a long trip once in the middle of the night. I don’t have a lot of patience at 3:00am. I lifted the dinette seat and cut the wires. Problem solved. I ordered a new on the next day from Amazon and it was waiting for us when we got home. I don’t recommend going too long without one, but if it’s broke, it’s broke. Fortunately there are also Camping Worlds and other RV repair places all around. Mike1 point
-
You could try a little lubricant to see if it makes the twist easier. I switched hoses a few years ago to the Valterra Dominator. It doesn’t have that kind of locking cap, just a plug that goes in and stays by friction. Never had an issue with it. The other advantage to the Dominator (and Camco RhinoFLEX I think) is that when you scrunch them up they stay scrunched up. You only need to unscrunch what you need. Mike1 point
-
It’s been my go to app as well. It’s also included with the Garmin RV890. I always emailed them when I noted any inaccuracy and always got a timely response in appreciation of the input. Mike1 point
-
That unit has been around awhile as a no-idle truck cooler, at least in other countries. It's only 6800 btu. But, it's 12v, low wattage, so ... runs on battery. Variable speed compressor. Pretty pricey, for 6800 btu. And, unlike rv acs, it's wider than it is long. Would def not work with my sidemount solar panel configuration. I'd say, probably should keep at least the bed area cool, if you put up a curtain on an expansion rod. Lots of van life youtubes out there to watch from the past year. I don't know why dometic doesn't bring in some of their higher capacity variable speed compressor/inverter technology rv products that they sell in the UK, Europe, and Australia. Those, like the ibis 4, are real competition for the truma, and very efficient.1 point
-
Congrats on the sale and garage space reclaim. I am so happy to hear it all went well. Great job!!1 point
-
Congratulations, @connor77! @NCeagle, might be more takers in the summer heat? Mine was old (2008), but worked, so I listed parts for free. No takers in a week, so it went to recycling.1 point
-
John - you can re-list yours 🙂. Just sold our Dometic for $700 to a nice couple from Vermont. We agreed to meet in the middle and met them in New Hampshire. Super smooth transaction. Within 45 minutes of putting it on Craigslist I had interest. First person that emailed me bought it. Feel really fortunate. One less thing to trip on in the garage!1 point
-
I'm on my second summer in NC with the Houghton and I've used it a LOT. I regularly use our Ollie as a quiet place to relax year round even when at "home". I do agree with all of @katanapilot's reasons, pretty much in that order too. My wife and I both agree that it's easily the best "luxury" modification we have made to our Ollie (second would be installing a dedicated shower mixer with the High Sierra head). @connor77, I tried to sell the lightly used Dometic on Craig's list for about half of what it's worth (as suggested by @Trainmanabove). I only tried Craig's list as I didn't want to deal with shipping. Never had any interest or offers so I gave up after about a month. Still sitting in my garage today. No chance I'll ever reinstall it, so I may end up giving it away - I'll wait until you have sold yours though. 😉1 point
-
I myself see it's hard to justify replacing the A/C unit when it is working fine. If your new unit has a fan adjustment, or runs silent then that's the only reason I would even consider the replacement, The old unit is probably worth 50 cents on the dollar at best. trainman1 point
-
Ours (2008) had a tag visible from under the indoor unit. Look there?1 point
-
I've found owning an Oliver gives me more options on places I can fill up at.1 point
-
It seemed very strange to be happy about finding regular gas at "only" $4.14 as we did yesterday, at a Murphy's near the Asheville Airport. We "saved" 25 cents a gallon filling up there, as most stations near us were $4.39. My brother reported $4.76 in Florida, today. If I owned that diesel pusher at 5 mpg/over $1 a mile, it would have a for sale sign in the window. Or, trade it in on a nice sailboat. The wind is free.1 point
-
DEF seems to be in supply around here. It’s not a fossil fuel product, basically ammonia and water. I get it at Costco for about $10 a jug (2.5 gal). We’re packing to leave for Colorado next week. Diesel prices here seem fairly stable, not sure what we’ll see in NM and CO. Mike1 point
-
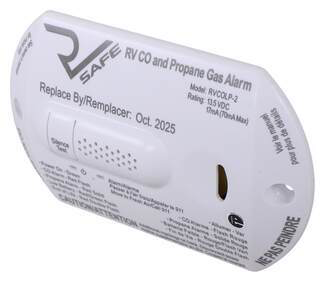
RV Safe describes their gas detector as "battery powered", that is misleading since you must hard-wire it to a 12 volt source. It has no internal batteries. This is what Kidde says, they market it as a portable unit. "Protection Everywhere. This is a battery-operated, free-standing carbon monoxide alarm that can be placed on a counter, nightstand or tabletop, or it can be taken with while traveling or camping so that you can always be sure you are in a safe environment. Additionally, if it is your preference, it includes the hardware necessary for installation on walls." An RV isn't going to hurt it, There are no moving parts except the battery door and the push buttons. I imagine Oliver chose their galley combo unit way back when there were few alternatives. It may also have to do with certification and expected life span of the gas detector part. John Davies Spokane WA1 point
-
Hmm. Much, I agree with. But one point I can't agree on. We don't ever "bathe" or "rinse off " with soap in rivers or streams. Even biodegradable soaps can contribute to pollution and imbalance of fragile ecosystems. We have enough pollutants running into our waterways, imo, from other sources . I don't need to add to it. If you must use lake or stream water to bathe, take it away from the shore in a container, imo. And disperse the effluent where the earth can filter. Another thing, for new campers. Boondocking is a super appealing idea. But, please educate yourself on proper preservation of the environment. In some remote places, your footsteps can crush years, or even decades of growth. If there are established paths, please stay on them. If there are established sites, please use them. I've found so many places cluttered with stuff from previous campers, it's disheartening, and I've spent hours cleaning up behind others . Many of us bought our trailers to get out and enjoy nature. Let's do our best to make sure it's there for the next generations, too. Tread lightly. Pack in/pack out. Leave your campsite as good or better than you found it , please. Use resources wisely, and enjoy what you see and experience. I'm sure @BoondockingAirstreamand I agree on that 100 per cent.1 point


-
Recent Achievements
-


")


")
")


