Leaderboard


Popular Content
Showing content with the highest reputation on 02/24/2024 in all areas
-
Thanks GJ ... as I have them wired in parallel I can't really power any more than before ... but I can certainly keep the party going quite a bit longer ... Cheers!4 points
-
We’ve stopped by Princess Craft several times. They are dealer for Intech and also Outdoor RV and usually have something interesting to look at. They also have a YouTube channel and do reviews, usually by PJ. I need to check to see if they’ve reviewed their Oliver’s yet. Mike4 points
-
and a bunch or other stuff too!3 points
-
Oliver=Durability3 points
-
First Ollies displayed at the Austin, TX RV Expo, courtesy of new dealer PrincessCraft RV. Nice to be able to come and look at the new 2024 model.
 3 points
 -
I just now looked at specs I found it interesting, when I looked, that the newer victron connect battery has a much lower water/dust resistance rating (ip 21 vs ip54 on earlier Bluetooth model. ) I would suggest that you vent to the inside, to avoid water/dust intrusion. (Check with manufacturer. ) probably block/waterproof the external vents, and, if it were me, put an extra "eyebrow" of water relief above the battety compartment, aka Eze rv gutter. The 460 ah battery we ordered for our boat is ip67. And, has bolt down features integrated into the waterproof case. We are sailors, as well as campers, so I'm always looking at ip ratings.
3 points
-
Conversing with a gif is a hobby of mine. Lol2 points
-
I too was agreeing with you and just adding another point of reference supporting your statement. I’ve been putting off adding extra holes in my battery compartment for no particular reason. I guess just waiting to see if and when they become necessary for our situation. Although, I’ve been tempted to add some on several occasions. Even to the point of making a fixture to prevent me from inadvertently drilling through the dinette seat back or the pantry wall at the bed.2 points
-
Agreed, LifePOH batteries do not require ventilation as they do not generate gas. My comment was intended to clear up what might be a misunderstanding by some readers. Lead-acid batteries generate gases during charging which may vent into the battery compartment, these are corrosive and flammable. That’s what the external vents in the door are for, and Oliver is required to put them there to meet RVIA standards. SeaDawg recommended sealing the external vents, which many of us have done, along with extra insulation. Venting into the basement isn’t required, as you have experienced, but it may help in temperature extremes, as many previous threads have discussed. For example, parking with the street side in full sun in Arizona in the summer @ 115F ambient. All I have done is cut two 2” holes in the sides of the battery box. I’ve noticed it is cooler inside the battery box on very hot days with the street side in the sun.2 points
-
Because my lithium batteries don’t require ventilation (I don’t know if all lithium batteries are similar) I sealed the ventilation holes in the battery compartment door and insulated the door with 1/2 inch thick closed cell neoprene foam. The only ventilation into the basement area in my installation are the two 7/8ths +/- holes left over from moving the #6 cables to the inside. So far my battery compartment temperature stays very close to the basement temperature.2 points
-
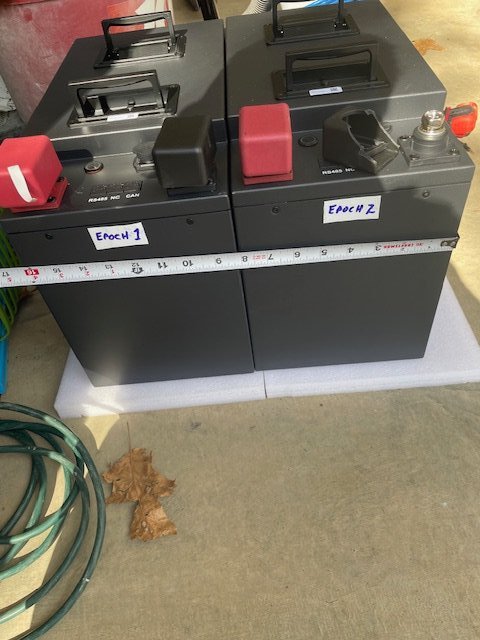
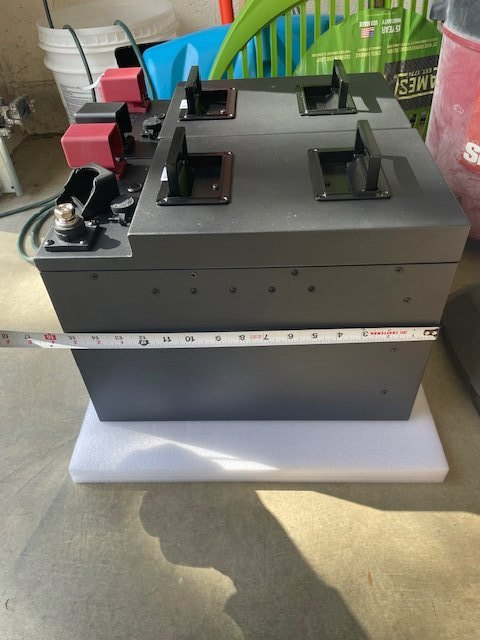
Hey JD ... yeah, woulda preferred the original basic model as it would have been an easier fit in the existing tray ... but with our travel plans I couldn't afford the delivery delay(s) (now expected in late March) ... and since the V2's were offered at no add'l cost I decided to go for it. Add'l features/benefits? ... mmm, I think the Victron and/or CANbus ports would definitely be worth it for anyone who already has (or is planning for) those components. The heavy steel casing seems very strong and substantial, but I'm not sure that created any additional value for me - that would not have been a deciding factor for me. One add'l note - each of the units has its own shutoff switch built into the top of the case (right near the red negative post in my pics) ... so, eliminates the need for a master battery shutoff ... thought that was a real nice feature . I believe the lesser model comes with a "remote shutoff" - also nice, but would require additional holes to be drilled and wiring the installation for them ... I actually prefer them right on the unit as on the V2's.2 points
-
2 points
-
Hoping #1512 will pipe in. As #12, we are one of the oldest , if not the oldest, in continuous ownership first gen trailers @bugeyedriver is just a few weeks behind us. . Last week, our Ollie celebrated its 16th birthday. 17th season camping approaches. We've done many updates, to suit us. But it was and is an awesome camper, without our updates. Other friends, who've done zero updates, spent the winter travel camping in their number 30 something. How cool is that? Looking forward to the day when I can apply for vintage tags, and still have a modern trailer, to pass on to our daughter.2 points
-
Time WELL spent! With twin 300's, you can easily power up a medium size gathering! Glad for your 100% success. GJ2 points
-
When I get to Talihina OK, I have 8 miles of 10%+ grade fire road to haul Ollie up Buffalo Mountain. The road is graded (sometimes) and I am dodging rocks and holes along much of it. But there are times that I must also use every tool I have (4WD, Low Range, Low Gear, Locker Rear axle, and deair my tires as well. Since at the bottom I have no idea what I'll be encountering going up, my airing up and down when in doubt is just a smart precaution. But like you, I probably have loaned the compressor to others far more times than I have used it. GJ2 points
-
No "facts" from me but I agree with your street side reasoning for yet another reason. Since most roads have a crown (the middle of the road is higher than the shoulders of the road such that rain can drain to the shoulders of the road more easily), there is more of the vehicle's weight on the curb side tires versus the street side tires. Therefore, the less weight you have on the side of the vehicle (or trailer) that has only one tire or any questionable tires the better off you probably are. Bill2 points
-
Nice, when my Xantrex craps out I'll get the Victron Multiplus. I'm not familiar with the Victron Multiplus setings, and I could be wrong but 8.5A seems a bit low. I know we have owners with the Victron inverter on this forum so hopefully they will chime in.2 points
-
FYI: We bring our Honda EU2000i w/grounding plug if we expect several days of cloudy weather on a given trip. However, with our 340watts/roof-mounted panels, 200w Renogy portable modules, and 300amp-hrs of BBs in the bank, the Honda hasn't seen the light of day since we've had our OTT (purchased used in MAR23). @Wandering Sagebrush - Definitely don't think you're missing anything at all. We now tow in with the fridge in the DC mode since we've installed the Victron DC/DC charger - prior to that we ran it in the LPG mode. It's nice now being able to tow with the LPG valves closed. The DC/DC charger is dumping 27 -29amps into the BBs plus whatever the roof modules are generating while towing, so whenever we decide to stop for the day, we've got high SOC (usually 100%). You'll find, like us, that when boon docking in colder WX, your furnace will consume the majority of your stored Amp-hrs. If your AGMs are type 27s. Just noticed you've got 640amp-hrs of storage! You're GENSET will likely stay in the TV during the majority of your trips no matter the weather conditions. 300amp-hrs seems like the sweet spot for our style of camping off grid. Cheers,2 points
-
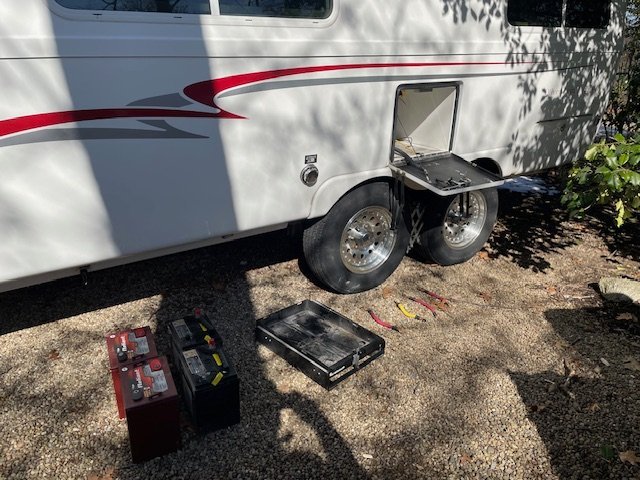
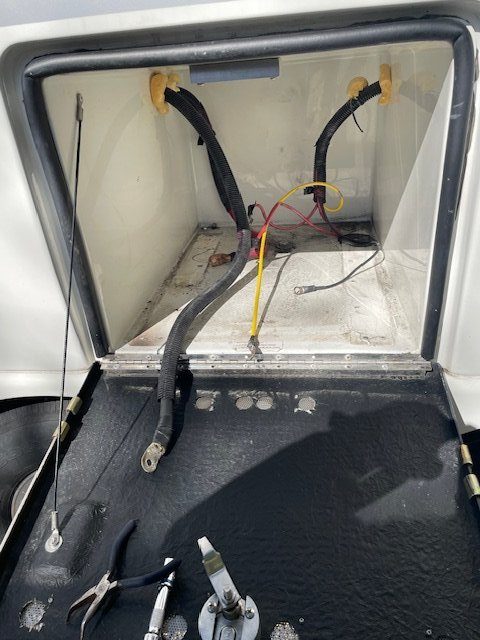
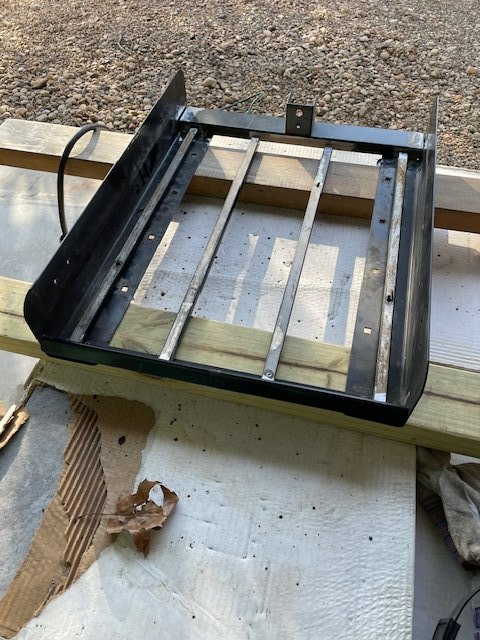
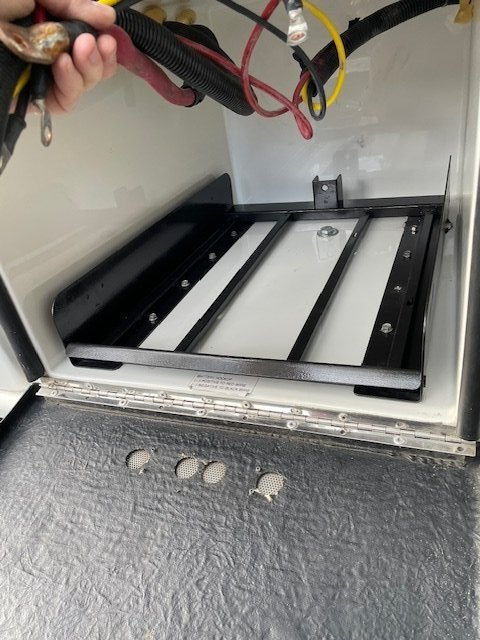
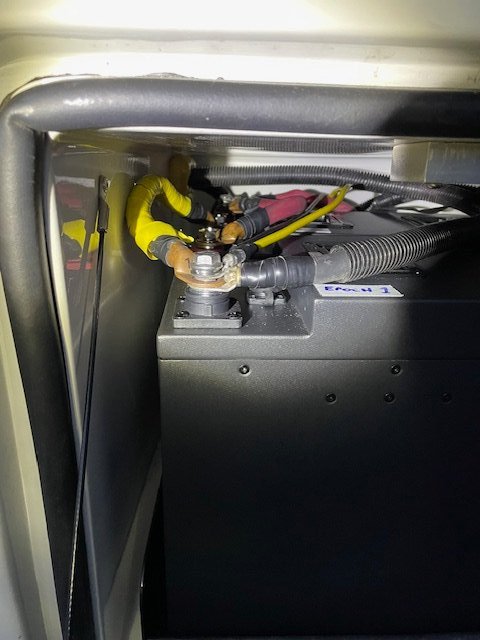
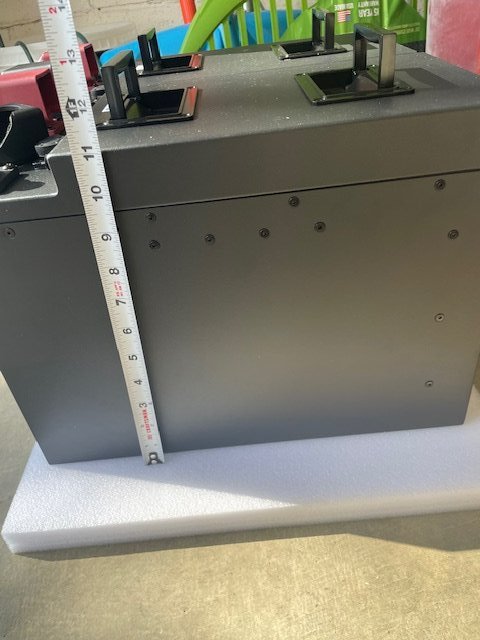
Sorry Group ... worked on this all day yesterday & then got pulled elsewhere today ... it's pretty much finished, but I may make some tweaks. In all, once in place the actual connections and settings was the easy part. Most of the work was in redesigning and rebuilding the tray. As things worked out, I removed the OEM slide out tray but used the tray base (keeping its original dimensions) and welded in a few cross members - one large one in the rear for stability and tiedown bracket, and 4 smaller "'c" channels to carry/spread the weight. Importantly, that allowed me to use the existing bolts & holes (no add'l drilling & tapping). However ... with this setup I had to turn the batteries sideways to fit. The downside to this is 1) no slide out drawer for ease of maintenance, 2) sideways orientation made it a little difficult to reach in to make the connections. That said, since there are only the two batteries, the total number of connections was less and for future servicing they're relatively easy to remove and/or move. Note that with their height, the working area for connections was a little tight, but well doable. Sometime in the future I'd like to re-do the tray ... I'd widen it slightly side-to-side (only need another 1/2 inch! - I got a little tired and lazy & wanted to save some welding) and "oblong" the holes in the base, to fit the existing holes in the floor of the compartment. This would allow me to be able to turn 90 degrees (from shown) & have the lugs of both facing outward & side-by-side ... that'll make connecting and servicing much easier, even without the sliding drawer. Re-setting of the BlueSky Solar charging via the IPN Remote (unique to the earlier 2014/15 models) was straight forward, flipping the PD charger/controller from AGM to LI was super easy (accessible after removing the faceplate of the control unit), and (as mentioned earlier) the 7-PIN charge circuit had already been disabled ... so, ALL DONE! turned the breakers back on and, viola! ... it all worked! Now, just want to let it work for a few days. A few related notes: Kevin at EPOCH Batteries was very helpful ... placed a call on Thursday mid-morning (just before I started tearing everything apart - wanted to confirm the BlueSky Solar charge settings & had a couple of misc questions) ... he returned my call within about 20 minutes, was patient, and happy to share knowledge and advise on appropriate concerns. By the way, I'll mention here that documentation from EPOCH for the batteries is virtually nonexistent - they seem to depend on their online community for FAQs and group responses. Didn't bother me much though as, again, the swap out was pretty straight forward ... my call to EPOCH was really for confirmation and confidence building more than anything else. The EPOCH Bluetooth app works OK but could use some refinement. Each battery has its own Bluetooth connection, each battery is queried and displayed separately - a side-by-side of both would be more convenient. The app offers a minute-by-minute history of status of each, but after a short while you'll need to scroll extensively to get to the most recent data - that gets old really fast. That said, the app interface provided some very good info. An upgrade, of course (suggested by the EPOCH folks). would be to install a shunt in conjunction with a remote monitor (Victron perhaps). Related, since the app is Bluetooth to the batteries (using my iPhone), the data feed & status indicators drops once your about 20 feet from the trailer - I am worried that I'll not be able to see it from the driver seat of my truck ... still not a huge deal for me as I check the app only when in or near the trailer anyway. Oh ... and the OEM tiedown straps were too short. I replaced them with a simple ratchet strap ... it works but is not quite as "elegant" as I'd like. I'm gonna shop Amazon for a better strap setup. In all, I think I accomplished what I'd set to do - simple battery swap with no add'l components needed. The battery tray rebuild was more than I'd hoped, but otherwise I'm happy. I can appreciate that some add'l componentry and the conveniences that would provide, but I'll save that for another time. Questions? Oh ... and ... thanks, everyone, for your guidance and insights on this thread ... I've really grown to love our Oliver community over the past 3 years. Cheers! -Dan
2 points
-
It's the same with my battery jump box. Sharing is caring! Mossey2 points
-
Yes, @Hokieman and @mountainoliver, that's what I meant, but didn't make clear. With a minimal ip21 rating, I'd want to seal that door to the outside, for both dust and moisture, very carefully, and if I needed venting for temp, I'd want it to be to the cleaner interior of the trailer. Thank you both for helping me out. I appreciate it. You both read my mind.1 point
-
With the tremendous effort that OTT expends in their make ready process, I'm surprised that they don't "Shrink Wrap" their trailers for transport. GJ
1 point
-
I have the Xantrex PROwatt 2000 inverter in my 2020 LE II. It has Charge Current setting just like the 3000 watt version. The max charge current in the 2000 watt inverter is 80 amps (as opposed to 150 amps in the 3,000 watt inverter.) To set the charge current limit to less than the factory default of 80 amps, you just need to go into the inverter panel on the wall of the Oliver, enter into configuration mode, scroll to setting # 24 Charge Current, and change the setting. It only takes a minute or two. It is certainly not as easy as using a bluetooth app and I often have to refer to the manual again because the exact sequence of button pushing is easy to forget. But it works just the same as in the 2000 watt inverter.1 point
-
With no offense intended, I believe there is some questionable advice in this thread. In particular, it is counterintuitive to me that reducing the input amperage to the inverter is the best way to limit the level of charging current that the inverter is delivering into the batteries, especially when the inverter has a setting (#24) designed specifically for that function. Wandering Sage Brush is apprehensive about using the smaller Honda 1000 to charge his house batteries while boondocking. There is nothing to be nervous about as many of us do it all the time. The only issue you need to be aware of is ensuring that the combination of trailer loads (120 volt loads and 12 volt charging load) is less than the maximum output of the generator. If you try to run higher loads (i.e., greater watts) than the generator can produce, the generator will overload and shut down. The table above showing inverter settings are for a 3,000 watt inverter. Setting 28 is factory defaulted to 25 amps because 25 amps * 120 volts = 3,000 watts. If you lower the amperage limit in Setting 28 down to lets say 15 amps, you are turning your 3,000 watt inverter into an 1800 watt inverter because 15 amps * 120 volts = 1800 watts. There is no need to do that. If you want to charge your batteries with a 1000 watt generator, then you need to limit the draw on the generator to less than 1,000 watts. If you want all the available 1,000 watts to go into your batteries, then there are two steps you need to take when you decide to charge. First is to turn off your inverter and any 120 volt loads if you want to all the generator output to go into your batteries. You don't want any 120 volt trailer loads drawing on the generator at the same time you are charging the batteries. Second, you need to reduce the amperage limit in Setting #24: Charger Current. The charger typically charges at about 14 volts when the batteries are getting close to full. Since volts x amps = watts, 1000 watts into the batteries is going to require 71 amps of Charge Current (14 volts * 71 amps = 1,000 watts) . Adjusting for losses and generator derating at altitude and in higher temperatures, you should probably limit the watts from the generator at no more than 900 watts which equates to 64 amps (900 watts / 14 volts = 64 amps). So whatever inverter/charger you have, set the max charging current at 60 amps and your Honda EU1000 will probably charge just fine without overloading. If you are running the Honda 1000 and you are also getting 20 amps from your solar panels at the same time, then you will be putting 80 amps into the batteries (60 amps from the generator and 20 amps from the solar). This is equal to 1,120 watts (80 amps x 14 volts = 1,120 watts) You can leave the Charge Current setting at 60 amps all the time if you want unless you want your batteries to charge faster when you are on shore power. If so, just increase the max charging amps in setting # 24 before you go back on shore power.1 point
-
I’m assuming Seadawg suggested venting to interior for temperature stabilization. Many owners have vented battery compartments to the basement, and some to the inner cabin. This helps the batteries operate closer to their optimum range, not too hot, nor too cold. You’ll notice a significant difference when monitoring your battery temps.1 point
-
SeaDawg - good callout, not something I'd paid attention to. That said, given the substantial nature of the heavy steel case, I think I'm ok with it. I need to re-check but I think the manufacture indicated no venting necessary ... so, with that, I like your idea of closing off the external vents and the Eze gutter - think I might do that ... thanks for the tip! Also, I really liked the single 460Ah unit and almost went with it ...really liked the bolt down feature and a singly unit would have easily fit the compartment ... but then figured it was a good value for another $200 to gain an add'l 140 Ah (2 x 300 Ah) ... adds another nearly 2+ days of off-grid boondocking to my trips!1 point
-
I m guessing that this used to be a reasonable recommendation before there were regulated loads and we still had incandescent lights. If the internal voltage was raised into what were closer to resistive loads, both the current and the power would go up. Not the usual case anymore, where we have mostly constant power loads.1 point
-
Yes the Sol trailers are also sold by PrincessCraft RV. We looked at several models and did like them. Wouldn’t trade our Schooner though.1 point
-
Thank you. The previous owner replaced the Xantrex(failed device) with a Victron, so I’m going to need to do a bit of research. The current limit is now set at 8.5.1 point
-
Good question! I don’t know, never tried, but I will just for you😎 and let you know. I did a simulated hookup by backing my F150 up to the Bulldog and did a test. I had no problem connecting to my Victron BMV-712 which has its own Bluetooth radio in the display and is installed under the SS bed. These 2 pictures show the BMV-712 Bluetooth off and on. Mossey Bluetooth off while I was in Ollie. Bluetooth on while I was in my truck.
1 point
-
You purchased the model with the Victron comms: 12V 300Ah V2 Heated Bluetooth LiFePO4 Battery - Epoch Essentials (epochbatteries.com) Wondering what that does for you, that adding the Victron SmartShunt would not do? I already have this shunt and their smart Bluetooth dongle for communication purposes. This Epoch model is also 300AH without the Victron comms but slightly smaller, so thinking it would fit in the OTT OEM battery tray as-is. Are there other features that made you decide on the higher-end and slightly larger model vs. this one? 12V 300Ah Heated & Bluetooth LiFePO4 Battery - Epoch Essentials (epochbatteries.com) I just read your comment above again. It appears you ordered the smaller model but was supplied the V2 model instead since it was in stock, in time for your trip. Still wondering if the V2 model is worth it considering fit. Other V2 benefits?1 point
-
Don't be nervous. The Yamaha will be fine. Just get the grounding plug and adjust setting #28 like @rich.dev said. I do it through the wall control panel rather than the app. I've found some odd behavior when using the app to change that setting.1 point
-
FYI: Our Viair kit sits next to the spare SureFlo in the "pump section" of the Casablanca "garage". The Viair was handy in adjusting tire pressures at the end of our stay at The Q last month - but the SureFlo hasn't seen the light of day since it was stowed. Hope it never does....1 point
-
This surely is a milestone. Great work Oliver!1 point
-
Mmmm ... I don't think an upright (on end?) config will work - not enough height in the compartment ... see the dimensions of batteries in my pics. Note that the side-by-side config requires right at 16" of width - interestingly OEM tray base is 15 7/8" ... thus, I'll widen it by about another 1/2" in my future "tweeks". Did this answer your question(s)?1 point
-
Lots of good ideas and thoughts on this. Thanks. Just for conversation I will be a devils advocate "lightly" regarding tire inflation for both the TV and Ollie. But allow me to digress for a brief moment. Awhile back on an automotive forum, doesn't really matter which one but might have been a Tundra forum, there was a somewhat heated discussion regarding a gentleman who had gone from standard P rated tires to LT tires on his truck and asked what PSI should they be run. Sensible question but one fellow ripped the guy up on side and down the other claiming he should be running his tires full bore tilt at 80 PSI or risk a blowout and kill everybody on the highway. The answer struck me as a bit extreme given the research I had done on the subject to this point. Effectively it is true running tires at 80 PSI will reduce less heat build up due to less flexing and perhaps increasing gas mileage along the way, but is this the only safety factor of the equation to be considered? I have my doubts. What about braking, handling, maneuvering especially if in an emergency situation. At 80 PSI on lighter vehicles such as half ton trucks or Olivers there will not be enough tread on the road (the way the engineers and manufacturers designed the tire to operate). The tire chalk test bears this out too. Cutting to the chase, imagine having to swerve out of the way because some reckless driver runs a red light in front of you. Cornering and braking will not be optimum with over inflated tires and it compounds exponentially if towing a trailer. I'm certainly no expert on the subject but believe much depends on the individual vehicles and trailers and tires. What I can add from personal experience on a trip this past Sept from MT to southern UT with new LT tires. Ran my TV at 50 PSI and Oliver at 45 PSI. Truck being a tad bit heavier and loaded in the back with gear and tongue weight of trailer. Kept a close eye on heat and tire pressure build up with the TST TPMS and both did fine and this was driving through some 100º heat in SLC late afternoon. Thankfully no emergency maneuvering on the trip to test my theory. And for sure don't go up the gravel road to Green River Lakes in the Wind River Range with 80 PSI on either of your rigs. 🤣1 point
-
Yeah...My Viair has been used maybe twice since I bought it. One time "might" have been to blow up an inflatable water toy. This is what keeps holding me back from installing onboard air. The big use for onboard air would be to install a train horn for left lane drivers. 🤣 John1 point
-
Since that price is for the bare tool only, I doubt it's a bunch cheaper. Since I'm not an old Milwaukee guy, just a Milwaukee guy and do not own an DeWalt tools, I did buy a Viair several years back. And the only time I needed it was to help a neighboring camper air up his bicycle tires. Mossey
1 point
-
@Pam and David Hokanson are #1501, and just got their hull number on Monday. Maybe number 1500 doesn't know yet. Or, isn't here on the forum.1 point
-
We’re 505, 999 ahead of you. Wonder who will be 1000 (hull 1505). craig1 point
-
Congrats to you. We are #1290, one of the last hulls made in 2022. We love ours. Hope you have miles of smiles to come. John1 point
-
Hear! Hear!1 point
-
I’ve heard tank sounds, as well, more of a ‘high-pitched whistling’ rather than ‘ringing’; probably a difference in interpretation. Mostly detected when a tank is low and drop in ambient temperature; thinking maybe coming from the tanks safety cutoff valve. Briefly switching the pressure regulator to the other tank and then back again after a short period usually resolves the issue. Not a concern unless there is a propane smell, that very distinctive mercaptan odorant that has a sulfur-like smell.1 point
-
Today it was reported that defamation cost a well known person $148,000,000. Sometimes there are consequences to untrue statements.1 point
-
Very well stated @ScubaRx on all levels and I agree 💯. Patriot🇺🇸1 point
-
Just so everybody is on the same page, the bearing Kit shown above is for the 3500 pound axles used on the Elite II's through 2021. In 2022 Oliver started installing a 5200 pound axle on the Elite II models. This axle is the same size that has always been supplied on the Elite's except it is de-rated to a 3500 pound weight capacity due to using a 4 leaf spring pack (3500 lbs) instead of the normal 5 leaf spring pack (5200 lbs.) These new axles are now standard with Dexter's Nev-R-Lube Bearings. If you have a 2021 or earlier Elite II with the standard bearings they cannot be replaced by the Nev-R-Lube style. There were changes made to both the hub size and the spindle size. The complete axle would have to be replaced. If you have a 2021 or earlier Elite I it will require the standard bearings for a 5200 pound axle. If you have a 2021 or earlier Elite II it will require the standard bearings for a 3500 pound axle. Advantages with Dexter's Nev-R-Lube Bearings: * No need to pull the hubs to repack the bearings or replace the grease seals when checking the brakes. * No more inner and outer bearings. Just one sealed bearing cartridge. * Pre-set adjustment means installation is easy and human error is virtually eliminated in bearing adjustment. * Pre-lubricated at the bearing factory providing resistance to contamination. * Sealed for life which means increased durability and reliability and no more bearing maintenance. * 5 year or 100,000 mile warranty against defects in material and workmanship. I do want to emphasize if you do have a trailer that has the Nev-R- Lube bearings installed there are periodic checks that need to be performed to make sure they are in good working order. Nev-R-Lube Bearing maintenance needing performed every 12 months or 12,000 miles. 1. Elevate and support the trailer unit per manufactures instructions. Never jack the trailer up on any part of the axle. Always jack the trailer up on the main frame rails of the trailer. 2. Check for excessive wheel end clearance by pulling the tire assembly towards you and by pushing the assembly away from you. Slight end play is acceptable. 3. Rotate tire slowly forwards and backwards. The wheel should turn freely and smoothly. 4. Excessive wheel end play, restriction to rotation, noise, or bumpy rotation should be remedied by replacing the bearing unit. Note: A slight amount of grease weeping from the seal is normal. Excessive leakage may indicate abnormal bearing operation. The important thing to remember is that even though this bearing is sealed and does not need lubricated it still needs to have a yearly inspection for the end play. Having this checked will hopefully keep you from having wheel bearing issues on that next adventure you are planning. If there's a downside, it would be that if/when you need to replace them it will cost a lot more than the old style bearings and seals. A sealed Nev-R- Lube bearing Kit -42MM CARTRIGE & ATTACHING COMP, FITS 5,200 LB & 6,000 LB AXLES - Part #K71-997-00 will cost over $300 per wheel. I would be remiss to only replace one at a time.1 point
-
We had a propane (LP) issue on our last trip. We arrived at our third stop and I setup the outside camp, the blanket, chairs, grill and fire ring, etc. Then I decided to start the fire ring, since it was getting late, and it gets warmer after the stones heat up. The fire ring flame was half of its usual force. I hollered at Chris, who was inside getting things ready for dinner, to start a kitchen burner. This is something we do each time we open the LP tank valve, so that we know there will be gas to the furnace later. The kitchen burner was also at half strength. I was puzzled for a while, and eventually checked the rear LP connection. You know that idiotic design where you have to release to bumper, revealing the sewer hoses, to hook up (why not mounted like the front one, aimed curbside)? Turns out the rear shut-off on that port was half open and it was leaking out of the cable connection without a fitting in place. It's not supposed to do that! I moved the shutoff to 90 degrees, and it stopped leaking. It had moved likely from the sewer hose hitting it over bumpy roads. The fire ring and kitchen burner were now again at full pressure. This useless rear connection is also dangerous in another way. They run a copper/brass line without protection directly under the frame. This is somewhat OK in front of the trailer wheels, but not a good idea near and behind them. One of several reasons to have the LP off when towing. I will be removing this line soon, certainly before our next outing. We never have a need to connect at the rear and never pulling the bumper to do so! I have a 12 ft line to a T-connection for grill and fire ring and they each have lengthy lines. We can connect at front and position the grill as far as the rear bumper if we need to. I will post info and pics on removing the rear LP line, just past the furnace T, which btw is also behind the trailer wheels. I will cap the rear line and likely add some form of stone-guard or protection. More on this coming soon!0 points


-
Recent Achievements
-


")


")
")


