Leaderboard


Popular Content
Showing content with the highest reputation on 02/28/2024 in all areas
-
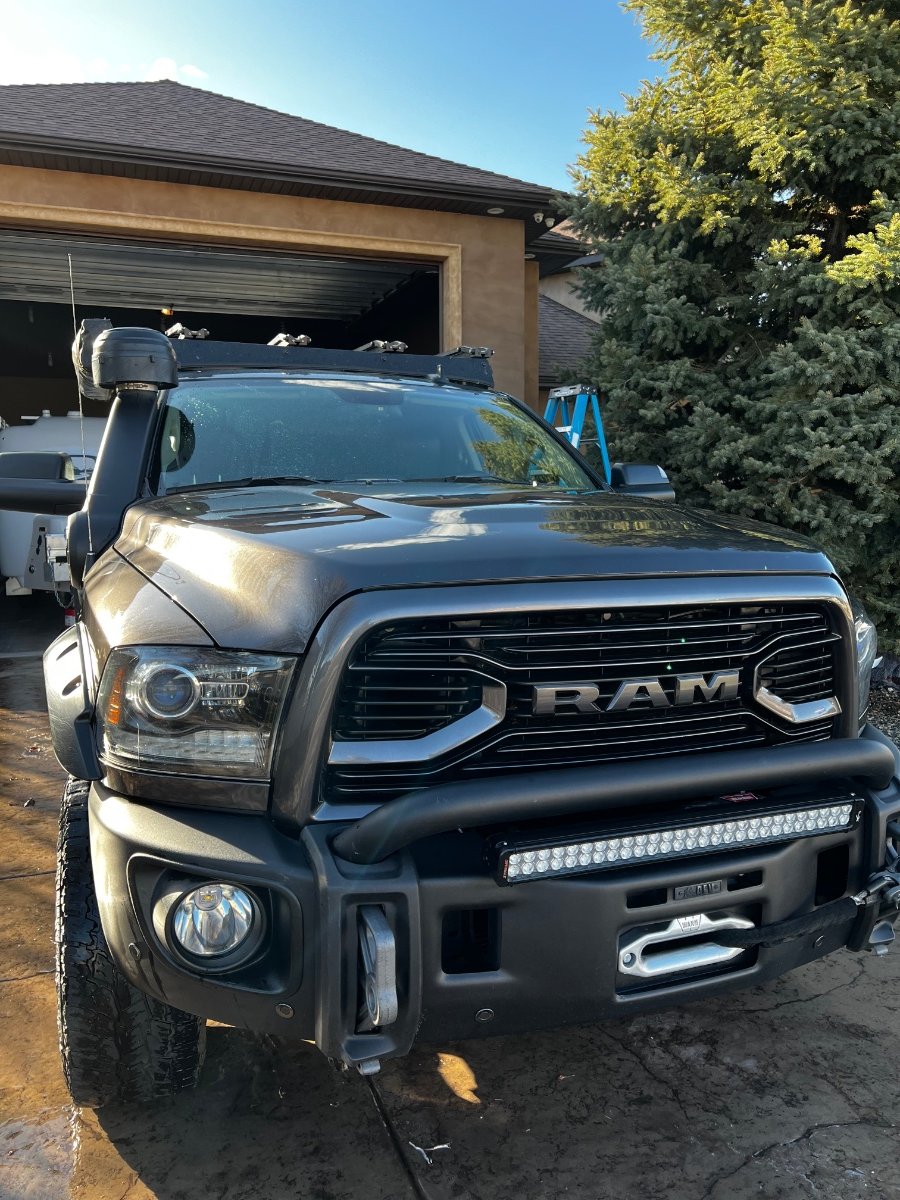
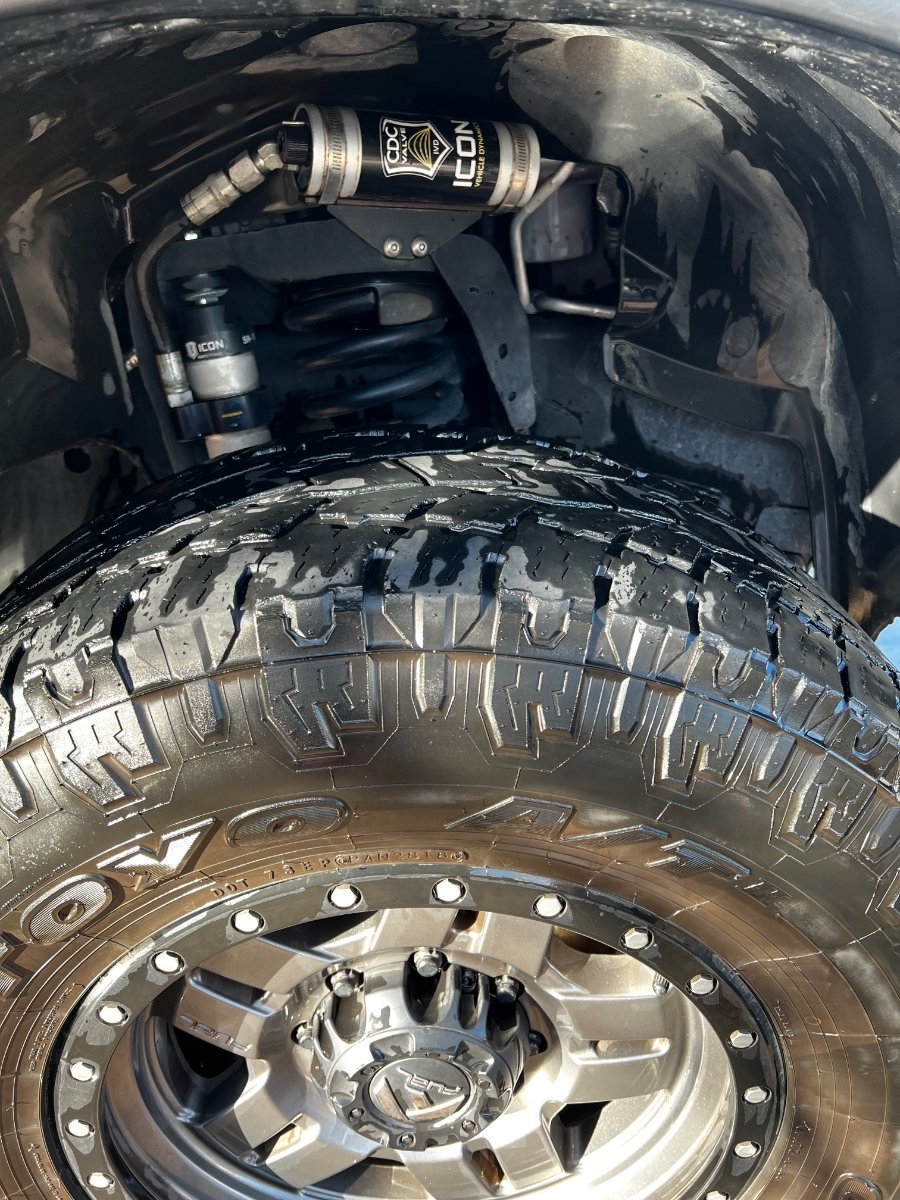
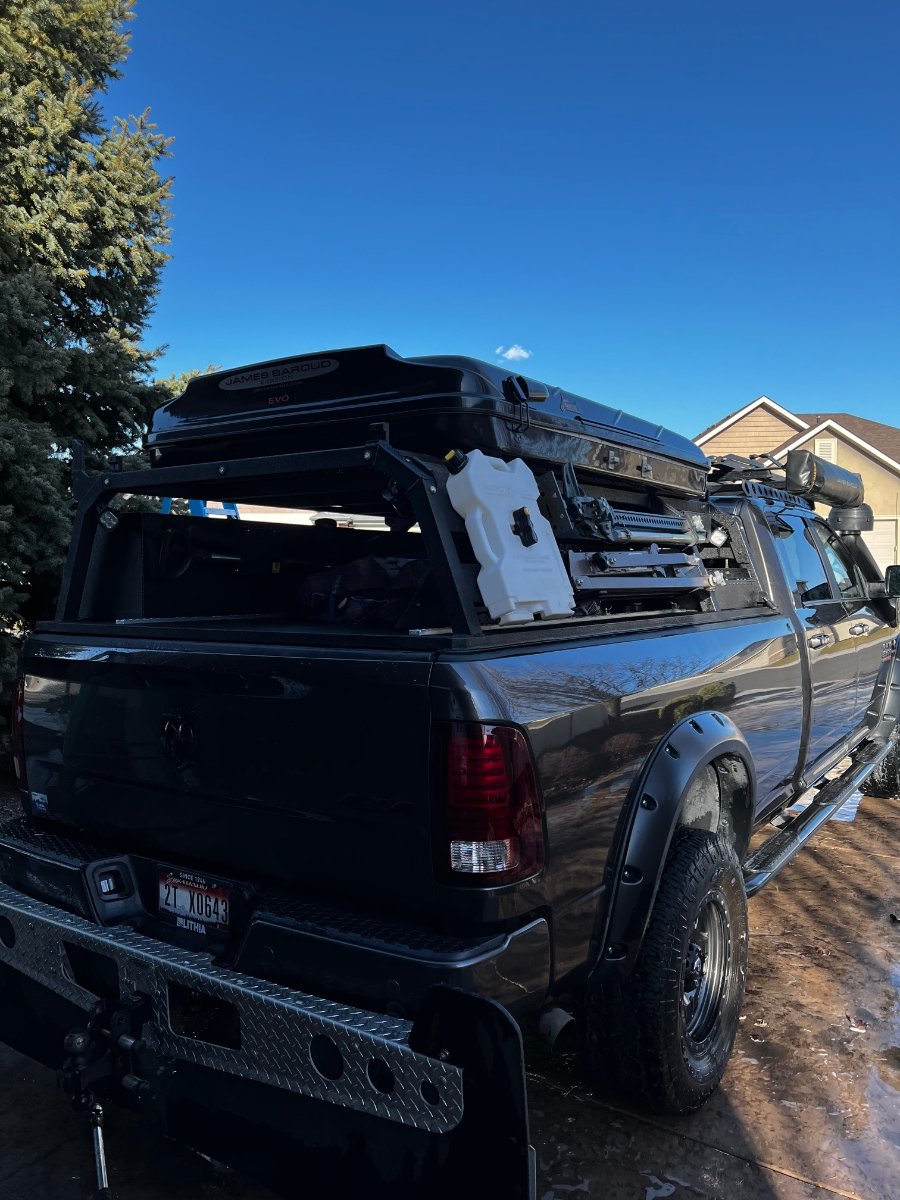
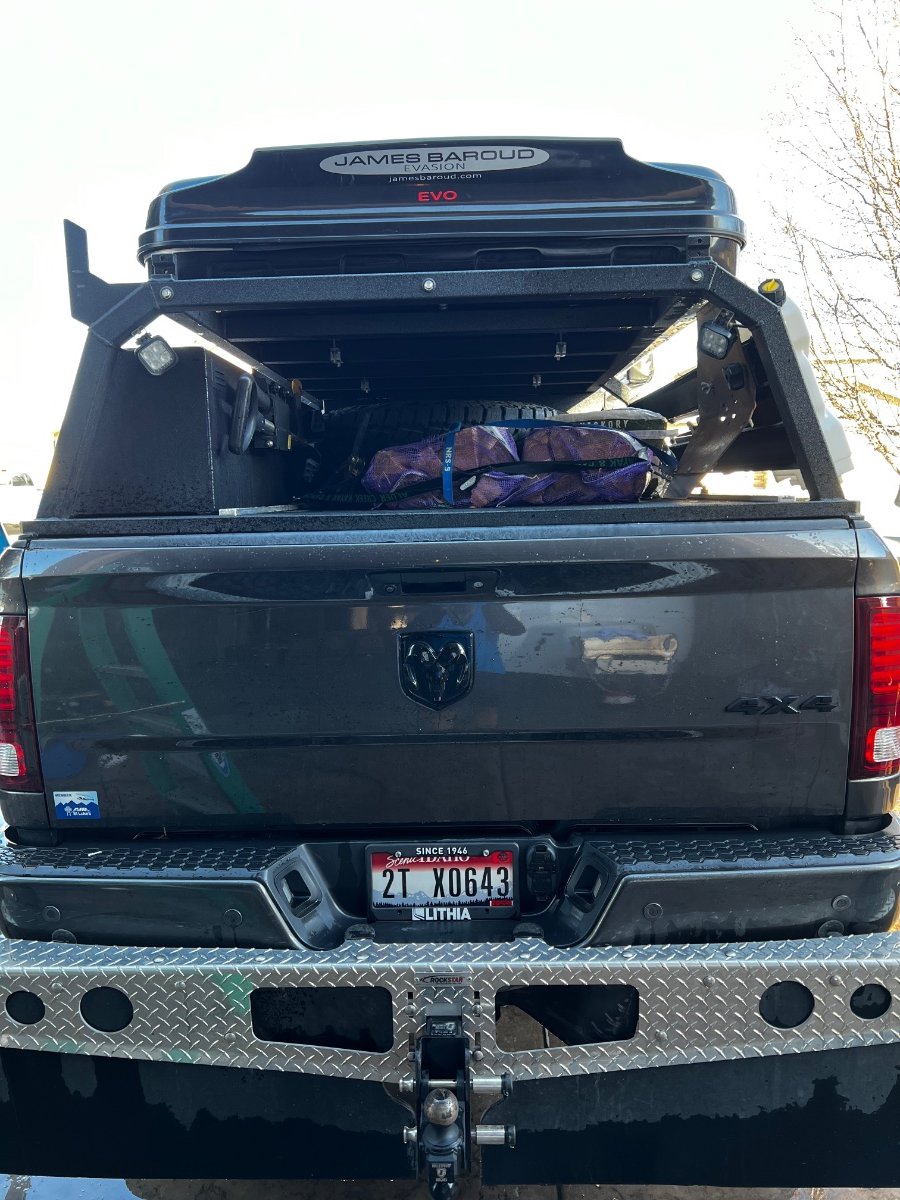
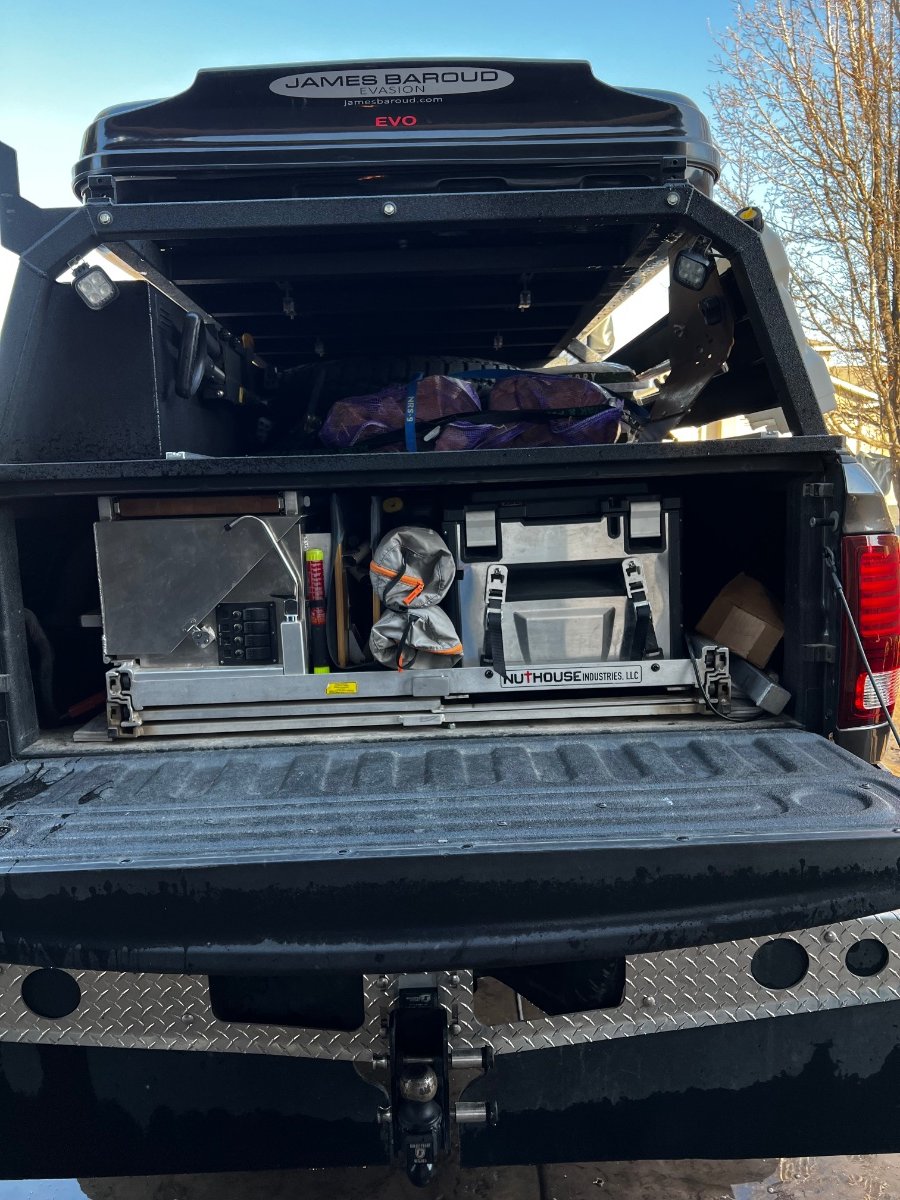
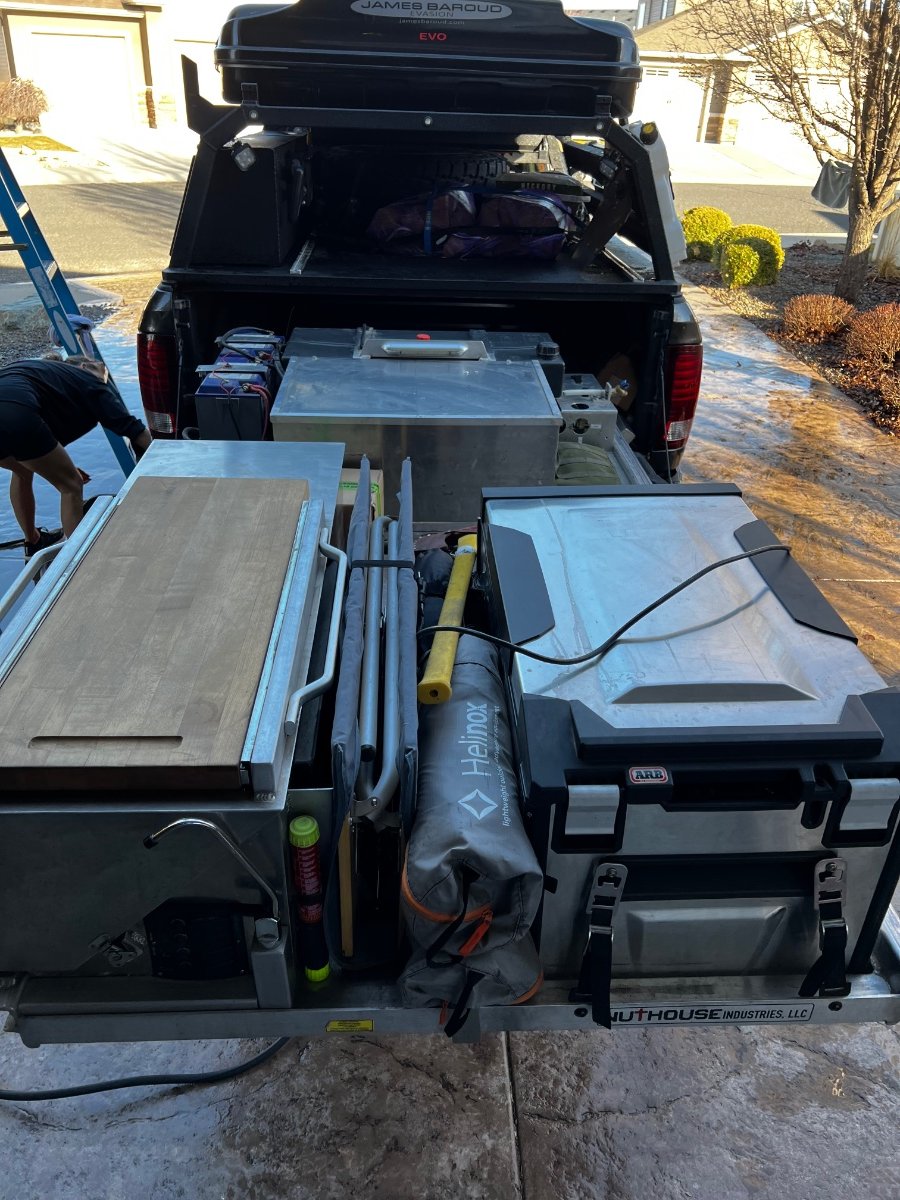
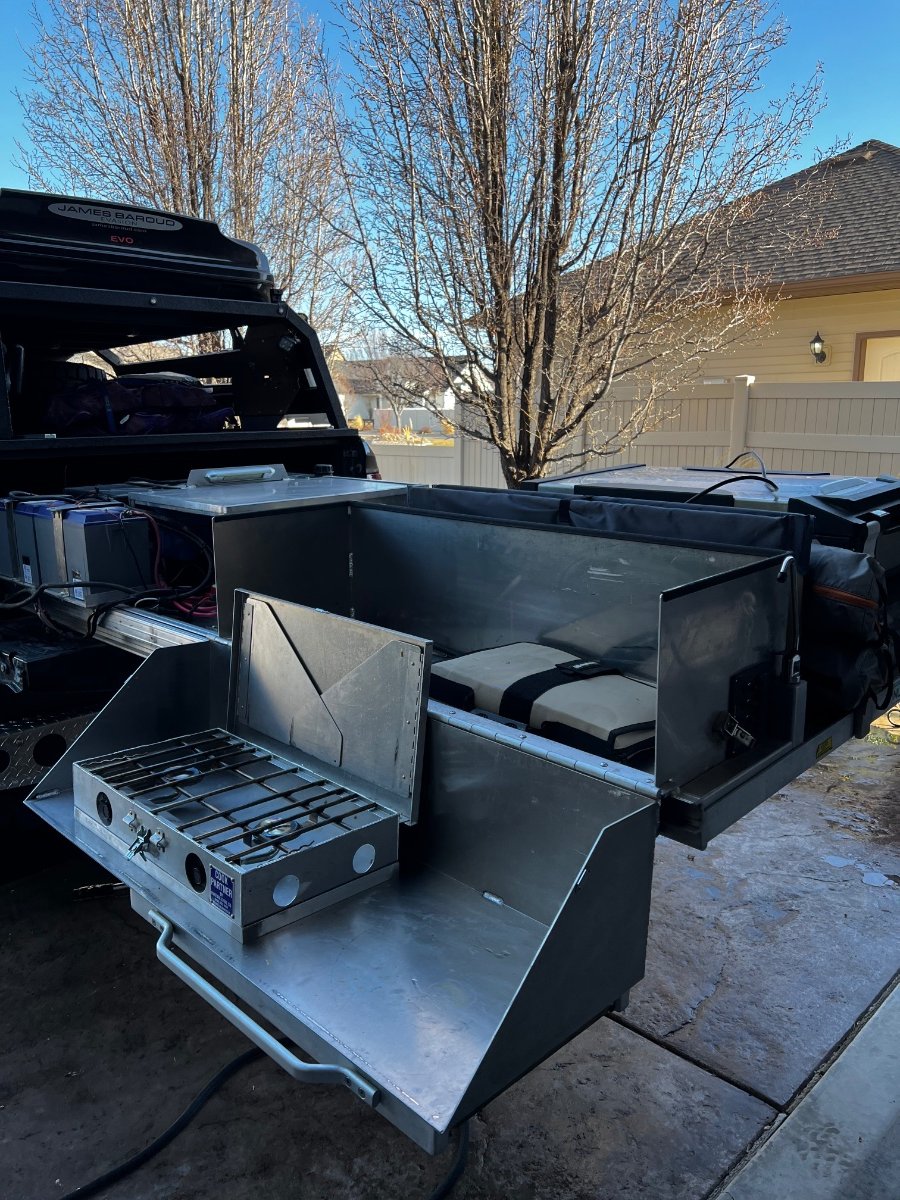
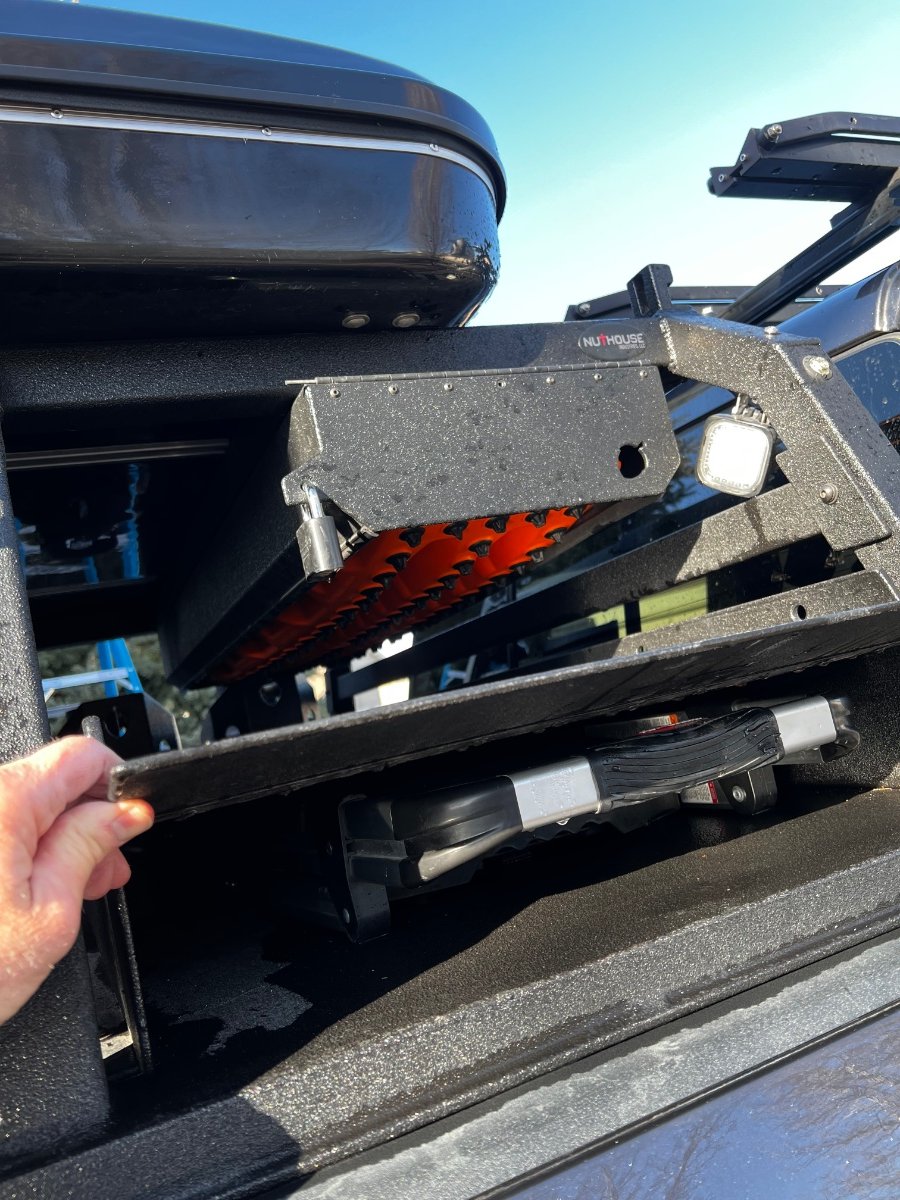
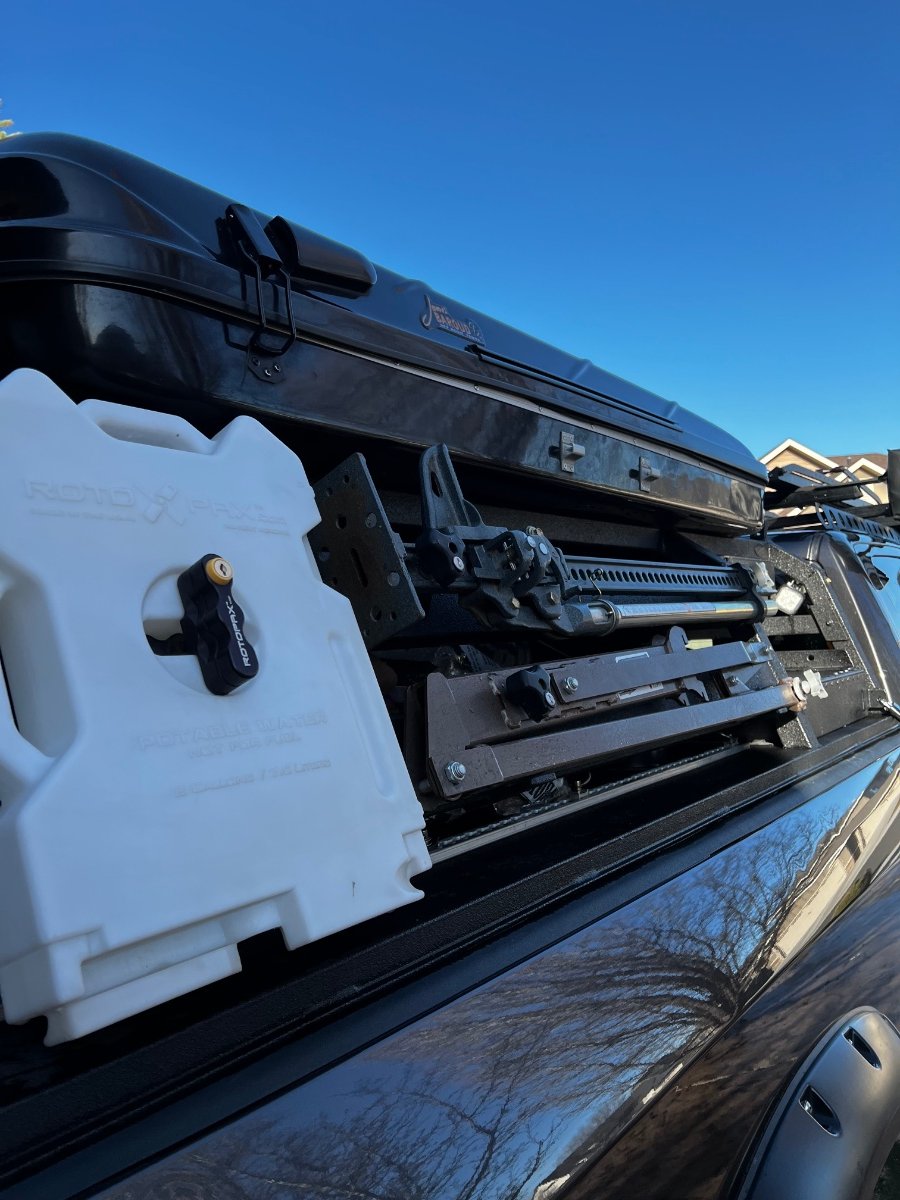
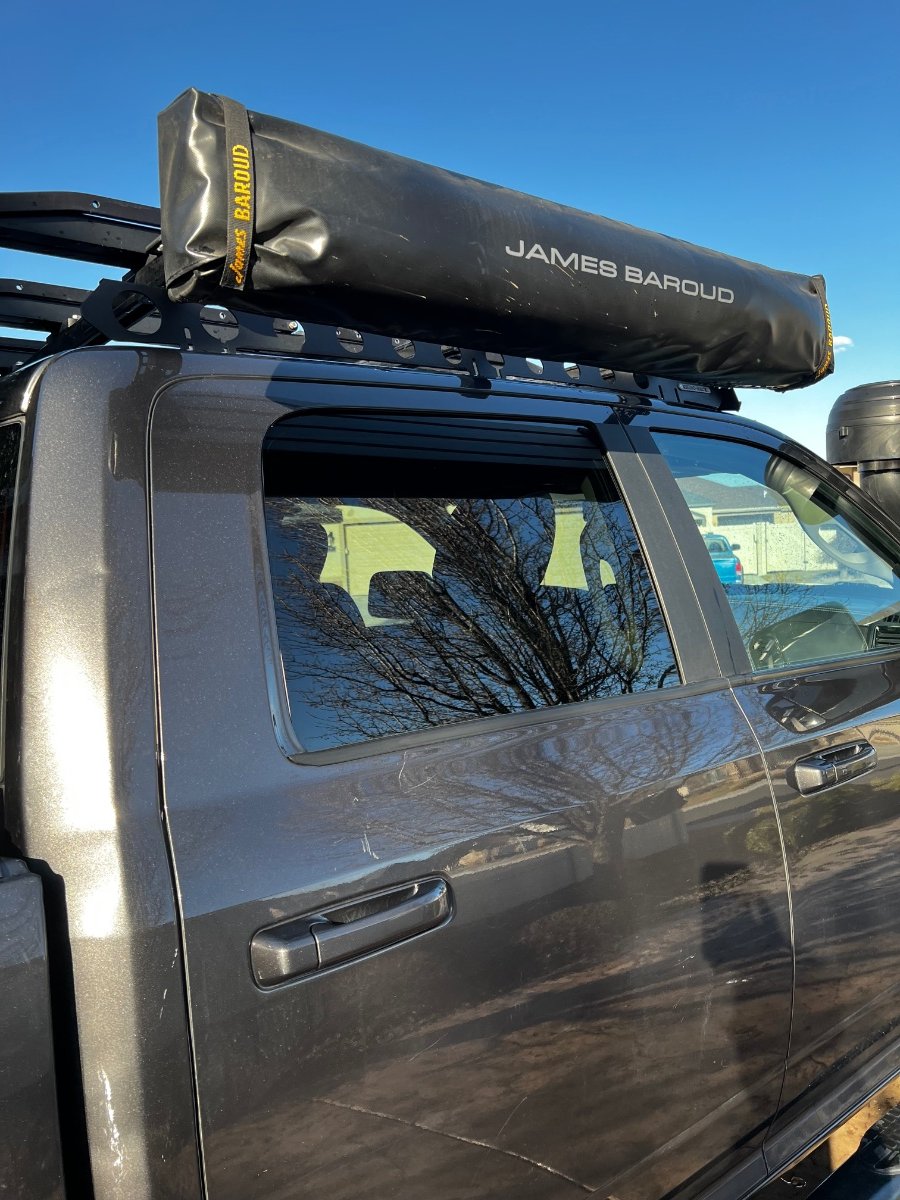
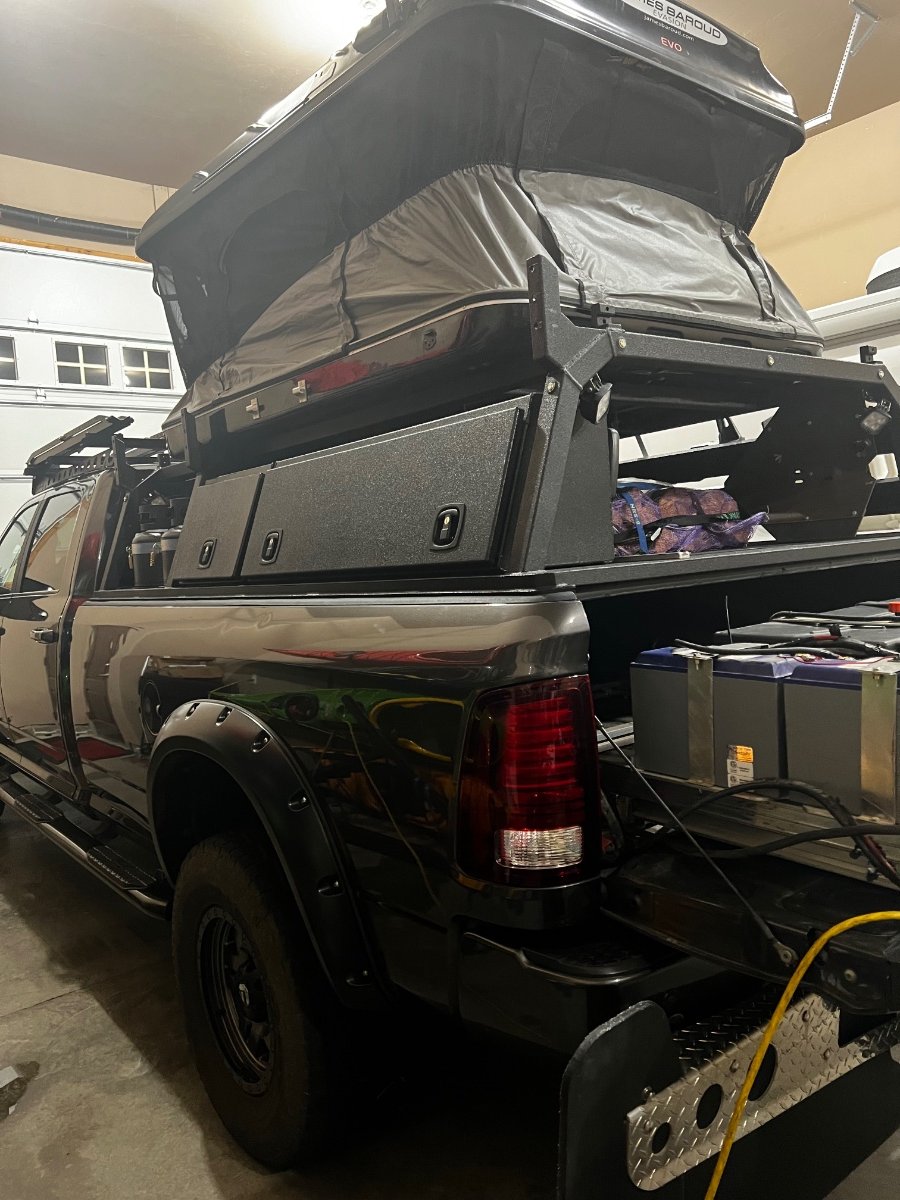
Hello, I have been ask a few times about our tow vehicle, so I thought I’d start a post concerning tow vehicles with an overland conversion. The first picture shows our AEV bumper which houses the 16.5 ti Warn winch and the off-road lights. You can also see the AEV raised air intake. The second photo shows our Icon suspension which gave us a 2 inch lift. Next is a side photo with the James Baroud rooftop tent, comfortably sleeping 2 adults. The rack was built by Nuthouse Industries in Ohio and has led lights all around. From the rear you see lockable storage on the left. Behind the firewood is our extra full size spare, with the other mounted under the truck. The next two photos show the full length slide. It has a 16 gallon fresh water tank with a pump, an electrical system with 200 AH Battle Born lithium batteries, solar smart charger and 2000 watt converter, all Victron. More posteriorly there is an ARB cooler and a fold down kitchen with 2 burners, a slide out cutting board and water. The following photo shows our four maxtrax and our ladder storage for the rooftop tent. Then you see the locked storage for our land anchor (we are frequently in the desert), a hi lift jack and some extra water. Over the passenger doors there is a fold out shower and bathroom, also by James Baroud. The last photo shows the locking storage and two propane tanks. We have a portable propane water heater for the shower. We can carry four bikes over the cab and four behind the truck, unless we have the Oliver then just two additional bikes. We also have an easy on off rack for the top that allows us to carry two 18 foot sea kayaks. There are lockers front and back and two air compressors one for the lockers and on-board air and one to run the Firestone remote air bags. We also had a 42 gallon diesel tank put in. We had a large awning that was destroyed in a microburst, not sure I’m going to replace that! Kirk
 6 points
 -
If you have the 3 way Dometic it runs the most efficiently on propane. When we’re boondocking it goes on propane and stays there, never had any issues. Mike5 points
-
We've had issues with mopeka and pro smart so I went back to my fail safe plan :) We have 2 x 20lb bottles and open only 1 at a time. If the open 1 runs out, we switch over to the other and go fill the empty. We have a pretty good idea if we need to fill before we run out. Cold weather usually depletes ours in 1 week and if we don't run the furnace we get about 3 weeks. If we cooked every meal in the trailer I'm sure we wouldn't get close to 3 weeks. 2 to 3 meals, and coffee most mornings, a week is about all we do inside. If anywhere close to those times we usually stop, when convenient, and top off. We ran out this morning :)BTW and knew right away in Tucumcari, switched over and all was fine. We were stuck in those 48-63 mph winds for 3 days so I couldn't follow my "gettin' close" plan. Now that we're in 25 degree temps again we'll refill on the way to Amarillo today. Don't get me wrong...if 1 bottle gets depleted, we fill it asap. I'm not trusting my plan with 1 bottle empty. I tried the sensor route and am not spending any more money on them. Works for me so far. BTW...full timers for 4+ years and lovin' it :) If I was part-timin' I wouldn't have a clue as my time line would be tossed out the window. John4 points
-
Enter the sniffer, a recent Amazon purchase routinely put to good use to eliminate any fear of a minor leak! If ever a tank is opened for use, a quick check is performed. Furthermore, I keep the MB Sturgis protective plugs and caps on all of my fittings and hose ends, even on hoses that are rolled and stowed with mating ends connected. Oftentimes when deployed they are laid out on the ground and the protectors ensure a clean/debris-free connection.
4 points
-
Bike racks and Ollie's have been a very popular topic over the years and I don't remember ever seeing your's. Please add pictures if you could and perhaps you could start a new topic so your Starlink post does not get cluttered with off topic questions. Mossey4 points
-
Hey, GJ: Concur 100%, but we've only found 4 hub caps on the Casablanca....🤪3 points
-
Besides a cool truck- I did catch a couple of sightings of an Oliver in the background too. Bill3 points
-
I bought the Truma before we took delivery of Hull #1291 in November, 2022. It worked o.k., but required me to remove the cover of the "doghouse" each time I wanted to check propane levels. So, I invested in a pair of Mopeka tank sensors in 2023. They have worked well. So, I haven't used the Truma since!3 points
-
I finally got around to purchasing some temperature sensors so I could experiment with different cold air return locations. The original 6x10 grille (45 cu. in. free air flow) was installed right next to the furnace in my front dinette seat (Elite 1). I never understood this decision and wonder if anyone knows why Oliver put it there. It is within inches of the furnace and two supply outlets. This is not desirable for even heating and does nothing to create air flow below between the hulls, which would help keep that area warmer in colder temps. My experiment showed much better results than I anticipated. First I sealed off the OEM return with tape. Then I cut two 6" holes in some cardboard and replaced those with the rear curb and street side fiberglass seat panels. I then placed sensors on the floor of the basement down with the plumbing on each side under those holes. I placed the third sensor under the sink. When I turned on the furnace, there was very positive intake through the 6" holes, which by the way, provide a bit more free air flow than the OEM grille (~56sq.in. for 2, 6" round versus 45 sq.in. for 6x10 OEM grille, which actually has 5x9" free air flow). I brought the interior temps up from 58* to 68* in about 10-15 minutes. You can see the temperature difference in the pic below; and this is with the return air holes cut in at seat level, not at floor level and as far to the rear as I would want them! I also noticed a big improvement in heat distribution throughout the trailer, although in our small elite1, heat was never a problem in the cabin. So, before I start cutting holes in my trailer, I ask if there is something I'm missing here, and why didn't Oliver do this to begin with. It seems like a very simple way to markedly improve the performance of an already stellar trailer. Any comments appreciated! Thanks. Dave
2 points
-
You definitely saw an Oliver, White Betty, OTT E2 #13052 points
-
Our DC/DC charger keeps the overland batteries topped off. We supplement with portable solar panels.2 points
-
We have 3 of the Bluetti PV200 portable solar panels for up to 600 watts of solar charging power. They work great, highly recommend Bluetti's products.2 points
-
Awesome Build. Brings back memories of our Four Wheel Camper (FWC) Pop-Up truck camper. Those were fun days in the back country2 points
-
Definitely. Wait, what was your first name again?2 points
-
We have the ProSmart system that Oliver installed ( tank bottom sensor ) and we've had one of the devices fail and the other is difficult to connect to. I did purchase the Truma handheld device as a backup and it works pretty well with the minor limitations listed in previous posts; the device must be placed at a right angle to the tank and multiple readings are required to determine the level at which the propane is found. As I said it works pretty well but it's fairly expensive. The least expensive method, and pretty accurate, is to pour warm water down the side of the tank and then slide your hand down the tank to feel the point at which the tank goes from feeling warm to cold; that's your propane level. I use this method at times and it's works well. I used this method to verify the Truma device's accuracy.2 points
-
I purchased a Dometic LPGC10 model in 2020 and it is fairly accurate to date. It can be a bit finicky at times, mostly due to the device not being held perpendicular to the tank, as required. That may seem like a simple task, but when reaching in and looking downward, there is a degree of difficulty involved. A green light indicates gas, but sometimes defining the tank level is difficult in that the indicator light will toggle red/green; however further adjustment(s) will ultimately determine the tank level. In a brief look at the current Amazon ratings between the two devices, the Truma may prove better; perhaps a user of that device will chime in. I like having such a device, and if/when my Dometic fails, I will research the Truma.2 points
-
No, I didn't shield the bottom - I rarely drive at night and have not noticed a problem in the rain. However, I did notice glare caused by the sun reflecting off the Oliver's white shiny surface. That cause me to paint the underside of my "hood/cover" with ultra flat black paint. This plus moving the camera a bit further aft/towards the back of the trailer helped. Hopefully in about a half hour or so I'll have a chance to take a couple of pics of the hood/cover and post that under a separate thread. Bill2 points
-
I'll be curious to see if you shielded the bottom as well. Those three amber running lights make the camera nearly useless at night; especially in the rain.2 points
-
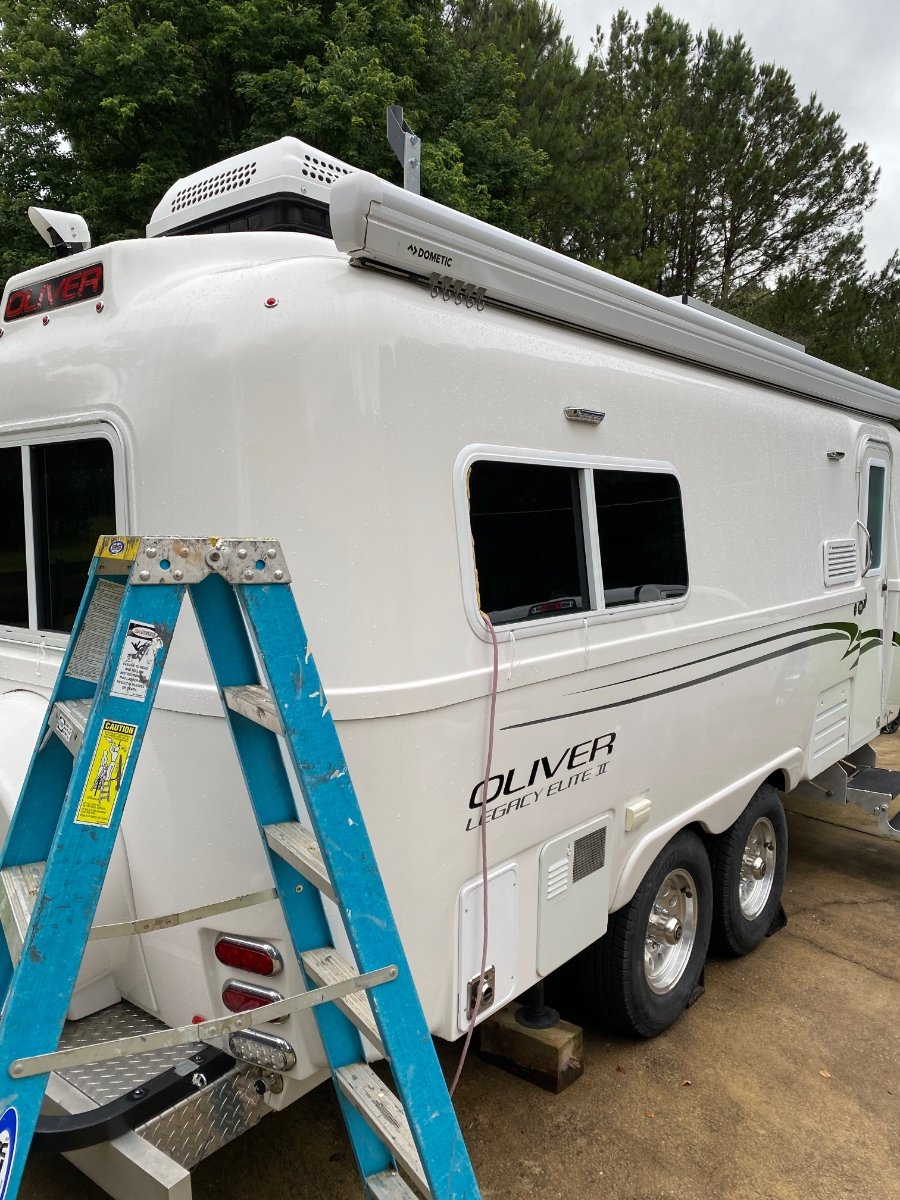
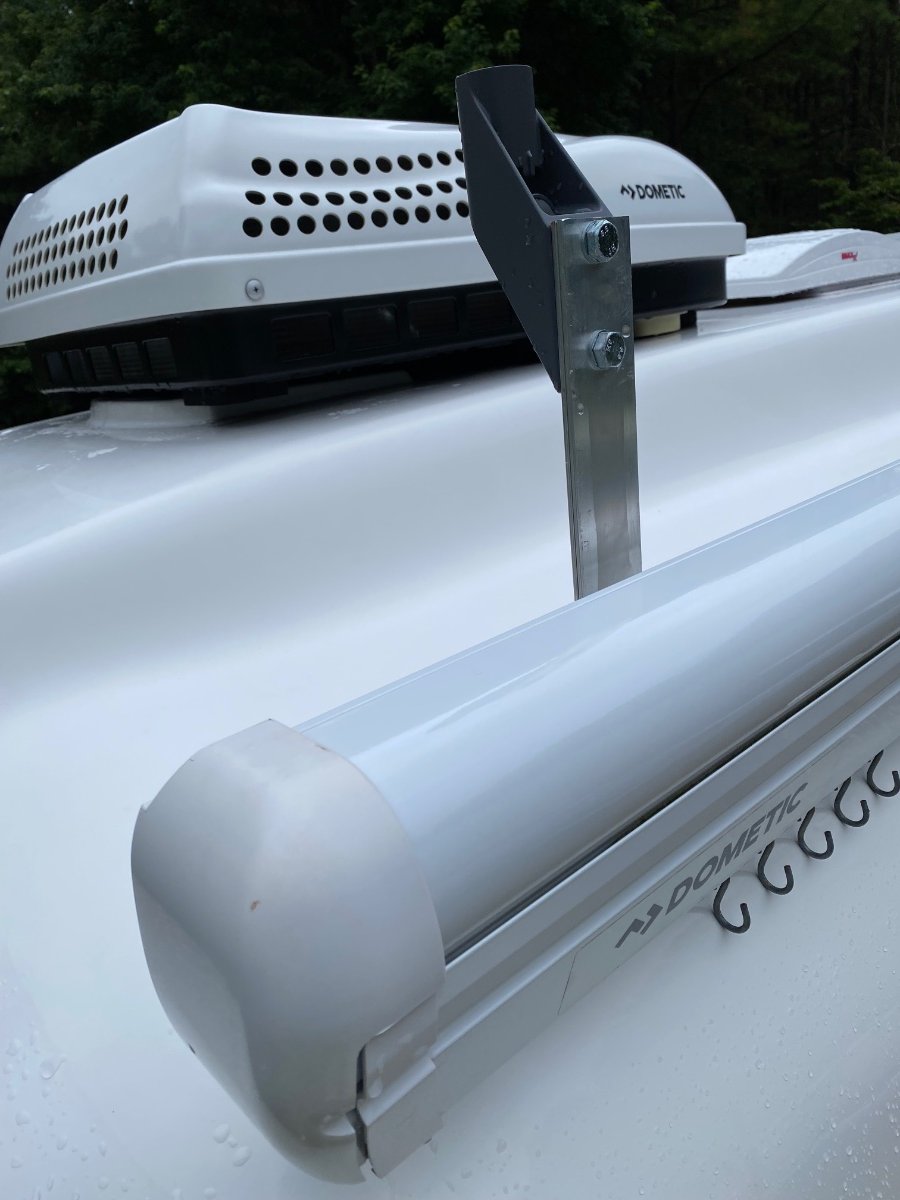
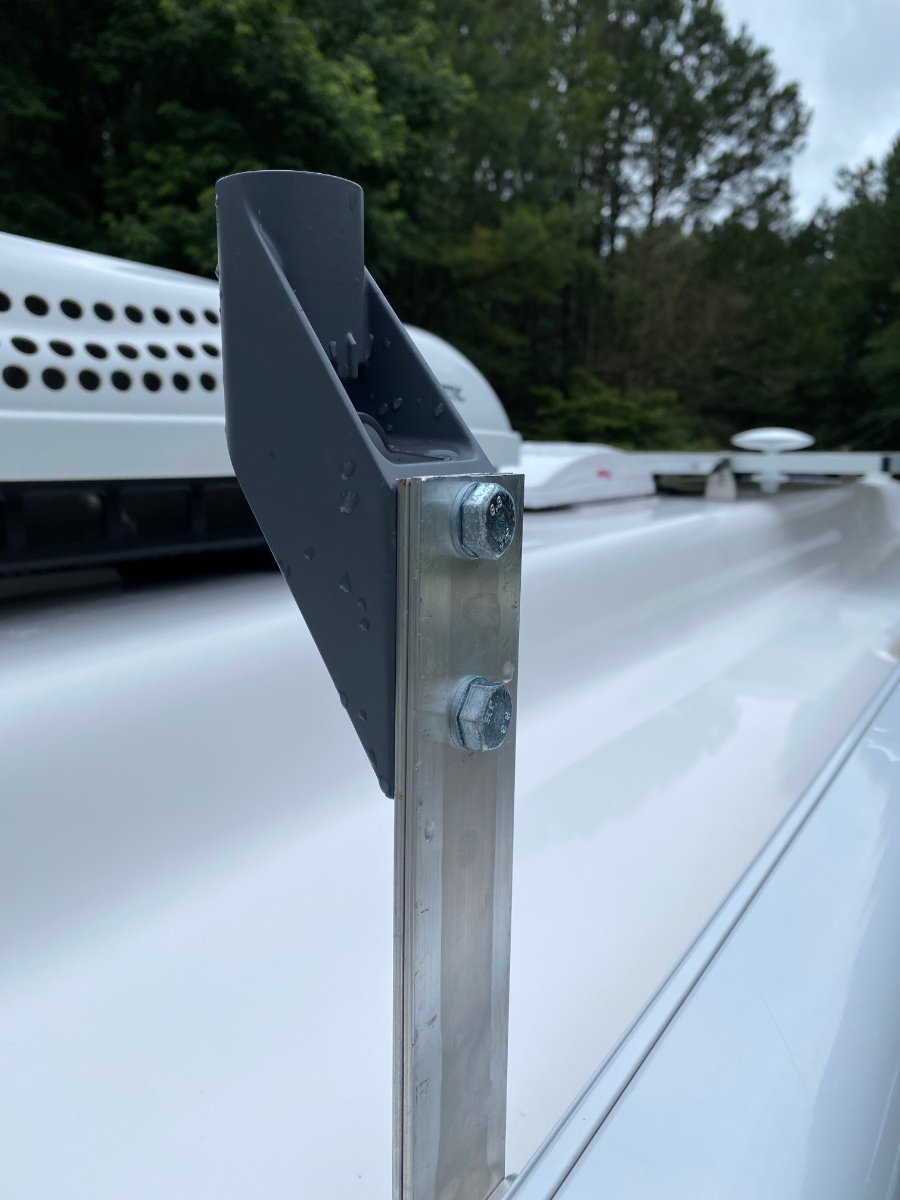
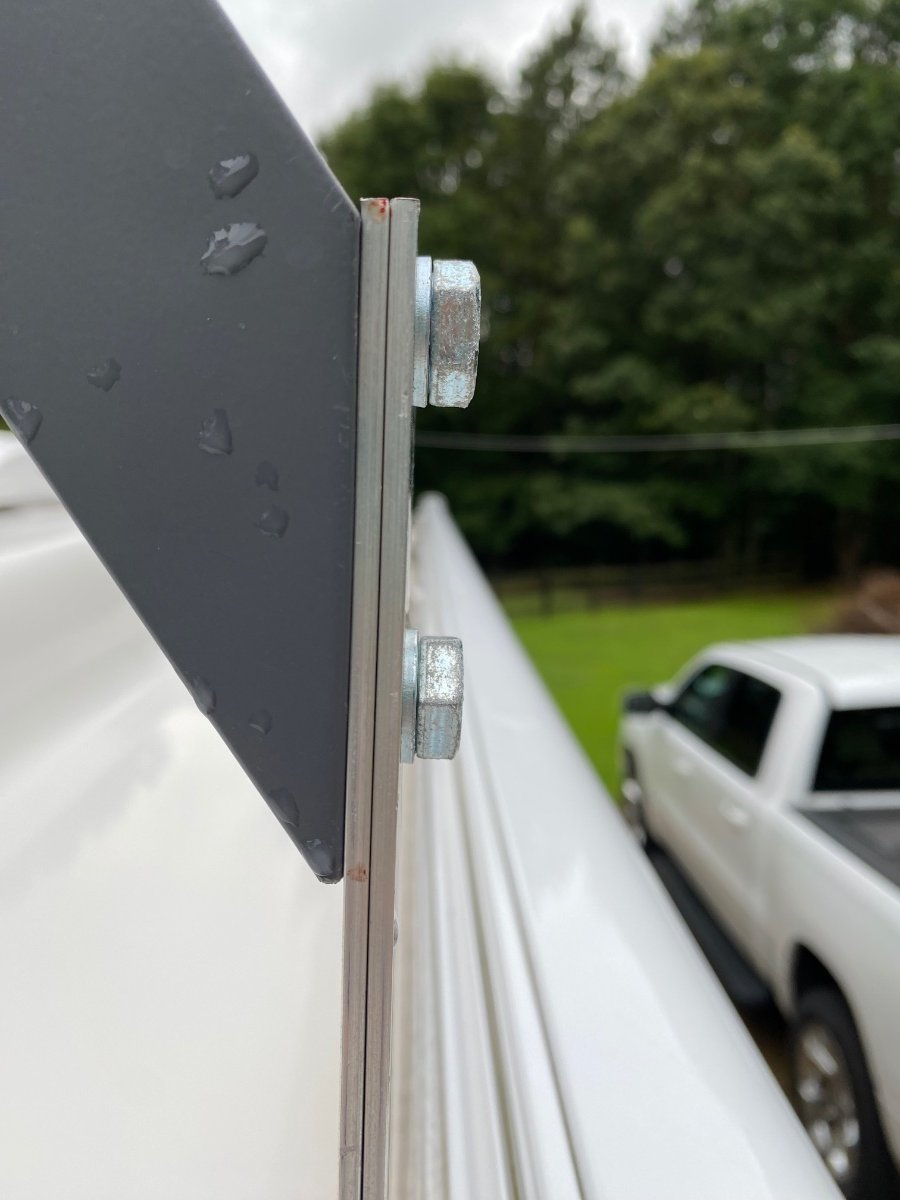
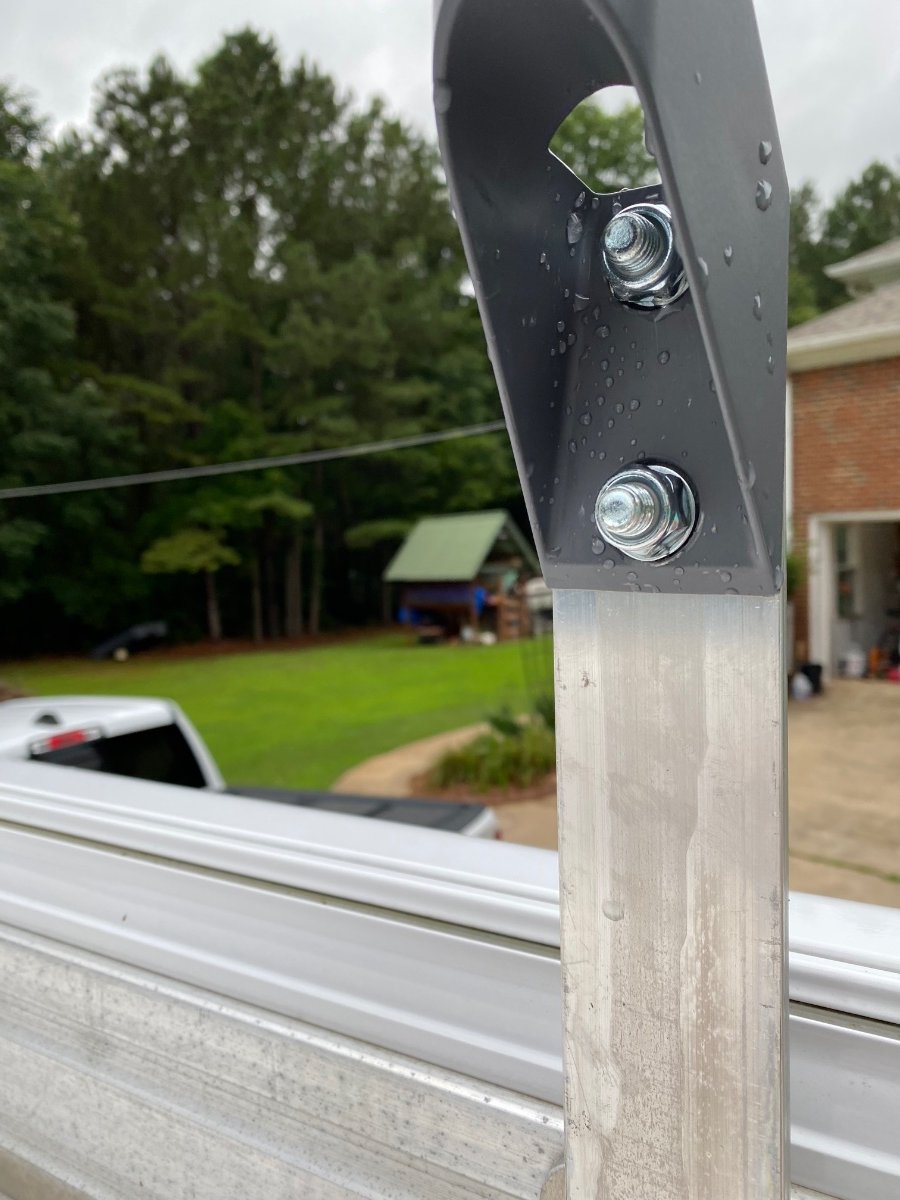
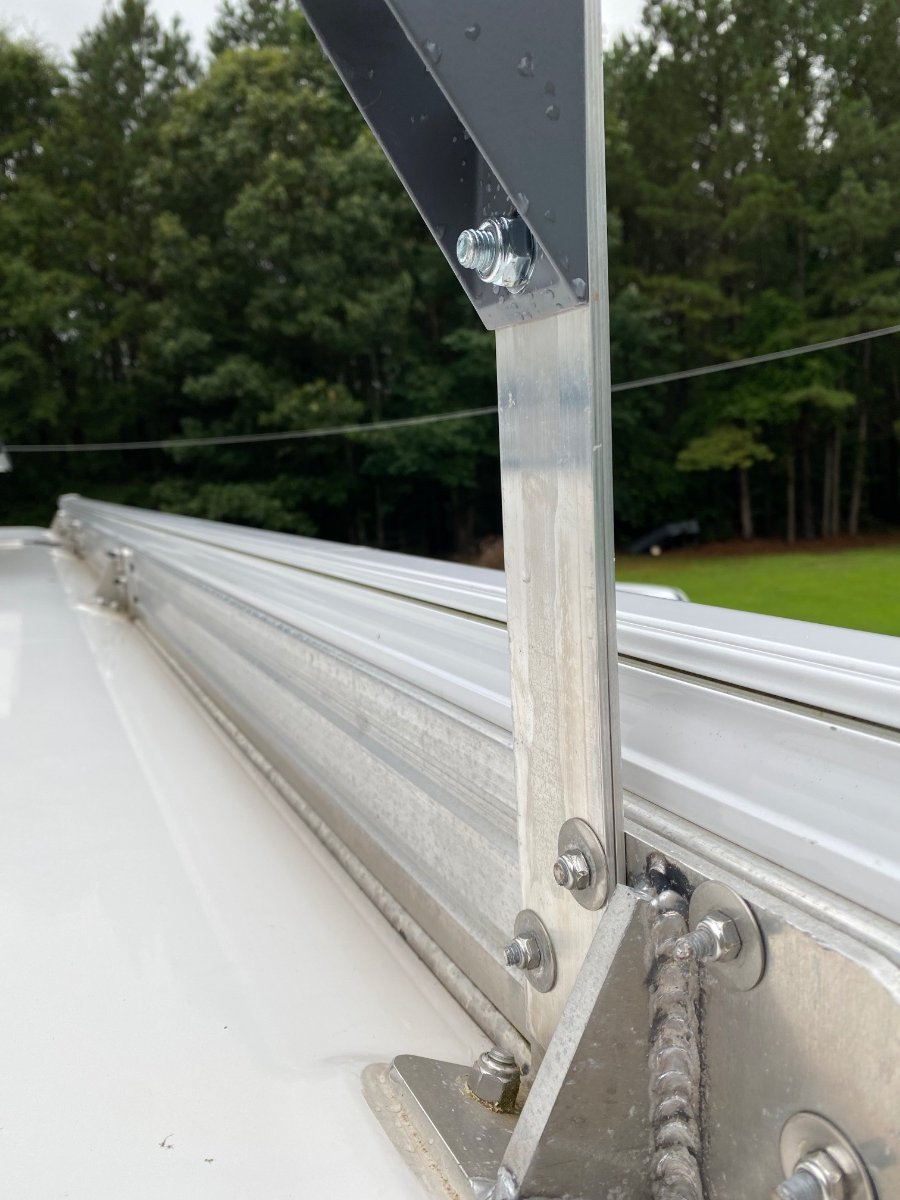
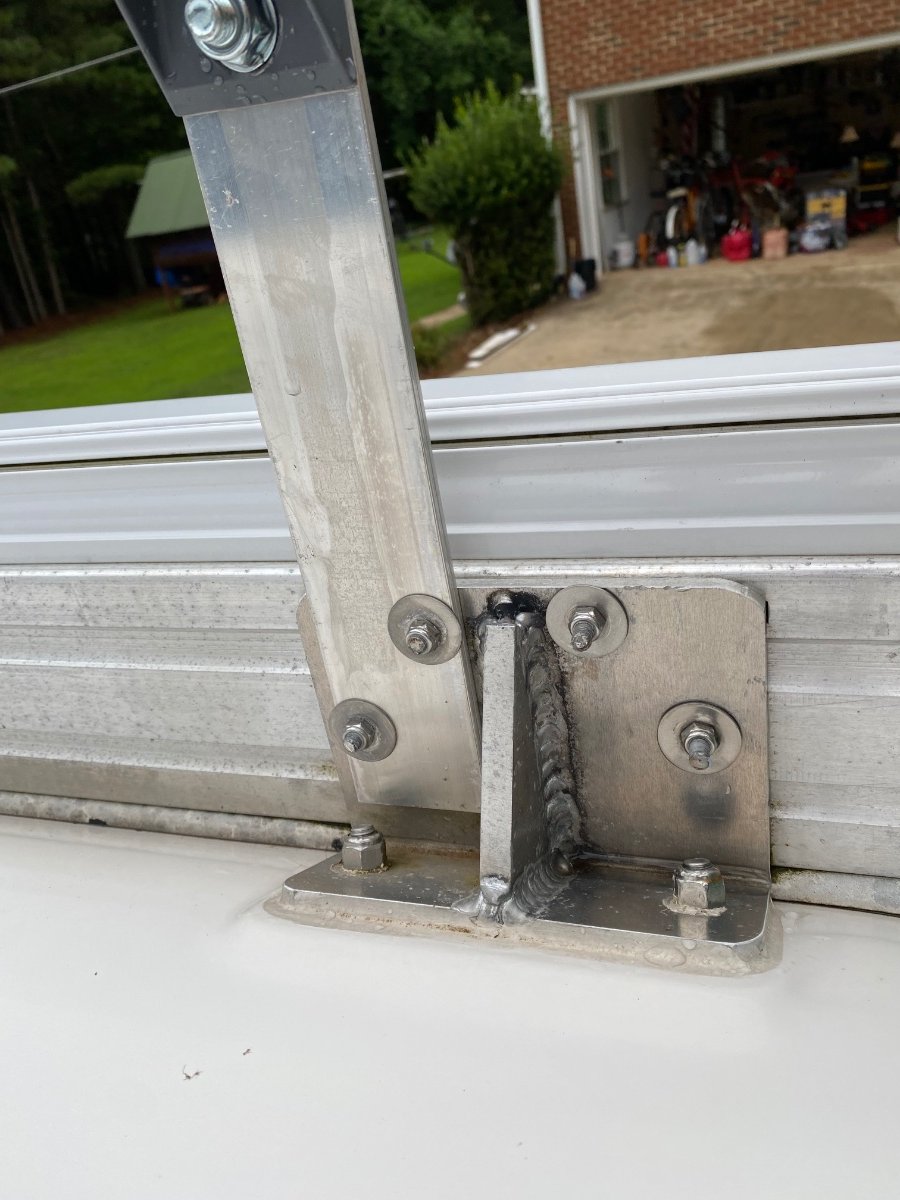
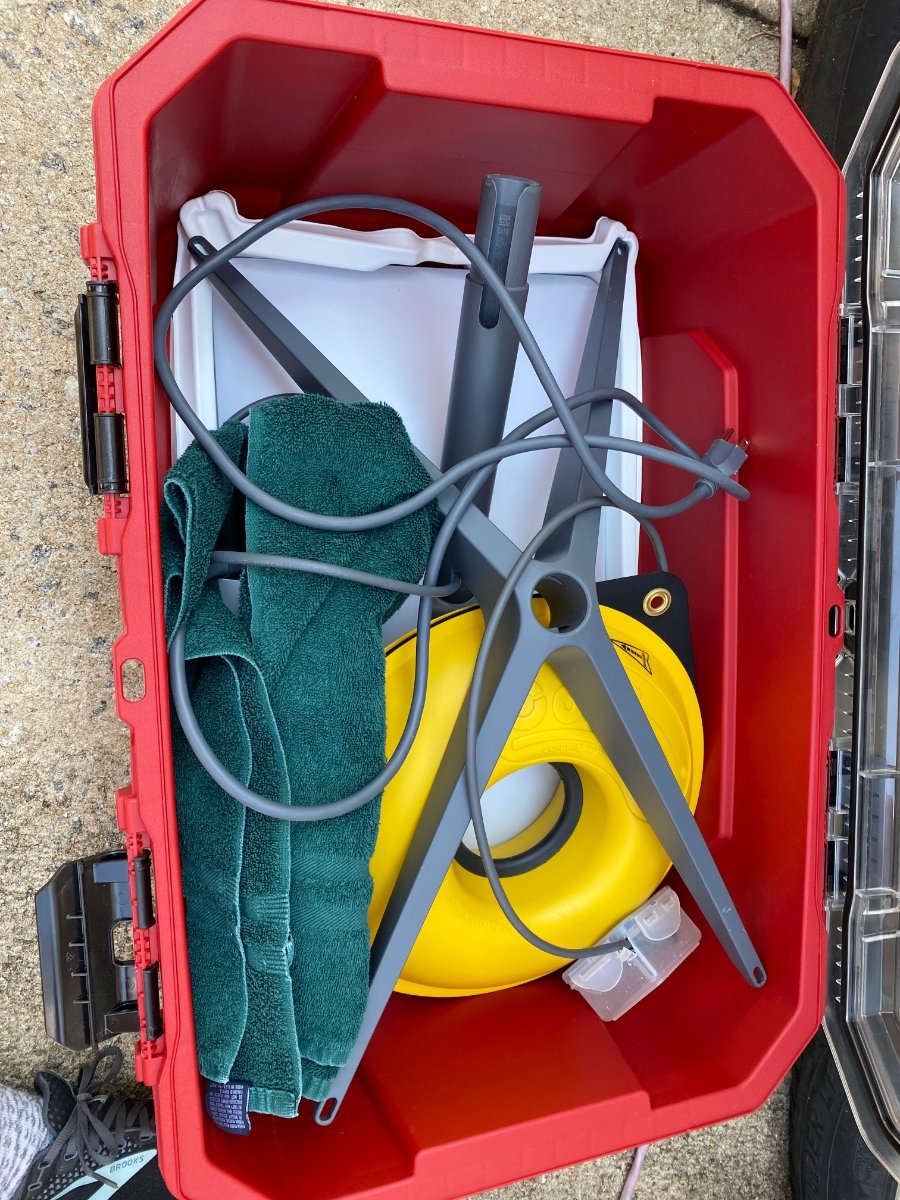
We liked the idea of mounting the Starlink bracket to the roof as we already owned the short mount from when we mounted it to the fascia board of our house. Mounting to the awning where easy and quick access to install the dish at each campground was our priority. But our 2019 Oliver has a Dometic awning whose bolt pattern is diagonal and the Starlink mounts bolt pattern is vertical. Our solution was to select a 2” wide piece of 4’ stock aluminum at Lowe’s, cut 2 pieces for strength, and drill holes on one end to match Starlink mount and the other end to match the Dometic awning. 1. We began by measuring the clearance needed for the dish to clear the awning when the dish is in stow mode, and length for the drilling of holes on both end. For our application, that length was ? We also ensured the trailer was level before starting. 2. Next we used cardboard to make a template to cut and drill the hole patterns. I am sure others may find a better way to do this, but we put dark powder on the bolts and then pressed the cardboard to them using a level on the cardboard to ensure it was straight. (We also visually assessed that it appeared perpendicular to the awning). We then pre drilled the holes in the cardboard and did a test run. NOTE: it took us at least 3 cardboard attempts before we got it right! 3. Now we transferred the template to the metal pieces. We actually drilled the awning pattern on one end of the 4’ aluminum piece before we cut the short lengths. This was in case we messed up, we would only lose a short 2” piece rather than our planned 8” lengths. We mounted the long piece to the awning, but the upper hole was slightly off, so we had to wallow that hole slightly larger, but that did not impact securing it. We cut our length and drilled the Starlink holes. We repeated this process for the second piece. 4. We purchased stainless steel bolts, washers and lock nuts for the Starlink end. So we stacked the 2 aluminum plates and installed. The direction we chose for the Starlink mount was to make it easier to see and plug in the router cable to the dish when we put it up there. NOTE: the awning bolts had been cutoff and threads were damaged so the nuts wouldn’t come off easily on the rear awning bolt set. Thus we had to use the set forward of those. 5. We have traveled at 65mph and it doesn’t seem to move and remains secure. 6. Like others, we bring the 4 legged dish mount/anchor and use it if we are under trees and need to move the dish 50’ away from the camper. We aren’t concerned about theft of the dish as it cannot be used by anyone else. Each dish is specific to the owner’s account. For interest, I am including a picture of our Husky storage box and how we pack it. We use a Cord-Pro to wrangle the 75’ router cord to prevent tangling. I also notched a Tupperware to protect the cord plug end that goes in the dish. It can be delicate and damaged easily. 7. We current put the cord thru the basement door and plug into the router via the trap door at the bottom of the bedside table (we have twins. The basement door has a notch in the rubber seal where the cord fits and allows us to close and lock the door without pinching the cord. Eventually we plan to convert the satellite port. Please ask questions, we would be happy to answer.
1 point
-
Purdy is good - we like purdy! Ha!1 point
-
FYI- the rubber “Halo Rings” allow the bottles to sit a bit higher in the rack giving the sensors a bit more space. Makes a tight fit - and keeps the rust from taking over on the bottom of the tank rack.1 point
-
@Nancy_D, we have a Norcold 3-way refrigerator and use it to freeze the blue freezer bricks. We typically use 6 bricks, in 2 groups of three and rotate the groups as needed to refreeze them. Typically this is a daily rotation. We have added supplemental fans mounted at the rear of our Norcold refrigerator, which make a significant improvement in the cooling capabilities of the Norcold refrigerator, especially when outdoor temperatures are high. If you encounter problems with you refrigerator, I recommend use considering the Beech Lane Refrigerator Fans The freezer bricks always refreeze overnight. I don't know exactly how long they take to refreeze, which will vary somewhat depending on the outside temperature and activity opening the door.1 point
-
Same here - LPG mode is our boon docking configuration as well. We've yet to experience any issues with either keeping items frozen or freezing thawed items in any of the 3 modes of our Dometic fridge. We normally travel with the fridge in the DC mode and a bag of ice in the freezer to accommodate the occasional adult beverage at the end of those long tow-days. FYI: We had a 3-way Norcold with separate/dedicated freezer compartment in a previous TT and it was awesome for freezing items fairly quickly in any of the 3 modes of operation. Cheers!1 point
-
Very cool Overland TV, @snakeriveridaho! Looks like you've got some of that "Backcountry Pin Striping" too! Your Nuthouse pull-out rack is sweet! Just curious, are you running a DC/DC charger in the TV or the OTT? We've been to the Overland Expo in Flagstaff a few times - very cool rigs there to drool over! Cheers!1 point
-
Sorry to hear about the rally but, Bentonville sounds like a plan!1 point
-
It's definitely not Jacob.1 point
-
I'd like to revive this old thread to ask if anyone has had further experience with trying skirts. This winter I spent 30 days in fairplay colorado starting just after the new year. Within that 30 days there were 3 non consecutive weeks that did not rise above 32* during the day and those weeks I'd say averaged about 10 degrees at night with some down to only 2* or 3* Despite some issues with maintaining stable temperatures inside due to what I suspect to be a poorly placed temp sensor the inside Temps never got below about 50* and I tried to keep it around 70 inside according to the temp reading from my weather station I have stuck to the aft wall just above the chrome seam. All that being said the trailer performed extremely well. I was on shore power the whole time but no city water or sewage since the park was winterized. I filled my tanks before i headed there and I did not bother to winterize because I really wanted to push its limits to see how it would do. Below about 40 ish the walls do start getting pretty cold I was burning through my 40lbs of propane roughly every 5 days though I think that would be dramatically improved if you remember to turn the electric heater on the water heater, I forgot about that feature so I had left the propane heating on for it the whole time. The only time I had any pipe freezing issues was when it was single digits at night, as long as it got above roughly 15-20* during the day it would thaw back out and that was the water lines to the bathroom sink. The hot water line was usually the first to freeze but very little extra drop I'm temp would get both lines. No lines ever burst so I suspect it was only within a section of the pex itself which is plenty flexible to withstand some light freezing. Which brings me to the question of a skirt. I have strong reason to believe that the only place it could have frozen was somewhere on bottom of the trailer between the bathroom and kitchen sink, the heater kept the bathroom itself hot enough that I seriously doubt it froze under the bathroom sink and since the kitchen sink never froze up it obviouslyhad to be further down than that. And there were 2 nights that were particularly windy when those same pipes froze when it was somewhere around 15 degrees much warmer than they were usually freezing at. With my eventually goal of making it through an alaskan winter in this trailer I definitely believe that a skirt would go a long way to keeping the wind out from under the trailer and keeping it livable in single digit Temps and below. The current idea I have been mulling over is to use billboard material to make a skirt that will snap into buttons around the base of the hull and be secured to the ground with tent stakes. This would be heavy duty enough to keep out the wind but thin enough to roll up and not take up much space in the truck. I "full time" so my truck bed acts as my garage for bulky gear/storage and space is at a premium.1 point
-
I am the same way. Must be a Jason thing. lol1 point
-
Looks like I am going to have to cancel my trip this year. My job is sending me to a conference during that time. If anyone wants my site at the campground (F23), I will coordinate with you to cancel my reservation so you can get it right away. @Half Fast Hugo I will have to catch you in Bentonville sometime. I live about 5 hours from there.1 point
-
Very Impressive RAM. I did not see any solar panels on the RAM. Where are they located on the truck?1 point
-
Thanks, SeaDawg. You are correct, I do have a 3-way Norcold fridge. I'll give it a test run. I'm encouraged that it might work. I'm planning to cool the refrigerator and freezer down thoroughly before we load it up and prepare to hit the road. This is not a pt situation - but I've definitely used a bag of frozen peas for just that purpose in the past! i'm just hopeful that I can keep lunches cold on travel days. It would be great if I don't need to purchase ice regularly. Thanks for your thoughts.1 point
-
If you have children or curious pets, an oil filled space heater is much safer to wandering hands or tongues. But they do weigh a bunch more than the typical 2 pound space heaters sole at Walmart. GJ1 point
-
Thanks! I re-read my post and it could use some editorial corrections! We can't take credit for the bike rack mount. It was put on by the previous owner to solve the issue of needing a 2" receiver. It's certainly stable as it's well bolted! I can add pictures of that if you would like. I believe it had it custom fabricated and painted or powder coated. We added O-ring screws at the corners to allow us to tie down gas cans when we carry them.1 point
-
Thanks for the link... my PD converter does not have the LI/LA switch. I could replace it with one that does. I've been debating whether it makes sense to move the converter out of the fuse/breaker panel to a separate device. This *might* be something like a Victron Phoenix Smart IP43 Charger so that I could control & monitor converter-based charging activity with the Victron app. Apologies for the thread creep...1 point
-
Just an FYI on the subject of replacing a converter/charger in a Progressive Dynamic's Power Control panel or upgrading an existing inverter: the wiring and components of any electrical system, whether AC of DC, has been engineered to the specification’s of the system components. If you choose to upgrade any single component, such as the PD converter/charger from 45 amp to 60 amp, you may overload the other components of the system. Please be careful and consider the bad things that can result from our desire to gain capacity from our upgrades and replacements! Mossey1 point
-
I caught this on FB today. Oliver crew is celebrating the 1500th Ollie to roll off the line. I'm very happy for everyone at Oliver. I wonder who will get this hull #?
1 point
-
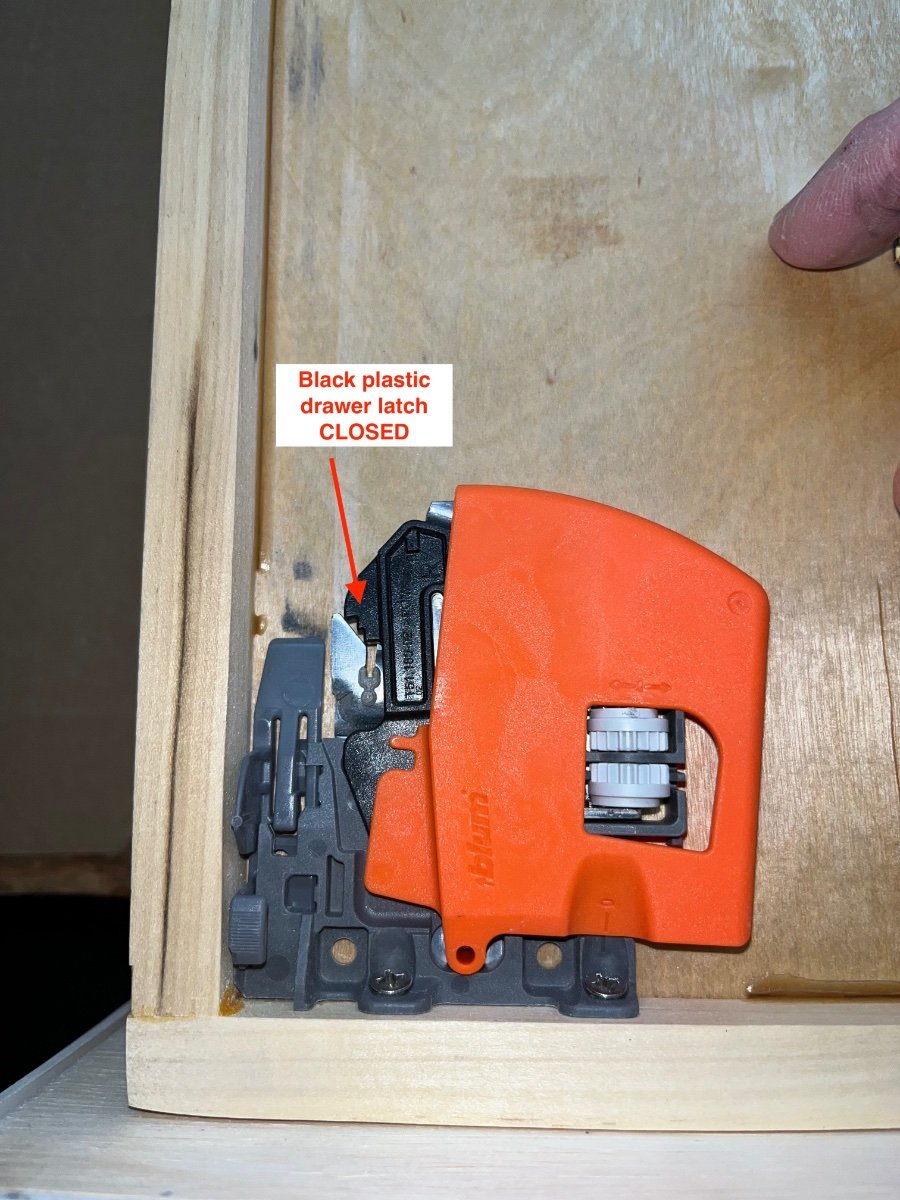
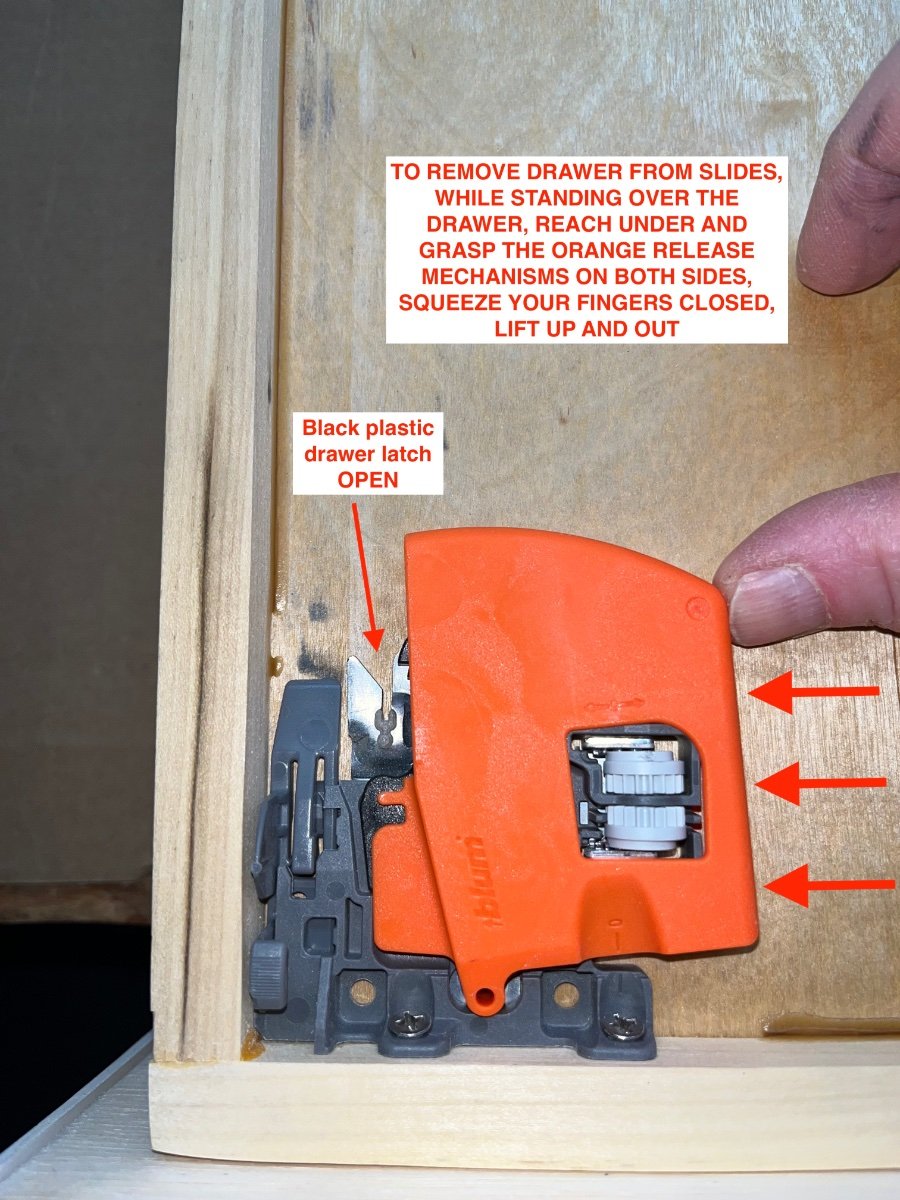
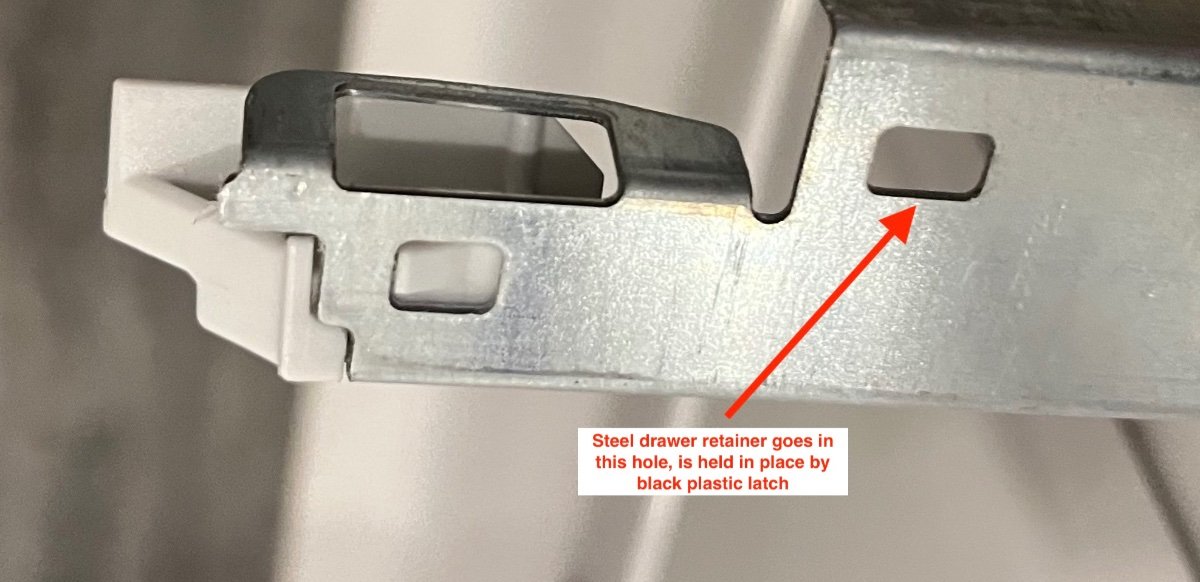
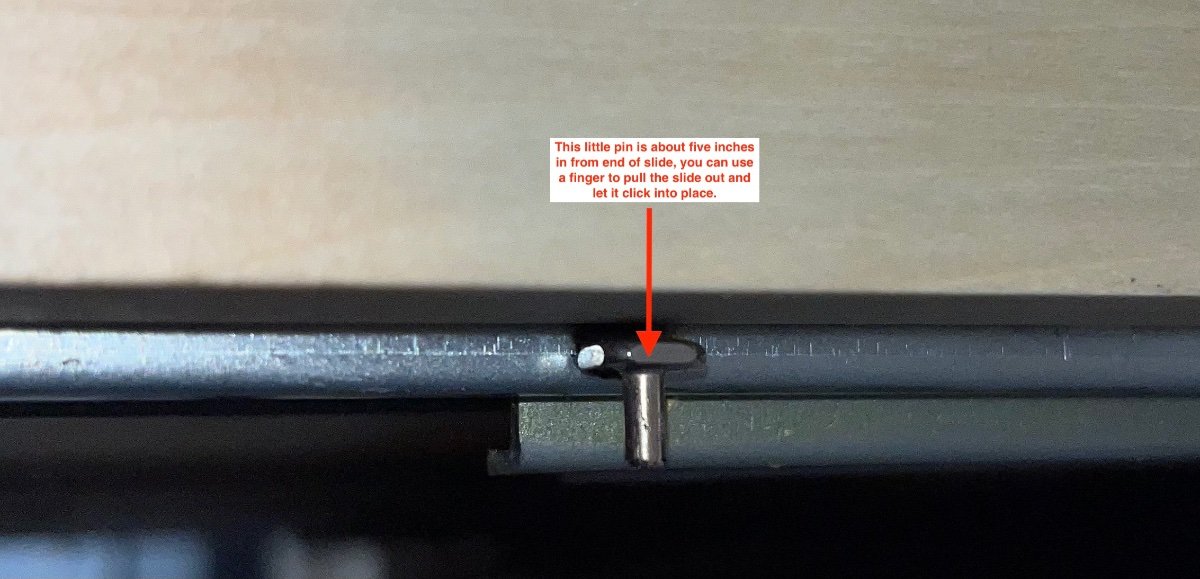
These drawers are not at all intuitive when it comes to taking them out of the galley cabinet. It is dead easy if you pretend that you are a simpleton and don't over think things... . Stand over the end of the open drawer, reach under the sides at the very front with both hands. Put your fingers underneath on the inner edge of the orange release thingies and squeeze, move your fingers toward your palms. The latches will release and you can lift the drawer up and out, away from the slides, which will probably spring back out of sight. That is the "self closing" feature at work. Here is what is going on: The drawer is held to the latch assembly by two TINY SHORT screws. They are known to strip out the soft wood. Sometimes you will find the drawer lying up by the bathroom door with spatulas and other stuff scattered everywhere. Tighten them gently, they will move! If they are stripped, install longer ones. FYI this is a six year old drawer, Oliver may have altered these parts. For example, mine don't have the inner safety latches. Note that you might want to wear disposable gloves. EDIT: one member installed 1” long screws, driven into new holes at an angle, and found that to be a very solid way to do this. Here is the end of the slide, showing the opening that catches the latch. THIS IS SO VERY COOL! I just discovered it after all these years.... On the bottom of each slide, about 5 inches in from the end, is a tiny pin that sticks down. When reinstalling the drawer, you can use it to pull the slide outwards until it clicks into the latch. It keeps your fingers away from the grease too. Finally, you can flip each drawer and lay a thin bead of wood glue around the joint between the bottom and the sides and let it sit overnight. It will dry almost clear, so don't worry about minor mistakes. Plus nobody but you will ever know. I do not recommend gluing the inside of the drawers, that will show and it also has some sort of protective clear coat, so the glue might not stick. This thread is very much related: ... https://olivertraveltrailers.com/forums/topic/2151-how-to-galley-drawer-travel-straps/ John Davies Spokane WA
1 point
-
You didn't mention the conditions under which you are camping. Are you boondocking or in a campground with full hookups? If you have electricity, I would suggest going out and buying a small electric heater. It will easily heat your trailer to 70 degrees or more. We keep one with us at all times. If you are boondocking, just put on some extra cover or clothes. You could still buy the electric heater and run it off your generator or for short stints off the batteries. How long you can run the heater is dependent of the type batteries you have. We even carry a Mr. Heater Portable Buddy gas heater that runs off a small propane bottle or a larger tank with an auxiliary hose. We like to have every eventuality covered. I don't like being inconvenienced by something breaking down on the road.1 point
-
@RoadKingsofGA Very nice and creative! And your documentation of the project should be very helpful to others. But I’m more interested in what may be a bike rack mounted on top of the sewer hose storage area. Can you elaborate on that project if it is indeed a bike rack mount. Mossey1 point
-
There is a basic flaw in your reasoning, would a casual thief know that? 😉 A cable lock around a fixed object would make me sleep a little easier. FYI your awning mounts should have holes drilled as indicated by the arrow, later versions have a great big opening there. Otherwise it will trap water and debris and corrode them. Especially if you have not removed that pesky rubber seal… John Davies Spokane WA
1 point
-
I completed my rear jack inspection and re-greasing last week, finally. Look like it was the first time since the jacks were installed at Oliver. Unlike @John E Davies my gearbox has no drive area, however, it was certainly time for new grease, no question. I gears looked brand new with no signs of heat strain (no brown areas). I think it was @John E Davies or @SeaDawgwho mentioned to loosen the three Allan nuts under the gearbox in order to spin the passenger-side gearbox in order to get it around the edge of the fiberglass edge. It worked like a charm. Thanks! I cleaned out as much old lithium grease and replaced it with fresh Mobilith SHC PM 460 White Lithium Complex Multipurpose Grease. I even setup my phone to video record the sound and to check for any movement of the jacks under load. I did not notice any movement, but I will double check the jack bolts that go through the frame. Others have reported them as loose as one full turn. I cleaned the jack legs too and inspected for any damage. They both looked with only road grime on them. I coated with a dry lube and worked them up and down a couple times. I forgot to take a pick of my grease job. But, looked just like John's grease job, only white instead of red. LOL Also updated my maintenance log. Don't forget to do that.
1 point
-
I’ve noticed in the latest rounds of factory photos that Oliver has switched to Reflectix style insulation, which is sort of like a foil bubble wrap, rather than the thinner foil backed foam that they were using before. I’d think that it should be more effective. I’ve been adding a layer or two of reflectix in the lower hull myself, over time as I do other things. Unfortunately, there’s no way to get into the upper hull, but with some work you can access much of the lower hull. We’ll see if it makes any difference. One place I’m glad to get the extra insulation is around the beds beneath the windows. It’s actually quite easy to stuff two layers of reflectix in there from below, and I’m hoping that it will keep those walls warm at night and eliminate the condensation if you happen to sleep up against them. So far, I’ve added extra insulation behind the bath vanity, extending somewhat into the closet and bath floor, all of the curb side from the fridge back, then all along the back and forward on the street side to the pantry. The insulation goes from about the belly band down to the floor and underneath the plumbing in all those areas.1 point
-
NC Eagle, I also ordered the Oliver because I wanted to be able to do the same thing you're planning to do in terms of skiing out west. I live in Maine not far from Sugarloaf and Sunday River but I still want to ski out west. I've only skied Steamboat and the conditions weren't great when I was there. I also like to fish and plan to do some of that out there too. I'll be following this thread and if I find anything that might be of interest regarding the skirts or other ways to keep the cold out and things working I'll post it. Hope everything goes well with your upcoming delivery.1 point
-
Hi SeaDawg, if I were going to name my Ollie, it would probably be "Powder Hound". I love skiing, especially in the deepest powder I can find. 🙂 For the past 3 seasons, I've been driving my truck (from NC) to CO, UT, WY, etc., and bouncing around for 3-4 weeks at various ski resorts. I love having the mobility and flexibility to pack up quickly and go wherever the best conditions are. I have gotten so many more quality days in the past 3 years doing this than I had in the past flying in for a week and hoping it snowed where I was staying. Anyway, I can't live in my truck so I use expensive hotels and my dream is to try and do this in the Ollie. I specifically picked the Oliver because I feel it's the best true 4 season TT in the industry. Conditions in the Rockies in the winter can vary from sunny and 40 degrees to storming and below zero - not to mention high altitudes where propane and other things also don't work as well if at all. The more prepared I am for cold, windy conditions for days at a time, the higher my chances are of not having to pack up and leave. My ultimate winter camping trip would be to get to a ski resort and set up camp in nice, 30 degree sunny weather just before the big storm. I would need to hunker down and ride out the storm. These storms often include huge wind, thus I am thinking about the skirts as something that would help in those situations. I would dig out after the storm and have several epic days of powder skiing. I'd find out where the next storm was going to be and go do it again. This is truly possible: https://rvacrossamerica.net/winter-rv-camping-ski-resorts/ The plan was to have most of this year to get to know the Ollie and prepare a bit for the much more difficult winter camping adventures, but having to wait 6 months for the Ollie put a damper on that. The pandemic also may force me to try it this winter as a rookie. I've PM'd with DonnaDuane, who has experience skiing with the Oliver and offered some very good tips. They have not considered a skirt where they ski (Cascades), but said that if in the Rockies at higher altitudes they would. It's rare to see a camper without skirts in a ski camp area. I can't find any data/proof that they actually work, but common sense dictates that they most likely help and certainly don't hurt. I don't want to be the only travel trailer to have to pack up and leave for some reason - that would be embarrassing. If I decide to try skirting, I would want something that doesn't take up much space, is lightweight/portable, doesn't require drilling and is fast to set up and take down. The air tubes seem to meet these criteria but I'm still researching. I don't think they look cool (I'm laughing at the hovercraft vision 🤣) but I'm glad someone does! By the way, my expectations of pulling this off this winter are low - but if I don't it won't be because I didn't try. Here's a great video about challenges RVs, TTs and MH's have in the Rocky Mt. winters: I think the weakest link in the Oliver is going to be the refrigerator. Unless the model has changed, I don't think a heat kit can be added to the one we have in the Oliver. I will prepare to live without a fridge on my first ski trips, but that will be one of the first things I "upgrade" (there are models that supports heat kits, etc. - very similar to the low temp lithium batteries Oliver chose) I'm going to at least practice and test around here on some cold nights. 90% of the time my wife and I will be leaving winter gear behind and camping in tropical sunshine and fair weather and loving every minute of it!1 point


-
Recent Achievements
-


")


")
")


