Leaderboard


Popular Content
Showing content with the highest reputation on 11/10/2021 in all areas
-
For summer 2020 through 2021, camping was about it for safe travel. Or sailing. That's all changing. Imo. Airports are seeing increased passenger numbers, hotels are once again booking, resorts are filling, and I personally think a lot of campers bought in the last few years will begin to languish in sideyards, or go up for sale, as their amateur owners discover they don't love camping, and return to the more lux travel arrangements they prefer. Saw a lot of Quebec and Ontario cars on i95 yesterday, but only a few campers. 😃 Well, maybe it's just my hope, but that's my vision. We've pretty much stuck to our camping property in NC the last two years, and it's been great, but we're ready to get back on the road, next season. I do have concerns about the many sites turned over to reservations systems. We never used to make reservations, anywhere. But, many places that were all first come, first served are now reservable. I'm still optimistic for the future, however. Someday, they'll have to pry the bulldog collar out of my very cold hands...😅 Btw, there was a billboard on i75 yesterday. "Choose Joy." It was advertising a radio station, but, hey, I'm adopting it as my new personal slogan.3 points
-
CnC and JD: I extensively researched many Lithiums, and as other Oliver owners, narrowed the field to BB's and Lithionics. My factors in doing so were their USA mfg, warranty, reputation, reviews, quality and warranty considerations. In a previous thread, when JD called to our attention that the BB's were on sale ...at a great price... that pushed me over the line to purchase BB's. My trailer electrical loads during travel are to resupply the power used by trailer brakes, DC refrigerator, and to recharge of lithiums for power used overnight. These estimated suggested that for my use, a 30 amp DC to DC charger is optimal. Anything larger would be unnecessary. The 30 Amp Victron Orion cost me $220 with Military Discount and free shipping from BB. The 25 amp Redarc lists as $389, and the 40 amp at $452. +1 for VO. As importantly, BB highly recommends the Victron gear. For similar reasons, I chose the Victron 712 Smart and Victron Orion (VO) 12|12 - 30 DC to DC Charging System. +1 for VO FULL DISCLOSURE: I grease my Anderson Ball for friction reduction. My rig is tongue heavy, and I have never experienced any trailer sway even under extreme crosswinds, grades and trucks blowing by out west. My choice, but greasing the ball "could" be contributing to a restricted return ground path. My F-150 Lariat, SCrew, 3.5 EB, FX4, MTTP comes with fuse #43 that is a 25 amp slotted M-Class fuse. Unfortunately, when Ford went to the aluminum body, the wire size to the 7 pin was reduced. Granted fuse #43 will protect the wire, but it's voltage drop is significant enough that I do not believe it could also feed a 30 amp load to the Lithiums. I have noticed that during the past four seasons using L/A batteries, the 7-Pin trailer connection has significant heat generated discoloration for both the Charge Wire and Ground Wire connections. (And yes I do use di-electric grease to control corrosion). My opinion is that the existing Ford and Oliver electrical wires (Out and Back) are undersized. As does several other Ford and Oliver owners. Research into this lead me to use a "Non-Isolated" DC to DC which requires running both a + and - cable to the trailer systems. It's wiring diagram is slightly different than the one you posted. Good news is it will also significantly improve the return ground path between TV and Ollie. My measured distance for running these electrical home runs approaches 50 feet out and 50 feet back. Although 6 AWG stranded copper could be used, I, BatteryCables USA, and the Victron Forum felt that using the larger 4 AWG was the proper choice. (Not to mention that's what Galway Girl determined as well.) I think we can agree that all DC to DC chargers require careful attention as to how their "waste heat" is dissipated. After all, this WAS the point of my creating this thread. For the VO at least I could find published specifications that quantified the input power and output power needs. The difference between the two is waste heat that must be dealt with. For the Redarc I was not able to locate such data. My experience is that when a manufacture does not want such a comparison to be made, they don't provide the specification data to do so. -1 for Redarc. Regardless, as a PE with extensive heat transfer professional experience, I prefer the fact that the VO is addressing the heat build up issue front on. Large heat sinks and their optimal vertical placement of heat sink cooling fins for heat dissipation was noted. +2 for VO. However, as you indicated, this negatively impacts the number of suitable locations for installation. So, - 1for VO. I am sure your hole in the plate is a good idea to help out the Redarc in this regard, but where are it's external heat sinks? Or do they need a supplemental cooling fan or artificial airstream to keep their cool? Not evident from what I can see from their limited pictures or descriptions that I could find. -1 Redarc. In summary, I thought that since about the only time I will be using my VO will be when I am traveling, why not put it vertically in the front dinette under seat area. With the cushion and hatch cover removed there appears to be space for heat flows up and out of the under-seat area without providing any additional heat to the OEM street-side bunk area. So, maybe a +1 for Geronimo for creativity. This effort has a nice but steep learning curve. Getting my arms around it has been a fun challenge, but doing so would certainly not be possible without the expert inputs that you both, and others have and are providing. They are much appreciated and I look forward to every response. GJ3 points
-
My 2017 LE2 PD4045 charger module was not lithium compatible, so I replaced it with a 45 Amp lithium compatible module. Have you verified that yours is not lithium ready. And if you haven’t already researched the increased AC and DC load requirements, I think you should verify that the wiring and other components of the 12V DC circuit will in fact be suitable for a 15 Amp upgrade and the 120 AC feed for the increased load. I don’t have a DC to DC charger but JD mounted his under the street side bed so heat may not be an issue. I don’t remember if Galway Girl experienced any excessive heat issues with their install. When I installed three BB batteries, I followed Overland’s example and removed all wiring in the battery box except the main 12V B+ and ground and the temperature wire for the Victron 712. And I don’t have any advice about SCC heat output other than the Zamp SCC isn’t a large heat source and it is installed in a very small cubby above the radio. The heat from both of them combined was not a worry for me. God luck and have fun with your upgrades and additions, Mossey2 points
-
I’ve never disabled the anti-sway on any of my trucks, even when towing with the Andersen. The Oliver is not a trailer prone to sway, I’ve never experienced any sway in all types of towing conditions. When I used the Andersen it was for weight distribution. Mike2 points
-
I have a 2018 F150 with the LE2 and Andersen. I don't disable the F150 anti-sway. I used to engage the transmission tow mode. I don't even do this anymore. Most of the time it is so smooth I have to remind myself the Ollie is still back there. The only issue I have is front end porpoise on an interstate highway with rough expansion joints. I've cranked down the Andersen chains with some positive results. (I believe the Ford requirement is more WD than sway control. There should be a label on the underside of your F150 hitch)2 points
-
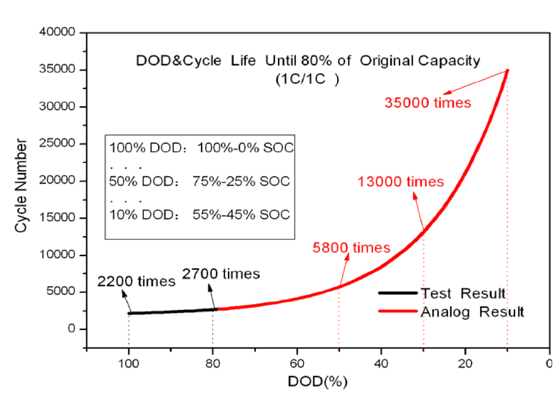
There have been numerous posts in this forum about Oliver’s lithium battery systems—about their usefulness, limitations, and value with respect to cost. Despite reasonable arguments against it, a number of us have purchased the lithium package. Reasons for purchasing the option have included the ability to run the air conditioner (A/C) for short durations (like at highway rest stops), greater usable energy (more boondocking in cloudy weather without needing a generator), faster charging, and longer battery life. This post summarizes things I’ve learned over the last 6 months about the Xantrex/Lithium/Zamp system. This post might also be titled “Things I Wish I’d Known from the Start.” This summary is a work in progress. Hopefully, with your corrections and additions, this thread will be of use to others that have purchased the Lithionics option or are considering doing so. At the time of this writing, manuals and other information for the Lithionics batteries are in the Service Center Knowledge Base — see links at the end of this post. I assume at some point Lithionics information will be compiled with all of the other trailer manuals in Oliver University. Battery State of Charge A key component of the Lithionics system is the app that lets users monitor State of Charge (SOC) and voltage (see links below). The reliability of the SOC values (which describes the amount of energy remaining in the battery) depends on (1) maintaining SOC calibration and having (2) up-to-date Lithionics firmware. The SOC should be near 100% at 13.6 volts, and about 50% (+/- about 10%) at 13.2 volts. If this is not what you’re seeing on the Zamp controller, Xantrex remote, or Lithionics battery app, then something’s wrong. By way of example, a couple times we’ve experienced the SOC readings of 60% when the batteries were dead -- not good. Note that the voltage reading on the app while there is a load on the system (e.g., electric heater) is different than when there is no load; the “resting” voltage may be higher. SOC Calibration The SOC requires periodic calibration. According to the manual for the 130 Ah batteries, the SOC can be calibrated simply by charging the batteries to 14.4 volts. The manual also states that fully charging the batteries to 14.4 volts should be done at least once every two weeks for battery life. Get the 130-Ah battery manual from Lithionics using the links below; at the time of this writing, Oliver has the incorrect manual posted in the Knowledge Base). When charging with shore power, it is not always apparent that the batteries have reached 14.4 volts, because when charging, the batteries only stay at ~14.4 volts for a short while before dropping back to about 13.6 volts. You can verify that batteries have reached 14.4 volts by monitoring battery voltage using the Lithionics app during a charging event. If you are unsure that the batteries are reaching 14.4 volts, you can at least confirm that the Xantrex charger/inverter is set to charge to at least 14.4 volts in the Xantrex app (https://support.olivertraveltrailers.com/portal/en/kb/articles/xantrex-remote-bluetooth-pair-operation) and, under Settings, check the custom absorption voltage. Ours came from the factory set at 14.6 volts, which is sufficiently high to get the batteries to 14.4 volts. Lithionics Firmware At least some of us that picked up our trailers in spring or early summer have batteries with outdated firmware. As I understand from Lithionics, more recent firmware versions have an improved SOC algorithm (our initial SOC readings were unreliable). You can check firmware version with the Lithionics app by clicking on a battery, then clicking on the settings “sprocket” in the upper right side, and then clicking on firmware. Our battery came with firmware version 1.0.05; I’ve recently updated to 1.0.07 by clicking on flash firmware. This has to be done with your phone in close proximity to the battery, and has to be done separately for each battery. Updating firmware comes with a “…this is a critical operation…” warning; you might want to check with Oliver or Lithionics if you have any questions about doing this. Has updating firmware improved our SOC readings? I’m not sure yet, but I think so. So far, the readings seem more reliable, but I’m still testing. SOC Calibration by Cycling A Lithionics rep told me that the SOC can be calibrated by “cycling” the batteries, and that this should be done every two months. Cycling consists of discharging the batteries to reserve voltage (e.g., ~12.1 volts) and then charging to 14.4 volts. However, the rep could not point to written documentation supporting this form of calibration. As the batteries support more partial cycles than full cycles (see graph below), calibrating by simply charging to 14.4 volts (assuming this effectively calibrates the SOC) seems better for battery life. Lithionics batteries will not charge from tow vehicle The standard 7-pin connection from tow vehicle to trailer cannot be used for charging the Lithionics batteries. Charging the batteries from the TV requires a DC to DC charger, which is an aftermarket installation. For more discussion on this, search for John Davies’ Redarc DC-to-DC charger installation description. Batteries Turn Off Twice now one or two of the three 130-Ah batteries have turned off when reaching low voltage (which happened because we were relying on incorrect SOC values). The SOC readings themselves looked OK, but the voltage did not correspond with SOC. The battery State in the Lithionics app reads “Off” for each battery when it is off. There is no flag on the Zamp or Xantrex control panel that alert the user to one or two batteries being off. The lesson (at least for me): monitor all three batteries, not just one, and note the Current, Power, State, and Status Code settings. If one or more batteries are off, turn the battery(ies) back on, and fully charge to 14.4 volts. Inverter Noise The Xantrex charger/inverter can be noisy charging the batteries with shore power (I’ve measured 60-64 decibels in the cabin when batteries are charging, and about 72 decibels adjacent to the inverter). The noise comes from (1) the charger/inverter fan and (2) the way in which the inverter is mounted (the fiberglass wall to which the inverter is mounted propagates noise into the cabin). The noise can be masked by turning on the A/C. Alternatively, the noise level can be reduced somewhat by lowering the charger current. In the Xantrex app, go to settings, and change the Charger Current from, for example, 100 amps to 30 amps. This will reduce fan noise. It will obviously take longer to charge the batteries with lower current. If you would like to be connected to shore power (to run an electric heater or the A/C, for example), but not charge the batteries (to avoid keeping them fully charged for long periods of time, or to reduce inverter noise) you can set the charger ignition control in the Xantrex app settings to “auto-on” (thanks to NCEagle for figuring this one out). In this mode shore power energizes the 110 outlets, the A/C, and the fridge, but does not charge the batteries. Turn the charger ignition control “off” to resume charging batteries with shore power. There are likely ways of re-mounting the inverter so that noise does not propagate into the cabin, with either a different mounting location or perhaps mounts using rubber bushings. Has anyone tried this yet? Xantrex Communication Errors Too often, I’ve gotten “Code 20” communication errors on the Xantrex remote panel. This can be resolved by pushing the red button on the 300A breaker under the streetside bed, waiting for at least 30 minutes, and then pressing in the little red flag on the breaker. Yes, this is a pain (I wish this breaker were more accessible), but it usually resolves the issue. Leaving the Xantrex inverter on battery mode for 25 hours or more will result in the Code 20 communication error. The time limit can be changed in the Xantrex app, but cannot be lengthened to more than 25 hours. As long as the inverter has not timed out, turning the inverter off and then on again at the remote panel resets the 25-hour time-limit clock. Battery Storage Lithionics provides guidance for storing the lithium batteries (see link below). Long term storage can include lowering the SOC to about 50%. Discharging to the appropriate SOC can be accomplished by turning on an electrical load (e.g., A/C or space heater) while in battery mode and monitoring frequently. Theoretically one could set the inverter cutoff voltage (in the inverter app, under settings), to something like 13.2 volts, but the highest cutoff-voltage option is 12.8 volts. Lithionics recommends keeping a log of SOC and voltage readings prior to and after storage for warranty purposes. ------------------------ Hope this helps. Again, please correct any errors that you see, and please add your observations and tips. Fritz ------------------------------------------ Relevant Links Lithionics battery app: https://support.olivertraveltrailers.com/portal/api/kbArticles/386680000012415191/locale/en/attachments/lpqvx861bbc9c842d48f7995281b07d0a193d/content?portalId=edbsnfe5dceb1ade7571879ff200cb63e14a94b62f48e3338c31a6401acd00130b0bc&inline=true). Lithionics battery manual: At the time of this writing, the Oliver Knowledge Base has links to Lithionics manuals for 125 Ah and 320 Ah batteries. However, our LE2 has three 130 Ah batteries as part of the 390-Ah package, and the manuals for the 125-AH batteries and the 130-Ah batteries are not the same. A manual for the 130 Ah battery can be found on the Lithionics website: https://lithionicsbattery.com/wp-content/uploads/2018/12/12V130-G31LRBM8-Battery-User-Guide-R1.pdf. Lithionics Storage Procedure https://support.olivertraveltrailers.com/portal/api/kbArticles/386680000012415191/locale/en/attachments/lrotz3ebee5a7020f42a58eb0d4db18a41356/content?portalId=edbsnfe5dceb1ade7571879ff200cb63e14a94b62f48e3338c31a6401acd00130b0bc&inline=true Lithionics FAQs https://support.olivertraveltrailers.com/portal/api/kbArticles/386680000012415191/locale/en/attachments/lrotz0edc34bc92ef4dce941bbb7f3f2d89db/content?portalId=edbsnfe5dceb1ade7571879ff200cb63e14a94b62f48e3338c31a6401acd00130b0bc&inline=true Xantrex Remote Bluetooth Pairing and Operation https://support.olivertraveltrailers.com/portal/en/kb/articles/xantrex-remote-bluetooth-pair-operation
 1 point
 -
Maybe the folks at Oliver could produce a photo calendar featuring the fine photography of Ollie owners? I believe that everyone on this forum would want one. It would also make a great marketing tool. I slapped this together in Photoshop as an idea.
1 point
-
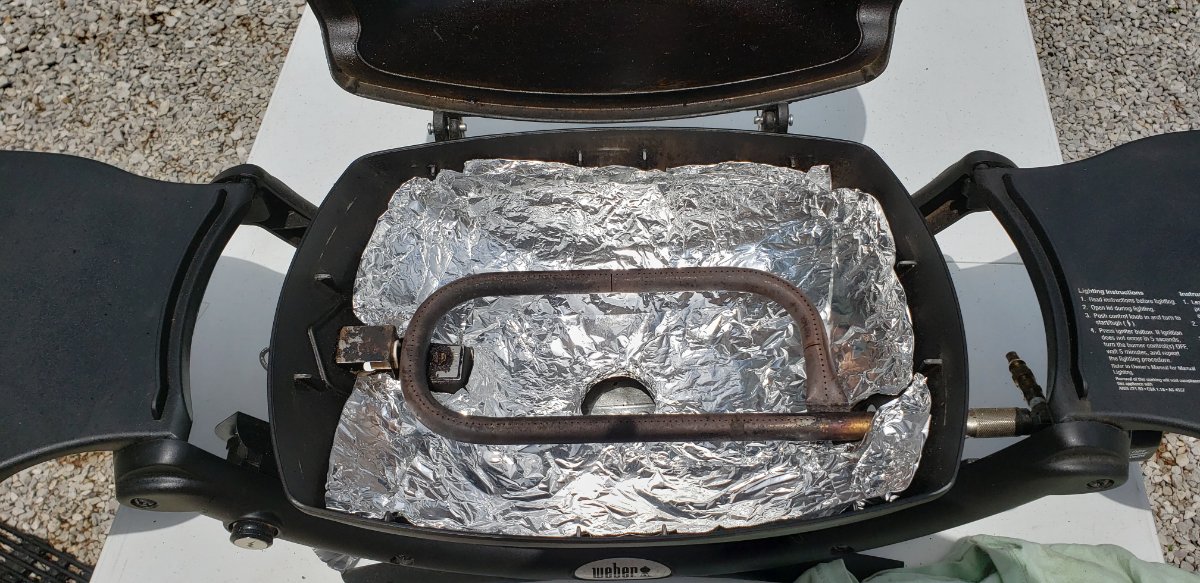
I know several out there use the smaller portable grills - usually on the Ollie propane system. As I have found Oliver Owners to be a crowd that keeps their stuff neat, tidy, and clean - I though I'd post this - my particular thing is keeping the Webber clean. I am sure many do this - but I line the interior with aluminum foil . About once a year - I replace it. We cook with the grill almost every day we are out in the Oliver, usually some kind of marinade on the meat - leaving a mess - the liner Makes clean up very easy. RB
1 point
-
We purchased our 2018 Oliver LE2 (Hull 342) with basic batteries, 2,000 watt inverter, 45 amp converter. At the time, Lithium's were prohibitively expensive and I figured that by the time my Duralast LA's were getting long in the tooth, less expensive options would be available. We now see many options for advance power systems, and my Duralast batteries likely will not last a 5th year. Time to upgrade. So, for the past month or so I have been researching, reading, purchasing, and gathering tools, supplies and materials for the modernization of our power systems. As Galway Girl I am phasing the effort: Phase one is lithiums, initial solar capability, and DC to DC charging. Phase II will be to upgrade my Inverter to a 3,000 watt version and possible roof mounted additional solar to support limited duration boondocking no generator Air Conditioning. For Phase one, here are the major components I have purchased, or are planning to purchase: 3 each 100 Ah Battleborn Lithiums Victron 712 Smart Battery Management System Victron Orion 12|12 -30 DC to DC Charger (Power from F-150 alternator/battery PD 4060 (60 Amp) Converter with Lithium Capability ( 😊 Andrew Kesner! ) Pending purchase of Renogy 100 or maybe 200 watt solar suitcase kit After next summer's installation effort, I'll post a report with lists of materials and my thoughts. My trailer almost never will to be used in freezing conditions. It is almost always used in hot mountain or desert conditions. As such, for Phase 1, heat management of the Orion and Renogy Voyager Solar Charge Controller are the subjects for which I am seeking your thoughts and suggestions: I will be using the Orion only when traveling. As such, I am considering mounting it in the storage area that is under the dinette front seat (Not the footwell). When traveling, I would remove the seat cushion and storage hatch cover to vent heat. This heat would be dissipated into the cabin, where it could be managed at stops by using the MaxFan. I will be using the Voyager 20 amp Solar Charge Controller only when boondocking. I would like to mount the Voyager in the battery bay. Will this unit produce enough waste heat to be of concern to the three Battleborns? Would it require supplemental ventilation as a result? Thank you, GJ1 point
-
We tend to camp when and where there are not a lot of others with whom to compete for spots. We are mostly dry campers from Jan-Feb-March in New Mexico and Arizona with some trips in the Spring East and then back West in the Fall. Observations from Jan/Feb 2021 in NM are that we always found a place to set up camp, even though the NM State Park Campgrounds were closed. Even with Arizona park campgrounds open there were few nights where we wanted to stay at a specific State Park campground where we were turned away. At least in NM and AZ State campgrounds usually have some sort of overflow, dry camping spots available and if not, it pays to have a plan B and C in your pocket for other spots nearby. Our best tool for finding great dry camping spots is the iOverlander app. From what we have observed, those with new stickbuilt SOB trailers tend to migrate to campgrounds with full hookups and paved parking spots. In the few trips we have made East and then down to pick up our new Ollie we had no issue finding campsites even without reservations, but this was in late September. Perhaps it is the time of year and location where we travel but being flexible, having a few backup plans in pocket and being dry campers have worked well for us even during the Pandemic where State Parks were closed and tons of new people were out camping. Best wishes1 point
-
@Zodd, I get it. Translation back and forth from 12v dc to 110 ac can be mind-boggling. Fwiw, when we switched from a laptop to tablets, we removed the inverter entirely. No need, and less to worry about. Everything we use on a daily basis is 12v. If we need 110, we'll, we'll go to a hookup. Or fire up the generator. Makes the math so much easier for my little brain. 😁1 point
-
Thanks @SeaDawg I think your statement helps. Maybe I was just misunderstanding the directional part of his statement. BTW this is not about how much a given device does or does not draw (not trying to prove how much a laptop does or does not draw). It was just about his 10x statement of it draw 10x more regardless of device, hence my random example. But if the statement was more about directionally needing to go from 12 to 120 that makes sense. It was not how I hear it but at least makes sense in that framing. For anyone reading this you will not understand the statement if you respond without listening to the clip 🙂1 point
-
There is a lot of craziness that will inevitably die down some, in a year or two, but I doubt that it will ever get back to those simpler times. It is still fairly easy to find spots in less popular destinations mid-week, but even there, the weekends are typically booked solid, Friday through Monday, so you are forced to move along. You really need to be able to boondock for extended periods, and be willing to travel over gravel ranch and forest roads. If you can find a nice primitive site on a BLM reservoir, or NFS pullout, you can use that as a base of operations to explore in your tow vehicle. Do not count on being able to drive into Yellowstone in the summer and find a spot at the spur of the moment. No way! Even the REALLY remote, lightly used National Parks like Great Basin have now gone to Reservation Only. their visitation numbers have doubled recently. You may have trouble finding a spot, but at least now you will not drive a couple of hours, only to see those hated Campgrounds Full signs. The wonderful COE campgrounds around Lake Roosevelt here in WA went that way last Spring, which was a great help, and in their case you can actually reserve the day you arrive. So if you see a spot that is open, you just need to find a cell signal, which can be quite hard, and grab it using their online reservation system (Recreation.gov). I hope that I can camp for a few more years, but at some point the crowds and the horrible summer wildfire smoke will force me to sell. For the cost of my trailer payments and insurance and additional fuel used, I can buy a whole lot of hotel rooms. It will be hard to rationalize all the camping hassles then.😤 John Davies Spokane WA1 point
-
Having done and re-done lithium systems, I am partial to Battleborn, their 10 year guarantee and their corporate ethics. Whenever possible, I like to stay with the same components and I'm partial to Victron equipment. That being said, I agree without John that the DC to DC wire sizing needed from the TV alternator and onward to the Oli seems problematic.1 point
-
Forgot this, you should research your F150 charge wire size and amp (fuse) capacities. They are likely pretty decent, but most likely nowhere close to 4 AWG. My LC200 has a 40 amp fuse in that circuit, I don’t know the gauge. I bet it is no bigger than 10 AWG. John Davies Spokane WA1 point
-
Bugeye driver had the front of his trailer color code matched, and vortex coating. It looks great.1 point
-
You should make reservations for weekends, most state parks get full on weekends. During the week there is better availability. Mike1 point
-
An Oliver employee pulled that trailer to a rally a few years ago (before rally’s were moved to Alabama). The front was black, looked like a spray on bed liner and didn’t look bad. I’m sure it’s good protection. Mike1 point
-
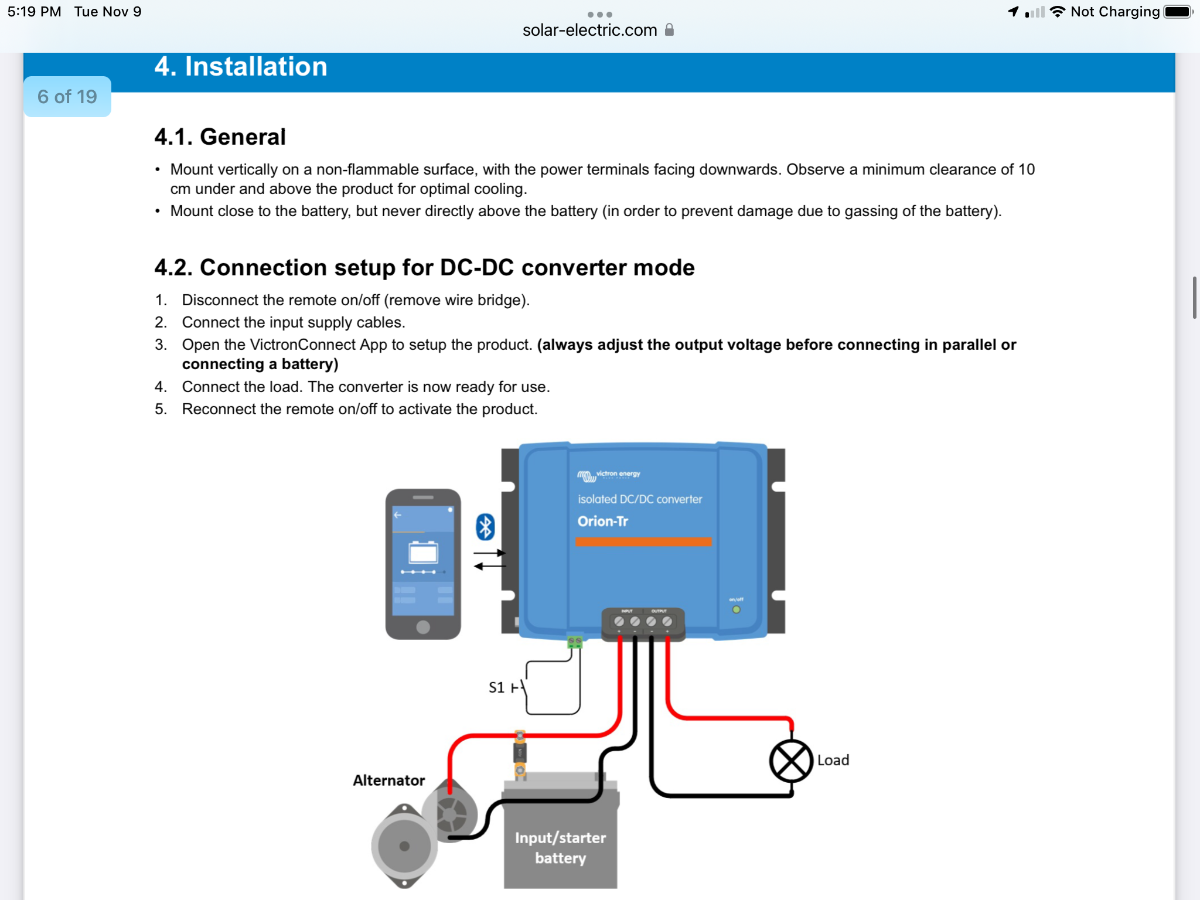
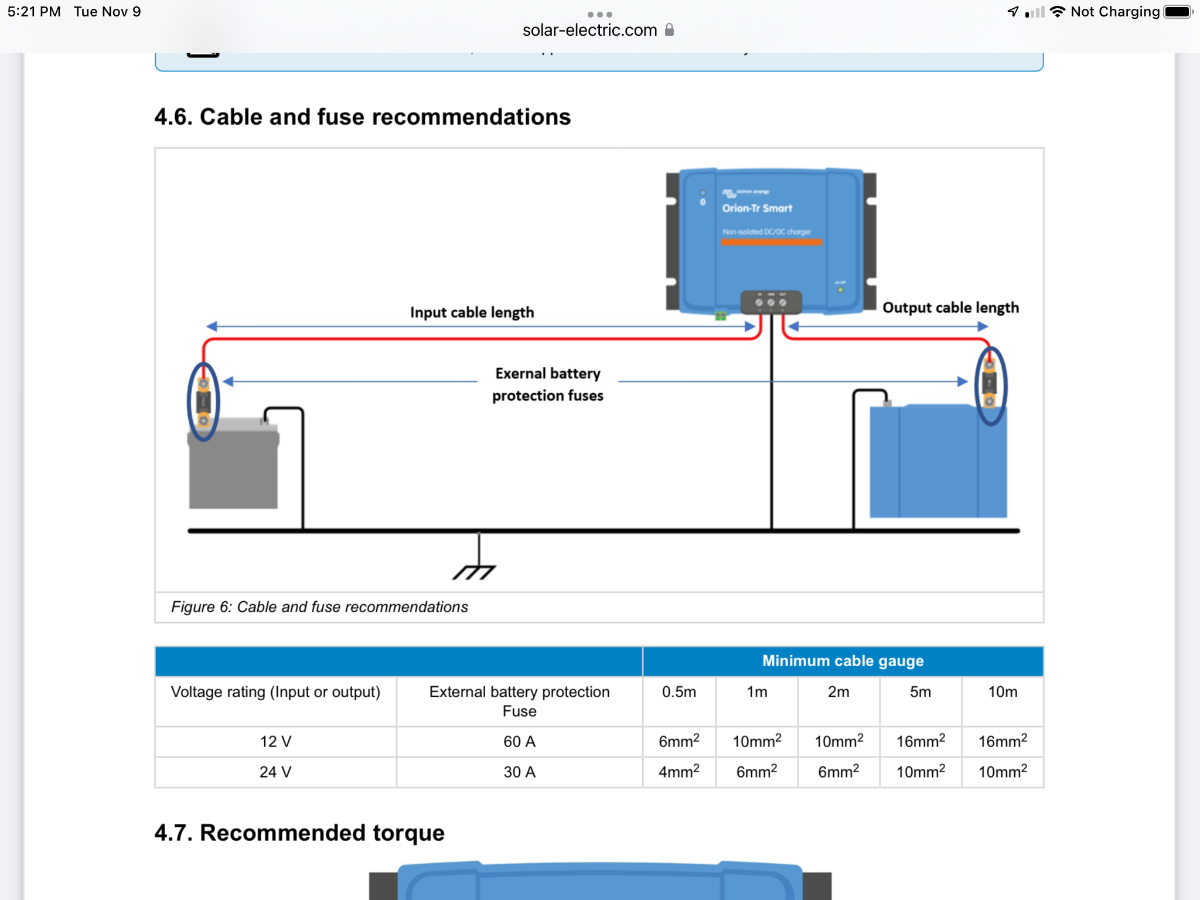
Have you researched the installation instructions for the Victron charger? I did, and that is (one reason) why I chose the Redarc. The Victron must be mounted vertically with at least 10 cm clearance top and bottom, that is difficult to do under the seats. I do not know the height of that particular unit, but my Victron 35 amp solar MPPT charger fits that way, but is not ideal, but it also sits right on top of a four inch diameter vent hole….. https://olivertraveltrailers.com/forums/topic/5329-how-to-victron-mppt-solar-charge-controller-underneath-the-street-side-bed/ My Redarc is horizontally mounted on top of an aluminum plate with big holes in it. Then there is the wire needed, the Victron needs 6AWG from truck battery to Ollie battery, so you must run all new wires. If you are going to all that trouble, you might as well make them even bigger and put in a higher amperage unit of some kind. Why stop at 30 amps? I picked the Redarc 11A unit because it is the biggest output I could find that did not require stringing new heavy cables all over the place; however one of my Ollie wires was actually undersized, and I had to replace that section. I suggest that you study the Redarc offerings, they have a 50 amp dual input one that ALSO functions as a solar MPPT controller. It is very robust and can be mounted in any position, anywhere, even underneath the frame (with waterproof butt splices). BUT you must run suitable heavy gauge cables everywhere, that unit requires 4AWG, and use a suitable Anderson 75 amp or bigger double Powerpole connector at the bumper.. https://redarcelectronics.com/products/dual-input-50a-in-vehicle-dc-battery-charger https://cdn.shopify.com/s/files/1/2204/8993/files/BCDC1250D_Instruction_Manual.pdf?529 https://redarcelectronics.com/collections/in-vehicle-dual-battery-chargers But mounting it outside the hull would completely solve your heat gain worries, especially when charging off the truck when natural wind flow would be excellent. I do think the battery box needs better venting, it should be wide open to the interior, and the door should be sealed and insulated. I addressed this in this thread. https://olivertraveltrailers.com/forums/topic/5301-how-to-lithium-battery-powered-vent-system/ It has been working great, and the battery temps have been remarkably close to inside temps. BUT i only have the standard 45 amp PD charger, and an 11 amp output Redarc one under the rear bed. I think it would handle the extra heat load of bigger units, but that is guessing. The big downside of a higher amp DC to DC charger is that if you sell or wreck the TV, or sell the Ollie, you or the new owner will have to do that part all over again. With the 11 amp Redarc, everything is in the trailer, the only caveat being a smart alternator TV requires you to run a very small gauge voltage sense wire up to the TV battery. John Davies Spokane WA
1 point
-
I used to have a picture of an Ollie that had the front sprayed with Rhino in black. I thought that it would be ugly but was surprised that it really didn't look too bad. I've been told that this Ollie is/was owned by one of the Olivers but I've never confirmed that. Perhaps Jason in Service might be able to tell you for sure? Certainly a picture would help you decide if that is really the way you want to go. Bill1 point
-
We've been to 15 Texas state parks so far this year and the majority were booked up at the time of stay. I would definitely recommend reservations. You can book 5 months in advance.1 point
-
I've had to do several things on my trailer to get them to work better, 1. lube the pin on the Anderson hitch will make a big difference in it's use, 2. drill out the pin holes on the rear bumper so the pins will go in and out with much more easy (John way is the proper way to do it), 3. file the side slide cut on the folding steps so the steps would slide properly, be surprised taking off a 100/1000's of a inch will do. I find that just about everything I buy these days needs a little tweaking to make it work correctly, I sometime wonder what people who are not mechanical minded do, use this forum and learn, good source for knowledge. trainman1 point
-
I do frequent gel coat repairs to kayaks as Im a rough water instructor. There is no difference between the layup of our trailers and my kayaks. A few things to consider: - While your ding goes through the gel coat and exposes the glass matt under, there is no chance that occasional moisture exposure will do any further damage. - Ideally, you would repair the damaged gel coat with an application of gel coat. It's easy enough stuff to work with, the stuff you need can be found at most hardware store or, for more $, at a West Marine and there are plenty of Utube type instructionals. Standard boat repair 101. The downside is that Oliver, from what I've heard, does not use a standardized or even consistent (from unit to unit) white. Nowadays, there are RAL based color options which, in short, means that if Oliver always used a particular white found on a RAL chart, we would be able to order gel coat in that exact color to make a perfect match. Store bought gel coats come in slightly varying array of whites so your repair will be a little off. If you want to try to match, you can experiment with a store bought gel coat and add a little coloration which is usually pricey and comes in primary colors only. - An option may be to contact Oliver to see if they still have or stock gel coat to match your hull number. Could luck out. If so, ask whether their product has wax already mixed in or if you need to add. If the latter, the wax is available from West Marine and includes a formulation of how much to add to a given amount of gel coat. - If you are willing to accept a slight color mismatch, John's suggestion is spot on. Marinetex is a flat, very slightly greyish white which, given the tiny area you have to fill, may be perfectly fine and makes for a super easy repair. If you go this route, I often prep the hole as John suggested, clean out hole and surrounding area with isopropyl alcohol and fill in with the product. Use a tad more then it takes to fill the hole, cover the area with a little piece of rolled plastic clear sheeting like visquene or the stuff you put over windows for the winter and use a spoon or tongue depressor to carefully smooth out the Marinetex which willspread a little beyond the hole - which is good. Peel up the plastic an hour later, let cure entirely, then wet sand with 800 then 1200 sandpaper. Finish with lite rubbing compound then a finberglass polish/wax. Good as new and easier then it sounds. BTW, that process is the same for how I work with gel coat. Best of luck. Gerry1 point
-
Glad you got it fixed. I too have had "issues" with my audio system from time to time - once every two years or so. I suspect that the "computer" chip(s) that run the thing gets "confused" and finds itself in a loop. In any case, a system reset - paperclip into the small hole on the front that is marked "reset" normally does the trick. Bill1 point
-
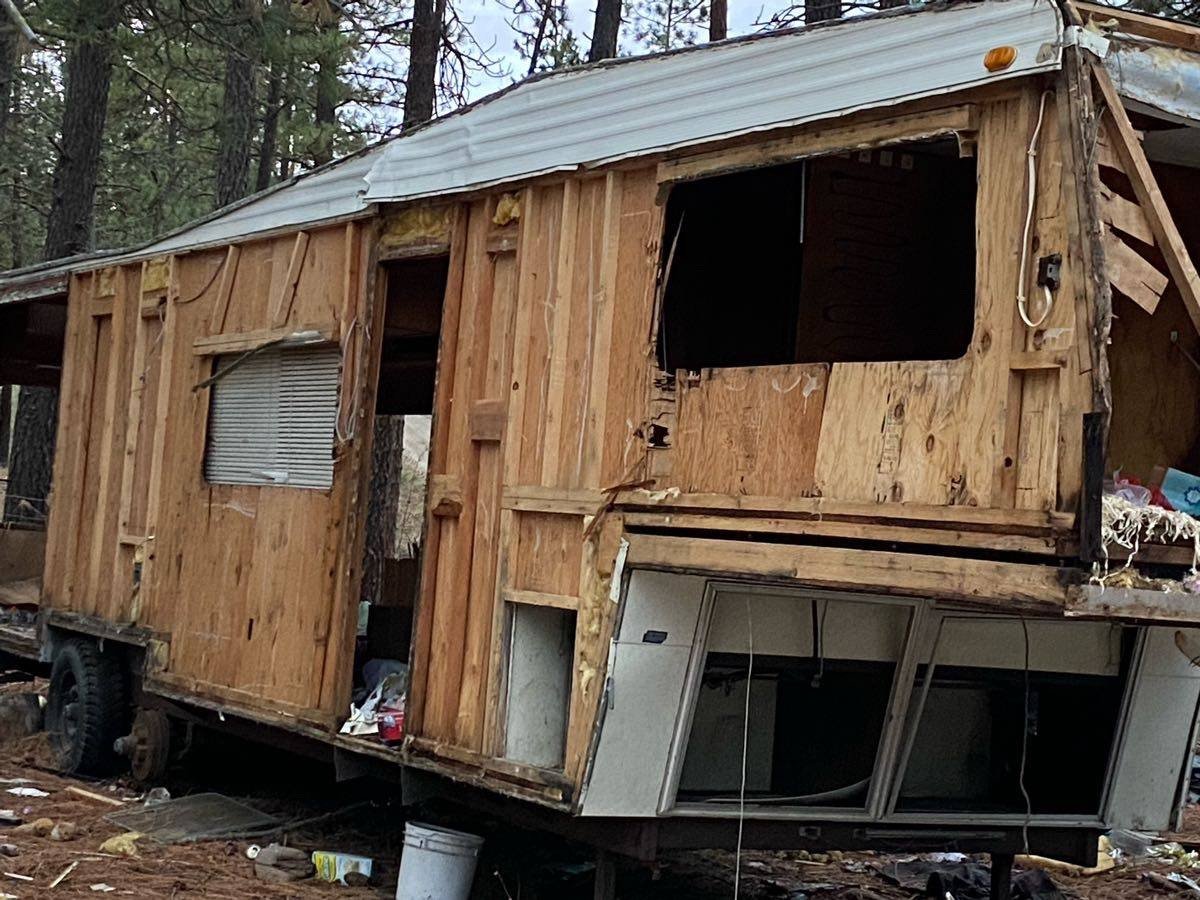
I will start, this showed up in a Craigslist Ad, “free, you haul”. Usually I would expect this to be in Idaho, but it is actually close by, in case anybody here is interested😁. Can you imagine the incredible mess if a wind storm went through there? I bet his neighbors love him…. For those who may not know, the black areas in the wood are dry rot and mold. John Davies Spokane WA
1 point
-
I just want to mention that earlier this year in April I spent ten days in Colorado and Utah with the Oliver with out shore power. The Oliver had 340 watts on the roof and Zamp 30 amp charge controller. The only up grade was four 100 ah Battle Born batteries and Victron battery monitor. We used the furnace every night, inverter for coffee maker every morning and microwave a few times to thaw food. Plus lights, water pump, fan, music. I brought alone a generator but never needed it. We always had batteries top off with the morning sun. This was a big improvement over my previous experience with the AGM batteries. At this point I am happy that I kept my 2000 watt Inverter, it handles everything just fine including the new Houghton AC with out any of the new inverter charger issues. I recently up graded my roof mounted solar only because I live in MN and can not expect to harvest as much energy as Colorado or Utah. I do think simpler is better, like the Battle Born batteries are easy to use when coupled with Victron battery monitor and a cut off switch, which make it easy to care for off season. So eventually they will work the kinks out but simpler is better.1 point
-
The dealership has disconnected the battery and will do nothing further until a Toyota inspector comes to look at it. Due to the serious nature of this failure Toyota wants to send their own expert to try and determine how this happened. I had to call Toyota USA and report the incident so they could open a case file. They gave me a case number and said that an investigator will call me back. I used a dry chemical fire extinguisher on the fire and used up about the whole thing. It was a full size household type. Never smelled gas when I went out to the truck. I can't rule out rodent damage, but I have never had a problem with them fooling around in my vehicles. Plenty of more comfortable places for them in my 92 year old garage! Thanks to all of you for your concern. We are sad and upset but safe and unharmed. We are fortunate this happened at home rather than on the freeway with our Ollie in tow!1 point
-
As an old airline pilot once told me, “the only time you have too much fuel is when you’re on fire.” 30 pounders for us.1 point
-
The hold down brackets are pretty much infinitely adjustable for height, there is a single long threaded rod. But both bottles need to be the same height, you could not have a 20 next to a 30, it would not work. Unless perhaps you made a raised floor under the shorter one. FYI if you have the 30 pounders and want to decrease their weight without buying new smaller bottles, just have them partially filled. The gas that goes in is measured by gallons, instead of saying “Fill it up.” just ask for 5 gallons instead of 7….. This is not rocket science. I have 30 pound ones and will use them full until I am too feeble, then I will get partial fills. There are probably some refill stations that won’t do this, but I have never encountered one: “Refilling propane tanks at your local Tractor Supply Company is convenient and light on your wallet! A proper Propane Refill at Tractor Supply ensures your tank is filled to the maximum legal limit. Sold by the gallon, a propane refill is great if your need a top-off on a weekend or in the evening. Only charging for the number of gallons filled, a Tractor Supply propane refill is the ultimate owner experience. Enjoy a top-notch propane refill today! Propane refill sold by the gallon Tractor Supply only charges for the fuel we put in your tank Propane refill offers no hidden fees; No minimum amount; No flat fee; No purge fee” https://www.emptygrilltank.com/tank-sizes-and-specifications/ John Davies Spokane WA1 point
-
John - No - the jugs of water is used on those occasions when there is NO water in the fresh water tank. These times are usually in the winter months when water in the fresh water tank might be at risk of freezing or during the rest of the year when you might not want the weight of the water in that tank while towing. The standard Oliver toilet works just like most other RV toilets in that the amount of water used to flush is regulated by how long you hold down the handle (foot peddle). Bill1 point
-
I always carry one to two gallon jugs of water in the Oliver next to the toilet primarily to be used for flushing. This practice started out during cold weather camping but during the past several years I've found it to be useful even during the warmer weather months. Bill1 point
-
I agree. Each Summer I run from OK to OR and back. Out on the flat interstate out west, the speed limits generally are 80 MPH. If I run at the legal limit, I AM the island in the stream with hundreds of trucks a day running well over the limit. I will often follow (well behind) their convoys so as to not be a hazard. I employ extra following distance to avoid windshield damage, truck induced wake turbulence, and to let them clear out any deer, elk or other hazards. I can say that for sure, my F-150 SuperCrew Ecoboost and Ollie II can keep up at or beyond those posted limits when conditions are good. However going across I-80 there are some sections that almost always have severe alternating left/right cross winds cause me to slow down to 65 - 70 MPH for safety. My travel safety mitigations are: I set my truck's emergency anti-collision system to the most sensitive setting. I always tow with an Anderson with the ball greased. Ollie has never needed sway control. I use the Anderson only for WD purposes... as is required by Ford for their F-150's with tongue weights over 500 pounds. My loaded F-150 front and rear axle loadings are within 30 pounds of each other. To get that on my rig's set-up, I need and use 3 to 4 threads tension on the Anderson chains. I run Michelin Tires at 43 PSI cold, and they are always monitored by my dash mounted tire pressure monitoring system. I carry a DeWalt 20V air compressor so that I can check my tire pressures easily before the sun hits the tires. Having this compressor (With the hard case) makes this task easy. Let the sun or road miles hit your tires, and using a gauge is just guessing what you really have in the tires. I use a Etekcity Infrared Thermometer 800 non-Contact Digital Temperature Gun to check my tires every two hours or so. My Ollie loaded is 5700 pounds, and my truck has one person and about 500 pounds of gear. As such, I am towing well below the door sill weight limitations. Credit where credit is due, the idea for most of the above safety practices came from John D and other senior mentors on this web site. Geronimo John1 point
-
Good points John. My original shackles/bearings on the suspension also wore out very quickly and it was a notable difference with the EZ Flex upgrade.1 point
-
When I had Oliver put the Dexter on my trailer about a year after we got it, Jason told me the original bushings were totally gone! Mike1 point
-
One last thought on the subject, as to why the Olivers do track so well without swaying. During the factory tour with Robert Partee we got to talking about this and at that time seeing just the frame and large wheels naked without a cabin attached it occurred to me the reason for this stability unlike so many other travel trailers is the relative immense size of those wheels. Its not just the diameter of them which no doubt helps but also the distance from the center of each axel point which due to the size of the wheel tire combination has to be much further apart than a conventional trailers with their skimpy little 14" rims and crappy trailer tires. Modern day mountain bikes have almost all gone to 29" wheels. The reason is simple, better stability. While I haven't measured the relative difference in the diameter of Oliver wheel sets compared to conventional travel trailers my guess is there is at least a 25% increase in the size of the diameter, then spread those two pivot points further apart and you have a built in anti sway prevention system. Thats my two cents worth.1 point
-
I’ve heard that the Elite II tows well at 90 without an Anderson and with a truck that people say was not meant for towing. Don’t remember where from - possibly the passenger seat from someone reminding me that we were towing.1 point
-
There have been a few threads on this over the years. If you do a search on “jacking” you’ll find a number of posts. I’ve used the back jacks several times to do tire work. Once at Discount Tire to have new tires mounted. Once early on when I got my TST TPMS I went to a local tire dealer to get metal stems and a balance with the sensors on. One time at a camp site my grease cap came off and I used the rear jack on that side to raise and remove the tire. In all cases, I had the trailer connected to the truck, I put down the front jack and used blocks under the rear jacks to limit jack travel to just an inch or some. I also ensured the trailer was on level ground. Oliver now recommends against it, probably because of potential liability. Mike1 point
-
Yes. It is in fact how I changed the four settings that Jason told me to customize (btw in his mail where he shared this link to the inverter settings customization guide for various Oliver configurations, he mentioned that I could use a 120a "charger current" setting instead of the 150 listed in the table for my config with the LifeBlue batteries, and btw 120 matches what LifeBlue suggests in their documentation). And I also finally realized I can scroll down on the settings page and see my Inverter's serial number on my phone via this app 😉 - you'd have thought Xantrex support might have told me that when I told them that my serial number was fairly well hidden as installed in the trailer by Oliver but hey now I know. I will also be using the app to switch between 15 amp and 30 amp "AC input breaker" settings depending on whether I'm plugging into a standard household 15 amp circuit or a 30 amp circuit.1 point
-
That worked briefly for me, then the error came back. Hopefully you are now on the other side of it for good! I've installed the replacement that Xantrex sent me (following nudging by Mike in Oliver service on top of my requests) and in a few fairly brief rounds of testing it's all looking good.1 point
-
Wow. I can sort of get that they may not have really been on top of this issue when mine was delivered in Late December (though from a separate thread on the forum I have seen that at least one owner had raised the E20 issue directly with them at least a few weeks before and multiple others noted having the issue but I don't know if they'd contacted Service yet). But by June both the E20 AND the problem with not being able to update firmware on some units (the two issues don't always co-occur based on comments from some folks who indeed seemed to resolve the E20 issue with successful udpating of firmware). So I'm scratching my head wondering whether dealing with the downstream service issue and associated customer frustration is really worth whatever they're saving by not testing for both problems and resolving them pre-delivery. I've been generally happy with my limited need for responsiveness and help from Oliver service folks but I'm underwhelmed by some details of delivery particularly though not entirely limited to this pair of issues. When I pay a premium for a premium product my expectations around such details are higher than when I go for cheap and cheerful.1 point
-
I began my first real trip last week towing my Elite I with my 2014 Tacoma 4x4, 3.6L V6, all stock. The truck has been at its limit, I think, going mostly along I40/Route 66. I am in Casey Illinois right now. There are 156,000 miles on my Tacoma. The 4Runner has the same engine, but is it a similar chassis? I mostly tow in 4th gear (the shift lever to the left when in D). Hills have been no real problem, although I do slow down a bit. The transmission is there for the correct gear, so downshifting to third and an rpm of 3,000-3,200 is appropriate, to me. I cruise at about 65-70 when allowed, rpm about 2,500. I do know that the trailer is there, which for me is okay. Handling is fine. No issues. Using the Tekonsha P3 brake controller that is plug and play. 10 minute installation. This is my first real trip, other than towing it home. Home was strictly on I40 - to Barstow, then to Los Angeles. This trip I have been on back roads, small highways and interstates. stayed in Branson, Mo for a few days - first time. I had the truck, so I am using it. When it turns about 200,000 miles I will probably get a new truck, which I am thinking about now. Not sure what to buy, or if I should think about an SUV-type vehicle, such as a LandCruiser, Tahoe or? I will replace the Tacoma with something that provides a bit more substance for towing, and a bit larger for my 6' height. The new Ford Hybrid looks enticing, although it is also a V-6. Gas mileage has been a dismal 12-13, although it is usually not too good at 18 mpg. I don't let the tank get below 1/4, so I am filling up about every 180 miles, which I am justifying as a good resting point. I am happy for "cheap" gas outside of California, where it is close to $5/gallon. My eastern plan is Brunswick, Maine, via Lake Erie. There will be hills along the way, and I may have to drop into 3rd gear a few times. That is okay. I don't see that as a strain on the engine when using the proper gearing. And the load is okay. I don't travel with a lot of stuff. If the Canadian border is open, I'll go home along the border, in Canada, just because, to the Dakotas.1 point
-
Great. This seems to have eliminated a lot of grief. Good job!1 point
-
Richard.. After we talked, got curious. When your awning is all the way out, have you measured the fabric? Was thinking it might be longer (stretched) on the left, as it rolls in the upper tube and is pulled to the right?1 point
-
My awning does the same always has. I crank it to the end back off a half turn and then back in it goes right in. I tried the little bit of adjust available with no success.1 point
-
RV magazine has just released their "Guide to Towing" in the latest issue (June, 2021). Try looking HERE for a start. Bill1 point
-
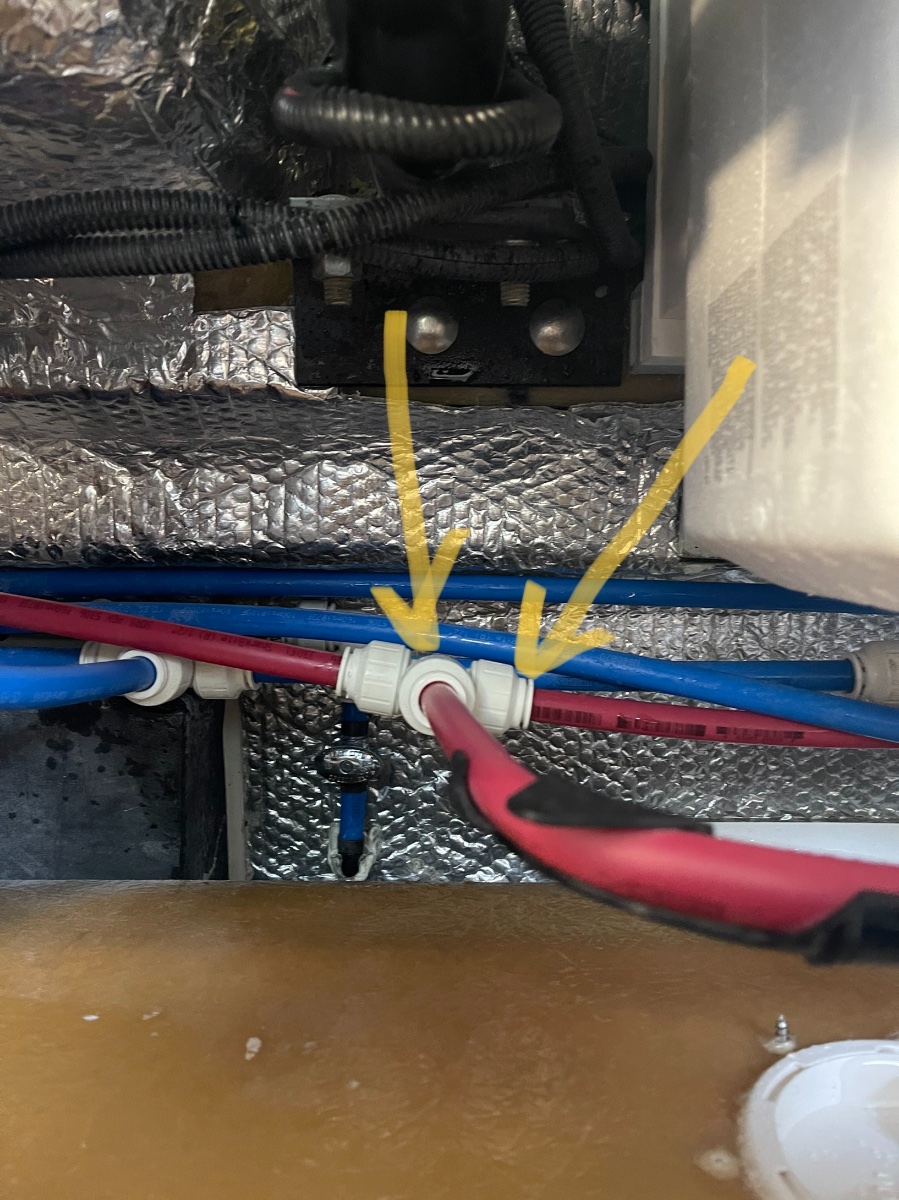
Ok found the GUSHER. Water was coming out of the top connection but pushing back in place fixed it. The connection on the right seemed fit, but water is pouring out there with pump turned on I completely disconnected and reconnected all sides of this t-fitting and that seems to have fixed it. thanks for the help y’all!!!
1 point
-
Now John, perhaps you’re jumping the gun just a little bit.. clearly it’s a work in progress, I mean, what do you suppose that appendage nailed to the exterior curb side will be for? And as for it feeling just a little light in the steering? Easy fix! Just add another heavy steel veranda to the front bumper! Which will lead to the obvious next step of a porch that wraps around the whole rig, which of course will contribute to the tires sinking into the mud and out of sight... resulting in it being listed as a weekly rental..an artist retreat during the summer, deer hunting camp come November... at least that’s what would happen here in Maine..1 point
-
Well, as has been said - how you set up your Ollie and the solar - should depend on how you use the RV - for me its the amount boondocking you do - or not. Honestly, with the increase in the numbers of folks that are now RV'ing and pretty much filling most campgrounds, not having the ability to stay off grid - comfortably - is a real issue. As much as I detest detailed trip planning - (where we will park) - I have attempted to secure sites for June/July across several of the western states - and -not to my surprise - a few places I would like to have found a fri/sat spot are packed full. Luckily, most of where we plan to head has lots of great - free - boondocking. With this in mind - I finally added a small gen set - just for the days the Sun is on strike. (and for running the AC when we are trekking across the plains in summer) Having a fully capable off grid RV really adds to the versatility of the experience. Now I will say - if commercial RV parks are your thing - you can find a spot in most places - well - it was tough during spring break in Florida. But having the ability to park in B.O.B. places- for weeks on end - are , well priceless. RB
1 point
-
Nice work John. How is the rest of you conversion going? I thought I read on one of the new Li manufacturers sites that the temp window has expanded - hi and low. In the end - is the conversion worth the trouble - I wonder. RB1 point
-
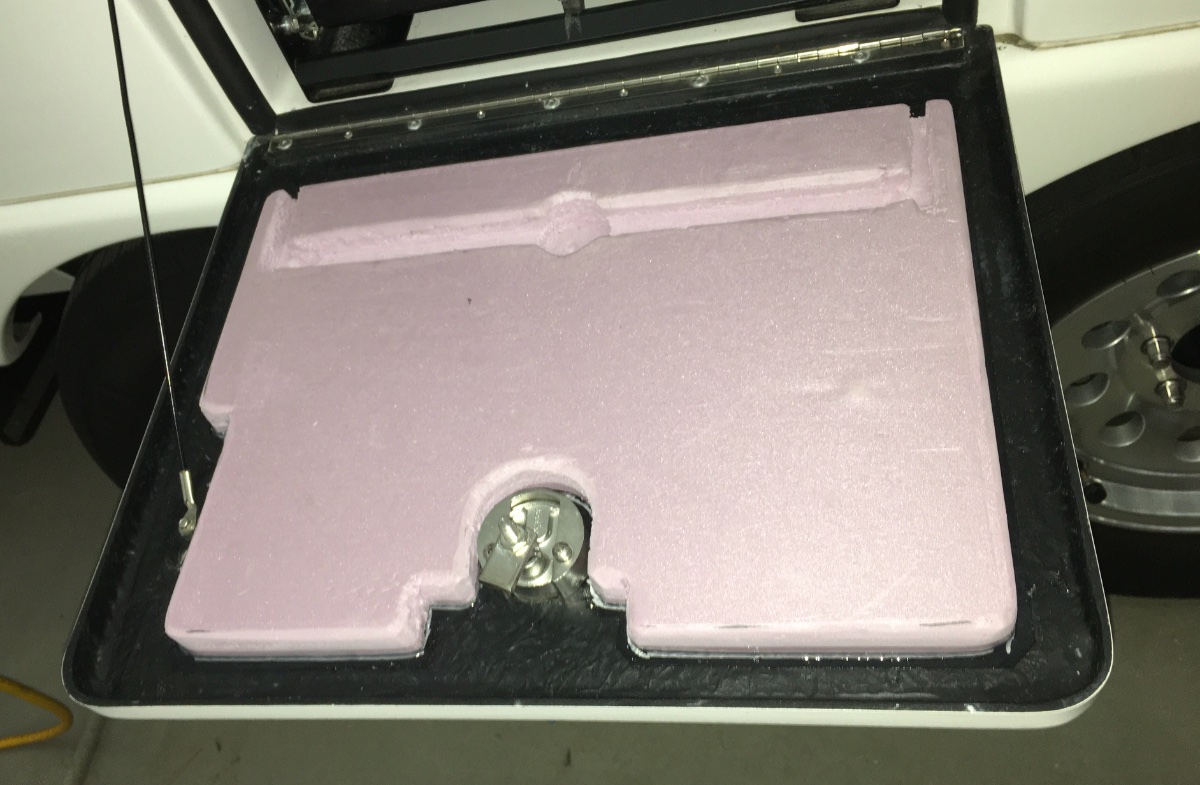
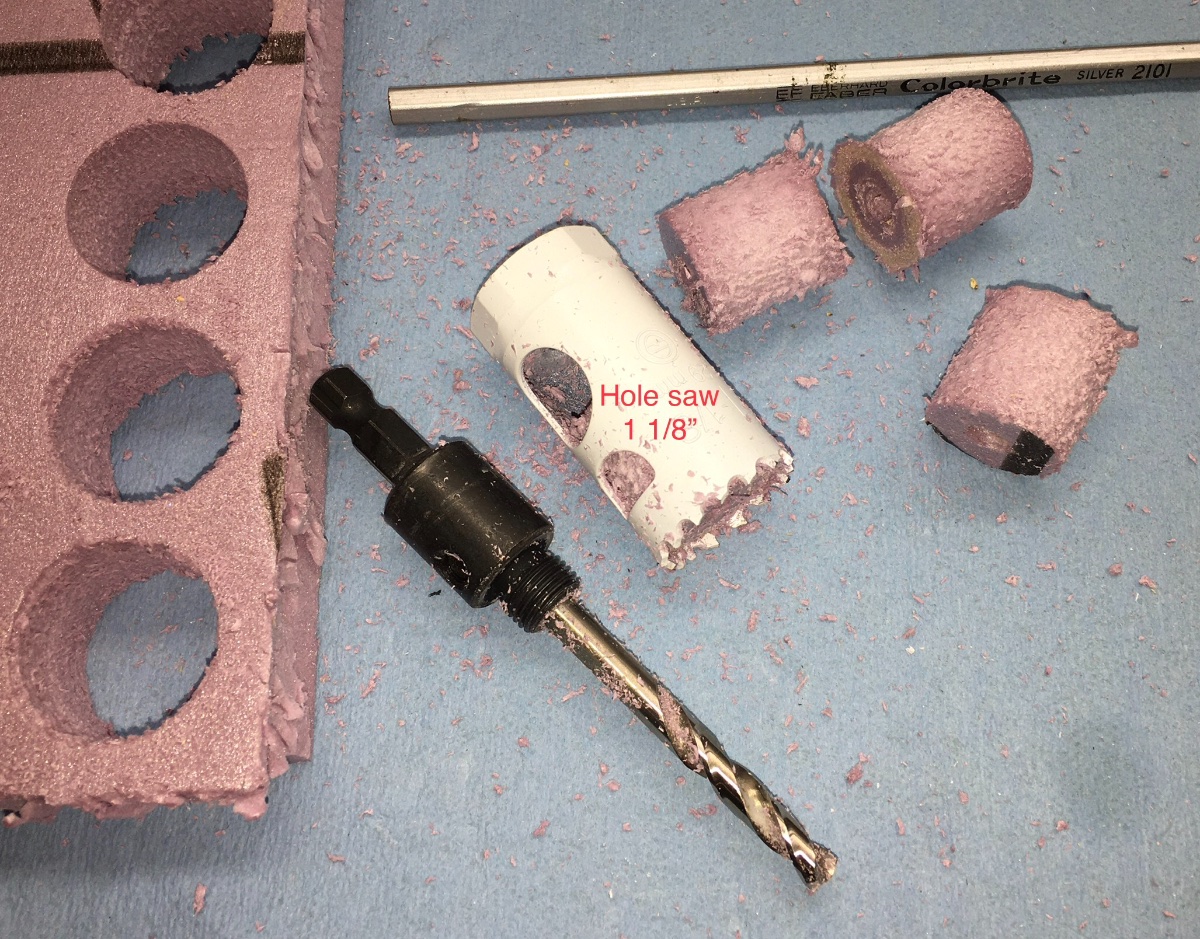
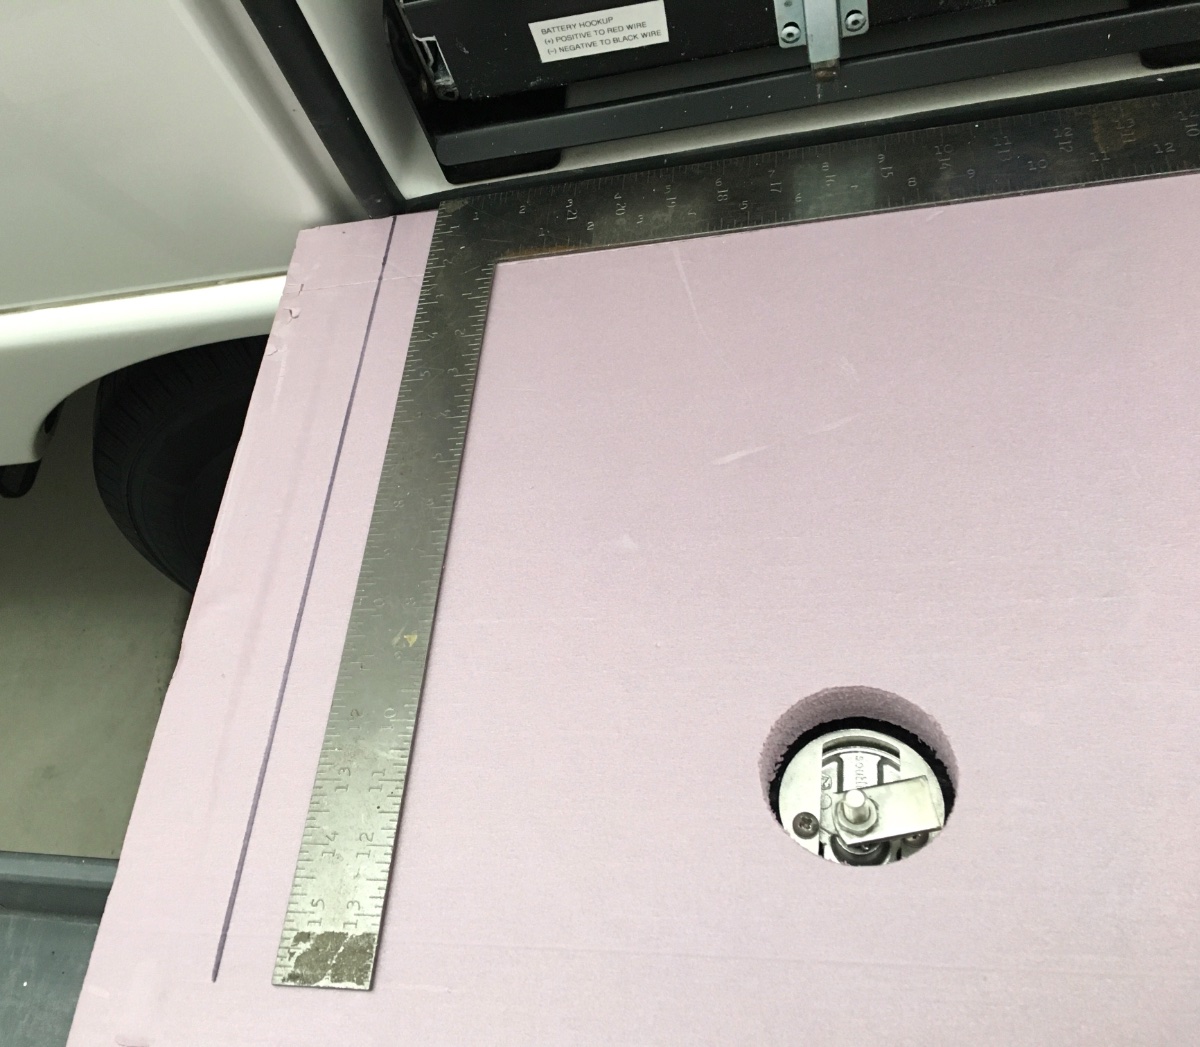
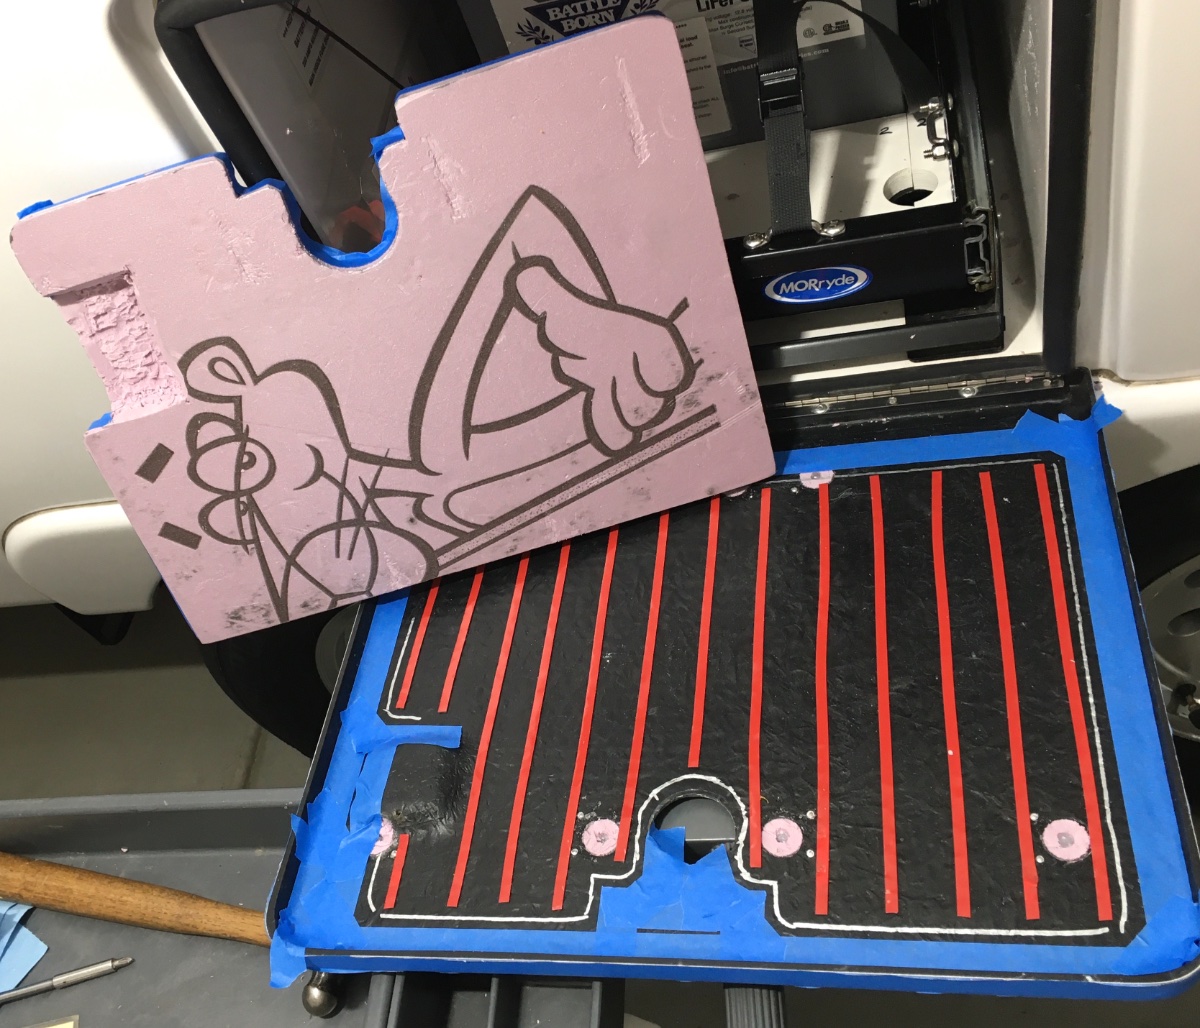
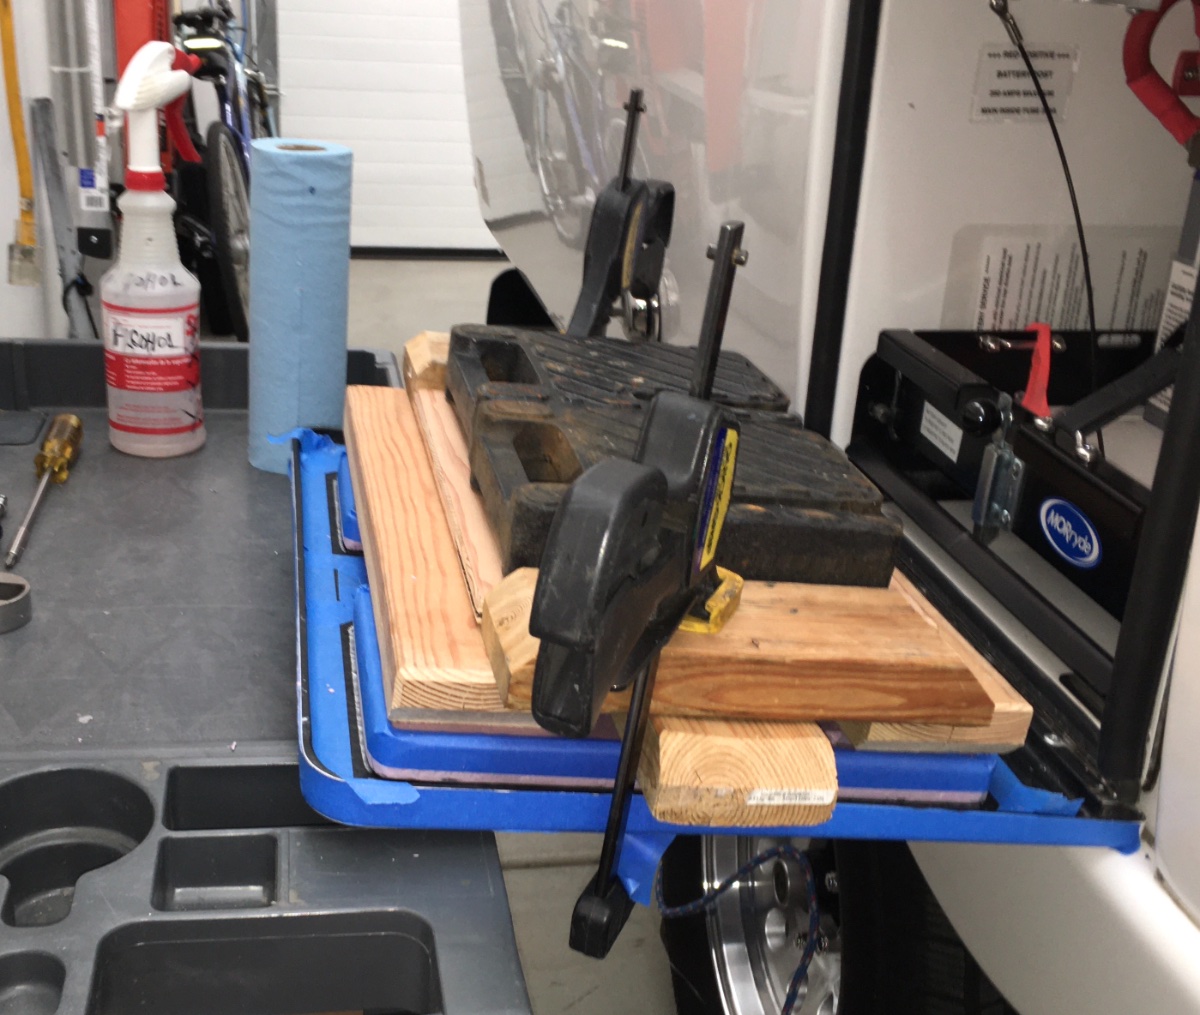
Battery door - plug holes and add insulation. This did not work out well, I am not very satisfied with the results, but I will post pics anyway. Maybe somebody can suggest a better solution. 1/2" foam board would be much easier to fit, but the insulation value is not so good. The material is Dow Corning rigid foam board, 1 inch thick, which weighs essentially zero pounds. This stuff is incredibly light. $20 for a 4' x 8 ' sheet at Home Depot. It is fire retardant, which is important. For comparison, this is R-5 (insulating value) whereas a typical foil/ air bubble sheet, which is used extensively in an Ollie, is R-1. https://www.homedepot.com/p/Owens-Corning-FOAMULAR-150-1-in-x-4-ft-x-8-ft-R-5-Scored-Square-Edge-Rigid-Foam-Board-Insulation-Sheathing-20WE/207179253 It can be cut easily with a VERY sharp razor knife, and rough edges can be rapidly sanded smooth and contoured with a bench top belt sander and coarse 80 gr belt. WEAR A MASK. BTW it is indeed completely waterproof, I soaked a piece for 12 hours to make sure. I had to wedge it in place, it pops out like a cork otherwise: Cut four hole plugs to seal off the existing openings. (My door has 8 holes, yours may vary.) Cut them in half: Glue them into the holes with clear RTV sealant, some will squirt out through the front Perko vents. Remove that excess with alcohol and paper towels: Wait at least a full day and then trim off the excess foam and sealant flush with a razor blade: SUPPORT the door with something, a 30 inch high rolling work table fit perfectly, and it gave me a nice place to put tools and materials... Remove the support cable. Cut the foam. This is pure trial and error, because it has to fit past the rubber seals, and also have extra material removed to clear the battery tray and knob, and the support cable, and the lumps and bumps on the door itself. Take your time, trim a little, test the fit, trim some more. It should fit as closely as possible, for maximum insulation value, yet allow the door to close easily without stressing it. I used a router bit in a drill press to carefully carve out areas that needed clearance. Be sure to allow some room for rivet tails! When you are satisfied with the fit, clean and smooth the parts and use 3 M VHB tape to secure it to the door. I used 1/4" wide tape placed vertically, so any water leaking past the rubber seal will drain straight down. Add some weight and go take a long break: Remove any weights or clamps. Seal the edges with clear RTV sealant. Use tape as shown to leave clean lines. Reattach the support cable. BTW when trimmed as shown in the top pic, the airflow from the fan underneath the tray is not blocked. EDIT: Leave several small gaps in the sealant at the inside (bottom edge when closed) so moisture can drain out. John Davies Spokane WA
1 point


.thumb.JPG.dd838cdb3df463dab6a16861fa23a319.JPG)


-
Recent Achievements
-


")


