Leaderboard


Popular Content
Showing content with the highest reputation on 03/17/2022 in all areas
-
We received them in January, this year, at factory pickup 🙂4 points
-
We received the same 3 manuals in hard copy. My wife combined them into 3 sections in a single binder as the originals were starting to come apart. I like paper and we do bring the manual with us.4 points
-
To all our Irish (and Irish for the day) friends, hope you have a happy day! Corned beef is resting, Irish stew is in the crockpot, beads and hats are by the door, and friends will be here at our home soon for our traditional celebration. We've been blessed with a beautiful afternoon here in Florida. A little tune from my new favorite young Irish artist (who resembles one of my nephews, especially that engaging Irish smile) to start the party. "May your troubles be less and your blessings be more, And nothing but happiness come through your door."3 points
-
I believe that your understanding of lack of charge from the 7 pin is correct. Without a DC/DC charger you would probably burn up your TV alternator if 7 pin charging was allowed. I also believe that dependent on your actual electricity usage, you will be favorably surprised as to how much you can count on those solar panels to keep up the batteries. Bill3 points
-
I read, somewhere in here, that 2020 was the last year they delivered hard copies. Calling your sales rep is the easy answer.3 points
-
I just had my new TV ceramic coated (Star White Ford 250 Tremor 7.3) and the installer made a deal I could not refuse to coat the Oliver. I showed him the OTT website and he was immediately interested. I might get my first Ambassador stipend before I even take delivery of mine! I'll keep everyone posted. From what I have observed this is not something you should buy from Amazon and brush it on in your driveway. My installer has environmental controls like hepa filters, UV light curing and he goes though about 30 microfiber applicators. This is after he strips and de-waxes, clay bar out the impurities and then buff out swirl marks for prep. Around 20 hours of work.3 points
-
Something similar happened to me recently. Check the four valves near the water pump. In my 2019 there is a diagram on the inside of the fiberglass cover over this area that shows Normal and Boondocking valve configurations. In my case while de-winterizing the pressure was low at the faucets and water was flowing into the tank. Checking the diagram I found that one valve was wrong for the Normal Valve Configuration. After setting the valve correctly things were back to normal. Hope yours is a simple valve configuration issue too.3 points
-
Years ago, we like took the ferry from Bar Harbor Maine to Nova Scotia. It saves a lot of time and then you can visit Nova Scotia from south to north. We are planning a trip this summer using the ferry and after going through Nova Scotia going to Prince Edward Islands and then south through New Brunswick or going west and come south through Quebec. We use and like RVParky for trip planning3 points
-
Here is a bmp file with the 2016 config on it. I believe OP has this already but for any other 2016 owners. Guide-Sheet.bmp2 points
-
This of course depends on latitude and time of year, and I suppose how long you and your wife leave the electric coffee maker plugged in. In a sunny site in June at the southernmost tip of the WA coast, we were back at 100% charge by noon each day with some daily microwave and furnace use as well as some use of the vent fans and of course lights (with the factory installed 340W of panels). We make out coffee with the stove but I'm guessing the outcome wouldn't have been dramatically different with a plug-in coffee maker. OTOH, one month earlier up along the coast in Olympic National Park, in a shady site during a mixed sun-and-cloud period in which we also used the furnace a bit more than we did one month later, we got a little back each day but would have been needing to use the generator if we'd stayed there for two weeks ish.2 points
-
In that case - assuming that the TV spare tire is not shown on the original setup - I'd buy two more sensors. 4 for the road tires of the Ollie, 1 for the Ollie spare tire and 1 for the TV spare tire. Bill2 points
-
Ok, it's silly question time! Have you verified where the leak is in the door seal? Is it possible that the leak is elsewhere and pooling by the door? Mossey2 points
-
Yep, my 2016 is still good too. I assume that you've checked the door fasteners and latch for tightness. Other than that - does the weather stripping look to be in good shape? Is there any sign of the door being out of alignment? Bill2 points
-
Poor water pressure and flow means either gunked up faucets and aerators (hard water deposits), or possibly plastic shards from the manufacture of the fresh tank. You are going to have to do some exploratory surgery, open up some fixtures and water line connections to see what is going on. Start by removing the plastic bowl under the water pump to see if there is debris in the screen. Hard water deposits can be helped by flushing with a vinegar water mix, to dissolve them. Be sure to treat the hot water heater too. It is the hot lines that create the problem. Blocked lines require disconnecting at both ends and back flushing with water or compressed air. Either method will be messy, wear safety glasses and try not to shoot water where it should not go (electrical stuff!). Good luck. John Davies Spokane WA2 points
-
Oliver should provide you printed and bound copies of the exact same docs that are in the Oliver University. I received 3 booklets: 1) Owners Manual 2) Standard Features Guide and 3) Optional Features Guide. You’ll notice the individual components manuals are from the OEM and usually mention the warranty. I personally have downloaded .pdf of these on several devices, along with many other OEM technical manuals in my offline library. I don’t bother to carry the paper copies in the trailer, prefer to use my iPad.2 points
-
There should also be a check valve attached to the pump that prevents city water from running backwards through the pump into the fresh water tank. A common point of failure that will cause the same symptoms.2 points
-
Good point. Here in the Northeast some of our boondocking is in heavy shade. The lithium package will allow us to go longer before needing to move to sun or run a generator. With the larger lithiums we should be able to camp at least a week in the shade, then recharge when we get home again. The limiting factor will now be tank sizes.2 points
-
I can't give you specific advice as my LE II is a 2020 and when I ordered mine, Oliver did not offer any lithium options (they announced availability three weeks after I ordered mine). After purchase, I immediately upgraded to Lithium. The upgrade was painless . Having said that, I would probably order the full Oliver lithium package if I had it to do over again just for convenience and the bells and whistles of Oliver's battery choice. As a point of reference though, I will explain my experience in which I easily upgraded later. Since Oliver had no lithium option and I planned to convert to lithium right away, I asked Oliver to add the solar system and inverter, but I would stick with the standard 2 flooded batteries when I ordered. Oliver said I had to upgrade to 4 batteries (flooded were fine) if I ordered the solar/inverter system because they needed 4 batteries to test out the whole system before delivery. So I upgraded to from 2 to 4 flooded batteries. When I got the trailer home, I replaced the four flooded batteries with 4 Lion Energy UT 1300 lithium batteries through Costco (113 ah each for a total of about 450 ah). They were $700 each (Costco has specials on these batteries a couple times a year) The UT 1300 lithiums (only 23 lbs each) are group 24 size which is the same footprint as the four flooded batteries (Group 27) that came in the Oliver. That made it easy. All I did was remove the four flooded batteries and replaced them with the 4 lithiums. They were an exact fit and I didn't have to change out any of the wiring. Truly plug and play. It took about 2 hours. It would have taken half that time except that the posts on the UT 1300 lithiums were both sized the same as a negative terminal on a flooded battery so I had to run to NAPA and buy a replacement negative terminal for my positive battery cable so it would fully tighten onto the postive post of the first lithium battery. (The positive terminal post on the flooded batteries is slightly larger than the negative terminal post I learned.) That was not an issue with the remaining three batteries because the cables attach to screw posts with wing nuts.) I now have 18 months of experience with my lithium batteries and at least 12 boondocking trips. No problems whatsoever, knock on wood. The UT 1300 lithiums don't have bluetooth or heaters but that hasn't been a problem. Each battery has a button you push that will light up a row of 5 LED's when the batteries are above 70% state of charge (SOC), when you get down to only 2 led lights lit, the battery is down to about 20% state of charge. While crude and not particularly accurate, they work and I always have a good idea of how much juice I have left. The Battery Management system (BMS) in the UT 1300 seems to work fine, and has all the important safety systems built in (e.g., won't charge if the battery is below freezing, etc.). I store my trailer outside and the solar system keeps the batteries fully charged all the time in the summer. In the winter, I am connected continuously to shore power which makes sure the batteries are brought to a full charge each day. I know this is not recommended for maximum battery life, but the Lion Energy warranty is 8 year replacement with no pro-ration if the batteries drop to less than 70 percent capacity in the first 8 years. We'll see.2 points
-
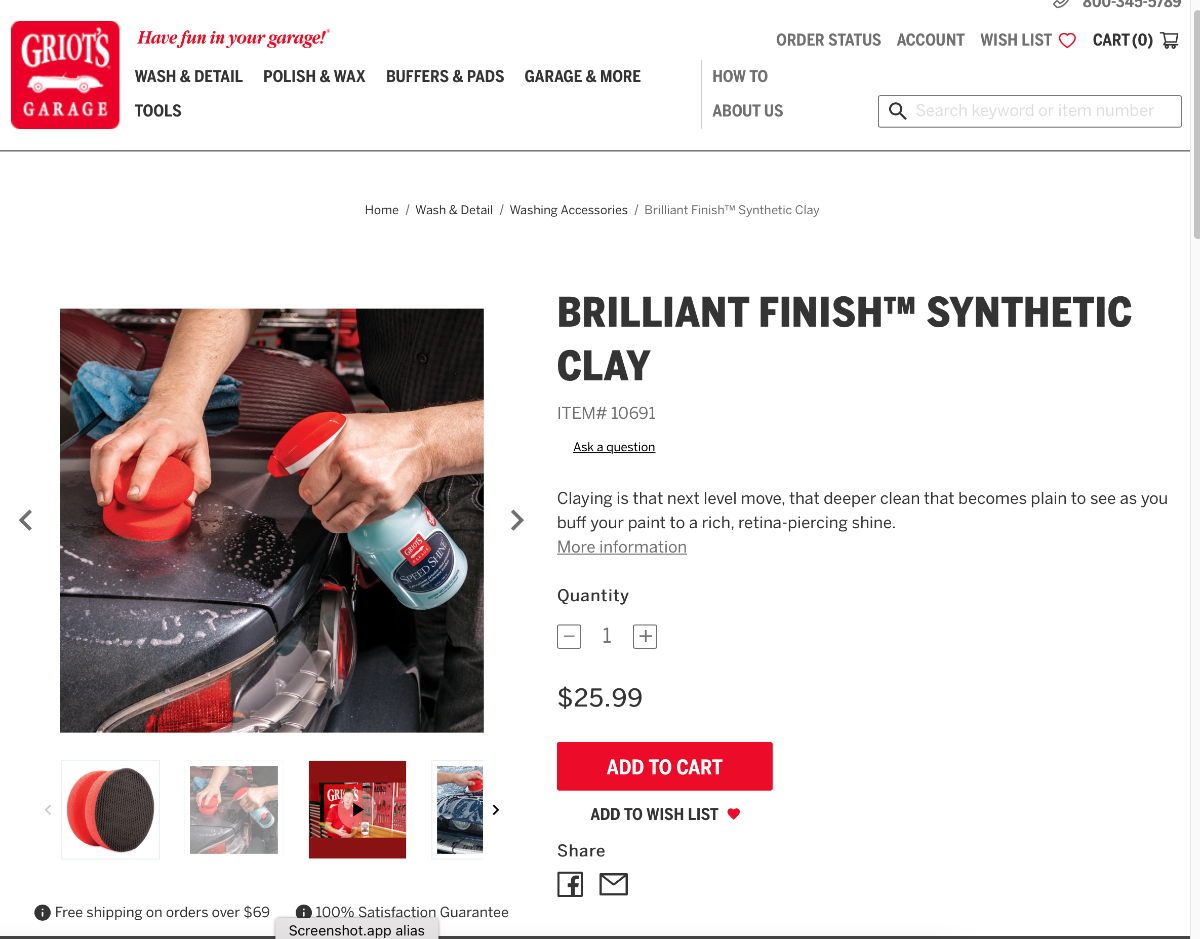
I normally use a degreaser to get off sap and other stubborn crud on the gelcoat. Has anyone tried this clay bar substitute? https://www.griotsgarage.com/brilliant-finish-synthetic-clay/ Here is a great review: https://www.autogeekonline.net/forum/product-reviews-by-mike-phillips/106302-review-how-griots-garage-brilliant-finish-synthetic-clay.html I use a real clay bar on my cars, but when you drop it on the ground, you are screwed, you have to throw that piece away because it traps grit. With the Synthetic Clay you just rinse it and continue on. I may order one to try. Any comments? John Davies Spokane WA
 1 point
 -
Sure - I like spending your money and I've already got enough different kinds of paint prep things in my garage 😅. Seriously, it sure would be nice if this works well. Bill1 point
-
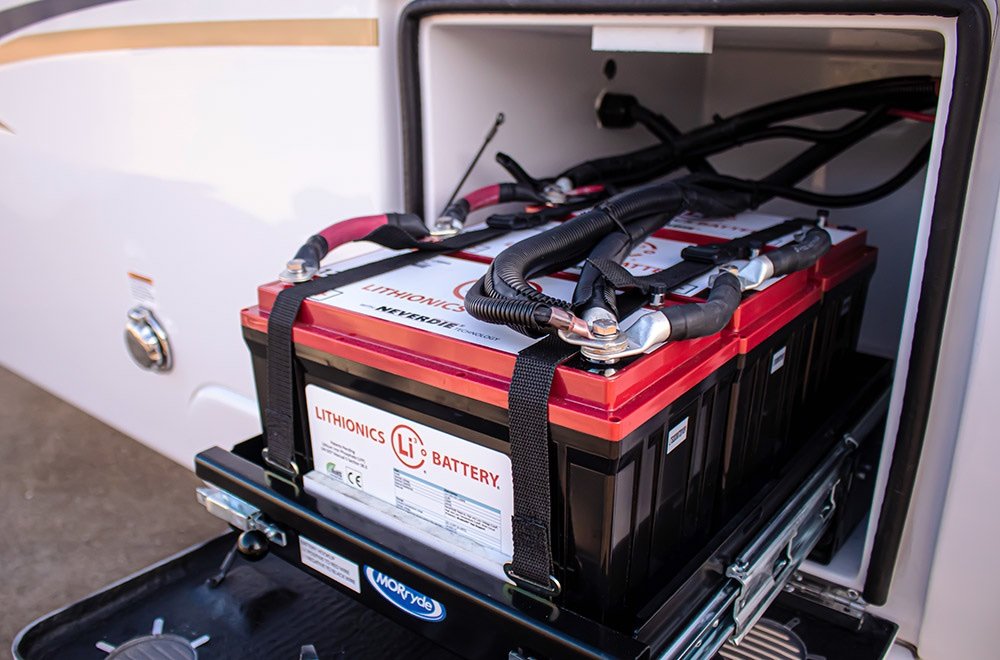
Just FYI here's my explanation of our Lithionics Upgrade ...may be useful for those reading this thread. https://4-ever-hitched.com/ggs-blog/f/lithium-battery-upgrade Craig - Hull 505 - Galway Girl1 point
-
I’d strongly consider upgrading the AC unit like @Spike just did. You might be fine with the 2k inverter…1 point
-
Just thought of another potential place to check - the door window! Some blue painter's tape around that window and a garden hose should let you know it that is OK or not. Bill1 point
-
It took me weeks to finally confirm it was the door. The weather seal looks okay. I will take a much closer look at it soon, again.1 point
-
Good thoughts, Mossemi, and Topgun. My 2008 seals look a bit clunky, but they still work well.1 point
-
As I am understanding Olivers OEM Lithium battery arrangement... they will not charge from the 7 pin connector (from TV) while driving from place to place. So my assumption is that I will get some charging from solar panels (dependent on sunshine) and also whenever hooked up to shore power. Of course a third option would be a generator. From our past experience (with a previous travel trailer)... we are not so much campers as travelers. We move a lot. Another option would be to install the "dc to dc" system that I believe John E Davies documented... and is what I hope to ultimately do in order to utilize that otherwise untapped resource while moving from place to place. As is so often the case... only some real world experience with the Ollie and our style of camping/traveling. When it's hot... I can guarantee you I want electric hook-up for that A/C.... but for those other times... just how much can I count on the solar panels to keep up before we need to find shore power to charge up again. Expect wife to make her coffee every morning, run the microwave now and then briefly... and lights of course.1 point
-
Yes. It will support up to 6 tires. I just need to buy a another sensor. One more thing on the todo list.... John1 point
-
He's got a 2016 and has the picture describing the configuration. Not sure if the video show the 2016 version or just mentions it.1 point
-
I received both and carry both forms of all these manuals with me while on the road (if I can't sleep these are sure to do it for me 😁). In addition - with the hard copies I keep assorted other articles and notes (such as torque values, maintenance charts, how to articles, etc.) just in case. One of the "secret" areas is a great place to keep these papers . Bill1 point
-
They are likely original as I'm the second owner.1 point
-
You would have gotten 4 pressure sensors for the trailer when you took delivery of your truck. You will need to take your trailer to a tire shop or take the tires off the trailer and take them to a shop and have the sensors installed. I took both tires off on one side and installed the spare as a safety for the jack while I took them to a tire shop. Took a couple hours but the system works great. John1 point
-
Good point on portable panels. Do you have one of this type? If so, have you augmented its stand in any way? I imagine it would have to at least be staked out in wind, if not even also needing additional support.1 point
-
As we patiently wait for our March delivery, I noticed that the 2022 Owner's and Component Manuals are now available in Oliver University. I have downloaded and used Adobe to link the Table of Contents to the document to avoid scrolling. Hope some find this useful, I intend to do this with the component manuals as well. Please let me know if you discover any errors. Cheers, Pat 1276727297_2022-OTT-Owners-Manual-11-04-2021-linkedTOC.pdf1 point
-
Did this "require some assembly" at Oliver TT? I believe my 2500 has the same TPMS, and I was hoping it would connect to the TT, but my salesman (who admits he knows nothing about trailers and towing) didn't think it would. My truck delivered a few days ago, I'm trying to absorb all this new info before I hit the road for Oliver delivery (3/28).1 point
-
I can turn the charger on/off independently of the other electrical things. I just flip the breaker for the charger in the fuse panel under the dinette. All the other 110 stuff stays on. Mike1 point
-
We really enjoyed the rail trip across Canada from Toronto to Vancouver via VIA and the Rocky Mountaineer. The food and camaraderie were wonderful not to mention the scenery. Saskatchewan was immense and like another planet . I want to go back with the Oliver. Cheers1 point
-
I concur with Jim Oker regarding the projected life spans of lithium vs. AGM. One additional benefit of lithium not yet mentioned on this thread: you can run the AC from the batteries for a few hours. With regard to the economics of the Lithium Pro vs. Solar Pro packages, and other considerations (like weight), see this thread:1 point
-
We got AGM’s because that was what was available back then. They did fine when we boondocked. If lithiums weren’t available I would have replaced them with AGM’s and we would still be happy campers. But, since it looks like we’ll be camping a while longer I thought it was worth it to spend the extra money on lithium batteries. No regrets. Mike1 point
-
The cable passes behind the spare cover and just comes out through the top. It works well as a backup camera as long as you go slow and steady. I still like to get out and check things if I don't have a spotter. The big benefit is not having to have another screen in the vehicle. Not sure what trim level you have but my truck also came with TPMS sensors for the trailer that link right to the trucks infotainment screen which also make for one less device. John, There is no disconnect on the camera but there is plenty of spare cable to set the cover aside. John1 point
-
As you compare AGM to Lithium prices, consider how long you are likely to be using the trailer and if you believe "many years" is likely, then it's worth factoring in the comparative predicted lifespans of the two battery types. Lithium doesn't look quite as expensive once you do that, and if you boondock a lot especially with unreliable solar conditions then the Lithium also offers potentially significant additional benefits1 point
-
I'll second what Mountainman198 said above. I purchased a used, year-old 2020 LEII and it has the solar package/4 AGM batteries/2000W inverter. All of our camping was boondocking last year in places like Rocky MT Nat Park, Custer SP, Canyonlands and forest service campgrounds with no hookups. The 4 AGMs connected to solar always had plenty of power for our needs. Now, we don't have any need to use the A/C where we camp. We had no problem running the heater all night on several trips. We watched downloaded netflix shows on the TV at night. I ran a small coffee maker in the morning and a toaster. My wife ran a 750watt hair dryer. No problem. Now, we were always in the sun where the solar would recharge nicely. I suppose I might have trouble if I were camped in the shade - I don't know. I think the lithium system is surely teriffic but I don't feel I "need" it for what we do and where we camp.1 point
-
I didn't order Lithium with my trailer and have just returned from 2.5 months in the SW, some campgrounds with hookups but the majority was either campgrounds where dry camping was available or boondocking. The solar, 2000 watt inverter and 6V AGMs performed flawlessly. I had enough power each night to run the furnace from bedtime to awakening, run electriconics and have lights. I would not have benefitted from the Lithiums mostly because I don't use a electric coffee-maker, hairdryer, microwave, crockpot or waffle iron. For my use, the standard solar and 6V battery bank is more than I need. Now, if Lithium prices came down considerably by the time I am ready to replace my AGMs would I splurge? Maybe, maybe not since a lot of my camping happens during Winter months and in the cold and Lithium just doesn't perform to its full potential in the cold. I understand why many upgrade to Lithium and it makes sense for their camping patterns.1 point
-
Lithionics is made in Florida. Typically sold only to manufacturers, including Oliver and Winnebago, and others.1 point
-
1 point
-
We love lithium for many reasons - especially the lithium battery management systems. What we see omitted in most lithium-related posts is the charging limitations - not how you charge - but how fast you can replace that expended energy. So, it's the age-old "what goes out must come in." Hence, we were happier with four lithiums in our RV than the three we currently have in our Ollie. We were happier when we could provide 40 amp hours while driving than the 5 we currently have. We typically use 120 amp hours during a 24 period when boondocking and not fully replacing those amp hours simply means our stay is shortened. Charlie.1 point
-
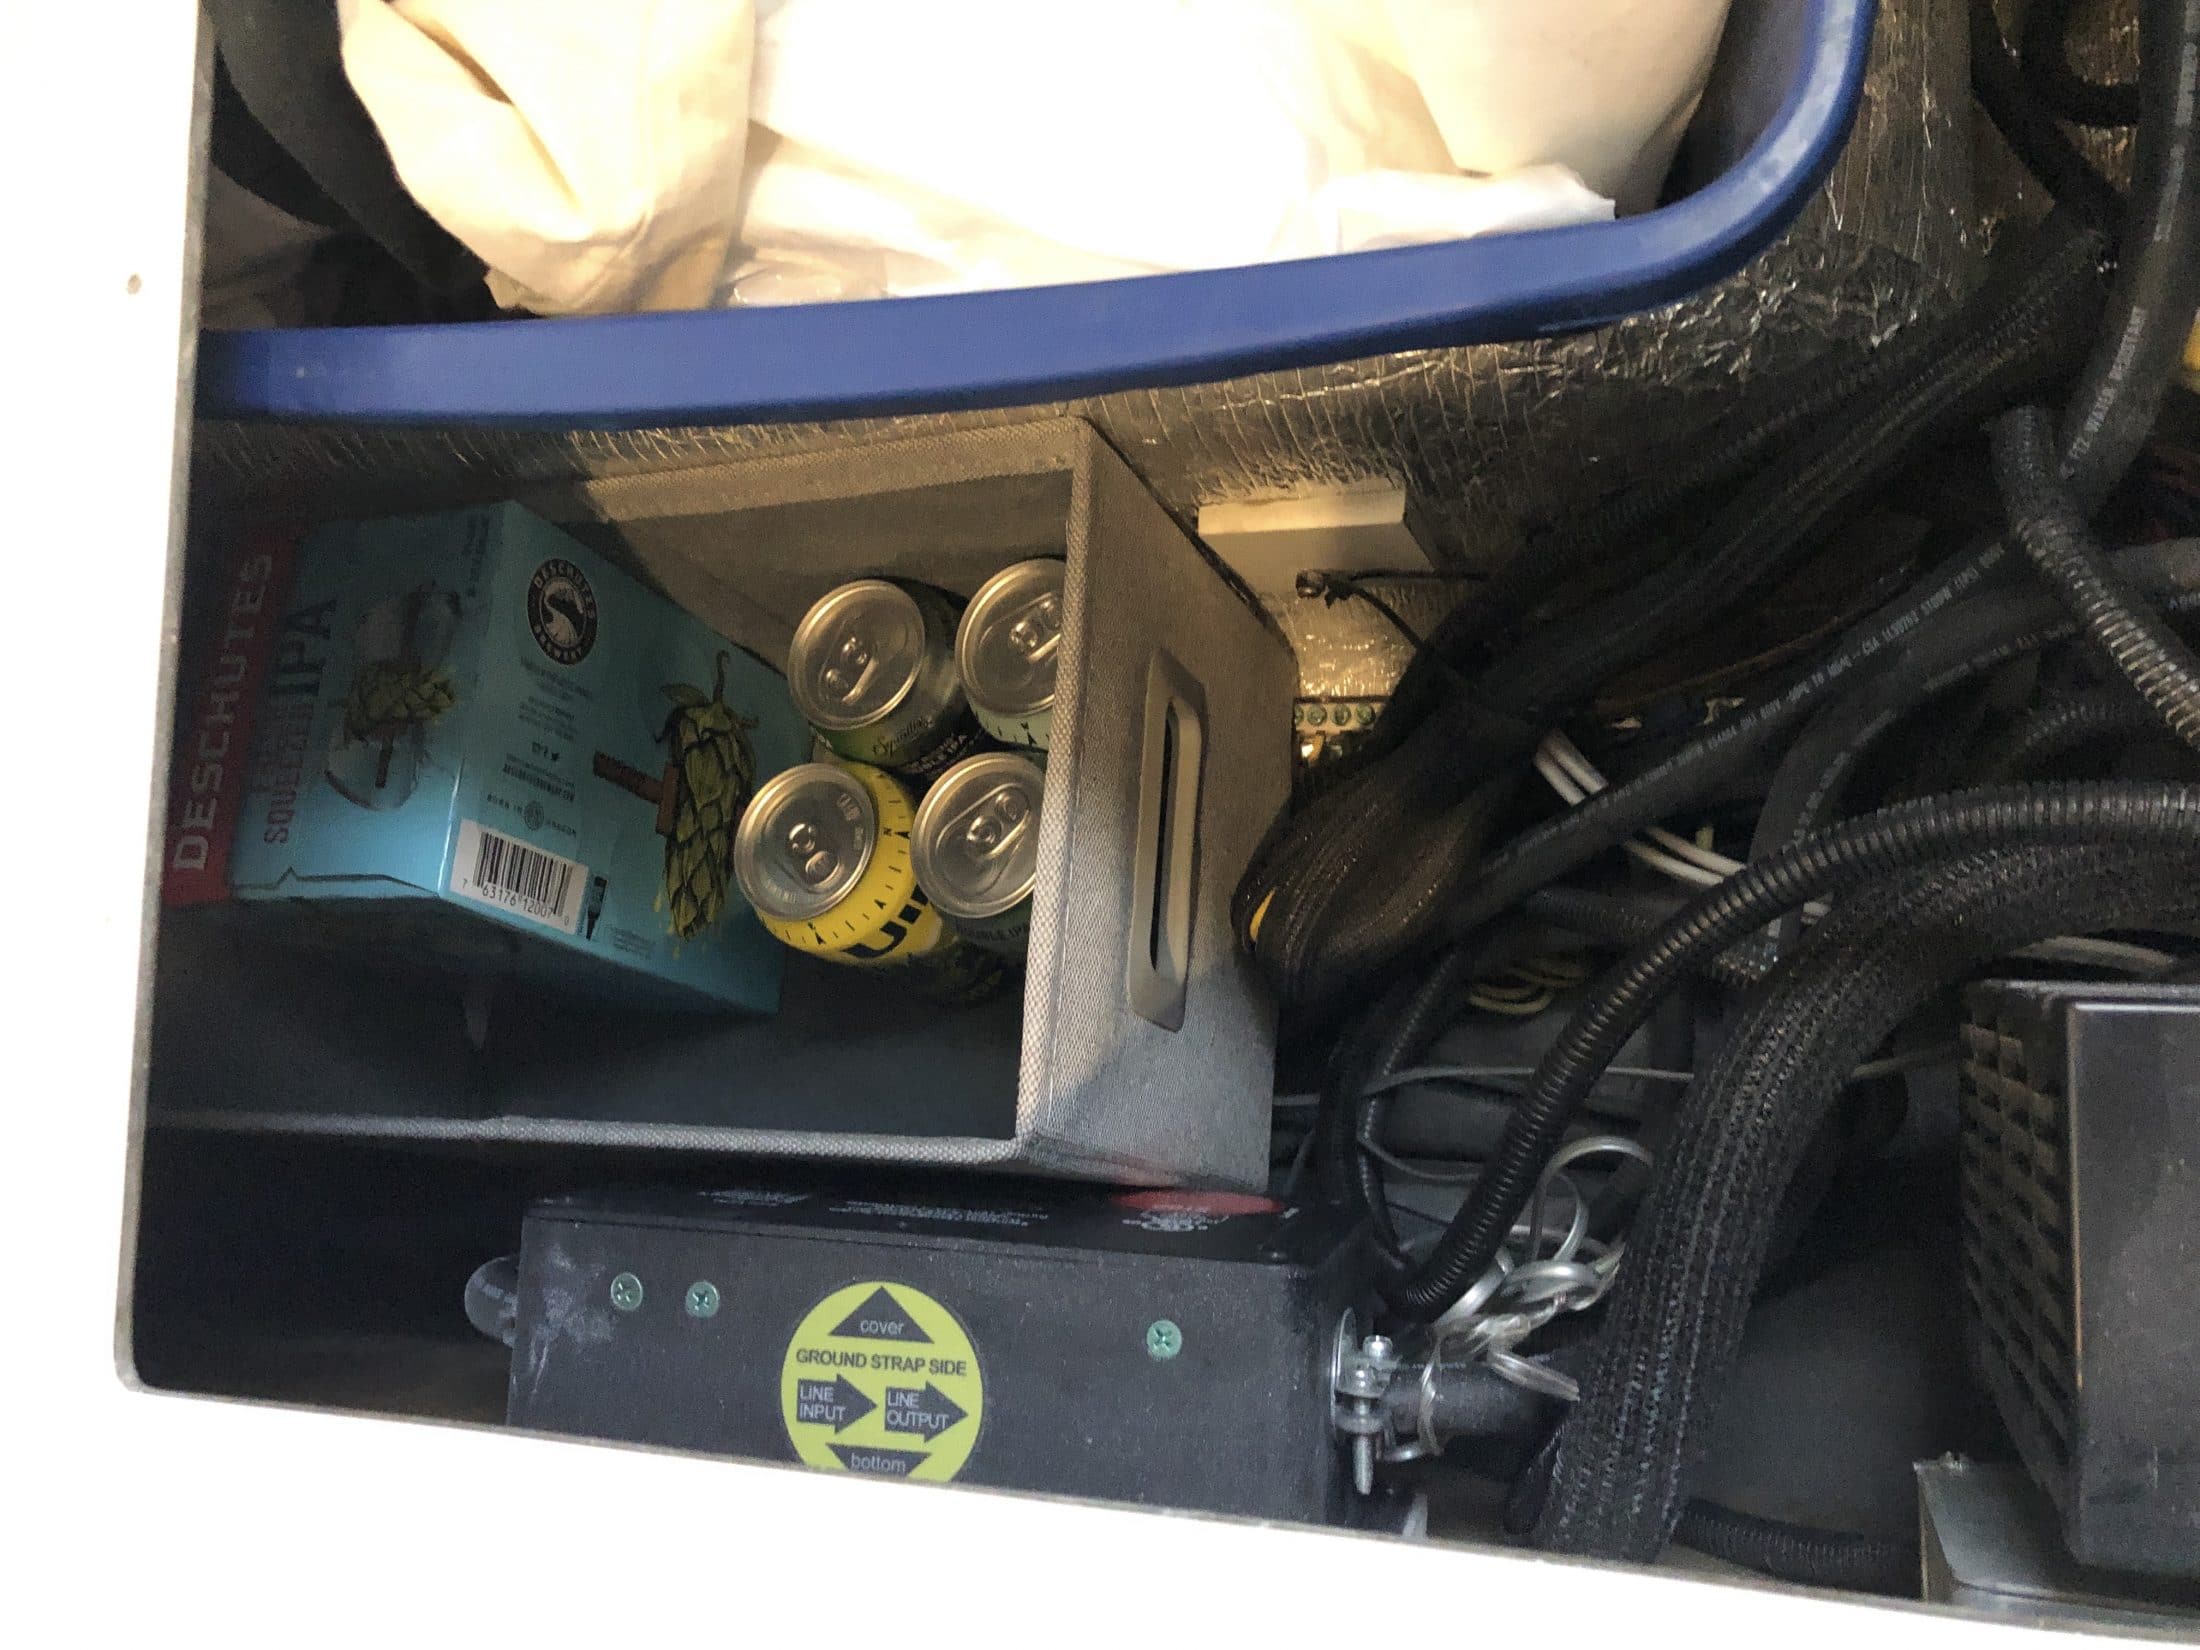
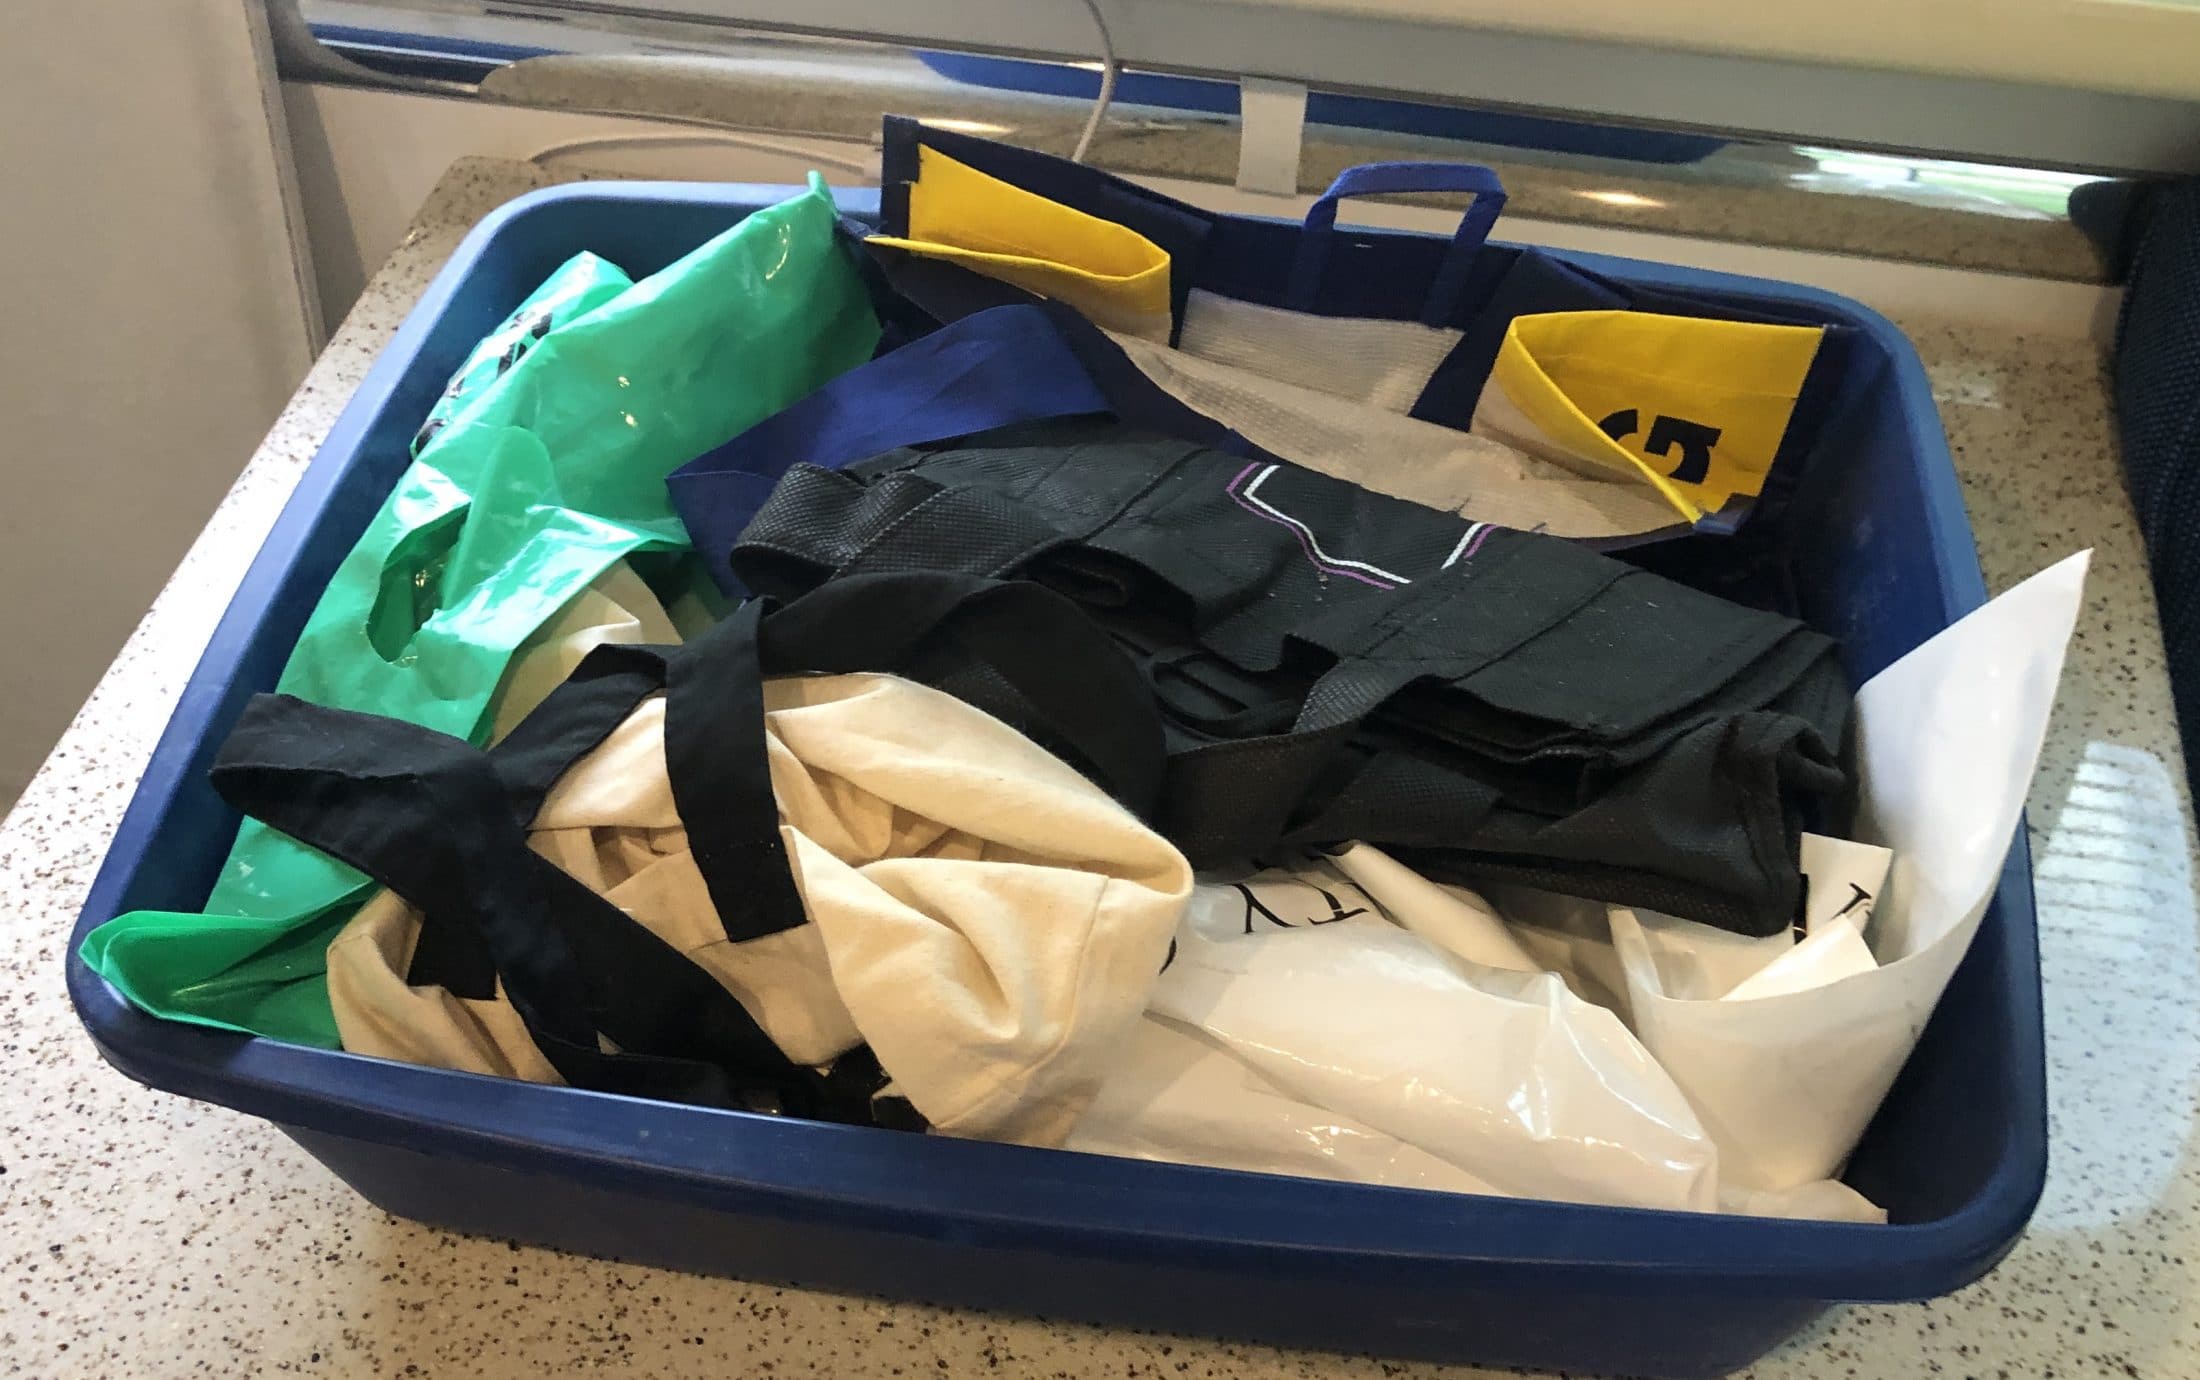
I decided to move the remote display for the surge suppressor to under the dinette, using mountainoliver’s method. When I did this, I looked at the space under the rear dinette seat and decided that I should try to use this space for storage. There is a lot of wiring in there, so I did not want to just put stuff in there on top of the wiring. I wanted to put a container in there so as to not interfere with the wiring. I measured the area and decided the maximum for the container was 8 inches wide x 15 inches long x 12 inches high. I found that the Container Store’s web site, in the storage section, has a nice filter in the sidebar where you can put in minimum and maximum sizes for each of the three dimensions, and then they show you what products meet that criteria. Using this I found the Light Grey Poppin 3x2 Storage Bin that measures 8 inches wide x 13 inches long x 8 inches high. Pretty close to a perfect size. The container comes folded up; you unfold it and place the bottom piece in to give the container some rigidity. It fit perfectly in my trailer. Fortunately, the container is not rigid, and if the fit were a little tight, you could trim the bottom piece to make it fit. It is flush up against the surge suppressor; I checked the instruction manual for the surge suppressor, and it does not have any warnings about providing cooling space around the unit. So I think I am okay. On this trip, I am storing extra beer in this compartment. BTW, the picture also shows a flat blue tray sitting on top of the wheel well. In this tray I keep the folders Oliver sent with literature and a DVD for prospective buyers that I show Ollie to; I keep some canvas tote bags on top of the folders.
1 point
-
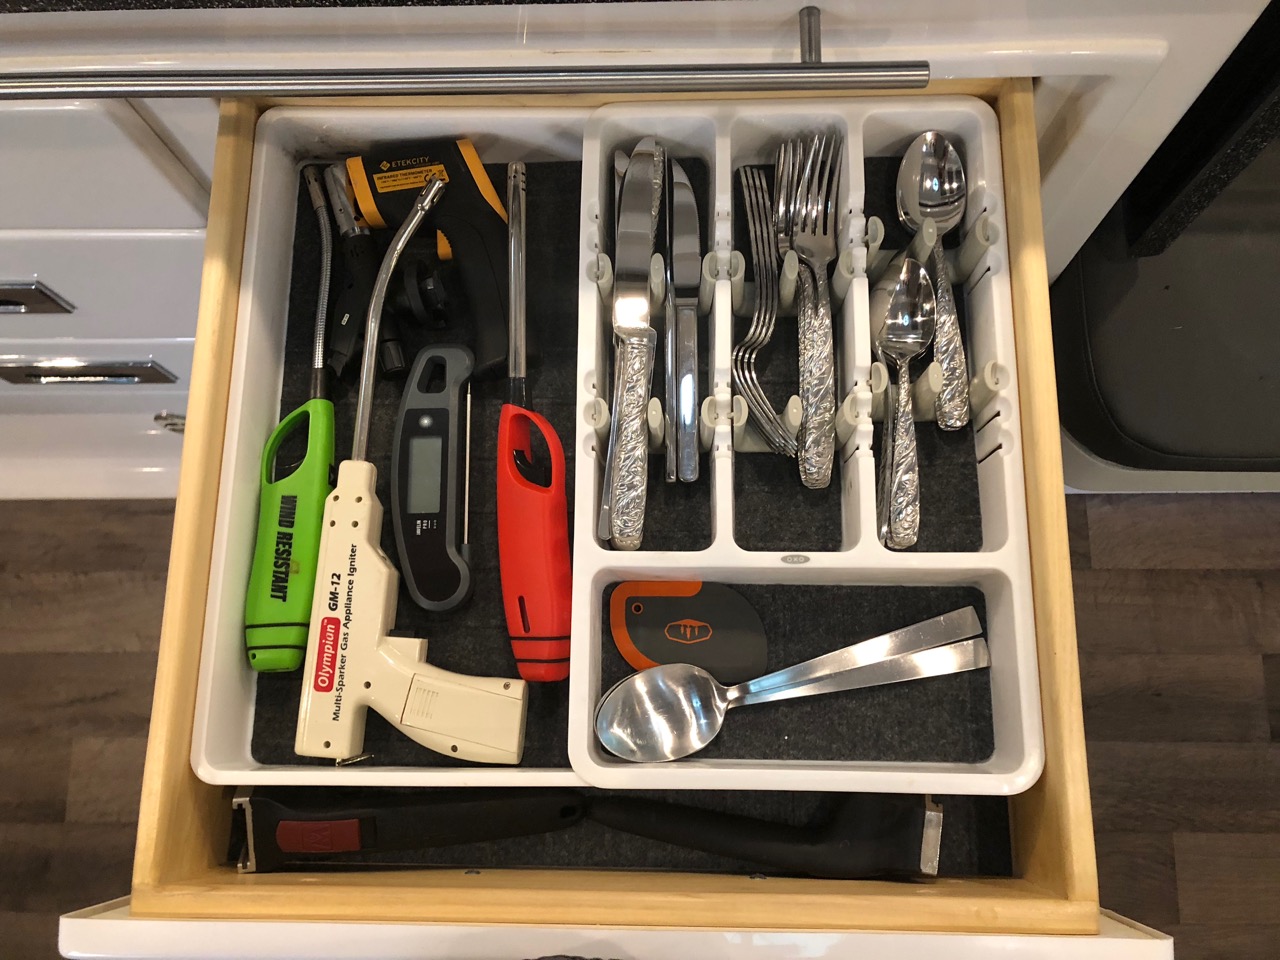
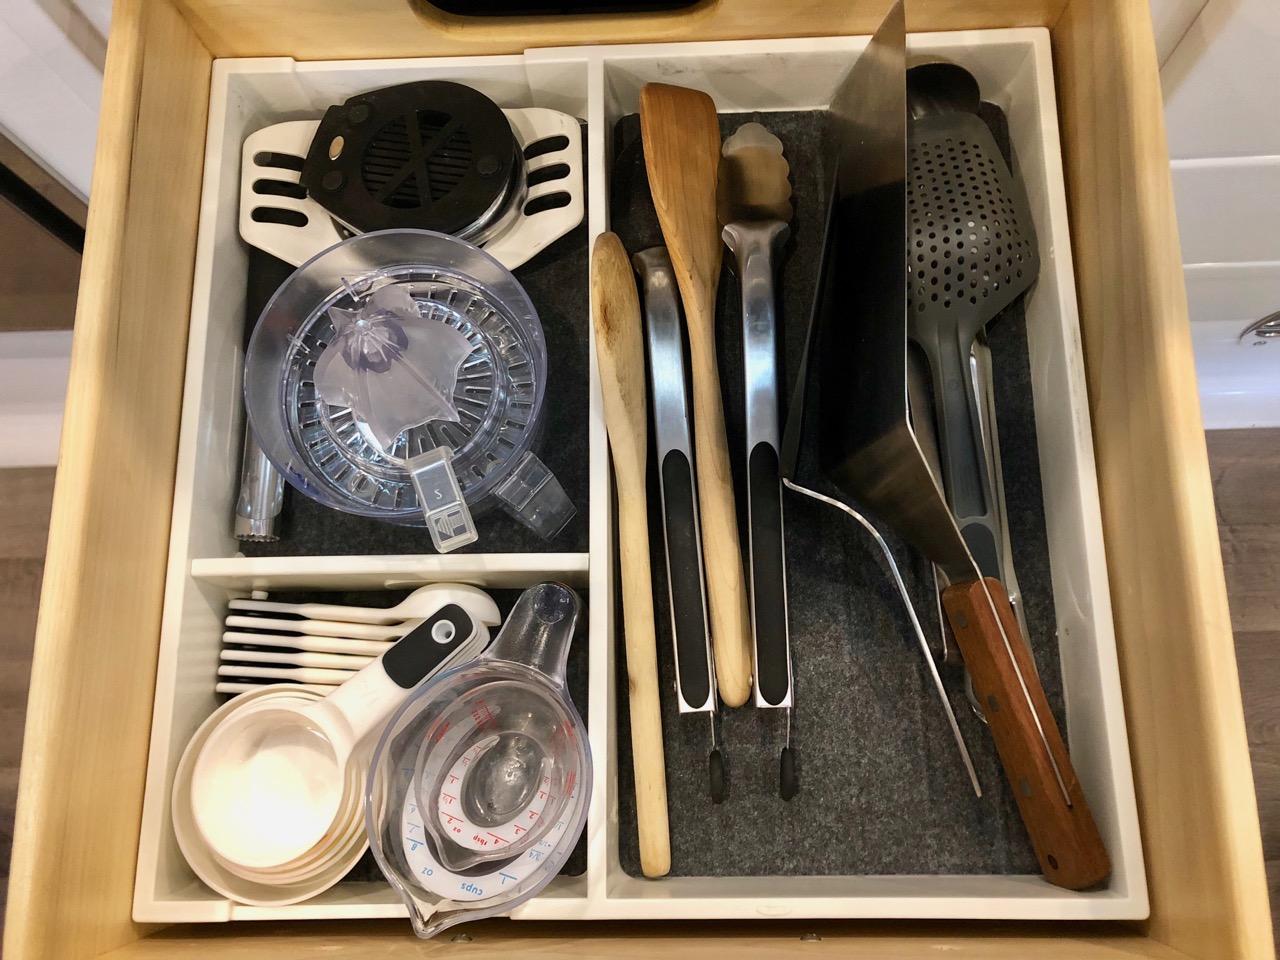
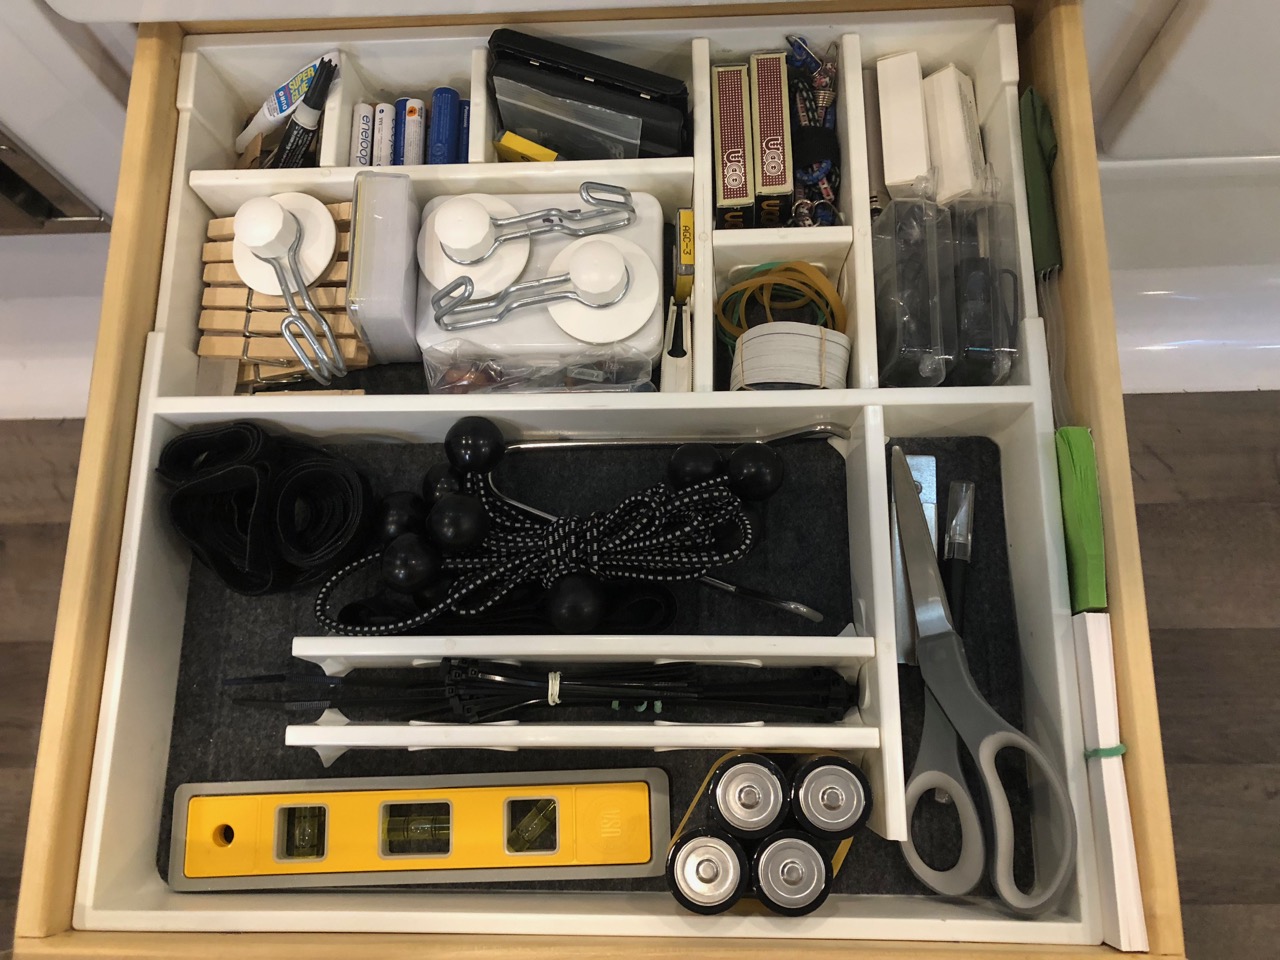
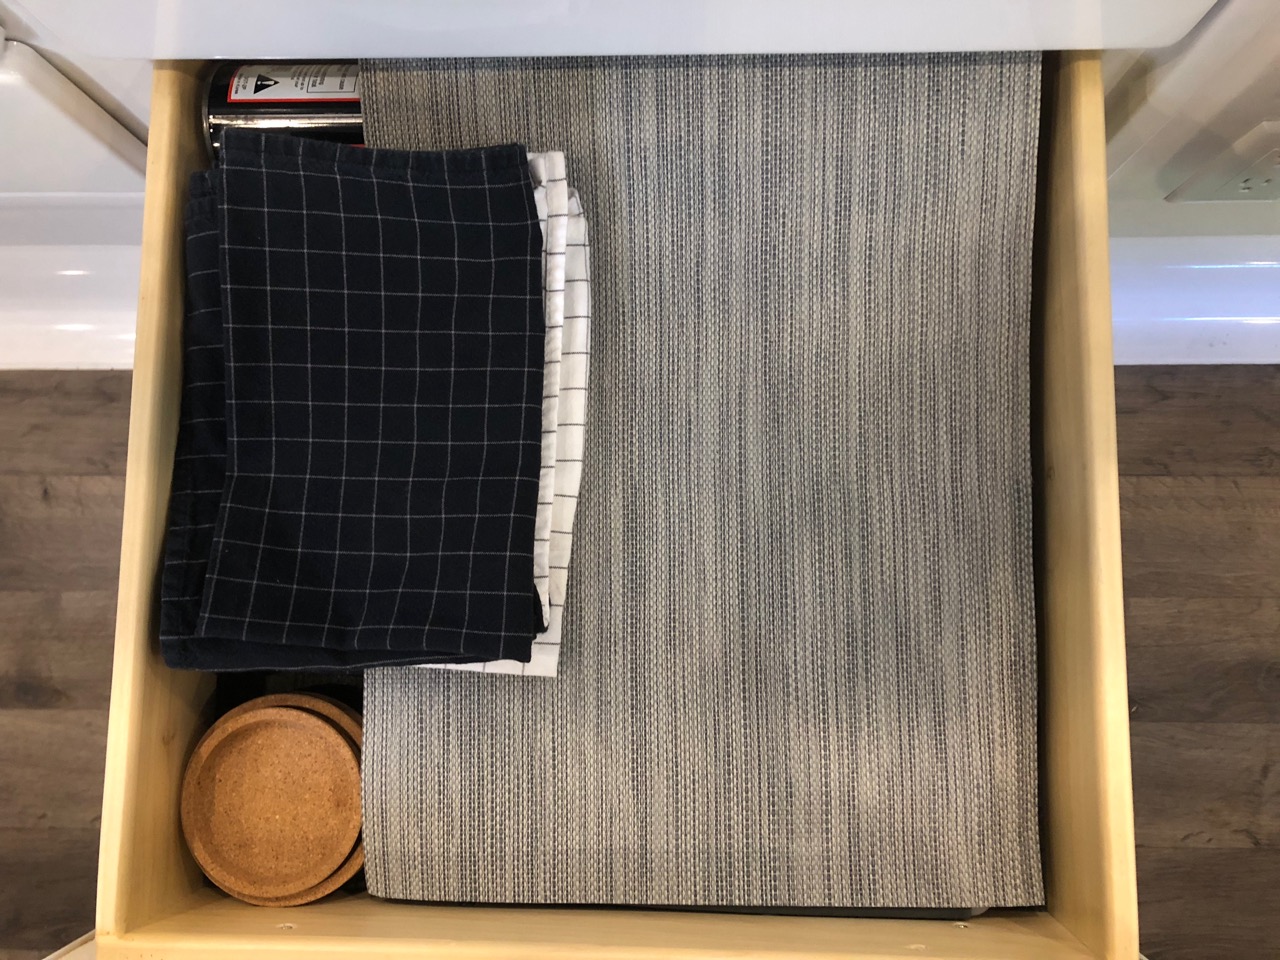
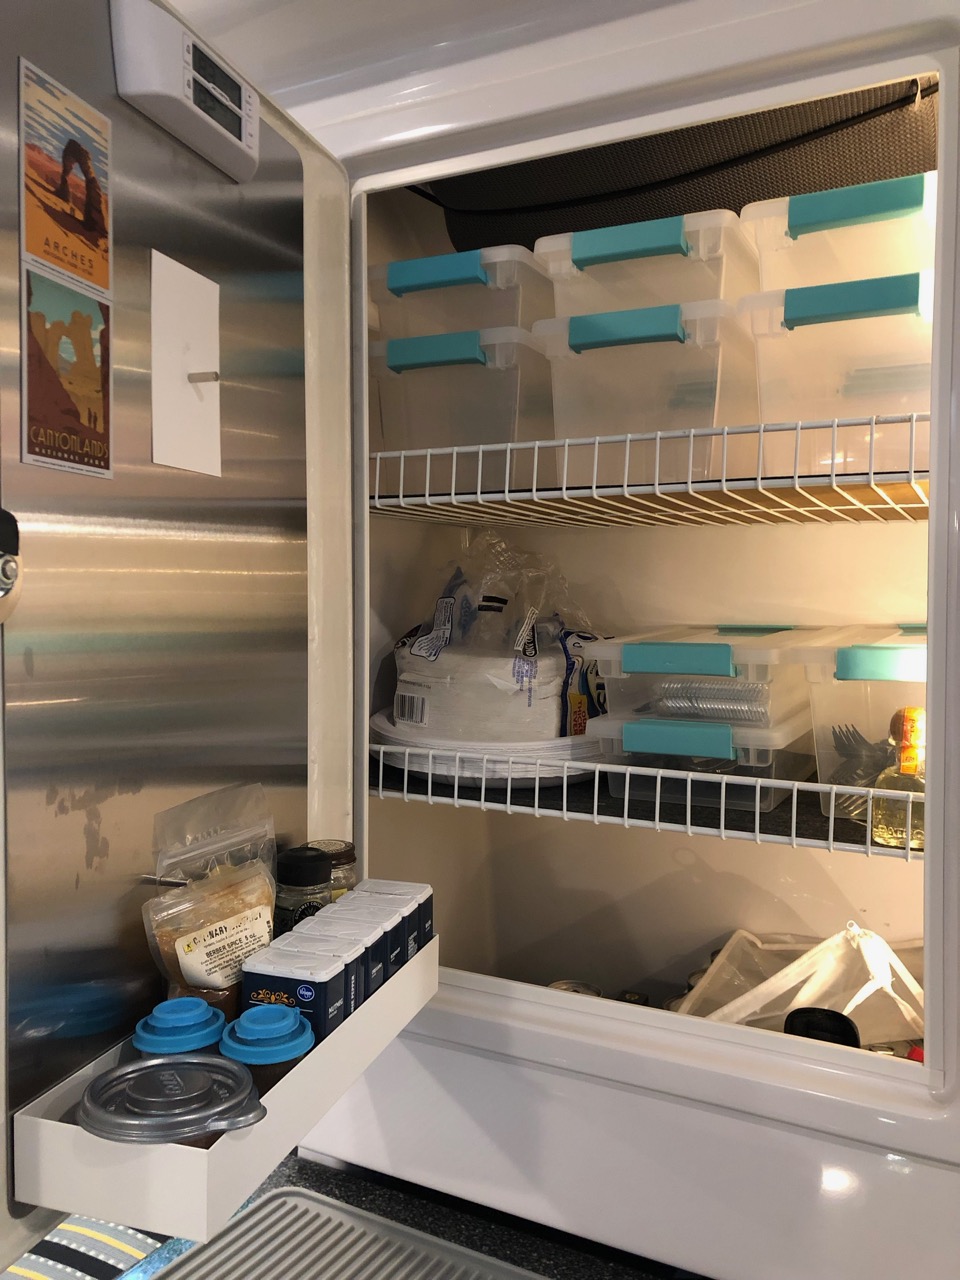
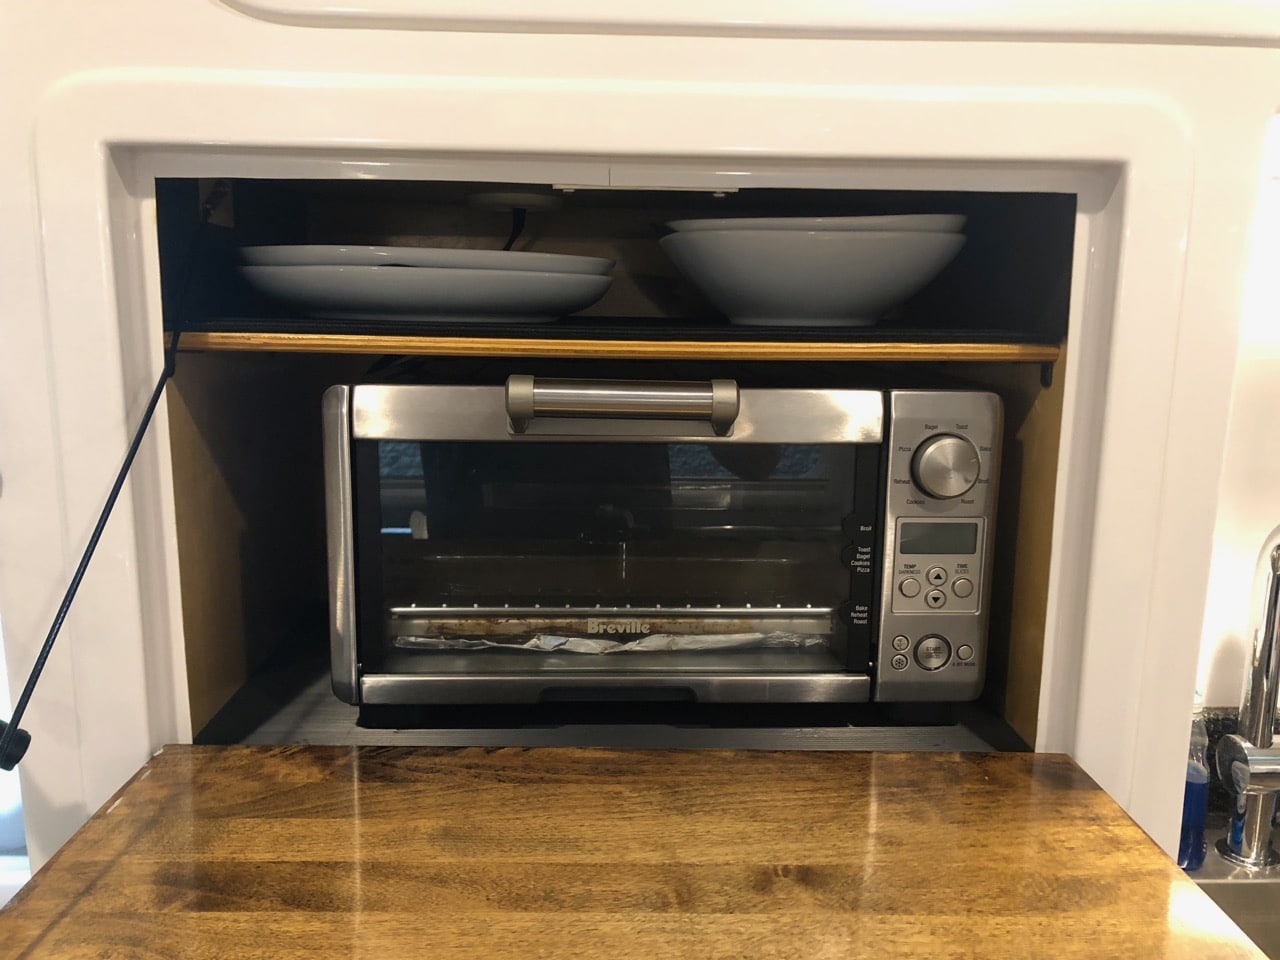
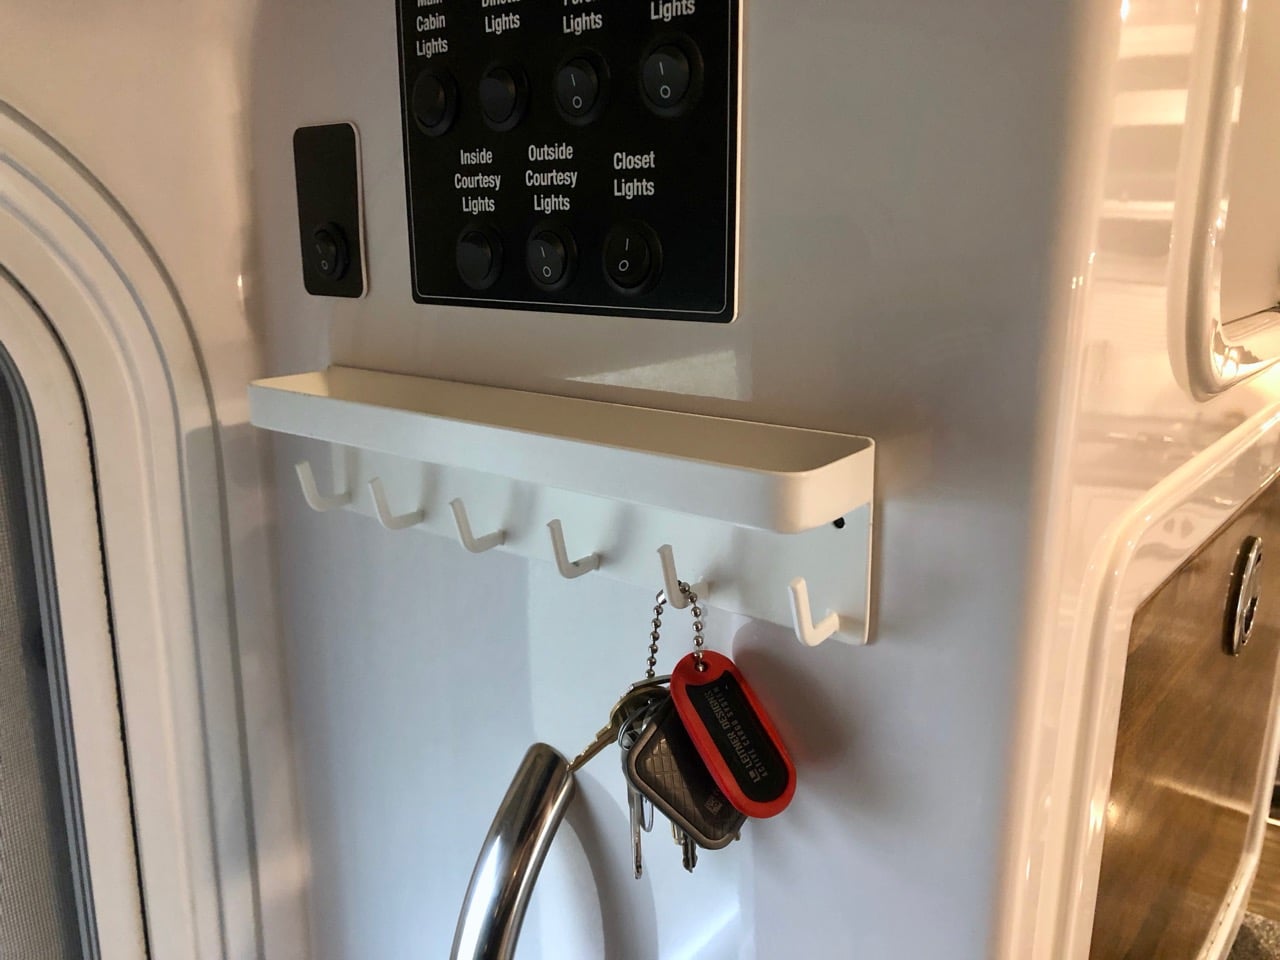
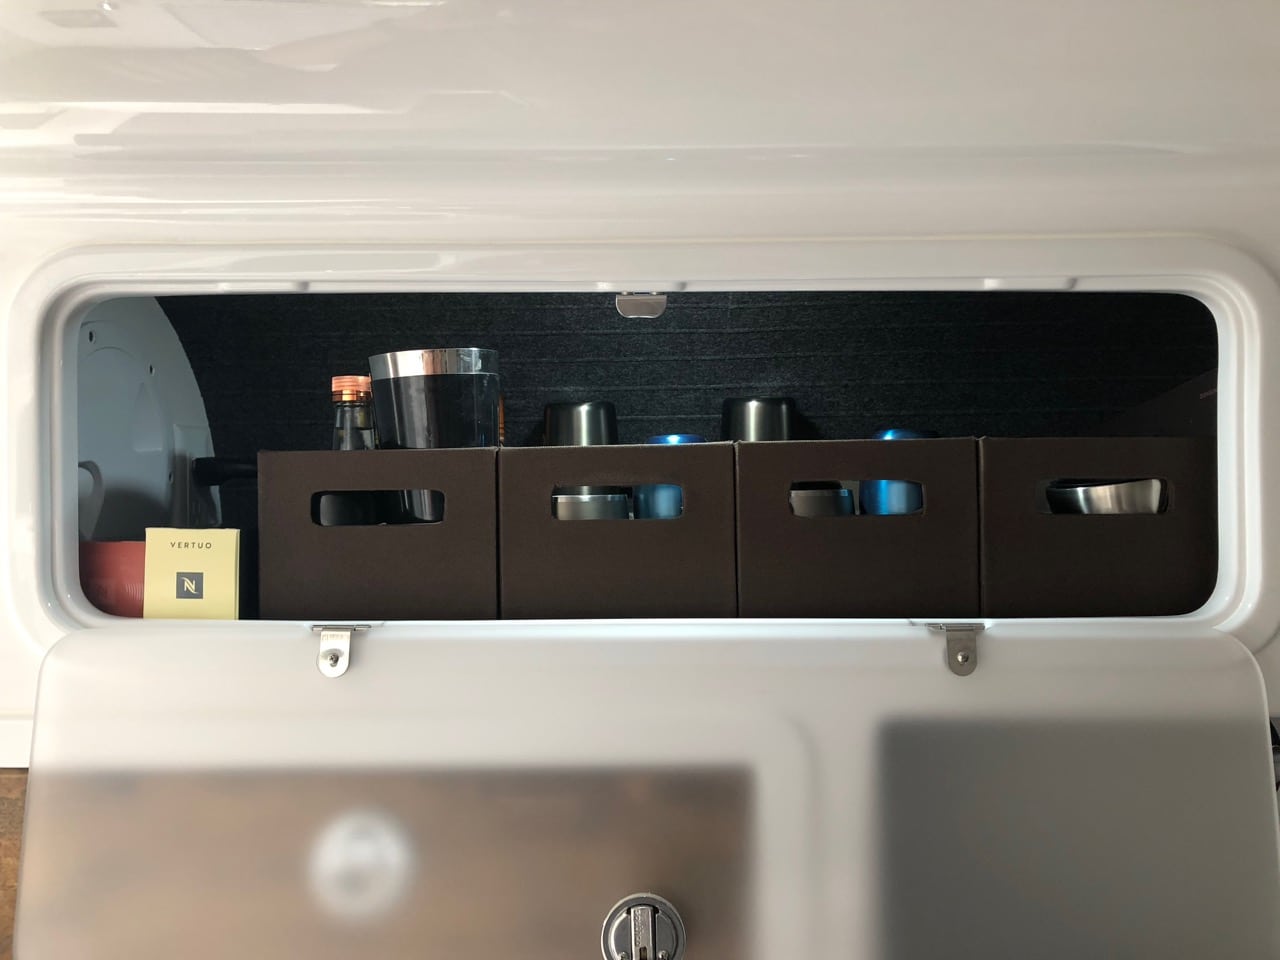
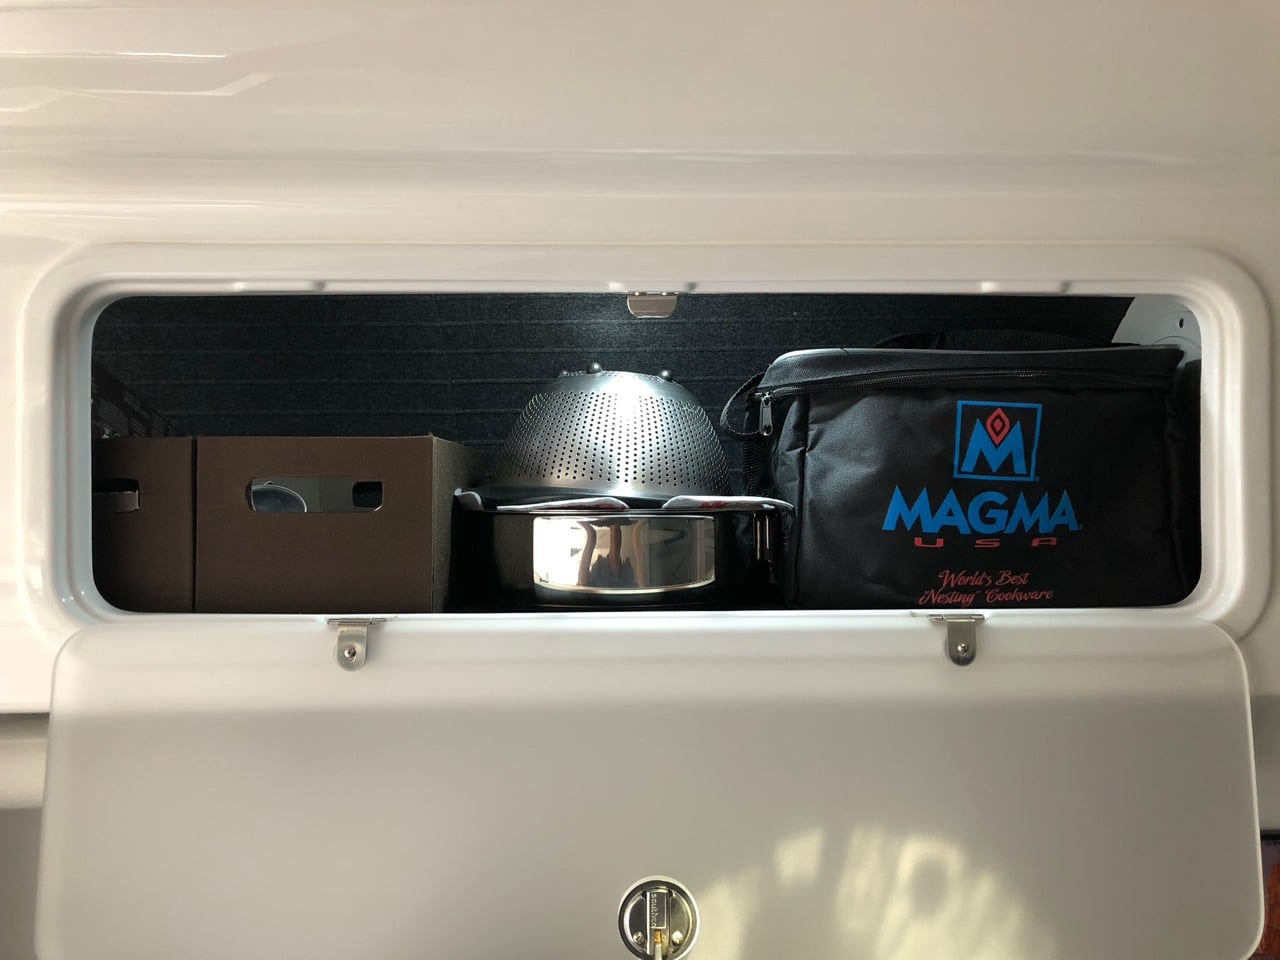
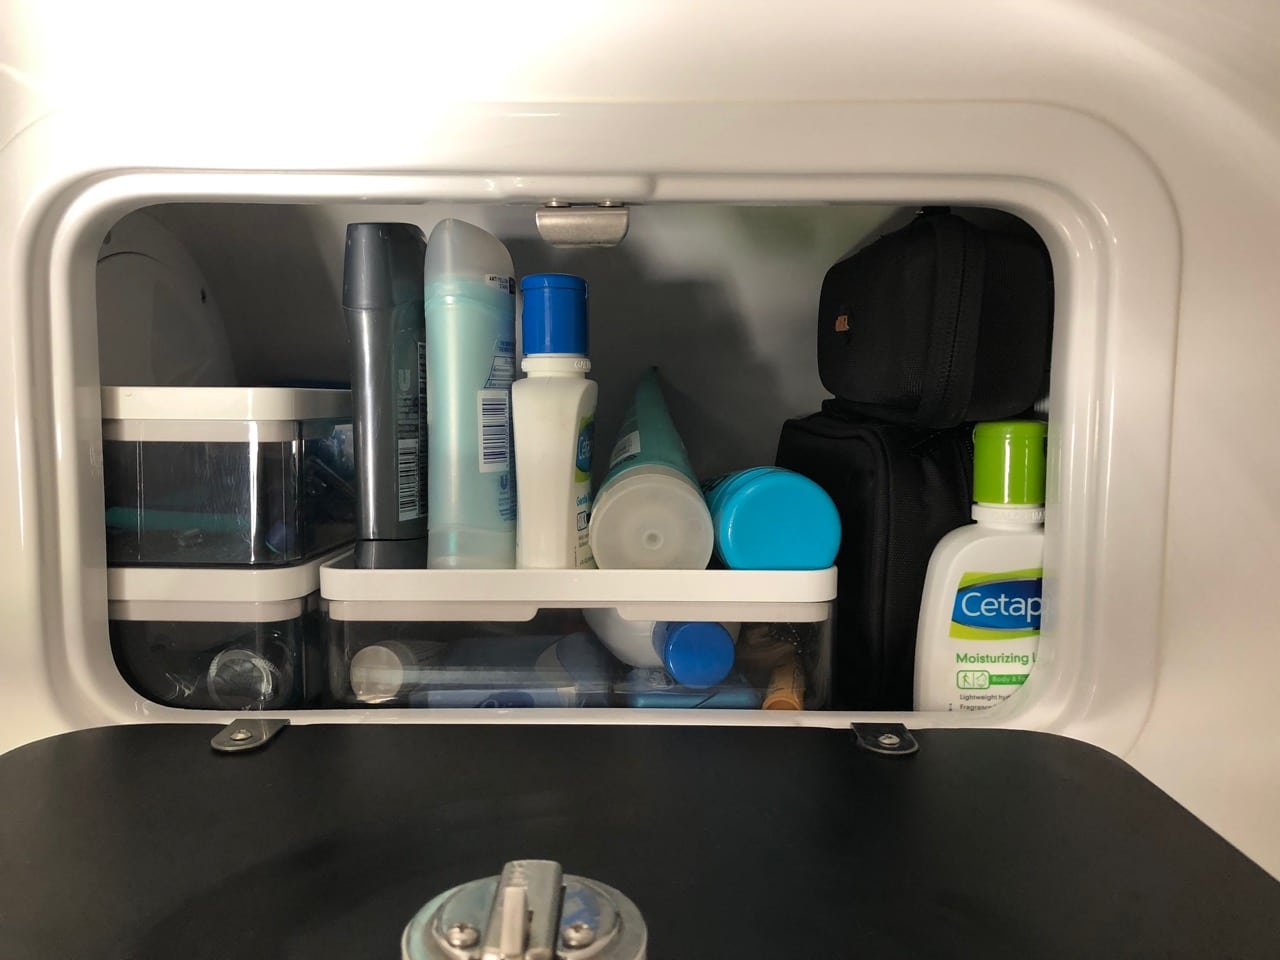
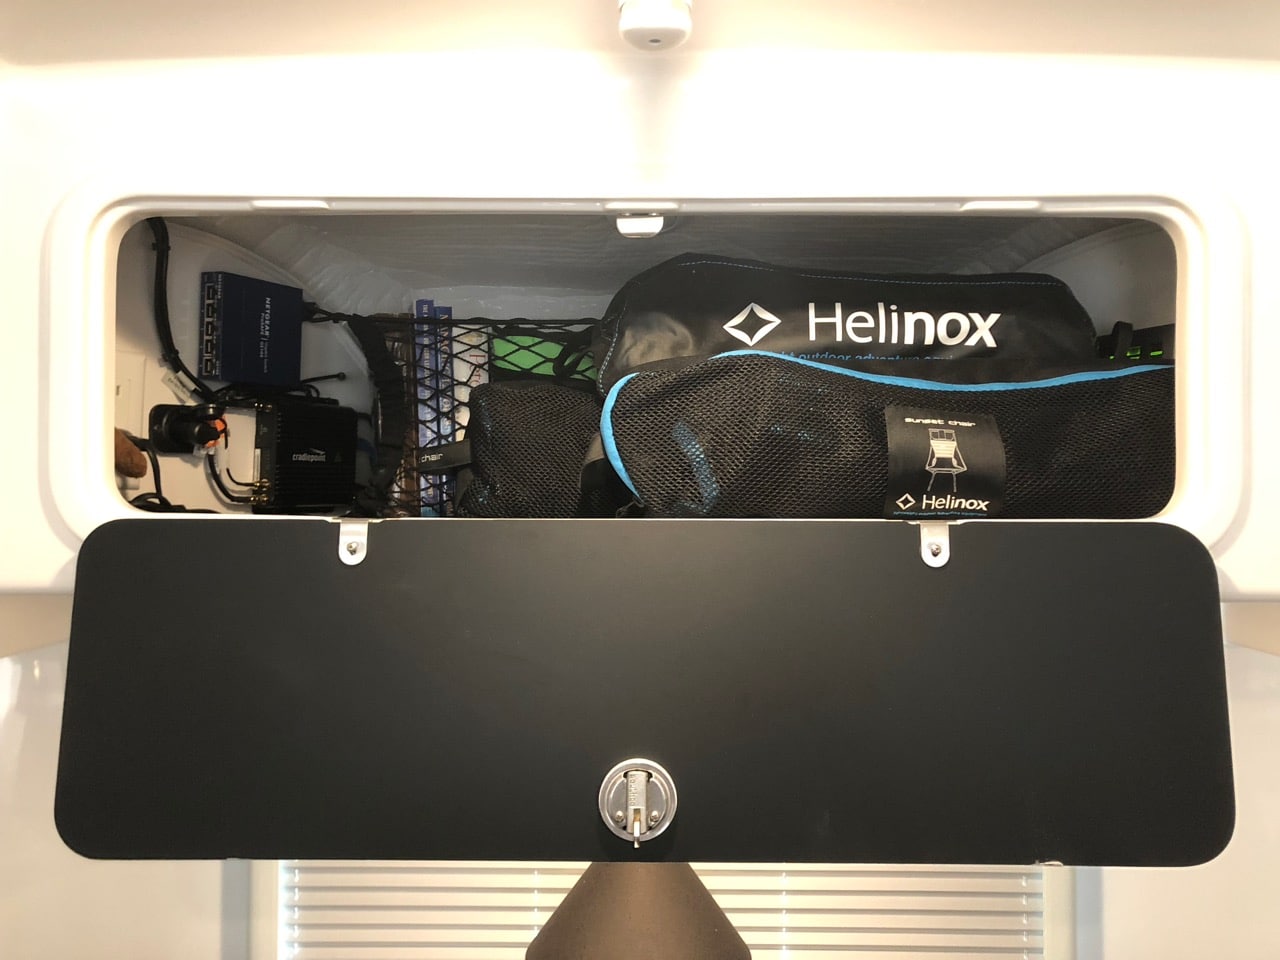
Since I was taking some inside photos today, I thought I'd snap a few to add to this thread. Plus I'll add some that I've posted in other threads recently. Here's how we organize all our drawers: Top right, we use an expandable cultery tray from OXO - I cut out some pieces of a stiff felt liner from Ikea to put in each of the compartments, which cushions the utensils and helps keep the tray from getting marred - In the middle two and bottom left, we use a different OXO tray, with the same felt lining as above - Then on the bottom right, we keep two cutting boards, place mats, coasters, towels, etc., so no need for any organizer - For the nightstand drawer, I used the excellent trick that Bill came up with. But instead of the aluminum angle, I added some adjustable shelf pegs to the drawer, and then stuck some thick felt on the sides of the insert to both center it and keep it from sliding around. Then I placed a similar 10 x 16 tray in the bottom, also with some felt pads to keep it in place. Man, now I know where all the lip balm and sharpies end up. I added two wire organizers to the pantry door (glued some 1 x 2 PVC to the door to give some extra depth and something to screw to.). Unfortunately I can't find these exact items on Amazon now to link to - We added storage nets galore, and these are incredibly handy - In the pantry, I added a stainless plate from Amazon, to which I attached a small box from Ikea (discontinued) to use as a spice shelf. (The box slides under the pantry shelf when closed to keep the contents from bouncing out.). A bungee across the very top on the inside holds a folding drying mat perfectly. The boxes are Sterilite Clip Boxes, medium and small, which you can get on Amazon or at Target. They're the best fitting that I've found so far. On our last trip, I had trouble finding stuff to fill them. The light in the pantry is a Luminoodle Click. By the way, I buy bungee stuff from www.hookandcord.com. I asked for the cabinet instead of the microwave/convection oven, and we keep a toaster oven there, plus I made a shelf for plates and bowls - Some hooks by the door are always handy - As are some flashlights - Over the kitchen, I found these boxes for glassware, mini bar, etc. They're another discontinued item, but if you want to find something similar, they're 6.25"w x 11.5"d x 5"h. We keep out the two or three pans from our Magma set that we use all the time, while the rest stays in their storage bag. I lined the back of all our upper cabinets with the same stiff felt from Ikea that I used on the drawers (they had them on closeout sale, so I bought them out.) Like with the drawers, it keeps things from marring the fiberglass, plus I think it looks a lot better - The bath cabinet stays stuffed, but these boxes from Ikea help to keep it somewhat organized. I covered the back of the door with black vinyl to protect the mirrored surface - In the back of the attic, I put another storage net to hold books in place, and then in front of that, we keep camp chairs and other small items that get unloaded at the camp site. The rest is filled with electronics. -
1 point
-
I reorganized the pantry earlier this year. Painted the back of the door to make it easier to clean and added a stainless sheet I got off amazon. Then attached a small box from Ikea as a spice rack. The boxes I found at Target and they really fit well - much better than the ones I had before. And I added a LED strip light to the side to make it easier to see. You can't really see it, but I ran a bungee across the top and it's a perfect spot to store one of those folding drying mats. Also, I had some plywood left over from the electrical, so I made a quick shelf to go over the toaster oven (in the microwave cabinet). I ordered a giant neoprene mouse pad off of amazon, and cut it to size to keep the dishes from bouncing around too much. The cabinet itself was just bare wood, and was starting to get dirty, so I sanded it and added a coat of poly to make it easier to wipe out. I couldn't get used to plastic dishes, so I bought a few plates and bowls at Ikea. They haven't broken yet is all I can say.
1 point
-
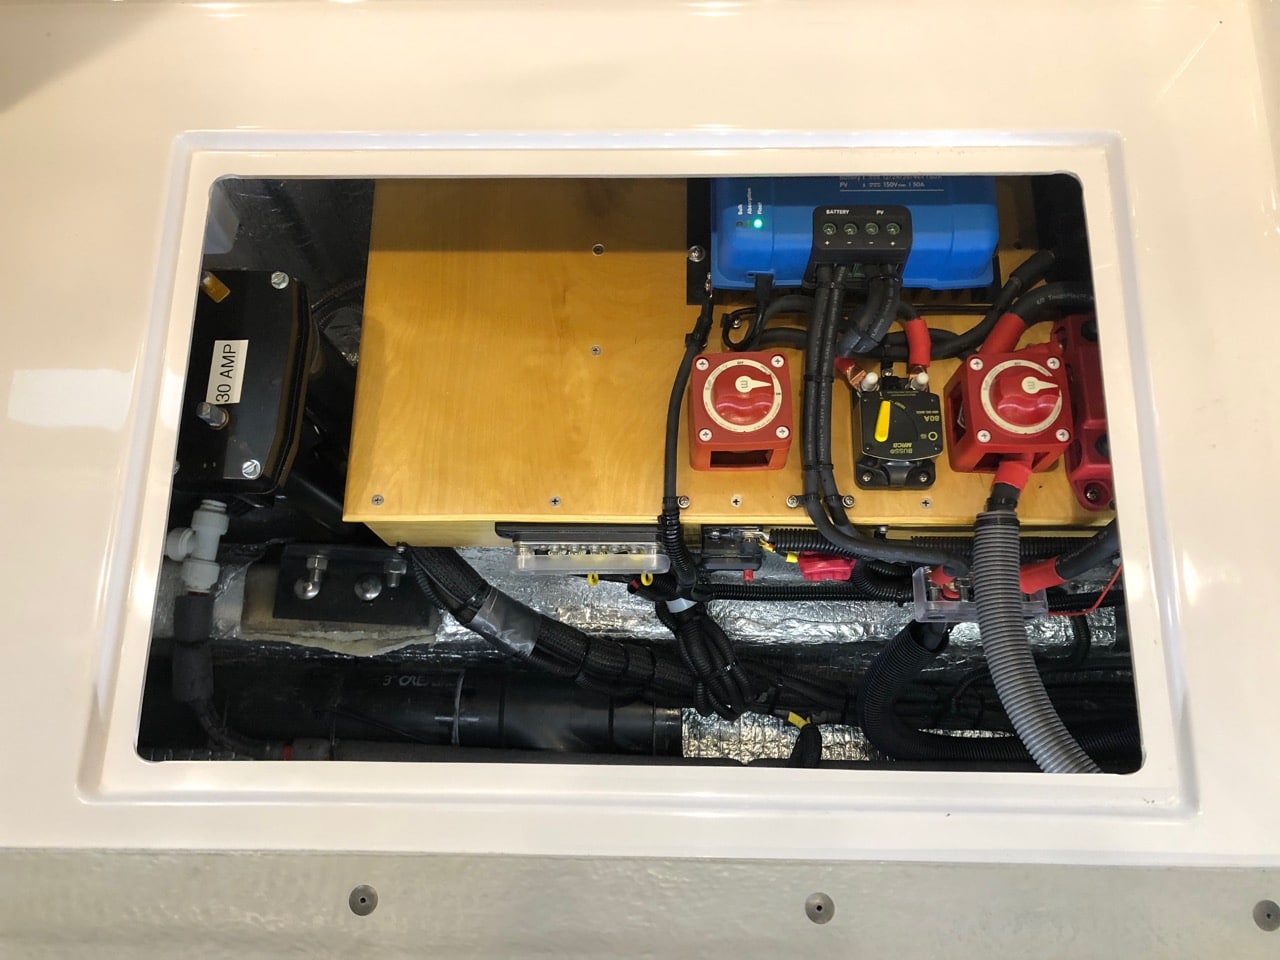
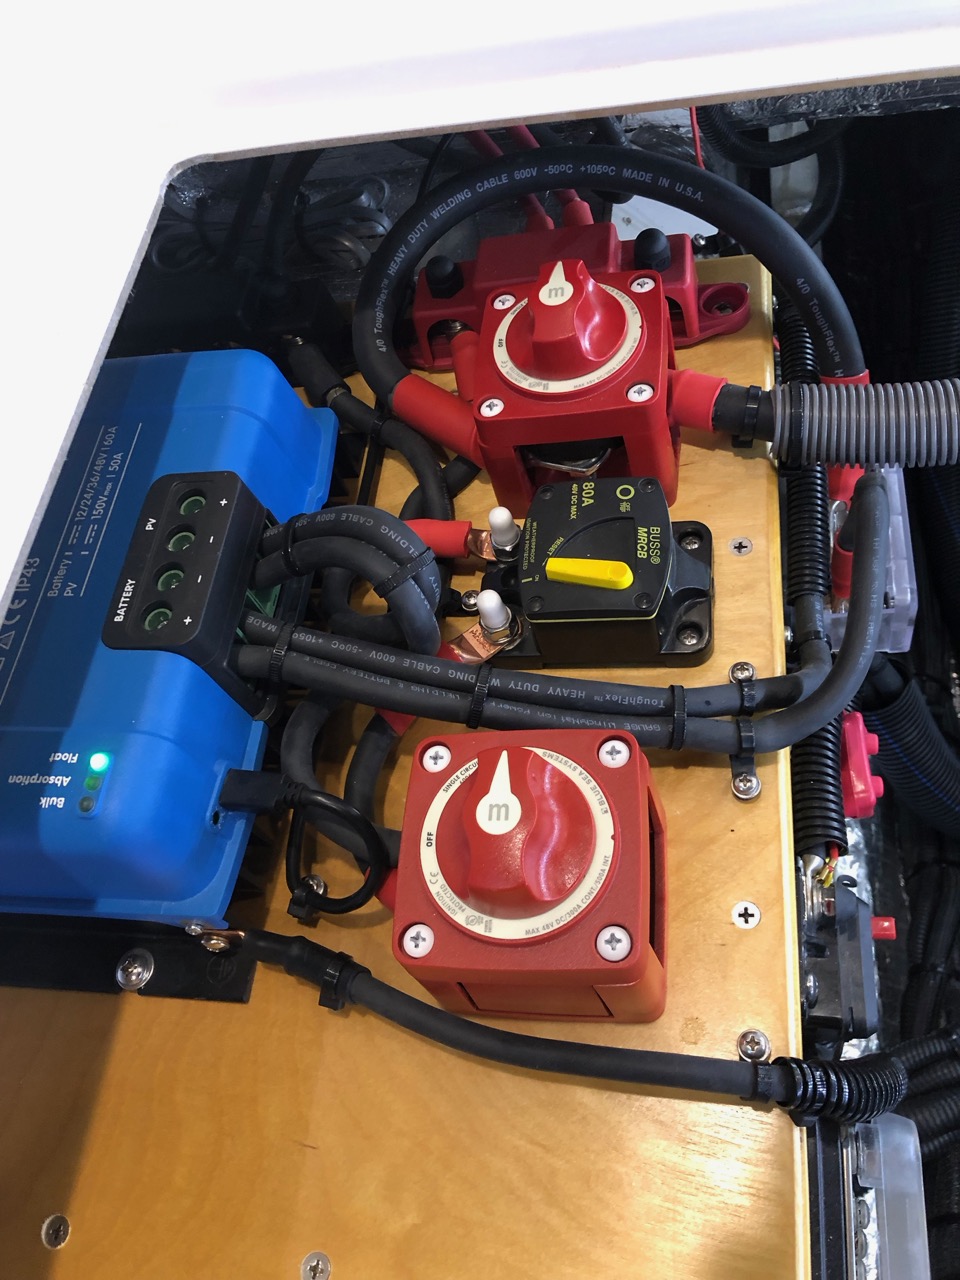
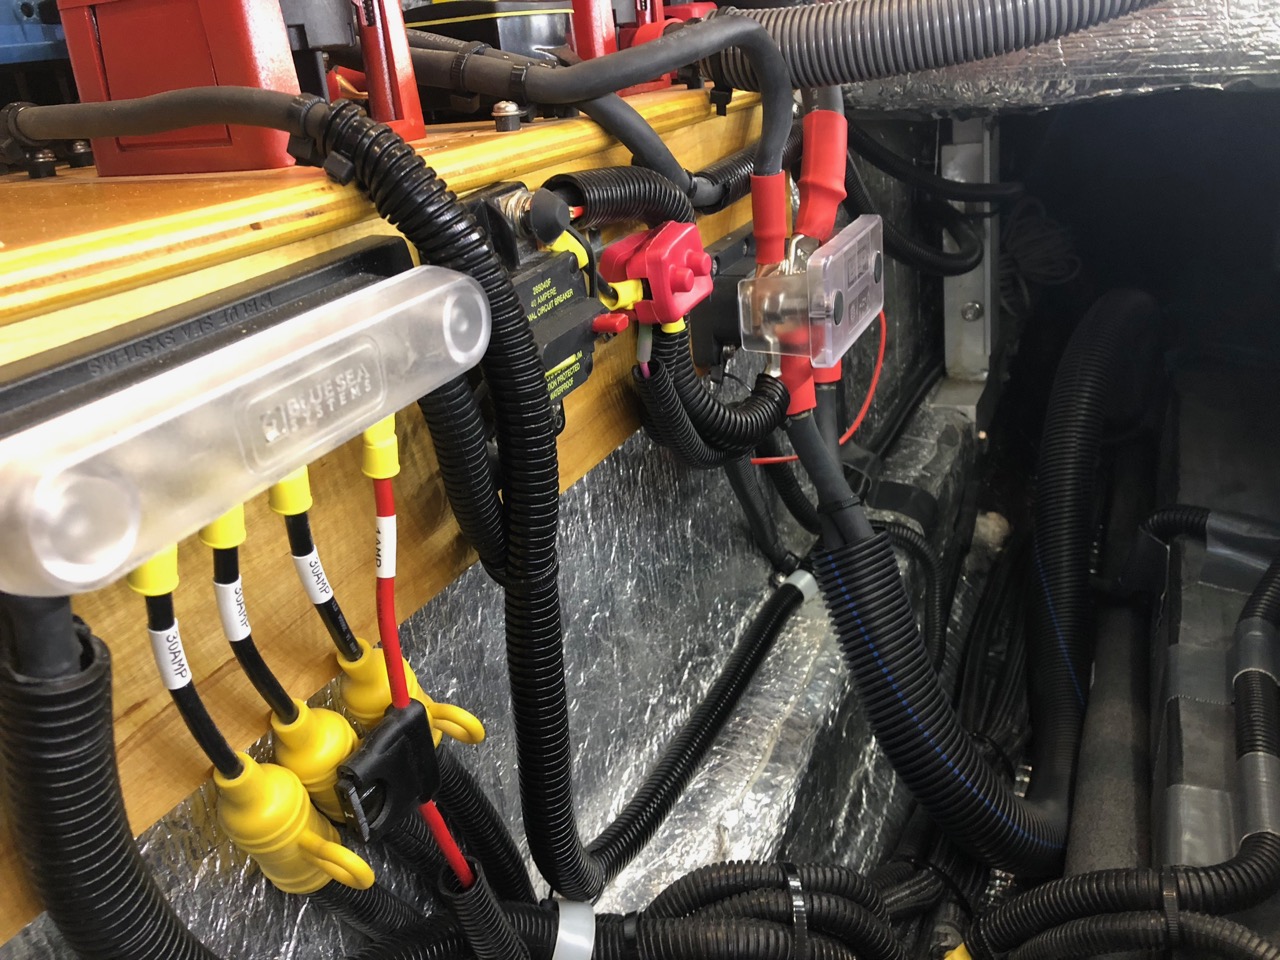
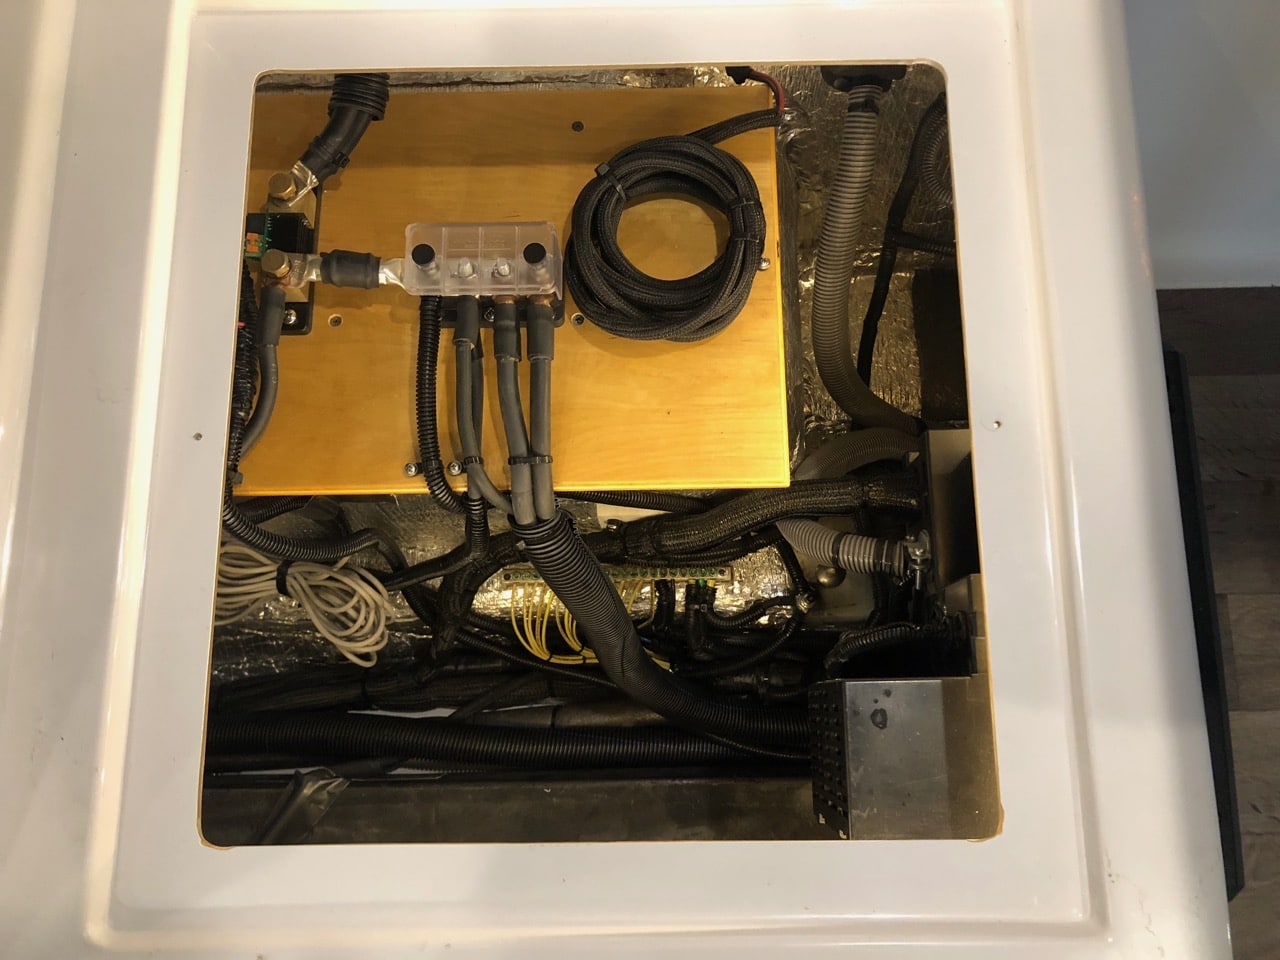
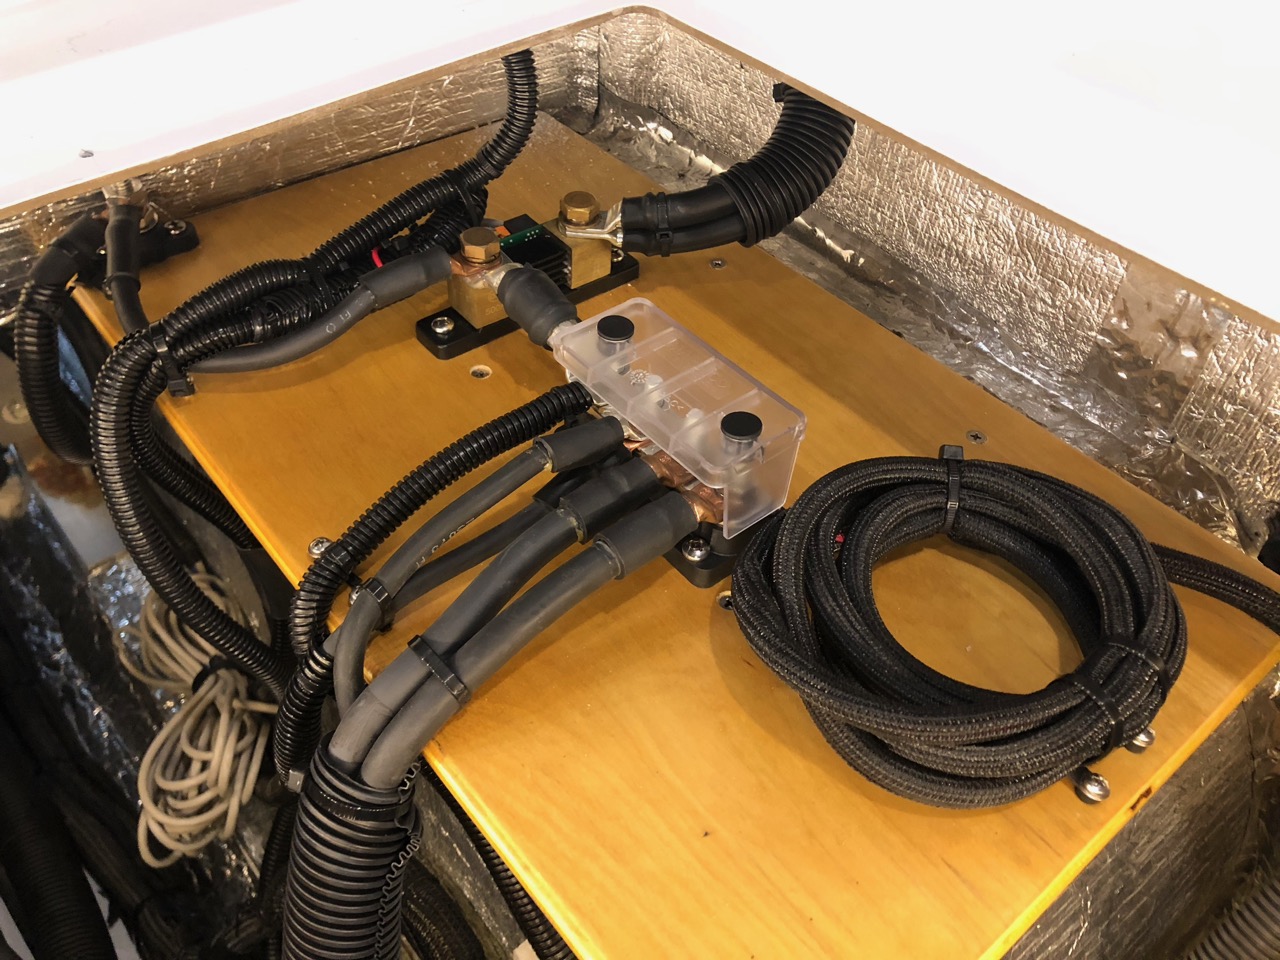
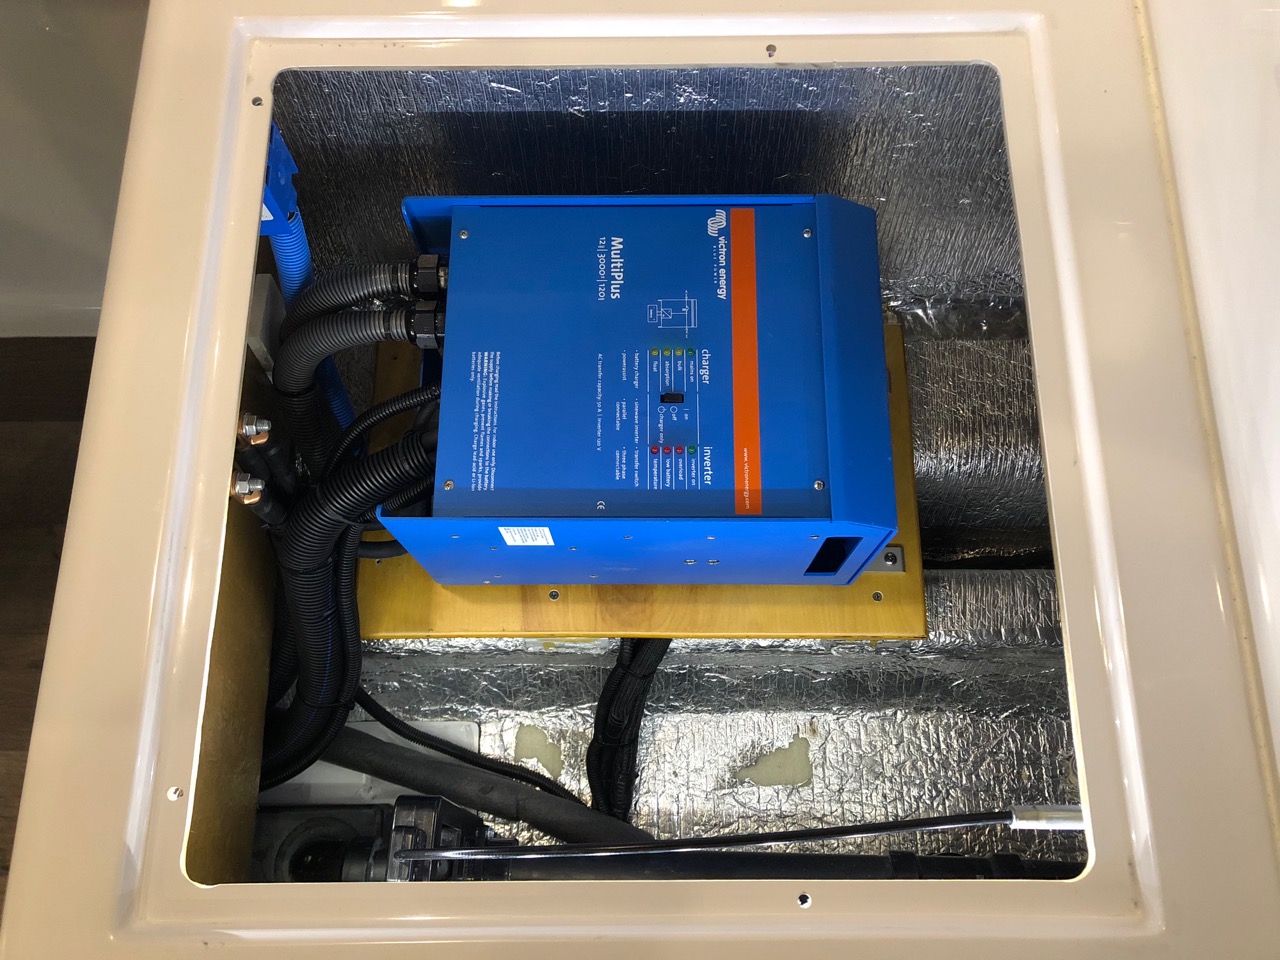
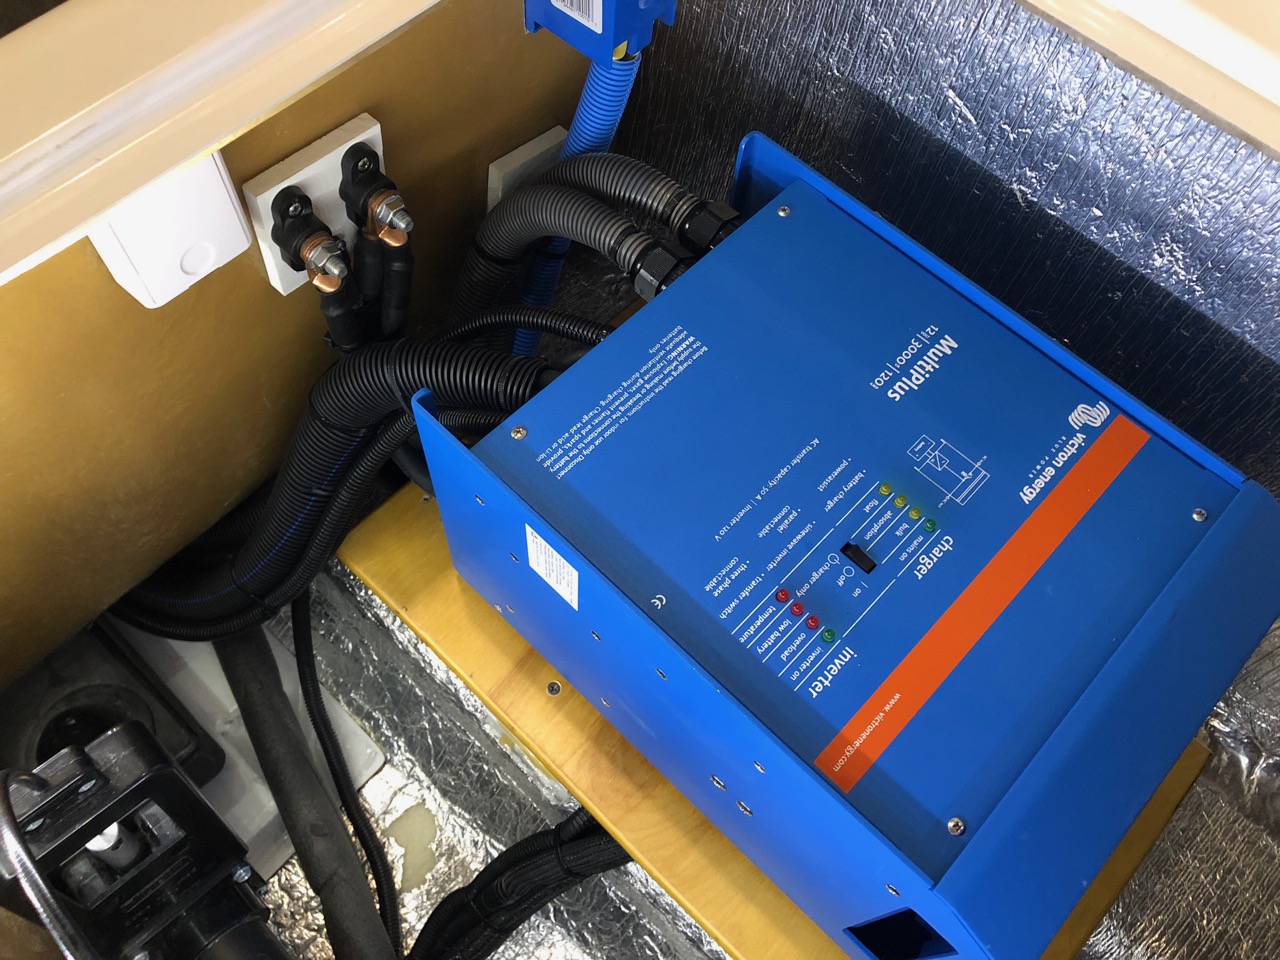
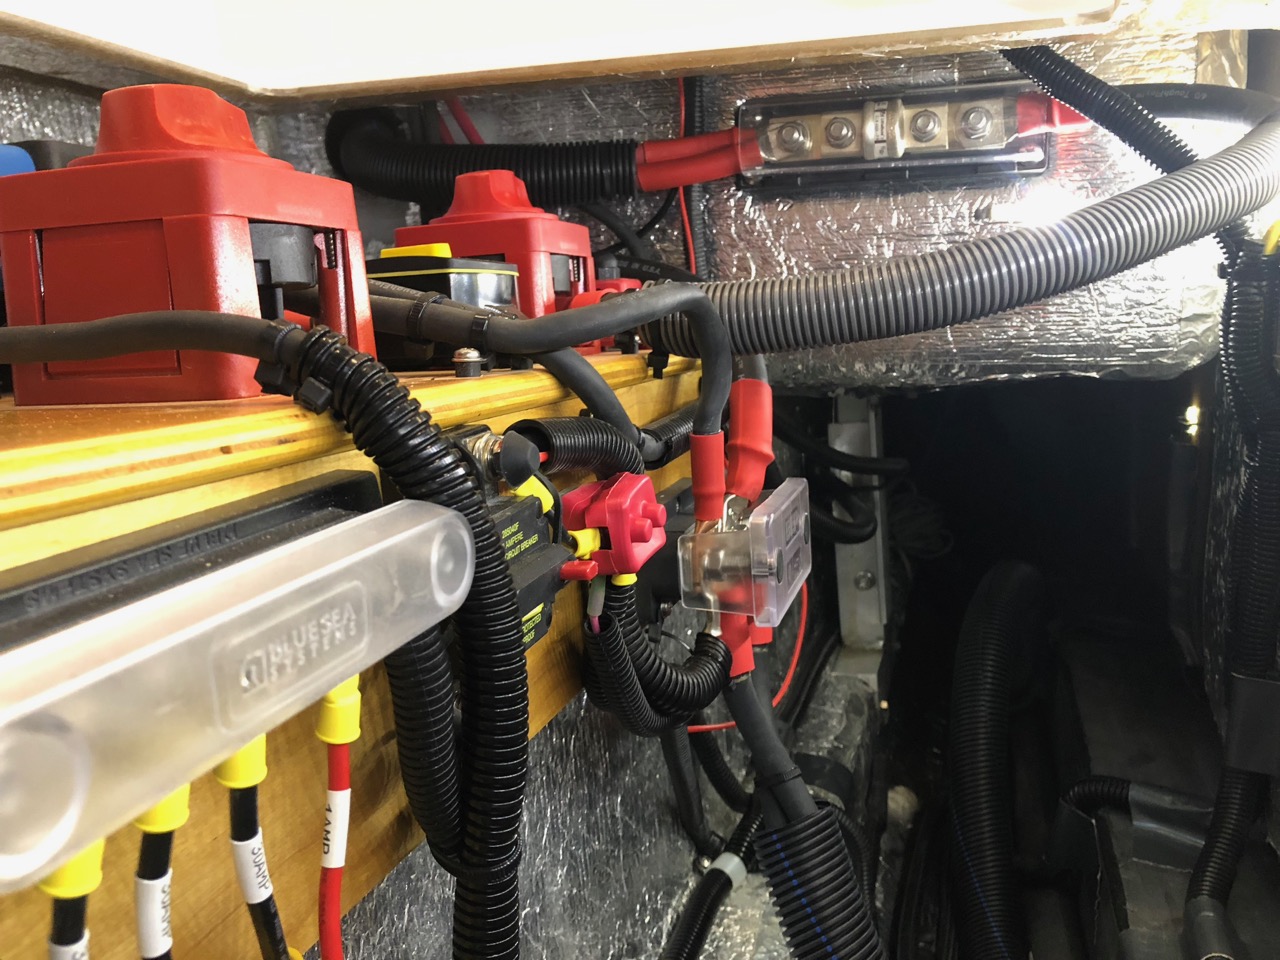
A little update on what I've been up to so far this summer, which has been all electrical. I've been wanting to redo all of the electrical work that I did when I took delivery, just because one, I was rushed, and two, I learned a lot both doing it and since doing it. So I made some new plywood boards to mount everything on, since I didn't really trust the PVC ones that I originally used. I rounded the corners of the plywood to try to minimize the chances of the corners digging into any cable that rested on it. Then reorganized it all, made sure all the cables were wrapped, and tried to tie down everything as securely as possible. I've been using zip tie cable supports. They're nice and small and grip the cables well. I used washers under the screws to prevent the ties from pulling through. Since part of the work involved removing the inverter, I decided that while it was out I might as well go ahead and get rid of the black tank and the sewer line. (You'll notice that I still need to recap the sewer at the grey tank.). That was a pain, but since I wasn't trying to salvage anything I could just go at it with an oscillating saw. I had to cut the pipe into pieces to get it out the rear hatch, and the black tank I had to cut in two as well since it wouldn't make the turn out the dinette seat hatch. Also meant I had to cut the vent pipe but I needed to remove the shower caddy for my next project anyway. None of this was too difficult and getting rid of the sewer pipe gave me a ton more room to run my cables. Before this, they were wedged pretty tightly in places, not very accessible - I was worried that they could wear against a sharp edge of fiberglass or something else that I couldn't see. I mounted a half-height milk crate where the black tank was, and enlarged the hole under the composting toilet. As an excuse for not deleting the black tank, Oliver once told me that it was needed as structure for the bath floor. That was pure fiction of course, since there's a gap between the floor and the tank, and you can enlarge that hole almost to the edge of the toilet and the floor remains solid as can be. That's where I'll store zip lock bags of extra peat moss in case we need to empty the toilet while traveling. It should be perfect storage for that - since I'd have to pull the toilet out anyway, access to the peat will be right there. I'll add a small rubber gasket around the hole to prevent shower water from seeping in. It hasn't been a problem, but with the larger hole I'd like to make sure. I also took the time to straighten up the rats nest of cables behind the fuse box as best I could. I don't know what other Ollies are like, but prior to this, I could barely even see in there. I'd even lost a small Atom smoke detector under the wiring after it fell loose. It was a few months later before I found it by wedging my phone randomly into the wiring nest and taking photos. Another thing I did was to saw off the sharp end of some screws in that space. Pretty much anything that is screwed into the fiberglass, like courtesy lights, has sharp screws that could potentially damage an electrical cable. All in all, I feel a lot more confident about the electrical, at least in these areas. This was all done working an hour or so a few days a week, so it seems like it's taken forever. I got about half of it done before the rally, but then it was slow going after that - a bit here and there as I found time. And I could still go back through to secure or wrap a few more things - seems never-ending. Also, working with the power off means no A/C and I have confirmed that I never want to boondock in the summer. Oh, I also added LED light strips in the compartments to make things easier to see. They really make a difference, so I highly recommend them. I'm using the Luminoodle Clicks that I listed above, but any similar strip light would work. Pics - Charge controller and breaker with cutoff switches for solar and batteries. Panels feed into bus bars on the right. I left space to the left for a second charge controller, breaker, and cutoff for external solar, just in case I decide to go that route someday: I moved Oliver's electrical and the positive bus bar onto a vertical panel. Main fuse is mounted to the battery box above: Negative side. The coiled cable is from the Zamp port, which I'm not using right now: And the inverter, which is much more secure now than it was when mounted to PVC:
1 point
-
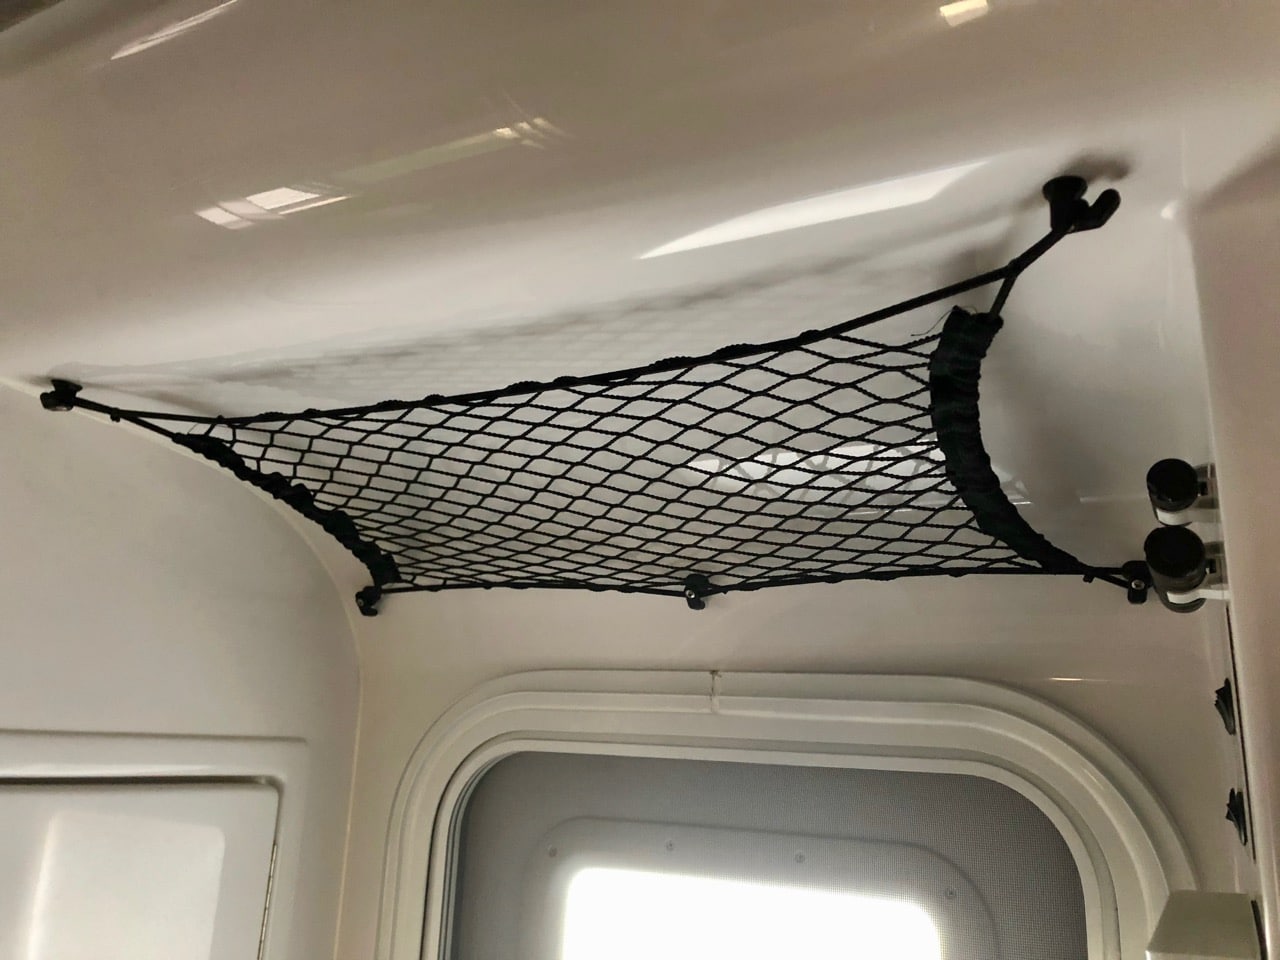
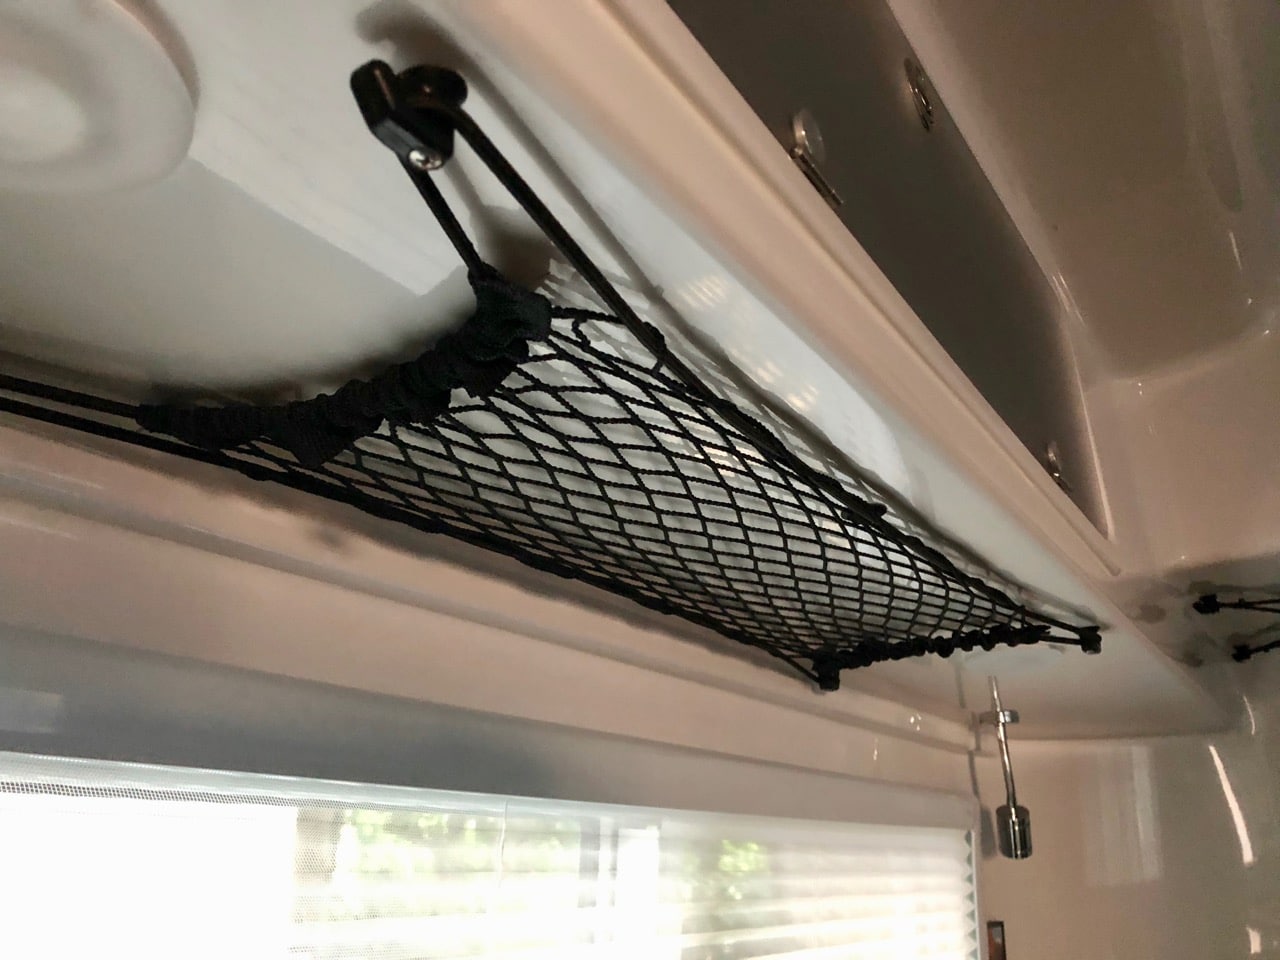
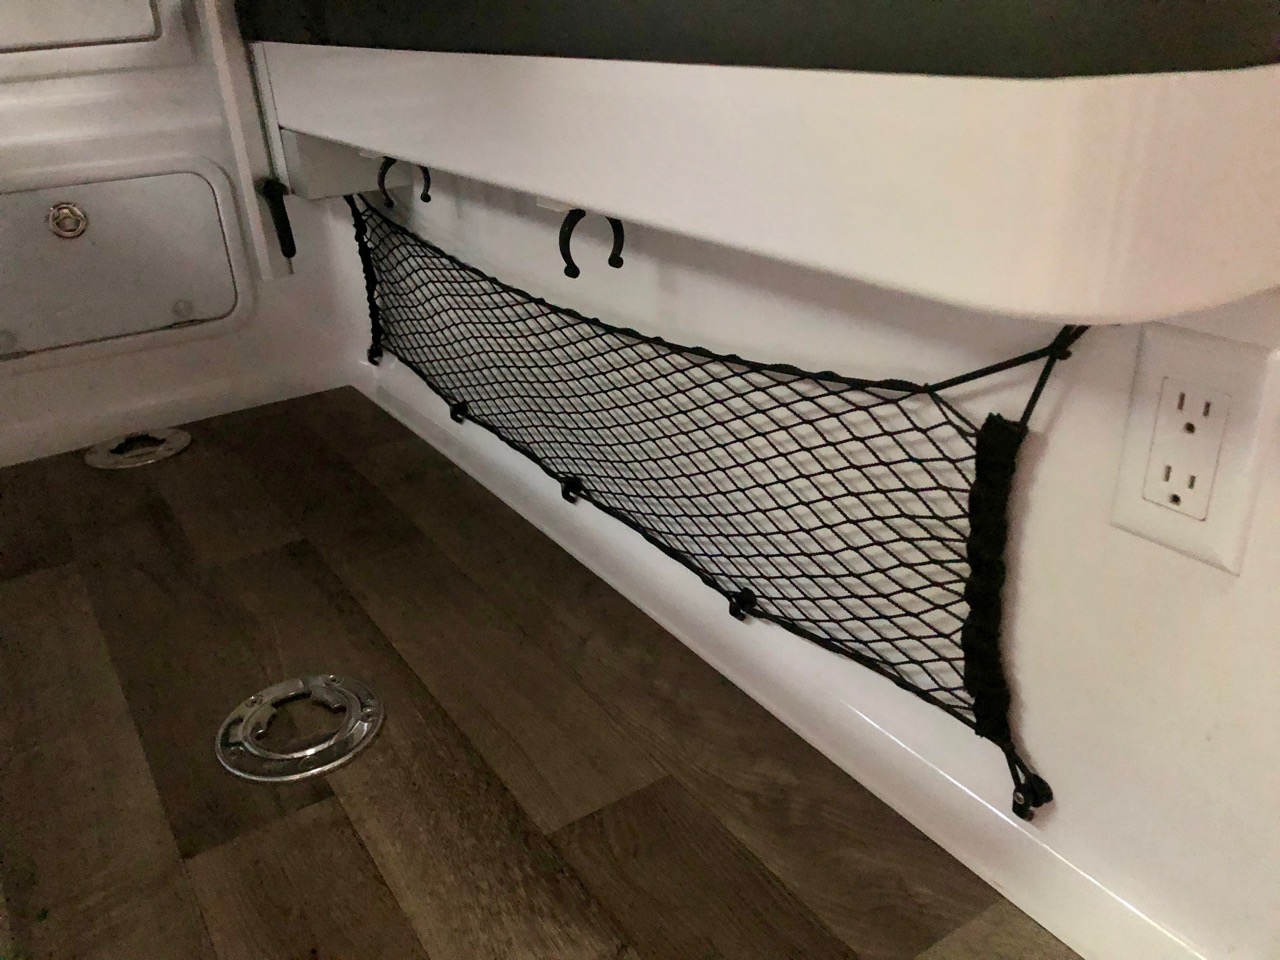
For people at the rally who asked for links to these items - Small Cargo Net (over each bed, dinette, door, and the two in the closet) Large Cargo Net (below the street side bed and under the attic) Map Pockets (by the front door and each side of the nightstand) Towel Bars (24" on the closet side, 18" on the dinette side) 1 ½" Stainless Mushroom Fitting (for running power cord into the attic) Deck Plate and Key (covers the hole on the spare tire cover) Recessed Anchors (for the bungees that hold the drawers in place) Shower Curtain Rod - Tubing (need 3 feet), Round Base (dinette wall), Lifeline Base and Clevis Slide (front wall) Shower Head (please read the separate thread on this since it's not a straight swap for the current one) Lagun Table Mount and Folding Table Top (I think I bought both from the UK store but it may be cheaper to order them separately. Be sure to check out the other style tops that they have, most of which are available in multiple sizes.) Folding Shelf Brackets (search for the counter extension thread to see how I had to modify them) Shower Door Magnet Luminoodles (pantry and access port lighting) Hopefully that's it. Thanks to all who came by - great to meet everyone. If I forgot anything, please let me know.1 point


.thumb.JPG.dd838cdb3df463dab6a16861fa23a319.JPG)


-
Recent Achievements
-


")


