Leaderboard


Popular Content
Showing content with the highest reputation on 08/24/2023 in all areas
-
Just passing along: Heard back from Rodney Lomax, Sales Manager at factory about a few minor changes to 2024 model year: No big changes as many happened last year. 1) Delete both street side water ports from side of trailer Simplify down to just 2 ports for water. ( These side mounted ports get lots of grime and road abuse. Moving to rear should help.) 2) Move current street side fresh tank fill to left side of rear bumper. (Like the current boondocking port on right (curb) side.) 3) Change right rear boondocking port valves so it is both the regular pressurized input line….and a boondocking port. (In 2024 Only 2 ports for water on rear of trailer) 4) Rework body moulds to remove the inset used for upper fridge vent. New fridges don’t need that vent. The trailer will then be streamlined all the way to the door on the upper hull. 5) The exterior solar port will no longer be standard but will be a dealer option for customers that wish to have it. (Note: Several owners added their own solar ports in the past.) 6) There is a possibility of a bathroom door change but that is still in the R & D phase and may not pan out.12 points
-
I paid a service center to grease my Zerks (and do other maintenance) early this year, in preparation for my current trip, but I'm confident that I can accomplish this task myself and I'll be able to do it in a timely fashion -- in fact, I bet it will take less of my time than driving to a random service center (and waiting).5 points
-
Certainly TRUE! All Oliver trailers built prior to 2017 or 2018 didn't have the EZ-Flex suspension and thus didn't have the wet bolts which have (I believe) brass bushings. The old suspension did have those "nylon" bushings and were only good for something like 12,000 miles. So, many of us that have the older Olivers switched to the "new" EZ-Flex when it became available or when the old bushings hit that 10,000 to 12,0000 mile mark. Its much better to give those zerks a shot of grease every few thousand miles versus having to replace the bushings. Bill5 points
-
I'm certainly NOT taking that bet. I spend more time collecting the tools and prepping for the job than actually doing the job. While the zerk caps help a bunch, I still spend a fair amount of time cleaning off the old grease - bring plenty of paper towels/rags to the job. Bill4 points
-
When I installed the EZ Flex system on our Ollie, the plastic bushings were destroyed after the original owner towed Ollie 6000 miles. The wet pins are an improvement, but agree, it could be a better system. Decided to find the easiest way to grease & maintain the EZ Flex system we have. Here’s the Dexter spring wet pin and bronze bushing used in the EZ Flex system. The bronze bushing wall thickness is .07”, have to admit I damaged one or two 😬during installation because bronze is much softer than steel. Glad I purchased extra bronze bushings. Helped a friend install wet pins and bronze bushings on his Legacy Elite.
 4 points
 -
@John Welte there is a great deal of information just above; I tacked on questions to a previous thread, to get more specific information on the grease type and tools and I've ordered mine. I appreciate the gentle warning on time required to 'do the job' @topgun2 . I started cleaning them yesterday.3 points
-
Actually, the wet bolts are an upgrade. Most Dexter RV trailer suspensions have simple nylon bushings around the bolts. These bushings wear out pretty quickly and need to be replaced regularly. Most people don't do that, hence the myriad squeaking SOB trailers you hear all the time.3 points
-
I have just noticed some suspension creaking noise. My last suspension was at Oliver last September and have certainly traveled over 3000 miles since then so it is time to buy a grease gun and figure out what to do. You Tube to the rescue.2 points
-
After a recent 18-day trip, we were under numerous thunderstorm and hail warnings while camped. I decided to try and come up with a reasonable, low cost way to at least try and mitigate hail damage to our TV while parked during a bad hail storm. After giving it some thought, I went over to our local HF and purchased a few HF 72x80” large moving blankets and a few rolls of the HF fatigue mats. The fatigue mats will completely cover the hood and roof/moonroof of our TV. These mats can be secured with gaffers tape if we need it. The mats are super lightweight and can easily be trimmed to pattern your WS, hood or roof top. They roll up and store easily. Naturally, I hope we never have to use these mats or blankets. It certainly beats nothing at all. Generally speaking, we feel like the Oliver will fair well in a hail storm with exception of the solar panels. We do carry extra moving blankets for the solar panels should we need them. This is not perfect solution, but it’s quick, lightweight and workable. It beats having to leave our TV at a dent removal shop for several weeks. I would be interested in anyones else’s contingency plan to mitigate hail damage to their TV. These HF materials came to $80. This is still a work in progress. Here is a $500 option 😳 - https://hailprotector.com/products/suv3-hail-protector-portable-suv-truck-and-van-protection-system-between-234-and-270-in-length Patriot🇺🇸 A few photos- I will pattern an entire foam cover for the WS. The rear fiberglass topper will hopefully withstand small hail.
2 points
-
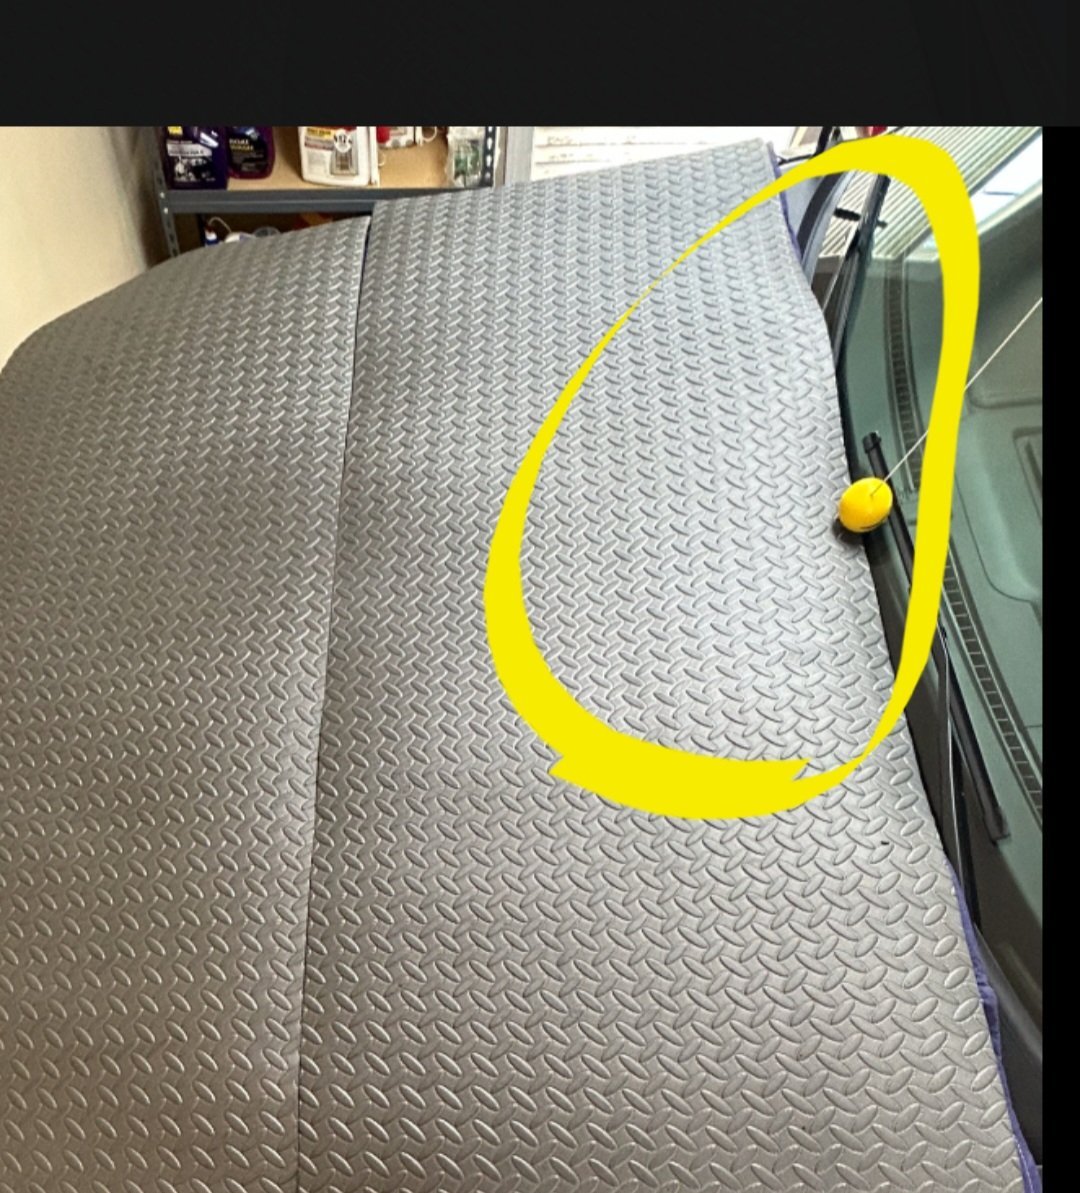
Btw, I use that same tennis ball on a string marker method, in our garage, so i dont get too close to my husband's vintage "college car". The hf mats are great. I've actually toyed with the idea of using them in the Ollie alley, vs, rugs. Easy to sweep and vacuum, cushy underfoot, in the garage and workshop. I suspect they'd deflect a lot of energy/damage.
2 points
-
I'd give them a shot of grease - the recommended interval for those is 3 to 5 thousand miles. As far as type of grease - that is covered on page two of this thread. Bill2 points
-
Update on brake problem. Welll it was a multifaceted problem. Unfortunately I turned our Ollie and Tundra over to a shop which was incapable of actually fixing the problems. They had them for five weeks. They gave it back to me twice as “fixed” and I made it almost two miles before the drivers side brakes started locking up, didn’t look back. They did get the drums turned. Actual problems were: 1. Bad Curt controller - friend and I replaced with Toyota specific wire harness and Prodigy 3 controller. 2. multiple wire issues where wire had been pinched between frame and hub tube, also some bad (shorting) connectors, mostly affecting passenger side brakes - solution, did some of our own cleanup and then took the rig up to All Wheel RV in Redding, CA (5 hours away) where they patiently went through and cleaned up electrical. 3. Still problem with rear passenger side brake not working, the old mechanic said alright let’s swap drums cross way and see what happens, problem stayed with brake. Inspection revealed that the brake was only making minimal contact, so replace that one plate (brake), after several test rides with shop owner and adjustments all brakes are working. After almost 3 months finally have our new Oliver available for trips. Very frustrating, and definitely a learning experience. I would fault Oliver in the electrical work done around the brakes and brake lights. Dexter on that crappy brake shoe. A lot of people are saying that quality control, in general, went way down during Covid. I should mention that the “All Wheel” boys liked how heavy duty the axle, brakes, and tires were on the Oliver. They pointed out a much larger trailer and said that I had the same brakes that the big one had. He also said that even without 4 perfectly braking wheels, we had a lot of stopping power. Which was reassuring. I’m going to send some of the costs off to Jason and we’ll see what happens. Can’t say enough good things about All Wheel RV. They will let you trailer camp in their yard too.2 points
-
Dexter recommends greasing the suspension every 3,000 miles. I've got 12,000 miles on mine (#1097) and can attest to it... because at 3,001 miles.... it's squeaks like a ... well it just squeaks a lot!! I have the LocknLube along with the 90 degree attachment. I've had to do it a couple of times while on the road. Things I've learned: If the wet bolt doesn't accept grease.... try taking weight off one side or the other with the rear stabilizers... just enough to shift the position of that wet bolt to allow it to accept new grease. The other thing I've learned is if your ready to rotate your tires (recommended every 10k miles)... it's a breeze to get at all 16 of the zerks with those tires out of the way! I did mine just yesterday. Now a question: I recently asked a friend if they had greased their suspension zerks... and they didn't have any! I crawled under theirs to see for myself.... it was a Dexter system... virtually identical... but without any zerks. Is there a way to convert these things to something that has some sort of sealed bearings? To me it's a pain maintenance job that has to be done somewhere on the road nearly every time we travel (even though it's freshly greased before we leave home). The idea of a wet bolt to me seems like something from the era of steam engines when the engineer and his mate walked all around the locomotive greasing/oiling all manner of moving parts.2 points
-
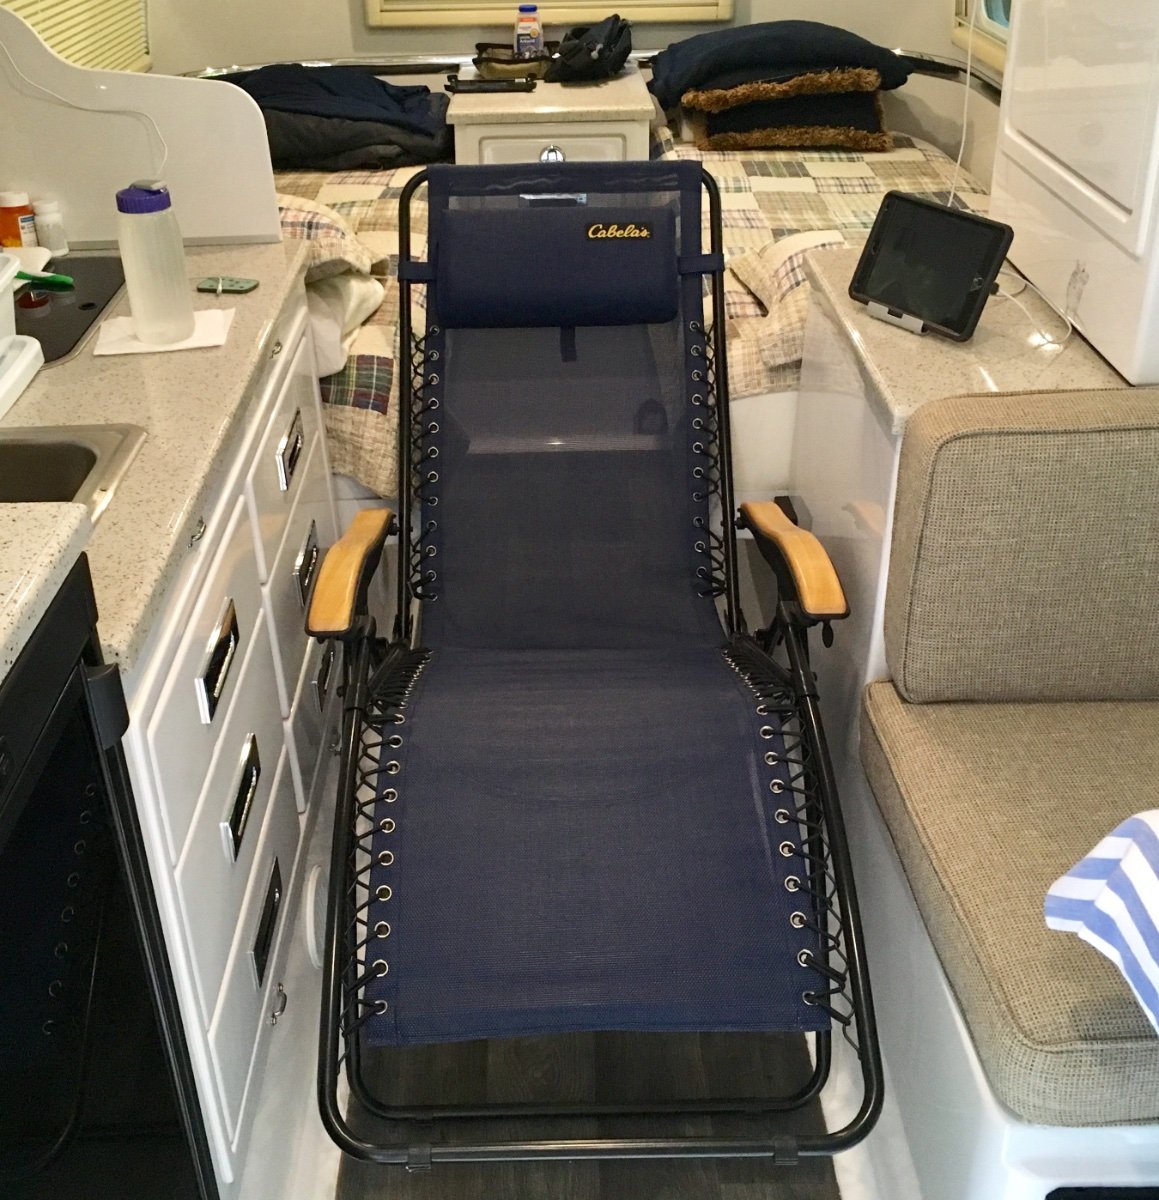
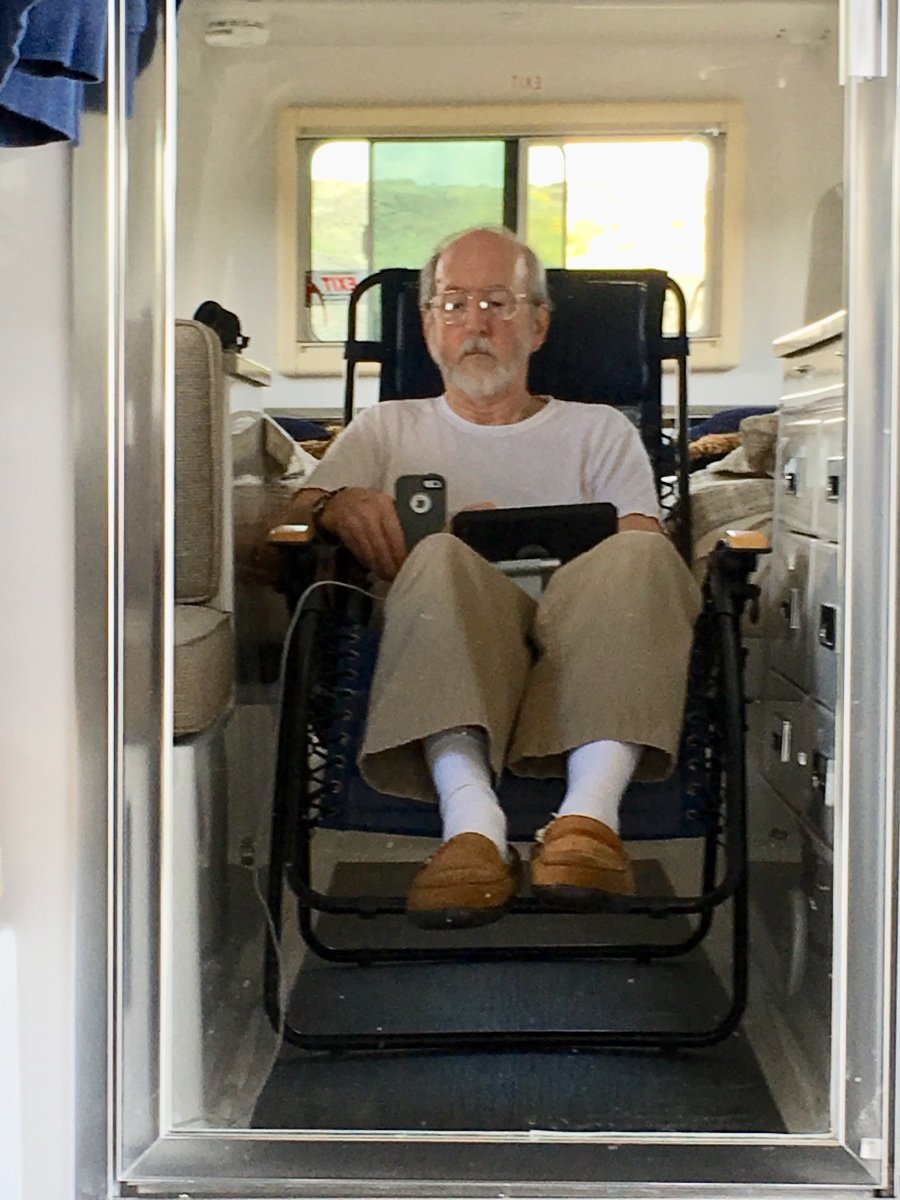
No need to miss the recliner: John Davies Spokane WA
2 points
-
Like Bill, I upgraded my trailer to the Dexter after about 18 months. The old bushings were totally worn out. It’s something to check if you are buying an older used trailer. The Dexter is easy to spot. Mike2 points
-
The original suspensions on the 2016's is good for 12 to 15 thousand miles. At that point, the "plastic" bushings are shot and there was no way to get any meaningful lubrication into these areas. If you do not tow much this is not the end of the world as we know it (i.e. the suspension will not simply fall apart). However, all of the parts down there will continue to wear (at an accelerated rate) until a bolt or shackle or spring breaks. And, with the suspension getting "sloppier" by the mile, the ride of anything above it will become not so good. This is the same basic suspension on many other RV 's(with the notable exception of Olivers do have shocks on all four corners) but Oliver upgraded in 2017 to a suspension that could be lubricated. Many of us upgraded our older Olivers when these plastic things wore out. Using the "search function" here on the Forum you should be able to find a number of posts on this subject and on how to do the upgrade. Bill2 points
-
Ralph, you can use any old decent quality lithium based chassis (general purpose) grease, but none of them are what you would call great products. I much prefer Redline CV2, it is FAR superior. You do need to flush out as much of the old black gunk as possible, I don't think there are any problems mixing them, but it is always smart to do that when changing lubrication chemistries. And write down the grease name and type on the frame where you or the next guy will see it, as a reminder. One thing I like is that the oil doesn't separate from the carrier nearly as much, so the suspension stays looking nice a little longer. A petroleum based grease seeps oil constantly, especially in hot temperatures, and that makes a huge mess over time, and I suspect that it is not good for the rubber Ezy Flex equalizer "bumpers". Red Line CV2 You are driving a Lexus, would you put crap grease in your truck?.... Me neither. John Davies Spokane WA2 points
-
This is Dexter's recommendation: Lithium complex grease, NLGI No. 2 such as Mobil Oil Company Mobilgrease HP or equivalent. It's easy to find an equivalent.2 points
-
I really wish I would have read this forum post before trying to do this… I ended up trying to replace a couple of the zirk fittings because they wouldn’t take the grease when screwed in, but would when by themselves. I even bought a device to “unstick” zirks. All I needed to do was jack up that part of the trailer… well, you win some, you lose some2 points
-
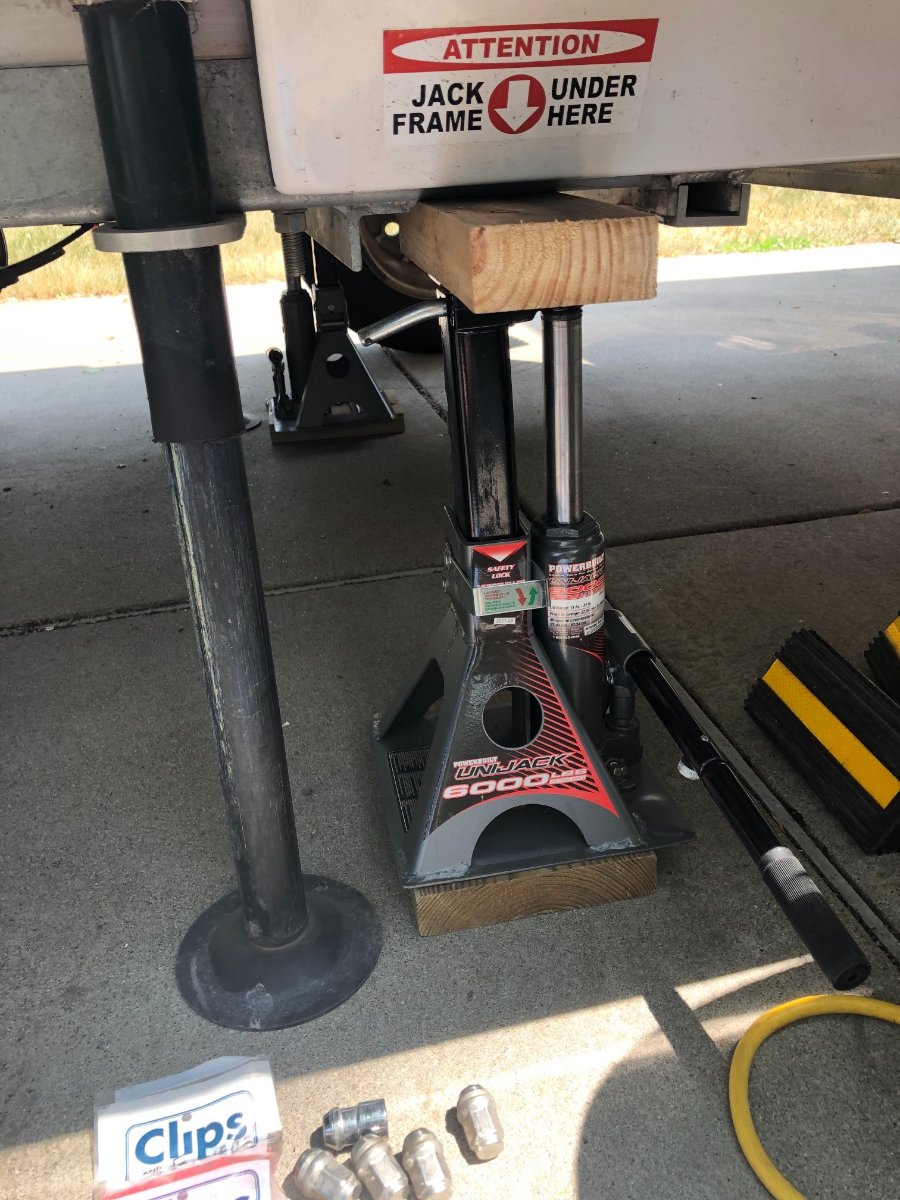
UPDATE: After completing what must be the 4th pass through at greasing the chassis I learned a few things: 1. The 90 degree coupler is worth the cost - really helps - esp with the wheels not removed, even with the wheels removed, You can actually do a good job with just the rear removed. Got all 9 on each side.............. 2. Taking weight off the assembly (wheels off) seems to allow for better grease penatration. As a little more grease oozes out once its back to normal. 3. My brakes look great - didn't measure them but to the untrained eye - maybe 3/4 life left - lets say 1/2 for safety sake. 18K miles. When we return - it will bearing repack time - will really take a close look at the stoppers at that point. Don't forget to at minimum to visually check the bolts/nuts/connections down and around there. I put a wrench on them last time - all were good. And did I mention - for some reason - this is harder than it once was - can't figure out why though..... RB (did you catch it 😆)2 points
-
Yep, always keep something on my desk to pick up and look at while on hold, ect. Job I retired from was a rebuild/manufacturing industrial machine shop in a rough neighborhood with a roof surface area of about 350,000 square feet. Had a pint jar about 1/2 full of 45 and 9mm slugs the roofers would pull out of the roof sitting my desk. Evidently folks would shoot their guns up in the air at night with our roof area being so large it would catch many falling slugs puncturing the roof starting leaks. The jar of slugs was a good conversation starter! 😬2 points
-
I've always wanted one of those just sitting on my desk just in the event someone were to ask ....😇 In any case - I'm glad it was you and thanks for both the pic and the instillation manual. Bill2 points
-
John, Have a pin sitting on my desk. It only has one hole for grease for the bronze bushing. During EZ flex kit installation, followed Dexter instructions for direction to point pin's grease hole, but still need to take a little weight off of one of the pins for it to take grease. Looks like a 1/8" hole. https://www.dexteraxle.com/user_area/content_media/raw/059-A45-00E-ZFlexInstructionSheet.pdf2 points
-
Thanks Bill and all. I did it yesterday and it was super simple. Different from the video at the top in that the zerk were on the outside vs facing inside (which seems like it might have been much simpler). I had 8 per side -- 2 on the top of where the Dexter attaches. Those were angled zerks, so they were pretty easy too. I did pull the wheels off for ease of getting to the zerks. Now that I know what I'm doing, I may try it without removing the wheels next time. All told, probably a half hour and next time it'll be quicker - unless I forget everything I learned this time (and that's as likely as not to be the case). Since I took the wheels off, I didn't need the angled grease gun tip, but next time when I try it with wheels on, I can see how the angled tip will help.2 points
-
Simple - Re-review the video at the top of this thread. As I recall, there are eight zerks per side for a total of 16. 12 of the 16 are easily seen but the others at the top where the Dexter attach to the frame can be a bit more difficult to see. Wipe off the zerk, attach you grease gun, pump grease until you see new grease coming out from around the bolt, remove grease gun, clean up mess and excess grease from around the Dexter and zerk. If you have them attach a zerk cap to help keep the zerk clean. Complete the first side, have an adult beverage and then complete the other side and call it a day.😃 Bill2 points
-
Tractor Supply zerk shopping tip: Zerks are packaged in smaller quantities and are more expensive per piece in the tractor parts section at Tractor Supply. Zerks in the Hardware or Autos section of the same store have more per package and cost less per piece. Probably a made in USA vs made elsewhere issue. Quality may or may not follow price. I replaced most of my straight ones with angled zerks. Much better for avoiding contortions under the trailer.2 points
-
Since these zerks come in a number of sizes, I've always simply taken out the old one and used it to make sure that I either got the right replacement from the workshop or from the local NAPA dealer (I'm sure that Tractor Supply and others will have them too). Yes, they simply screw out. Other than a general surface cleaning to make sure the threads don't have a bunch of dirt in them I've never gone on a deep dive for cleaning - the new grease should take care of that. Before you throw out that old zerk - give the little ball in the end a light tap with a drift or nail set tool to see if you can get it un-stuck. Perhaps a little brake cleaner or "Liquid Wrench" (after you have taken it out) will loosen it up too. If that works, then you have a spare for the next time. Finally, look at the one you are replacing and think about if an angled zerk would make the job easier. These angled zerks are about the same price as the standard straight ones. Bill2 points
-
I have found the God send of all greese guns. Dewalt 18v cordless greese gun. I hated all greese guns, clumsy need three hands hold the gun, pump it and try to hold the end on the fitting. The cordless is great chuck snaps on pull the trigger Done. Shocking price for one, but what isn’t these days. Well worth the price after one use.2 points
-
As I'm guessing that Ken has found out by now - this is not a "hard" job as long as you have the right tools. Zerks (the things that you attach the grease gun hose to) can get plugged making it all but impossible to get any grease flowing. The grease gun can be difficult to attach and remove from those zerks. The entire job can be a bit messy given that you are dealing with grease and crawling around under the Ollie. But, the job doesn't really take that long to do and it creates a good number of points for your "man" card. Bill 👷♀️2 points
-
I have spent a lot of time in this area though I do not live there (live in Montana). Understand this area has had a lot of rain these past few days from Hurricane Hilary that hit CA so flash floods are still a high warning especially in the slot canyons. Arches NP now requires advanced RSVP's just to get in the door, timed entries but the last time I checked a few weeks ago visitation was down about 20% for the year, evidently people didn't want to put up with this system and decided to go elsewhere. It will be VERY CROWDED still. Same for Zion NP too. Thats the bad news the good news is there are places within BLM land that is equally good just not the crowds. I personally prefer to boondock or stay in more remote campgrounds. Also consider the San Rafael Swell & Reef as well as some of the state parks such as Goblin Valley but that campground books up way ahead of time getting an RSVP this late might be iffy. Cell service in all these areas is sketchy at best or non existent. Grandstaircase-Escalante National Monument is huge but also well worth the effort although you will have to work for the rewards a bit more than some of the other national parks where everything is laid out on a silver platter for you. Consider stopping in at some of the outdoor recreation stores and pick up maps. The National Geographic Illustrated Trail maps are excellent and waterproof too. Moab does have an excellent visitor center in the heart of town where they sell maps, books etc. I could go on for hours on places to go without the crowds but much depends on what you are looking to do and where you like to stay. Hope this helps but ask away if you have more questions.1 point
-
"2. multiple wire issues where wire had been pinched between frame and hub tube, also some bad (shorting) connectors, mostly affecting passenger side brakes" Jeff, Did the old brake wires that ran through the axle tubes look like this, this was pretty much in the middle of the wire run? (one wire pair is the front, the other is the rear. not sure anymore as to which is front or rear) Did you end up replacing the brake wires that ran from Driver side to Pass Side? I will be making a "Forum" post on our issue and resolution. B~Out
1 point
-
We appreciate your thoughtful contributions. There are (so far) just a few of us with Houghton units, but it's really an easy swap, and a very reasonable price, as an upgrade. The humidity issue, and the drain, have been the biggest downsides, for most. Feel free to visit the rally next year. I'm sure a lot if folks would love to see your modified Houghton in action, and you'd see a bunch of Olivers. If you were to decide to change it up, I think you'd miss your nifty recliner upgrade more than the front pano window. In our experience, the best views at parks and organized campgrounds are usually through the back window. With the aeodynamic Oliver sloped front/trollley roof, having the front occupied by bath and closet just makes sense.1 point
-
Another tool that saves lots of time when greasing multiple zerks is this Lock N Lube grease gun coupler: https://www.amazon.com/LockNLube-fittings-best-selling-Long-lasting-rebuildable/dp/B00H7LPKKU/ref=sr_1_5_pp?hvadid=177565028286&hvdev=c&hvlocphy=9029558&hvnetw=g&hvqmt=e&hvrand=17231719377028863953&hvtargid=kwd-117864911294&hydadcr=7540_9880937&keywords=lock+n+lube+grease+gun+coupler&qid=1692803808&sr=8-5 Expensive, but well worth the cost to me. I have one of these couplers on each of the 3 grease guns I own. They clip onto the zerk with a spring-loaded clamp, so you don't have to thread a standard coupler onto each zerk, then unthread each time. That process gets tedious when greasing 16 zerks.1 point
-
OTT uses Mystik grease, so that is what I bought to lube our Elite II. Link on Amazon below: https://www.amazon.com/Mystik-665005002901-Hi-Temp-Multi-Purpose-Grease/dp/B0B85SSQQ9/ref=asc_df_B0B85SSQQ9/?tag=hyprod-20&linkCode=df0&hvadid=647244483985&hvpos=&hvnetw=g&hvrand=15993320974279103773&hvpone=&hvptwo=&hvqmt=&hvdev=c&hvdvcmdl=&hvlocint=&hvlocphy=9029558&hvtargid=pla-2021192446527&gclid=Cj0KCQjw3JanBhCPARIsAJpXTx59ct93dWx1KWfsWLBv0kzc9PndE_zIIDuTevC6mlJE4YoOtfyZ1f4aAvUnEALw_wcB&th=1 Using the same grease Oliver uses, I run no risk of incompatibility. Amazon sells it in 2-packs, so you will have enough should one tube not quite be enough. I have a dedicated grease gun filled with Mystik grease just for use on the Oliver. I use a separate grease gun, with different grease, for my tractor.1 point
-
This is what I’ve been using: Grease Grease Gun I used the normal big grease gun for a couple of years but found that this small gun was easier to handle, especially in the tight spots between the wheels. One pack of 3 mini tubes is more than enough for the job. I also got the caps to put on the zerks. Mike1 point
-
I hear ya! I won't be that brave soul. . . but my brother might! He lives out of state but he loves the Great Smoky Mountains so it's not hard to convince him to visit, when he has time. When he does visit, he stays in the Airstream that is tucked away nicely in its own "AirPort" not far from the house. He's an electrical engineer and is always curious about solving problems like this. He has seen where the thermistor is and knows that soldering new extension wires would be an over-the-head task. But I think he's open to it. Whether we can get all of the necessary hands up into the area to manage the task is yet to be seen.1 point
-
I made the change to the Houghton with the relay to keep the fan from running when the compressor is off. It has made a world of difference with the humidity and dew point overall. As expected, the temperature difference between the temperature set on the Houghton and the actual cabin temperature increased significantly. A solution I have found is to point a small fan up towards the Houghton so the thermistor gets better temp readings from the cabin when the compressor and internal fan are off. In a nutshell it works fantastic - we keep a fan on our nightstand running anyhow so pointing it up a bit was no problem. I'm interested in moving the thermistor as well as a long term solution, but it does seem risky to completely disassemble the Houghton and install a new thermistor that may or may not work as we expect. I'm waiting for one of you brave souls to try this before I do! 🙂1 point
-
Speaking of which - Back in the day when I owned a pop-up camper, I bought what amounts to a reflective "tarp" for the canvas of the pop-up. This "tarp" certainly kept the tent area much more comfortable when exposed to the sun AND it also helped retain heat at night. Plus, it reduced wear on the canvas. These tent covers that are made by a company called Pop Up Gizmos can be found at: https://www.popupgizmos.com/ Bill1 point
-
Thanks to everyone for all their comments, pictures and ideas. We are investigating dual e-bikes with the 1-Up dual super duty rack and replacing the 1.5" Oliver receiver with a 2" Curtis 5000lb bumper mounted receiver. Having just watched a YouTube video on the results of over tightening some lug nuts, it made me think some more about the potential loads on a hitch receiver for a bike rack. As I think about it, there are two ways to look at it. Simple loads from acceleration (force = mass x acceleration), and then there is the boogey bear of shock loads. I took my iPhone the other day and measure the g-force of a rather nasty bump in my truck and got about 2.5g at 40 MPH. Given the max length of the 1-Up rack in a dual configuration of about 25.5" and a weight of two e-bikes w/o batteries and the weight of the rack, you get about 1000 fl-lbs of bump on the receiver. Doubling it for safety brings one to 2000 ft-lbs. Looking at shock loads yields exponentially higher figures. I am not totally confident of the following numbers (need help from some Mechanical Engineers!), but I used the following variables in a standard shock load formula for a rectangular beam 🤔. 2 ea 65 lb bikes - 130 lbs total (w/o batteries) 47 lb rack on a 15" lever arm (over estimate as center of weight would be ) 3" drop bounce height (bumper bounce distance) 25.5" total beam length from receiver to end of rack 0.25" receiver wall thickness It's a guess as to how much the rear bumper actually could move/bounce on a large road bump. I estimate approximately 0.6" of LEII rear bumper vertical movement for every 1" of tow vehicle bumper movement given the LEII's axle distance from hitch to LEII's rear bumper. I end up with close to 675,000 PSI of potential shock load being distributed over the face of the receiver mounting plate (approx 20-24 sq in). With a 4" trailer rear bumper bounce (6.7" rear tow vehicle bumper bounce) this goes to +750,000 PSI. This gave me pause! No inclusion of shock absorption from trailer suspension is taken into account, which I am sure in non-trivial and over estimates given that it assumed the trailer is a non-flexing beam with no suspension. Use of good straps provide additional shock load dampening in addition to flat tire mitigation. These number suggest getting rather high grade bolts for attachment of the receiver to the LEII bumper. As previously mentioned by @taylor.coyote, @John E Davies and others, caution is needed! To reiterate, I am not a licensed Professional Engineer, so these number may be inaccurate. Spreadsheet attached for giggles! In addition to insulating the receiver plate from the bumper (with rubber, thin nylon sheet, or coating), any thoughts on using a nylon bushing through the LEII bumper to help mitigate bolt-to-bumper galvanic corrosion or would a thick coating of a galvanic corrosion coating work well enough? Bike Rack Forces Estimate.xlsx1 point
-
I think that we have the same dog! We've had the same experience in that people with other dogs assume that it's ok to let their dog approach without asking. It's funny that you mention the "find it" game; We have a ritual whereby while she's eating her dinner we hide her after-dinner snack somewhere in the house. When she's finished we shout "FIND IT" and off she goes. She quickly tracks it down and upon doing so we throw up our arms and exclaim "she saw it with her dog nose!!" 😁 while she proudly does a victory lap around the house.
1 point
-
I expect that would depend on several factors. Are you running any other 120V appliances? Is your fridge pulling from the batteries at the same time? Is it Daytime or Nighttime? Are you getting any replacement from the solar? How Much? A more informative question would be "How long will it take to replace 300 amp-hours if I run my batteries down half way while running my AC?" With really good sun, 400 watts of solar and a quality MPPT charge controller will produce 20 – 24 amps of power per hour on average. Assuming there are 6 hours of sunlight during the day, this would amount to 120 – 140 amp-hours over 24 hours. In the middle of winter or on cloudy days, you might get 3 hours of peak sunlight. This amounts to an output of 60 – 80 amp-hours. You should be able to get the batteries back up to 100% SOC in about 3 days. Here again, this is dependent on the sun and how much energy you pull out during the charging period. A generator would be much quicker.1 point
-
@topgun2's prize trout1 point
-
I believe Hulu has a TV series from the books. The second season is on now. We haven't watched yet, but it is on our list. He is the same author that wrote the Hoyt/Dewell books that were the basis for the Big Sky TV show. I just finished up another Elmore Leonard book (Kindle, not audio)1 point
-
Hey Mossey, Yup, I felt around everywhere. Looks like a simple suspension system. Drat. I can take some pics if needed. Or, maybe I should start a new thread. For the poor folk with low-end suspensions. LOL1 point
-
That is by far the simplest way to do it. Messy, but only needed the first time.1 point
-
There’s the impact wrench, also
1 point
-
I am going to guess the Dexter wet bolt has one hole. I have had several occasions that a zerk would not take grease. The issue was easily resolved by raising the offending side of trailer a little with stabilizer jack.1 point
-
90 Degree coupler https://smile.amazon.com/LockNLube-Degree-Grease-Coupler-Adapter/dp/B07STDDN1S/ref=sr_1_5?crid=1PP47DJBKR4DU&dchild=1&keywords=locknlube+90+degree+grease+coupler+adapter&qid=1620267138&sprefix=locknlube+90%2Caps%2C191&sr=8-51 point
-
Care to post a link to the 90 degree tip on Amazon? Thank you in advance!1 point
-
The first time doing any job is usually a learning experience as simple as it might seem. Well the first thing I learned is that the grease gun is not like a caulking gun. The plunger needs to be pushed all the way in. Mine would not go in and back to you tube for the answer which was to wiggle it a little with the cylinder unscrewed a bit. Next, the LocknLube came with a great tip which locked on the zerk allowing up to 10,000 psi of force. Unfortunately, I could only reach one zerk because the tip was so long the tires were in the way of the rest. Since I was doing this at the storage lot not close to any autoparts store I proceeded to remove the wheels and finish the job. When I got home I ordered a 90 degree tip from Amazon. The suspension creaking that alerted me to the problem was solved.1 point


-
Recent Achievements
-


")


")


")


