Leaderboard


Popular Content
Showing content with the highest reputation on 03/26/2024 in all areas
-
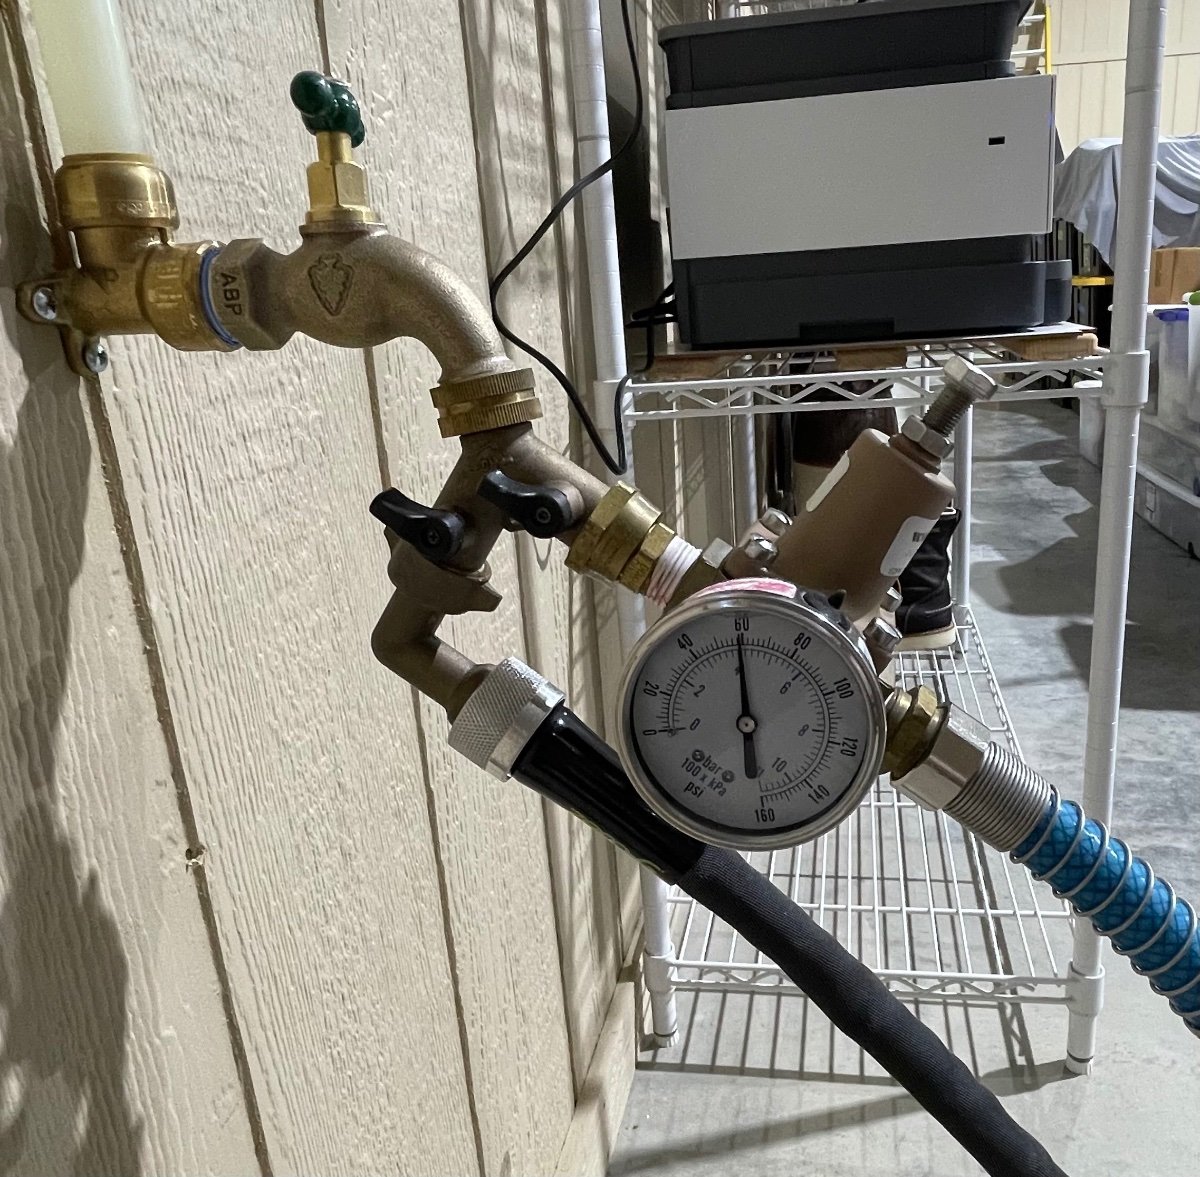
@Lisa Rae @jd1923 I have hull 313. I have 2 check valves under the basement floor just under the door. This is a picture that I made in September 2019 of mine when a few Olivers were having problems with split check valves. I’ve not found any of the brass Camco “pressure regulators” down there. The plumbing diagram shows the check valves but doesn’t show any “pressure regulators”. Oliver provided a brass Camco “pressure regulator” (or flow restrictor) for use externally to limit the incoming water pressure and I used it when our trailer was new. We noticed that when we turned on any water that the flow would be strong and then it would quickly slow. I did some reading on the internet that lead me to replace the “pressure regulator” with a diaphragm type pressure regulator. Video from July 2019, flow with Camco pressure regulator in place at the city water faucet (hose bib). IMG_4032.mov Video from July 2019, Watts diaphragm type pressure regulator in place at the city water faucet (hose bib). IMG_4034.mov I am the kind of person that likes to know how things work and I have thought about cutting the flow restrictor (Camco “pressure regulator”) open to see how it works but, it is my backup in case my Watts regulator fails. (Boy Scout motto: Be Prepared). All of my information and suggestions come with the added warning that what worked in my case may not work for you.
 5 points
 -
Go to Walmart and get a thermometer. Our first one sat on the counter or dinette and told us the inside temperature and had a sensor that would tell us the outside temperature. You can also get ones that have multiple sensors that can be placed in between the hulls, for instance in the water pump area. We also have one that is on the wall. Tells us the inside temperature, the date and day of the week (we’re old and forget which day of the week it is when we’re out camping 😂). Mike4 points
-
Jack up the side of the trailer that the fittings are on that you are trying to grease. This will relieve any pressure being placed onto the wet bolts by the weight of the trailer. That usually makes it much easier to get them to take grease. You may never get it to squirt out both ends of the bushing equally.3 points
-
Is that like the Miralax effect?3 points
-
Tell us what your tow vehicle is. If it’s half ton or smaller, I would keep the Andersen. If bigger, you could go without the Andersen. Mike3 points
-
Upgrade to the MicroAir T-stat - gives a nice BIG readout of set temp and current inside temp. If other upgrades are on your radar screen, such as a Victron SmartShunt, it's app will give a reading of the compartment it is mounted in, which is convenient to know in 18F climes. Concur 100% w/ @topgun2 & @Mike and Carol's solution sets... In addition, you might consider a Bluetooth unit like this: ...that can be mounted, say in the "dog house" near the LPG bottles for OAT, and another in an identified "coldest" compartment (ie: basement/garage, under vanity sink, near water pump, etc.). The BT app is easy to use capturing historical data for future planning.... Tons of options - just have fun making you own mods and upgrades. It might become somewhat addicting. Cheers!
3 points
-
My habit last year was to read the thermometer that is mounted on the wall -- but maybe it isn't accurate enough. Also, @topgun2 makes excellent points about the location of thermometers outside for accurate reading.3 points
-
I'd recommend the multiple sensors - or at least one that has the ability to add multiple sensors to it. And having humidity levels is important too. The first reason for this (for me at least) is that you want to know the temp and humidity level inside the main cabin. The second is that I want to know the temp and humidity outside so I know how to dress. I place two sensors outside for this purpose. If you are camped such that the front of the Ollie is facing the sun and place the sensor under the "dog house" then that sensor will tend to read too high due to the sun warming the front of the Ollie first. Therefore, I place the second sensor under the spare tire cover in the back which in this circumstance will tend to give me a more accurate reading. Next, if you are camping in cold conditions, it is helpful to know the temps in the basement area such that you can direct more heat down there to avoid frozen plumbing if necessary (as Mike points out above). An expandable system gives you the option of experimenting to see just how many sensors works for the camping that you normally do. Bill3 points
-
Spot on. It took me five season to get up to speed with enough confidence to convert a couple of marine lead acid to Litho's. But the time was well spent in learning from many of the same folks here on our forum today. Now there are many proven ways to get there. And as you pointed out, each technology matures and better ones arrive over time. When I purchases our OE2 in 2018, Litho's were relatively new and very expensive. In time their priced dropped and my time came to use the most proven and best reviewed technology. Good new is you have a good system now. Why spend today's dollars to change it if it works for now. Garner all you can from our friends here at the OTT forum and when your system is ripe for upgrade, you will know that is then far better than we did last year. But always be aware that words here, especially from engineers, make a difference. Your reputation is very good and is growing. GJ3 points
-
Me too, isn't that why we login each day? Thank you GJ, this made my day! @Mike and Carol reinforced my thought that my 450AH of LA might be good enough for many camping styles. And we have a near new battery bank the prior owner purchased in 2021. @MAX Burner also reinforced the idea, stating 300 AH works for them (although Art has a KILLER DC-to-DC installation). I'm going to keep reading, learning and likely will put off an LI upgrade for a couple of years. Just ask @SeaDawg, as she has been babying her AGMs for years. At the same time, would love to have 600AH of Epoch LI batteries ready for your next trip. All in time...3 points
-
Four 100 amp Battle Born batteries will in fact fit into the 2017 version battery tray. I say 2017 version because Oliver has used a couple of different makes that I am aware of. Oliver history buffs maybe can clarify this. Since the Battle Born brand batteries can be mounted in any orientation, four of the standard form factor batteries can be mounted on end. Battle Born also has a vertical form factor battery. Four of these vertical batteries also will fit in the tray. For both types of batteries mounted vertically, the cable connections get a little challenging. There is a forum post that covers a lithium battery installation and I think that it covers the four battery choices. Of course in recent history, there are several manufacturers who have large amp batteries that don’t require trying to shoehorn multiple batteries into the tray.3 points
-
I started in photography back in the mid 60's when everything was manual. No auto exposure or focus. My first camera did not even have a light meter. Had to use a hand held one and set the camera's aperture and shutter speed from that. Manipulating either or both to create different effects. Bought 35mm film in 100 foot rolls and wound my own cartridges in total darkness. It was all black and white. I thought I was Ansel Adams. I even lugged a big 2-1/4 square camera and tripod to the top of Sentinel Dome in Yosemite to duplicate AA's picture of the old Jeffrey Pine growing there. Here's Ansel Adams original: Unfortunately, unbeknownst to me, the tree had died during an extreme drought three summers before despite the rangers best efforts of hauling water to the top every day to try to save it. So all I have to show for my trek up the dome is a picture of a dead tree. Oh well, it was a famous tree.
2 points
-
@Geronimo JohnThat water is not pumped water. Those videos are with trailer hooked to city water through a hose bib on the house. One video with water flowing through a brass Camco “pressure regulator”, which I call a flow restrictior, and the other video with water flowing through a Watts pressure regulator.2 points
-
Just keep in mind that Art has exquisite tastes when it comes to beer! GJ2 points
-
When I was 11, Mickey Mouse was in second place, right behind Bonanza! And Captain Kangaroo was in last place.😎 My dad and his poker buddy’s guarded those cards and chips better than the whiskey and the clothes pins where in use on my rubber band gun! Mossey2 points
-
By the way, after eight nights in subfreezing temperatures, we finally depleted the first propane tank. Very impressed. And I now know how the regulator works. I also know that you can Google the Truma error codes and get a wonderful description of what’s going on. I could not have asked for better automation.2 points
-
If you need it - see Mike's post above this one - then watch several of the YouTube video's out there referencing the Andersen. Also, know that it does get MUCH easier the more you work with it and understand what you should do in the varying situations. There are also a bunch of posts here on the Forum about working with the Andersen. Even though our Ollies do not sway and even if you don't think that you need the Andersen, please be aware that if you are towing with a 1/2 ton (or similar) vehicle the manufacturers of those vehicles call for a weight distribution hitch. Given that, if you decide to not use this Andersen then you will subject yourself to liability in the event of an accident where you are not using it. Once you know how to use the Andersen, it really isn't a big deal to hookup and detach (99% of the time). Invariably, that 1% happens when you are in a rush, its raining, its cold, you're not happy (for various reasons) and/or you are (or have to) hookup at an angle much different from the angle at which you unhooked. Take your time - it will get better. Bill p.s. put the info below as your signature and you will not have to do it again. Also, it will tend to get you better and quicker info if you need help in the future.2 points
-
HA! Beat me to it! Excellent suggestion.2 points
-
We have a thermometer with 2 extra sensors. One goes in the fridge, the other either outside or in between the hulls. For remote monitoring we also have a Govee WiFi sensor that we can check from anywhere through our hotspot.2 points
-
Well written, GJ! Great advice... And OBTW, @jd1923 - John gets FULL credit for the cool DC-to-DC set-up in Casablanca. We communicated directly last year for several months (takes that long to get my "pea-brain" around the concept!) before coordinating the install - of which, about 60 - 70% of the effort is on the TV! The effort on the "OTT side" is straight forward if one chooses to mount the charger in the trailer - (otherwise, mounting the unit in the TV would be 80% effort on TV/20% on the Oliver, IMO). There advantages either way depending on a given camper's needs... PS: As GJ and I've mentioned in earlier threads - all of the necessary "cable-making" tools are available here for owners that want specific custom cable diameters, lengths, and lug configurations... Bottom line, the cardboard sign at the I-25 intersection could read, "Will Make Cable for Beer."2 points
-
Appears that some folks think that Litho's are maintenance free. They sort of may be, but all the other stuff we put in there are not. In the ole days we would use high mounted light tension springs to encourage the cables to stay out harms way. GJ2 points
-
That mirrors what we’ve experienced with our three BB’s.2 points
-
Certainly there at least two other brands that have similar safety characteristics as the BB's and can also fit into an OE2 battery tray and provide more than 300 AH. But the brand that MountainOlivers is stating is specifically the Battleborn's. At some point, my experience with them will be out of date. But as of today, I have not yet heard of anybody getting more than 300 AH's from Battleborns in an OE2 battery box. Hence my reaction to the statement of "three or four Battle Born batteries". Have they come out with a new product that will let us get four of their batteries into an OE2 and get more than 300 AH? If so, I'm all ears! GJ
2 points
-
Same here for us, Mike. AGMs served us just fine with our previous TT - however, for us at least, the Lithiums have been a game changer. For example, we just returned from a short 3-nighter to Columbus, NM. We started each afternoon with 100% SOC on the BBs (200w portable solar module tucked away in the TV). Standard boon-docking afternoon/evening drill for us is fridge operating in gas mode, inverter OFF, dinner off the gas grill, cocktail lamp - "LIT", furnace OFF, Starlink up and an after-dinner "Shoot 'em Up" movie (neither one of us makes it to the end before crashing-out)... The three nights averaged an 11% drop in SOC by morning. The OTT 340watt solar module roof mount (during MAR sun angles near the US/Mexico border) brought the SOC back up to 100% by 3pm-ish. FYI: DAY-2 was overcast, but we still had 100%SOC before we lit the cocktail lamp - we're love'n this system! Cheers, ALL!2 points
-
I got better flow everywhere in the Oliver when I switched from this to this https://www.rvwaterfilterstore.com/products/263a-lf-regulator-stainless?_pos=1&_sid=7382cb9a5&_ss=r
2 points
-
Amazing when anyone doesn’t want to produce something or for anything for that mater throw in the liability card seems to be the best answer these days. My question would be what is the liability? If that’s the case you could also claim the whole trailer a liability then you shouldn’t sell it. A wiring diagram is a very helpful tool if your out in the middle of nowhere and a electrical problem occurs. Even new vehicles you can obtain a wiring diagram. Wouldn’t help much because they are so complex it would be like reading ancient romans symbols who knows what they are, 🕉⛎♈️😳 very disappointed in Oliver you make a manual make it a complete manual.2 points
-
I've seen the schematic showing check valve only before. Yours is that way and easier to reach in your 2018 model. Mine is exactly like @Lisa Rae's and we both have 2016 hulls. Two devices on each line, backflow check-valve AND pressure regulator at the REAR of the basement instead. I found out the 40-50 PSI regulator is a RV standard of old. See this item that Amazon calls "Overall Pick" with 21K reviews: Amazon.com: Camco Camper/RV Water Pressure Regulator | Protects RV Kitchen Small Appliances, Plumbing & Hoses | Reduces RV Water Pressure to Safe and Consistent 40-50 PSI | Drinking Water Safe (40055) : Automotive One of my many summer projects will be to remove the internal 40-50 PSI regulators, clean and replace the backflow/check-valves and get an external adjustable pressure regulator like you showed. Wow, this one is very expensive at $280, but again I don't want the $11 40-50 PSI unit, or one of the dozens of China-made adjustable units on Amazon for $30 +/-. Is yours made in the U.S.A.?1 point
-
Wow you must be photography buff. You are correct. I try to keep them "simplized" (Yea that is another GJ concocted new word) as: The Keystone effect is when lines converge with distance. Parallax on the other hand is when an object appears differently when viewed from two different points when in motion. The picture of the cabinet door has a bit of the former as you astutely observed. But, if I am inside Ollie, and my wife is driving down the highway, would Parallasium, not to be confused with paralaxium, end up being Keystoning when viewed from an infinite distance? Think on that one for a while. GJ: PS: I can't as it gives me a brain circuit trip.1 point
-
That would never have occurred to me, back to the camper, thanks a lot!1 point
-
Nicely done on that signature - thanks!😉1 point
-
With regards to the fridge sensors - There are a bunch of choices out there these days. But, since I'm not the brightest bulb and am generally interested in things other than what the temp is in my fridge/freezer, I simply found that I didn't (usually) even look at the readout to see what was going on in there. So, I bought one of THESE and set the alarm. Now, when I return to the Ollie from a long day of fishing or hiking or being on the road, the alarm makes me look at it. This functions two ways - 1 - if the temp is too low I can figure out why and (hopefully) fix that fast. And, 2 - if the temp is too high, I can adjust the controls in order to lower the temp thus saving either propane and/or battery. Bill1 point
-
I have a 2 inch thermometer clipped to my backpack. For years, I have checked it before getting out of my sleeping bag. Apparently, I’m not as sophisticated as y’all. LOL. TYVM1 point
-
Just to the point it turns under the floor. The kinks and restrictions were between that point and the vent!1 point
-
@johnwen, you are correct- yellow is ground and red is 12VDC. I believe you were referring to the image below: Please note, I later relocated the fan control to the upper storage cabinet above the refrigerator and microwave oven. The power connections for the fans remained unchanged from what is shown above. Regards, Don
1 point
-
National Forest Campsites are very convenient and in more remote areas, empty. Read the Sign First, maybe Two Times... then Proceed with Caution. Photos: Caribou National Forest, Utah and Gold Panning options in Colorado. Do you have any signs to offer, or ignore them and invite Black Bear into your campsite after Sunset... leaving food on the Forest Service Picnic table? Did you know that in order to cut hanging branches in the National Forest that would drag onto your Travel Trailer sides or roof top, you need to have a Class in Operating a Chain Saw, before using one at any of the National Forest Campsites. Although legally, we have several long handled Trimmers, sharpened at home to make it easier to widen road width and access... for everyone. Many remote roads have become overgrown with brush along the sides of the road. Trees may fall onto the Forest Service Road... locals drive around or over the tree. We stop and pull the downed pine tree Off the Road, so we do not have to drive around half of the road. Sometimes we have to use our imagination... HOW... not having to use our long handle axe in the back of the tow vehicle. We have Two Shovels. A His and Hers. Filling large pot holes in the compact dirt road is a hobby. When full of water... necessary. Camp Host(s) at remote sites in Wyoming get Propane provided for Free to keep an eye of campers coming in and out of the area they are watching. I heard some get some financial incentives and pick the camping site you like the most. You get a sign : Camp Host. You also can post: 'Bears-Secure Food' signs to post. Wyoming and Montana campers may become part of nature's food source if Frying Bacon and not expecting company... sooner than later. Really... There must be some Oliver trailer owners that have pushed the boundaries of Popular Camp Sites with Signs and took the less traveled road gone into areas where Bear Signs are nailed to trees for those who do not carry a Side Arm... to make noise, when needed the most. Yellowstone Park is the ONLY place I have seen Human Beans chasing Grizzly Bear to shoot... photographs with children and flip flops. Spring is coming and you better get ready to scout out some better camping spots in 2024. Before the Signs Appear. 🙂
1 point
-
When I drain our fresh water tank I first turn on the pump then open the kitchen and bathroom faucets until the pump stops pulling from the tank, after that I open the drain valve and raise the front of the trailer, doing it that way only takes about 30 min or less to drain. Of course, then I have to drain the gray water tank which I try to dump on some nearby foliage.1 point
-
How long did it take you to install the EZ gutters? I just did the one window. Probably 30 minutes.1 point
-
If it is on auto, the display will turn red and stay that way only when the tank you were using runs out. It is up to you to check it. When I know my tank is running low, I check it every day then get it filled when the display turns red. If you are a bit absent minded, then leave it on manual and the furnace shutting off and the camper getting cold at 3am will be a good reminder.1 point
-
I don't honestly know how the ram 1500 air system works but on my truck I can select "manual" mode to prevent the air suspension from auto-correcting. The other method is to turn the ignition off thereby deactivating the air pump.1 point
-
Perfectly can't happen, but the WDH works best when set properly. Reading page 11 Section 5 of the Andersen WDH, "HAND-TIGHTEN both Tension Nuts as much as you can... using a socket... tighten both Tension Nuts another 3-4 threads." Later they write, "Although it is not crucial" tighten or loosen each the same amount. When you get hand tight, the # threads left and right may not be the same. Could be the bomerang mount is not even and the bracket installation might not be equal left and right. Drive down a straight road a mile +/- and keep the steering straight ahead for 100 yards just prior to parking. I have a favorite street in our neighborhood to achieve this. You can start over with the hand tightening... Or just make sure each red rubber bushing is slightly bulging the same small amount. Eventually you should know for your hitch what is the correct number of threads left and right, and just do that without thinking. You want to see that level line, from the front wheels of TV to rear bumper of TT. How tight depends on how much weight distribution you need. Tighten the two nuts some MORE equally and the rear of the TV will come higher, nose more down. Loosen and the opposite. They cover this in the next section 6 of the instructions. None of this will work right if your Andersen hitch is not mounted at the proper height. Start with Section 2, regarding hitch height. When set properly, ours runs so nicely down the road. I can certainly feel the difference when I tow without using it. A lot of bouncing in the rear.1 point
-
oops! Sorry, guys! Anyhow, yes! Great rig - I love DXE antennas... Here's a pic of one of my SOBs with my home brew multi-band screwdriver and 12v electric tilt mount...
1 point
-
I finally did this over the weekend. I posted some pictures here.1 point
-
$13 for for the newer hatch that Oliver Service sold me. I prefer it over the threaded hatch.
1 point
-
I used 3/4’ Χ 9’ galvanized turnbuckles. Checked several local hardware stores but they did not have them in galvanized, found them in Amazon for around $ 50. Just returned from a 450 mile trip and did not see any loosening issues at all. I will keep an eye and if I need to I would prefer to add a backup nut. If I drill a hole for a pin it may weaken the SWL ratings. I saw the build in clevises but the 3/4’ pin of the clevise would not go through the Andersen provided chains ( the OD of the clevise pin is a bit too large. As a matter of fact the 3/8” shackles need to be tapped gently in the eye of the 3/4’ turnbuckle. You could of course use the 5/8” X 6” that you suggest, dont see a problem with it but I opted for the 3/4”1 point
-
Yes, I'm in the east. One of the guys at Ferguson here didn't even know what it was. I assume that Oliver uses it because of some RVA requirement. That, or it's just a preference of theirs for some reason. It does seem more flexible, which may be the reason. Ah, well, I always try to do my projects at least twice, so next time maybe I'll be patient enough to order the ABS.1 point
-
Thanks, and I agree on the PVC. It was a debate when I was doing it (can't remember if it was here or with the guy at the Fergusons counter - possibly both), but ABS wasn't available and the advice I got was to not worry about it. And of course I had it inspected. Electrical, too. Promise.1 point
-
During my 35 years of law practice I did mostly litigation, including defense of product liability claims. IMHO, any "fear of liability" defense to providing owners with electrical diagrams is baseless. If an injury occurs and a product liability claim is filed, any available wiring diagrams must be produced through the formal discovery process. Since they can't be hidden during litigation, refusing to provide them to owners makes no sense. If Oliver management is monitoring this forum, I invite them to reconsider their position, and to resume providing wiring diagrams to owners. Surely Oliver has something their production and quality control employees follow when doing the wiring, to ensure it is done correctly. As a future owner taking delivery next year, I'd like to have one included in the owner's manuals with my 2022. It doubtless would prevent some warranty service tickets and calls, and so would reduce Oliver's service department costs. Given Oliver's commitment to the exemplary customer service so frequently described on this forum, it seems strange to refuse to provide wiring diagrams to owners, at least upon request. Oliver, your response?1 point
-
I took delivery of #797 on May 7th. The delivery was a very pleasant experience. Having owned an Elite 1 previously, I knew how most of the stuff worked and had already done the research on the stuff I didn’t know about. As I advised this forum, I discussed electrical diagrams with Jason. He has been asked about this by old and new customers many times recently, so I got a smooth and polite response. I’m guessing my experience was similar to Donna and Scott. The short of it is electrical diagrams are not available to us at this time. Liabilities, many variations in design due to options, etc. He suggested I use the 2019 version in the Oliver University, and call and ask questions about anything I can’t figure out. I’m In the process of inspecting and mapping out the key systems, and labeling the wires, fuses and breakers myself that are not already identified. Yes, it’s a hassle, but I try to pick my battles. I had several questions my delivery person could not answer, but she went and found Jason, who expertly answered them all, I was very pleased I did not find any significant problems with my Oliver (still looking). I had come prepared with a checklist of every problem I had read about on the forum, and I went looking. Many of the minor problems have been corrected, it seems Oliver has been listening to feedback. The trailer was not perfect, but much better than my expectations, and nothing I can’t fix myself easily. My wife and I are just grateful to have it, been waiting since September! Life is good.1 point
-
Owners have now gotten various answers from various employees on why Oliver won't share electrical diagrams any longer. From there are none (right!) to not sharing a super competitive design (right!) to a liability issue (right!). The real liability is in the fact that every time an owner of a 2020+ trailer has an electrical problem, add 1-2 hours of discovery work (more $$$) and/or risk (more $$$) to the labor tab due to lack of information. Oliver has set a precedent and provided electrical diagrams for all models until they magically disappear in 2020, so I think they need to provide recent owners with a valid, consistent reason or they may really be putting themselves at risk. P.S. I might not be as adamant about this topic if Oliver had at least provided some basic information in the non-existent electrical section of the owners manual or if they had bothered to label any wires or make sure things worked electrically before delivery. I had several electrical problems right out of the gate that took longer than they should have to troubleshoot due to the lack of a diagram / information. My examples of "need to know" would include which circuits have cutoff relays, which circuits have in-line fuses, which circuits have neither, which components are connected to DC only and which are connected to both DC and the inverter, and which circuits are not completed (e.g., the charge wire from the TV is NOT connected if the Lithium package is purchased).1 point
-
I've asked Service (Jason) and Sales (Phil) for them by email and phone. No luck. I know of several owners that are asking. It's crazy. I've opened a handful of tickets just because I don't have the electrical diagrams - simple questions that could have been answered. For someone who loves to work on their Ollie, I have it listed as my number one quality issue / gripe by far. Now I know Patriot is after them too. I'm going to open a service ticket and see where that gets me.1 point


-
Recent Achievements
-


")


")


")


