Leaderboard


Popular Content
Showing content with the highest reputation on 09/14/2023 in all areas
-
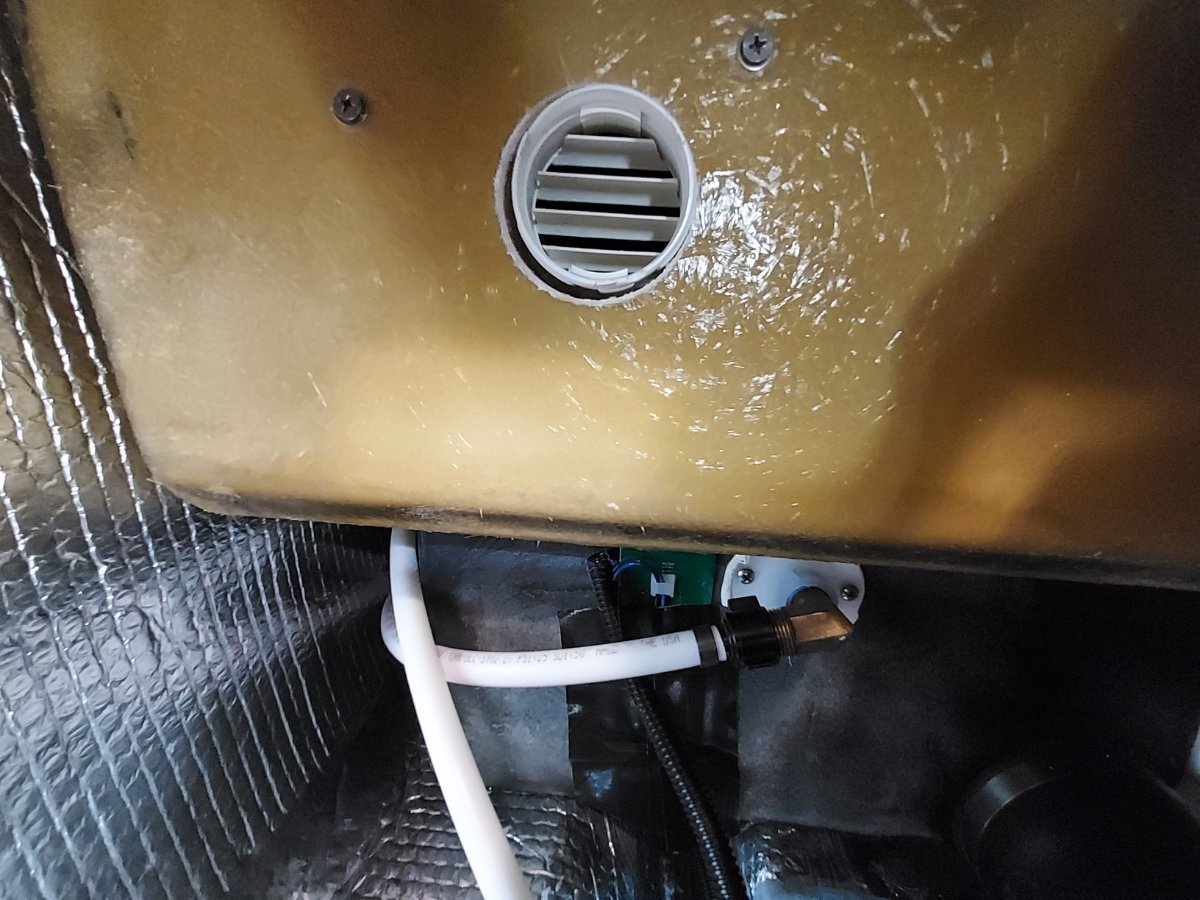
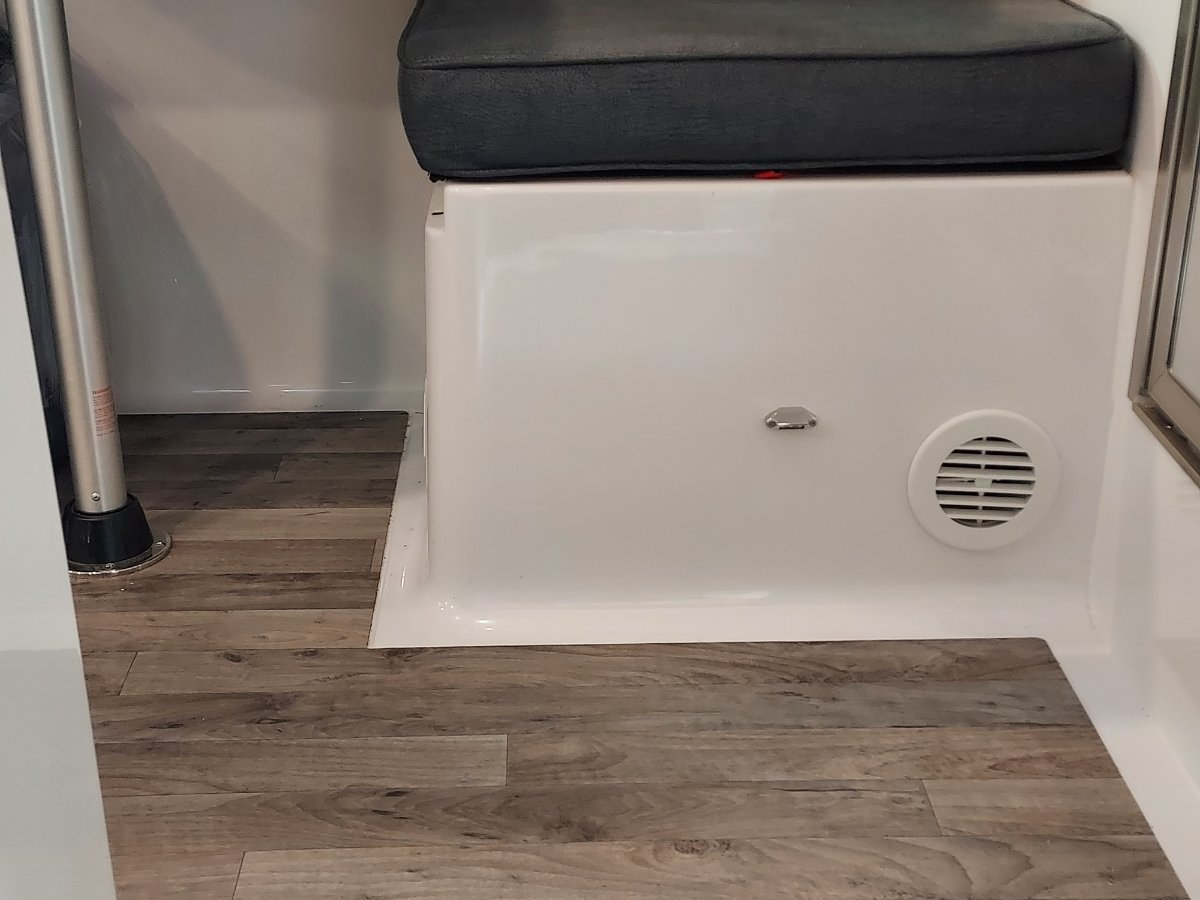
The answer to this question depends, to some extent, on how recently your hull was manufactured. Our late 2022 Hull #1291 with the Truma Varioheat furnace can withstand colder outside ambient temps than earlier models because Truma required a redesign of the duct system that includes a return air vent between the bathroom and the under side of the front dinette seat. See photo below: This return air vent enables distribution of more heat to the underbelly of the trailer, providing some additional thermal protection to the plumbing. Your Hull No. 1423 probably does not have the Truma Varioheat, and, therefore, does not have the updated ducting. The thread below contains lots of information about the performance of Olivers of various ages in cold temps: There are adjustments and mods you can make to help the plumbing system better withstand cold temps. The easy one is removing the outside faucet head and re-installing it on the inside of the hull (underneath the street side bed) when camping in cold temps. I have added some additional return air vents to improve circulation of warm air through the otherwise isolated parts of the trailer. See photos below: The bottom line: the plumbing will not freeze in any Oliver, with the furnace running, down to temps in the high 20's. To be able to use the trailer without winterizing at temps below that level, take the steps detailed here, and in the thread embedded above. Good luck!
 5 points
 -
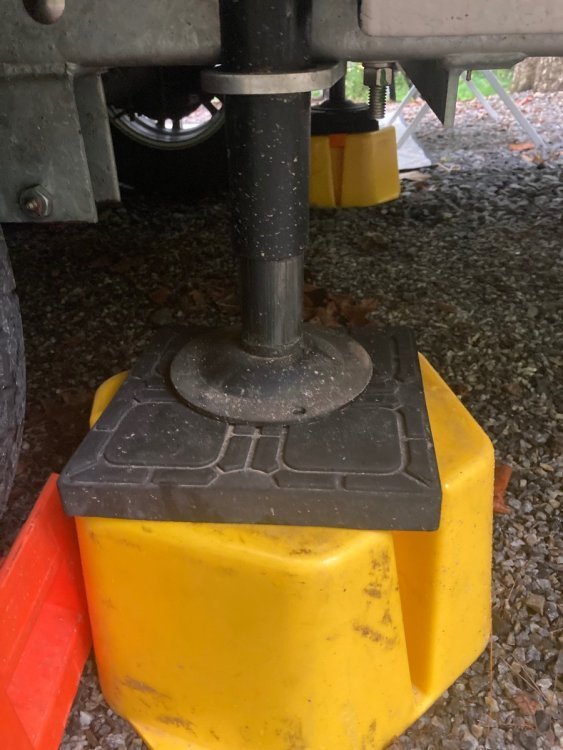
I "borrowed" this pic from @Hokieman post above. This is a great example of what I've been preaching for the last 15 years on how the jacks ought to be used. As you see he has only barely extended the jack foot. This makes for a very stable resting platform since there is virtually no flex from the extended leg of the jack. Further, when you forget to raise one of the jacks as you are leaving camp you will not ruin the jack by bending the still extended, all the way to the ground, jack foot. Rather the jack will drive off the block and exactly no damage will occur. Hopefully you will feel it, if not you may leave your blocks behind but they're a lot cheaper than replacing the jack. If this tragedy ever happens to you, know that you will have to cut off all of the inner jack tube that is sticking out. Without a reciprocating saw with a good metal blade or a hacksaw and a lot of arm moxie you may be stuck for a while. You can't just drive away dragging the bent jack. Great Job!!!
5 points
-
Here is the information that I have for for the windows: For the 3 large windows, Pelland Enterprises in Arnold, Ca. phone number: 209-795-9330 - I bought 17'. The Item code is H109-376-19 and the description says 1/2" Glass Vinyl Seal, Black sold by the foot at $5.17 a foot for a total of $87.89. For the escape window: I bought from Steele Rubber Products. Steelerubber.com The PN number is 70-3825-255 I do not remember how much I paid for it, but I think I ordered 10' . I also ordered this in black. I hope this helps someone.4 points
-
We've had the Battery Box on our radar screen since we purchased Casablanca back in March from its PO in TX. One of the Hull #226 selling points for us was that the PO had recently replaced the AGMs with 3 Battle Borns and added a Victron Smart Shunt. However, upon learning from the forum, the BB install by the PO was less than optimum - or at least to our understanding at the time. We were surprised that there wasn't a battery master "shut-off" switch. This fact was the main driver for this project - after looking into what we "really" had on our hands, the pervasive project "scope creep" showed its ugly head! Full Disclosure: Although we've had several RVs over the decades, never have we owned Lithiums. Thanks to these forums, learning about the nuances and particulars of LiFePOs, specifically, Battle Borns - and even more specifically, their application with the Oliver, has taken some time to digest. We didn't want to delve into the "fray" of "cleaning up" what was previously installed until our understanding of this particular system was at a high enough level not to screw something up. So, thanks to the forums, many of y'all's posts regarding the subject, and special thanks go out to @Geronimo John for his patience and guidance with what ended up being a fairly large scale re-design of Casablanca's DC distribution system. Initial Configuration and Issues: 1. A key indicator that there was an issue somewhere within the "DC system" was that the charge controller would never reach 14.4 volts; 13.6 was the max ever observed/measured. 2. The BBs were stacked in an unusual configuration on the battery tray. The rear two batts were aligned side-by-side facing left/right and the third "outer" BB was aligned 90 degrees off facing fore/aft. Several cables were too short not allowing full battery tray extension. Clearly not a neat/tidy or logical configuration. 3. The battery bank was not strapped down. 4. Although likely large enough for intended current, the three BB's parallel connections were made with 1/0 cables versus the 4/0 cables distributing the current into the trailer. 5. Several positive and negative connections were made directly to the battery bank without the use of any sort of terminal post or terminal bar even though the Smart Shunt was in place. These connections were bypassing the SS, not good - thus contributing to phantom current within the DC distribution system and not allowing the Victron App to capture all DC power activity. 6. One cable, a yellow 4 AWG, ran from a negative BB terminal to the wrong side of the Victron SS; this cable essentially paralleled the 4/0 cable from the same terminal to the shunt. This made absolutely no sense. 7. As stated above, no battery master switch. We've always had a master switch in previous campers - handy for longer term storage and eliminating phantom current. In case of fire, we wanted a "safety switch" located outside the camper and inside the battery box to quickly secure DC power after quickly exiting the rig. SUMMARY OF WORK PERFORMED: The closer we looked at the DC set-up the more questions and issues surfaced. There were other ancillary DC system "gripes" but the above list really paints the picture of what we were dealing with... After quite a bit of forum research, thought, and informative and lively discussions with Geronimo John; a clearer project plan developed. 1. We made an assumption that the PO didn't upgrade the "lead-acid" charge controller circuit board as part of the BB installation. This rationale would explain why we never observed more than 13.6 volts on shore power with the controller energized. Sure enough, after pulling the board, it was clear that the board was doing exactly what it was intended to do - charge lead-acid batteries; as it didn't have the Lithium micro-switch option. So, we ordered a replacement 45-Amp board from Amazon with the Lithium option - enter "project scope creep." Above pic shows replacing the LA charge controller with a Li-capable board. The lead-acid board is 100% functional and will be posted for sale on the forums. The new Li-board cranked right up and the BBs finally received the charge intended for a Lithium battery bank: 2. Disconnected and removed the 1/0 cables connecting the 3 BBs, labeled and stacked them sequentially from back to front. Sized cables to allow full extension of the battery tray and added nylon tie-down straps from Rangley. Cut, crimped, heat shrunk, and installed new 4/0 color-coded cables in parallel configuration: Made a terminal buss-bar from 3/16" x 1" solid copper for the Blue Sea Systems master switch (Amazon) which will be heat shrinked once it arrives. Contoured a poly board from an old cutting board to mount the switch, like many owners have done. Mounted a positive (+) terminal bar with the master switch to accommodate DC connections. In the new configuration, only 4/0 cables are connected to battery terminals - removed the various "added-on" connections and placed them appropriately between the (+) terminal bar and the Victron SS. Now, all DC (-) connections are made through the shunt so all DC power measurements are captured with the Victron Application. Peace of mind - priceless. While we were at it, we added an SAE solar input port for the 200W Renogy suitcase solar modules - more scope creep... HA! Not being an EE, I'm sure there's something left out, but in the end, we've got a clean set-up in the battery compartment, fully functional Victron SS, and the appropriate charge controller to manage the BBs. Time for a cold one. Cheers! A & D
2 points
-
The furnace will heat below deck. You can enhance that by opening some forward hatches to get warm are from the coach into areas that are further from the furnace.2 points
-
I assumed running the furnace would heat below deck. I am trying to go from assuming to knowing. 🙂2 points
-
I admit that I have no direct knowledge of how much that particular line would drain under the circumstances you describe. Compressed air will quickly displace water pushing it the line if the air has an escape route. I've found the best method of evacuating water for the plumbing is to use the on/off method. I usually use about 40 pounds of air pressure. Apply pressure to the lines with all taps open. At first, a good bit of water will flow out. When it has reduced itself to a sputtering gurgle, cut it off and wait a few minutes. This will allow the residual water to run to the low spots and pool. Turn the air back on, water will come out the second time but not nearly as much. Repeat this several times until you've gotten the bulk of the water out. I doubt you could ever get it all out but that's OK. In the case of a closed end line (as with the composting toilet) I believe it would drain out just fine, but if I were worried about it, I would replace the cap with a valve that I could open during the blowing out process and then close again. If you wait until the last stages of the above process, you'll only have a small amount of water from the valve that you have to deal with.2 points
-
It’s a judgement call that depends on the depth and length of cold, and how risk tolerant you are. As mentioned above, it’s not that difficult to winterize and de-winterize a camper or trailer. Oliver with the boondocking connection at the rear makes it easier than most. Don’t forget to get antifreeze in the drain traps.2 points
-
I have a 2015 F 250 gas with 18” factory rims and Michelin LTX A/T 275/70R 18 tires that ride pretty smooth and reasonably quiet. The original set netted me 65,000 miles and I replaced them with the same tire.2 points
-
It depends on how low your temperatures get and how long they stay there. I’ve never winterized because we also camp year round. It routinely gets into the 20s where we live (San Antonio area). Keeping the heat on and opening the inner hull hatches keeps things from freezing. We occasionally dip into the teens and even single digits and when that happens I open all the inner hull hatches, run the furnace, and have a couple of small electrical heaters - one in the basement area and one where the water pump and all those water lines are. It’s usually only 2 or 3 days once a year. Mike2 points
-
You didn't say how low of temps you were talking about or if you were going to be living in it or just storing it until you do "visit warmer climes"... but I'd say, with the furnace on and plugged into shore power you should be good down into the 20's. The weak point would be the outside shower faucets, due to their exposed position and of course any water hose connected to the city inlet port. There will be some that have experience at lower temps but I'd be concerned with that unless I was actually living in it at the time to be monitoring things. For what I am guessing would be intermittent trips... and being stored at home with furnace running you should be good into the twenties. More than that, I would just learn (if you haven't already) how to winterize it. It's not a difficult process to winterize/de-winterize and then you would be protected without having to run furnace/aging the systems... while it's not being used.2 points
-
If I'd known there was going to be math involved, I would not have signed up.2 points
-
WOW! That's a big elephant - one bite at a time... Concur with John, I'd add Pagosa and Silverton to his list. Try not to miss the San Luis Valley and the Arkansas River from Ponchas Springs all the way up to Leadville (highest aerodrome in US). There's a nice transition over Independence Pass from Leadville area down to Aspen, your Tremor will eat up that breath-taking route with 14k'ers in all directions, Mt Massive, La Plata Peak, Castle Peak, and others. Enjoy CO, we've got a remote off-grid cabin there near Antonito - love it!2 points
-
That is too much to pay for a RV Power Inlet - 30 Amp Twist Lock. Its being made from Stainless Steel that makes it so expensive. I really don't like purchasing from etrailer. If you get a defective part, you have to deal with the actual manufacturer of the part for exchange as they won't allow you to send it back to them. I always buy from Amazon. If there's a problem, they will always allow you to send it back.2 points
-
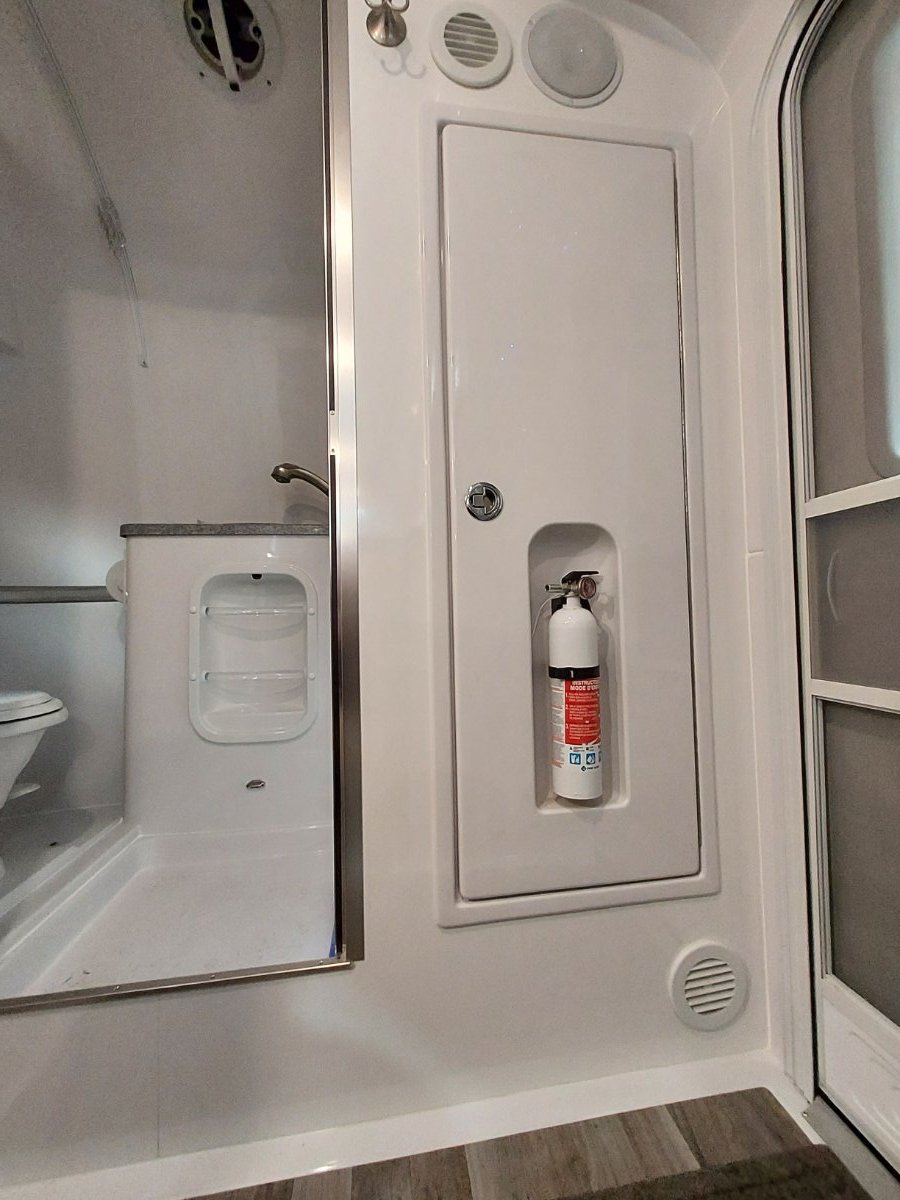
I too have a 2020 LE II and I definitely bought mine new as a 4 season trailer and as I use it extensively through the winter in Oregon, I do not winterize it. I am extremely pleased with the LE II overall, but OTT completely failed when they engineered the forced air heating system. A forced air heating system does not distribute hot air throughout the living space, it has return ducts that pull hot air from the supply ducts across the living space to a one or more return ducts and back to the furnace. Oliver only put in one return duct and they located it immediately in front of the furnace itself. This means that there is no circulation of heated cabin air through the basement. It is dead air space. Even more inexcusable, OTT didn't put any return vent in the bathroom so when the bathroom door is closed, the supply vent in the bathroom pressurizes the bathroom space and warm air doesn't flow into the bathroom. Given the primary problem is a lack of properly sized and located return air vents, adding or relocating supply vents will not be very effective at warming the basement. I too spent did lots of testing with thermostats to get a good understanding of basement temperatures at various cabin temperatures. Like you, I found that no matter how hot I heated the cabin, the area around the outside shower would inevitably fall to around 5 degrees above the outside temperature. I determined the main reason was the lack of heated air circulating through the basement due to the lack of appropriately located return vents in the cabin. I also found that the tiny vents in the bottom of the trailer designed to drain any water that finds its way to the basement are a problem in cold weather given the flaws in the heating system. There are enough tiny air leaks in the cabin to create a slow convection effect which draws cold outside air slowly through the basement vents. Since there is no warm air circulating through the basement even when the furnace is running given the flawed design, this slow intrusion of outside air pools in the basement creating the dramatic temperature differentials between the cabin and the basement. I have not permanently fixed the problem yet, but found a temporary workaround that I am confident is good down to 15 degrees or so. If you have the inverter like I do, there is a large street side hole just behind the battery box (to access the inverter GFCI). When it gets cold, I just unscrew and remove the cover and create a second temporary street side return vent. Now more than 50% of the hot cabin air flows into the street side of the basement and across the water tanks and rear area stirring up the air. The area by the outside shower now varies less than 10 degrees from cabin temperature and the battery box stays within 5 degrees of cabin temperature (I have lithiums and have sealed and insulated the battery door). The furnace seems to run quieter and the cabin heat is more evenly distributed. The walls don't get quite as cold either. This winter if it gets real cold, I will also temporarily tape over the vents under the trailer to stop the convection currents from pulling cold outside air directly into the basement. For me, I think the permanent fix is to add a few return vents to the trailer. I will probably put one under the front dinette next to the CO detector and another smaller one in the bathroom. This should ensure that the entire basement enjoys adequate circulation of warm air when the furnace is running and that the bathroom is warm even with the door closed. You may want to try unscrewing the cover from the street side hole in front of the inverter and see if you experience the same improvements in basement temperatures that I did.2 points
-
Your primary hazard when using the furnace is indeed CO poisoning (from a stress crack in the combustion chamber, which is impossible to predict). You are putting a lot of faith in the two Oliver installed “yes/ no” CO detectors. The one under the galley isn’t going to be helpful, CO is lighter than air. The combo smoke/ CO unit below the attic is good, if it works. I recommend this digital CO detector as a failsafe, it will show you trends, for example, the current level (should be very close to zero, but up to 50 is acceptable in the short term) and the highest reading since last reset. https://olivertraveltrailers.com/forums/topic/6780-how-to-replace-the-propane-co-detector-with-a-gas-only-one-and-a-digital-co-detector/ I have three of these, one in the trailer up high, one in the RV bay, one inside the house (because I have gas appliances and heating). The Rv bay unit shows elevated levels briefly when I have run a car in the attached garage, it has never actually got to an alarm level. Those who camp in milder weather should crack a rear window and open the bath vent half way and not stress too much. If you are running electric heat, there is no worry at all about carbon monoxide death…. Which I understand is quite nasty, but OTH it is quite hard on your family and friends. Symptoms of carbon monoxide poisoning may include: Breathing problems, including no breathing, shortness of breath, or rapid breathing Chest pain (may occur suddenly in people with angina) Coma Confusion Convulsions Dizziness Drowsiness Fainting Fatigue General weakness and achiness Headache Hyperactivity Impaired judgment Irritability Low blood pressure Muscle weakness Rapid or abnormal heartbeat Shock Nausea and vomiting Unconsciousness John Davies Spokane WA
2 points
-
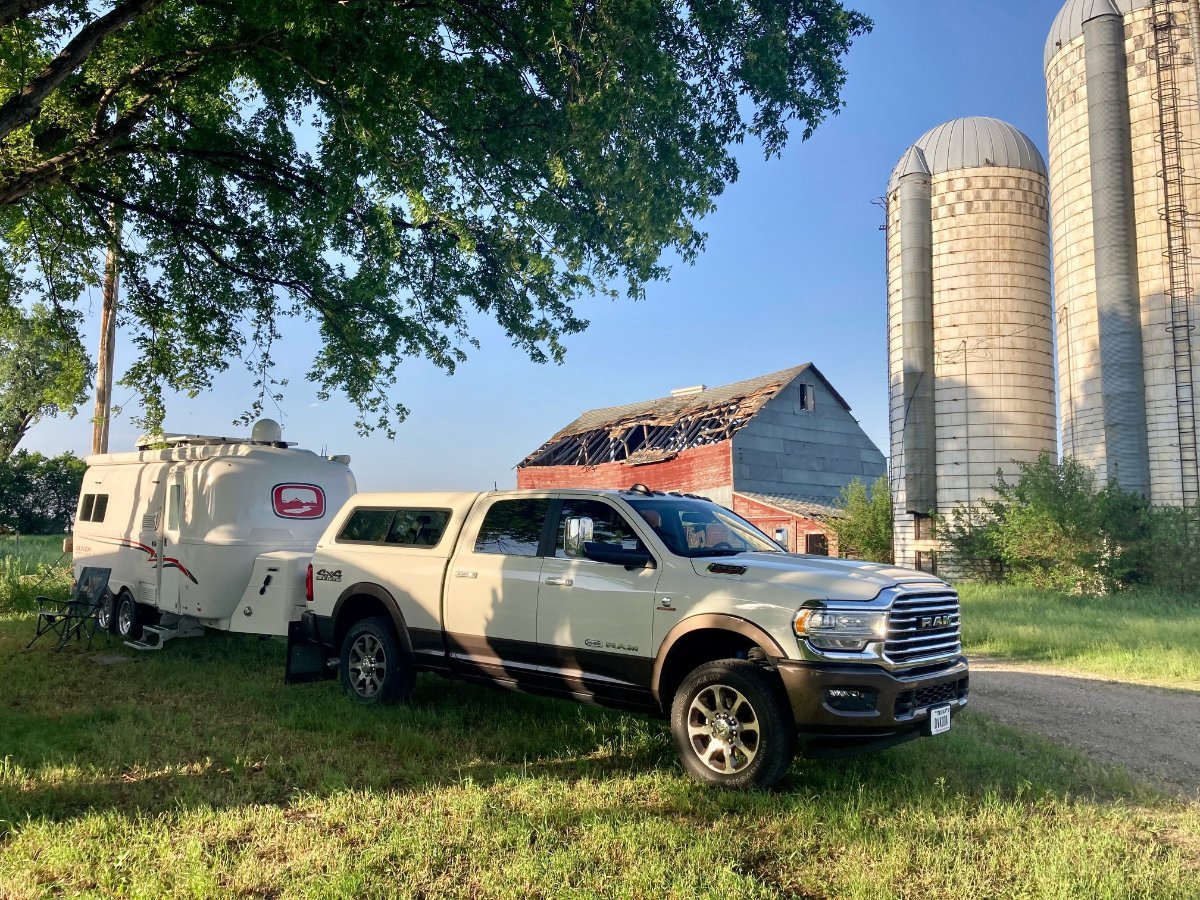
An Oliver Elite 2 from Tennessee, parked in Loop B with a great view of the Spearfish Formation “Red Beds”!
1 point
-
Well... This thread may not get much mileage because it's happening during the Ollie Rally in Alabama. But here's an initial SITREP for all y'all that will capture our Sea of Cortez beach adventure over the next week or so... We're in Ajo, AZ ATM and about ready to launch on the 100+ mile trip to the beach later this morning... More to follow!
1 point
-
As I recall, the Border Patrol check point south of Why has some weapons grade nasty speed bumps. Even going really slow, they jolted the **** out of the Airstream.1 point
-
Enjoy the Races! Perfect place to take your Ollie - went there the first time in '79, fantastic!1 point
-
Her trailer is a 2017.1 point
-
What year is your Oliver @Nan?1 point
-
Our Elite 1 doesn't have a very heavy tongue to begin with (no basket , nothing on the tongue, around 420 pounds.) I wouldn't try this on mine, for all the reasons Steve mentioned above. Our elite1 bumper is very short. We only carry a dump hose in the cavity .1 point
-
Greetings from hull # 50 (plus 67)! 😁 Bill1 point
-
This is a great article on the high country around Durango/ Ouray/ Tellurude. https://expeditionportal.com/colorados-million-dollar-highway/ Be prepared for snow at any time up there! John Davies Spokane WA1 point
-
Scuba RX, We're not alcohol drinkers either but stay at HH quite often. We especially like the museums and farm stands. Probably my favorite HH stay so far has been the Soaring Museum in Elmira, NY. It was great to watch the gliders take off and land just steps from our Ollie.1 point
-
As we don’t consume alcohol, HH has never been a draw for us. Yes, I know they’re not all alcohol related, but with having to pay to be a member, being expected to buy something before you leave seems to be awfully expensive for what you get in return.1 point
-
Hull #1291 exhibits nearly identical flexibility up and down when someone is moving about the trailer. Such movement is particularly noticeable when someone is climbing the stairs to enter the trailer.1 point
-
There is no dampening built into the trailer. The hull sits directly on the frame separated only by quarter inch strips of rubber between them. The attachment bolts go through the hull, rubber, and frame from the inside.1 point
-
Very nice job! What brand of safety shoes are you sporting? Don’t think I’ve seen ‘em before! 😂🤣😂 Mossey1 point
-
Yes, I can clarify. I’m running Cooper Discoverer AT3’s on my Oliver on the original 16” wheels in the original size. Sorry for the confusion, would 18” wheels even fit? 18” wheels and 35” tires on an Oliver would probably require major bodywork! 😆 Mike1 point
-
Olivers are built much like a boat, on wheels. They are meant to flex. Fiberglass flexes. Even steel flexes. Big ships flex. Determining how, when, and how much is the big engineering question. We rarely even use the rear jacks, if camped for a night or two. I guess maybe because we're used to boats, we're not bothered by the little movement. Perhaps I'm "desensitized", since I'm used to everything moving around on a sailboat. The slight movement we feel is not an issue, imo. More importantly, we've never experienced any separation or other issue, like some sob trailers , like airstream. (16 years in, 150k miles) It does, however, give us a little bit of understanding of what happens, going down the road. If the hull didn't "flex" a bit as necessary, something else more catastrophic might occur. Stationary, at a campsite, you can add extra jack supports, if it's disturbing, without harm to anything, except extendimg your setup and breakdown time. Me. I'm in the it "is what it is" category, and happy to not have to worry about a tent in the wind and rain.1 point
-
In summary, the fiberglass body is not a rigid structure and the attachment of the body to the frame is not a rigid connection. I struck up a conversation with John Roemer, aka Raspy on this forum, at the 2019 Rally regarding the degree of movement felt inside the Oliver. We were sitting beside his Oliver and he was showing me the modified jack stand that he used in an attempt to reduce wobble by reducing the extension of the rear jacks when his wife, a very petite lady, entered their Oliver. While watching the frame area and the right rear jack atop the modified jack stand we noted how much the fiberglass body moved. We asked her to exit and re-enter and to move around inside the cabin and noted that even though the frame was stationary there was considerable movement in the body. I have used x-chocks between the tires and jack stands under the front corners and even though I can reduce the wobble I cannot eliminate it due to the inherent movement of the non-rigid fiberglass structure and its method of attachment to the aluminum frame. We have become accustomed to the movement and now set up with as little extra gear as possible.1 point
-
We’ve been using a TMobile sim card in our cradle point for about a year. No problem. I picked the sim up from the t-mobile store, popped it into the cradle point, and voila! It was a piece of cake.1 point
-
I found a major issue with my power inlet (lose lug that caused some surrounding plastic to melt) as we were preparing to depart on a long trip. A direct replacement (stainless steel) would have taken days to arrive. I chose to go to a local RV shop just minutes away for a replacement I could install and still be on our way. It wasn’t a question of cost. At some point I will replace the plastic with the original stainless steel cover. Mike1 point
-
Good luck! Be careful down there. https://www.borderreport.com/immigration/border-crime/10-road-racers-massacred-in-northern-baja-9-wounded/1 point
-
Organize one. They’re a lot of work.1 point
-
We've had this trip on our radar screen for years.... Finally, we're able to align the planets to make it happen - we're traveling with friends from our old Airstream club (4 Corners Unit) who've been doing this trek annually since 2003. They've got it down - it's actually an easy transition from Lukeville, AZ (border crossing)/Sonoyta, Sonora Mex. The only documents asked for by the Mexican side was our TV and OTT registrations - they took a peek inside Casablanca and "one and done." No guide needed...1 point
-
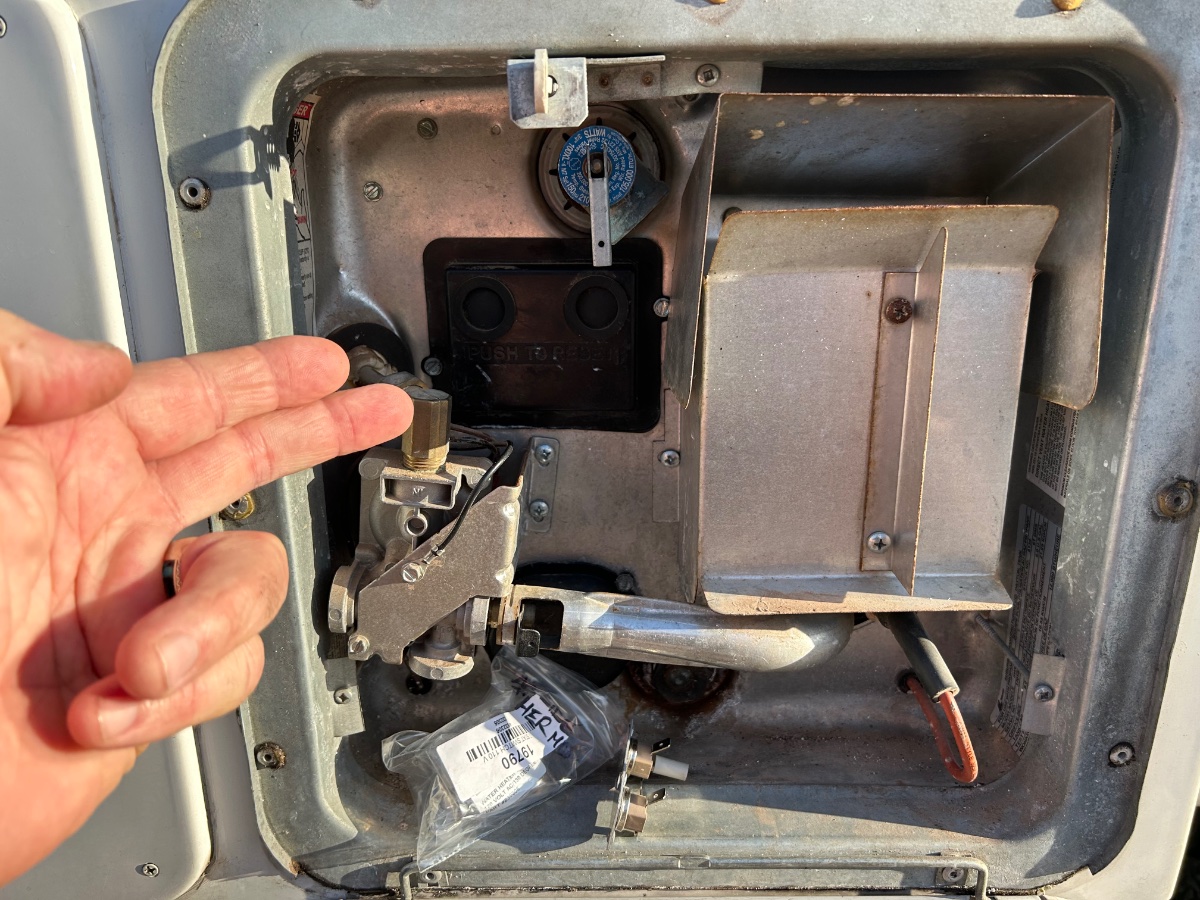
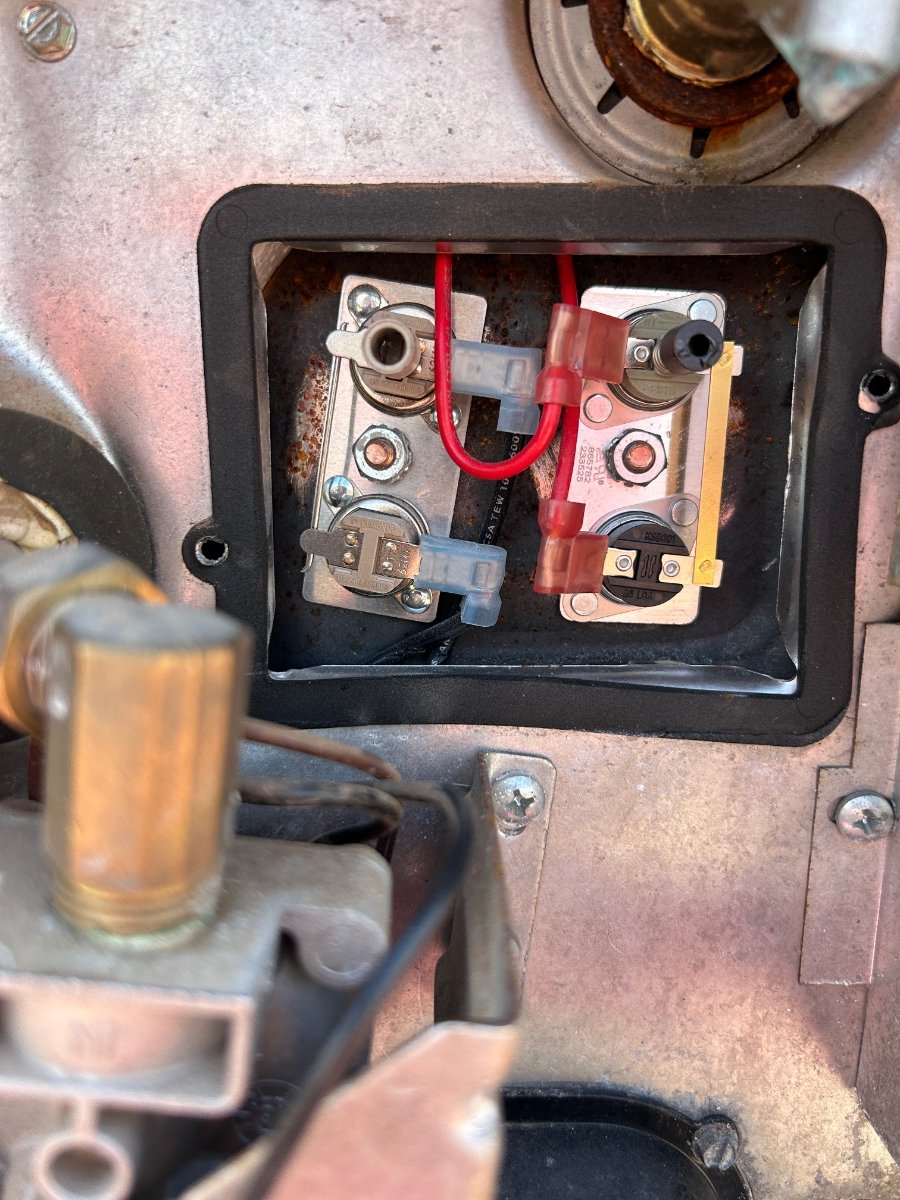
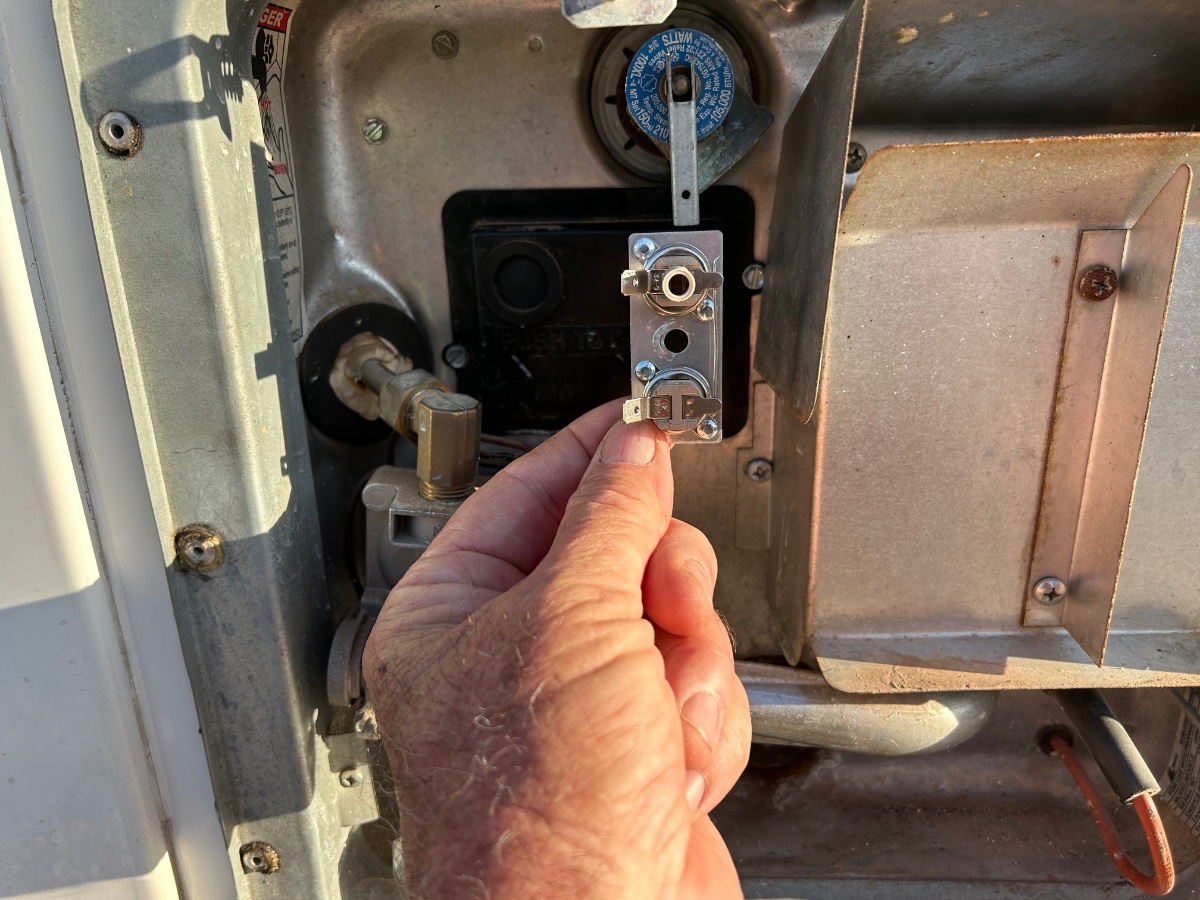
SITREP 18MAY: Departed Wednesday AM with 6 Airstreams, an RPod, and our OTT for Playa Bonita RV Park at Rocky Point, Puerto Penasco. FYI, our only issue with Casablanca was a faulty Suburban SW6DE water heater DC-side thermostat. Replaced the Tstat in short order - all good, so momma got her "Hollywood Shower" this morning (and I'm back in "hero" status). Best wishes to all those at the Ollie Rally this week! We would have been there had we not already planned this trip... Cheers! A & D (Magnus, too - WOOF!!!)
1 point
-
My wife and I purchased our 2020 E2 based, to a certain degree, on our enthusiasm for cold weather adventuring. We took a number of trips over the 21/22 winter season to check out limits and capacities. All were trips between 3 and 7 days, in northern New England with night time temps in the range of roughly 30-0 degrees Fahrenheit. We would note nightly exterior temps, kept the overnight cabin interior set to 60 and rotated 3 digital temp sensors around what we found to be the most vulnerable areas to cold we found (and could get to) between the shells that housed water lines and tanks: 1) under front dinette seat, under street side bed by the exterior shower, 2) the pex lines to exterior shower passing through the faux wall at very rear of basement and 3) the battery box. We could not get to but are curious about the cabinet housing containing the bathroom sink. Playing it safe, we kept the trailer winterized for the entire time relying on containerized water and our composting toilet. All of our sites were boondocky, with no shore power hookups so we relied entirely on the LP furnace and solar/lithiums. We found that the stock trailer could manage to keep all the areas listed from dipping below freezing down to 25 (exterior temp). The lines behind the faux wall and exterior shower would hover in the low 30s at that temp. We realized those pex lines will, realistically speaking, need to be always kept winterized by adding cut offs as heating the basement area would be an inefficient waster of LP. Side note that we asked Jason if that could be done during our build and he informed us that the shop could not find anywhere with enough space to add them. We're open to suggestions. A simple set of tweaks including adding two layers of Reflectix to cover the interior of both the basement and battery compartment doors got us down to 20 with similar results. Next project was more involved. The temperature difference between the areas under and wall along side the curbside bed versus the street side bed was resulting in heavy condensation on the streetside wall and window which would soak that bed. We also found that the battery compartment was dropping down into the 30s at exterior temps in the high teens. While there is a matte heater pad below the batteries, it seemed to us that the compartment was too cold to reflect the lithiums themselves being warm enough to run efficiently and we noticed anecdotally an increased need for more charging assist - be it solar or generator. Could haver been the drain of the heat pad or the lithiums running less efficiently in the cold (as validated by the manufacturer) but which one did not matter. We felt adding heat to the box would be of benefit. Our fix was to re-route some heating vent. We capped the rearward 4" vent and re-ran that line through the gap behind the water tank from the furnace to the street side, past the inverter, under the battery box to a new vent we placed as a mirror image to the existing one below the drawers in the galley. One vent grate is pointed fore and the other aft. Here we used semi rigid vent tube specifically because it sheds so much heat, allowing the areas it runs through to warm. Where the tube ran past electronics, we would shield the hot tube in a layer of reflectix. Measuring with an infrared thermometer, the reflextix surface was cooler than the surface of the OEM flexi vent tubing and quite cool to the touch. The heat exiting the new vent would run about 10 degrees warmer than the one on the other side of the isle even though it is a further distance from the source. We expected an increase in output from the vent in the bathroom but did not notice much of a change. As the bathroom is a bit of a "dead end" with air being forced in but nowhere for it to exit, we added a 4" eyebrow vent at the floor level below the towel rack to allow for circulation and share some heat passively with another problem cold area - under the front dinette seat. While there are no pex lines run there, there are drain pipes and tanks and it would otherwise fall to freezing if outside temps were in the teens. Not very scientific but the furnace did not sound like it was under further strain or seem to run more frequently given similar temps. Our rate of LP consumption is roughly the same now as it was before alterations which, in single degree night time temps, consumes a 30lb tank in just over 2 days. Not very good. To increase efficiency, we cut two layers of "double bubble"reflectix and taped the edges with silver foil vent tape - as suggested in a previous post. They fit tightly inside all windows and are held in place by closing the shade. Bought a camco 14" soft material vent cover which bunjied over the Maxair (when not cooking) and cut a piece of 2" open cell foam to fit the window in the door. Covered it with a layer of reflectix and taped the edges. This is held firmly in place by the screen door. As all including the fan cover have refectix sides facing inward, the add ons look good enough - not jury rigged. Our takeaway is that these tweaks have bought us 20 degrees of leeway so we have squeaked by to zero. The batteries box is running much warmer but the other areas are more iffy. There is less condensation around the streetside bed but the exterior shower, for it's entire run, will need to be somehow shut off and winterizede or will be subject to freezing. Someone had suggested cutting a block of memory foam to put in the box with the exterior shower nozzle and knobs which may work but would not help with the tubing behind the faux wall. As to factory options that would have really helped: The exterior shower really needs cut offs or could have had it's lines run through a heated area of the belly and it would be super helpful to insulate the basement walls, basement door and shower door. The walls of the trailer REALLY transmit a lot of cold into the interior. A layer of spray on insulation foam would have gone a long way to help with that. I am also eyeballing the sealed belly and thinking a layer of sprayed on insulation could really help there as well. Am going to contact an HVAC place to get some feedback on options there. Also looking for doable suggestions. We love our Oliver and appreciate the incredible quality of the build. We also realize that there are very few folks looking to use theirs in frigid conditions. We're hoping that those of you that do, pipe in with further feedback and refinement to increase both capacity and efficiency in these sort of conditions.1 point
-
For the sake of efficiency, we sleep with everything buttoned up. If you run your hands past the edges of window sliders, past the seam between panels on the bathroom window, around the edges of the door, etc... there are plenty of minor leakage points. We feel these minor porosity is healthy and would prevent mold much the same with a modern house. During the days we run the Maxair when cooking and, as necessary, pull the reflectix inserts in the windows to allow the heat "cook away" moisture buldup per condensation on on the glass. We also carry a small mountain of micro fiber hand cloths to wipe away moisture from the glass, bathroom and galley. Super absorbant and easy to clean. Our safety backups is the monitor/alarm to warn of of C02 buildup. The smoke alarm has gone off while cooking items that really produce smoke but the alarms have not gone off otherwise.1 point
-
Thanks for this informative post. Please tell us about cabin venting at those temps. Which windows or vent fans do you typically open and how much, especially while sleeping? You mentioned MaxAir vent was covered, not used except for cooking. We have camped into the high 20’s, and have been experimenting with cabin venting balance to minimize condensation. We are hoping to improve the cold weather capabilities so these mods and ideas are very beneficial.1 point
-
It’s good datas, thank you. It’s a Florida’s 4 seasons trailer! There is no rig that will stand cold weather for a long time because there are too many infiltration weak points: water inlet, back of the fridge, back of the water heater, door, windows, maxxair, roof vent , weak insulation factor (R…) etc……but Oliver is way better then other type of construction with a double haul and no slides out……it’s designed in case of a nights or two below freezing but not that much. 4 seasons in Eastern Canada need R60……!1 point
-
Thanks for the very informative post. It is particularly useful to know that the "stock" trailer will protect the water systems from freezing down to 25 F, and that you burned about 15 lbs. (3+ gallons) of propane per day when nighttime lows were in single digits. Please forgive me if this is a dumb question. But, if you kept all water systems winterized the entire time, using only containerized water and your composting toilet, what would it matter if the external shower was exposed to freezing temps? The winterizing process should have filled all of your Pex lines with RV antifreeze. What am I missing?1 point
-
I am in the middle of a project where I am rebuilding the basement. I have decided to reroute the supply lines for the outside shower to a position more inboard than they are now. This is mainly to allow the new floor that I intend to install to be lower and completely flat. In rerouting those lines it will put them in a position closer to the centerline of the trailer as opposed to right next to the outside wall. This should have a positive effect on insulating those lines. I had not thought of putting valves into those lines, but it does sound like a good idea, and in their new position, it will be easy to do. I will probably put electric motorized valves in since I would not be able to easily access manual ones from the outside. Thanks for the idea.1 point
-
We've been HH members since early on. We don't think it's necessarily a bargain as we only use it a few times a year - BUT we have never been disappointed in our stays, which are mostly at wineries. Frankly it's great way to drink and NOT drive. We'd recommend them. Charlie.1 point
-
One thing to keep in mind with Harvest Host, they automatically renew your membership every year. Just be sure you know this prior to signing up. -Patriot1 point
-
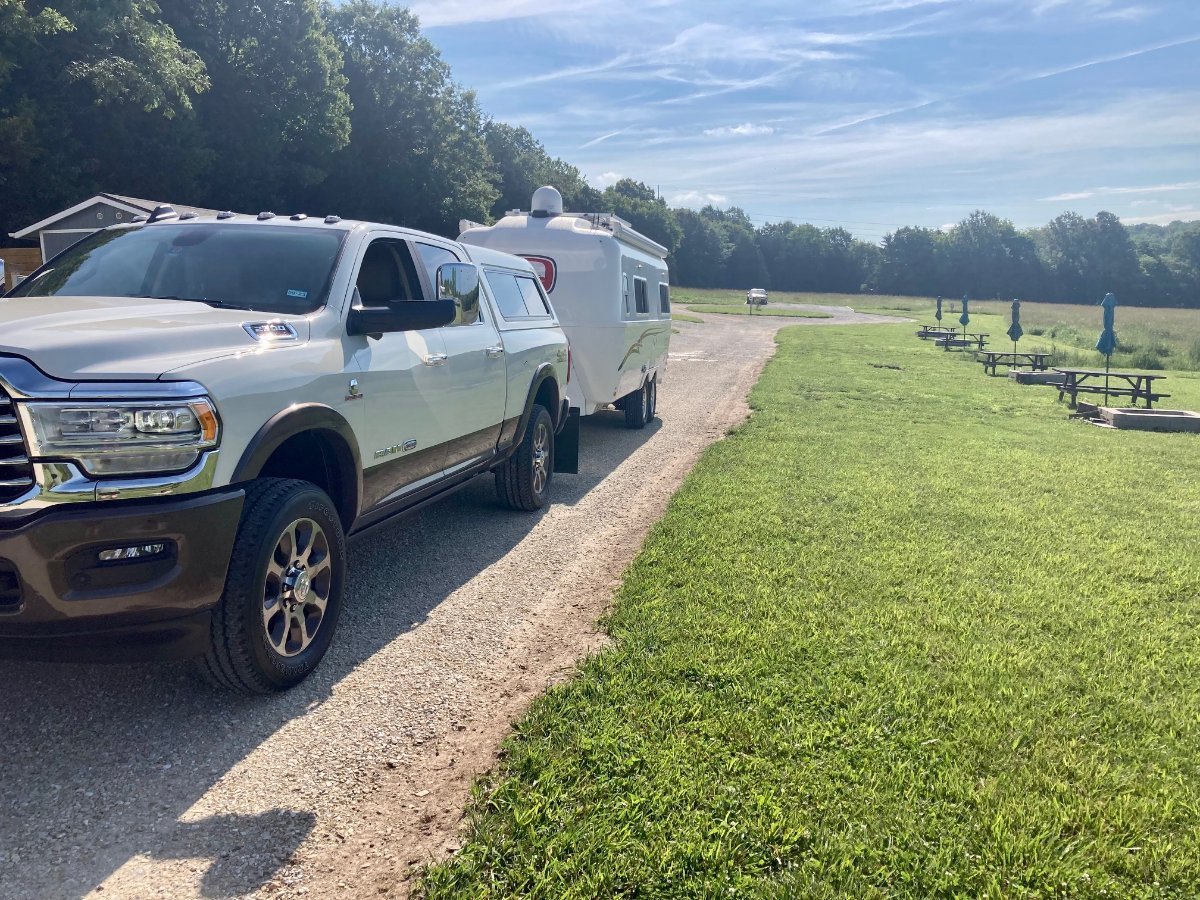
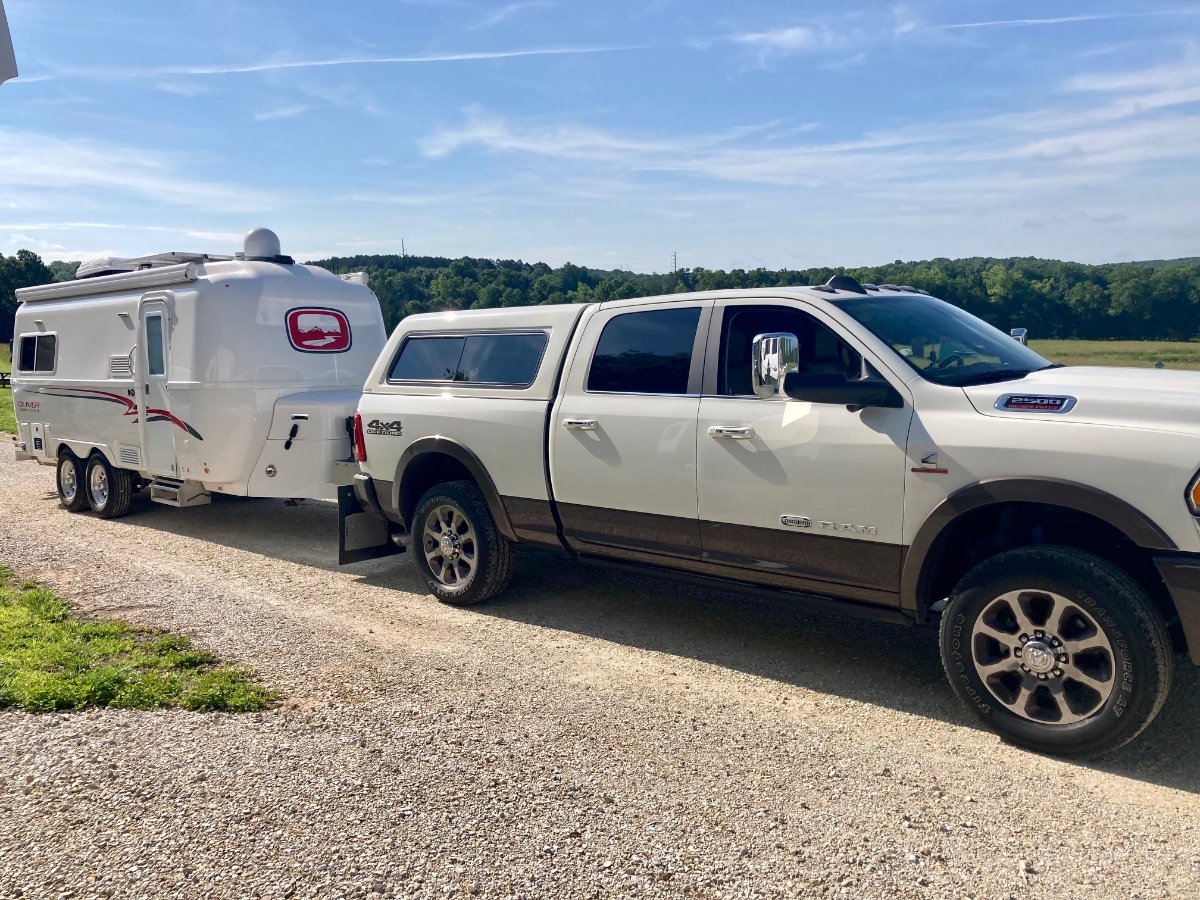
We have used HH for three stays now and love them. We have stayed at one with full hookups, one with electric only and one that was completely dry. They are great to stay at and well worth the subscription cost (we have the additional "Boondocking" subscription as well). Hope that helps you in your decision making. Appreciate your great Youtube channel! Photos are from HH locations in Minnesota and Missouri:
1 point
-
We just used Harvest hosts on our drive from Minnesota to Colorado and back last week. We used it five nights total. There are breweries and wineries right off the interstate that are popular and you’ll need to reserve ahead at least a week. Others attractions are available on short notice, especially if they are less popular and further off the interstate. If you travel on state highways during the week, no problem. If you only travel on interstate highway on the weekend, expect to plan ahead at least a few days. Needing to plan ahead months in advance wasn’t my experience.1 point
-
???? The second one, in the back, is a combo CO/ smoke detector. I am not sure how you interpreted it differently. At least with propane, the nose works really well to detect even small leaks. John Davies Spokane WA1 point


.thumb.jpg.91ab93de4a01f9040d89cc75c92a3115.jpg)

-
Recent Achievements
-
")


")


")


