Leaderboard


Popular Content
Showing content with the highest reputation on 04/13/2022 in all areas
-
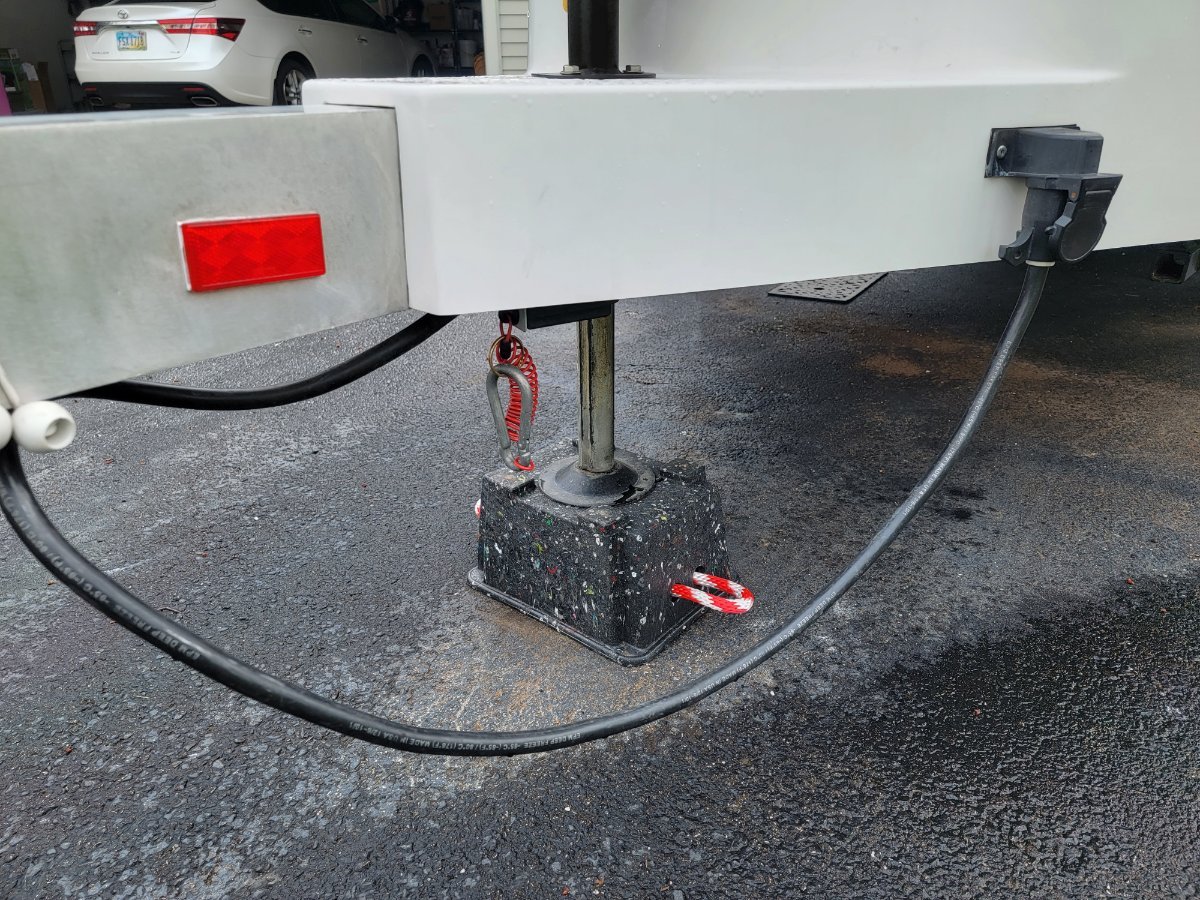
Just wanted to share an item that I've found recently that I'm pretty impressed with. I have used various pieces of treated lumber in the past and will still carry a few for sloped sites where I need to lower the bow more, but I recently was looking for a better (and safer) option for the front jack post while parked in my driveway or at level sites. It's called an Ox Blox. They can be purchased in a pack (4) for the rear stabilizers as well. I only ordered one for now to test it out as it's a little pricey for a hunk of 9# plastic, but so far, I really like it. It can support up to 10K pounds. I added the knotted red rope handles for ease of use. I know there are other options like Andersen but I'm liking it's low profile and the recycled plastic. https://www.amazon.com/Trailer-Camper-Blocks-stabilizer-Supports/dp/B09DMM51FP/ref=sr_1_1_sspa?crid=2QDUHSRGXH4DQ&keywords=Ox+blox&qid=1649865895&sprefix=ox+blox%2Caps%2C178&sr=8-1-spons&psc=1&smid=A2VI3MSVP5BC79&spLa=ZW5jcnlwdGVkUXVhbGlmaWVyPUEzR0dXVTcwMUFBVFJDJmVuY3J5cHRlZElkPUEwNzg3NTkzMjk4MVVISThCUE1WRCZlbmNyeXB0ZWRBZElkPUEwNDgwODAwMklGNEtXWTNDVzRLTSZ3aWRnZXROYW1lPXNwX2F0ZiZhY3Rpb249Y2xpY2tSZWRpcmVjdCZkb05vdExvZ0NsaWNrPXRydWU=
 7 points
 -
Hello Oll, I’ve been working in the marine industry for 40 years. gelcoat is very similar to paint in it’s required care. CUT, POLISH, WAX !! A heavily oxidized gelcoat will require cutting with sponge abrasive wheels. If you have not had experience with this , it would be best to learn from someone experienced. There are excellent YouTube tutorials on this if you are feeling too cheap to pay someone or, honestly want to learn yourself . Most important are cutting implement abrasive grades, polisher speed adjustment during passes and pressure applied to surface as you go. Polishing a new paint/gelcoat or an old weather/industrial impurity/sun damaged finish is an acquired, hands on skill. The most forgiving victim would be an auto/boat that is moderately oxidized. Find an old car that needs a polish and go to it. It can only look better, so you won’t have to worry too much about barking up an $80,000 trailer. After all of these years polishing boats and cars, I have come to be unimpressed with highly specialized products. Any product that promises high gloss without your flesh as a toll, is packed with disproportionate amounts of petroleum products like oil or grease (most likely salad oil from the local grocer). While some amount of these two ingredients are normal and desired, too much is harmful when left on and especially when activated by U.V. Influence. (Think Amorall after two weeks in the sun) I recently bought an Ollie elite used (02/10/2022) from a guy that neglected to clean and care for the exterior finish (gel coat) and had it stored outside in Albuquerque N.M. The finish had a good bit of oxidation on the upper end sections. The gel coat was slightly yellow and not reflective at all (moderate oxidation). I chose to do a 4 stage polish restoration on these two areas , 3 stage on the upper sides and a 2 stage on the lower tub portion of ol’ Boondock. I use a dual action orbital polisher from Harbor freight (@$100) combined with the foam polishing pads in the specified cutting abrasives and the Maguire cut, polish and wax in their respected levels of abrasion for cut and polish. It is important to match the pad and polish cut levels. All of these items can be purchased at Harbor freight. The complete works for a 4 stage polish will cost about $300.00 . A 1 time detail (polish and wax, no cutting) for your Ollie by a competent detailer will run you $400-800 if they are any good and experienced. A 4 stage polish on an 18’ trailer takes 2 full days, a 2 stage ,1 full day. Ask yourself how much you would charge for your two days of experienced, dirty, manual labor. I’m only stating my experience here. If you disagree, tell your life mate, not me. Maintaining expensive, shiny things is expensive and time consuming. The maintenance part of acquiring and maintaining these things “comes with the dinner”. have a great day, B5 points
-
We had an annual service at Oliver in December 2021. It included checking and recaulking up on the roof, greasing the chassis, repacking the bearings, a full flush and descaling of the water systems and water heater. This required a full day and at least half of a second day. I suggest contacting Oliver Service for full details and pricing as I believe the cost for this has increased. We do grease our suspension every 3000 miles. I do this myself, it is pretty easy. I would recommend a 45 degree attachment for your grease gun. Much easier with the 45 degree elbow. Hope this helps. We were happy with service. We camped at Oliver the night before the service and night after service. We arranged this through Oliver too!4 points
-
No worries Mike, hopefullyI'm replacing your slot in line with the Casita my friend bought from me. 😉3 points
-
Duh!☹️ Lets also throw in a plug for Mirna (Foy's wife and all around nice person).🥰3 points
-
Not to mention the fine craftsmanship of Oliver owner Foy Sperring and all his fine wood products for Olivers! Mike3 points
-
We'll be covering over 12,000 miles this summer. I figure that with all that is going on in the world, to delay our Canada/Alaska trip may result in a lost opportunity... forever. My recommendation is that if you have the means to do so, roll your Ollie's this summer and do that trip while we still can.3 points
-
I drove to Tallahassee yesterday and left the Oliver at Vinnies Northbay. They are going to put the ceramic coating on it and I will pick it up after working the tornado relief in Dawson City, Kentucky next week. The process takes about 3 days.2 points
-
Our door lock started to act up, it would beep and try to unlock, but it didn't, the fix was replace the batteries, they didn't have enough power to throw the lock lever. When in doubt, it's usually the batteries on most batteries operated items. trainman2 points
-
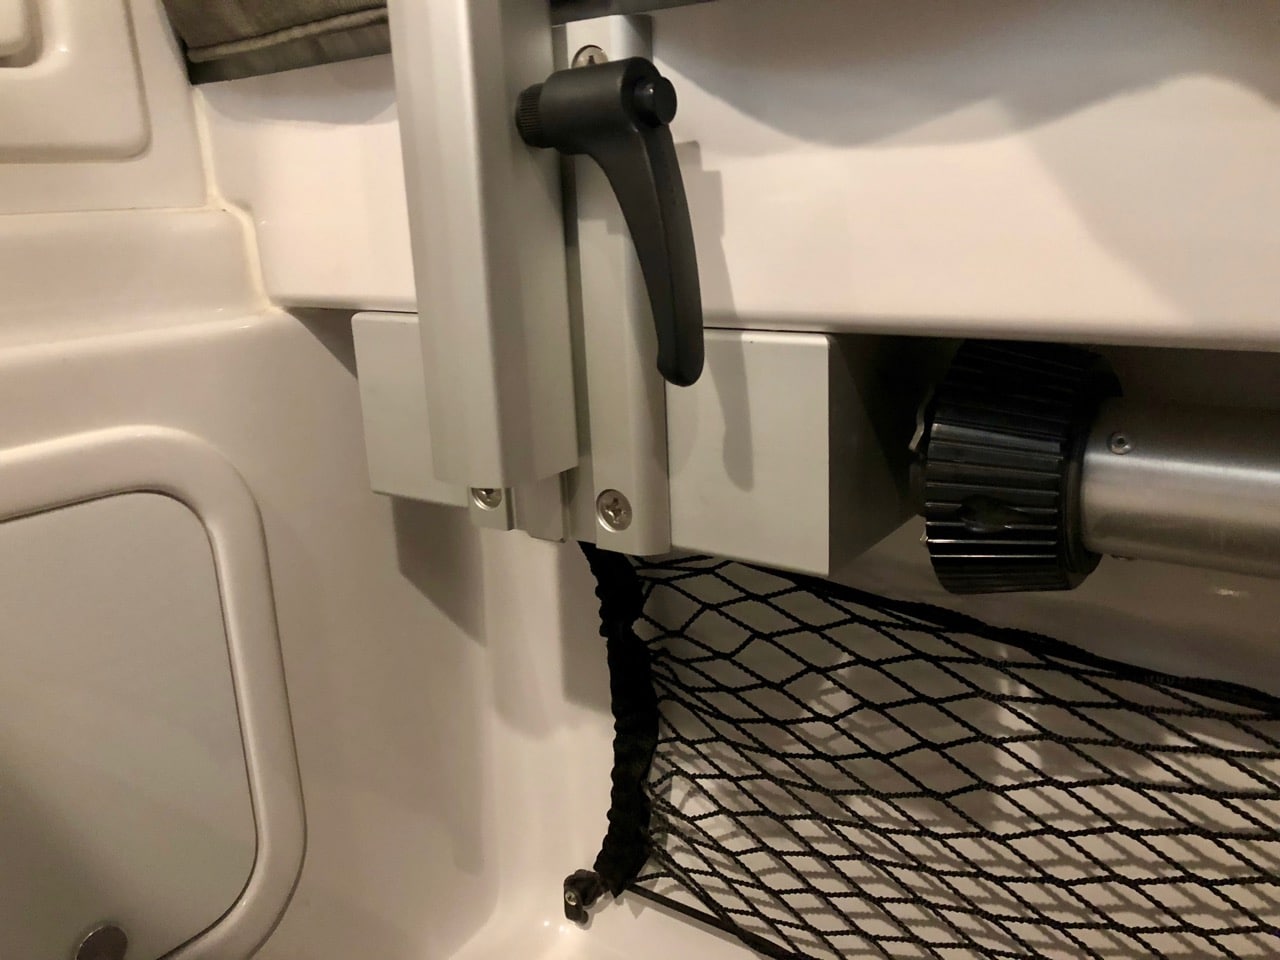
I can't recall where I found this, or I would post a link, Here are some screen captures. I have been using these stainless crimp rings for years, and removal was always a pain, though less so than for the copper ones, but when I saw this tool, I had to have one. Picked up at Lowes for $30: Here is the full pdf. John Davies Spokane WA 1082707744_ApolloPEXInstallationManual0422.pdf
2 points
-
I've slowly converted everything in our house to rechargeable. And now I am doing the same with the Ollie, wherever possible. I keep a charger and a bunch of spare rechargeables on board.2 points
-
The RVLock is supposed to give a warning tone when the batteries need to be replaced. Problem is, the lock gets flakey before this warning happens.2 points
-
Garmin makes a nice small one that easily connects to the mirror in late model Fords (and other vehicle brands too). A couple of years ago after doing a bunch of reviews (as JD suggests) and watching a bunch more YouTube videos, I bought a front and rear dash cam that went by the trade name of Apeman. As a friend of mine suggested - perhaps that alone is why I bought it? However, I'd like to think that it had a ton of features, allowed for about a 320 degree view, all at 1080p and the price (on sale) was under $140. Since this camera will give me a warning if it has recorded something that I should see - it does this automatically in the event of an accident, movement or noise even if the vehicle is not on (parked) and/or I'm not in it. Of course it also records constantly while I'm driving. Whatever you decide to buy, be sure to get a large data card for it (I've got a 128 gig card and some newer cameras will take an even larger card). Virtually all of these cameras record to the data card until they are full and then simply start to overwrite the oldest data. My camera does this except that it will not overwrite anything that has been saved due to an "event" - either identified on its own or by me. Happy shopping! Bill2 points
-
We have used a VAVA dash cam with 1080P for years, but you'd need to be more specific in what you expect beyond resolution before others can answer wisely. Charlie.2 points
-
I'm using two blocks of wood that I had for the last 45 years, still work great. trainman2 points
-
Followup, here is the access panel in place. And yes, the drawers still close 😉 John Davies Spokane WA
2 points
-
We have had a number of "vendors" as members here in the past. Off the top of my head there is/was Andersen, MicroAir, and the fellow that produced the laser cut plastic protection plate for the Dometic fridges (Tractors1). Frankly, I wish that all of the Oliver vendors would be on the Forum so that we had direct access to help via this platform when we need it and/or to get questions answered. I too am looking forward to seeing ScubaRx's #50. Bill2 points
-
We did speak with Oliver and were encouraged and given permission to make a post on the forum, there have also been quite a few people that have encouraged us to make a post here as well to reach the audience that isn't on Facebook. I hope I'm not intruding on anyone or breaking any guidelines.2 points
-
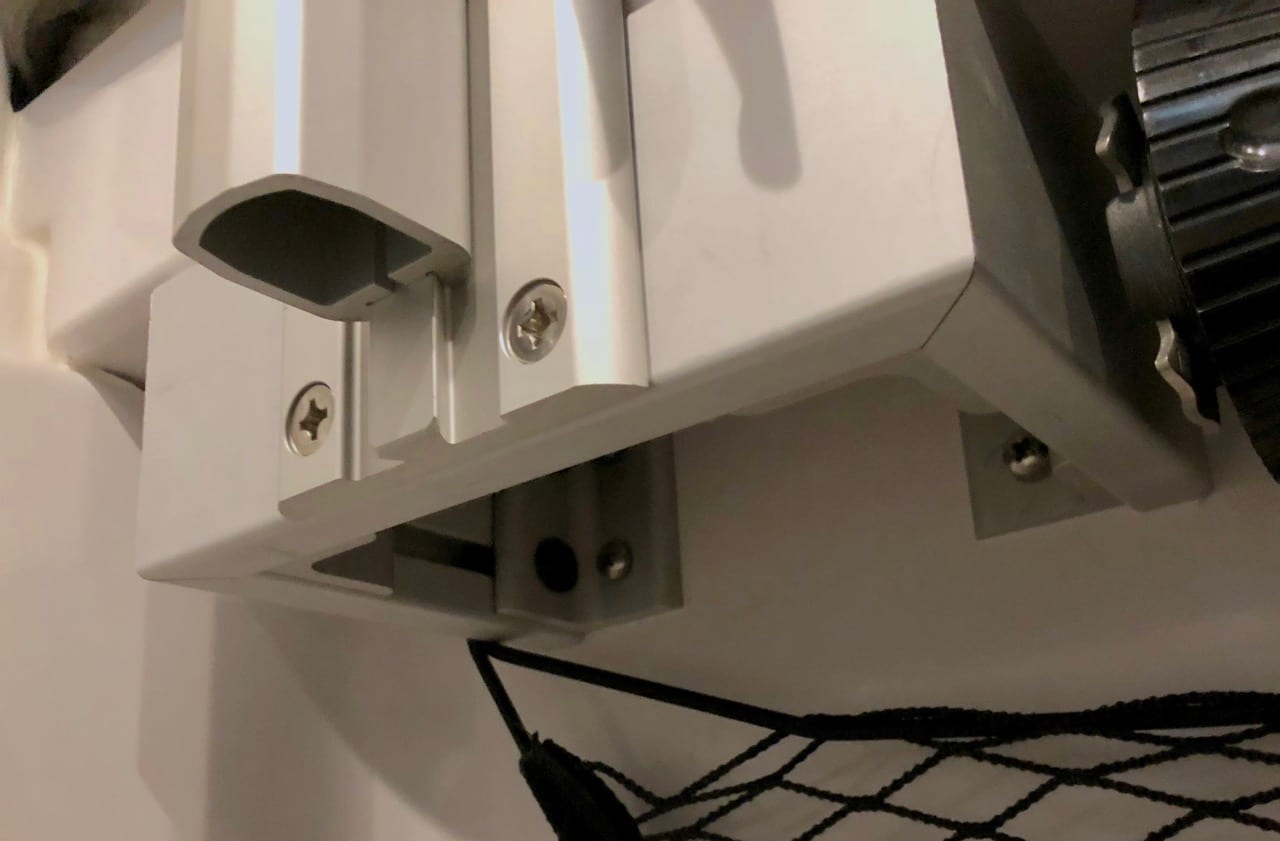
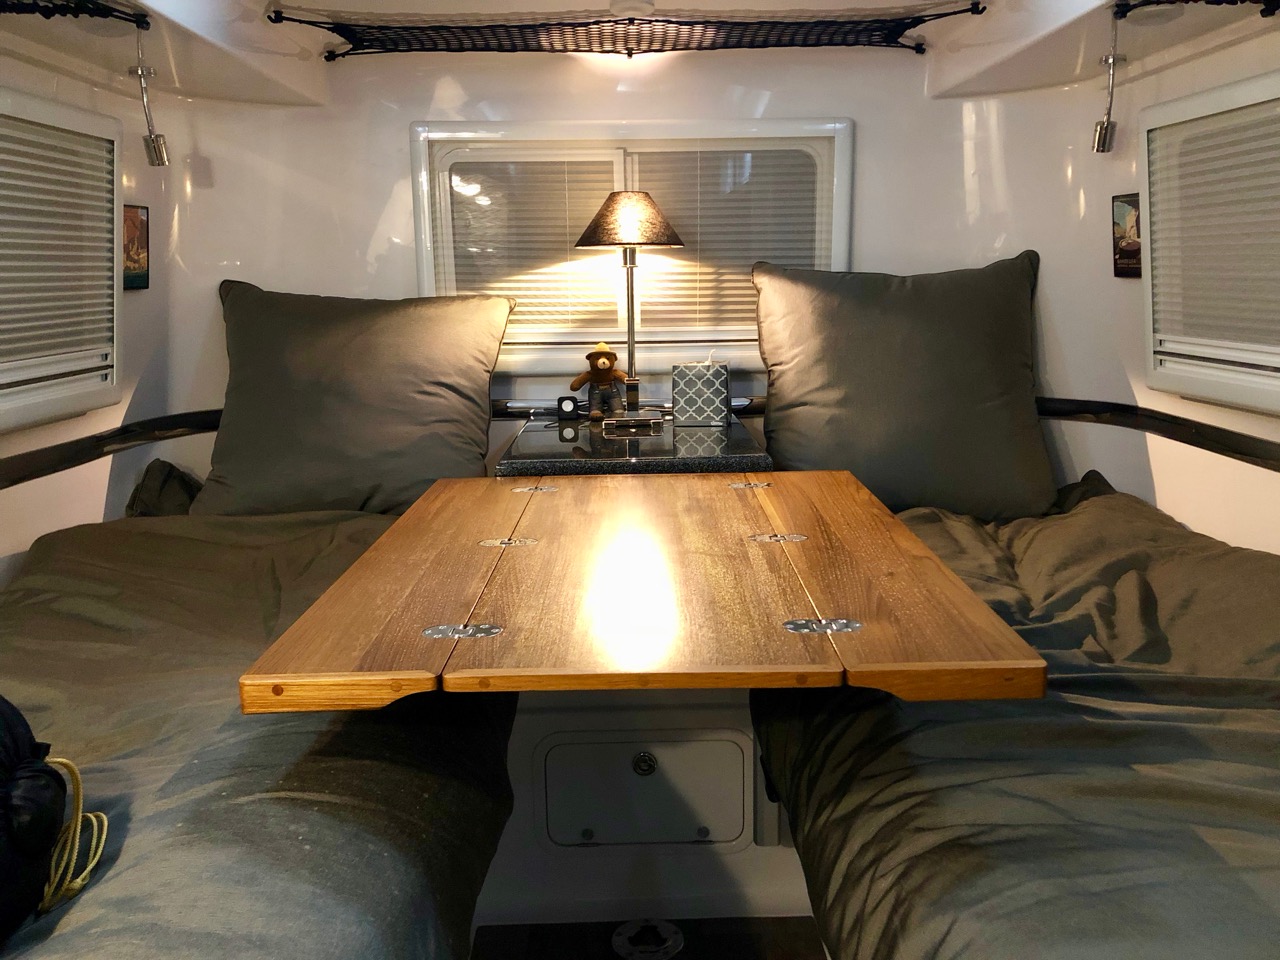
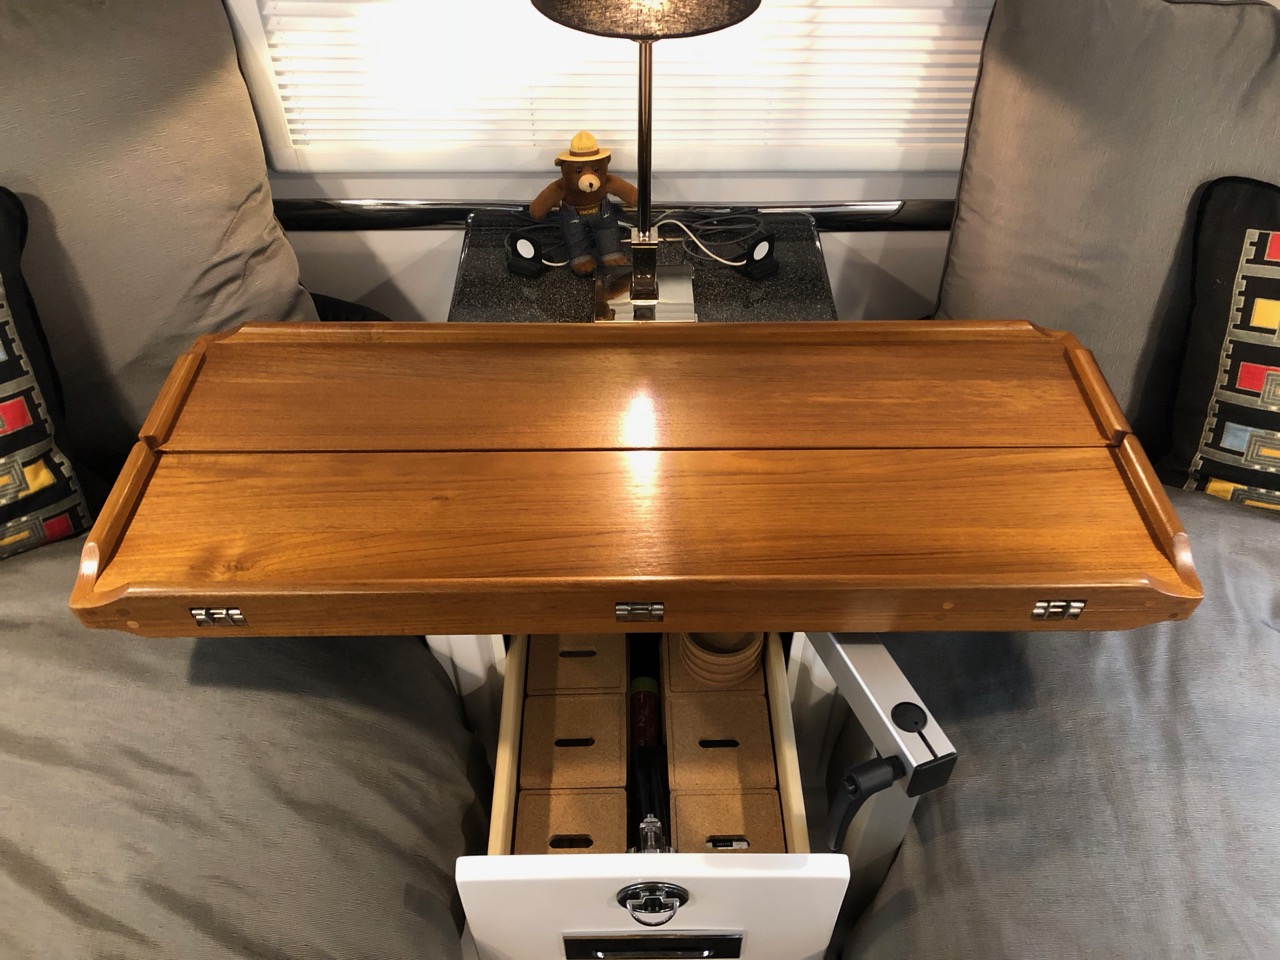
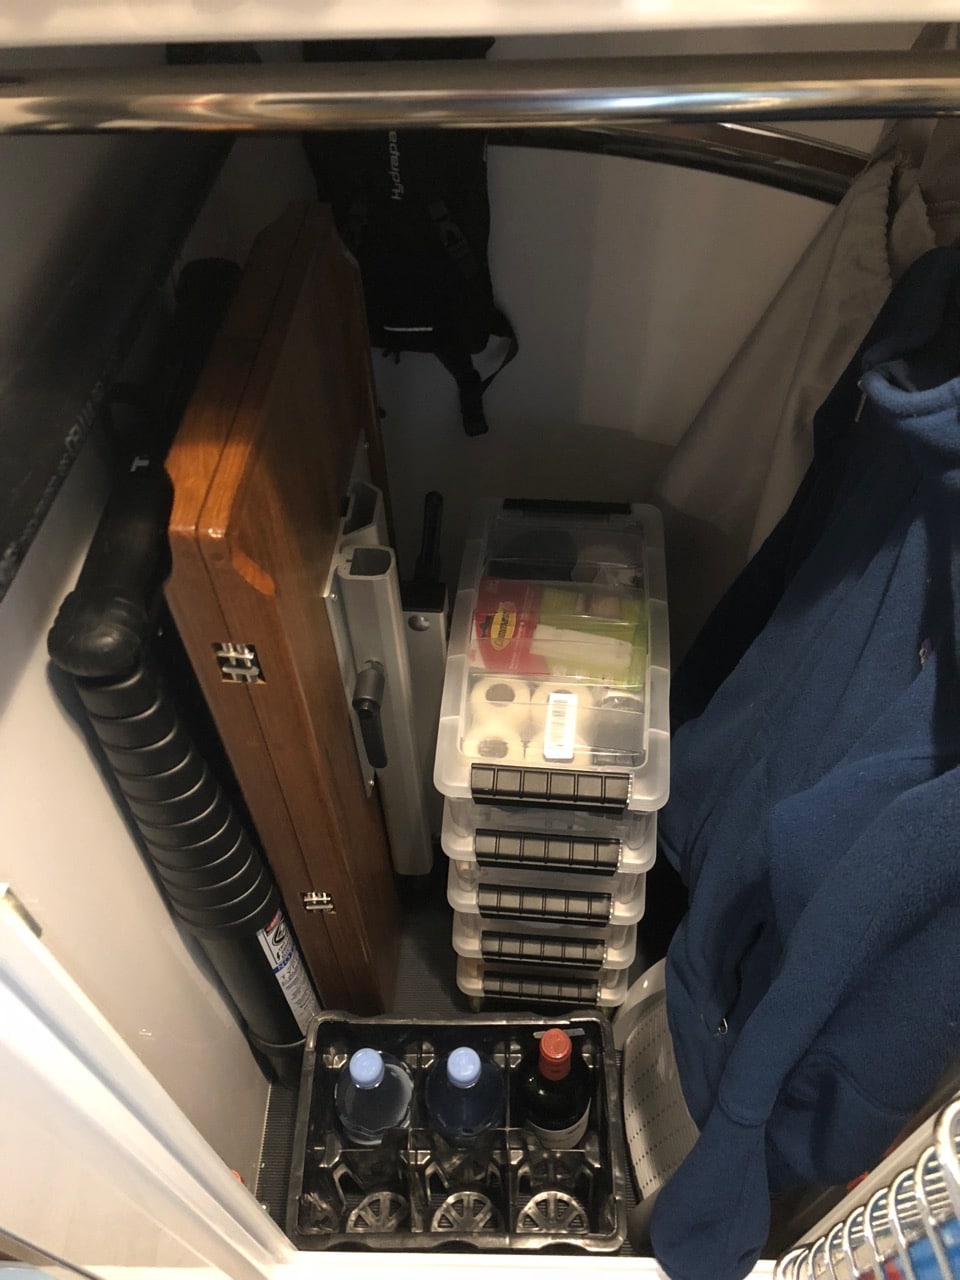
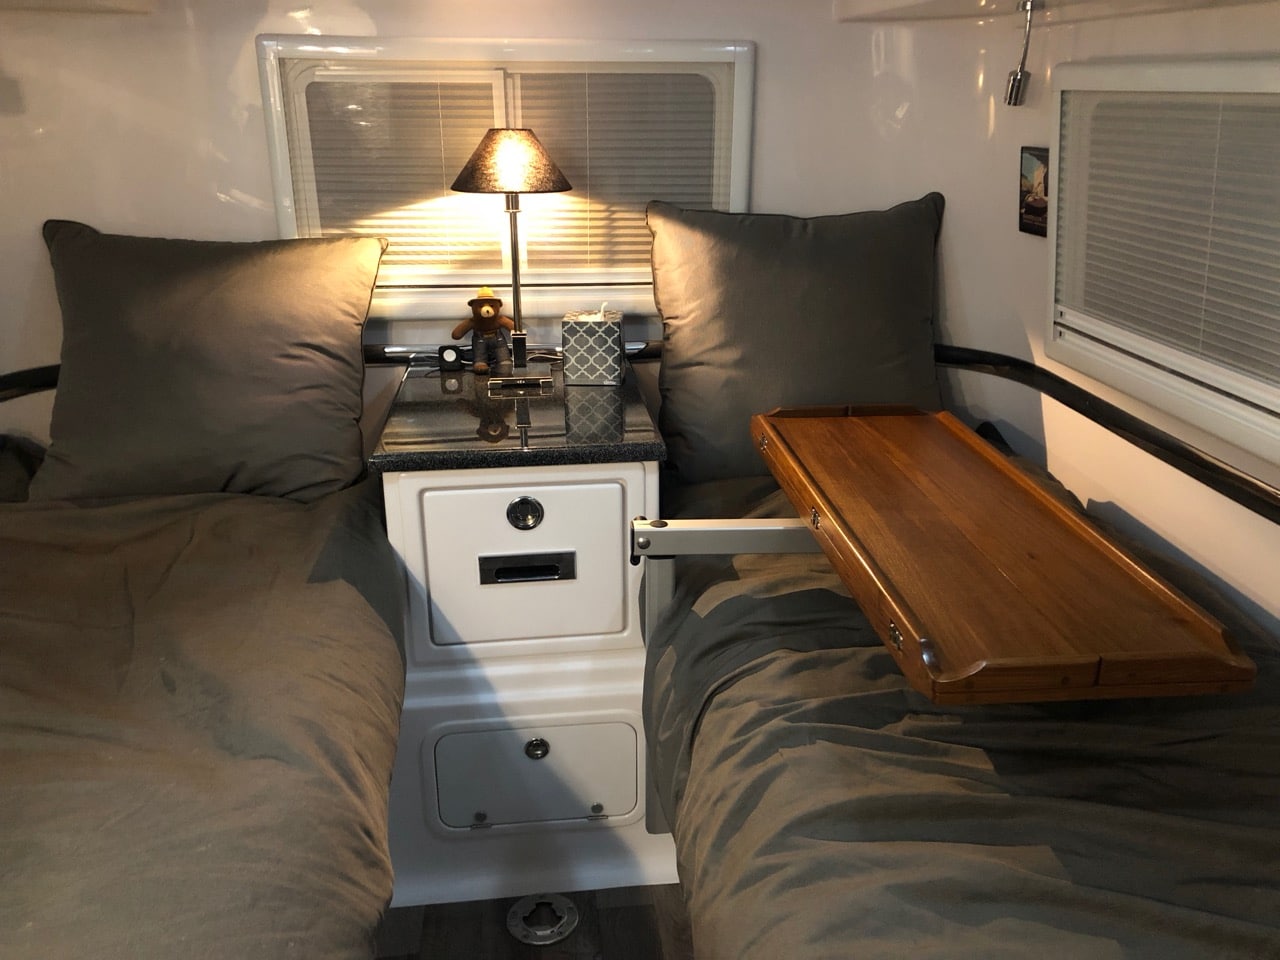
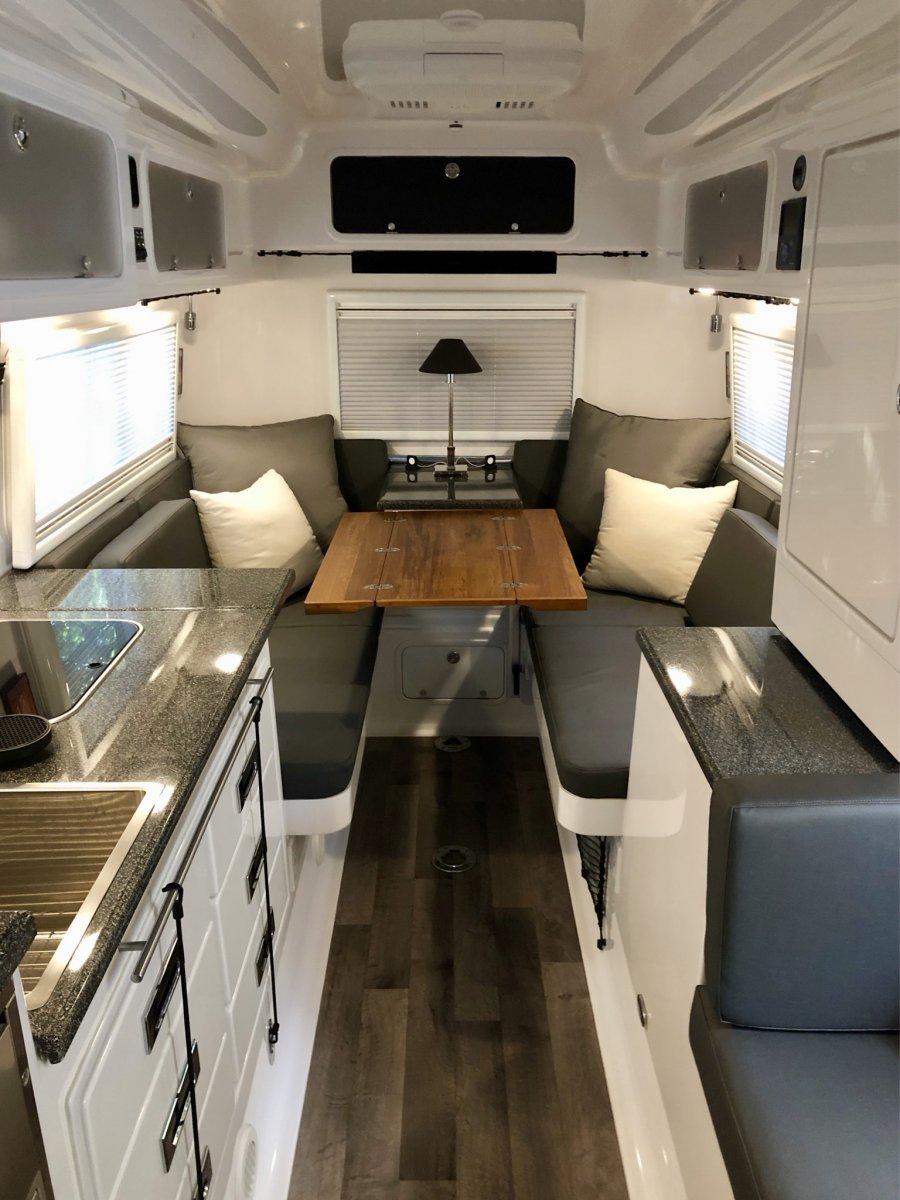
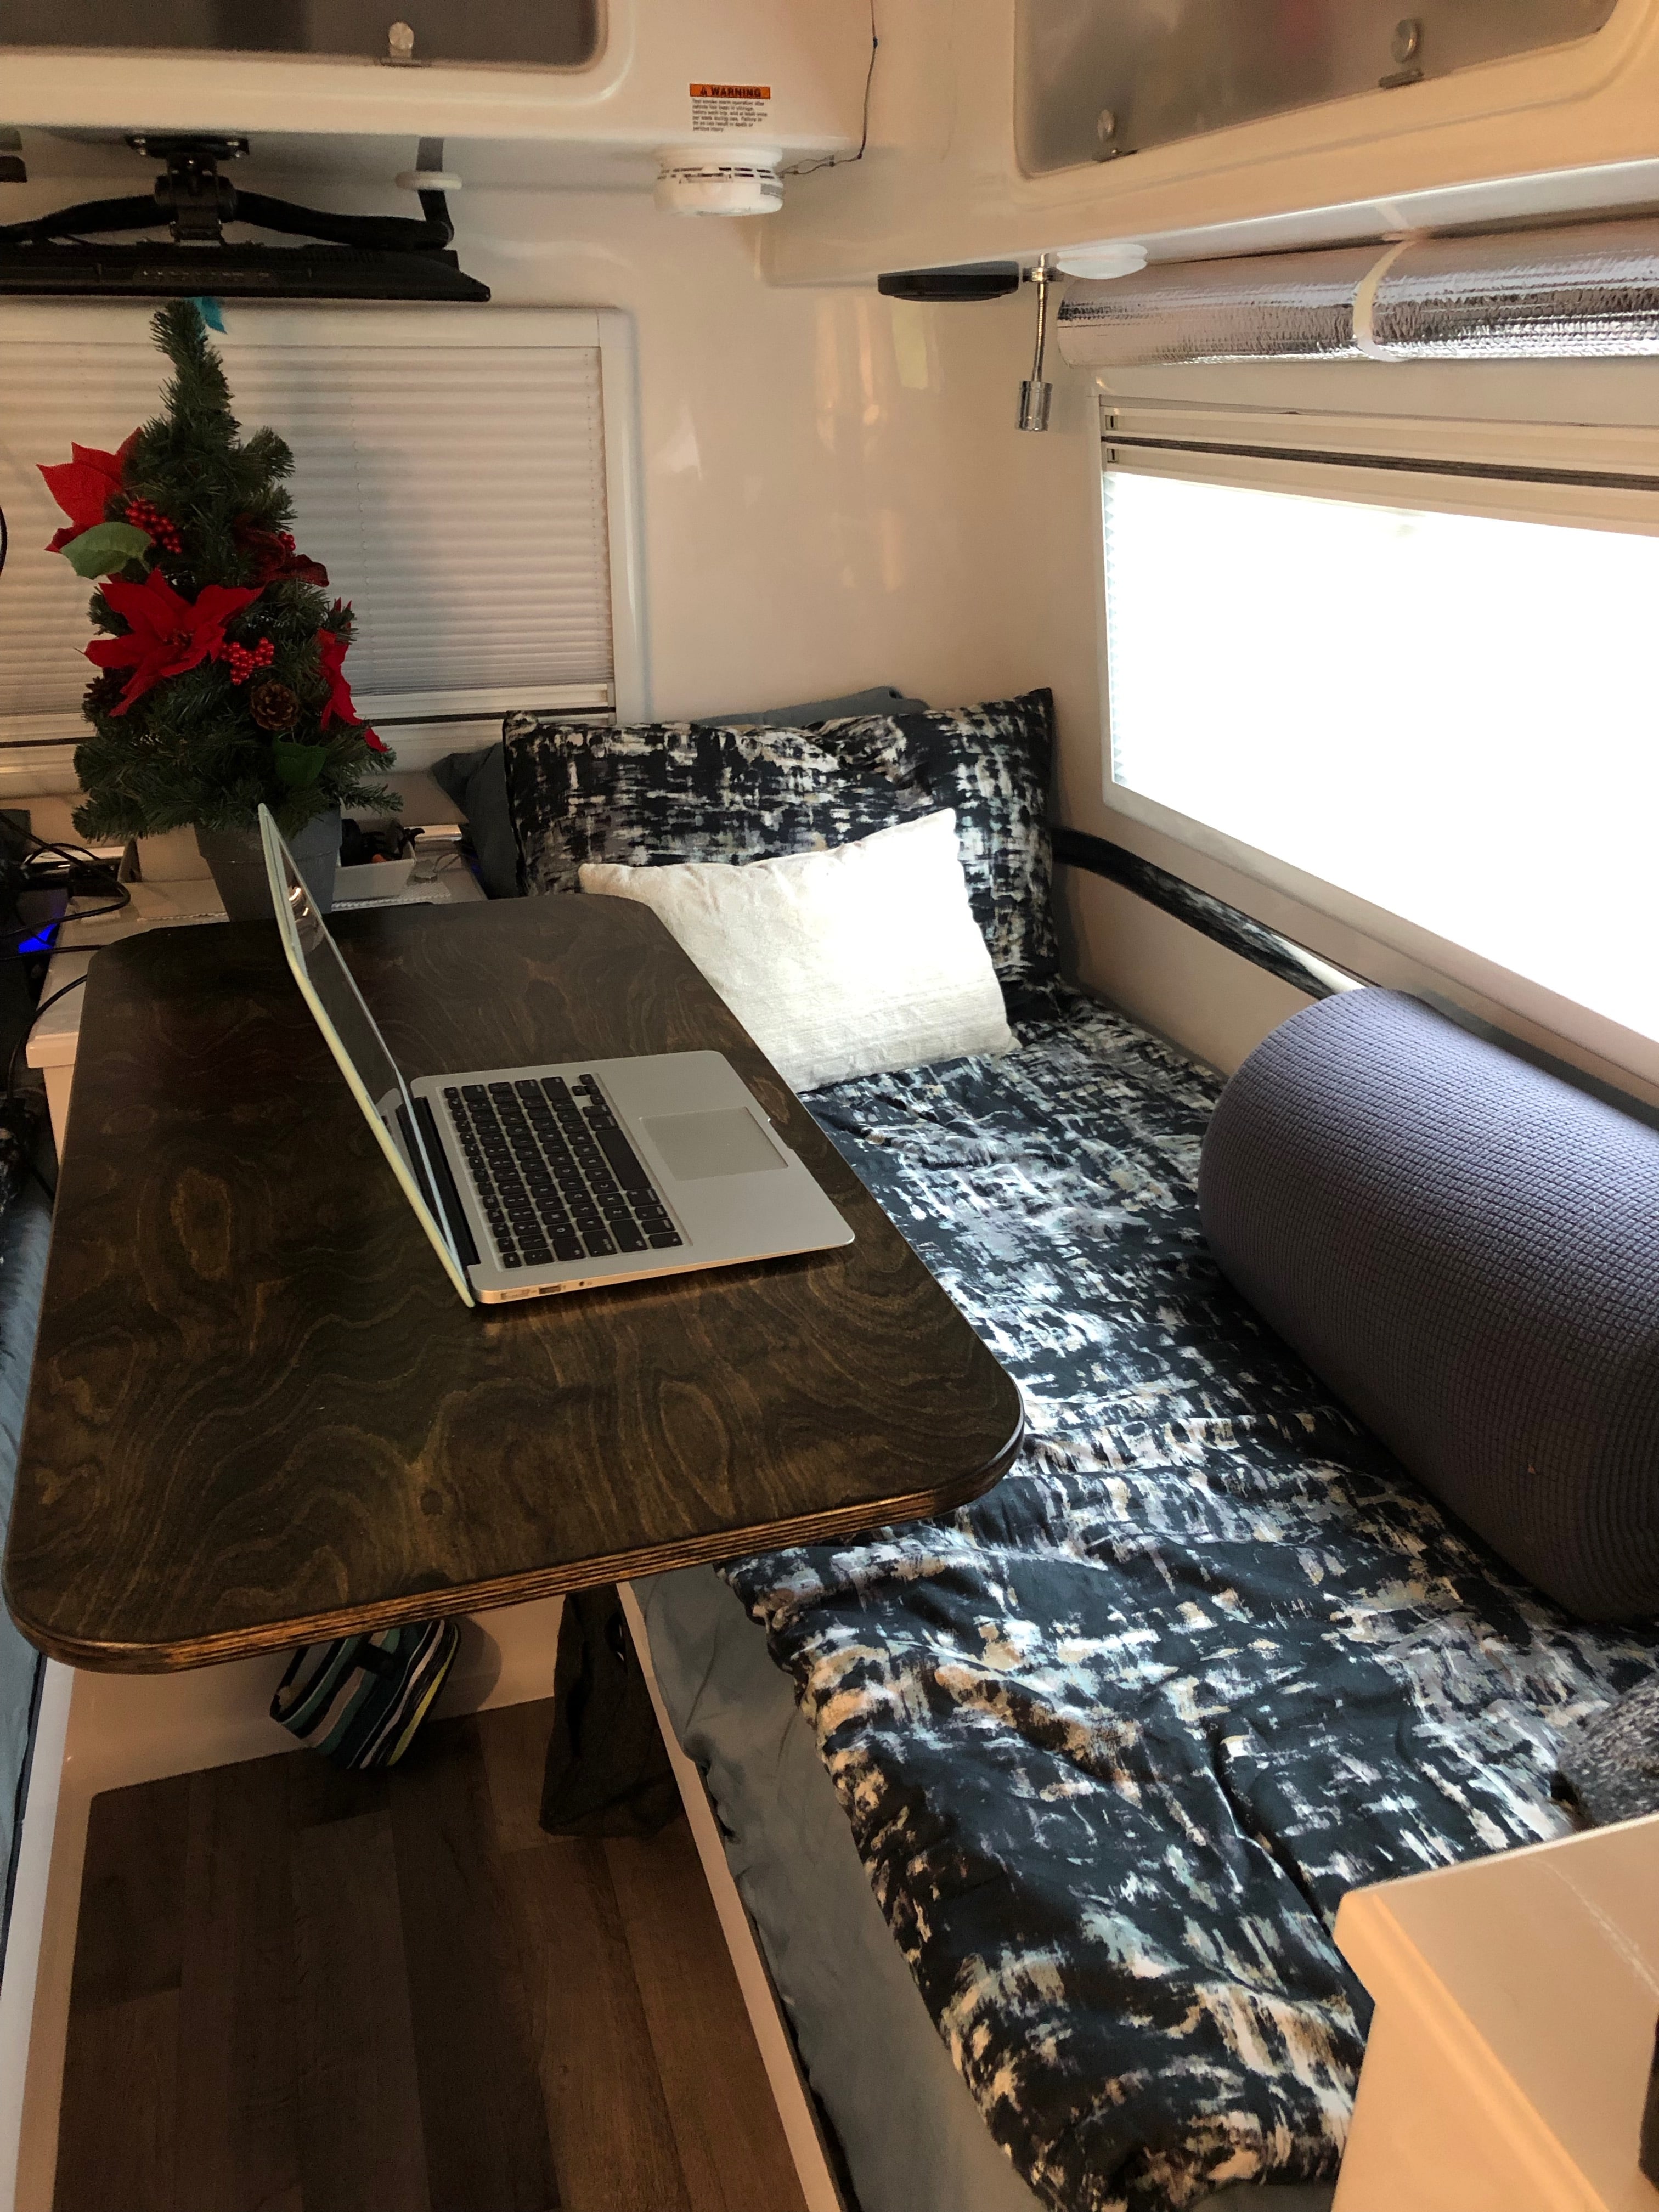
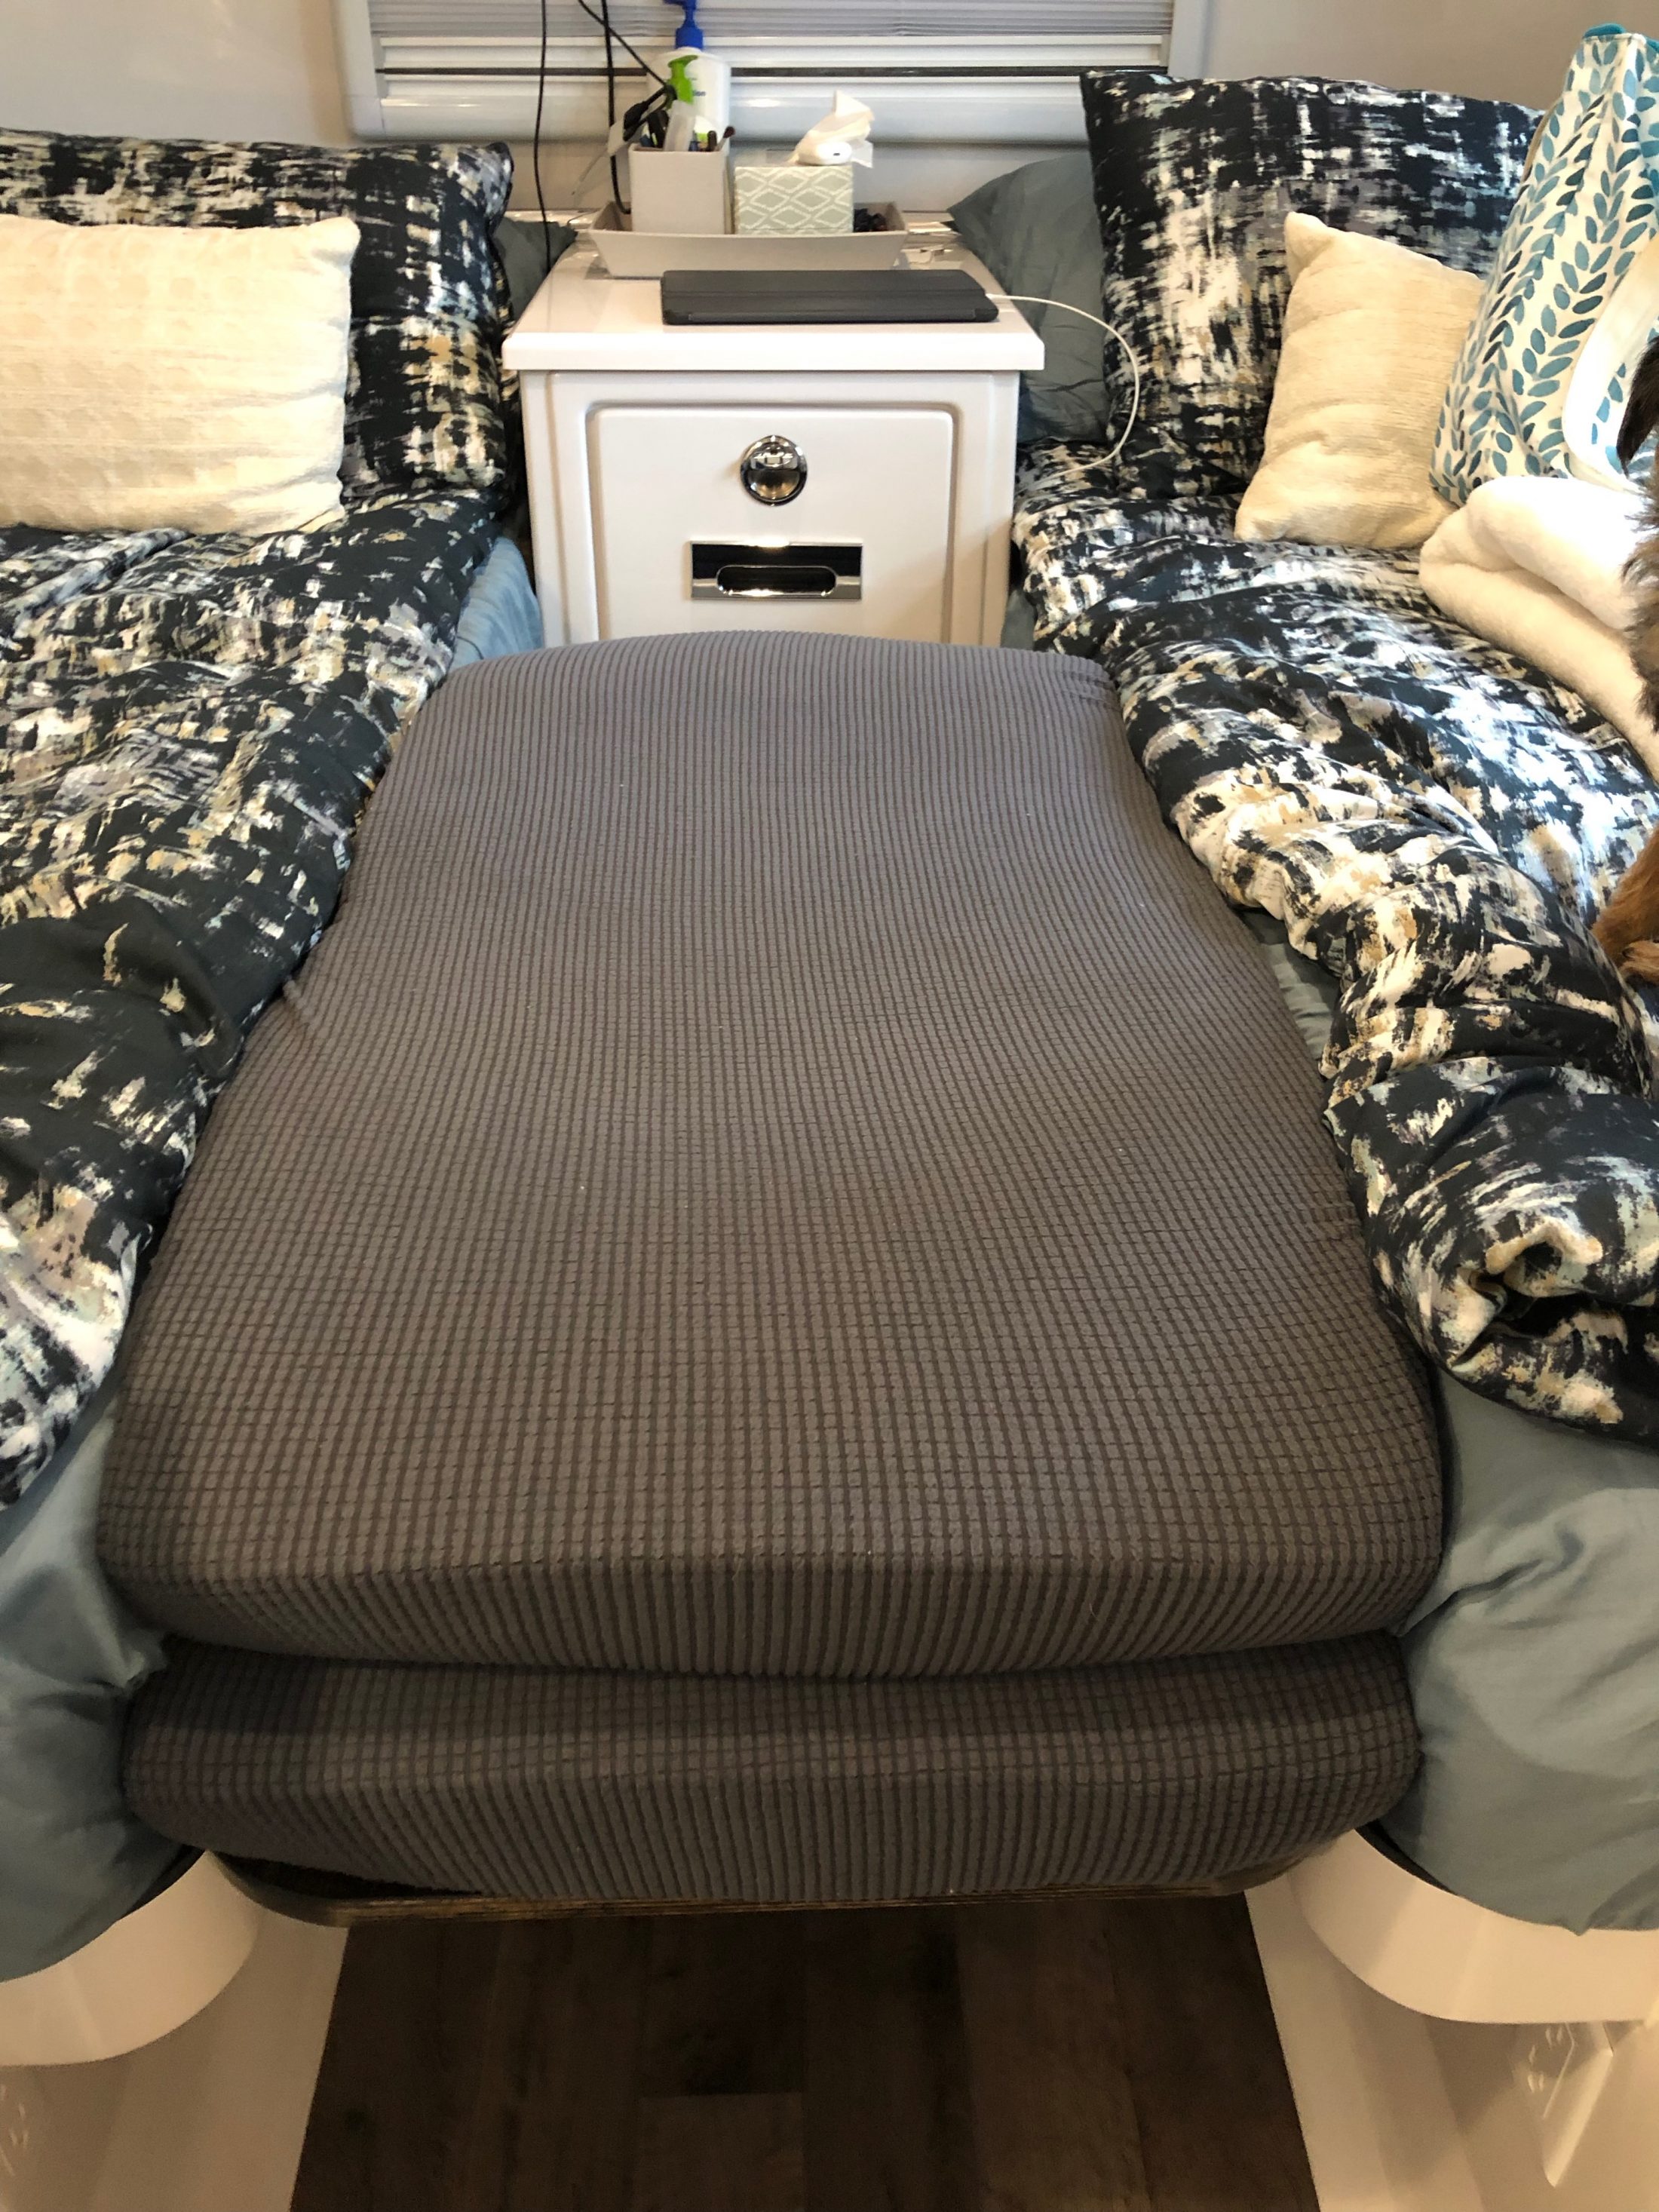
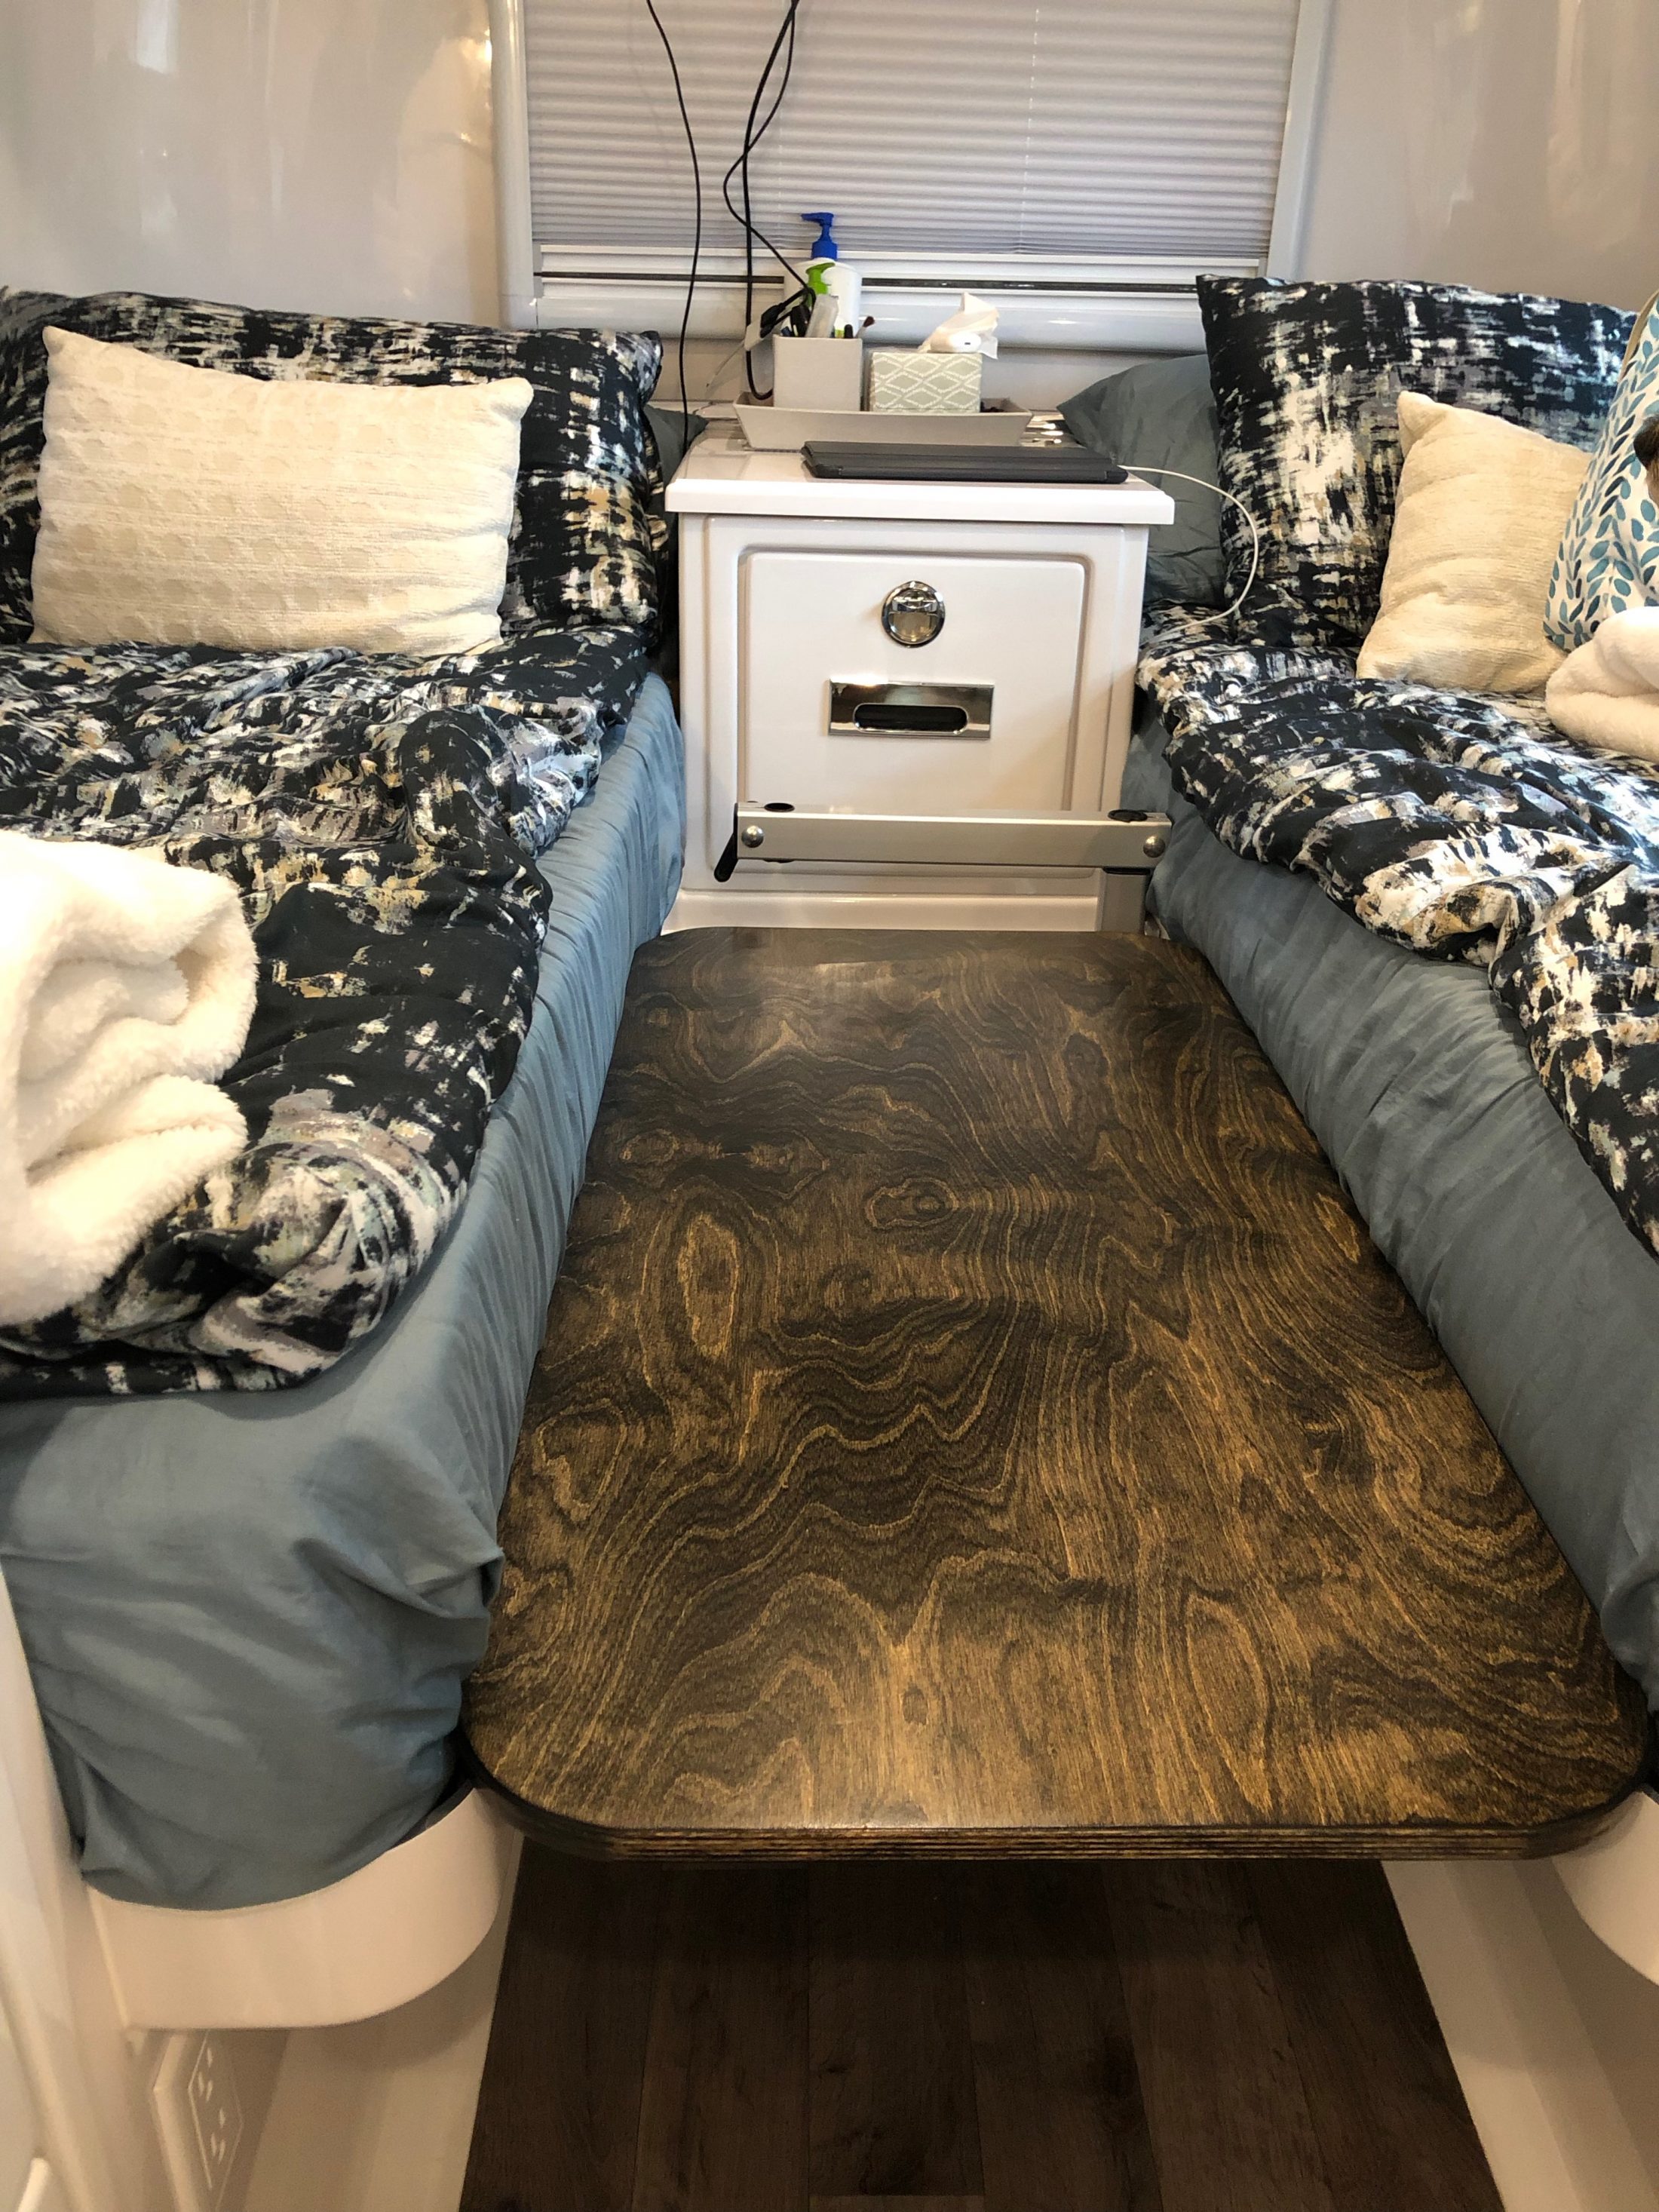
I think like a lot of Elite II buyers, we were torn between the twin beds vs the king. We chose the twin, but not so much for the size or comfort of the beds as it was the utility of nightstand and easy access to the overhead compartments. But we liked the idea of having a table and a large lounging area in the back, and so I set my mind on the idea of trying to have both. At first I designed a custom table for the back that would latch into the nightstand in the back with a pole in front, similar to how the dinette table works. I showed it to Oliver and they thought they'd give it a try, but as time went on and things got delayed or forgotten, I sort of gave up on that idea and asked if they would just sell me the standard table top and legs and I would figure it out. They did, and it was a big mistake since I could never figure it out. The table was just too heavy and bulky to put up and take down, and there was absolutely no place to store it. Plus the height with the standard legs was too short for the mattresses we had (another poor decision on my part). So on our first trip it was labeled the Albatross Table and it was just in the way the whole time. It didn't make another trip, just the two mounts screwed to the floor to remind me that not every problem has a solution. But the solution does exist in the Lagun table. I'd seen them before in the king bed model but I had sort of dismissed them as being too small to be of use. But that was before @rideadeuce started this topic about their upgraded table top. Their top was much larger, foldable, and just generally nicer looking than what I'd seen before; and so it clicked with me that with the Lagun mount, we could have a foldable table that could easily be stored or moved out of the way for access to the upper storage. Also the height could be whatever we wanted and unlike the table we had, could be quickly locked for travel. There were just two problems for us - the mount in it's normal location would block the nightstand drawer; and on top of that, we had opted for an access hatch to the basement right in that same spot where the Lagun is usually bolted to the hull. I needed a way to mount the table to the side somehow. So I made one of these - This contraption is made out of 15 Series extrusion from 80/20. I cut, mitered, and erector setted this little block and associated connectors to go beneath the bed overhang. The Lagun mounting plate (the vertical piece) bolts to the mount and then the whole thing gets bolted to the side wall under the bed in four places and to the bed overhang in four places. It looks complicated but if you have a miter saw and can play with Legos, you can build it. Here are some pics of the block in place so you can see how it mounts. The top two bolts on the Lagun plate bolt into the side of the bed extension, then there are two bolts on the block that secure vertically into the base of the extension, then another four bolts that go into the side wall of the base of the bed, opposite the basement. I marked and drilled for the two vertical holes first, then temporarily bolted it in place to mark all the other holes. You need to do this since not all of the surfaces are perpendicular to the trailer or one another. But the flat bottom of the bed extension runs parallel to the floor so if you use that as your starting point then the table top will end up parallel to the floor as well. The end result is extremely solid - The table top I chose is the 35" Nautic Sail top from Marine Teak. Look around on their site and you'll find a number of styles and sizes, any of which would be a great choice. (This is the same company as this one, btw, but they have more choices in table tops on their UK site.) I debated oiling it, but came to my senses and coated it in a couple layers of low gloss poly. Taking it apart to seal is no problem, but you do have to keep track of a number of shims that go under the hinges to make them flush to the wood. So here's the final result. I really like the versatility of the top. Use it folded, unfolded, bar height, table height, sideways, lengthways, stick it over the bed for travel or to get it out of the way, or...however. With the mounting plate where it is, we can raise the table hight enough to clear the nightstand and lower it enough that it sits on the bed locked in place for travel. As you can see, the drawer clears just fine. The table will work best once we have our cushions made to replace the mattresses, but we just did a quick weekend trip with it and it works well even as it is. And best of all, it fits in the closet -
1 point
-
Just a quick note for those interested in the lithium platinum package, which we have on our 2022 Ollie. We took our maiden voyage in VellOllie this week, about 4.5-5 hours from home. Because I knew we would have an electrical hookup at our campsite, I decided to run the regrigerator on DC for the entire trip down. We started at 100% battery, according to the Lithionics app, and ended at.....99% battery on one, 100% on the other. It was sunny the entire trip, which helps of course. On the return, we ended at 99% and 98%, and were in cloudy conditions for the entire drive. I'd say that's pretty good performance, and have confidence in running the fridge on DC while traveling, even when I know we won't have electrical hookups at our final destination. Pretty cool...and part of why we went with the biggest solar/battery package we could get.1 point
-
We just bought 2 of these. One forward viewing in the TV and one that fits nicely in the rear window of the Ollie (plugged into the USB port on the ceiling). I can't view live video from the cab of the TV, but that's fine. It will auto record events if something happens.1 point
-
Yeah, that’s the recommended solution posted on the other forums, or going with the internal sensors inside the tire. Either way, a significant bit of cost and downtime to upgrade all 4 wheels. Very mixed feelings at the moment about continuing to use the sensors with the rubber valve stems and risking catastrophic rapid leak(s) if one or more of the valve stems fail, or removing the sensors and going without the TPMS system for now and risking an unmonitored tire leak. TireTraker manual does say metal stems are “recommended” but not required.
1 point
-
In fairness to the manufacturer of the pump, I was full timing for 2+ years and cooked and washed dishes nearly every night in a hard water area. I'm sure I blew through the typical mean-time-between-failures. I'm actually very curious to see what it looks like inside.1 point
-
Yeah, the Oliver is a battery black hole. Television remote, radio/DVD remote, MaxAir fan remote, power awning remote, awning wind sensor, electric door lock, door lock remote fobs, smoke/CO alarm, tire pressure sensors, plus my flashlights and battery camp lanterns. I carry quite a few spares of batteries in various sizes to keep up.1 point
-
Nan, Can't wait to hear about the results!1 point
-
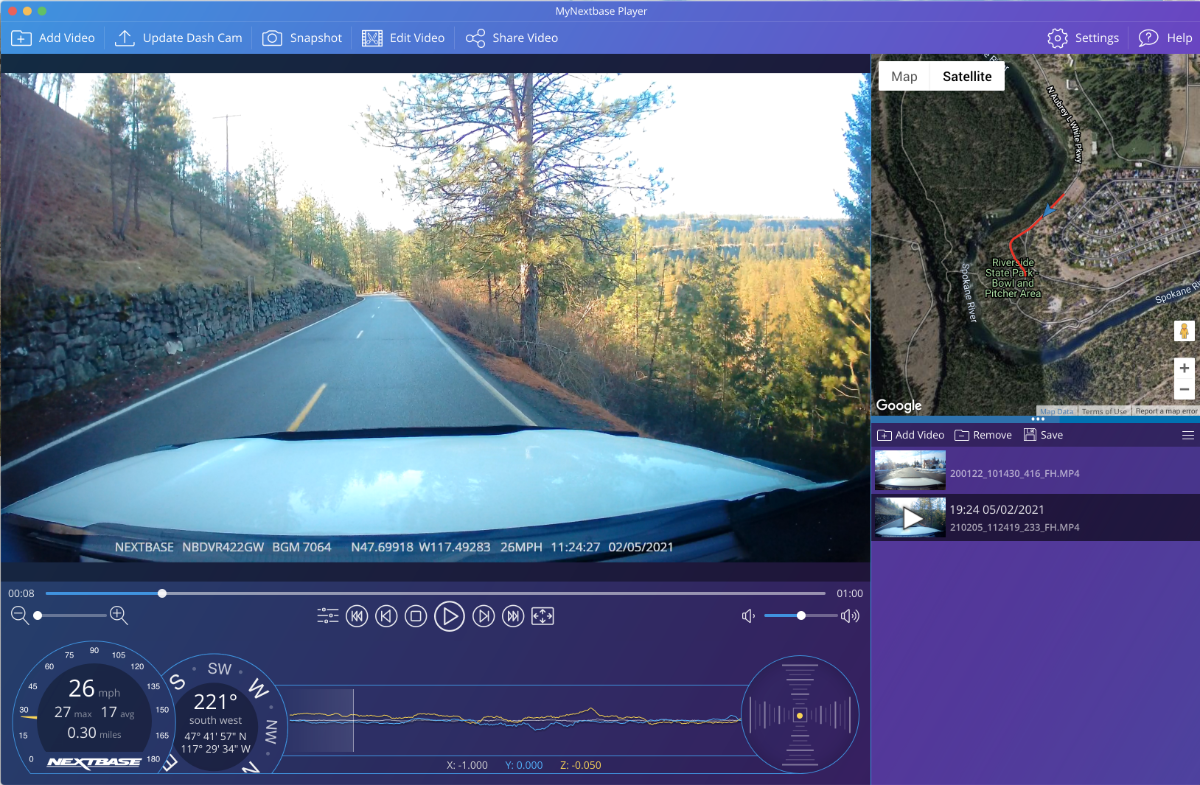
You need to read some dash cam comparison reviews, and decide how much you want to spend and what features you would like. Where and how you park your car is important too! This would be a good choice, I have had one on my TV for three years and just bought a hard wire kit for my wife's new Acura RDX, so I can swap it easily to her car. I will probably buy another cam for that car when they are on sale. https://www.amazon.com/Nextbase-522GW-Dash-Cam-Kit/dp/B07PV2RX57?th=1 Nextbase 522GW price history You need enough image quality to read license plates at NIGHT, and a polarizing filter to cut glare in sunlight. Everything else, like rear view cams, are optional features. I really like how this cam captures all the speed, location and G force info, and can overlay it onto a Google map. This is a screen cap of a video using their desktop application. I have to admit that I feel naked and unprotected driving without one. 😉 John Davies Spokane WA
1 point
-
Very true! Also be very aware that there are many fake/ counterfeit/ expired ones for sale, if the price is too good, they are suspect. I try to be ones fresh off the rack at a box store, or from a non-Amazon vendor. John Davies Spokane WA1 point
-
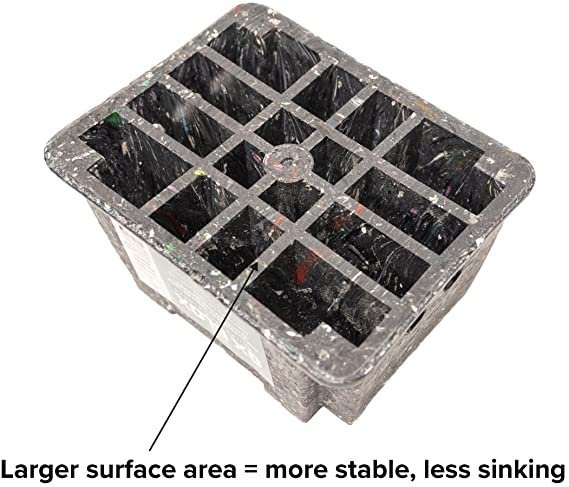
Weighs 9#
1 point
-
1 point
-
Yes, in my case.1 point
-
I’ve done this too. Pretty easy! thanks for the advice!1 point
-
Yep, Ralph is almost a neighbor! He texted me that you would be here but…. Colorado is calling! We’re in Tennessee often so that is our best option. See you at the rally! Mike1 point
-
@Chukarhunter sounds like a plan, worth a shot and should be a quick and easy investigation. I will say this thus far I've seen no corrosion at all on any of the wiring throughout the camper. Thanks1 point
-
I believe Ralph mentioned you guys lived fairly close to him. I'm sad we will miss you in Texas, but we are super excited to see your guys at the rally!1 point
-
As I've said many times, the wrong tools in the hands of inexperienced people can cause more problems than they solve. We have 40+ years in maintaining fiberglass boats and trailers. I always look to practical sailor for guidance and new tested and vetted products. I'm sure you are very careful in reading directions, and proper use, as we are. Not everyone is, which is why, I suspect, @dewdev issued his warning. The article you referenced was for heavily oxidized (read neglected) hulls. Compounds and a power buffer are a strong combo. It needs to be done properly, carefully, and only when necessary, as you said, @Jim_Oker1 point
-
If you can see the point and can reach it with something like a small disposable paintbrush you can paint some of the dish soap plus water on the area and if there's a leak you'll almost certainly see bubbles appearing fairly quickly there, and they will keep appearing even if you brush them away so long as the area stays wet.1 point
-
No impact to travel. Potential increase in Ramen purchases. 🤣1 point
-
It concerns me... but I'm at least blessed enough financially to be able to afford to travel despite the increased fuel charges. So I'm just ball parking some numbers here, but if I get about 14MPG and use somewhere in the neighborhood of 165 gallons on that 2300 mile trip it means that it's going to cost me another $165 each way (round trip it's $330) MORE than fuel was just a year ago. The last time we traveled extensively it was spring of 2022... we were in a tear-drop camper and because of it... we tended to almost exclusively go to KOA's for the shower/bath house facilities... and pay anywhere from $45 ~70 per night depending on the locale. Why? We needed those nicer facilities because we didn't have them in our little tear-drop. Now when we get in our Ollie... we expect to be staying in state parks, Core of Engineers, maybe a even a few Harvest Hosts or even the occasional Cracker-docking (love that word!). We even expect to stay at least a few times on BLM. All told, even considering the higher cost of fuel (say $500 more).... we will easily save that now that we can choose places that I might not have wanted to stay in before. All that and we are going to be obscenely comfortable in our new Ollie! And let's not even talk about all the great campsites that will be opened up to us going forward. The other off-set is that our house is going to be virtually shut off while we are gone. Typically our travels have taken us out for 6 weeks or so at a time but when we leave this time... there is no telling when we are going to make it home again! 🙂 So we are going to enjoy life while we can and be grateful to God for every day we get! And no looking back! I'm also reminded of how fortunate we are in this country to only have to worry a bit about the current cost of fuel.1 point
-
We took delivery of our Elite II on March 4. Visited the Oliver facility and met with some great people who helped us with documentation and with the delivery tour. Tour and explanations of how things work were pretty straight forward with no major hiccups. Stayed at Olivers campsite for two nights so we were hands on. Left the facility on Sunday for Nashville for 2 nights. After this we were pretty confident that we could be on our own. Called tech support once, confused for the orientation of the valves - normal, boondocking. The technician was great explaining the difference between the two. Our route took us to 6 HH locations (by the way best investment we ever made )met with some great hosts from wineries, distilleries, organic farms. Great people to meet and talk to. All HH sites ( with the exception of one ) offered no electricity or water which was no issue for us. Used the central heat for 9 days and consumed the first propane tank which is not bad at all. On March 11 and 12 while in NC, we experienced a snow blizzard with temperatures down to 7 degrees. Our truck and the Ollie were covered with snow and ice, however we were very comfortable inside and nothing froze. I was concerned about the outside shower but luckily I did not flush the antifreeze on delivery date. After this we headed south GA, AL, FL , MS , LA and returned back home late last week. Had many curious visitors inquiring about the trailer, most unaware of the name, some pretty disgusted with their own complaining about the particle board roof and tarp, floors and overall the low quality craftsmanship of the rigs that they currently own. I saw some folks bring their own level to make sure their rig was level. Towing the trailer was a dream and especially easy on road construction sites. Overall we averaged 13.3 MPG taking in consideration the NC steep grades - some 4 degrees up and down and driving against strong head winds for 4 days. Solar option works really great - did not choose the Lithium battery option - but sufficient for lights, microwave, instapot, radio, etc.Just 4-5 hours of sunlight was enough to fully charge the batteries and I think that we can stretch the battery reserve for 2-3 days with no sun. The convection oven was a no no with solar. Only complaint we have is the roof AC, very noisy, uncomfortable. Another great feature is the black tank flush port. Before we arrived home we stayed in a RV park, drained both tanks and flushed black with fresh water. Overall it was a great first trip and already started planning the second and third.1 point
-
My solution back from my trucking days was simple, i set my CB antenna (mounted to my mirror bracket) to about 2 inches taller than my trailer and adjusted the height whenever I changed trailers. I'd slow down and if the antenna hit then I knew I had less then 2 inches clearance (or possibly none!). I hadn't thought about it recently, but it wouldn't be difficult to mount some type of "measuring stick" to the truck to accomplish the same thing. That said, I've not seen many overpasses or tunnels that are less than 10 feet so my backup plan has always been to open the driver's door, with the vehicle in gear and my foot hovering over the brake, I stand in the open doorway while watching the top of the trailer and if it looks like it's going to hit I jam on the break (which in the old days resulted in stalling the truck but sparing an accident). Even if it has enough clearance if you hit a bump in the tunnel or under the bridge, it could cause the trailer to jump high enough to crunch the roof so it's always better to creep through those places slowly and like you said, it generally results in testing "sphinter control."1 point
-
I figure that my solar panel “curb feeler” will save the hull itself. So, maybe $5,000 to repair that? As long as it doesn't wipe off the air conditioner too. I have a 14 foot tall door on my RV bay, the first year that I had the Ollie, I used to just raise the door part way, to save wear and tear on the door springs. It worked great until the time I misjudged the height. As I was pulling forward the front of the hull caught the bottom edge of the door and trashed two full panels. I backed up and unhitched and kicked the door more or less into shape so I could close it again. The overhead door guy was unimpressed. He has seen everything. The repair was around $800, if I recall correctly. I think my wife was not amused. The Ollie damage was confined to the sewer waste cap, which ended up on the floor, and some light scuffing on the gelcoat. Cost of that repair was less than $5. Ollies are tough, as long as you stop in time (as soon as you hear that horrible SCRIIIIIITCH!) Now I always raise the door to its full height. Back when I used to ride bikes and carry them on the roof of my car, I would tie a bright orange surveyors tape flag on the garage door, to remind me to not drive in yet. That worked well. John Davies Spokane WA1 point
-
Being a former big rig driver, I was taught that YOU are responsible for the clearance, regardless of the signs. Experience showed me that those measurements are typically the low points, whether to the side of the bridge or within the tunnel. However, don't assume that they update the signs when they've done road maintenance (like resurfacing). I have seen signs under my 13-6 that I determined I had plenty of room (but was sweating bullets nonetheless) and bridges it said I'd clear, but I wouldn't try. Consider getting a retractable pole and mark the max height of the trailer on it. Stop and poke around when in doubt...60, 75, 85 grand is a big personal gamble! Safe journies.1 point
-
Posted height is supposed to be the minimum, so it would be directly over the edge of the pavement. Look for damaged concrete from truckers who ignored that😬. For a two lane tunnel I don’t worry much, I just shift over to the middle a little. Here is one from Colorado National Monument: Those single lane low ceiling round tunnels are another thing entirely, they can be butt clenching, pardon the allusion. John Davies Spokane WA
1 point
-
We have seen curved tunnels with signs that specify the heights at both the edges and the center.1 point
-
Glad you got it fixed. I too have had "issues" with my audio system from time to time - once every two years or so. I suspect that the "computer" chip(s) that run the thing gets "confused" and finds itself in a loop. In any case, a system reset - paperclip into the small hole on the front that is marked "reset" normally does the trick. Bill1 point
-
When we had mattresses, it did just feel like sitting on the bed, so it was ok but not perfect. Once we swapped out our mattresses for cushions, however, that changed and it feels like true sitting area. It’s a little tight on the street side for two, since the leg of the table takes up some space, but it works. The curb side is fine for two. So I’d say it’s perfect for two or three, a little cozy for four, and doesn’t work at all for five or more. We haven’t tried it, but I don’t see why you couldn’t use a camp chair in the aisle for someone, so long as the chair is tall enough. Heres a photo of how it looks now with the cushions:
1 point
-
I am hoping enough people keep posting about adding the Lagun table on the side and Oliver makes it a option. I have seen some beautiful craftsmanship added to the Lagun set up. Very nice!1 point
-
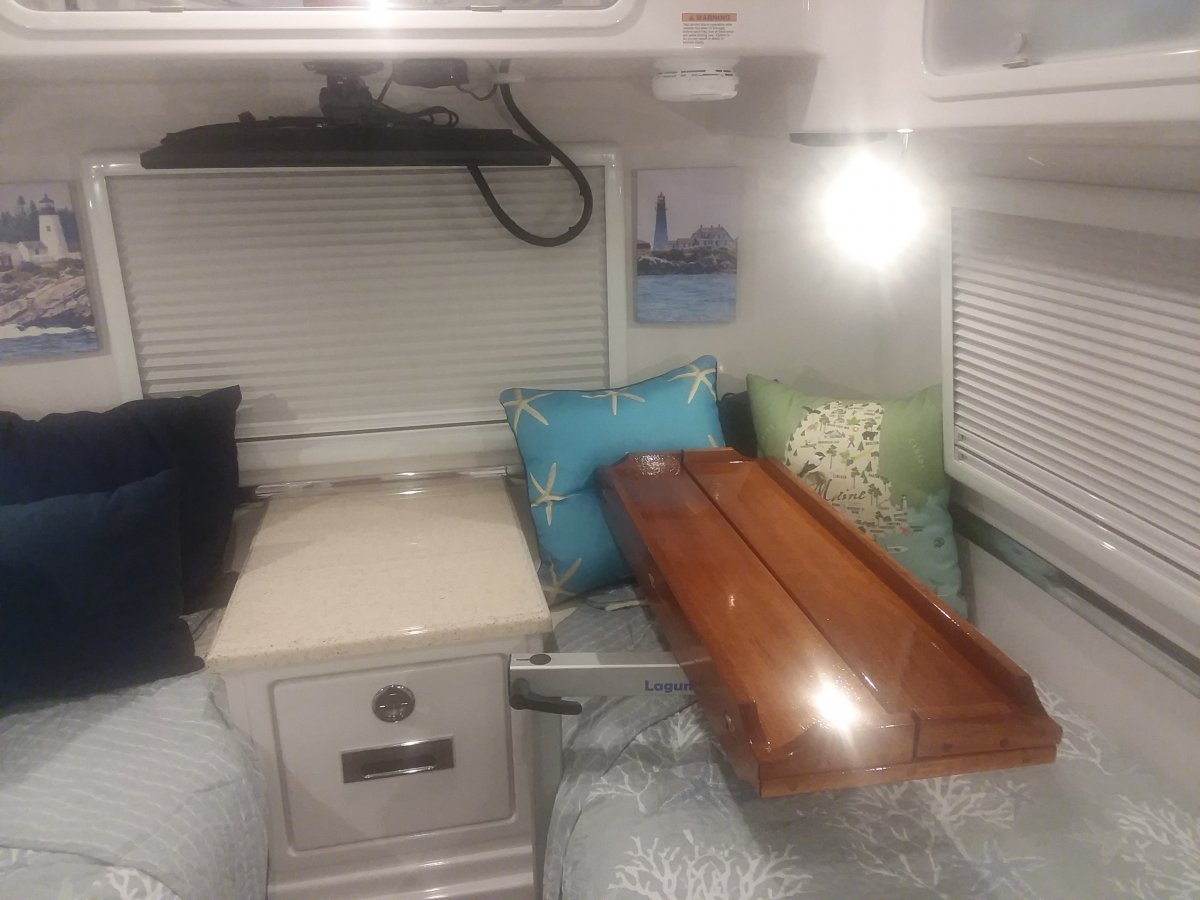
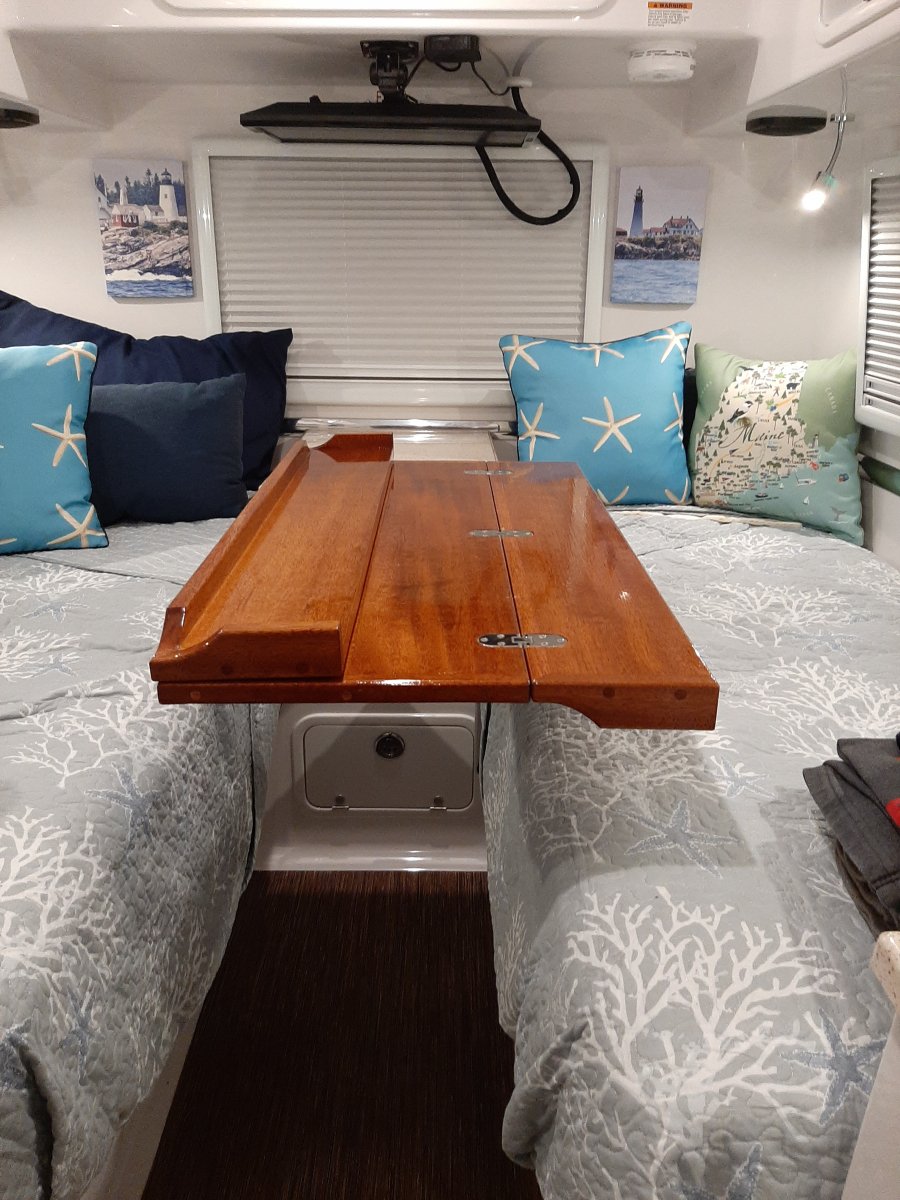
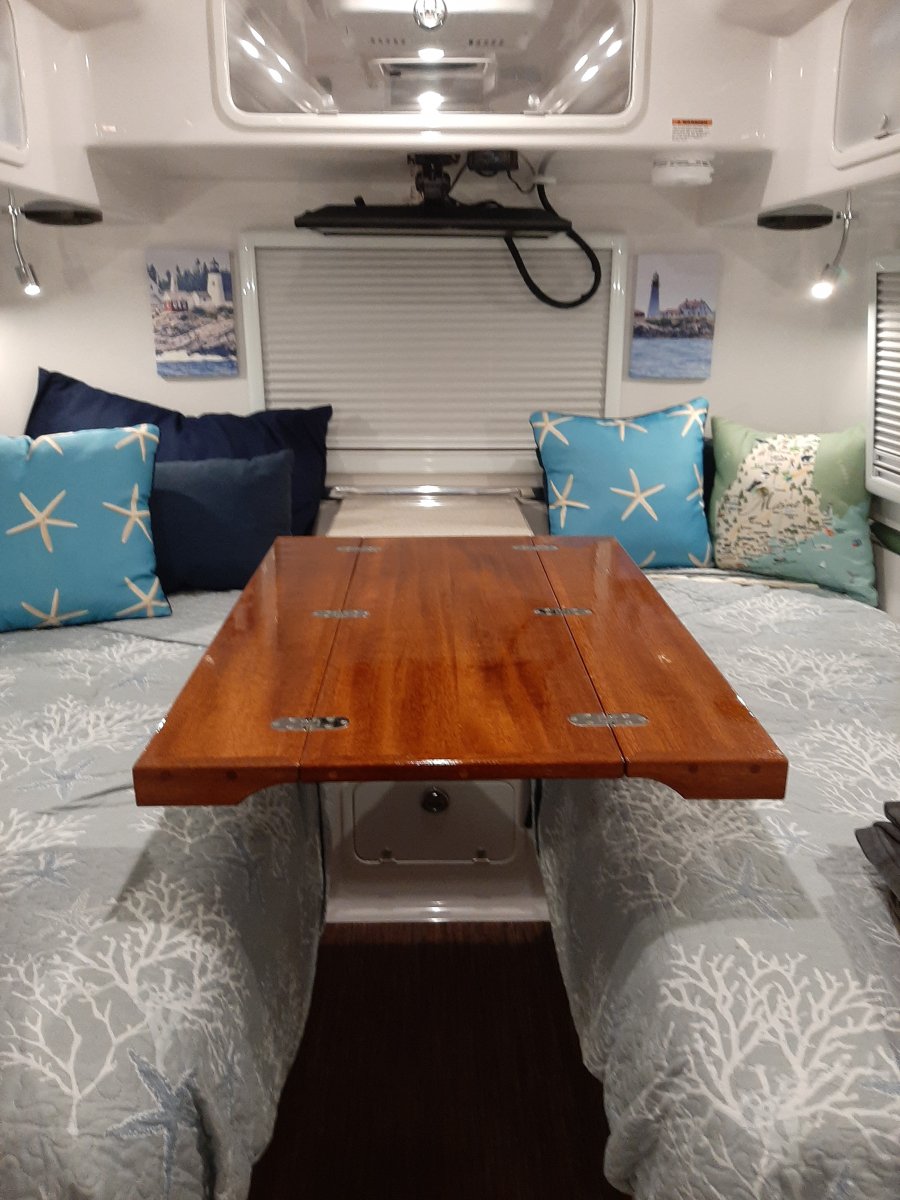
Here are some photos. When we travel we fold up the top and lower it on top of the bed and tighten up the adjustments. I surround the top with bed pillows incase vibration loosens the adjusters. That has not happened. We have the table set up all of the time. Overland did a great job with this. Thanks for sharing. Our custom table is a little bit narrower than Overland's. We mocked up the size we wanted using cardboard.
1 point
-
Well it's time for us to weigh in on this mod. With inspiration from overland we went ahead and made a similar retrofit in our Oliver, with a twist. We now have a table/desk as well as a twin bed bridge. I give the complete details here on our website.
1 point
-
Jamie Dupuis at his best.1 point


.thumb.JPG.dd838cdb3df463dab6a16861fa23a319.JPG)


-
Recent Achievements
-


")


")


")


