Leaderboard


Popular Content
Showing content with the highest reputation on 06/08/2023 in all areas
-
After a few situations that forced me to do a deeper dive into our Oliver electrical systems, I'm learning rule #1 is "TRUST your Progressive Industries EMS!" I have on 2 or three occasions, when the inverter just isn't coming on "like usual"... and stumbling around trying to find which of my three Oliver manuals has the list of error codes for the EMS... I've decided to type it up and post it right next to the EMS read out (in my 2022, it's in the rear storage bin on the right). Having those Error Codes, along with their definitions conveniently available... can go a long ways to discovering the root of the problem and fixing it quickly. If you like, I've attached the List of Error Codes and their meaning on a Word file below. It's typed exactly as the Progressive Industries owners manual says it. Maybe someone else will find it handy? Error Codes .docx BUT WAIT! There is more! If you act now... I will include the steps you need to take if you accidentally put your Truma On Demand water heater into "clean mode". These steps are found no where in the Truma owners manual provided by Oliver... and were supplied to me by someone whose name I have lost... but in a remote campground in Vermont... they saved us from taking cold showers for the remainder of our trip! accidently put the Truma into Cleaning Mode.docx6 points
-
Same situation on my 2021 LE2. I like the effect the upper and lower exterior lights give but never ever use them due to the issue of having a single switch for both sides. Instead I just use my LED awning light for a porch light. Would love to have a electrical diagram before cutting into wiring to install new switches to control left/right, upper/lower exterior lights uniquely. Let us know if you have success in obtaining a more current electrical diagram so those of us who want to correct this design can do so with confidence.5 points
-
The outside courtesy/belly lights on our 2022 are the same as the porch lights, one switch for both sides. Which gives me an idea: maybe you could swap some wires around so one of those switches is the left porch and left belly and the other switch is the right porch and right belly? Would be better than the current setup. Currently, if we want light on only one side of the trailer, we use the awning light (which is also pretty bright).5 points
-
Here’s the Truma document in PDF format. I keep a copy on my iPhone in the Books app, along with PDFs for all of the Oliver manuals, other component & accessory manuals, etc. That way I have them available even if I’m somewhere with no cell or Wi-Fi connection AquaGo stuck in clean mode.pdf4 points
-
We've skipped the cream many times because we didn't have any - it's still yummy.3 points
-
We spoke to phil from Oliver at the rally and he has also brought this to attention to his superiors. He has no idea why they switched it on the newer trailers but he gets a lot of complaints about it.3 points
-
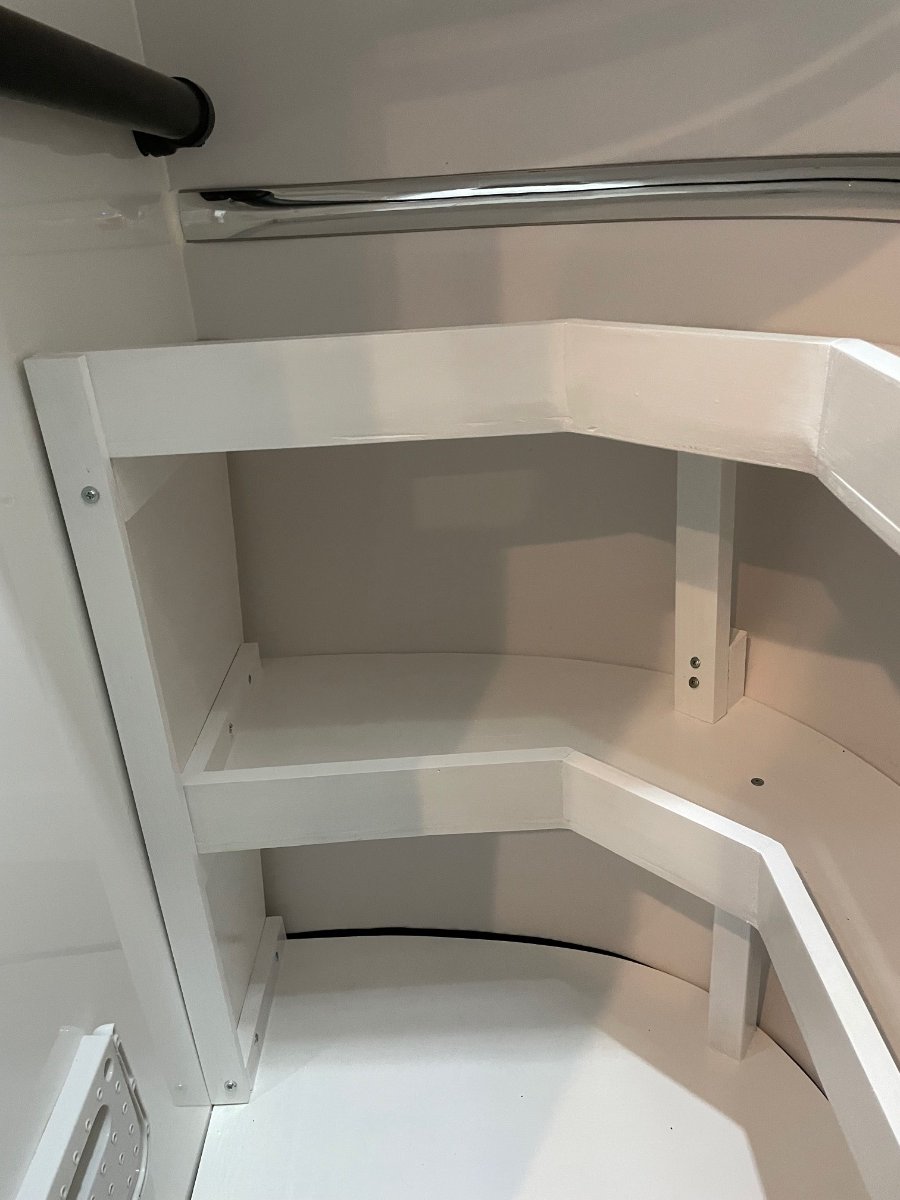
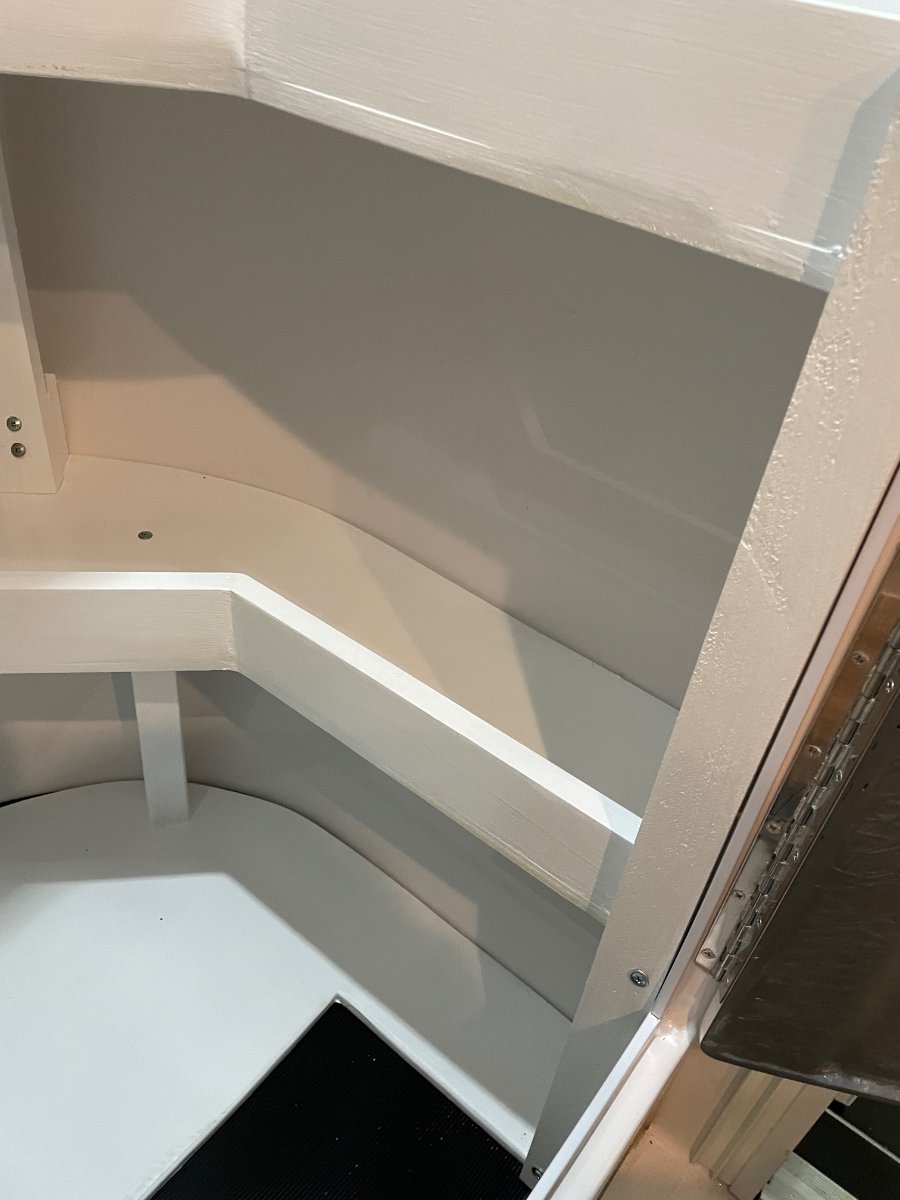
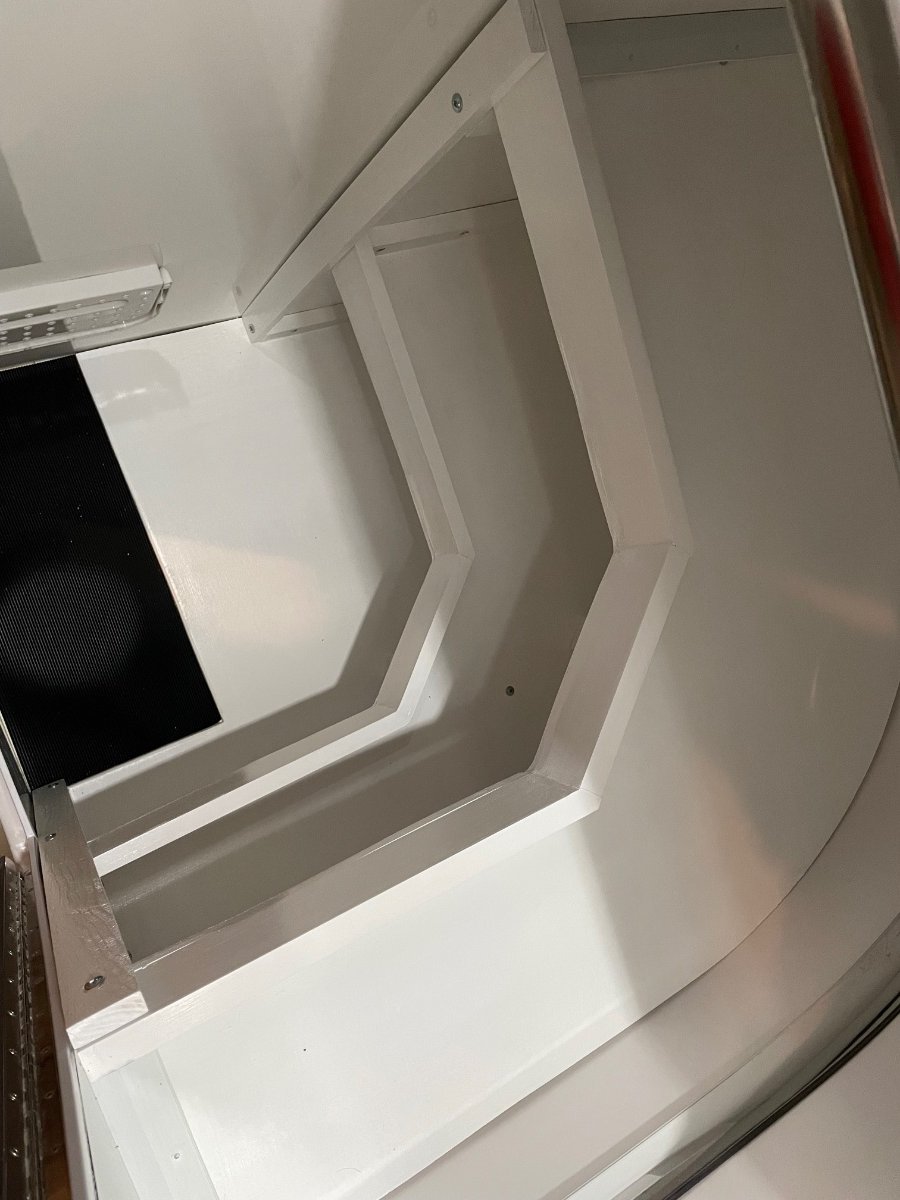
Good afternoon, I wanted to post some pictures of my closet renovation (thanks to coach and jojo.) I have been getting our Ollie ready for a big trip out West this July. Going to the Rally was awesome and really gave us some great ideas! Matt and I loved meeting all of you. the drinking glass holder is going in the left overhead cabinet above the table.
 2 points
 -
I get 3% back on fuel purchases with my credit card. I use a diesel as my tow vehicle. Does anyone use a fleet card? https://ratings.freightwaves.com/what-is-the-best-fleet-fuel-card/ Does anyone use the GasBuddy system? https://www.gasbuddy.com/pay/premium2 points
-
I made the angle in the middle of the shelf 45 degrees to dress it up and put a trim strip on each end. Looks a lot more professional. Plan to also put a cargo net across the from for travel.
2 points
-
Steve, If this works for you I say go for it. There are many iterations of this mod. I would just insulate the bottom of the steel reducing sleve where it contacts aluminum to try and preempt galvanic corrosion. Naturally being steel it is subject to rust. Not something I wanted to deal with. I opted to have a local fab shop just pop the center out of the stock aluminum sleeve and it was no charge. It took them maybe 5 min with a giant press. Zero issues with many miles on the 1Up bike rack. Patriot🇺🇸2 points
-
We use this -https://myopenroads.com and really like the diesel fleet discount. We paid $2.92 @ a Travel America for a diesel fill up on one of our pit stops heading to the recent Oliver Rally. That’s our lowest price to date. I also like using the high flow volume pumps and easier maneuvering our TV and Ollie into the trucker diesel stations. The free Open Roads app is very user friendly and there is no annual card fee. Check it out.👍🏻 Patriot🇺🇸
2 points
-
Hard to find deals on fuel for gassers like you can get for the diesel. I do try everything I can, like 10 cents/gal at Flying J and Loves using their apps, Exxon/Mobil app has rewards that can be applied to gas. I also shop at Kroger, which has a "Boost" program that gives you a 10 cent/gal discount at Shell for every $100 you spend on deliveries. Up to maximum $1 off/gal.2 points
-
Awesome. I know you always do your homework. I want to make sure others do, too.2 points
-
Yep, it’s light. We have small propane bottles and the Toyota Operator’s Manual’s tongue weight range for 2022 Tundra is 9% to 11% of the trailer’s weight. Our ready to camp weight is around 4950 pounds with 480 pound tongue weight, between 9% & 10%.2 points
-
That's really low, from what I've read. I know you have done mods to keep weights down. I'd make sure the tongue weight is at least 10 per cent. Likely good, with your mods. Safe travels.2 points
-
Reasonable complaint. I sent it to the factory. Were it me, I'd like to have two switches.2 points
-
Great description, photos, and information for airbag options! If I remember correctly, 20 PSI worked well for our 2016 Tundra/Ollie rig. We have an actual tongue weight of 480 pounds.2 points
-
Honestly, I am pretty sure I threw out the suction cups and the baskets are now just sitting on the floor. Less than ideal, but maybe better than them falling off the wall spewing their contents everywhere. I do think I took the film off the suckers...2 points
-
If you never use your Oliver, honestly, put it up at a fair price, and let someone else enjoy a beautiful trailer. Few people actually "need" lithium, but many, many folks benefit from them. We still use agm. But, honestly, I'd rather install my own, than wonder about the prior care and maintenance, and installation, if I were buying a used trailer. Unless you need to replace your current batteries, I'd kick the can down the road. Buy a nice, quiet inverter generator that will run your a/c, and call it done. Especially if you're waffling on keeping the Ollie. You can always keep the genset for other uses. My opinion. Others will vary.2 points
-
I have this issue on my 23 LE. I plan on installing a separate switch in series with the street side porch light. This will enable me to decide whether one ( curb) or both porch lights go on with the main porch light switch. Probably tap into the wire directly behind the radio and mount the switch inside the cubby next to the radio. This will not happen until my warranty expires.2 points
-
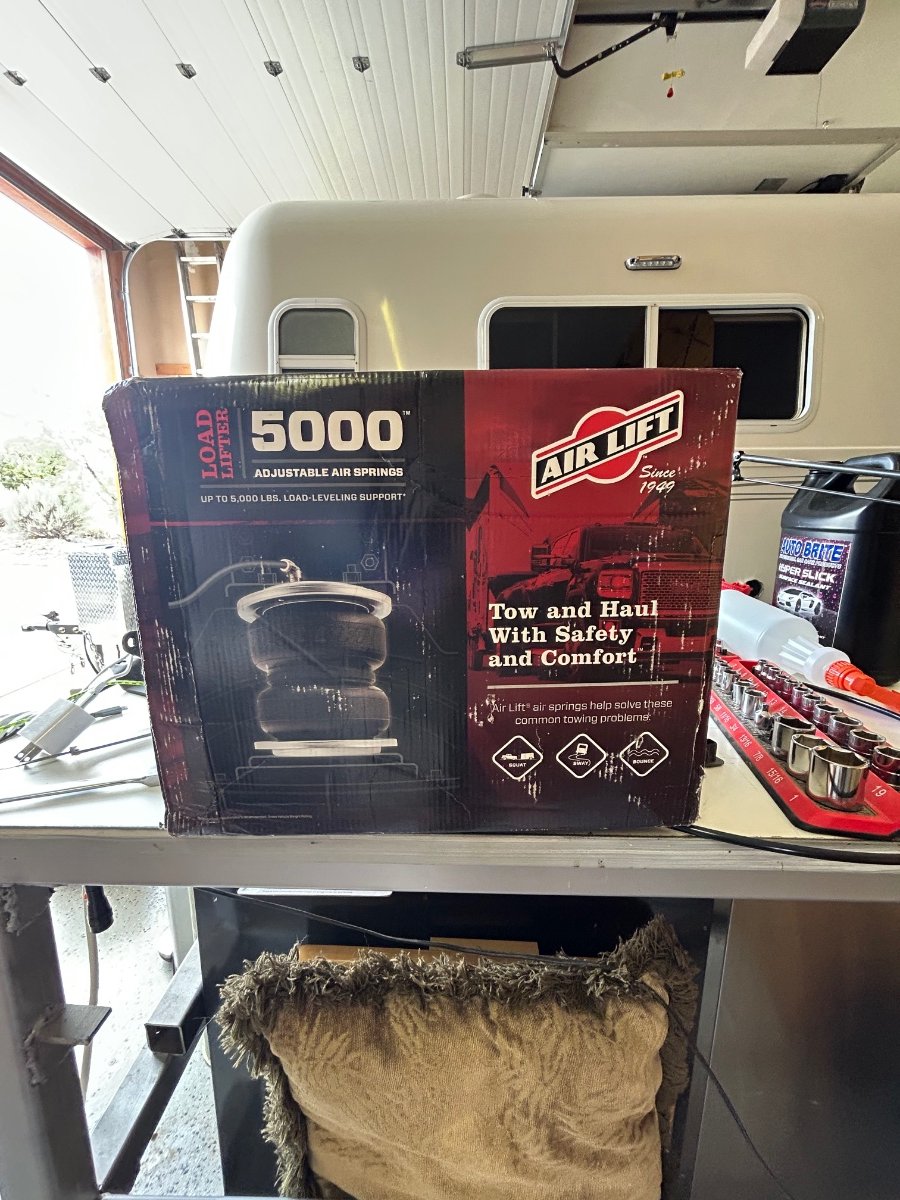
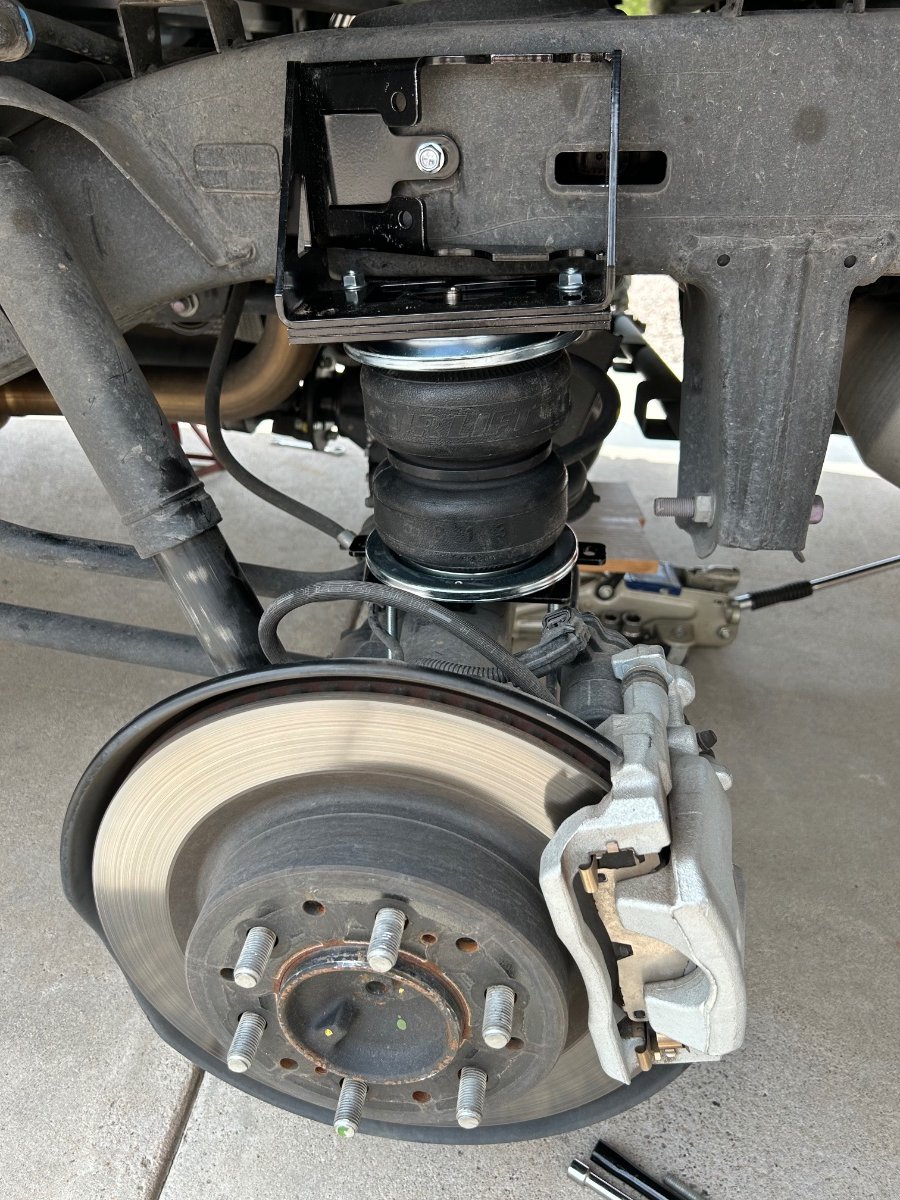
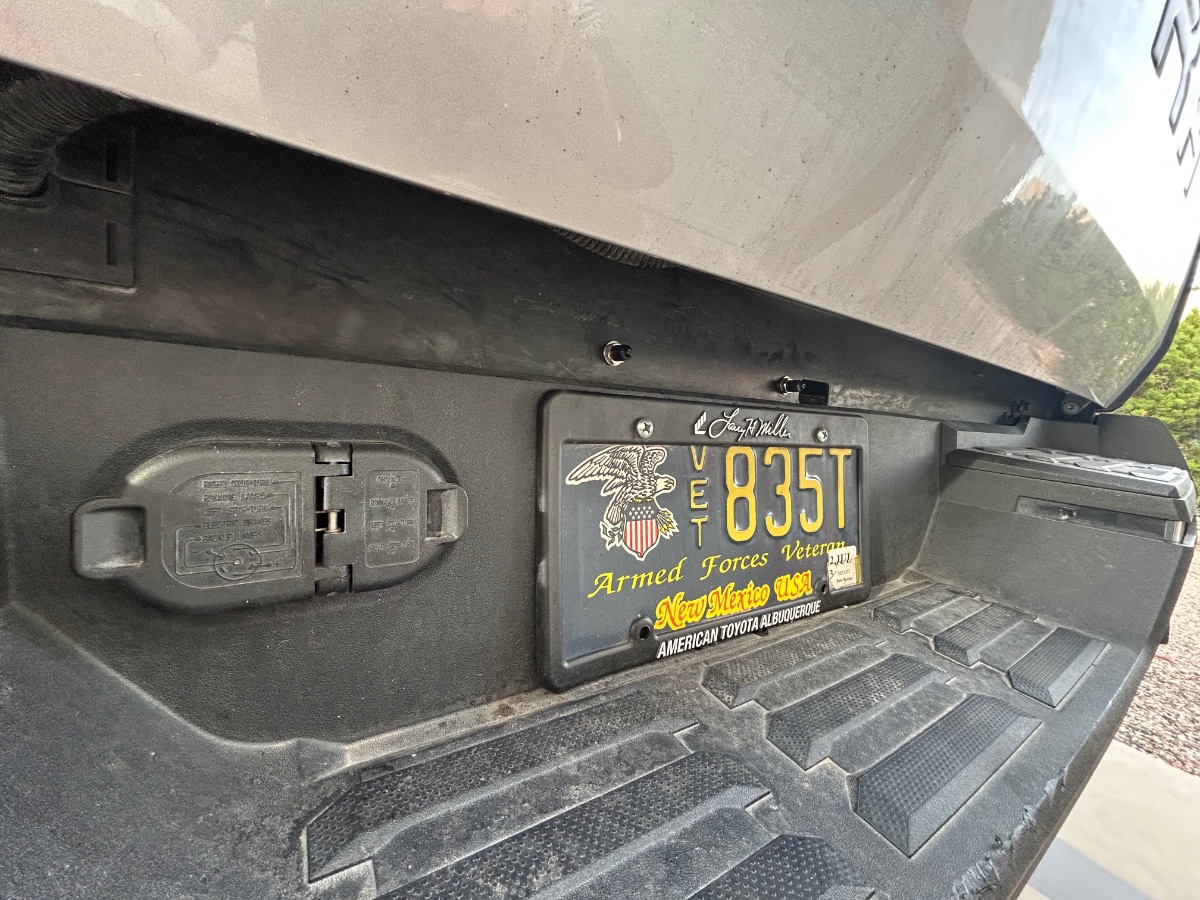
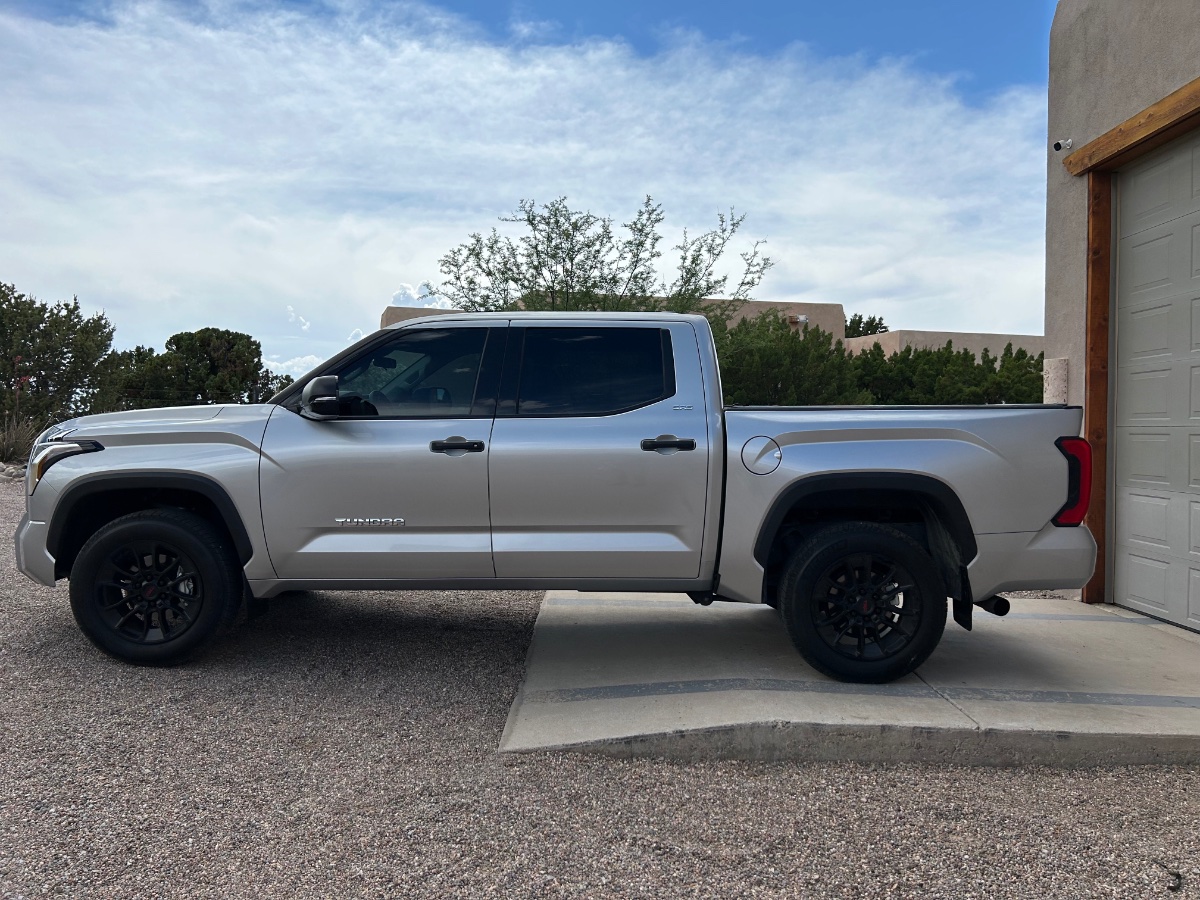
So, we went with the AirLift Kit. Spent most of yesterday afternoon installing a set of airbags on the Tundra... Researching Firestone, Torque, Rough Country, ReadyAir, and a couple others it came down to performance, stability ratings, guarantee, and price point. Firestone Ride-Rite and Air Lift Load Lifter 5000 were the toss-up. The various limited lifetime guarantees were mind numbing to sift through, but that said, the Air Lift seemed slightly better than most. The internal jounce in the Air Lift was comparable to (if not a bit beefy-er) than Firestone's. Price point - about the same. $450-ish. The Air Lift kit won the decision. We've done business with e-Trailer over the years and decided to stick with a known entity - slightly more $'s but worth it for the customer relations. Safety-chocked front wheels, floor-jacked the Tundra at rear differential, safety-jacked, removed rear wheels and prepped for the install at noon yesterday. 3+ hours later - done. Air Lift install procedures are 5 stars! Custom description and color photos for the 2022 Toyota installation - absolutely 100% correct and detailed in all regard. FYI, we assembled the port/starboard bag assemblies the afternoon before to prep for yesterdays drill. The factory jounce assembly is removed and no longer required when installing any air bag kit. It was interesting to discover that our factory jounce actually hit the top of the axle recently by observing that some of the road debris had been rubbed off by it! Hmmm... Once safety-jacked, (used frame points fore and aft of rear axle on both sides) with 2 jack stands on either side, lowered floor jack positioned under the rear diff to make enough room between frame/axle so air bag assemblies could be correctly positioned. Bolt-on procedures went smoothly without issue. The Air Lift Kit frame brackets were used to relocate hydraulic brake line mounts so as to keep them free yet stabilized which we thought was a brilliant feature. We liked the Schrader valve mounting position that another Forum member used which was the two upper license plate screw holes - but our truck's configuration couldn't accommodate that option. Decided to locate the individual port/stbd valves just above the license plate mount to be somewhat "out-of-sight" but still easily accessible for airbag inflation/deflation. Routed the 5-foot air lines from valves to the bags up and away from exhaust heat areas and cable-tied accordingly. Connected lines with "PEX-like" push-in fittings on top of airbags. We sprayed the air line connection at the bags with soapy water checking for leaks - no bubbles! Inflated each bag to 45psi after completing the installation as part of the leak-test process. Re-checked the system this morning - all good. Will be headed into town later today for a test ride - I'm thinking running the bags at 25psi for the first ride attempt. Will report back regarding ride "feel". Below pic shows truck bed height at 45psi, FYI: We are expecting better stability, less jouncing, and an overall longer lasting suspension. Realizing that air bags DO NOT change cargo capacity in any way, the benefits of airbags, such as eliminating "sag" and possibly better braking, should meet our driving/towing characteristics. Cheers!
2 points
-
We are at the Oliver rally in ME and we found out that the older Oliver’s had two switches for the porch lights. On for the street side and one for the curbside lights. The newer Oliver’s not sure on the 2023s have only one switch for both sides. It is annoying not only to us but it’s a common complaint of most people that you can’t shut off the street side porch lights. When in a camp ground most of the time all they are good for is to blind your neighbor.2 points
-
Be sure to be there plenty early on the 15th if the schedule is like it was this year. Coming over from Disney with an overnight on the way. Planning to arrive around 2:00 on Wednesday.2 points
-
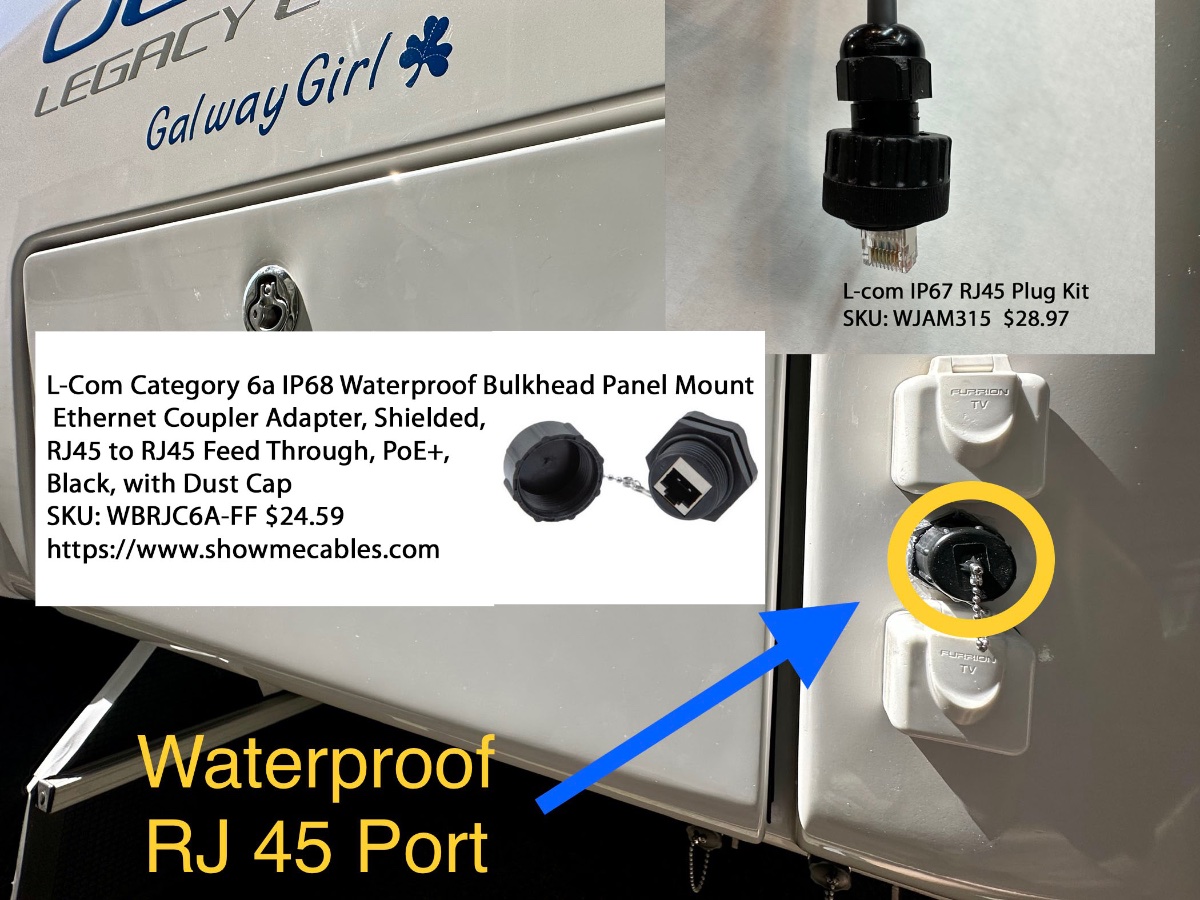
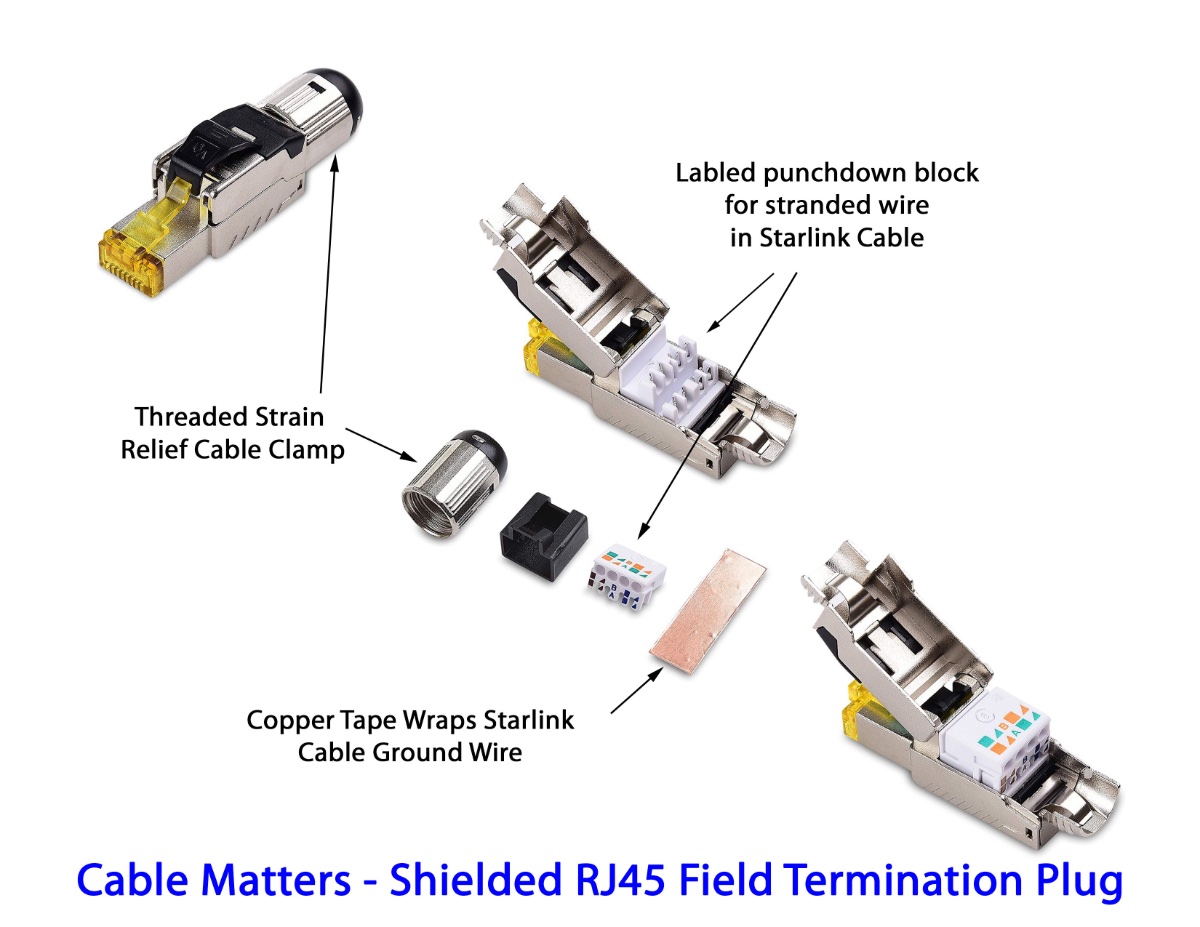
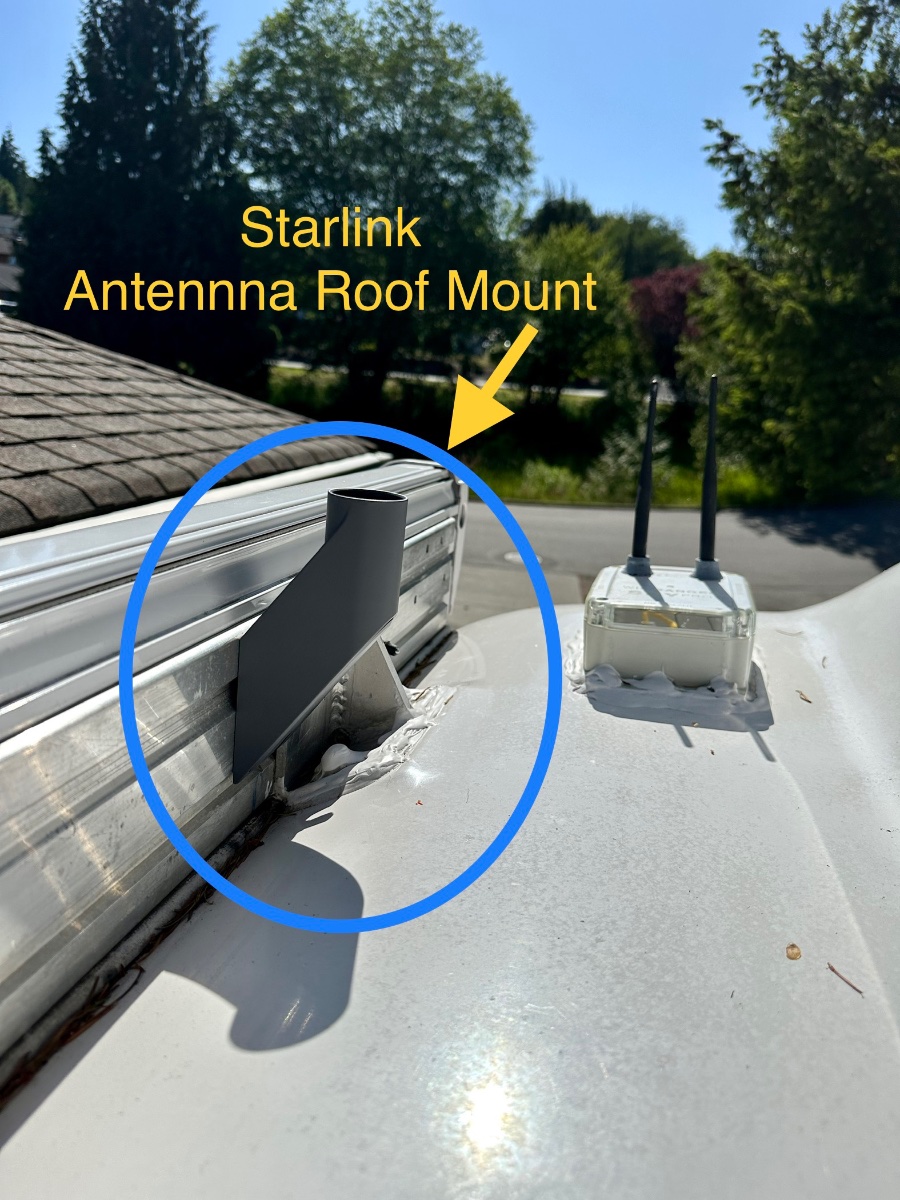
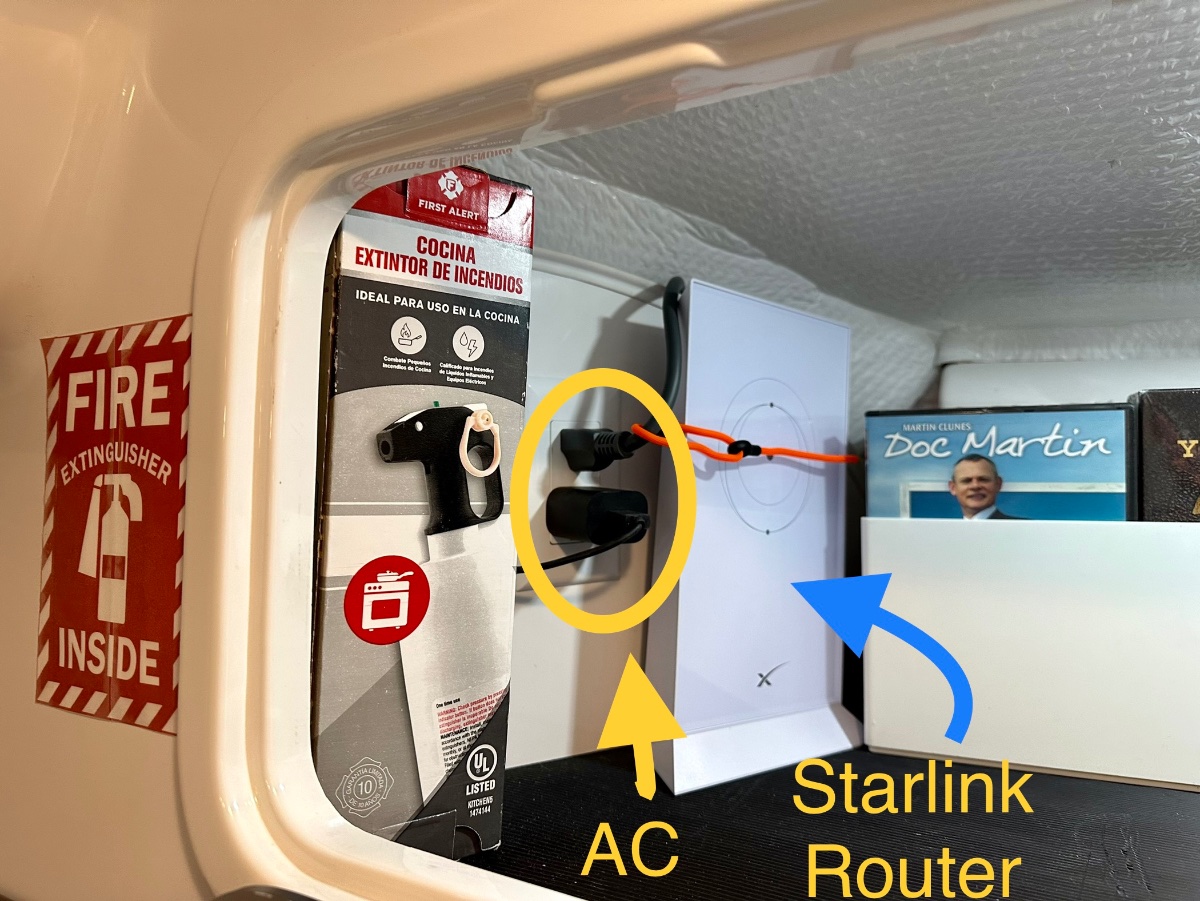
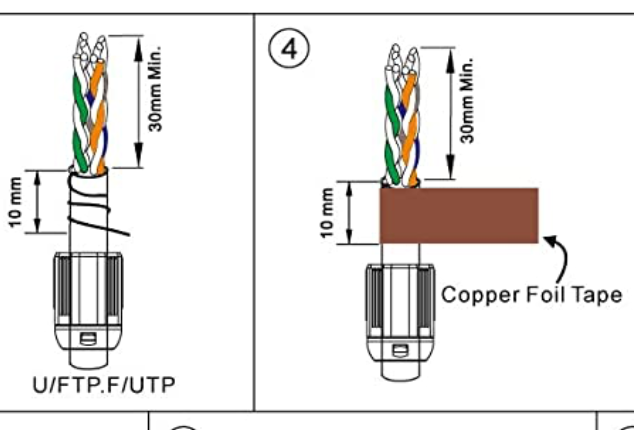
After looking at the forum I found a couple posts on installing Starlink. I decided to add another to the mix. Pre-Installation Starlink Test: In testing the system before a full installation I found that the Starlink Router could be plugged into curb side Oliver outlets and then the router could sit on it's back on top of the tire under the wheel well. This provided 58dB of signal outside the trailer and about 78 dB inside. So if you don't want to hassle with mounting the router, drilling holes etc. you could just find a weatherproof box/cover for the router and leave it outside. (Signal strength and bandwidth drops a bit but not really very much.) Read on if you want to do a more complete installation. 1) Roof Mount: (This is just a way to mount the antenna up high.) I bought the Starlink short roof mount adapter. Our hull 505 had the Dometic Awning, so I could not simply bolt directly to the mounting bolts from the awning brackets as they are at odd angles. I used 1/2" long x 3/8" diameter Self Tapping Bolts. I drilled holes, then drove in the self tappers into the mounting rail making sure to use washer/spacers to keep it from penetrating the back of the awning box. I used blue loctite on those tapped bolts. This mounting position will be perfect in those cases where we have clear sky and want the antenna up high. I'll continue to carry the ground mount for portability uses. I don't plan to drive with the antenna on the roof. 2) Mounting the Router - In the Rear Attic and Running Cable into Basement I mounted the router inside the rear attic cabinet. It's held in place by a simple orange strapping tie that feeds through a hook-eye behind the router. This is a good spot for the Router as it's close to a 110V outlet, and easy to run the cables under and behind the back of the cabinet over to the right side then down to the basement area. To make the cable run to the basement I needed to remove a couple panels: (NOTE: DISCONNECT FROM CURB POWER and make sure Inverters are OFFLINE BEFORE ATTEMPTING) 1) Street side attic panel (2 bolts) tip it down flat to gain access to the street side rear of the cabinet. 2) Basement rear dress panel covering the back the basement. (2 phillips screws). For my installation I ran the cable beside the existing AC drain tube on the street side rear of the trailer. I pushed the cable snake down beside that tube, and then at the bottom in the basement attached and I pulled up a length of pull line from the basement area. I attached the pull line to the end of the Starlink cable (the end that plugs onto the dish) and then pulled the Starlink Cable down into the basement. I tested the Starlink at this point before cutting the cable to get a baseline of speed for comparison after I cut the cable and attached RJ45 network connectors and the thru hull port. After testing I looped up about 3 extra feet of cable in the basement and then cut the cable for installation of the RJ 45 connector that would feed the back side of the thru-hull RJ45 plug. 3) Install new RJ45 male plug on cable in basement: Pro TIP: Use metal field termination plugs for the Starlink cable cut ends if possible/ Trying to use the typical plastic RJ45 connectors is a real hassle as the conductors in the starlink cable which stranded and thicker than normal. I spent well over an hour trying to get my shielded/plastic RJ45's to work. I finally said let's try a real metal coupler. In the picture below is the plug I bought from "Cable Matters" on Amazon $6 ea. They feature a clearly labeled punch down block, a threaded strain relief clamp and copper foil tape that is used to wrap the ground (or drain) wire around the cable shaft where it enters the connector. This is the connector I used on the inside of the trailer connecting the Router to the Thru Hull plug. 4) Install the Thru Hull Connector and connector for Cable to Dish I purchased an L-Com IP68 (waterproof) through hull connector specifically designed for shielded PoE Connections. I also purchased a matching L-Com connector kit for the cut end of the Starlink cable. This matching plug screws onto the outside connector for a waterproof sealed connection. I placed the connector mid line between the two existing connectors leaving both the Cable and Satellite COAX's in place. The new bulkhead coupler fits exactly between those two connectors, but I would suggest shifting UP 3/16" from center to allow the bottom door to fully open. (It's the 'satellite coax' in my case which I never use.) Hope this is useful to any new Starlink owners. More detail is in our blog here: Adding Starlink to Galway Girl Craig Hull 505 - Galway Girl
1 point
-
I've used a bolt on steel 2" receiver on the back "bumper" for around 5000 miles so far. Used mostly preexisting holes from the original aluminium sleeve. Got Steel U bolts that were a bear to source and keep them from rusting by spraying a couple of times a year with a can of Fluid Film. Added a 3rd u bolt between the two existing ones as the spacing between the spare tire housing and the rear of the receiver was too close for our comfort so decided on a bit of overkill. As mentioned above, we use a layer of very thin but fairly rigid rubber matt between the receiver and bumper surface which I expect to switch out every couple of ears. We carry two beefy fat bikes (= heavy) on a tray style bike rack that speaks to a 2" receiver and is "RV rated" whatever that means. Been solid as a rock.1 point
-
We use our Costco visa, 4% back on gas purchases pretty much anywhere but other warehouse clubs, and grocery store coded purchases, up to 7000 annually , and mostly a Penfed card, 5 % back, on gas purchases. The Penfed deal we've had for a very long time. Don't know if the card is still offered. We're not stuck looking for a particular brand, as we were in the days of our Exxon and BP cards. We do tend to look for costco gas stations along the way, as the price is always good, for gas. (Most don't have diesel) I think we paid $2.95 for regular gas in Columbia SC a few days ago, twenty cents less than most stations. Every little bit helps.1 point
-
That is smart, I buy too much from Amazon, I'll have to start buying gift cards from Krogers, too! Thanks for the tip1 point
-
We picked up our used but well loved Oliver on Sunday, spending the night at Camp Roadrunner, Mark and Sally’s place in Central Oregon. The Trailer was spotlessly cleaned, and ready for us to take possession. Mark spent all afternoon ensuring that we knew and understood the systems, and care and feeding of the Roadrunner. Thank you Mark and Sally! The following day we started towards Northeast Oregon, spending the night in the Ochoco mountains, making it a short travel day. We’re home at Fort Sagebrush today, thrilled with our Ollie. Next on the agenda is taking it to Oregon DMV to get the title and registration in our name. I do need to add another flat 4 trailer connection to the truck to accommodate the lights on the caboose storage box. We are thrilled!😊
1 point
-
So you can turn the porch lights on or off on both the curb and street side, but you can’t turn on one side or the other individually. Now we have to figure out how turn the lights on either side or both sides together. I’ll see if I can find a wiring diagram for a 2022 LE2 and work on a plan. Off the top of my head I would say that a SPDT switch would be a simple solution if you would be satisfied with the ability to operate one side at a time. Mossey1 point
-
LOL, Lucky you, wait until it goes off scale. We have been at AQ 500 a few times in the last two years. Visibility very close to nil. When we were camping in southern BC we literally had ash fall. Fortunately we had shore power, I kept the air breathable by running my inside HEPA filter and by using furnace filters in the windows. John Davies Spokane WA
1 point
-
No slaving, just toss the ingredients in the pot let it do it’s thing and in the mean time enjoy a beverage! 😊1 point
-
I'm thinking this threat could easily "moderate" into a new thread devoted to yummy IP recipes... just say'n, HA!1 point
-
That reads very much like a truly fabulous soup from one of my favorite St. Pete restaurants, Bellabrava. The fennel and seasonings in the sausage flavors everything. They boil the starchy potatoes (russets) in the broth. No dairy, no thickener, just the starch from the potatoes. Thanks for sharing. I'll skip the half and half. (I asked for the recipe, that was declined, but several questions answered.)1 point
-
Arriving at 2pm on Wednesday will tend to make you a bit rushed. You will have to check-in, get to your site, set-up, then get over to registration and then get up to the Lodge. Of course all this assumes that you want to be at the cash bar that usually opens at about 4pm as Steve Morris points out above. If something were to happen (i.e. you are delayed) you can always register late (even on Thursday) but, you will still want to make it for dinner that usually starts at 5 to 5:30. And, certainly you will want to be there for the door prizes that usually start right after dinner. Bill1 point
-
Spent last weekend at a supposedly sold out Anastasia State Park in St Augustine where at least 30% of the spots were empty. Maybe charging double for people who cancel less than a week out or just don't show at all would help?1 point
-
Ours travels on the floor of the closet. Carol has cooked up some great chili in ours, among other dishes. Mike1 point
-
The thing I notice the most between the low setting and the night mode is the compressor seems to start softer and run at a lower level. The low rumble sound of the compressor is much reduced in the night mode. Honestly once the camper is cooled to a comfortable level, the night mode seems to be very effective at maintaining the temperature and humidity level we like throughout the day. Also based on my experimenting with my generator and running the AC, the Truma on night mode never draws more than 1800 watts on the Gen's onboard meter and seems to have very little serge when the compressor cycles on. I really like these design characteristics. I am a little jealous of the those who have switched from the Dometic unit as I have nothing to compare to. Oh the dilemma of only knowing luxury! 😆1 point
-
Great question. I think it just cycles less giving the impression it’s quieter when it’s in this low power mode or sleep mode. Or maybe just not having the Penguin noise banger it’s just so much quieter. A really worthy upgrade for sure. Patriot🇺🇸1 point
-
Ok. I know this has zip to do with Olivers, but a number of us do enjoy trail riding. We are looking at a side by side Honda Pioneer 520 vs Honda Pioneer 700, because we can load it into the pickup bed, as we have done with our Honda Rancher many times. The 520 is definitely smaller, with a 50" width, than the 700, which is 59.9 wide. Price difference isn't the deal (even though not a lot), it's the flexibility of being able to take it up the ramps to the truck bed and go. Any of you have experience with the Pioneer 500 or 520? Or, fans of the 700? My husband and I sat in a 500 today (same cab, basically), and thought it would probably be fine. ( We're average sized folks, 5'11 and 5'4). We use the utv a lot for property maintenance on our camping acreage on WNC. The dump bed on the 520 is tiny (say 25" x 35"), but it's still a dump bed, and can carry some tools. We have a bunch of trails that we've made on our mountain property, and the narrower width is kind of appealing. As is the Honda badge, as our over 20 year old Rancher has never given us issues, with regular maintenance. .1 point
-
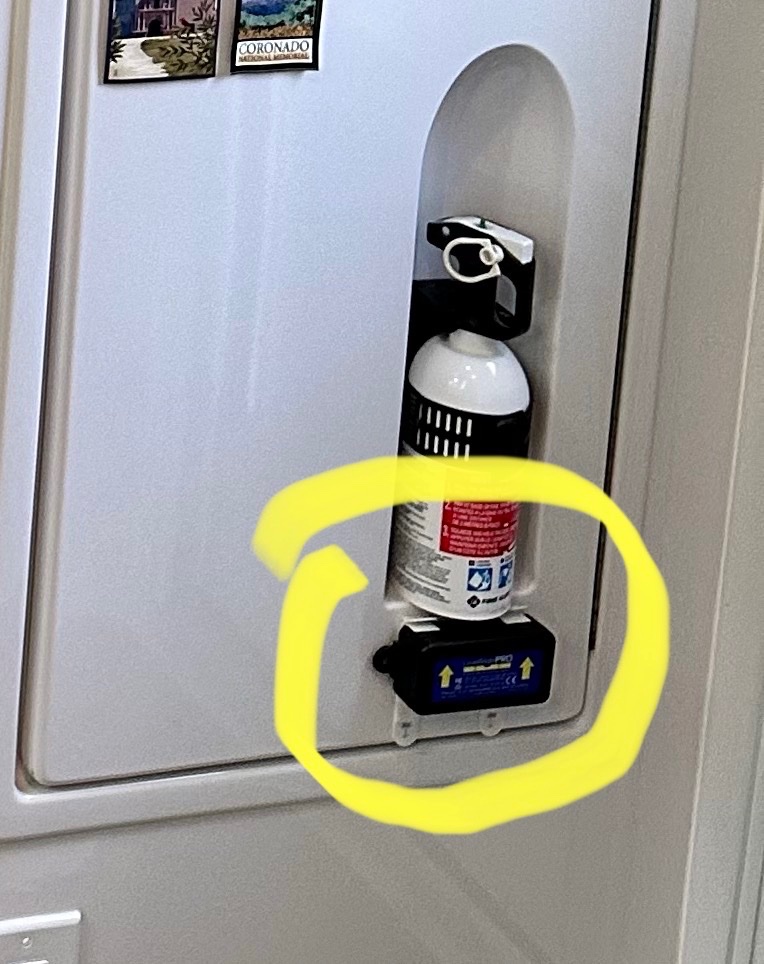
That is one reason I placed ours in the closet. It is not real attractive, but we never see it unless we are looking for it, mounted above door height, on the interior closet wall. You raise a good point about securing it with screws, rather than Velcro or double-stick tape, to avoid having to re-level the trailer.1 point
-
Originally I mounted in back of closet and it was hard to reach. I moved it to the outside of the closet door just below fire extinguisher mounted with double stick Velcro. I can reach it while standing outside with the door open to turn on/off when setting up camp. I can pull off easily to change batteries.
1 point
-
I guarantee you that there will be NO popped interior rivets on your Oliver. Ever.1 point
-
Riding in the back of the pick-up truck everywhere we went is another one of those fond memories. Did I mention a 12 GA shotgun and 30-06 hanging on the rifle rack behind Grand Pa's head? Never know when dinner would present itself to the Country Boy. Grand Pa could hide anything in his stew. Possum, deer, every kind of fish, polecat, mountain lion, armadillo, squirrel, duck, and once rattler snake! He used to say "If you don't like it, you just aren't hungry enough yet. Bet you'll give it a try in the morning!" And we all survived. Swimming in the Trinity River down stream of Liberty all summer long. Making a rope tire swing and learning how not to tie the knots. That one hurt. Running trot lines with over 100 #3 stainless steel hooks. Mixing up blood and Ivory Soap to make catfish blood bait. Window sash weights every 30 feet on the line to make sure it stayed below the flowing logs. Getting hooked, pulled out of the boat, and taken down 20 feet to the bottom ... and surviving. Even falling into the outhouse as a 3 year old. Survived that too. If it was broke, we fixed it. If it was worn out, we took it apart to salvage parts for the next project of creative invention. Nothing went to waste. Those type of experiences are what made our generation so great. Sadly, now days the vast majority of kids don't get a chance to live and experience success and failure in life like we were fortunate to have done. GJ1 point
-
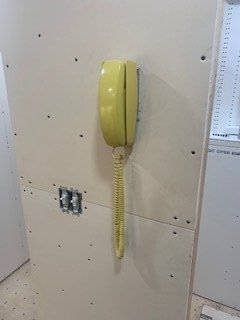
they make a new and improved portable version of the wall phone now
1 point
-
I still have my slide rule. I still like paper maps. I also like my iPhone with all the nifty apps for camping and traveling. Like Steve, we pick up maps at welcome centers too! Mike1 point
-
I would never leave on a trip without a paper atlas. And recently we’ve taken to stopping at the welcome centers when entering a new state and picking up their latest official state map. A large map gives you the option of seeing a Birdseye view and being able to “look down the road” further than you ever could with the tiny screen on your phone. Then we look at the GPS.1 point
-
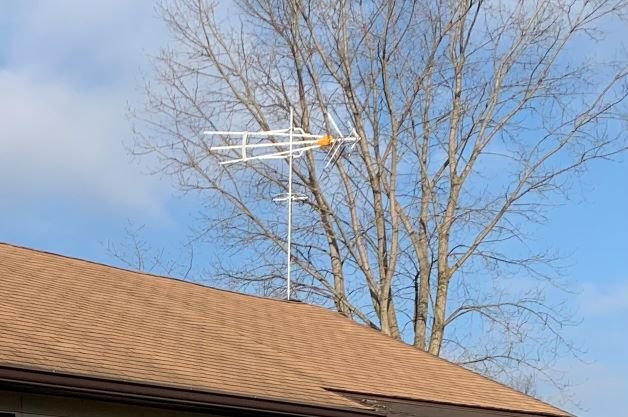
Love all this comparing old ways with the new. I love my digital media and resources as much as anyone else, but we have always carried pertinent hard copies of maps for all our destinations. My wife as copilot always pulls out the paper maps to gain a mental picture of the route and what's around. Funny that the land line came up as we just got a new fiber optic data service connected all the way to the house. Very fast to say the least, but it included a land line if we wanted it, and we did. But the crazy part is we connected it to a 1970's Slim Line wall mount Bell Telephone in the kitchen. Looks like walking into my childhood when we come in the back door. Oh, and we get our television service via the good old aerial antenna on the roof of the house. 😆
1 point
-
Do you seriously have a true landline? We've had voip for decades, which is what the cable vendors bundle here. I don't even know if a true wired landlines is still available here. We call the "landline" the solicitor line. We give out that # when someone requires a phone #. Everyone else calls our cells. Kind of miss those landline days, but I don't miss "dialup " speed. And yes, we carry atlases and paper maps, as well as two phones and a GPS.1 point
-
30 years of land navigation in the army, usually with at 1:50,000 folded map sheet, trained my brain to be comfortable with a paper map. I like my GPS’s for turn by turn directions, but we also carry a big atlas with us for planning and exploring alternate routes. Mike1 point
-
Oops, I forgot the link. It looks like it is discontinued/out-of-stock, anyway. https://www.blueridgeoverlandgear.com/collections/all/products/trip-planning-bag?variant=190202048676801 point


.thumb.jpg.e34bf01ef7f7d5e99ad31856d45afbeb.jpg)


-
Recent Achievements
-


")


")


