Leaderboard


Popular Content
Showing content with the highest reputation on 08/07/2023 in all areas
-
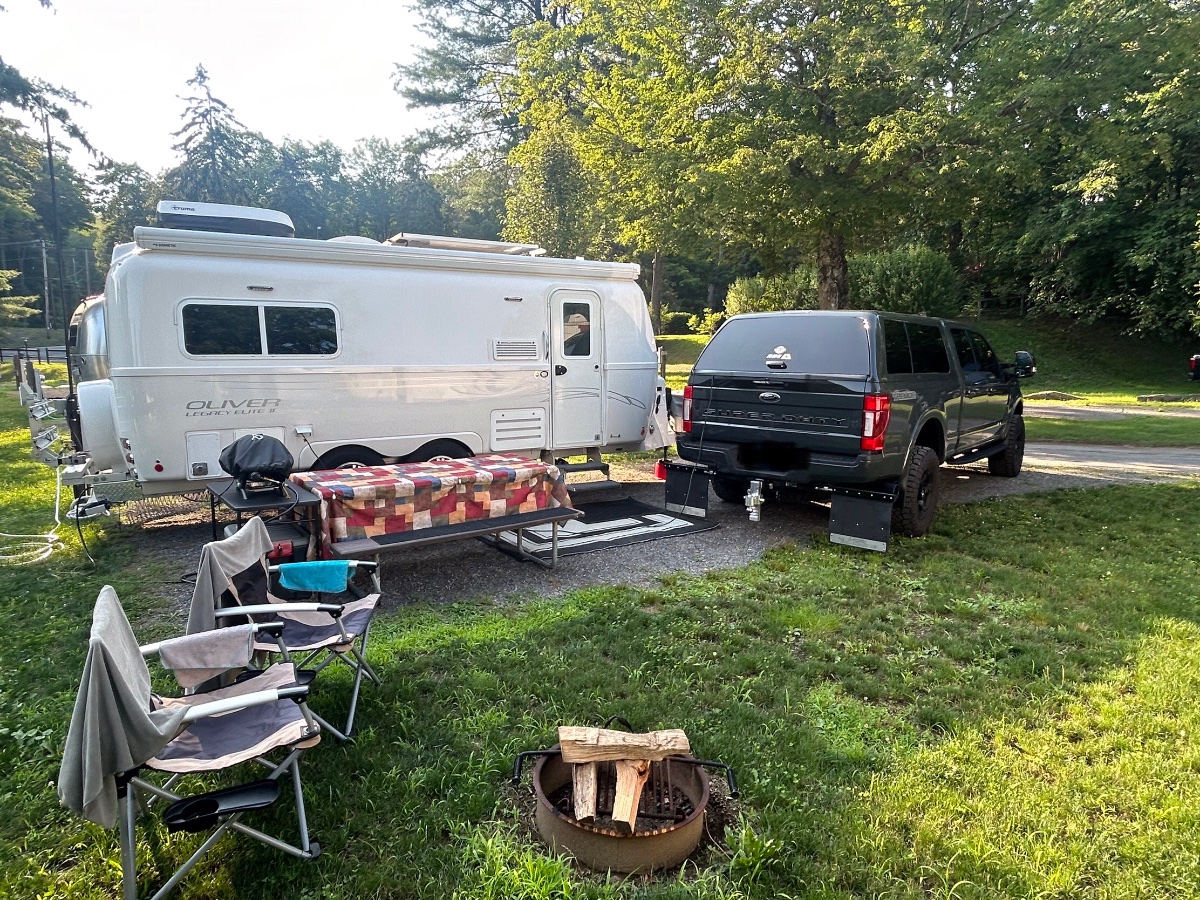
@topgun2: TRUE and TRUE! There's no way we could fit the recycled plastic bottle mat into the Ollie garage, ours would only roll-up into a giant burrito and would live in the shop and travel in the truck bed, its nice having the CGEAR residing in the OTT. Definitely more expensive, though - ours was north of $160. We've been using it since 2020 on several dozen trips - very little if any noticeable wear/tear... Tons of size options, too.4 points
-
I bought a Sand Mat like this, after reading about it in another forum post: CGEAR Original Sand-Free Outdoor Rug Camping Mat - Water-Resistant & Anti-Fade Material - Military-Grade Construction - Reversible Design - Area Rug for Beach, RV, & Picnics - Includes Travel Bag https://a.co/d/6dzNKWn Mine was on sale, maybe from REI, and maybe half the price. It works well to filter out the sand and seems durable; it came with a bag that also is open mesh (which means I don’t store it in the trailer.)4 points
-
And that huge mat might push the Beast a little closer to its max payload.😃 Mossey3 points
-
We used to roll out a huge PVC mat I think it was like 8x10😳. Wrestling and cleaning this large mat became more trouble than we were interested in dealing with. So we opted to go a with a much smaller 4x6 PVC mat and lay a rubber mat that actually drains water through the bottom. The porous heavier rubber mat lays on top which keeps the pvc mat in place should a breeze kick up. I picked up two of the small PVC mats at Wally World for $20 a piece on an end cap. One as a back up should we need to replace the old one. The new smaller mat works perfect, has held up great and is super easy to manage and clean (hose off) and take up very little room in the bed of the Beast. My attempt to make set up and break down of camp a little more user friendly. The huge PVC mat goes in the donation stack. Small door mats matter!!! 😂 Patriot🇺🇸
 3 points
 -
Kind of like Ollie's, sometimes you get what you pay for! And I have to give credit to Overland for the original post about CGEAR RV mats. I bought our 8'x20' Orange/Agave mat in February of 2020 on sale. It was the only color available in that size and price and Krunch does not like it. It is big and heavy and if I was to buy it again, I think I would op for 2 smaller mats, especially if we had a Clam shelter. Mossey
3 points
-
I bought mine on Amazon. I’ve had it 3 years and still looks like new. It sprays off dirt easily and drys fast. Faulkner Deluxe 48896 Multi-Purpose Paradise Mat, 9' x 12', Blue (Improved/ Blue) https://a.co/d/66JgfWo
3 points
-
This is the one we use and have been very happy with it. It is the same rug Oliver has in their showroom. Lightweight, dries quickly, doesn’t hold dirt or sand. https://www.amazon.com/gp/product/B007G2KJLA/ref=ppx_od_dt_b_asin_image_s00?ie=UTF8&psc=13 points
-
Your assumption is very likely correct. And, that bang is a bit startling even when you are expecting it. If this happens to you again and you notice that the shackle has flipped then all you have to do is slowly drive (on the side that is flipped) over a curb or a 4x4 (this is what they do in the Oliver Service Dept). Bill3 points
-
We’ve had two C-Gear Original Sand-Free Mats since 2017 (10x10) and 2019 (8x11) in orange/teal. The square one fits perfectly in our six-sided CLAM enclosure. They worked great in the teardrop, where it is too east to transfer dirt and grass inside. Now they’re perfect for the Oliver. They dry fast, fold relatively small, and work as advertised. They do tend to gum up with clay mud, but a good hosing off at home easily cleans them. I don’t know if it is still the case, as I don’t see it on their web site, but both of ours were made in the USA. The company started out making landing mats for military helicopters is sandy locations.2 points
-
I think I would just cut off enough of this one to fit a future Clam and seal the cut ends. Mossey2 points
-
@mossemi: That's a great point - if we get a Clam in the future, we would definitely consider the option of 2 smaller mats; which would be a perfect configuration. Although we like the 8' x 20' and it fits into the rear garage hatch - it is not light weight by any stretch compared to the recycled bottle mats. We had it for the AS which was a longer rig, a smaller size CGEAR mat for the Casablanca would be even better, IMO. We'll probably live with this one until a Clam is obtained...2 points
-
Mossemi put me onto the CGEAR type mats a couple of years ago. The biggest benefit that I see with these mats is that they fold/roll up much smaller as compared to the recycled plastic bottle mats. However, from what I've seen, the CGEAR sand mats are also somewhat more expensive. Bill2 points
-
FYI: Over the year's, we've been getting our mats from the Quartzite RV show - they're the ones made overseas (China?) from recycled plastic bottles. They would last several years, but hard to keep clean and once they started fraying - boom!; our's would unravel fast. Fairly inexpensive and loads of colors and patterns. D found the traditional CGEAR sand mats several years ago and they work great for us! Water drains through them quickly, debris - sand, dirt, etc., works its way through and not into the Ollie. The mat has lots of tie-downs and is a heavy duty product all around. She got us an 8' x 20' green/blue color combo with the storage bag made from the same material. The bagged mat fits into the "garage" hatch and lives full-time in the Casablanca. D and Magnus really love this one! "HWHL"!
2 points
-
I don't bother with a chock when coupled. The truck parking brake is quite enough, as it ain't going nowhere! I will chock to decouple a trailer for tire repair, since I prefer to drive the wheel in for repair, not the whole rig, unless we're many, many miles to a tire store and then the spare makes sense to me. I see so many vehicles stopped, just one foot from the white line on a major highway and I'm thinking why, in the world, did they stop there? Why not coast a little down the road to a safe place. This is first and foremost. Your tire likely needs replacing anyway, you can't hurt it any further, maybe scrape the rim little which is less important than your safety! Just keep rolling, don't hit the brakes, flashers on, and coast slowly to a safe place, while looking ahead to eyeball the best safe level spot available! And Steve is absolutely correct, if you are going to mount the spare, drive truck & trailer in for repair, there is no reason to decouple.2 points
-
I'll bet you're are spot on about the noise coming from a reversed shackle. While working on the running gear of the trailer, while I would advise you to chock the opposite side, I would also recommend that you to never unhook the tow vehicle. It is your greatest safety net. With the trailer still attached to the truck, there is virtually no way it could move forward or backward.2 points
-
Another point to remember is that bearing don't have a recommended change interval. Don't just assume because they have 12,000 miles on them they're shot. The number one cause of trailer bearing failures is infrequent use and the subsequent corrosion or pitting that can occur due to grease contaminated by condensation/moisture forming inside the hub. Routine inspection and repacking, or more frequent supplanting of old grease, are the accepted ways to extend bearing life.2 points
-
When returning home from the Oregon Coast this April, my wife and I boondocked at a Harvest Host site. That cold evening, we tried to heat water for hot drinks in the microwave using the inverter, but it shut down after just a few seconds. We were surprised and disappointed, because our Lithium Pro Package with Xantrex Freedom XC Pro 3000 watt inverter should enable us to use the microwave on inverted power for at least a few minutes. It had been a cloudy day so we got minimal solar recharge, and with our Nordcold fridge running on DC while on the road, our battery State of Charge was down to about 74%. When we submitted a service ticket, Jason Essary confirmed that we should be able to run the microwave on inverted power at 74% State of Charge (SOC), and much lower, down to 25-30% SOC. With Jason's helpful guidance, I then spent dozens of hours trying to troubleshoot the electrical system, both on the DC and the AC sides. The inverter/charger was charging as designed, and would run 120V appliances that pull up to 1100-1200 watts (including the Truma air conditioner, which pulls 1100 watts with the compressor running), but loads greater than 1400 watts (like the microwave or a space heater on a high setting) caused the inverter to shut down. Nothing we tried solved the problem, including replacement of the Optifuse 300A inverter breaker, which Oliver sent to me under warranty. I also spoke with a Xantrex customer service rep (after45 minutes on eternahold) who assured me the problem could not be with the inverter, so it must be in the trailer wiring. Jason then authorized me to engage an RV service tech at Oliver's expense to try to find a solution. But that was right before I had planned to use the trailer boondocking at the Lochsa River the week of May 15. I decided to engage a tech after I returned home. But while camping (and running the Lochsa river during the day) I happened to mention the inverter issue to another RVer. He asked me if my inverter is a Xantrex. Yup. He then told me he had been advised by an RV service tech to do a "hard reboot" of his Xantrex inverter to resolve a similar issue. He explained that this involves disconnecting both the positive and negative DC cables from the inverter, and leaving it at least overnight, then reconnecting. I determined to give it a try after I returned home, as it would be relatively easy to do. To my surprise, the "hard reboot" solved the problem. My tests have confirmed that we can now run the microwave on full power (1540 watts) for 4 minutes or more at a time, at SOC levels down to 35%. So, the Xantrex customer service guy was wrong--the problem was with the inverter. And, the solution was relatively easy to implement: turn off all batteries, and ensure that shore power is disconnected (so there is no power to the DC cables), then disconnect the DC cables from the inverter and leave at least overnight. I left mine disconnected for 3 days. Then reconnect, and turn the batteries back on. If your Xantrex inverter is not performing up to spec, try a hard reboot.1 point
-
Concur w/@SeaDawg: we've been using the Ecotemp at our dry cabin in CO near Mogote since 2008 - our's runs on a pack of D-cell batts, you definitely need to remove them as a part of your winterizing checklist. We built a vented plywood box and mounted it on the cabin for outside showers - 100's of showers, indeed! Good product for sure.1 point
-
So… I had a hail storm blow over me, while parked at my volunteer station here in the middle of ND. Thankfully, the hail was minuscule here at the hatchery (golf ball size, down the road.) I just realized this poll asks for input “if you have experienced hail damage”, and since I didn’t have damage, I haven’t answered any of the questions.1 point
-
Thanks Bill, the driveway entrance had a 2" bump, and I was taking a left turn (had jacked up the left side) at a good 10 MPH! Just another way to do it. Lol 😀1 point
-
We bought ours at IKEA, probably 12 to 14 years ago. It's getting a bit threadbare, but still hangs together, and serves the purpose. Camping world has some very nice ones that are made to fold up in small sections. Watch for their sales and closeouts. The ikea mat has a limited life left. I'll be watching at camping world, amazon,,and overstock.1 point
-
1 point
-
There is a post on our site from another owner that installed one with pictures. Likely was John D., but I may be foggy on that. GJ1 point
-
I was specifically talking about the original video in this thread where the unit was installed in an pickup bed camper. The Houghton is grossly oversized for their application. Edit: Also, testing at lower temps with high humidity will be a truer test to see if the unit is oversized or not. I'd really like to know how this Houghton performs (post fan mod) in an E2 under these conditions as I'd like to upgrade to a heat pump myself if and when my Coleman finally gives up.1 point
-
Yes, you need a second transfer switch. GJ1 point
-
Thanks for the tip! Adding it to my arsenal!1 point
-
Adding another to the list, for certain bites: Ivarest. Made for poison ivy, but really calmed down my double bites from a yellow jacket. The key is to let it dry, and cover with a bandaid, , if clothes will rub it off. Or, leave it open, when dry, if clothes won't rub it off. It's calamine, generic 2% benadryl, and benzol alcohol. Very pink. Cover the area til you can't see through it. Got the bites three days ago. No issue at all, now. The stings weren't as bad as the crazy itch. I "iced" as well, first day a few times, with a cold patch, to keep the venom from spreading. I had it in the locker for our friend who has a lot of issues with poison ivy. Glad I had it.
1 point
-
I’m betting it was the front two leaf springs that were replaced, and those 27” long replacement springs are too long. That’s forcing the forward EZflex link up into the trailer frame, and stretching the rear leaf springs to the point that they are flattened. From the Dexter searches I found, it looks like the spring length should be ~25.25” (confusing because the one site part number has a 27). Maybe someone else can confirm the correct Dexter part.
1 point
-
(Stolen directly from the Land Cruiser 200 subform over a iH8MUD, with regards to JamesC, the author) There are a lot of little things that I wonder about but I don't feel merit that I start a new thread. Still, I'm curious. Maybe this can serve as a repository for those misc questions that are still searchable but don't necessarily fit elsewhere? If no one else sees the value I'll just post mine here.1 point
-
They should be an exact fit.1 point
-
Just a reminder for anyone buying replacement lug nuts. Make sure you buy the “Bulge Acorn” type for aluminum wheels. I’ve seen a few owners referencing “Acorn” type as replacements, but the acorn type are for steel wheels and have a smaller conical seating surface compared to the bulge acorn type. Aluminum wheels are softer metal than steel wheels and the larger bulge acorn type lug nuts provide a greater seating surface to prevent deformation of the aluminum wheel and loosening.
1 point
-
Of course! Retired 13 years, and already stopped using my engineering brain... Thanks!
1 point
-
There's a 1/2" hex wrench for the exterior water hose fittings. I bought this one, but it's not currently available: Bondhus 12116 1/2" Long Hex L-Wrench https://a.co/d/6MCI0Jf I also find a spring hook can be handy in many situations, not just for springs.1 point
-
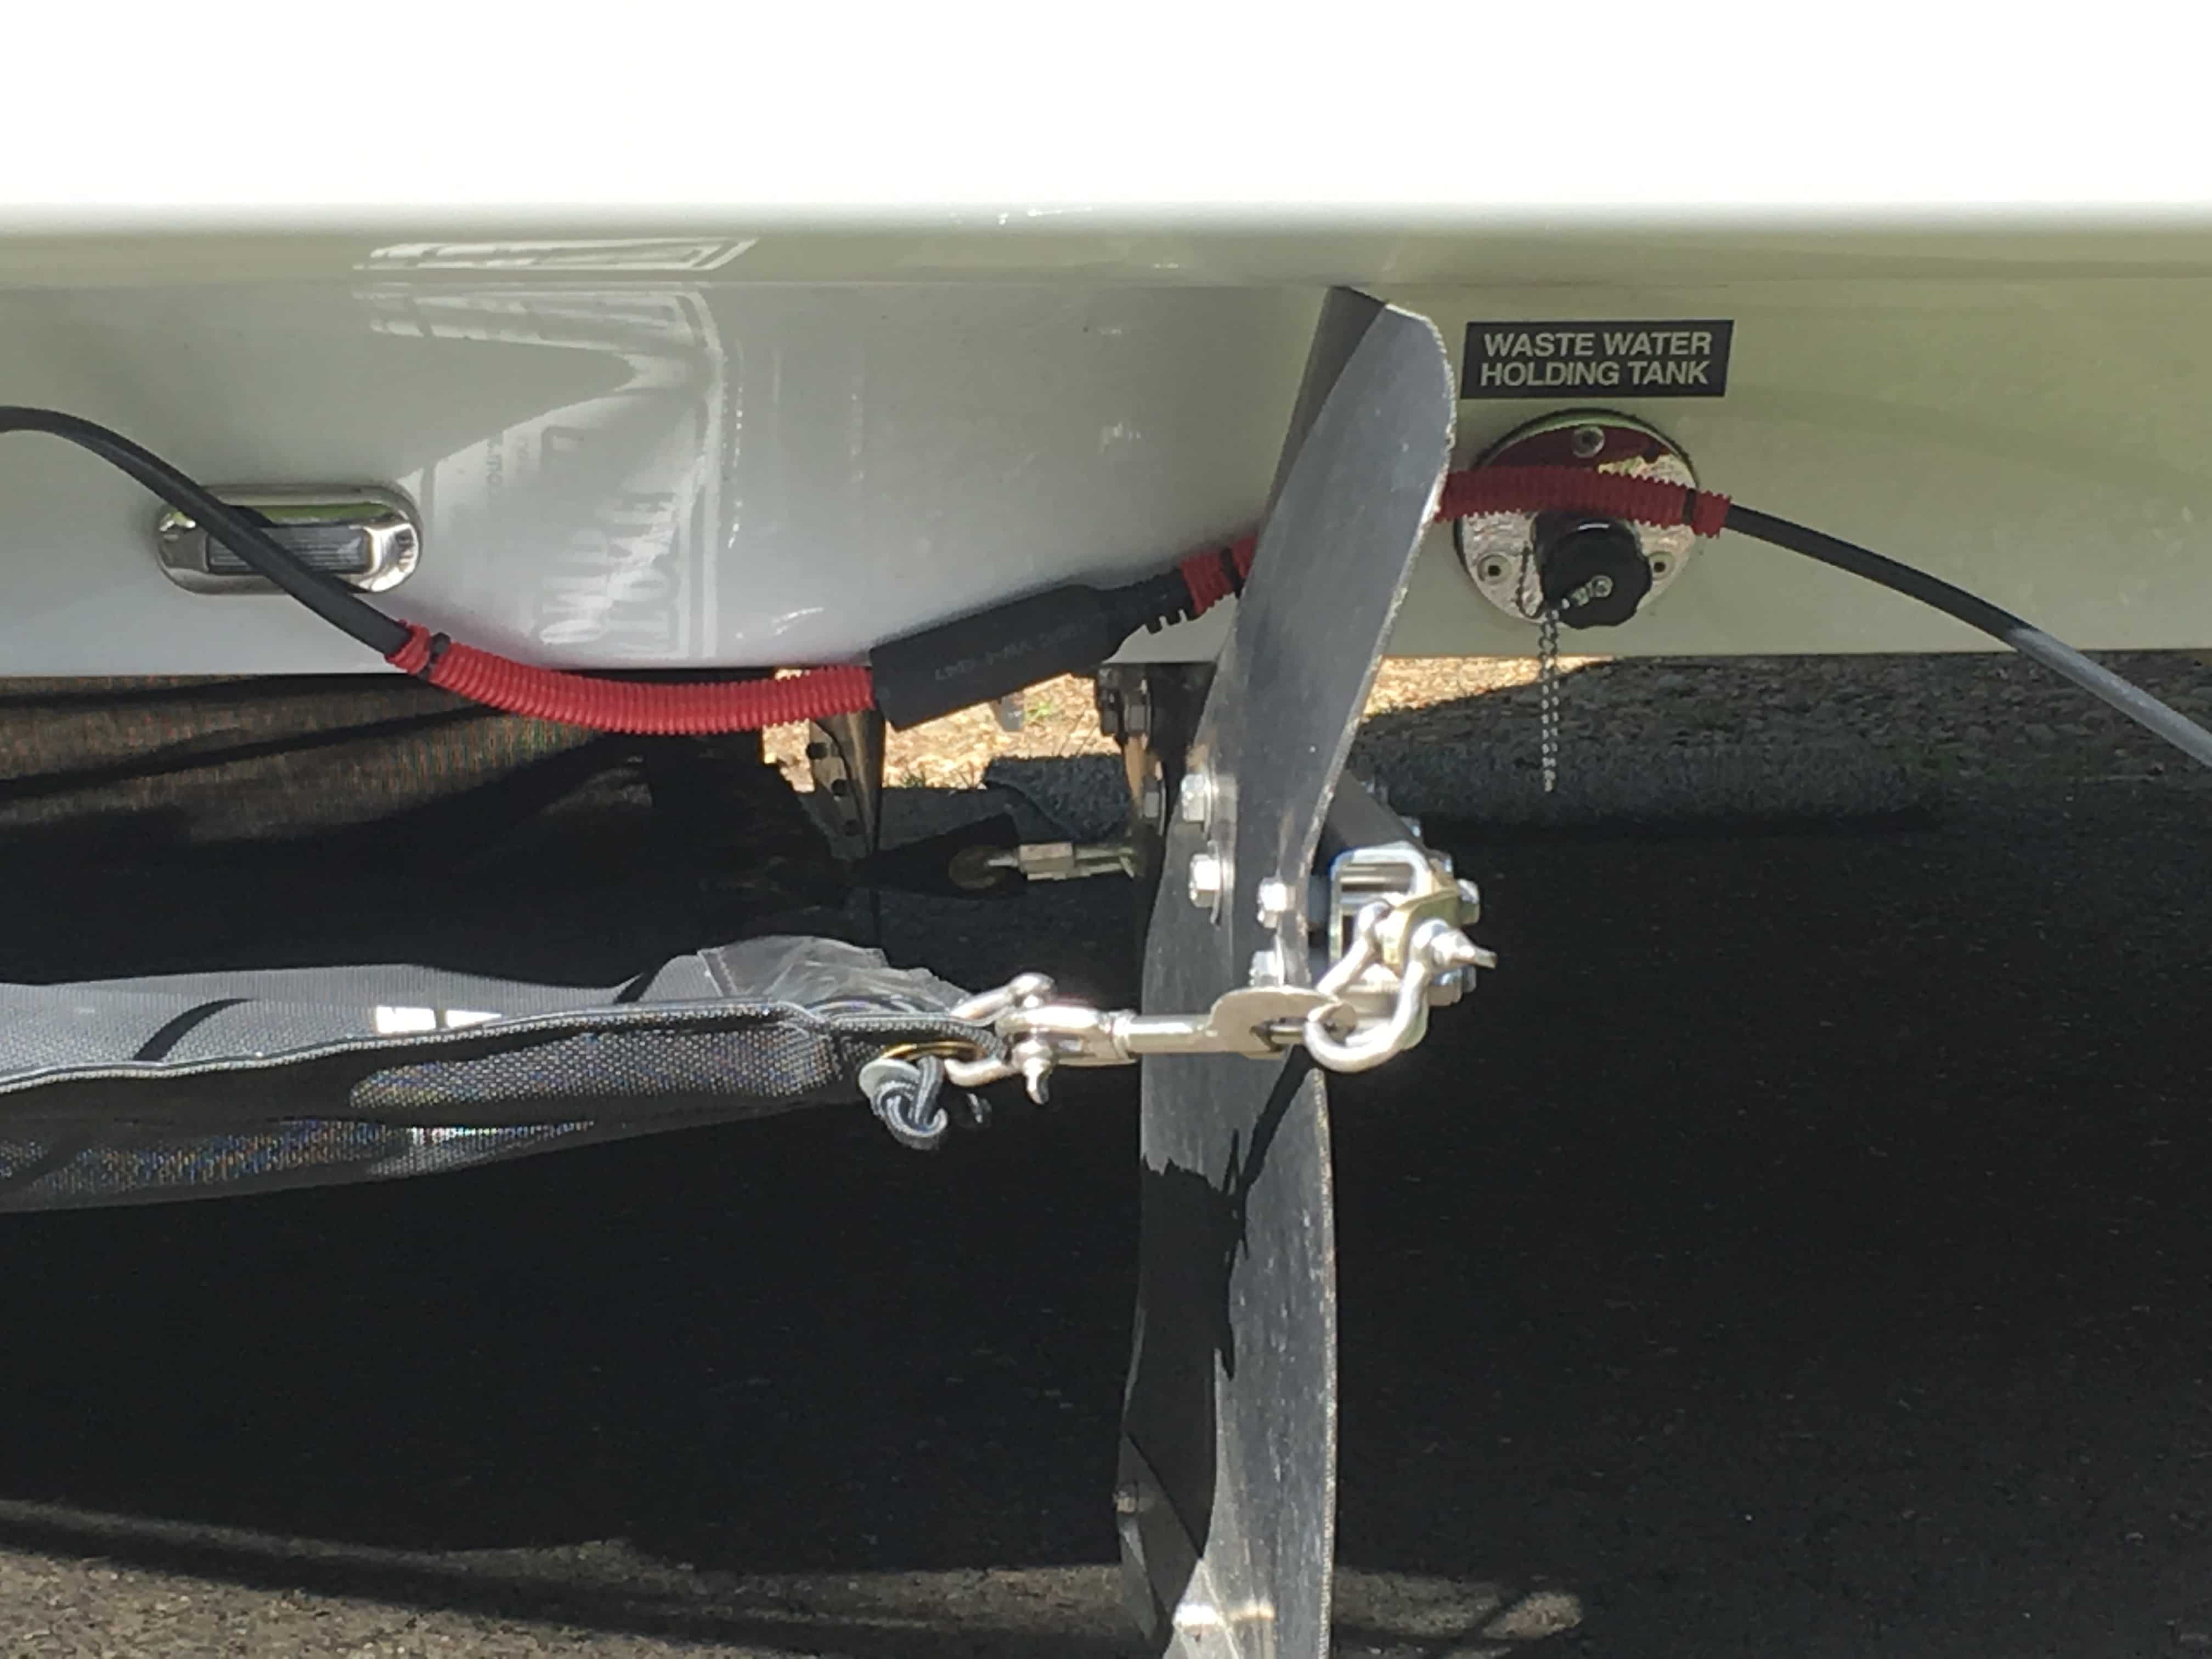
Yes, you don’t want to leave the black tank drain open - just when dumping. For the gray tank I usually leave it closed until I dump. If you want to leave it open it shouldn’t pose any problems except you won’t have gray water to flush through your hose after emptying the black tank. Mike1 point
-
For our Hull #1291, I purchased this inexpensive collection of blade fuses: https://smile.amazon.com/gp/product/B07G33XCHM/ref=ppx_yo_dt_b_search_asin_title?ie=UTF8&psc=1 It probably contains more fuses than I will ever need for the Oliver. I store it in the "secret" compartment below the pantry, underneath the velcroed piece of fiber granite.1 point
-
My trailer is also off site at this time but it's easy to open the fuse panel under the dinette seat. my recollection: its pretty standard stuff 7.5, 10, 15, 20 and 30 amp. Seems, I recall the 7.5 amp fuse for the furnace and fan may have been a bit unique but not hard to find. I do have a larger fuse ( maybe 40amp ) under the drive side bed next to the master power re-rest and in the battery compartment (positive side cable) . Not sure is this is stock from the factory I'm not the original owner of the 2016 trailer. check the owners manual starting on page 35 https://olivertraveltrailers.com/wp-content/uploads/oliver-university/Owners_Manual/2019/2019-Owners-Manual.pdf1 point
-
HERE is the thread on the slow blow fuses. Bill1 point
-
Since I store my Ollie away from my home I do not have it readily available. So, I simply don't remember what type of "blade" fuse is necessary - but - you can always simply pull one, take it to WalMart, Ace or any auto parts store and get a "kit" that includes a couple of fuses in the most common sizes plus a fuse puller (beats looking around for a pair of needle nose pliers). You will also need a couple of slow blow fuses for the jacks. There was a recent thread for those here on the Forum or you will find a yellow plastic/rubber protective case near the top of each jack. Inside that case is the slow blow fuse. Take it out, run down to your local NAPA store and buy a couple. Bill1 point
-
My son and I completed ceramic coating our Oliver Elite II Hull#1240 and I posted some pictures on the Facebook group and was asked to provide a list of products we used in the process. So instead of just pasting a long message into the group I decided to create a separate document that could be used as a reference. So I'm posting it here on the Forum for those who may be interested in DIY Ceramic Coating. I hope others find it useful. Thanks, Martin Oliver Elite II Hull 1240 Ceramic Coating Reference.pdf1 point
-
All, After consulting here on the suitability of my 2013 4Runner for towing an Elite, I've decided to move into something a bit more capable. There are quite a few nice, low mileage 2016 Toureg TDIs available locally and I'm considering. I think I read of folks towing Ollies with their Toureg TDIs and was wondering if any were on the forum. The Toureg would seem to meet my needs for a compact SUV. I used to have trucks but cannot justify having one as my sole vehicle. Heck, park an aluminum utility trailer in the garage and I have a truck when I need one. TIA, Bill1 point
-
I want the rocking when someone comes up the stairs. Look over and if the wife is in her bunk.... Grab the shotgun.1 point
-
Thanks gang. I knew some questions were probably a longshot since no one knows what the new Victron setup will be. I read through John’s Natures Head thread, so I knew some of the problems. But that was before wiring harness standardization. I’m sure hoping wires are where I’ll need them! Some of these questions *were* asked during our visit, which is why I’m asking here… Perhaps Jason will know when I call.1 point
-
My Natures Head was a factory install, one of the very first. It was a custom order that later became a regular option. I doubt that the fan power wire is there in a non NH trailer It would be simple enough to run one from an unused fuse in back.You would have to block off the top of the black tank and add a tee and pipe to the 1 1/2” black sewer pipe for the new toilet vent. You could leave the fresh flush line intact, as Oliver does, but it would be best to cap off that line under the vanity so you don’t have to fuss with winterizing that small section of line. The hold down brackets would be straight forward. It should be a fairly easy mod. If you did it right away you could sell your porcelon toilet as “nearly new, unpooped in” on Craigslist. 😁 FYI the early installations of the NH had the wrong fan fuse and it would pop after a day or two. Oliver put in a 1 amp, the required one is 2.5 Amp. John Davies Spokane WA1 point
-
Mike and Carol are correct. Since we do not all have new campers (and things change over the years and even in the same year), it is best to ask your questions to your sales person at Oliver.1 point
-
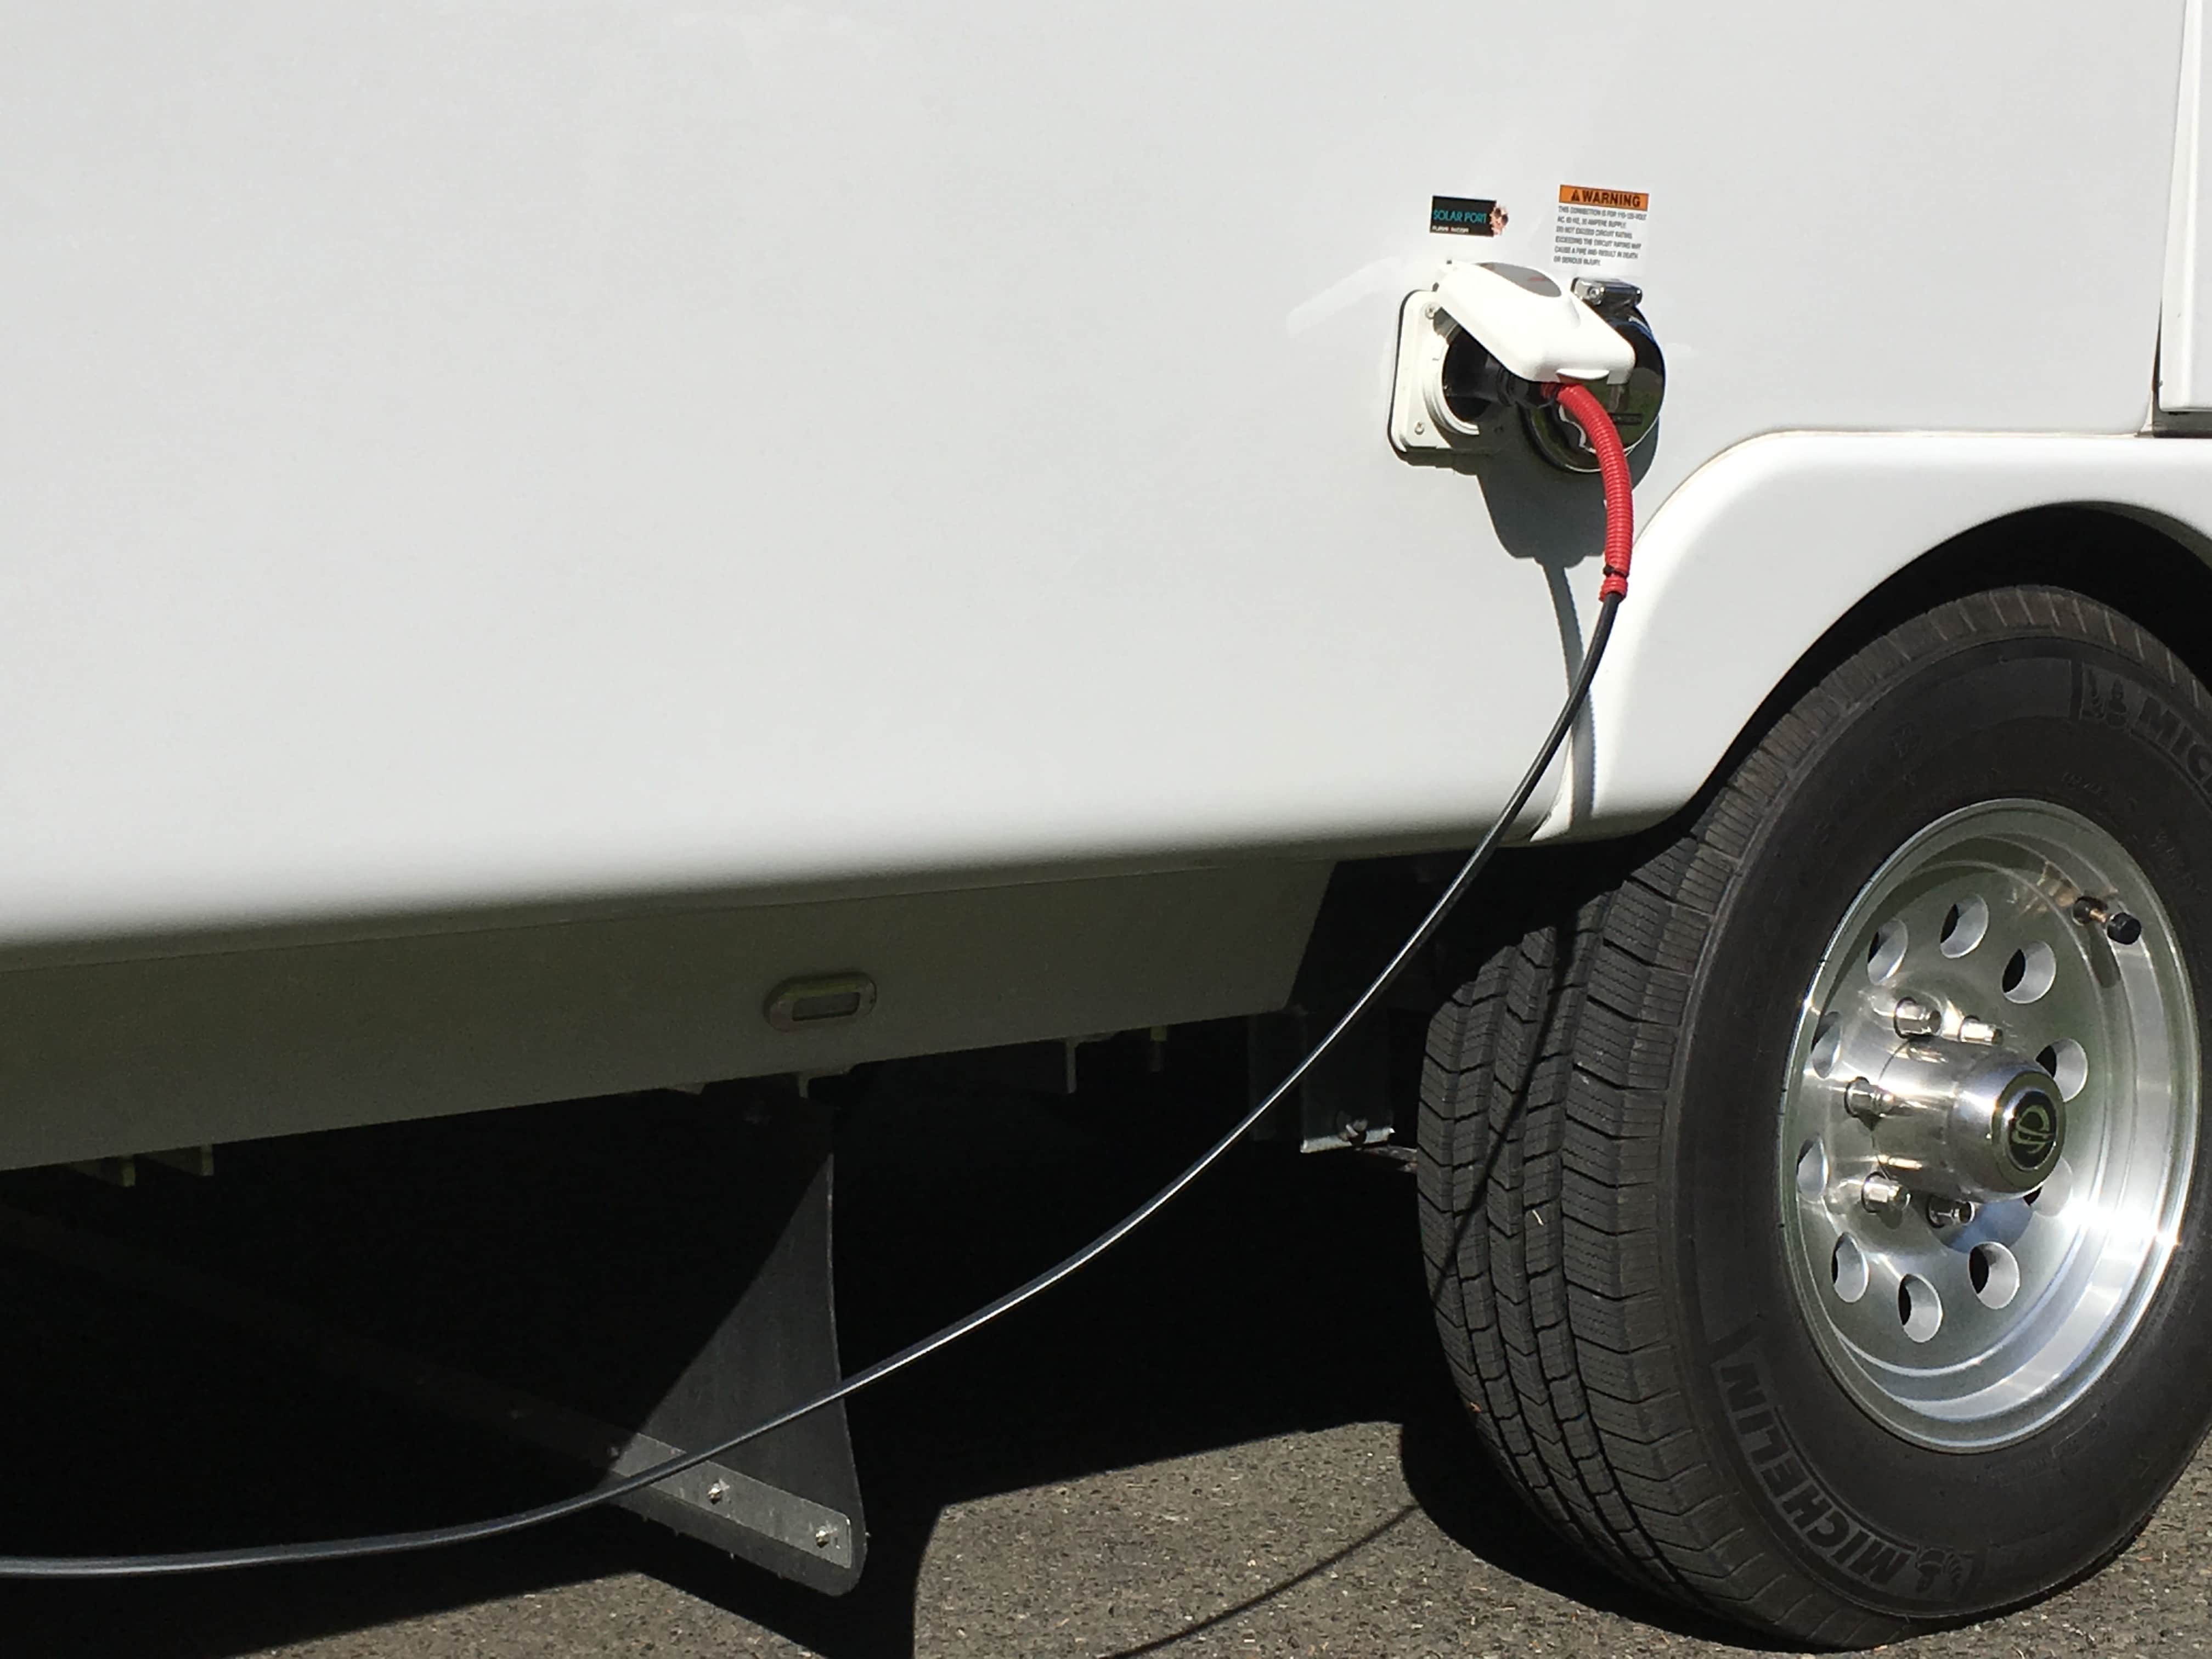
No. There is a dual AC outlet on the rear curb side. No. I use a portable battery to power my portable fridge, which is usually stowed in my truck. If the battery gets low, I use a Zamp extension cable plugged into the 12v Zamp sidewall port near the battery box. I use the same cable to extend the distance to my portable Zamp Portable Panels. Zamp Cable Extension It’s not difficult to install these components, but I suggest you get your trailer first to figure out if it’s necessary. As you mentioned, you could just run a short AC extension cord to the power post to power your truck fridge, or run a 12v cable to the side port.1 point
-
I hesitate to attempt to answer your questions based on my 6+ year old trailer. I’d contact your sales rep, these should be easy to answer. Mike1 point
-
No such thing as a stupid question, this is how we learn. I think these are all very good questions. We kept the stock camera but we liked our Tadibrothers better on our last camper and may eventually change it, but we did change out the monitor to a 7” the one that came with the camper was way too small.1 point
-
Before I made further efforts to remove the wet bolt, I would invest in a Grease Buster and give it a try on the bad zerk with some PB Blaster. It has worked for me on a bad zerk on my tractor. https://locknlube.com/collections/grease-buster/products/grease-buster-shop-size?gclid=EAIaIQobChMI_vrelKLQ9gIVhyCtBh3D9wptEAAYASABEgLgwvD_BwE I am a big Lock-N-Lube fan. Their Grease Couplers are big time savers when lubing more than 30 zerks on my tractor!1 point
-
Hello to the Elite II heading south on I-35 in Kansas just north of the Oklahoma border at around noon today. We were traveling without our trailer, which seemed really weird. Mike1 point
-
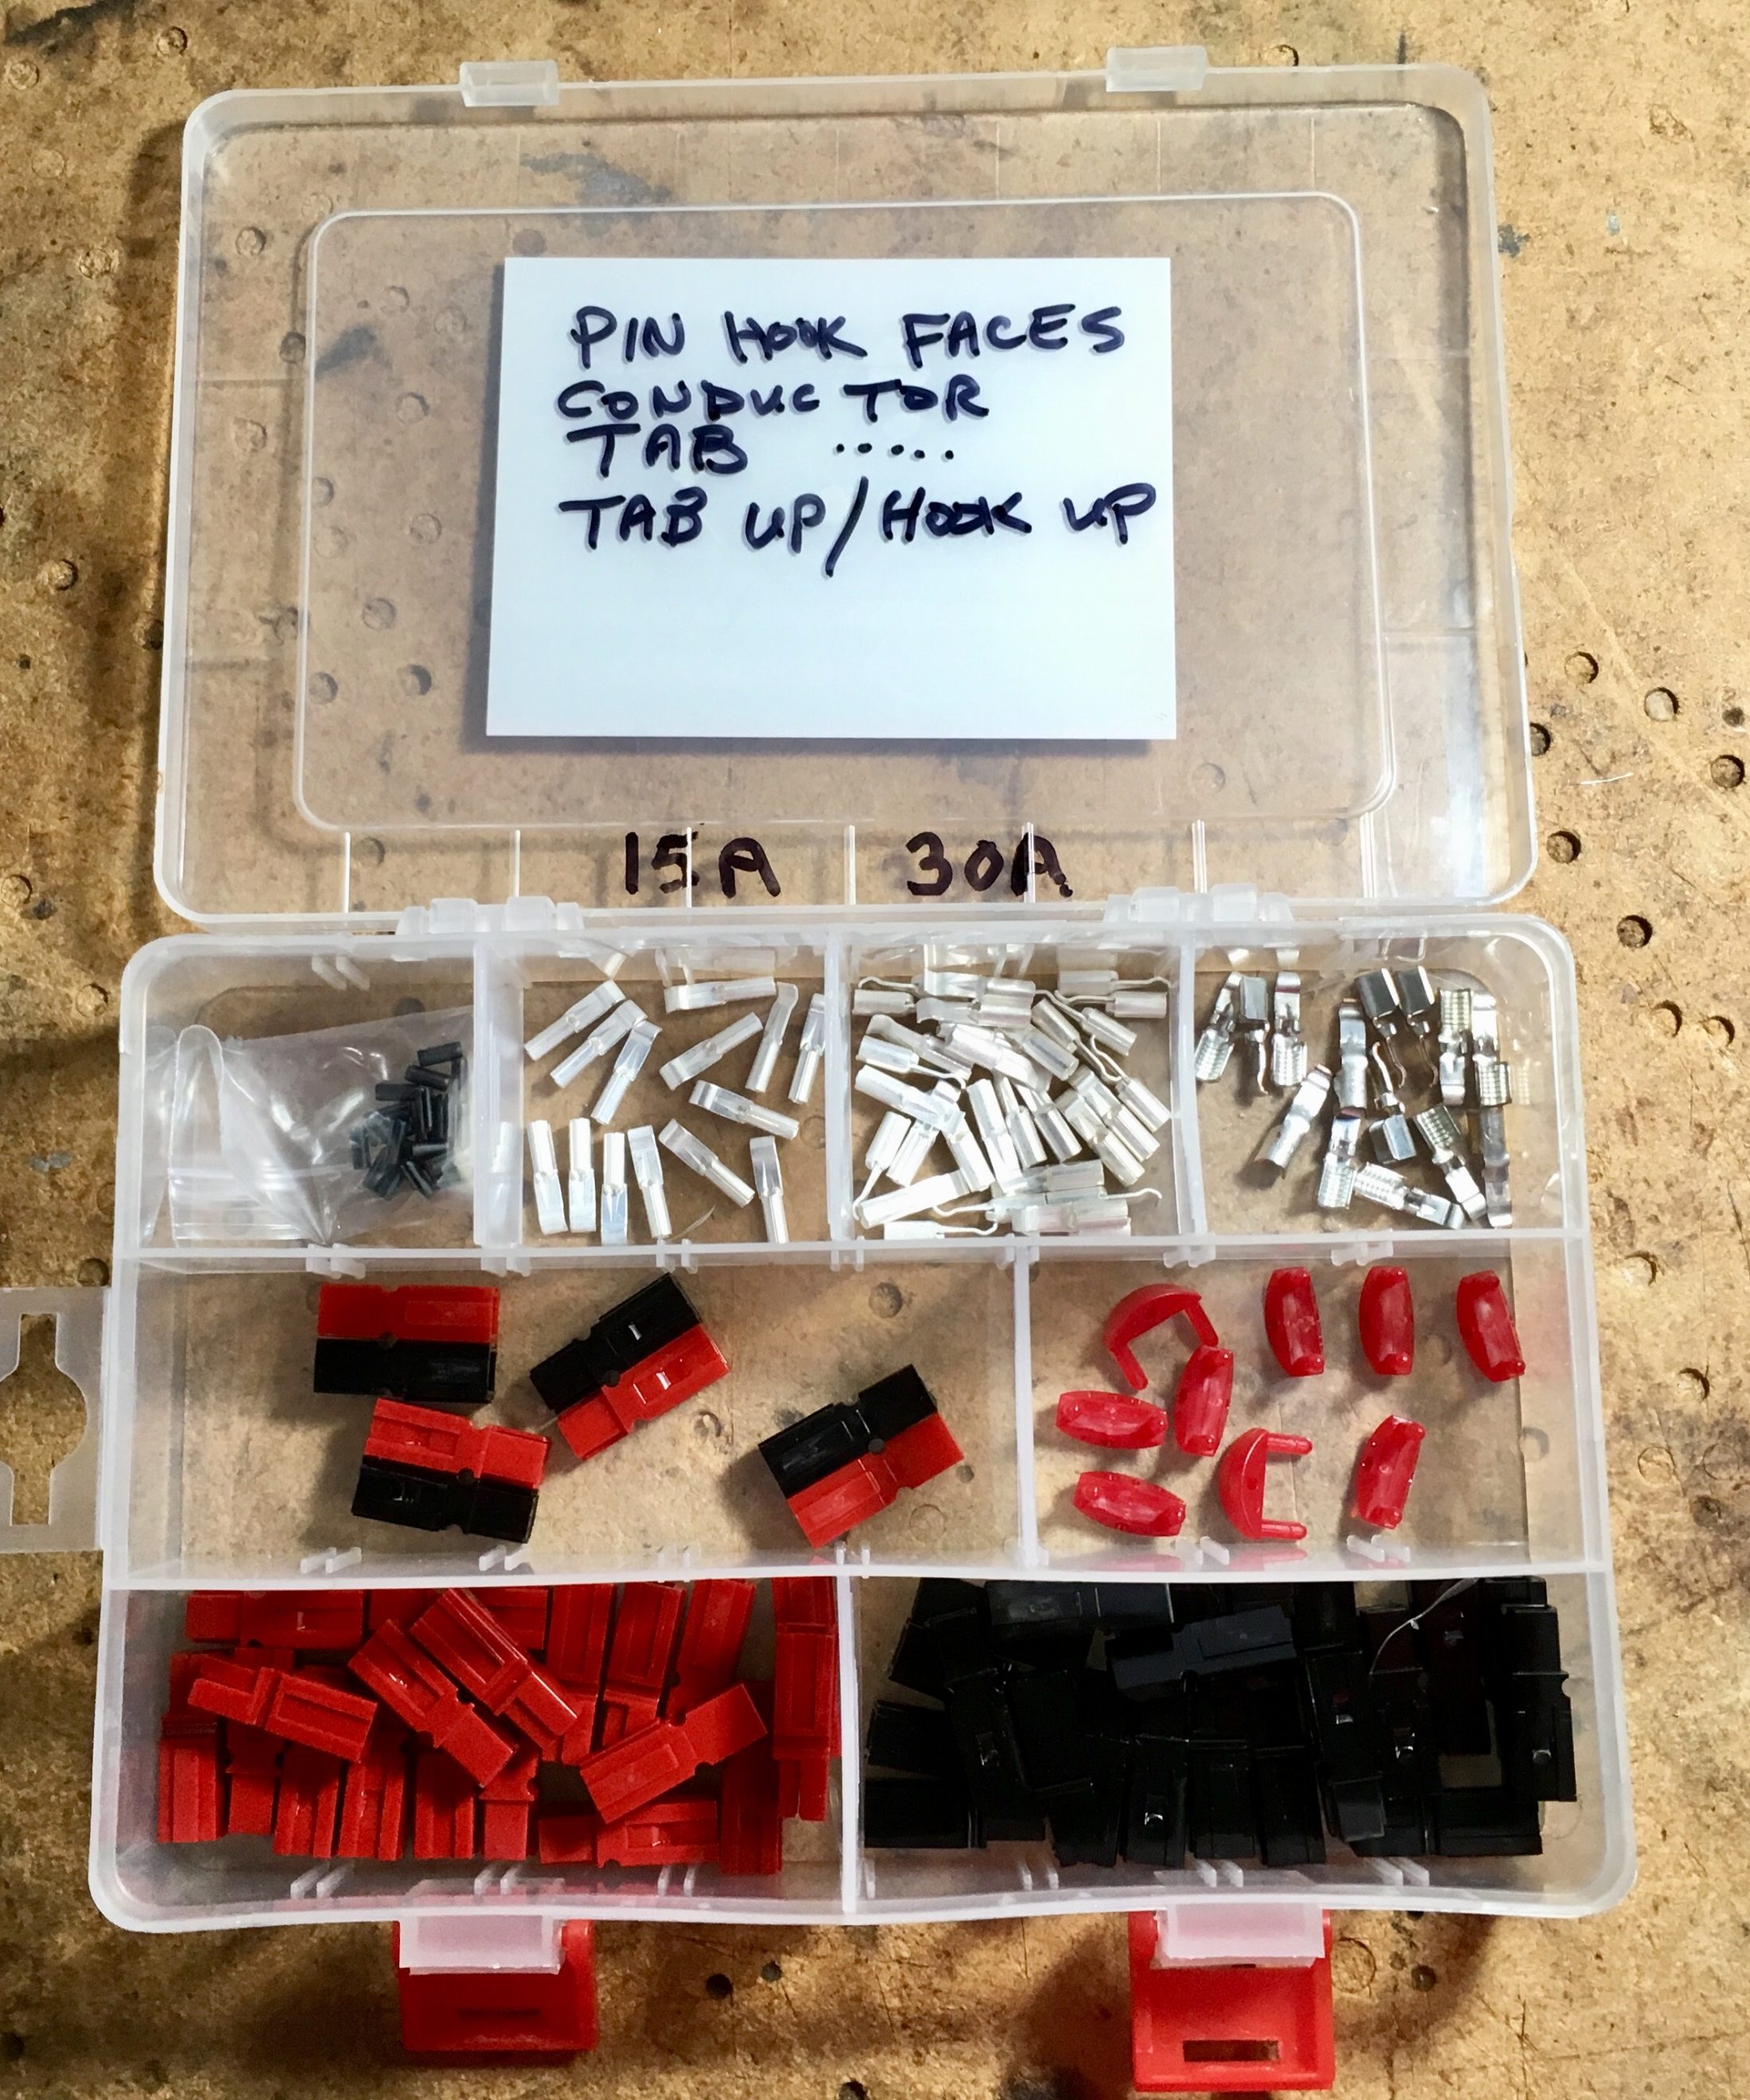
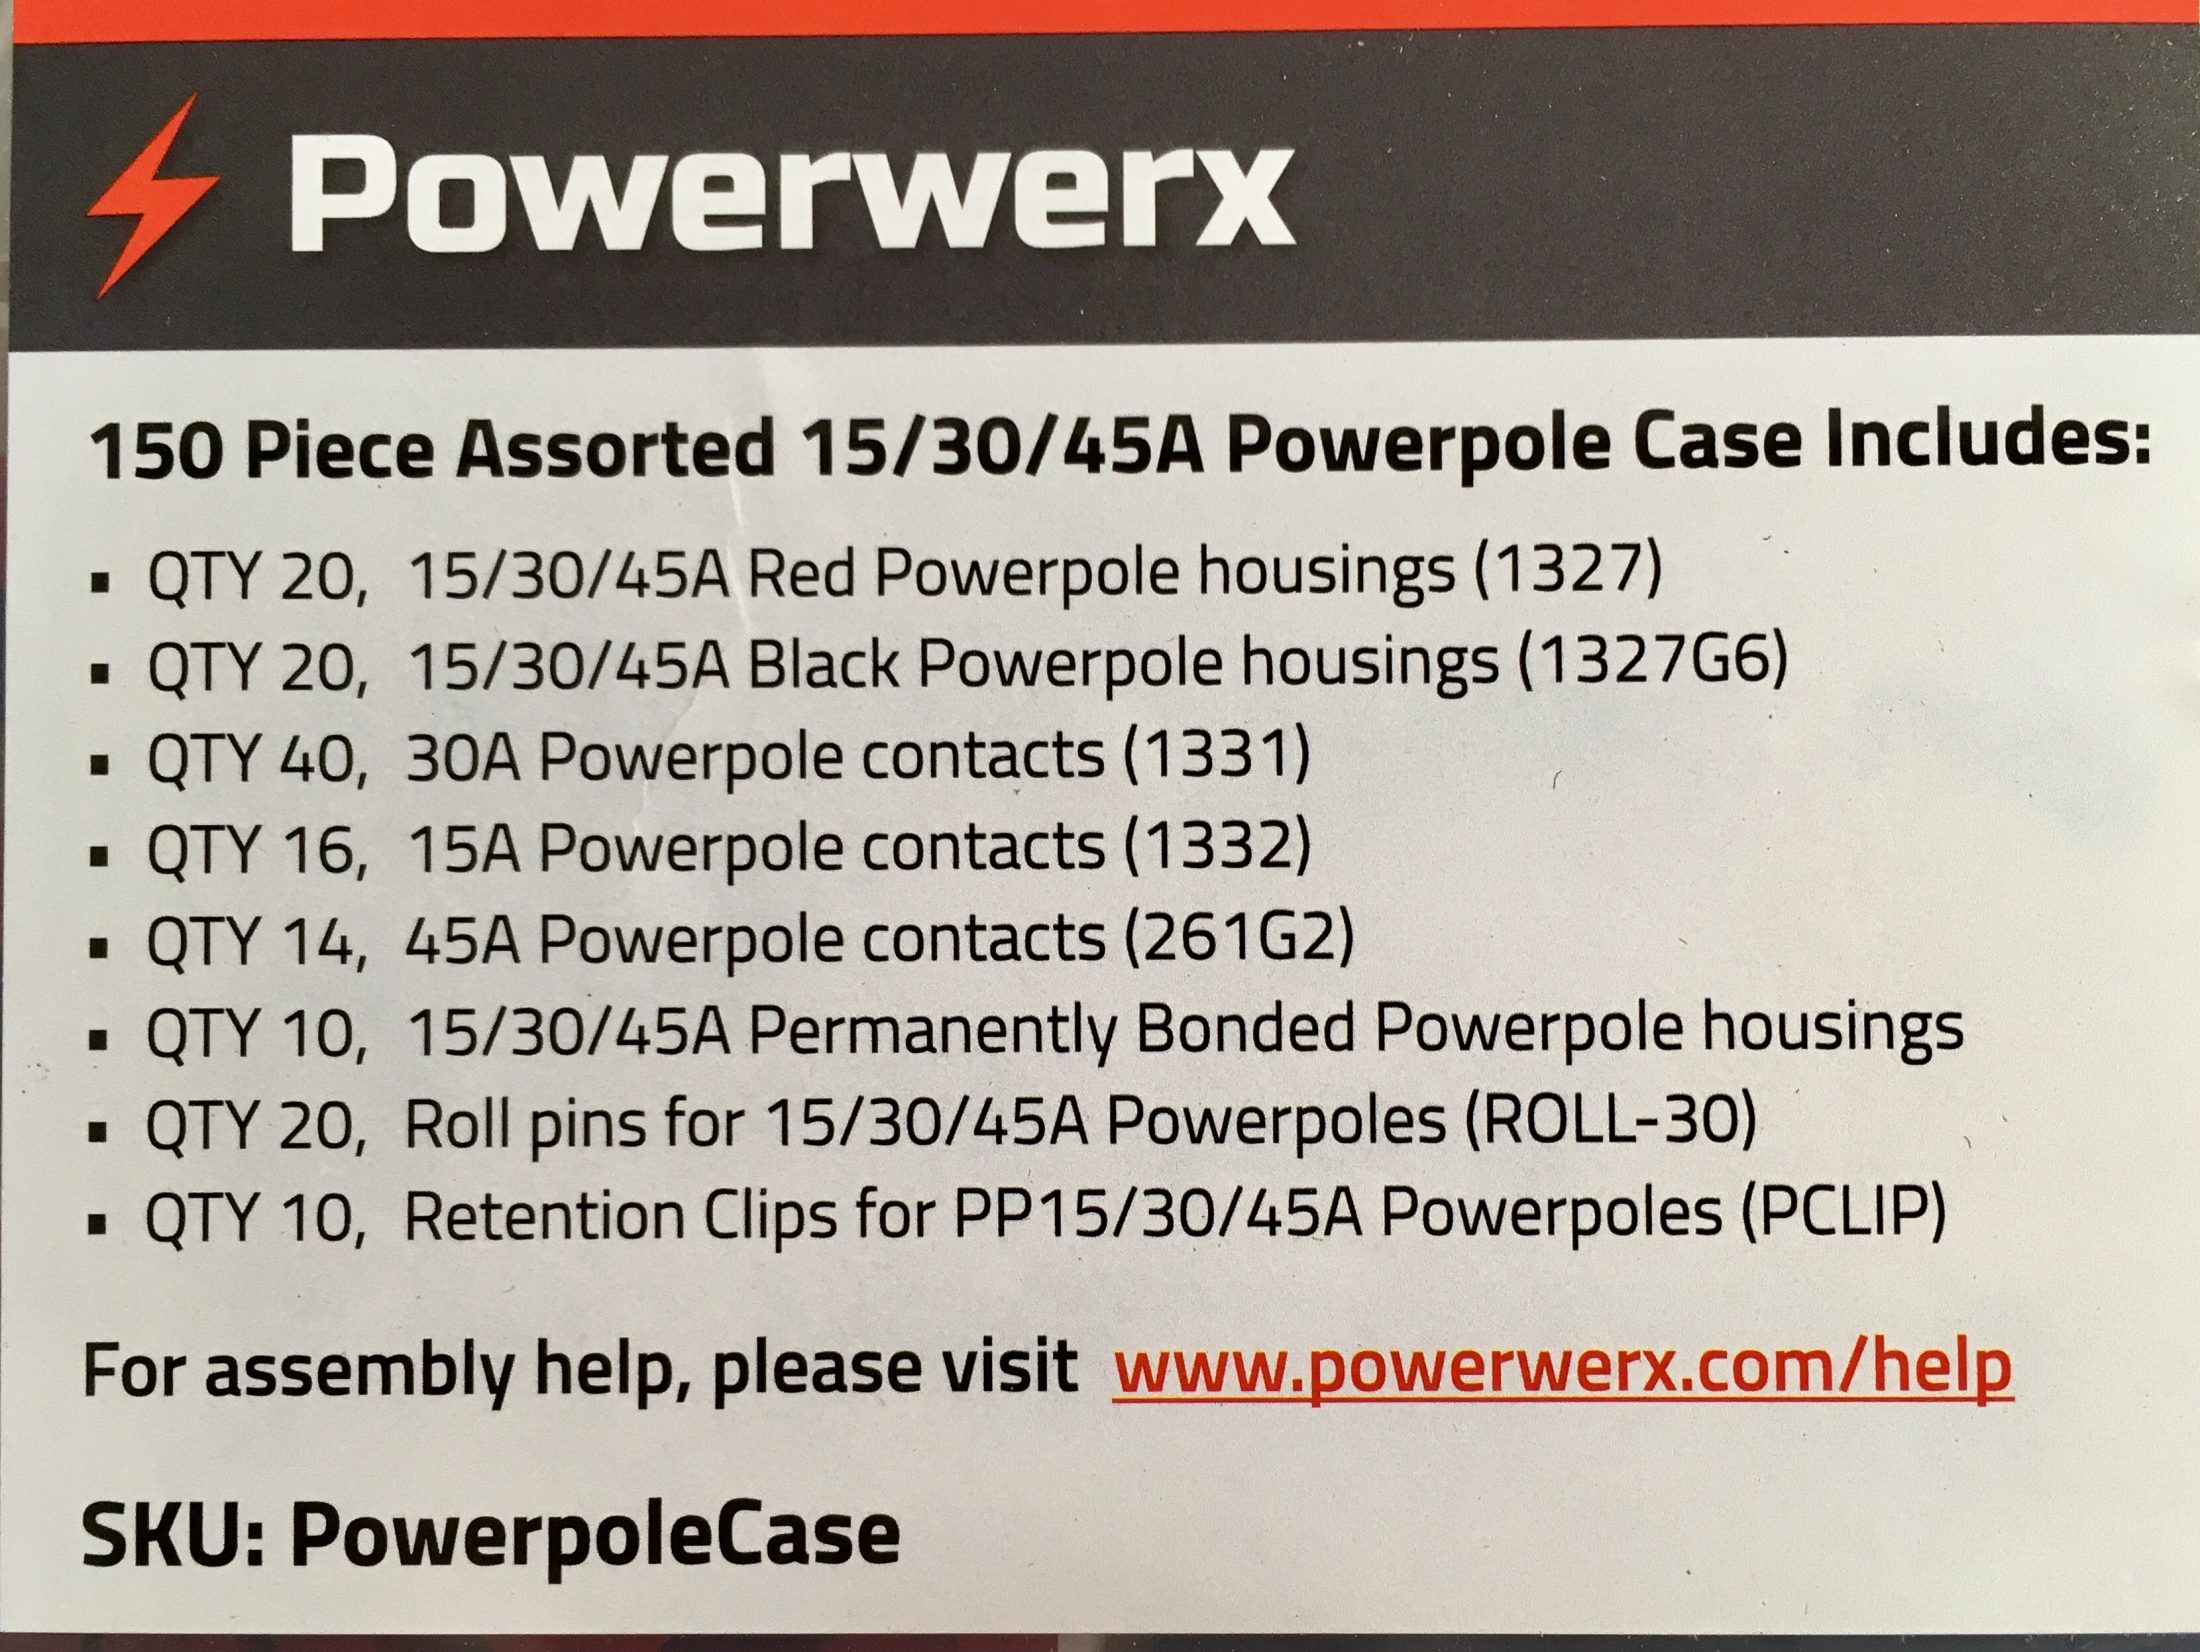
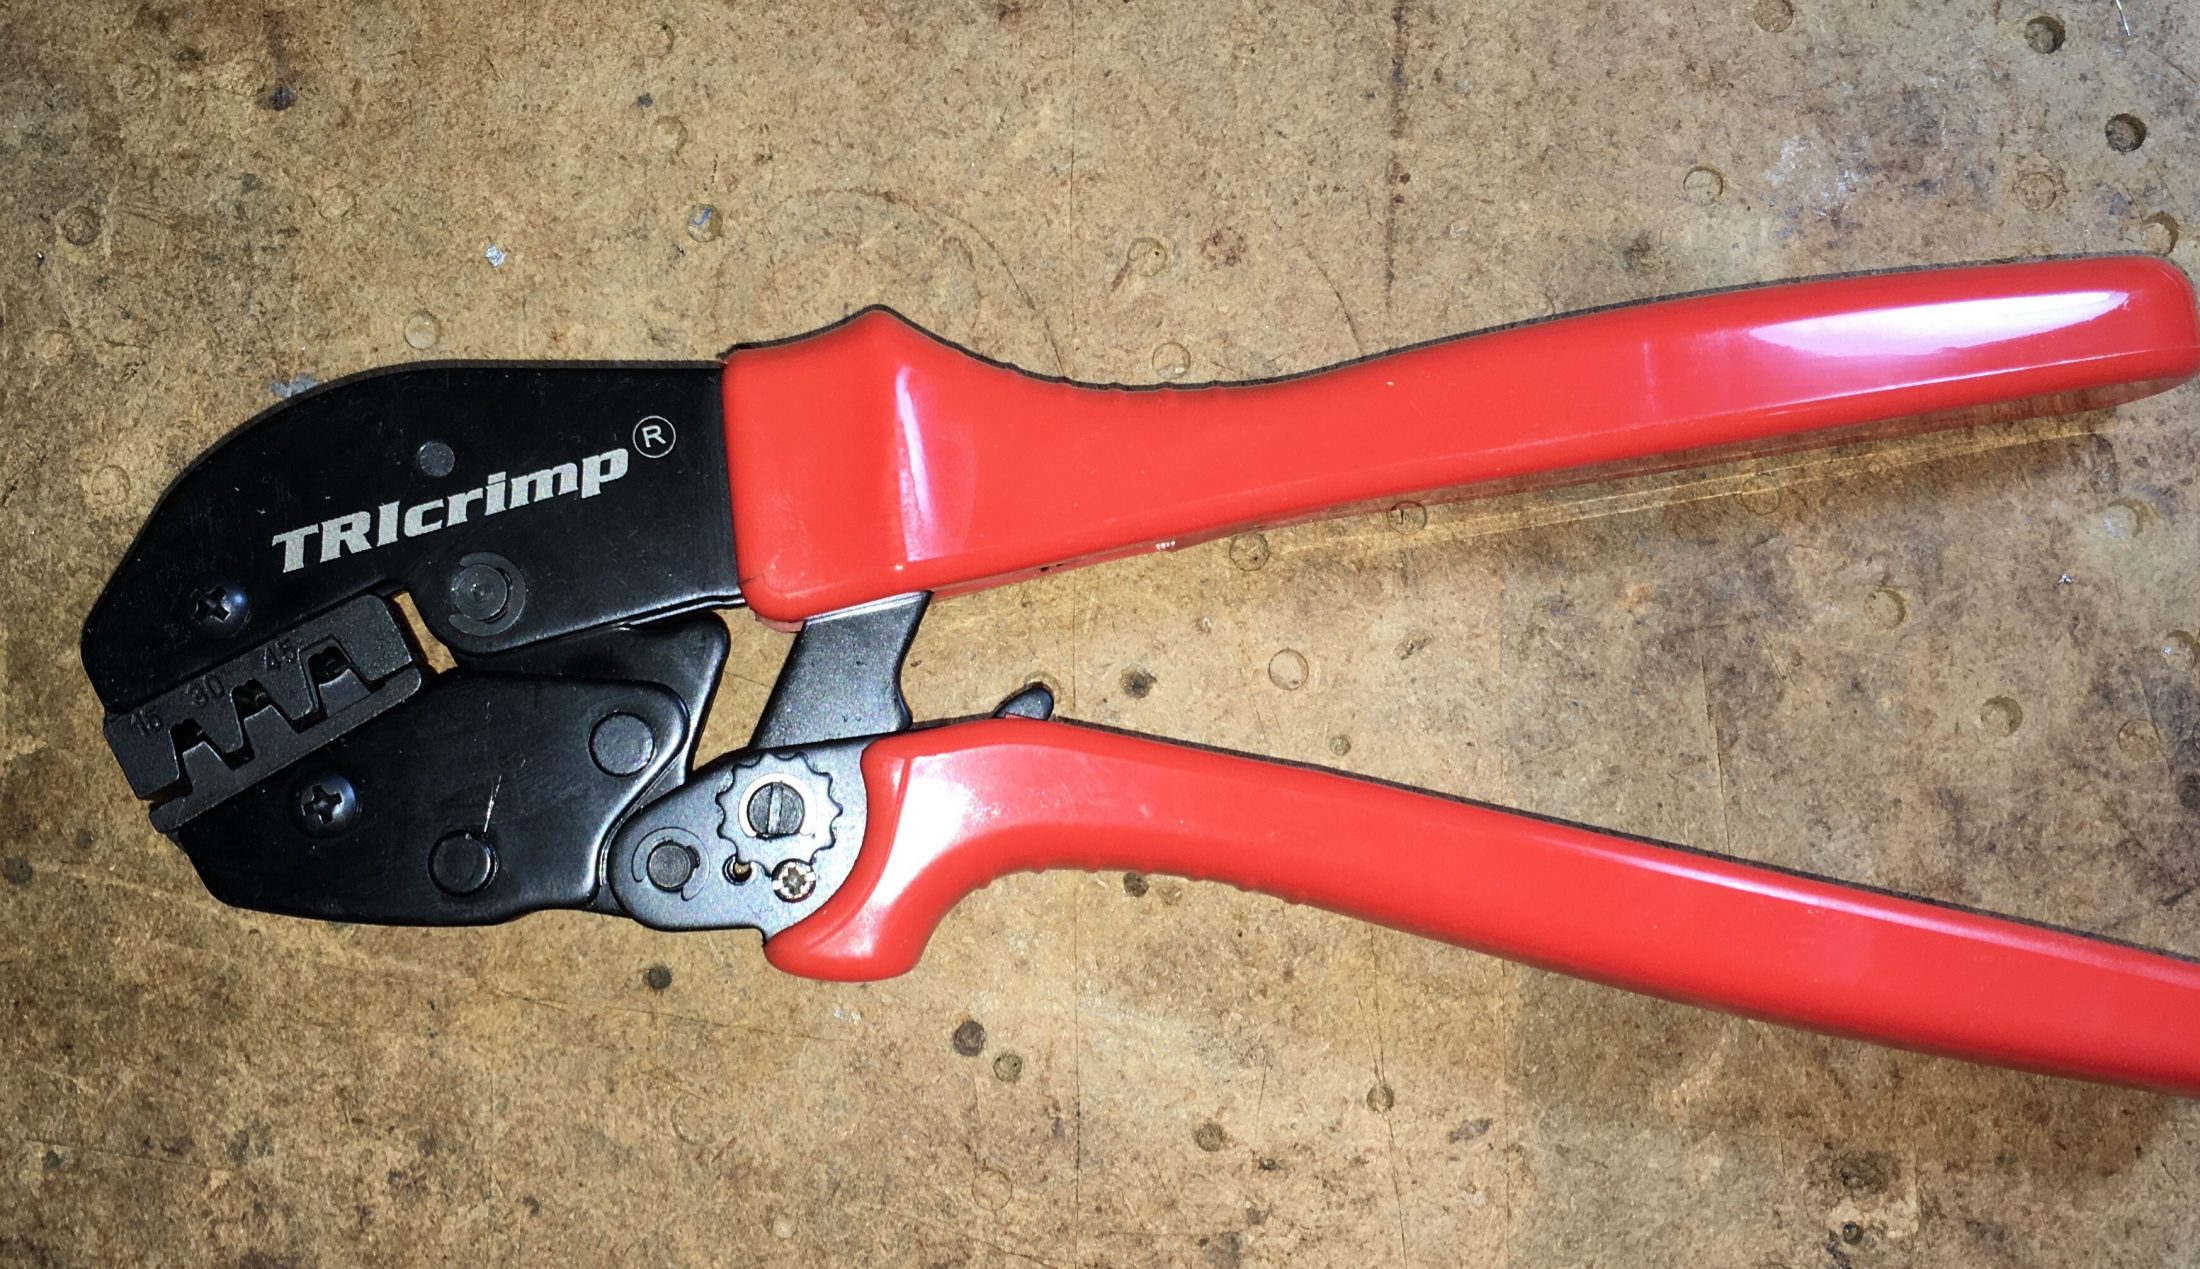
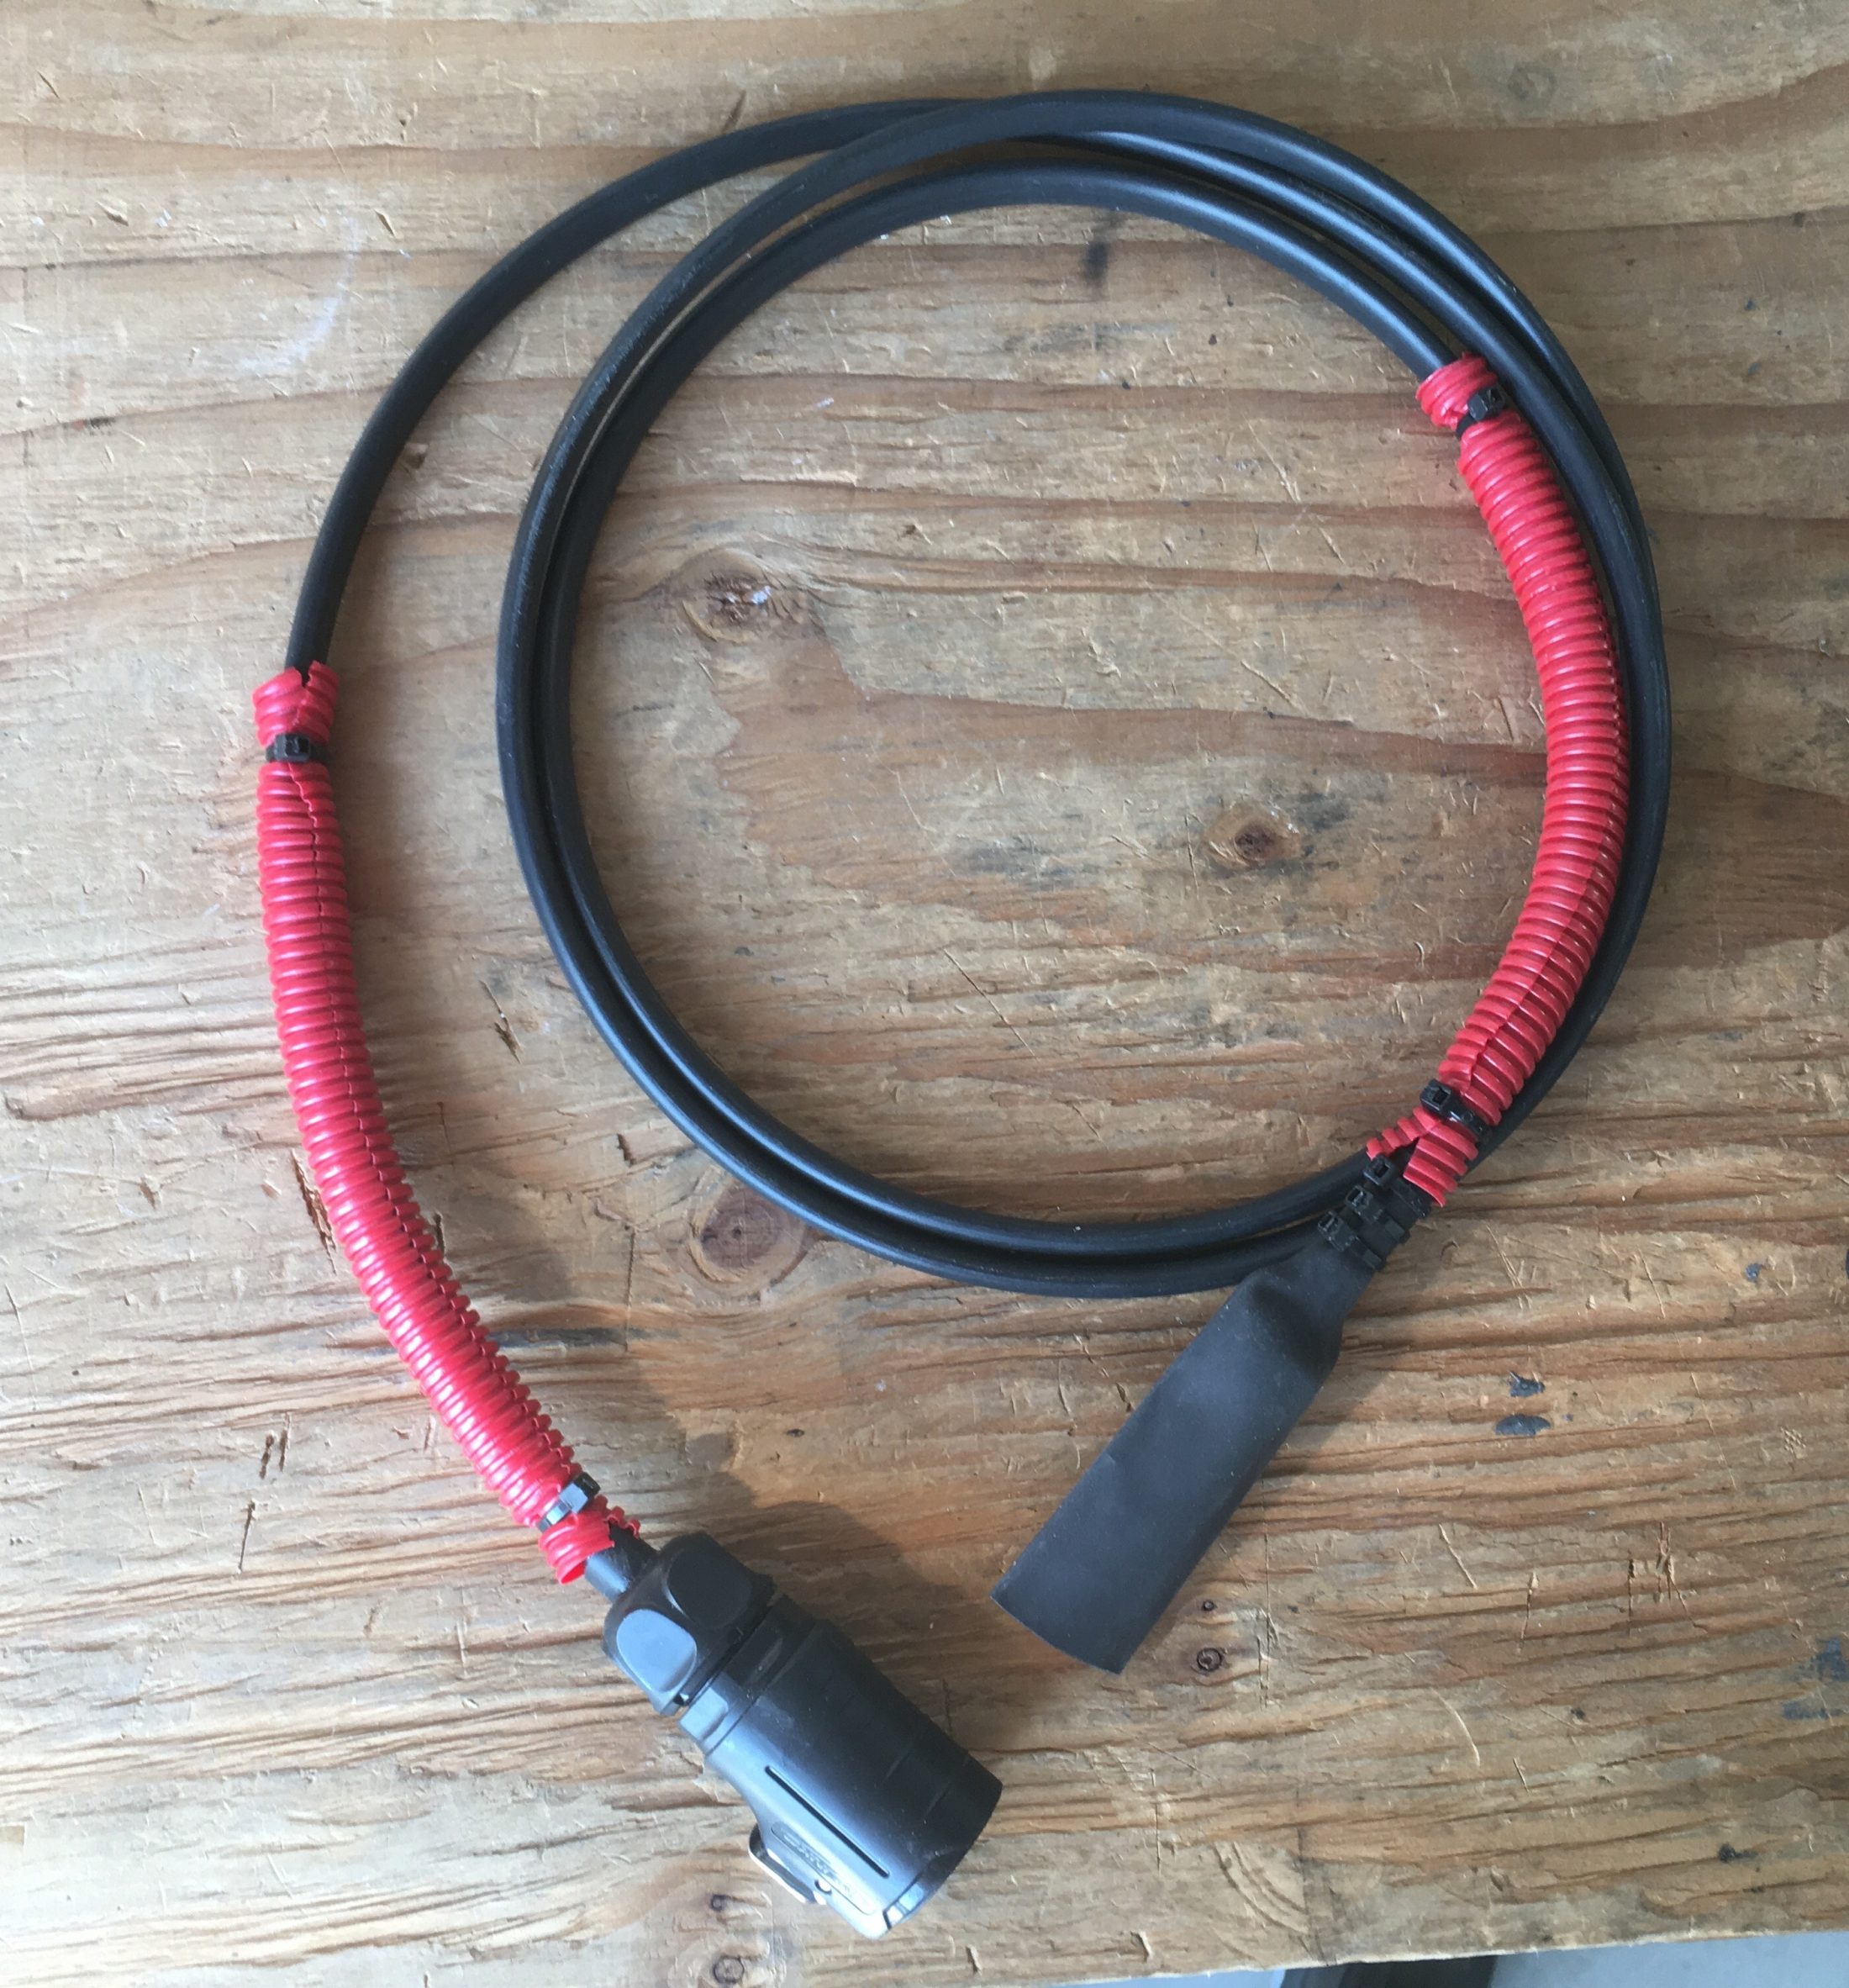
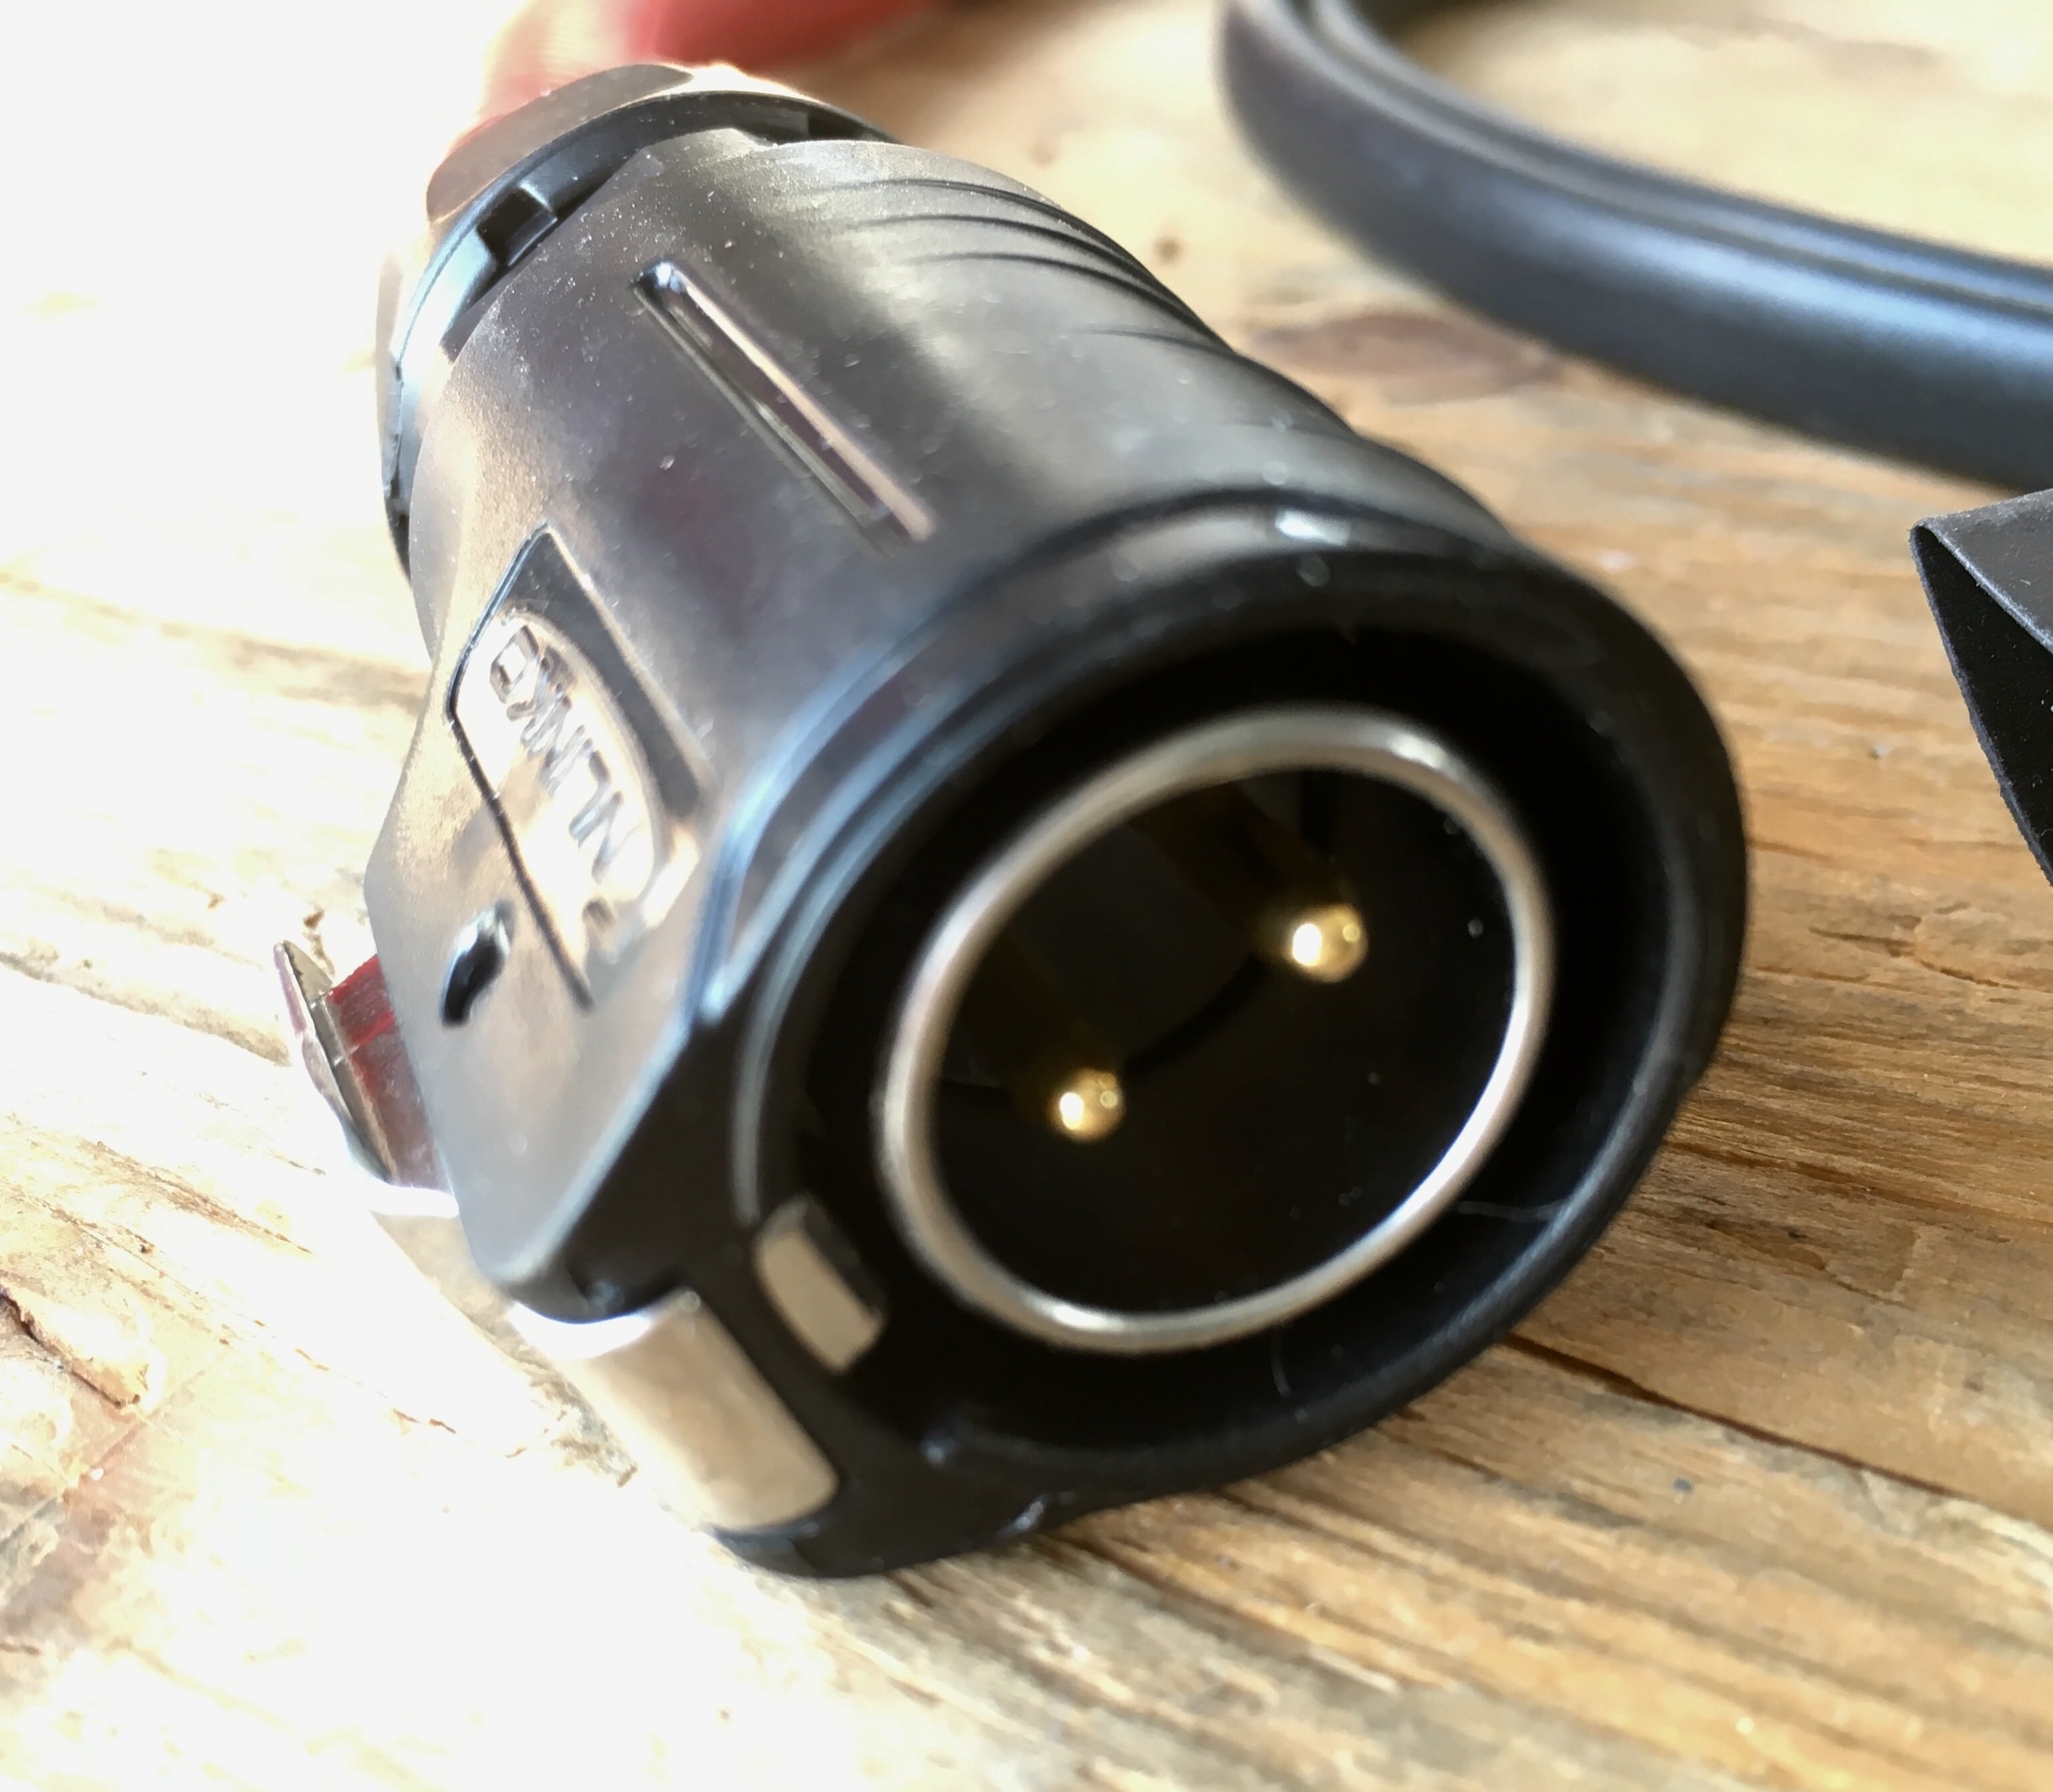
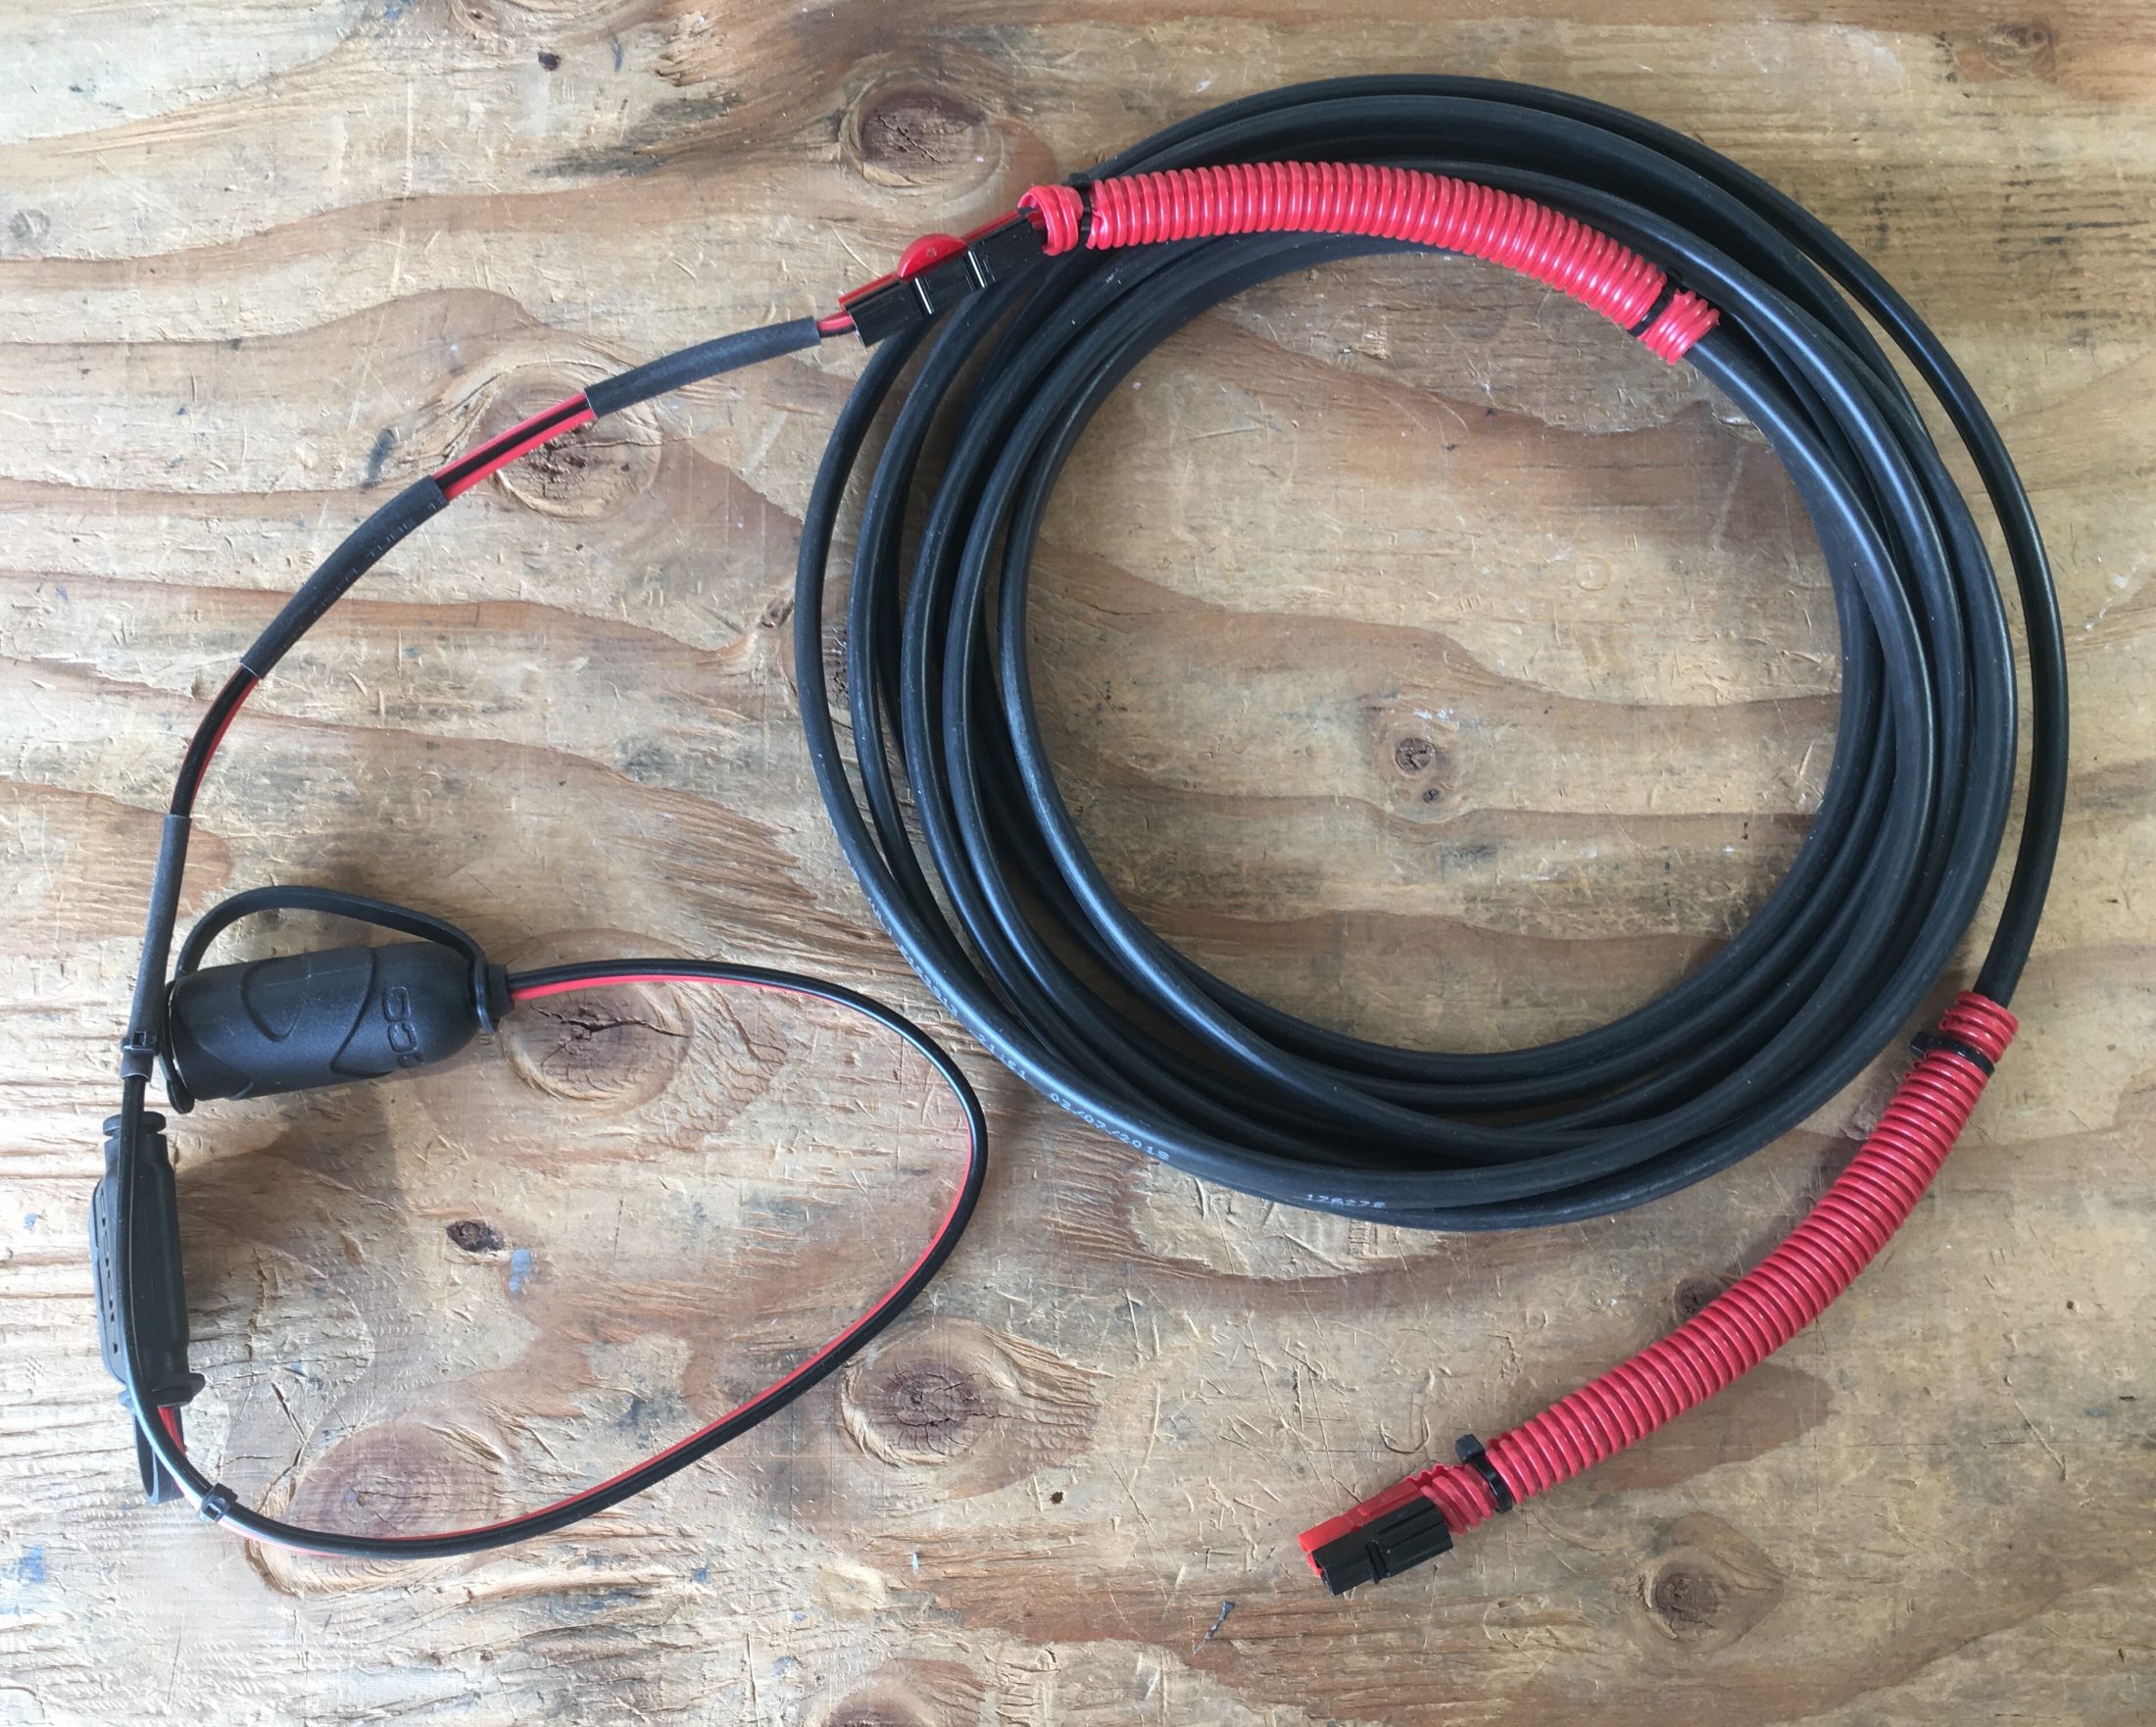
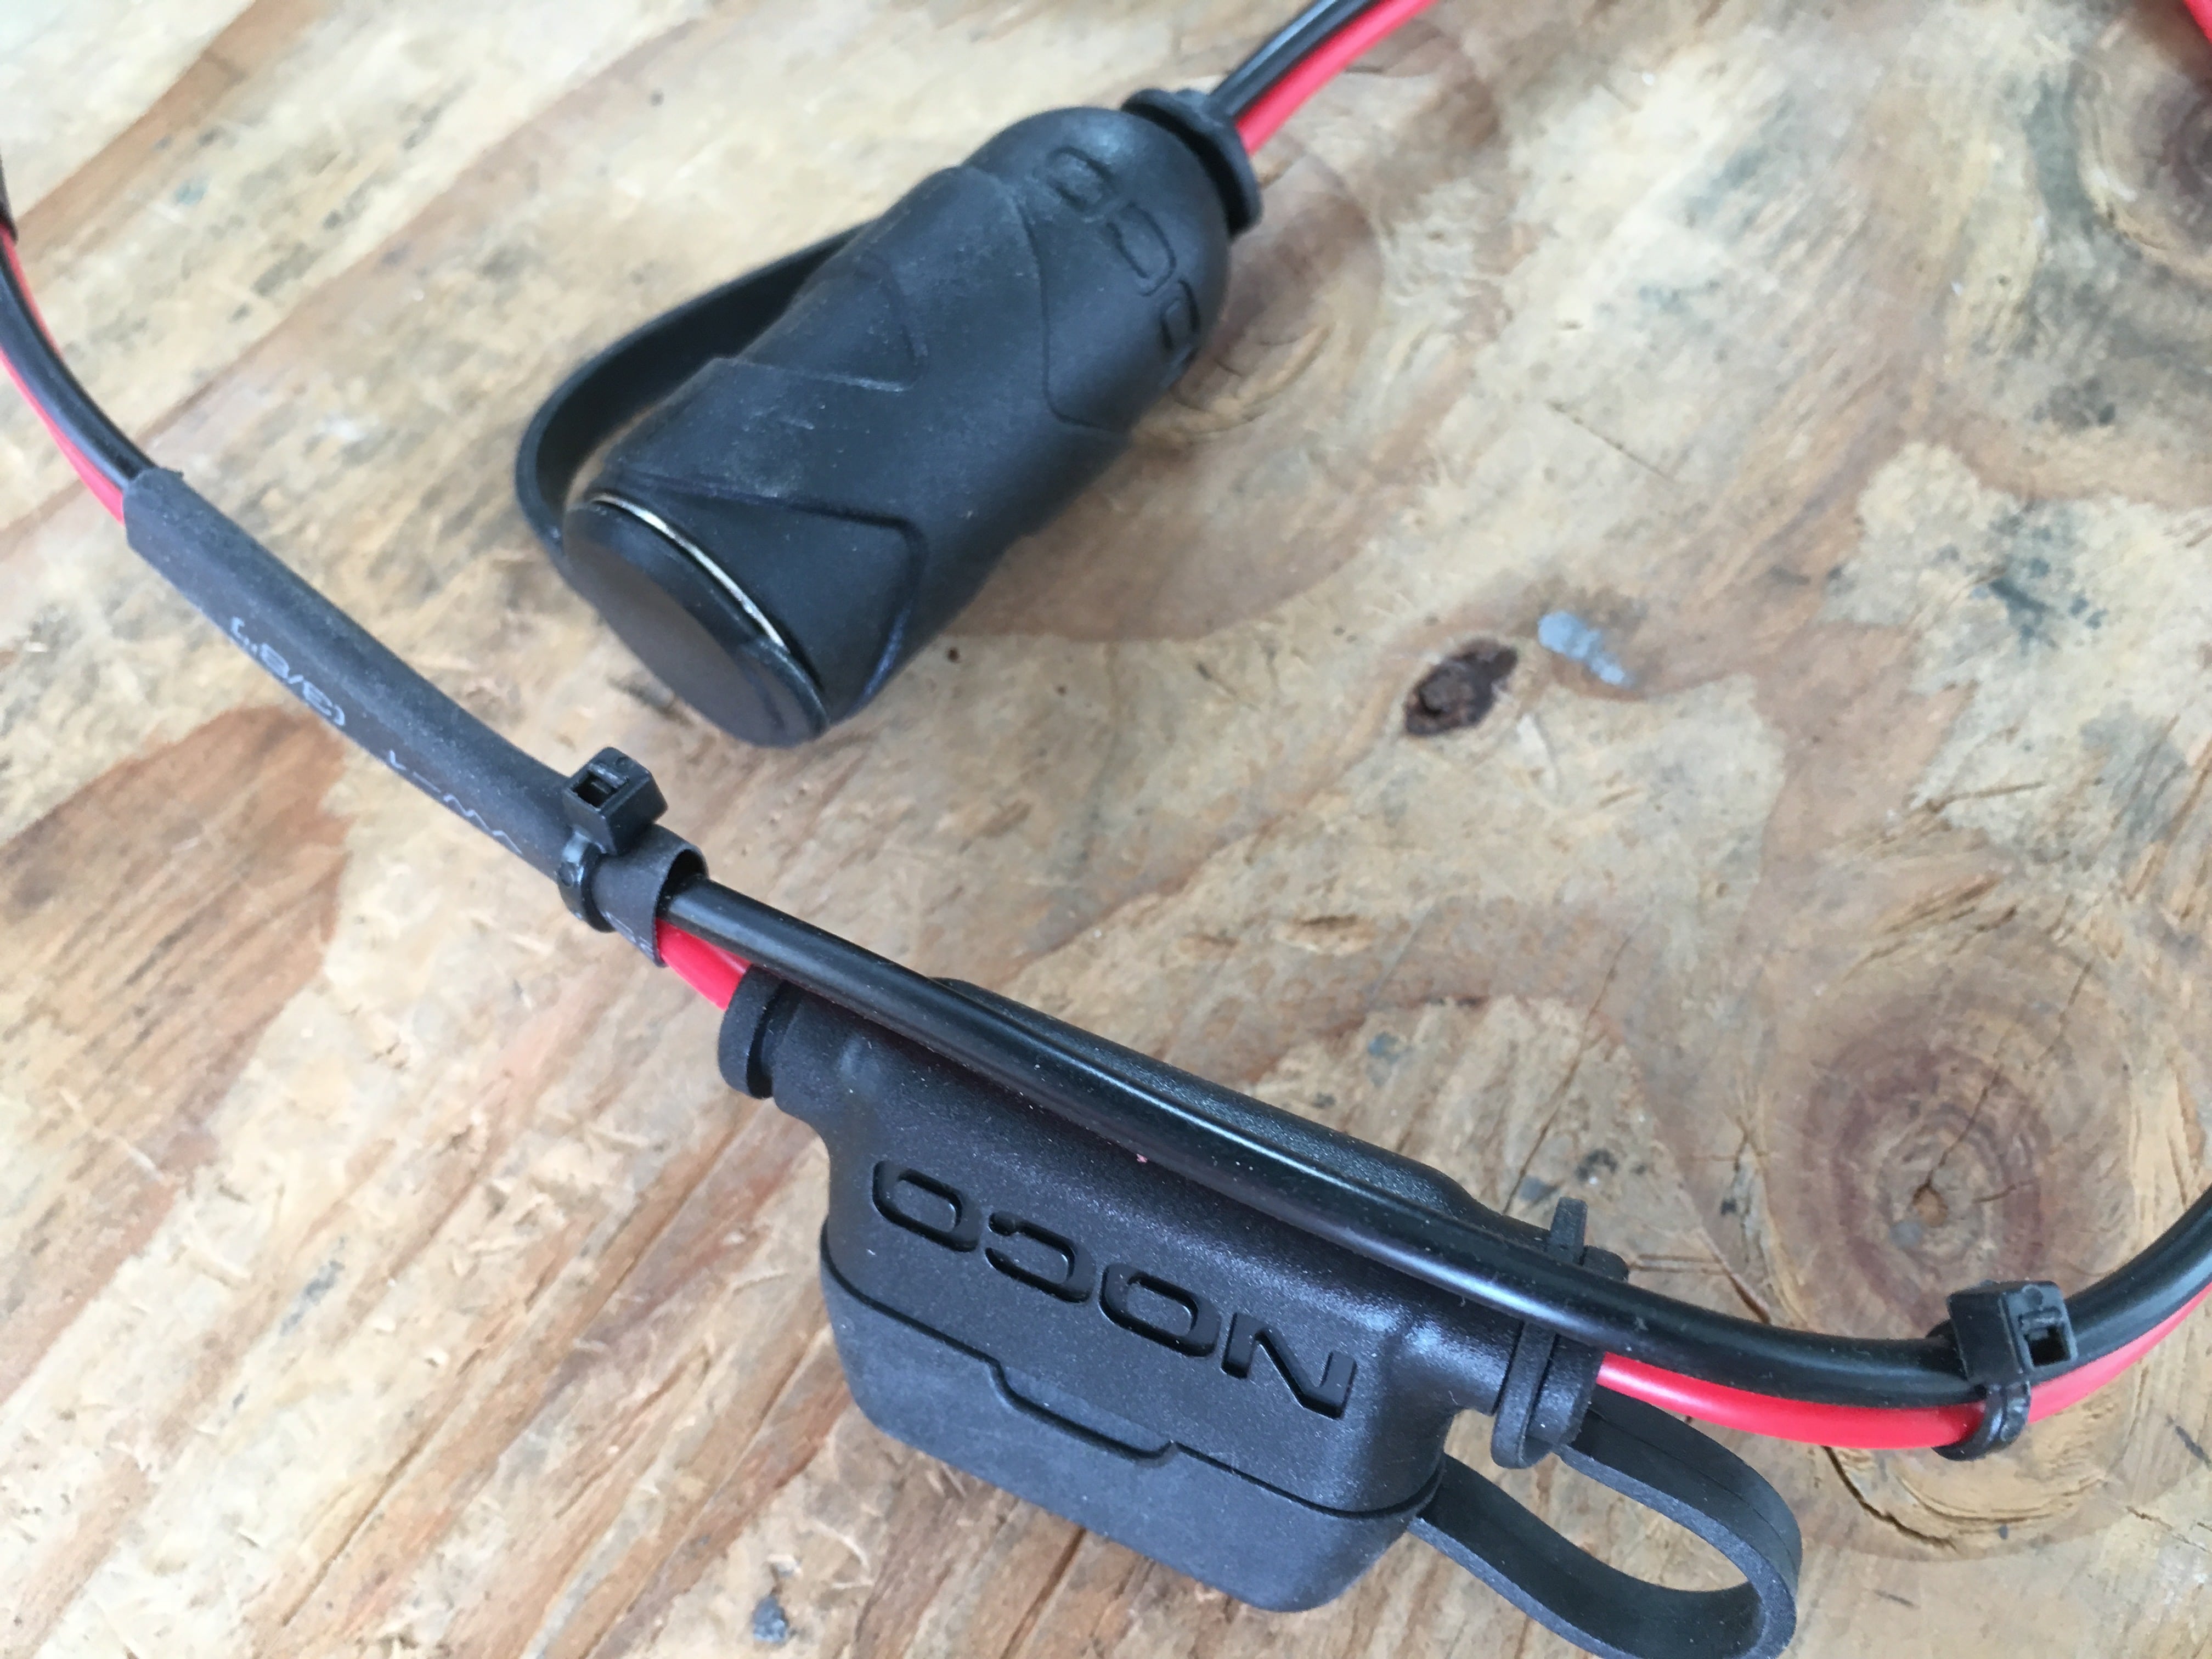
EDIT 05/10/21. Made an alteration to the cable, added a Y connection to connect to a portable solar panel ... https://olivertraveltrailers.com/forums/topic/5478-how-to-remote-mount-the-controller-of-a-suitcase-solar-panel-not-inside-the-trailer/ I wanted a large gauge cord that would provide 12v power from the trailer to my ARB compressor fridge (while inside the parked truck), and also as an extension cord in the future for use with an external solar panel. I had been using a regular 120 volt AC extension cord, but that required me to run the inverter all the time and I did not like the idea of a live high-voltage cord lying outside in wet conditions. The 12 V cord is safer and uses way less power than the inverter. The short rear section will unplug itself, hopefully, from the front section if I drive away without disconnecting first. I do hang a red flag on the gearshift every time I connect this cable to the trailer, as a reminder! Parts used: Unlimited Solar 50 FT - 12 AWG Solar PV Multi-Conductor Tray Cable. Rugged and heavy gauge. Actually a little too stiff, it doesn't like going past the rear hatch seal when I run it into the truck. https://smile.amazon.com/gp/product/B01KWGEODU/ref=ppx_yo_dt_b_asin_title_o04_s00?ie=UTF8&psc=1 CNLINKO 2 Pin Power Industrial Circular Connector, Male Plug, Fit Furrion RV Solar Port: https://smile.amazon.com/gp/product/B01M4RQ3X1/ref=ppx_yo_dt_b_asin_title_o03_s01?ie=UTF8&psc=1 NOCO GC018 12V Adapter Plug Socket with Eyelet Terminal. Heavy duty socket, dust cover, big wires, well built: https://smile.amazon.com/gp/product/B00G8WLW2Y/ref=ppx_yo_dt_b_asin_title_o03_s00?ie=UTF8&psc=1 Powerworx Anderson Power Pole Connectors: The best choice for reliable exterior (or interior) connections, heavy duty and self cleaning contacts. I used the red/ black paired connectors, not the individual ones, and the 30 amp pins, which are for 12 to 14 AWG wire. It is impossible to connect them backwards. You can order packs of replacement parts from Powerworx to refill your kit.: https://powerwerx.com/anderson-power-powerpole-sb-connectors [attachment file=IMG_7251.jpg] [attachment file=IMG_7248.jpg] A special crimper is required: It would also be smart to order one or more of the pin extraction tools in case you make a mistake. [attachment file=IMG_7254.jpg] Instructions, getting the pin to click securely in place inside the housing may be tricky otherwise: https://powerwerx.com/help/powerpole-assembly-instructions If you don't have an external port on your Ollie, this is what the factory used on mine. I think it is standard equipment now. Be sure to use an inline 10 amp fuse to protect the trailer wires: https://www.amazon.com/dp/B017P8H8PE/ref=twister_B017XOALKY?_encoding=UTF8&psc=1 The rear section of cable, 5 feet long, from the external port connector to an Anderson red/ black pair. The black sleeve is heat shrink tubing, shrunk and secured to the cable only. It provides some rain protection, which is not really needed. It does however keep the inside of the connector cleaner, especially if you drop it in the dirt.: [attachment file=IMG_7260.jpg] [attachment file=IMG_7261.jpg] Soldering the wires to the port plug is a challenge. You need to use rosin core electrical solder and a large high wattage soldering iron. The fat wires try to suck away all your heat. I added heat shrink where the wires entered, and "potted" the hole with silicone sealer to keep out water. The main section, 25 feet long, with an Anderson pair at each end. It mates to a 5 foot "inside" cable to power the fridge. It has an Anderson pair at one end and a fused DC round socket at the other. The red sleeves are so I can find the ends easily in bad light or against a dark background. [attachment file=IMG_7262.jpg] The inline fuse holder for the round socket, rugged and reasonably weather proof. I used a 10 amp fuse since that is the rating for the Furrion socket; the fridge draws around 3 amps when the compressor is running. [attachment file=IMG_7265.jpg] The spare 25 foot extension cable, with Andersons at each end. Plus a 5 foot scrap, to use to make an adapter cable to a solar panel, if needed. [attachment file=IMG_7266.jpg] It works great, coils up and takes very little room on the closet shelf, and I am happy with the outcome. I might suggest a cable with a softer outer casing for more flexibility, but this works. It is actually hard to find cable with a flat profile, which I wanted. Most are big fat round things. John Davies Spokane WA
1 point


.thumb.jpg.e34bf01ef7f7d5e99ad31856d45afbeb.jpg)


-
Recent Achievements
-
")


