Leaderboard


Popular Content
Showing content with the highest reputation on 11/02/2023 in all areas
-
Nothing earth shattering, but I thought I’d share some observations regarding freezing or not freezing items inside the camper during cold weather. Our Elite II is often parked on a piece of lake property we own in north central Minnesota. It’s strictly boondocking. We were up last weekend and ran the heat for about 24 hours before we headed home. We shut off the heat when we left. Tonight I’m back up and noticed some items were frozen, some were not, depending on their location. The weather has been in the low 20’s to mid 30’s during the last three days since we left on Sunday noon. It’s now Wednesday evening and I’m back. I’d winterized everything on a previous trip, so I’m dry camping. The composting toilet makes this possible. My analog recording thermometer is mounted above the microwave and to the left of the cabinet door. It recorded a low of 20°F. My digital battery shunt said it was 25° in the battery compartment when I got here around 5pm. The 1 gallon dog bowl on the floor of the bathroom is frozen. A 1/2 full 5 gallon water jug stored on the bathroom floor is frozen. There were four disposable one gallon plastic drinking water jugs from the grocery store on top of the composting toilet. None were froze at all. The contents of the pantry including drinks and canned goods were all fine. The contents of the refrigerator were all fine. This included eggs, pickles, beer, drinking water, and condiments. (In the name of science I opened and enjoyed several cans of beer tonight just to be sure cans from both the top shelf, bottom shelf, and door were all fine!) The take away? Don’t store anything on the floor that you don’t want to freeze. Anything off of the floor or in a cabinet was fine. Not sure how long it’d be fine, but for this one data point it works out. (Saturday is the start of Minnesota firearms whitetail deer season. I keep the camper up north all fall as a base to bird hunt ruffed grouse with my pointing dogs. Since the orange army is taking over the woods for a couple of weeks, I’ll move the Oliver home for the winter and put it away in the back yard under a carport.)4 points
-
More than a few of use a 350 amp BlueSeas master switch to eliminate any parasitic losses. It for sure would solve the problem and provide an emergency cut-off for peace of mind. GJ3 points
-
When towing our (then) new Elite II home to Idaho last November, we experienced freezing temps every night. As low as 9 degrees F one night. Like you, I placed a digital temperature monitor in that street side compartment near the outside faucet. I also placed digital monitors under the front dinette seat and in the closet (which did not yet have the air vents I installed after we returned home). The monitor in the compartment with the 3000 watt Xantrex inverter consistently reported the coldest temperatures of the three. The inverter operated only occasionally, such as when we first connected to shore power, having drawn down our Lithium Pro 390 Ah batteries somewhat during the travel day by running the fridge on DC. Even the night after we boondocked at a Harvest Host facility (so our batteries had two days of DC draw down without shore power recharge, just solar), I did not note a significant difference in the temperature reported in that aft street side compartment while the inverter was recharging the batteries from shore power. My conclusion from this data, collected over 5 cold nights, is that the amount of heat generated by the Xantrex Freedom Pro 3000 watt inverter is not sufficient to noticeably warm that aft street side compartment in freezing outside temps. For what its worth, with our Truma Varioheat furnace keeping cabin temps at about 70 degrees F overnight, none of the digital monitors reported temps lower than 35 degrees F, which was the one in that aft street side compartment the night ambient temps dropped down to 9 degrees F. So, the un-winterized plumbing in that yet-unmodified Elite II was not at risk at those temps.3 points
-
We're coffee junkies, for sure... Love Peets MD coffee anytime in a pinch. Our go-to has been Black Rifle Black Beard's Delight for many years. We've been using our same 'ol tea kettle and a Melita pour-over with non-bleached paper cones since early 2000's. We store the Melita in a pillow case above the kitchen sink along with an aluminum coffee container from the '50's. The pour-over gives us each 3 cups of great tasting strong Jo which gets me rev'd up for the day! (...also nice with a wee dram of Kaluha on Saturday mornings 🤪). Cheers!3 points
-
Love your scientific test methods! I'd love to help you in your analysis next time around! 😂 Good call on bringing the Ollie home to safety during deer season. I'd hate to find out the hard way what a stray high powered round does to the hull of an Oliver. The Ollie would be pretty invisible in the snow white countryside. Thanks for sharing your observations, actually pretty good information for us newbies. I've got tracking wifi thermometers in key locations in our Oliver to see how winter temps effect interior spaces. They wouldn't be much use in remote storage but in our driveway in Indiana they stay connected to the home WIFI for a permanent set of temp logs. Our first winter in storage will provide interesting data.3 points
-
Ditto. We use the cone,, into an old stainless carafe from a defunct coffee maker. 15 seasons. Better than the coffee maker at home. So good, that every once in awhile, I break it out at home. It just takes time, not electricity.3 points
-
Here's three good threads to read. There are, as TopGun2 mentioned, many more. https://olivertraveltrailers.com/forums/topic/8806-freezing-rear-water-lines/ https://olivertraveltrailers.com/forums/topic/7461-actually-a-375-season-trailer/ https://olivertraveltrailers.com/forums/topic/7405-winter-camping/2 points
-
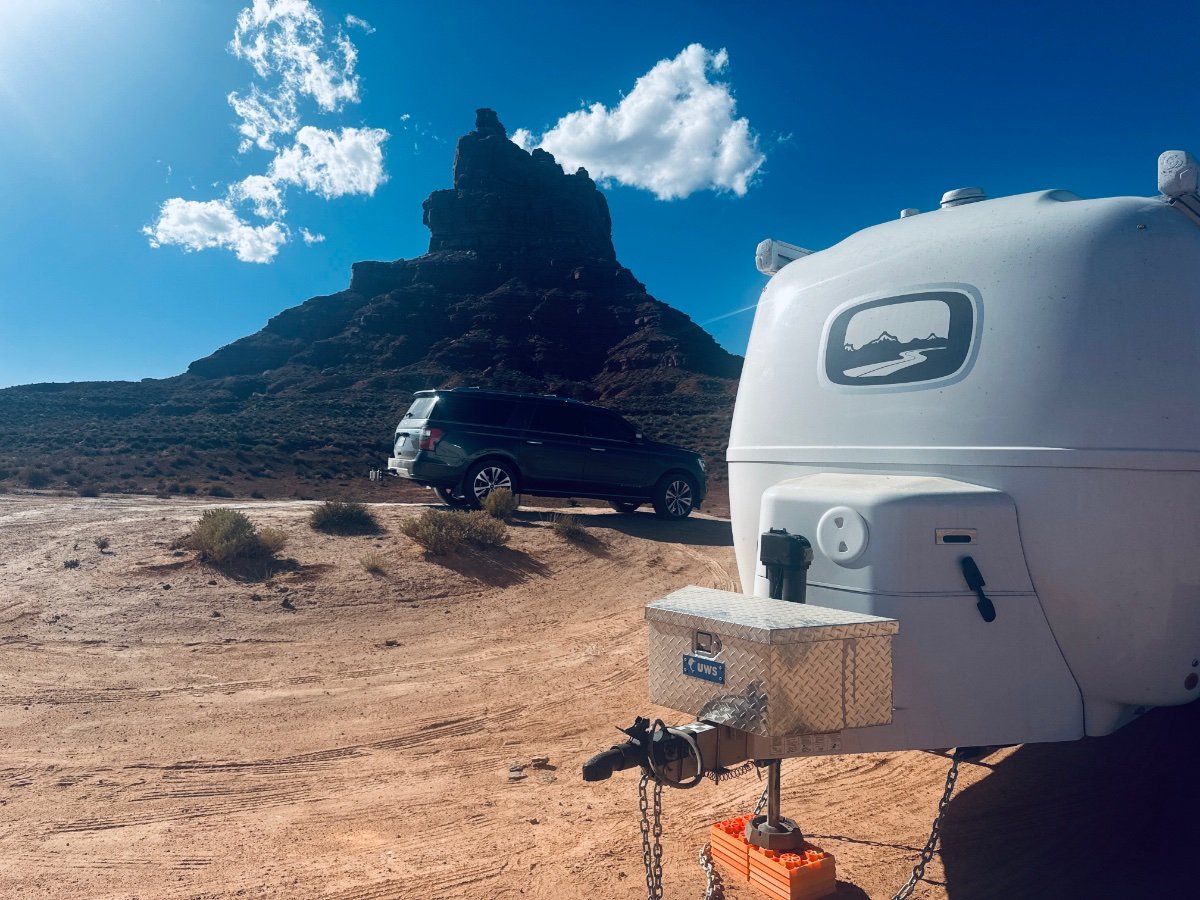
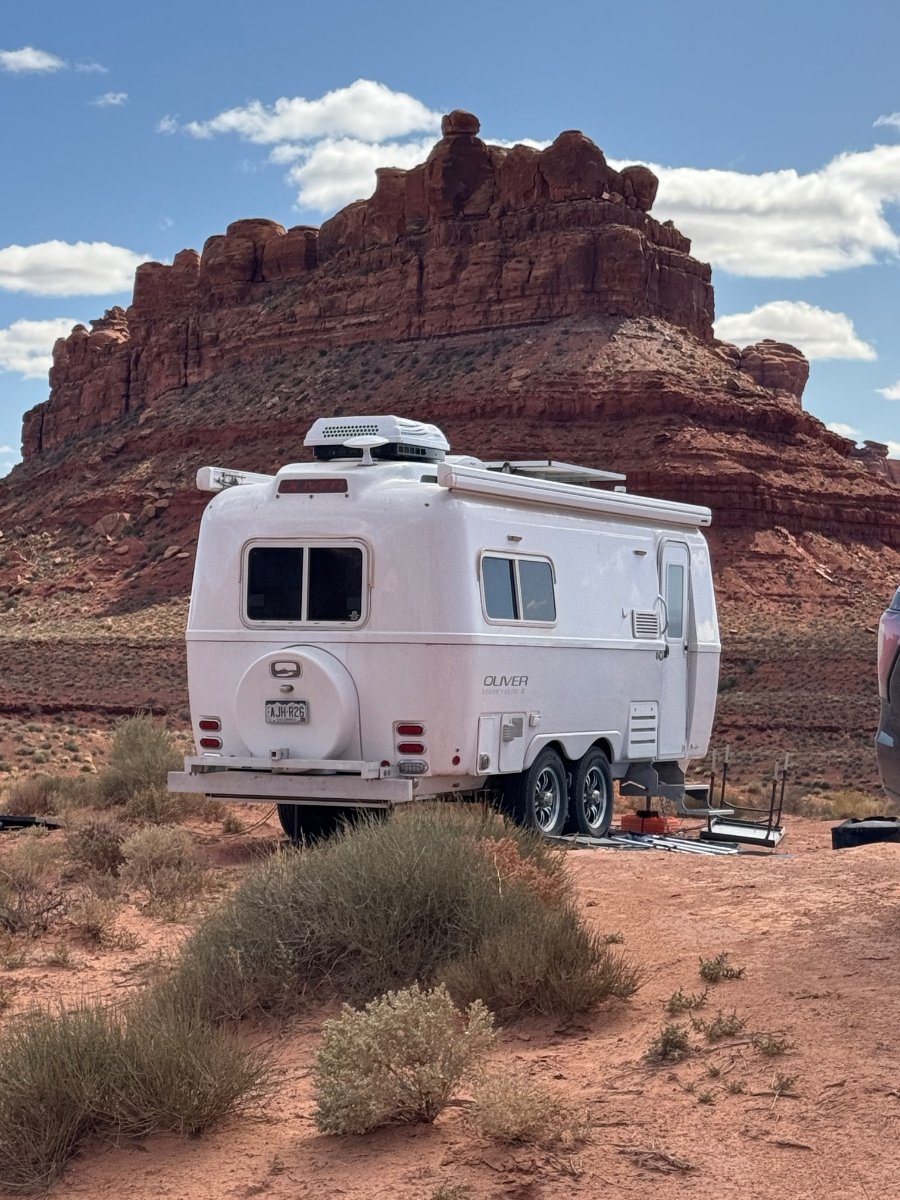
Time to add a few from our most recent month-long trip to Moab (mountain biking), Valley of the Gods (annular eclipse), North Rim of the Grand Canyon (supposed to be more mountain biking, but we got smoked out by a nearby prescribed burn), Valley of Fire, and a Paso Robles HipCamp (wine tasting, of course!). The rest of the trip was staying with friends, and we’re currently high-tailing it home! As always, the Ollie performed above and beyond — we never once plugged in, but still used the convection microwave and a/c whenever needed. And even though we spent several nights in sub-freezing temps, we had no issues with frozen lines. I love VellOllie!
 2 points
 -
With our Airstream, the simplest method was to just disconnect the trailer leads to the battery negative terminal. If I recall, there were three, the heavy gauge for the trailer, the lead from the solar controller, and the tongue jack. That eliminates all paths for current draw.2 points
-
We love coffee and we love our Oliver coffee. I know you said you did not want one of these but we love ours.
2 points
-
Thanks to my wife and our son, we are now Aeropress converts for life. We have a typical plug in induction water pot for any and all hot drink needs. Boils water faster than any other method. Using that to make tea, hot chocolate, hot toddies, you name it. Link: Induction Pot For coffee, the Aeropress is king. Once the water is boiling you can have a couple cups of perfect coffee in one minute each. No mess, simple clean up and fast. You pick your favorite coffee and grind. Very cheap and fast to operate. Stows away in the space of a coffee cup. link: Aeropress Video:
2 points
-
We have been Harvest Hosting our way to Florida from Maine this week.. Both Oscar Scherer and Myakka River State Parks had available spots this weekend which surprised us.. I guess we beat everybody else down here this year.. 🙂2 points
-
I do the same, using a number 6 paper filter into a stanley thermos. Makes even better tasting coffee than my 70's 1500W Norelco or vintage W. German-made Krups2 points
-
A quick Google search produced this: Damprid Moisture Absorber, Refillable, 10.5 oz, Twin Pack Packing, Solid, White to Off-White, Composition: Calcium Chloride, Sodium Chloride and Potassium Chloride, 2.15 Specific Gravity, OSHA Approved, For Bathrooms, Basements, Clothes Closets, Laundry Rooms, Bedrooms, Offices and Kitchens.2 points
-
You're all wrong! 😁 Deb had one of those little Chulux Keurig copies in the Hiker trailer, and it worked well for several years. For the Oliver, she got the smallest Keurig model, which is still at least twice as big as the Chulux.
2 points
-
We bought a tiny little Keurig-type machine on Amazon. We didn't want to give up the cabinet space for a regular Keurig. This little Chulux coffee maker is much smaller than the Keuirig, but it seems to work fine, if a bit slower to heat the water. Draws only 800 watts and easy to store.
2 points
-
Another possible solution... A pair of 300 Watt heaters would draw about 50 amps when on (12V), so it's pretty easy to do the math and figure out how long they could run on batteries. I have 400 Amp hours, so I could theoretically run these bilge heaters for 8 hours with nothing else running. However, the cabin needs to be heated (if you use the furnace, that's taking more battery power to run the fan) and other small things need battery power as well. I came to the conclusion that heating the bilge electrically was not feasible with 400 Ah batteries, so I started looking for options to leverage the propane furnace. I chose a "smart" fan that I put under the front dinette seat with a vent (AC Infinity CLOUDLINE T6). I can run that at various speeds and it pulls cabin air through the heat vent in the back and pushes it back out the front. I've used temperature sensors to ensure cabin air is moving around the bilge. I have also found the bilge helps control the very high humidity in the bilge during summer months. In addition to this fan, I have run some extra heat ducts on the street side and pump a little furnace heat into the bilge as well as a few heat strips on the fresh and city water check valves (prone to freezing and cracking). I liked the bilge smart fan so much that I bought a smaller one (TerraBloom ECMF-100) and I use that to push cabin air through my sealed and insulated battery box to keep the battery temps moderated during both summer and winter.2 points
-
There's a ton of this type of subject material here on the Forum. Try the "search function " at the top of the page and then just follow your nose. Bill1 point
-
Will have to try that one. Thanks for the tip.1 point
-
I use a Hario V60 pour-over and a 4-cup Pyrex glass measuring cup, heating the water in the microwave or on the stove if not hooked to shore power, and using the measuring cup to pour the water. I also have a Hario Skerton Plus hand grinder (which I'm sure is not as good as a Knock Aergrind but still does a decent job producing a consistent granule size, and costs much less). All of these along with coffee, filters, thermos, trivets, etc. fit into one drawer of the cabinet. The setup makes 26oz of coffee. While I would love each cup to be absolutely fresh, I'm just too lazy to do this twice. I'm sure the much smaller Aergrind is also much easier to use than the Hario. Lately I have been bringing / buying ground coffee during our trips. I get up much earlier than Sue, so when I grind I have to do it in the wet bath with the door closed, and even then it's just too noisy. My favorite grocery store coffee is Peets Major Dickason. I also use the ZeroWater filtration system for drinking and coffee water. At home I use a Breville automatic burr grinder and a Technivorm Moccamaster drip machine with thermal beaker. Both setups make excellent coffee. The home setup is much easier to use but requires too much counter space to be practical for the OEII. --Mike1 point
-
I know this is an old thread, but I'd like to broaden the topic by asking if owners in cold climate conditions can comment on the heat produced by the inverter charger located under the streetside bed? We have the 3000 watt Xantrex in our 2023 Oliver, and I've noticed as @John E Davies mentioned earlier in the thread that the inverter produces significant heat in that compartment. I have a tracking WIFI temperature sensor in that space next to the outside shower box, and I'm wanting to see if the inverter has a significant effect on that space in cold temps. My thoughts being along the line of that being shared space with the outside shower connection, of course the inverter would only be producing significant heat while either charging the batteries or inverting battery power for 115v usage. If dry camping under battery/solar conditions, at night when the most inverter production is occurring, substantial heat would be produced during those critical hours. Just curious if anybody else has observed any effective benefit from this arrangement?1 point
-
Pay attention here, light duty truck owners. This is absolutely true. You both are correct. My statement was not a typo, it was a brain fart. Post has been updated above. GJ1 point
-
I looked at the chemical composition of formaldehyde (and the EPA data sheet) and I don’t know enough about the chemistry to know its various forms. It could very well be that many product manufacturers have stopped using it, given its carcinogenic effects. It’s still used in a lot of things though (wood products, clothing, building materials, etc). One article actually reports on the use of desiccants to absorb and remove formaldehyde from the air — so it’s hard to say. Maybe just ignore my comment about it.1 point
-
I do that, too. Amazon sells a box of assorted hot chocolate pods that are pretty good. I have hot cider for the fall, too.1 point
-
Great thanks for the prompt response!😉1 point
-
Since I’ve had bad reactions, I haven’t shopped these products in years. Maybe they have changed them, but I believe they still have the distinct odor of formaldehyde that I remember — as I encounter them on store shelves now and then.1 point
-
I use an aero press: https://www.amazon.com/AeroPress-Portable-Travel-Coffee-Press/dp/B07YVL8SF3/ref=sr_1_6?crid=2IDH7CBZ1K29E&keywords=aeropress&qid=1698864367&sprefix=aero%2Caps%2C311&sr=8-6. Good coffee, extremely easy cleanup, small storage space required. Takes fine-ground coffee (I bring along an electric grinder); for a large mug the first pour of 170°-water is drip, the second pour is press.1 point
-
Coffe, one of my necessities! I have always preferred single cup serving methods. Nothing real fancy, but I have used the Primula classic stovetop espresso maker, Melitta plastic pour over #2 filter holder, Clever Dripper, French Press, and my current favorite, an AeroPress. I have the original and the travel size. The travel size lives in the Ollie. I heat water in an old Jet Boil backpacking stove outside while Krunch is still in bed. My coffee usually comes from Costco, whichever 2 lb. bag is on sale. At home I grind beans every morning and usual buy pre ground coffee for camping. And if you haven’t noticed, my morning coffee is on the cheap side. And I like it black! here's to your cup of ☕️, Mossey1 point
-
Our Nespresso (Pixie) fits in the overhead above the sink when not it use. If it’s out and we need to cook/clean it’s easy enough to unplug and move to the dinette table. Mike1 point
-
Congrats on your upcoming retirement. You've made the right choice in an Oliver. We've owned two over the past 16 years starting in 2008. The company is following a business path that will keep them moving forward and customers happy for years to come.1 point
-
Counter and storage space is tight, but the black nectar of the Gods is life sustaining. I don’t have a solution for you (we use Melita cone and pour into a Stanley thermos), but I’m interested in seeing the responses. Maybe we’ll find a better way. And… Welcome to the tribe, and congrats on the soon to be new Oliver.1 point
-
Nope not on mine Like @Patriot said, on the newer models we need 4-5 pumps to sufficiently protect the new flush port system. I remember reading somewhere this change was put in place to meet new codes for the black tank system, something to do with ensuring no backflow of waste water can get inside the water supply line. Here's a pic of the new layout with longer flush system.
1 point
-
I have used DampRid 1 gallon containers for years. I keep everything closed and install one in the rear and one by the dinette with the bathroom door open. I keep EvaDry charcoal packets in the closet and another in the bathroom. Very happy with the job they do1 point
-
Roger on the root cause of the plastic shards. But "Never" is one of those really big words that "always" get me in trouble. In this case, I would say "much less often" or maybe "rarely". 🙂 GJ1 point
-
If you poke around, you can find sites, especially weekdays. But, it's tough. We rarely camp in Florida in season. Some beautiful state parks, outside of urban areas, may still be available.1 point
-
Ours will be sitting outside in Indiana. I'll be leaving the vents closed. I'm leaving a counter top dehumidifier running all winter in the Oliver. I don't think it's going to do much as when the temps drop below the 40 degree mark, it's readout on the front as well as a second hydrometer in the camper usually read a humidity level of less than 45%. I'm also leaving a small electric heater running all winter to keep the inside temps above freezing. This will allow the compressor style dehumidifier to run all winter without low temperature issues. It has a drain hose hanging in the galley sink so it won't have to be monitored regularly. Of course ours will remain connected to shore power throughout the winter storage. https://www.amazon.com/gp/product/B0BTBYT96F/ref=ppx_yo_dt_b_asin_title_o07_s00?ie=UTF8&psc=1 https://www.amazon.com/gp/product/B0BB725X9J/ref=ppx_yo_dt_b_asin_title_o00_s00?ie=UTF8&psc=1
1 point
-
Plus one on Custer SP. And the wildlife loop road, at dusk and dawn!1 point
-
Because of the relatively small size of the black tank, folks are often hesitant to add enough "liquid ". Can't say if this is true for your use. (Ie, guys always peeing in the woods, etc.) If a user reserves the black tank only for the black, well, they just may not get enough liquid in there, with a light foot on the pedal. we all figure it out, eventually. There's a balance. Truth is for us, dump when grey is close to full, dump black first, rinse as available. Some dump stations don't have a hose fitting for rinsing, as they're vault systems. Stick a hose through the bath window and add water if black isn't full. (You can see, if toilet valve us open. Turn off pump, so you dont drain freshwater.) And please, dont use freshwater fill for your toilet rinse or through the window, if there is one at the dump station. Just restrict yourself to the nonpotable hose.1 point
-
I always enjoy studying JD's craftsmanship and beautifully executed designs. Sadly I don't have the shop, tools, skills or time to reproduce many of his works of art. I also am a Ollie Mod Minimalist (OMM). So your approach to the battery box (BB) heat/cool is very eloquent in my eyes. Well done. It solves both heating and cooling of the battery box. For those owners that are OMM's and are only interested in BB cooling, I have hijacked elements of both your and John D's designs. Then applied my OMM approach to keep it effective, but simple to execute at at a greatly reduced cost. To be clear, the purpose of this approach is only for BB cooling in extreme heat. Here is a GJ OMM concept: Install bathroom 4" air return portal as described in other posts. This and other leakage points will allow cabin "free air" to easily enter forward street side basement. Leave OTT BB exterior vents as is. But, add reflex insulation around them to reduce solar heating yet allow the vents to function as designed. Add a single air penetration into the battery box. Recommend this be as close to the cabin side low in the box as possible. Penetration size varies depending on your 12V Box Fan dimensions. Mount inexpensive single speed uber quiet 4" box fan (See JD's suggested fan in post above, or borrow one from an old computer.) Consider using a rubber gasket for sealing and vibration absorption. Install Thermal switch (See below) mounted high in the BB. Install On/Off Auto switch and of course a fuse where it is convenient, but not obtrusive. Cost: Peanuts. Operation: Switch "ON" or "AUTO". When thermal switch exceeds 104 degrees F (40 degrees C), the fan comes on and cooler cabin air from the forward street-side basement will be pushed into the BB and out it's existing vents. Added advantage is it will also help cool the bathroom and basement. Recommend executing the above first. See how it works for your system. However some will want to depart from the OMM approach to get even more BB cooling, you could always consider adding the following elements: If your street side foreword basement is rather hot, you may want to add duct from the cabin to fan as NCeagle used. Maybe add deflection louvers on the fan discharge (in the battery box) to better distribute the air into the BB . Maybe add a baffle on the battery box door from the top vents up to the top of the hatch to better pull hot air out from closer to the top of the BB. Add a removeable shade awning for the BB exterior area. But for this OMM, I would just go the simple, inexpensive and less visible approach. GJ
1 point
-
The Lithionics batteries come with a heating pad underneath the batteries. There is a switch in the battery compartment that turns the heating pad on or off. When turned on, the heating pad comes on when the temperature falls to 35°F. It goes off when the ambient temperature reaches 45°F. This is only necessary to charge the battery, and if there is a charging source available (i.e., shore power, solar, or generator). The batteries do not need a heating pad to discharge (e.g., turn on lights, etc.), even when the temperature is below 35°F.1 point
-
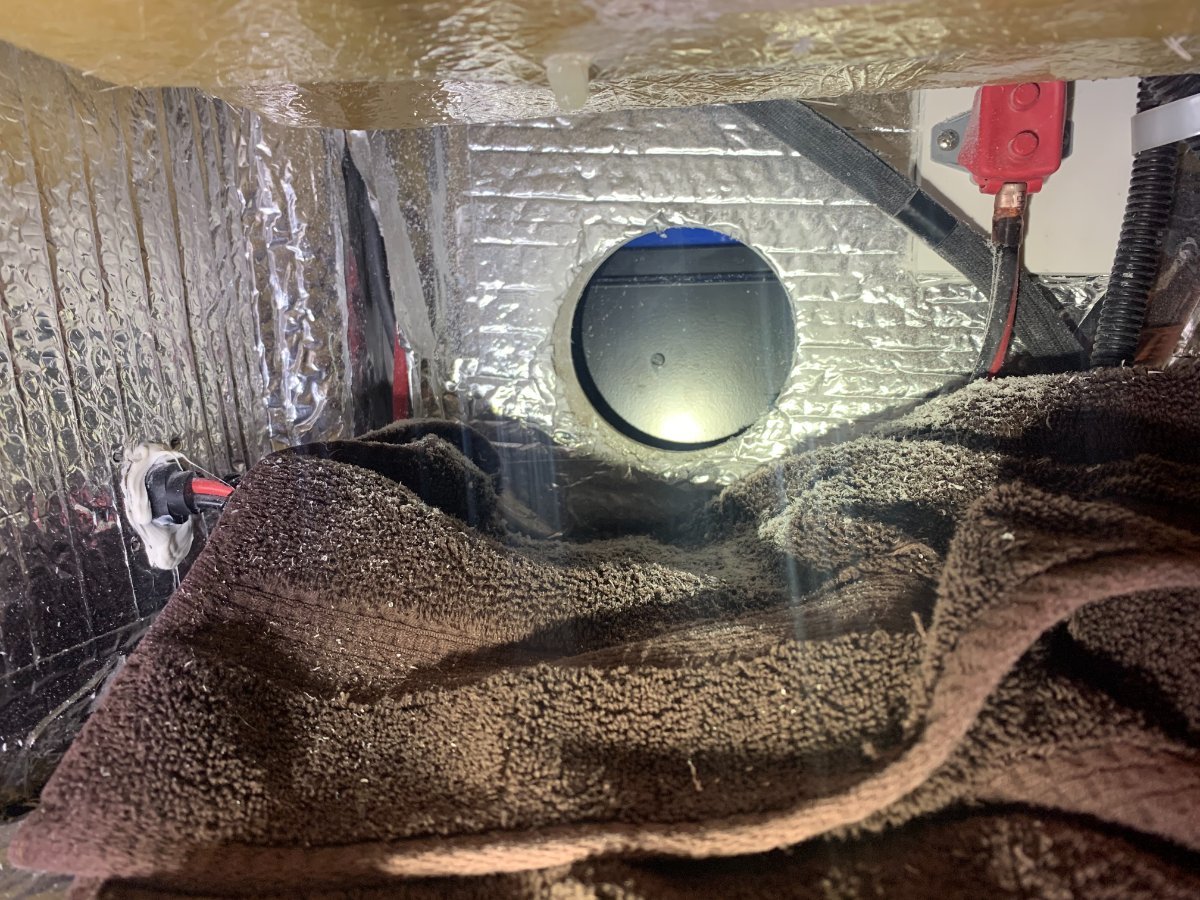
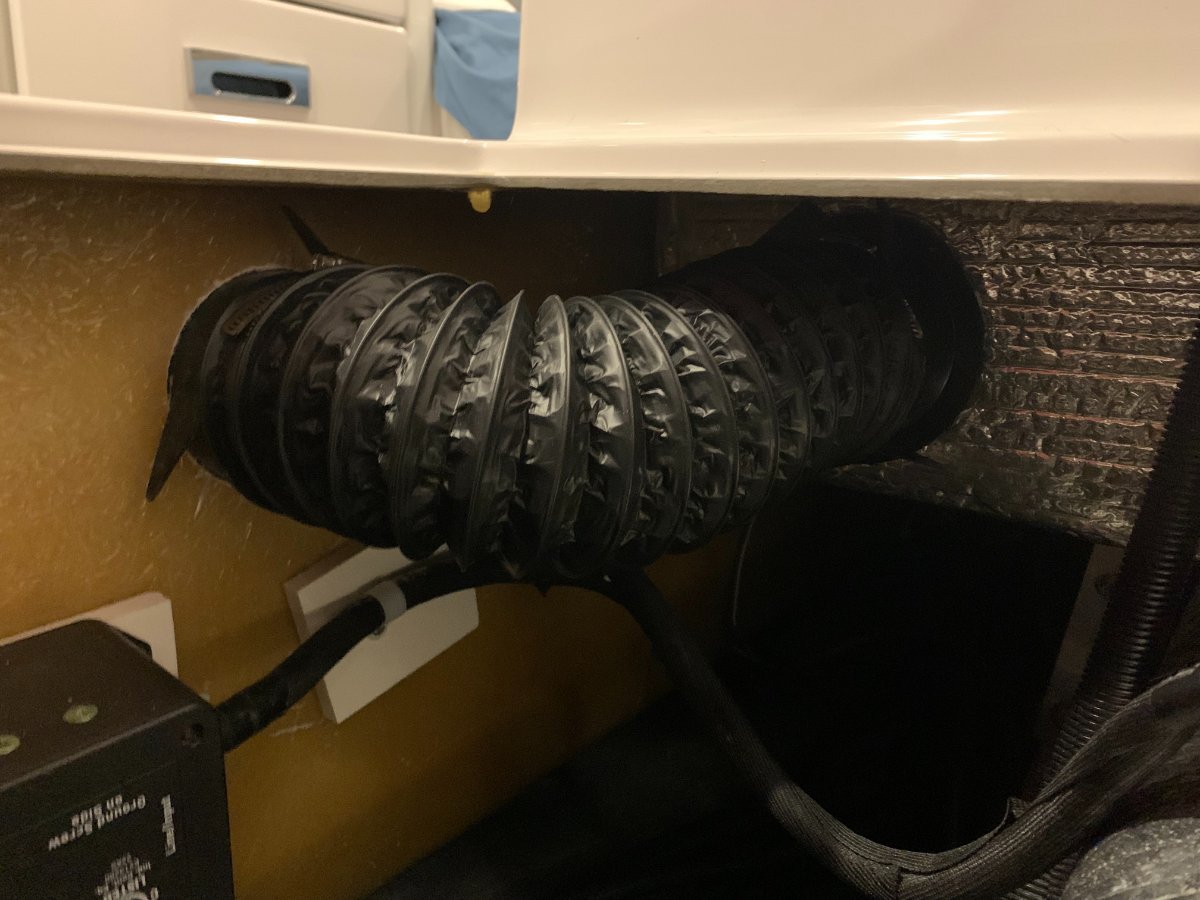
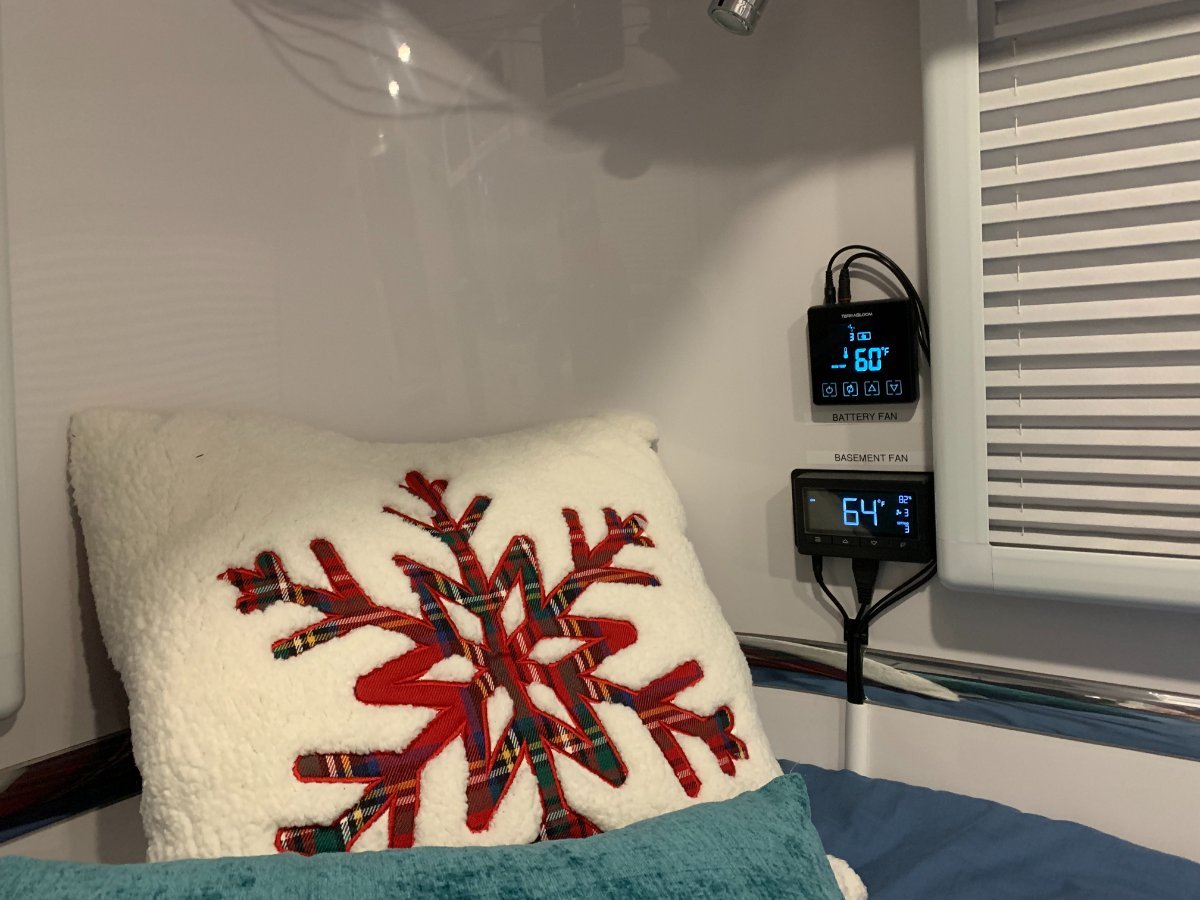
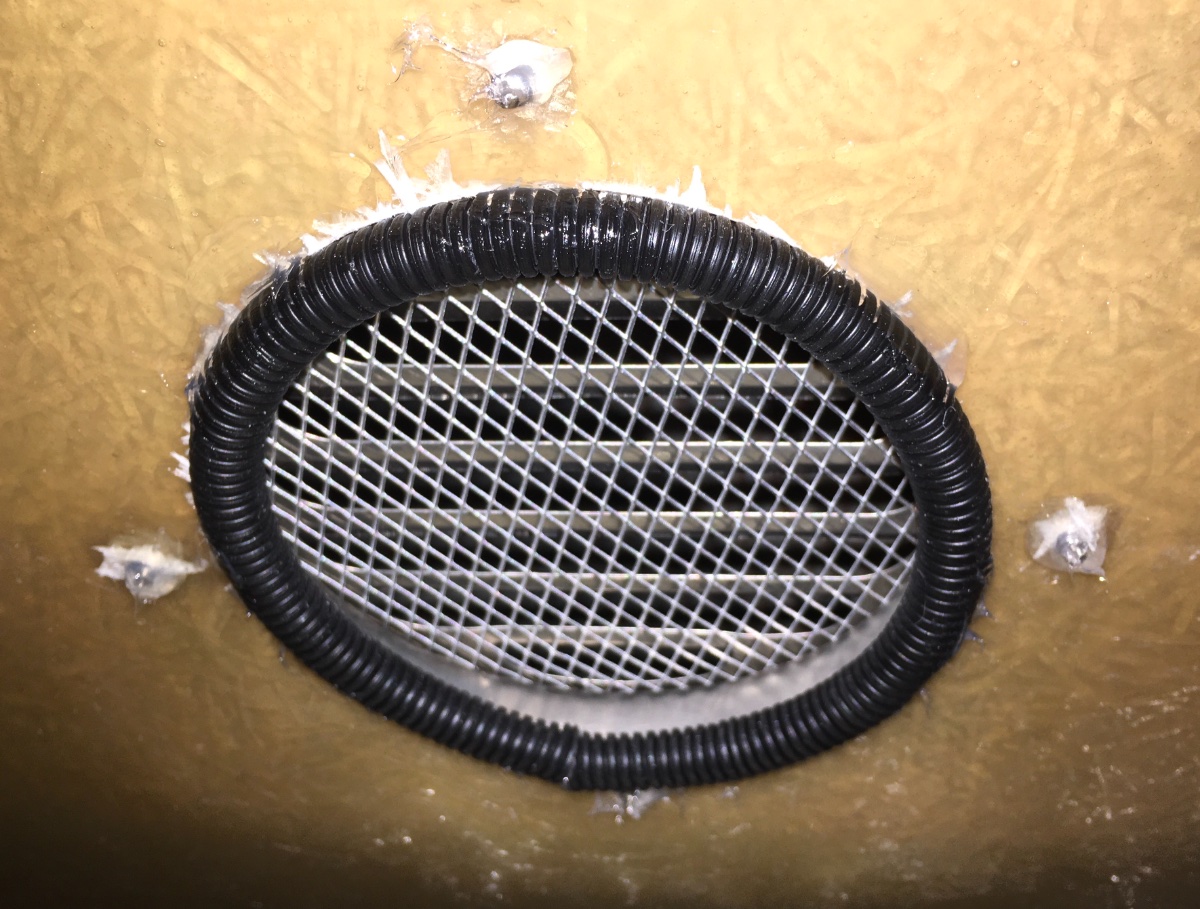
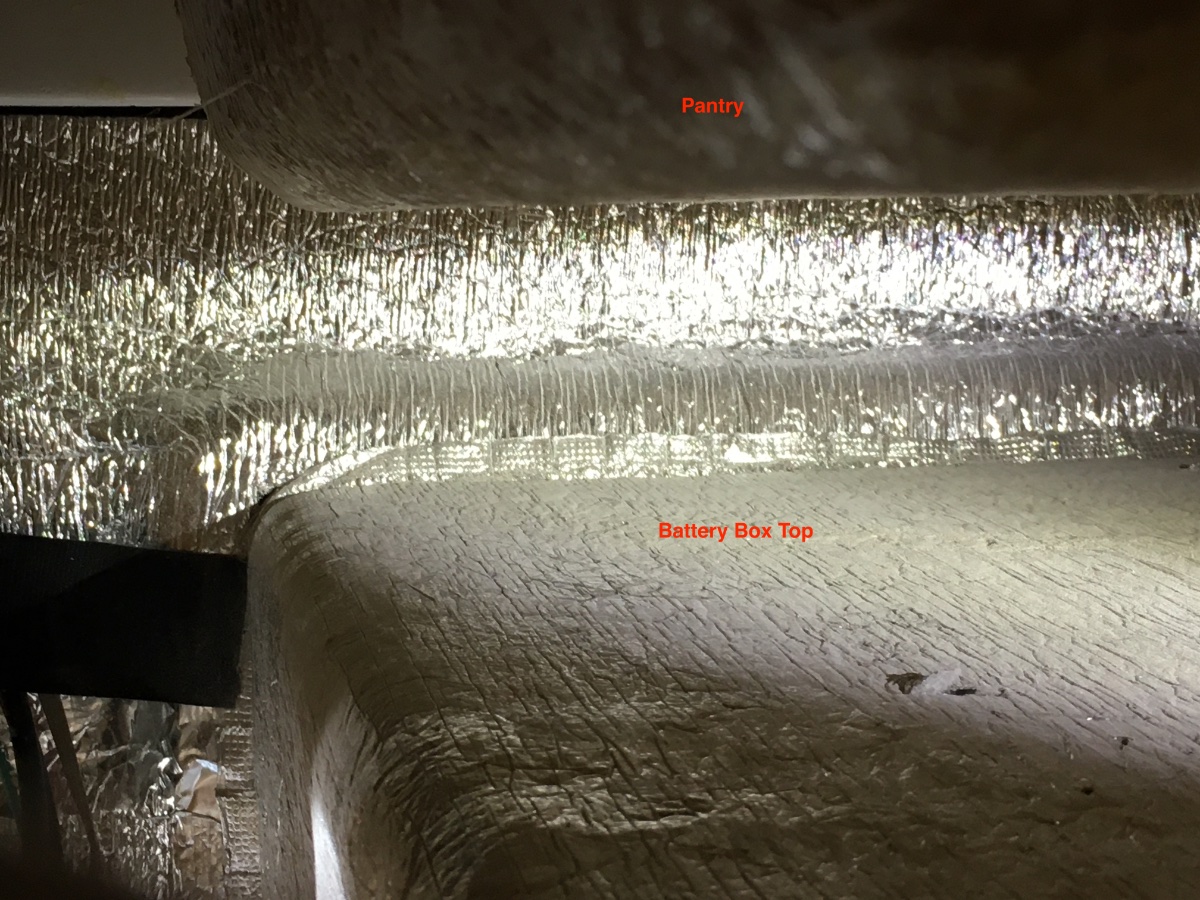
Ok, I did post some photos of the battery box design I used in John Davie's original how to post: https://olivertraveltrailers.com/forums/topic/5301-how-to-lithium-battery-powered-vent-system/ I also noticed that I never posted pictures of my bilge / basement solution. It's pretty simple - bungee cord simple. 🙂 The fan only has a duct on the exhaust side so the fan pulls air from right under the seat and exhausts it into the cabin. When everything is closed up and the fan is running, the cabin air is pulled into the basement (primarily) through the existing heat return vent under the curb side bed, so cabin air is circulated throughout the basement pretty well when this fan is running (all the time in my case). Here's the 6" cabin vent under the dinette seat: And here's the smart fan and duct under the seat: I keep thinking I should make a more permanent mount for the fan, but it's held in there with bungees for over 5K miles without budging, so I've got that on the back burner. I also tapped into the back of the 120V receptacle under the seat right next to the fan for the power. I put the controller for this basement/bilge fan in the back of the cabin out of the way next to my battery compartment fan controller: Here's the smart fan and vent I used for this project: AC Infinity CLOUDLINE T6, Quiet 6" Inline Duct Fan with Temperature Humidity Controller - Ventilation Exhaust Fan for Heating Cooling Booster, Grow Te HG POWER 6 Inch Round Air Vent ABS Louver Grille Cover White Soffit Vent with Built-in Fly Screen Mesh for Bathroom Office Kitchen Ventilation
1 point
-
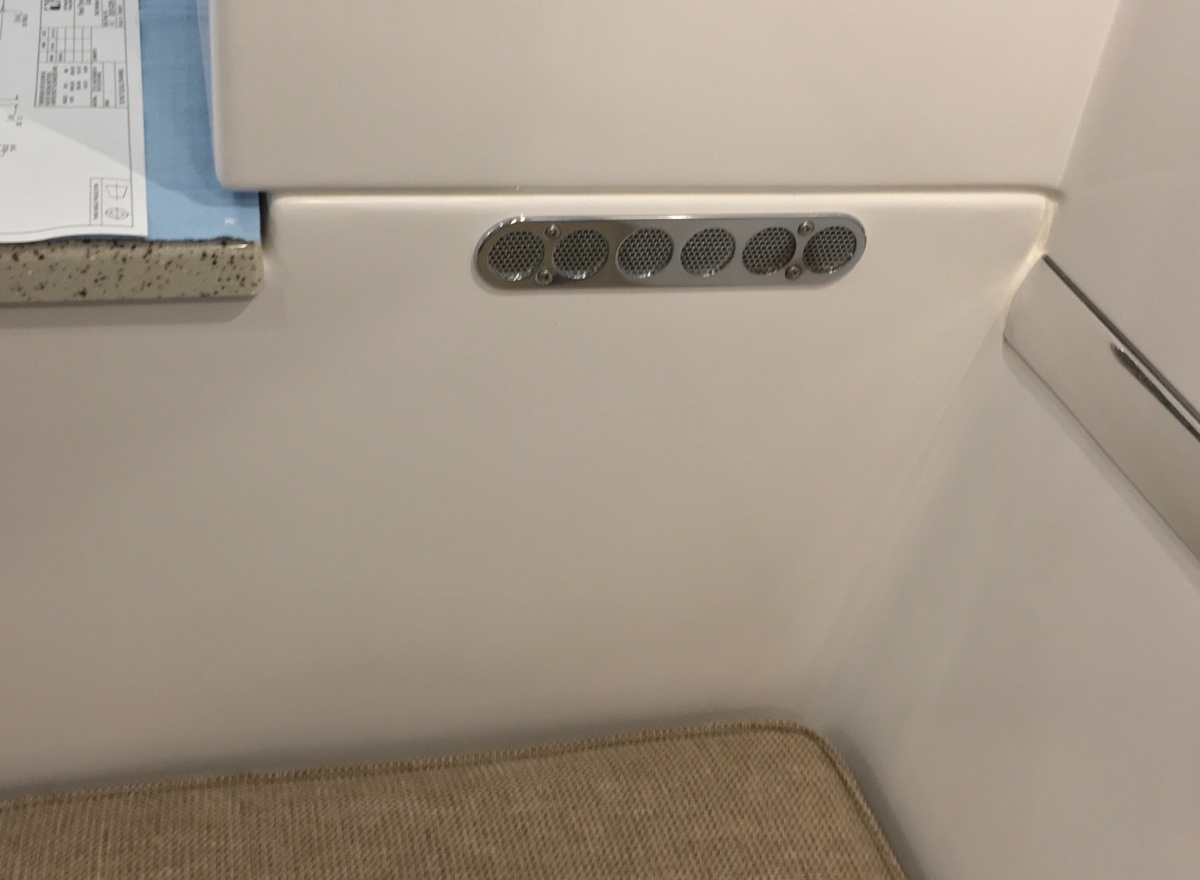
Several folks expressed interest in seeing another design to keep the battery box temperatures moderated (for lithium batteries only!). This is an alternative option to John Davies' design. They are similar except that I chose to use a forced air closed system to moderate the battery compartment temperatures while John uses a combination of forced air and natural convection. This ended up being my final design and it has been working very well since last April (2021). My goal was to keep the sealed battery box as close to cabin temperature as possible (warmer in the winter and cooler in the summer - humidity controlled at all times, etc.). I stuck pretty close to my original design except that I did end up venting back into the cabin, so essentially I am just re-circulating cabin air through the battery box. It's a super-simple design and temperature and humidity sensors have proven this works as would be expected since this is a "closed" loop system. I do think this may be a bit difficult to follow unless you have had your head under the seats and beds, but here goes... Here's a picture from the cabin that shows the 2 (finished) 4" vents used for intake (under the street side bed) and exhaust (under the aft dinette seat): I'm going to start under the bed, which is the intake side in my design. This photo shows under the street-side bed where I cut the 4" hole into the aft side of the battery box: And this picture shows the installed ducting and smart fan under the street-side bed: Here's a view of the intake vent from inside the battery compartment (it's the partially obscured vent on the lower right front of the battery box): Working our way forward, here's a picture of the 4" exhaust hole in the battery box. It's partially obscured by the rail. It's located on the lower left back side of the battery box: Moving back inside, here's a look under the aft dinette seat at the 4" holes used for the exhaust back to the cabin: And here's what the exhaust looks like with the short piece of 4" duct in place under the dinette seat: That's pretty much it. I threaded the cables for the sensor and the fan control unit under the bed and put the controller for the battery compartment smart fan by my bilge (aka basement) smart fan controller. The controller lights can be turned off and these controllers are where my feet go on the bed, so they are not in the way and tucked out of sight behind the window shade for the most part: I know this doesn't include a lot of detail (i.e., I can't come close to the quality of John Davies' post!) about how I tapped into the 120V power (in the basement), the sealant I used with the vents, the hole saw I used, how I cut the holes, etc. , but here's a list of the parts and sealant used and I can try and help with any questions if anyone uses this design. TerraBloom ECMF-100, 4" Inline Duct Fan with 0-100% Speed Controlled EC Motor, Metal Case, Energy Saving. For Ventilation Boosting, Heating, Humidity AC Infinity Flexible 4-Inch Aluminum Ducting, Heavy-Duty Four-Layer Protection, 8-Feet Long for Heating Cooling Ventilation and Exhaust Soffit Vents 4 Inch Round Air Vents Louver with Screen ABS Grille Air Exhaust Vent for Ventilation System (100mm)... J-B Weld 31312 All-Purpose RTV Silicone Sealant and Adhesive - White - 3 oz.
1 point
-
Pre installation of my 300W bilge heaters, I was stuck camping with electricity at 6 degrees for three days straight. (not by choice) in my 2008 Elite. The water pump line froze and remained so for twelve hours until my small ceramic heater thawed the line to the galley sink. That same year, two members (Mountainborn and Technomadia) camped for a long time in sub freezing temperatures and each had leaks occur in the vicinity of the external shower. I now have an Xxtreme Heater near the water pump and one on the other side, near the external shower / battery area. Yes, they draw power, but at very cold temps I strive to have hookups. During the 6 degree days, water pressure was not restored to the bathroom until the outside temps rose. The toilet was flushed using a bucket which I filled at a cattle water tank, after busting through the ice with a huge rock. Fun times were had by all.1 point
-
That is so very true. I tell my daughter that it is a false economy to not have fresh snow tires, no more than three years old, since the alternative is a multi-car accident, lots of cash expenditure and possibly death. At least a pipe freezing in your Ollie won't kill you, but it sure would interrupt your travel plans..... John Davies Spokane WA1 point
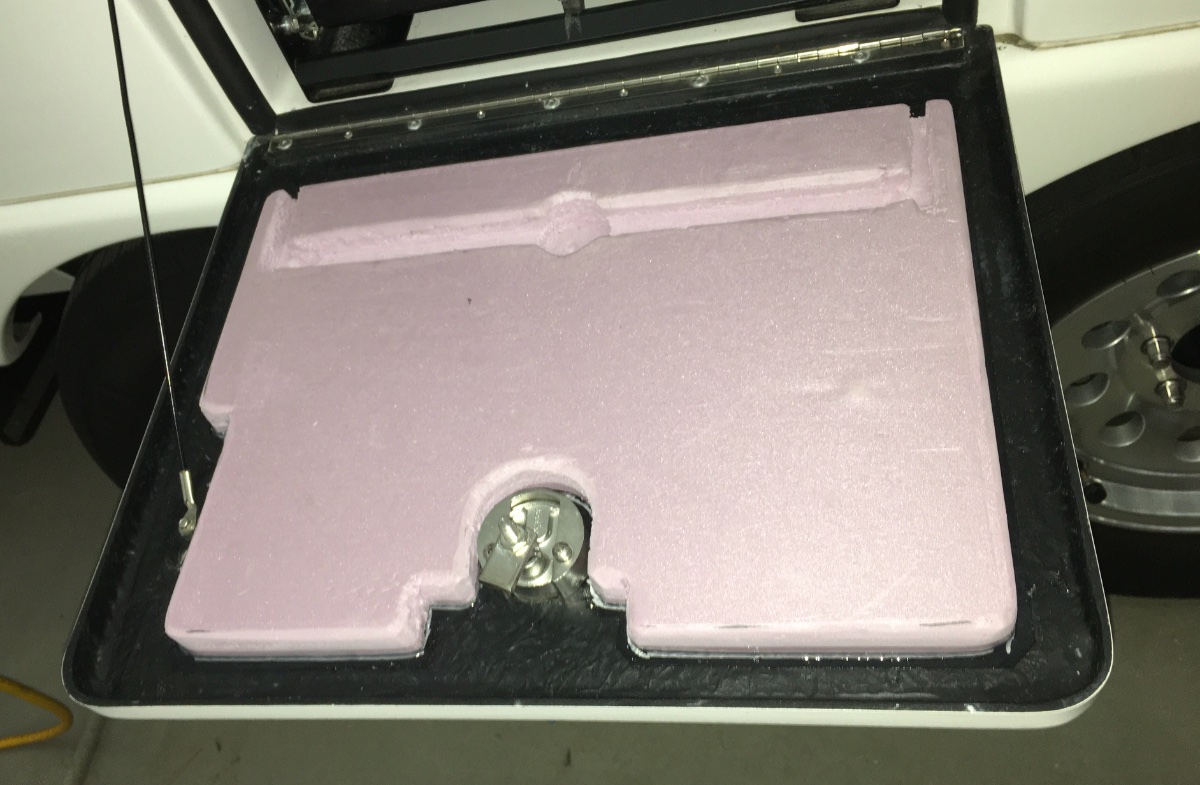
-
John, thanks for the kind words, the pink stuff just looks dorky and crude, I suppose it could be covered completely in heavy aluminum tape. but it would be tricky and time consuming to completely cover all the openings and cutouts. Plus it is soft, and susceptible to dents. I don’t know of an affordable material that would function better. Of course, I will probably be the only person to see it, and the next owner can take it out if it is too pink.... It should work very well at blocking heat transfer from direct sunlight. It will be interesting to see what kind of temps are shown on my monitor, and what effect the fan will have when turned on in inclement weather. John Davies Spokane WA1 point
-
Wow - amazing engineering and work as usual! I have a feeling many of us will be trying something similar once Summer rolls around. This is obviously not an easy mod to pull off. This will help tremendously even if the design varies a bit due to differences in the Ollies. What don't you like about your insulation on the door? I would have to say it's way more insulated than the rest of the Ollie, so I think it may not be a problem. Thanks!1 point
-
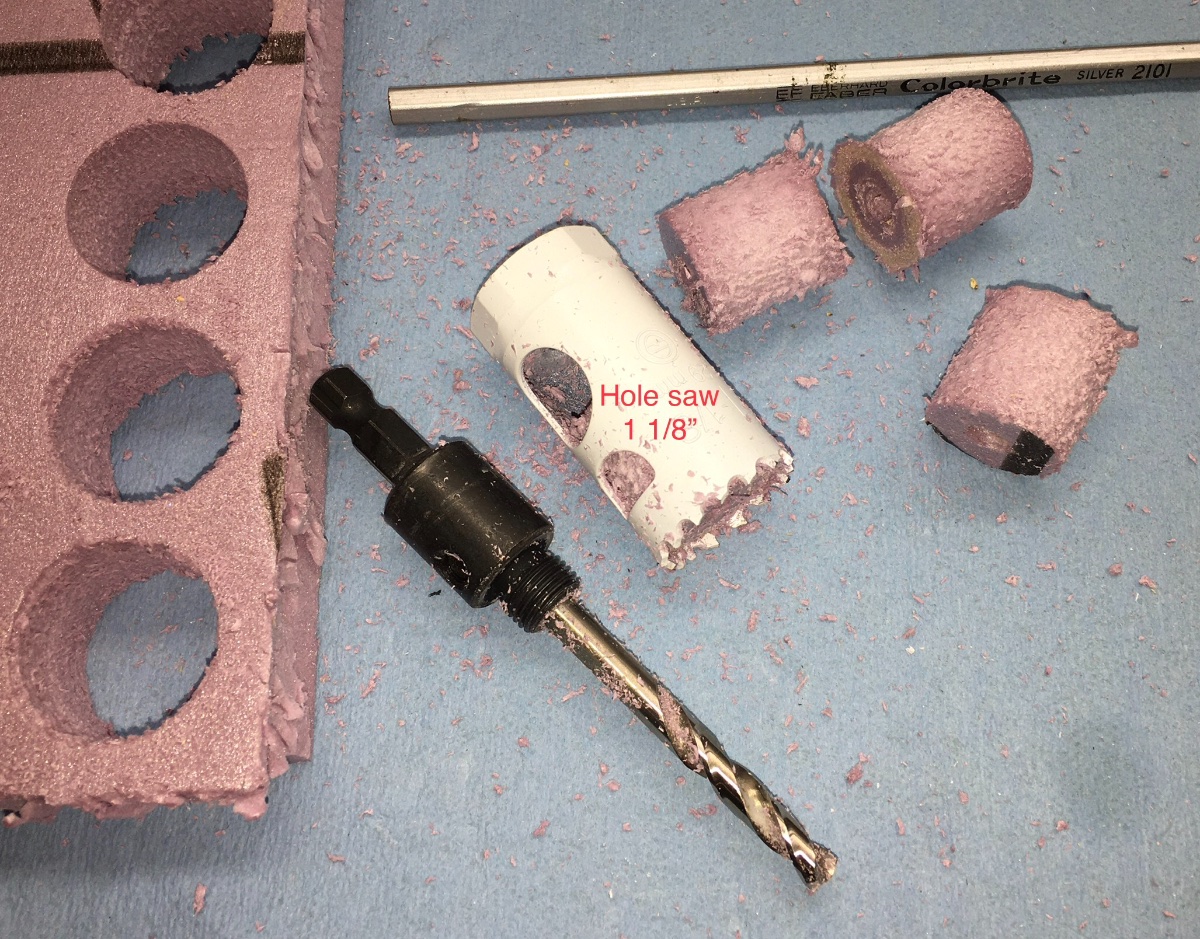
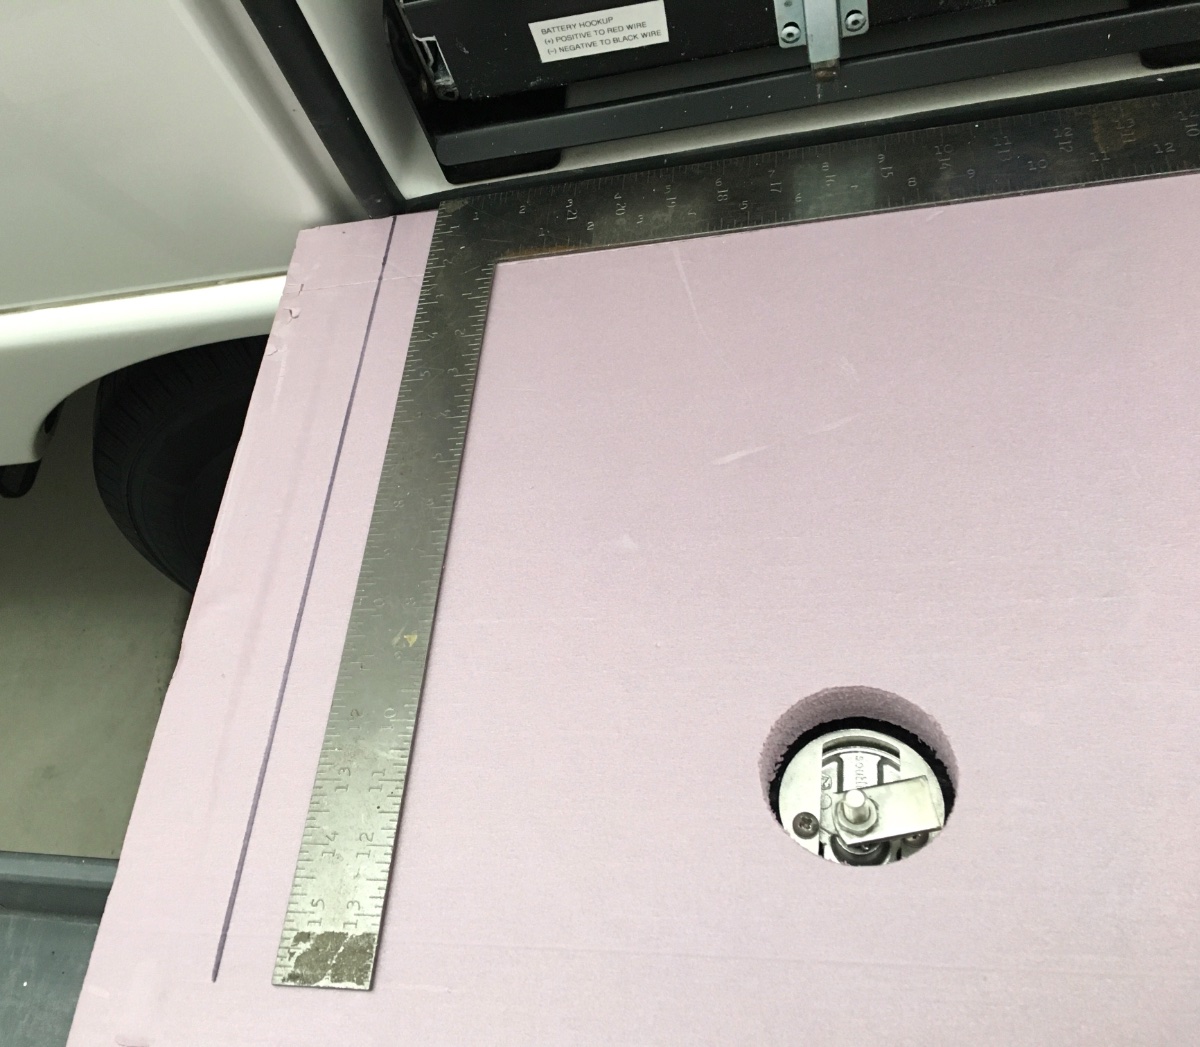
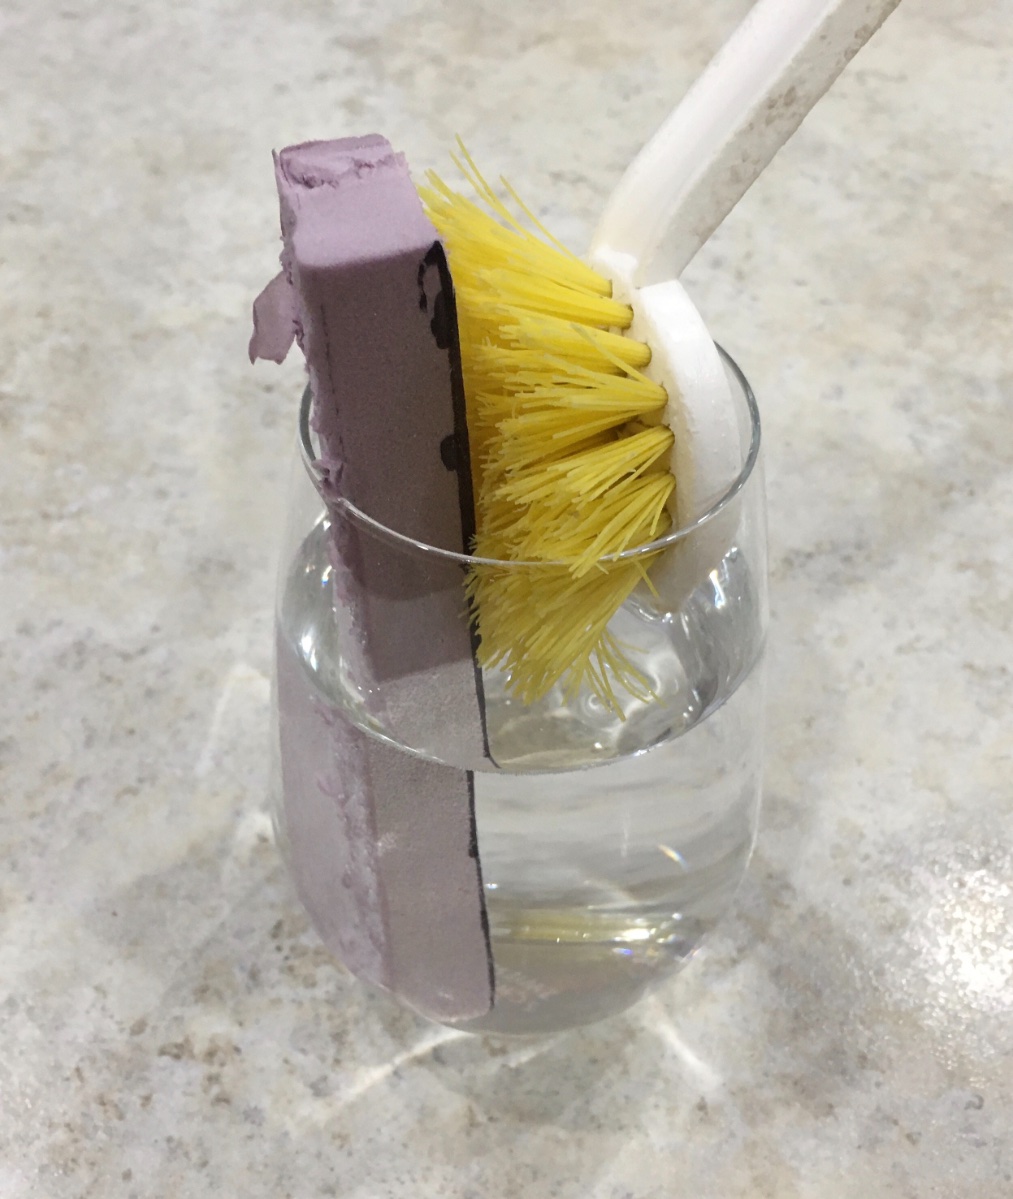
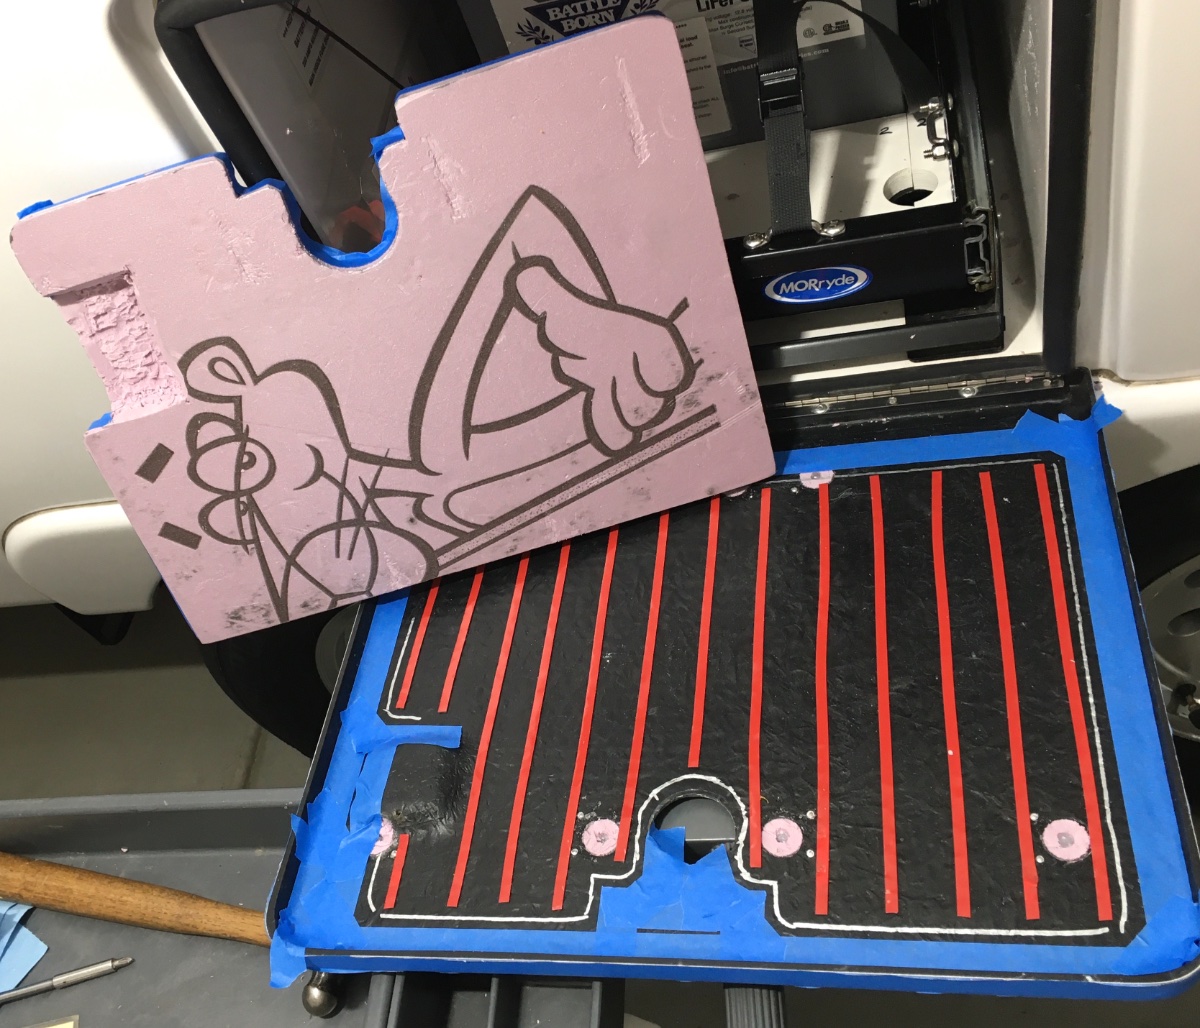
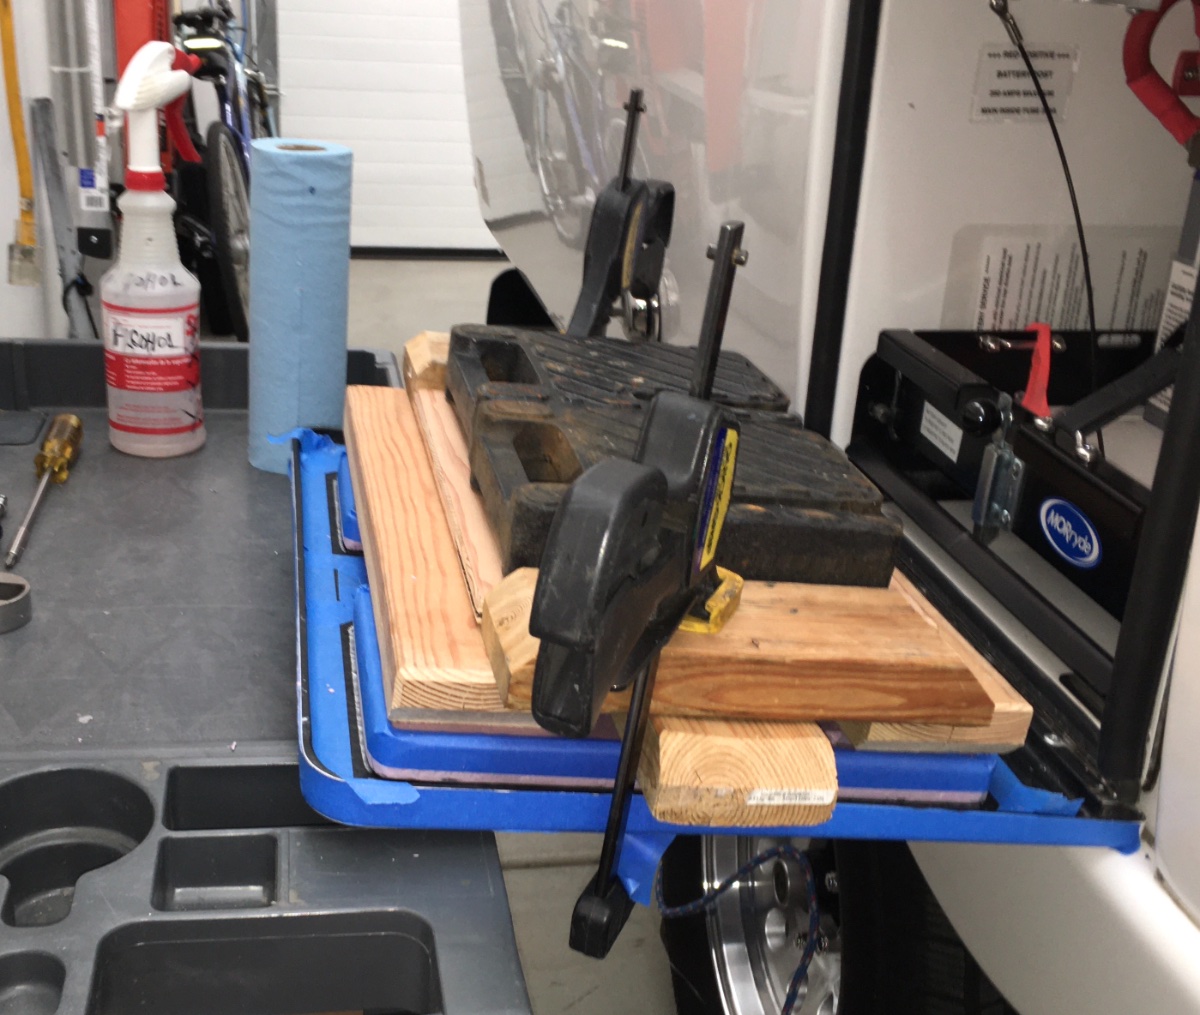
Battery door - plug holes and add insulation. This did not work out well, I am not very satisfied with the results, but I will post pics anyway. Maybe somebody can suggest a better solution. 1/2" foam board would be much easier to fit, but the insulation value is not so good. The material is Dow Corning rigid foam board, 1 inch thick, which weighs essentially zero pounds. This stuff is incredibly light. $20 for a 4' x 8 ' sheet at Home Depot. It is fire retardant, which is important. For comparison, this is R-5 (insulating value) whereas a typical foil/ air bubble sheet, which is used extensively in an Ollie, is R-1. https://www.homedepot.com/p/Owens-Corning-FOAMULAR-150-1-in-x-4-ft-x-8-ft-R-5-Scored-Square-Edge-Rigid-Foam-Board-Insulation-Sheathing-20WE/207179253 It can be cut easily with a VERY sharp razor knife, and rough edges can be rapidly sanded smooth and contoured with a bench top belt sander and coarse 80 gr belt. WEAR A MASK. BTW it is indeed completely waterproof, I soaked a piece for 12 hours to make sure. I had to wedge it in place, it pops out like a cork otherwise: Cut four hole plugs to seal off the existing openings. (My door has 8 holes, yours may vary.) Cut them in half: Glue them into the holes with clear RTV sealant, some will squirt out through the front Perko vents. Remove that excess with alcohol and paper towels: Wait at least a full day and then trim off the excess foam and sealant flush with a razor blade: SUPPORT the door with something, a 30 inch high rolling work table fit perfectly, and it gave me a nice place to put tools and materials... Remove the support cable. Cut the foam. This is pure trial and error, because it has to fit past the rubber seals, and also have extra material removed to clear the battery tray and knob, and the support cable, and the lumps and bumps on the door itself. Take your time, trim a little, test the fit, trim some more. It should fit as closely as possible, for maximum insulation value, yet allow the door to close easily without stressing it. I used a router bit in a drill press to carefully carve out areas that needed clearance. Be sure to allow some room for rivet tails! When you are satisfied with the fit, clean and smooth the parts and use 3 M VHB tape to secure it to the door. I used 1/4" wide tape placed vertically, so any water leaking past the rubber seal will drain straight down. Add some weight and go take a long break: Remove any weights or clamps. Seal the edges with clear RTV sealant. Use tape as shown to leave clean lines. Reattach the support cable. BTW when trimmed as shown in the top pic, the airflow from the fan underneath the tray is not blocked. EDIT: Leave several small gaps in the sealant at the inside (bottom edge when closed) so moisture can drain out. John Davies Spokane WA
1 point
-
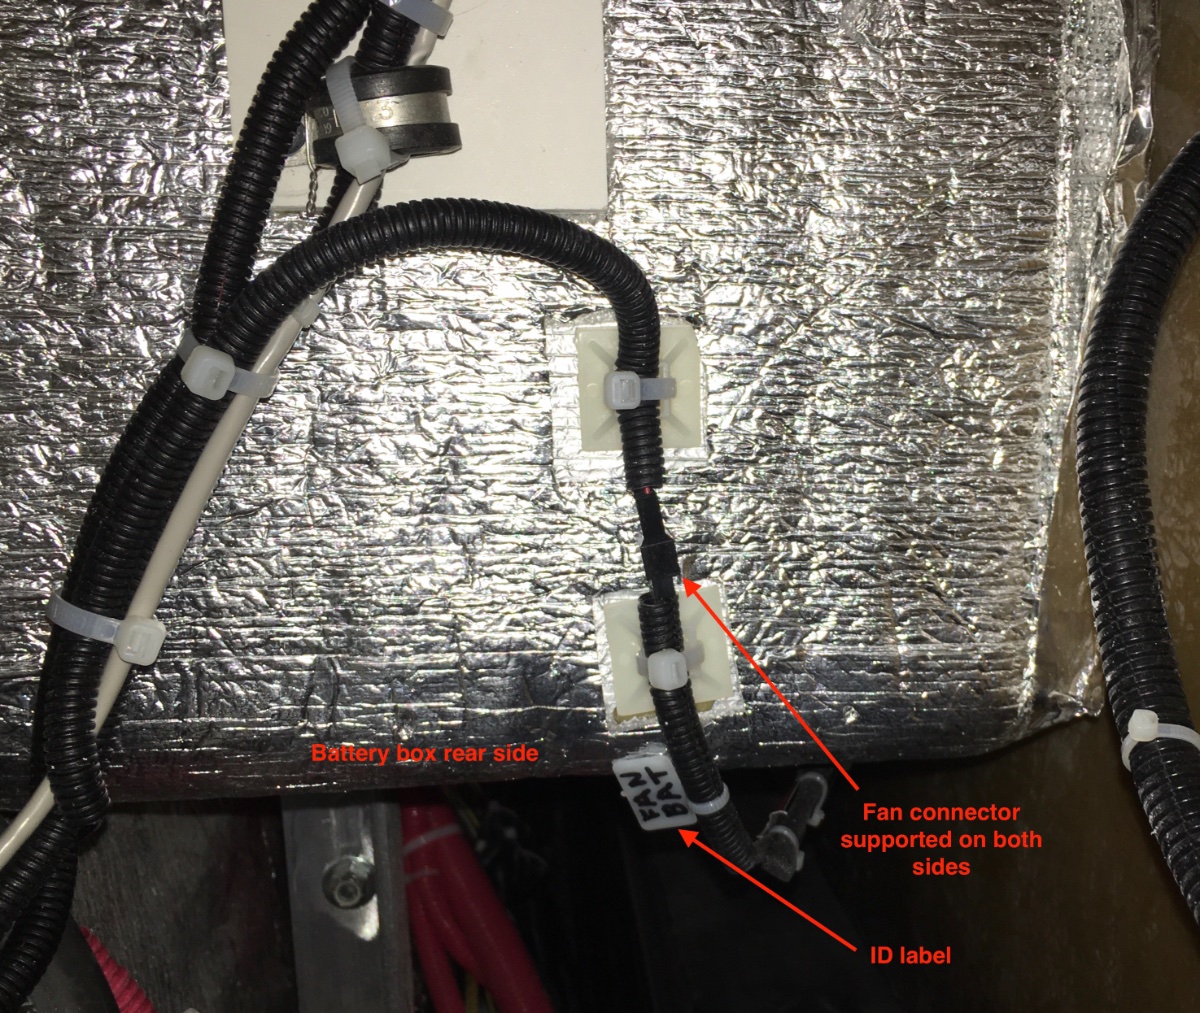
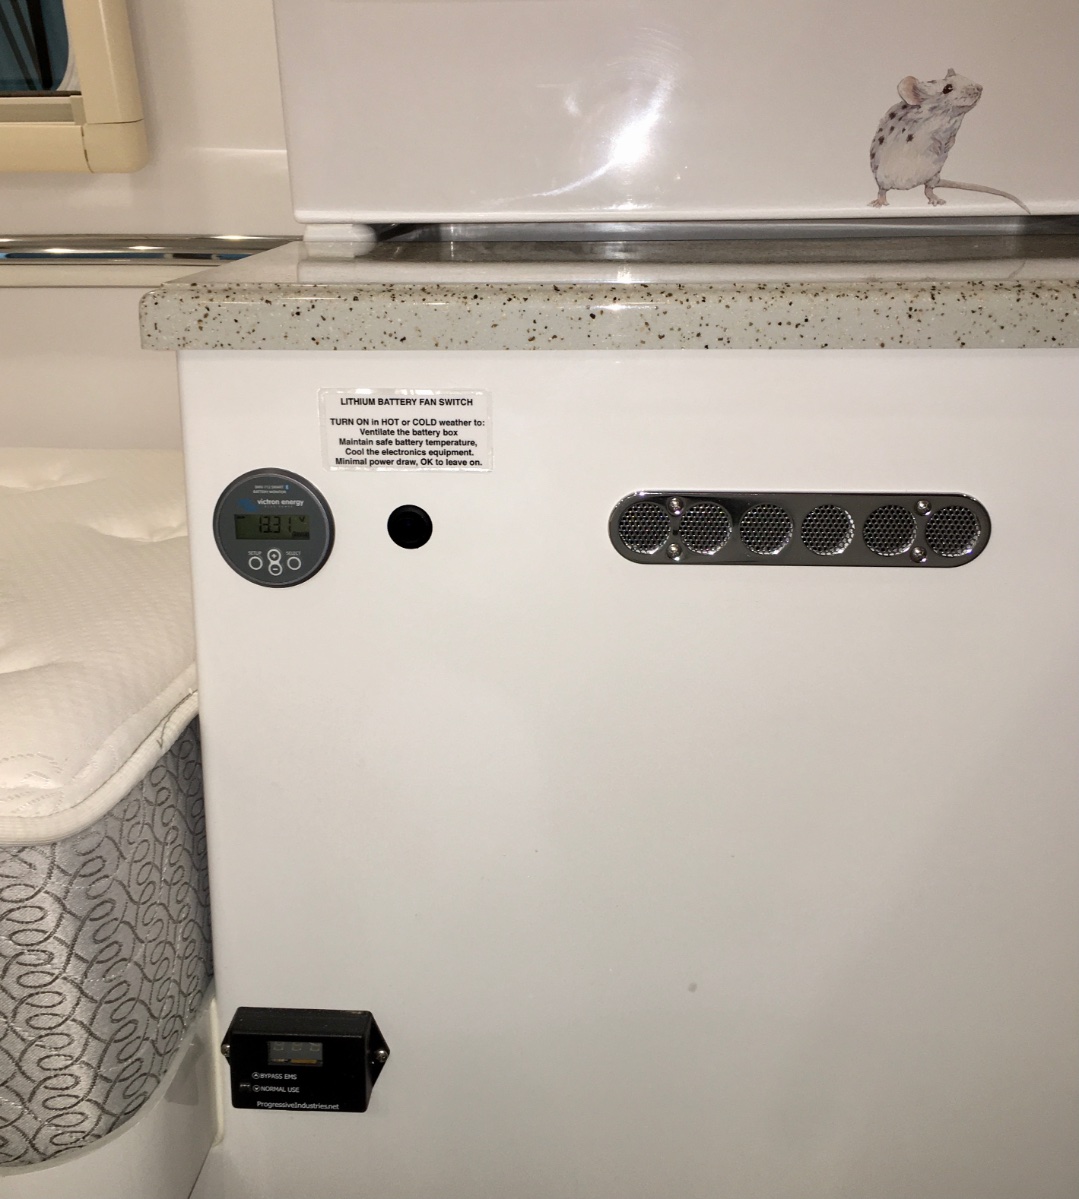
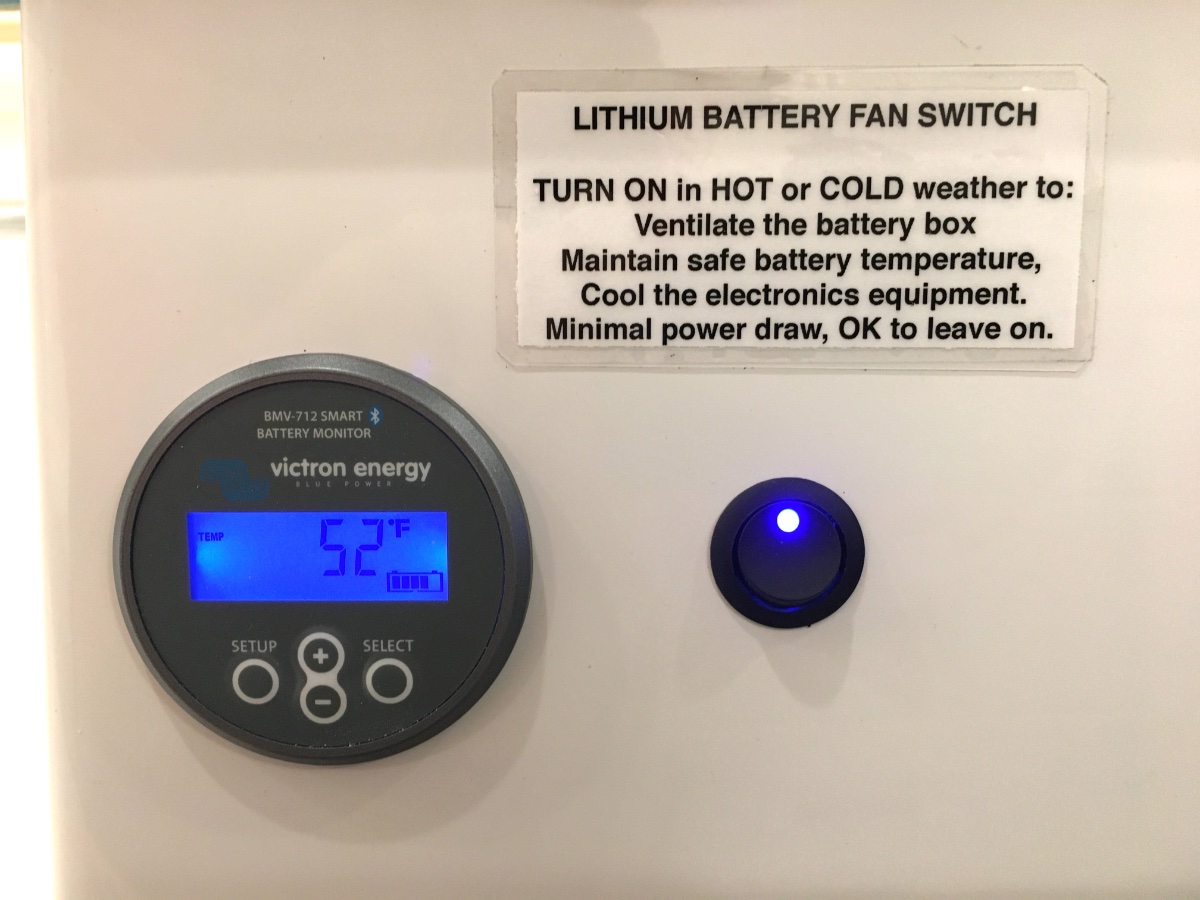
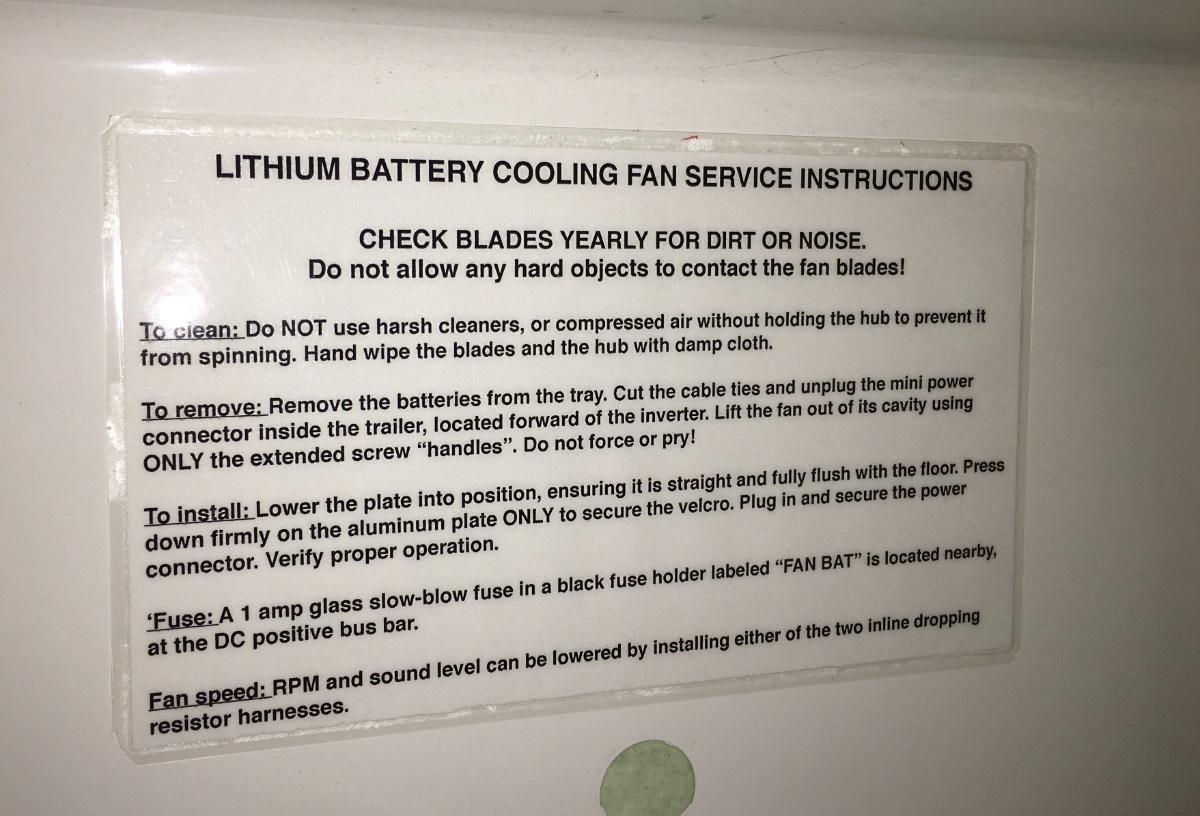
Battery fan wiring and switch. I used the supplied adapter cable and simply cut its 3 pin connector off and butt spliced the wires to a new 18 AWG red/ black wire pair. I secured the connector at the bottom of the battery compartment wall, forward of the inverter: Power comes via a 1 amp inline fuse connected to the rear DC bus. I mounted a switch next to my Victron BMV-712 Smart battery monitor display, below the pantry counter top. An additional ground wire is needed if the switch has an LED (this one is blue, to match the Victron backlighting): Finally, an instruction placard for a future owner or an RV service tech. This is laminated and taped on the rear wall of the battery compartment, and a copy is in the Owners Manual: John Davies Spokane WA
1 point
-
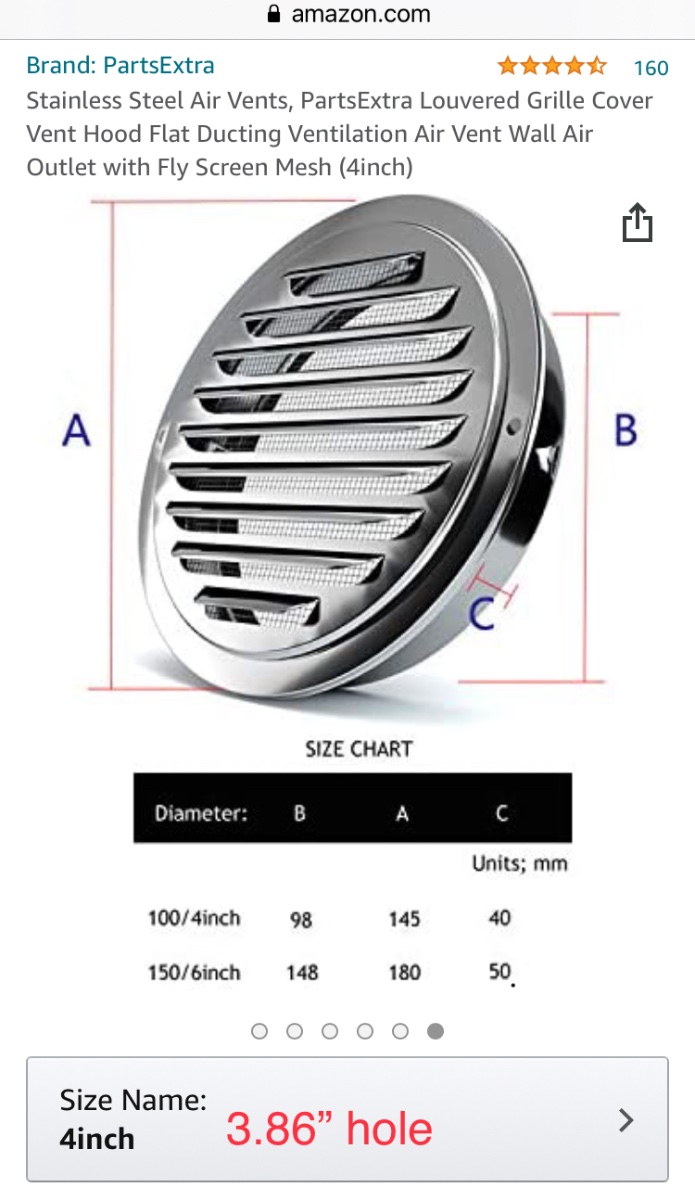
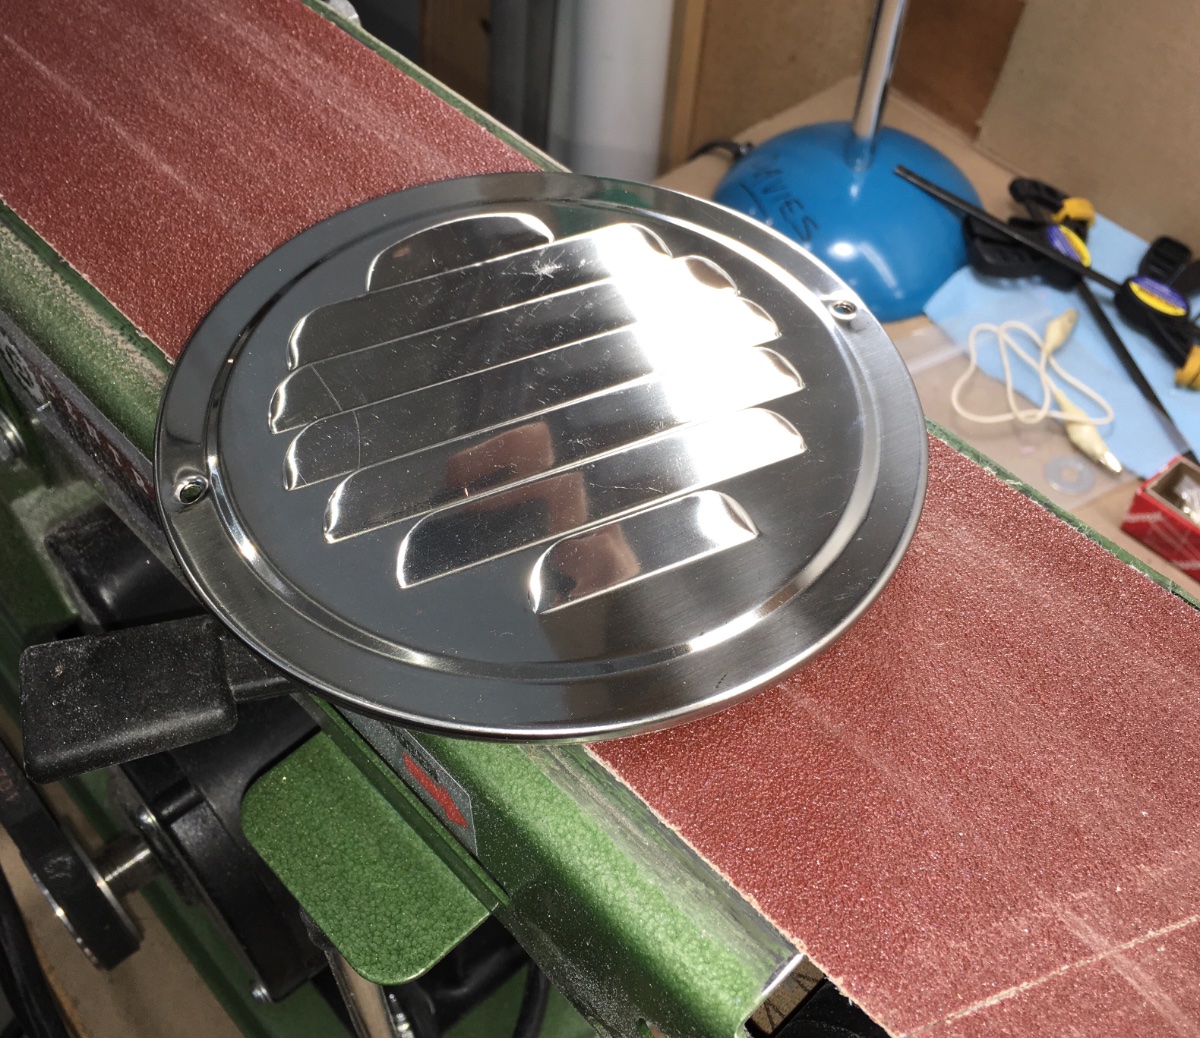
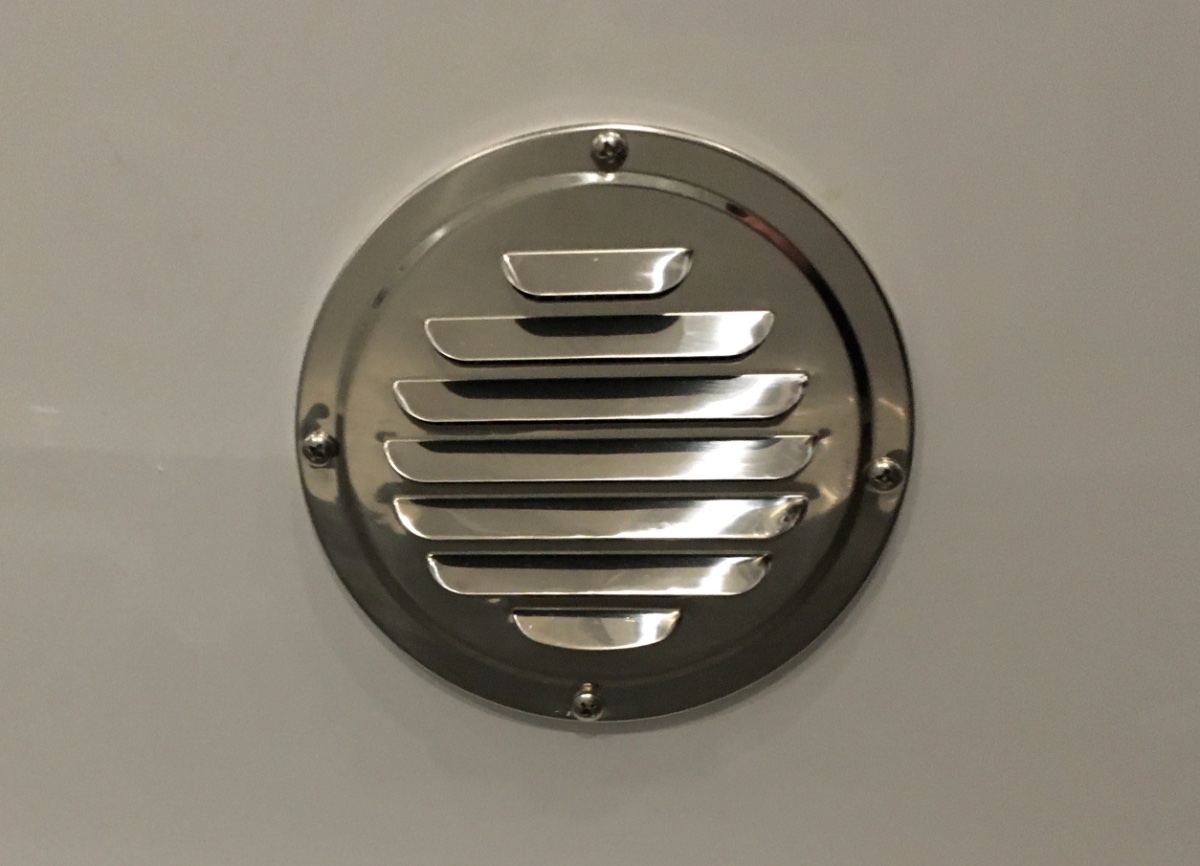
Battery box intake vents. Originally I wanted aluminum louvered vents, so I could paint them white to blend in, but the ones I bought turned out to be way too flimsy. They would have been destroyed by a wayward kick. I ended up with these and am fairly satisfied. They are sturdy and very pretty. Unfortunately they need trimming and the addition of two more mounting holes, so they would pull down tight and flat. Drilling stainless is possible, a drill press makes it less frustrating. It requires a lot of pressure on the bit. Use a 4" hole saw or a jigsaw to cut the holes in the fiberglass. I placed one under the rear bed and one under the rear dinette seat, centered front to back and up/ down. The center is approximately 9 " off the floor. Even though sanded smooth, the edge was pretty dangerous, so I used 1/4" split loom to protect fingers. I added a blob of silicone on each protruding screw tip. In the future I plan to add third vent at the bottom of the closet door opening. John Davies Spokane WA
1 point
-
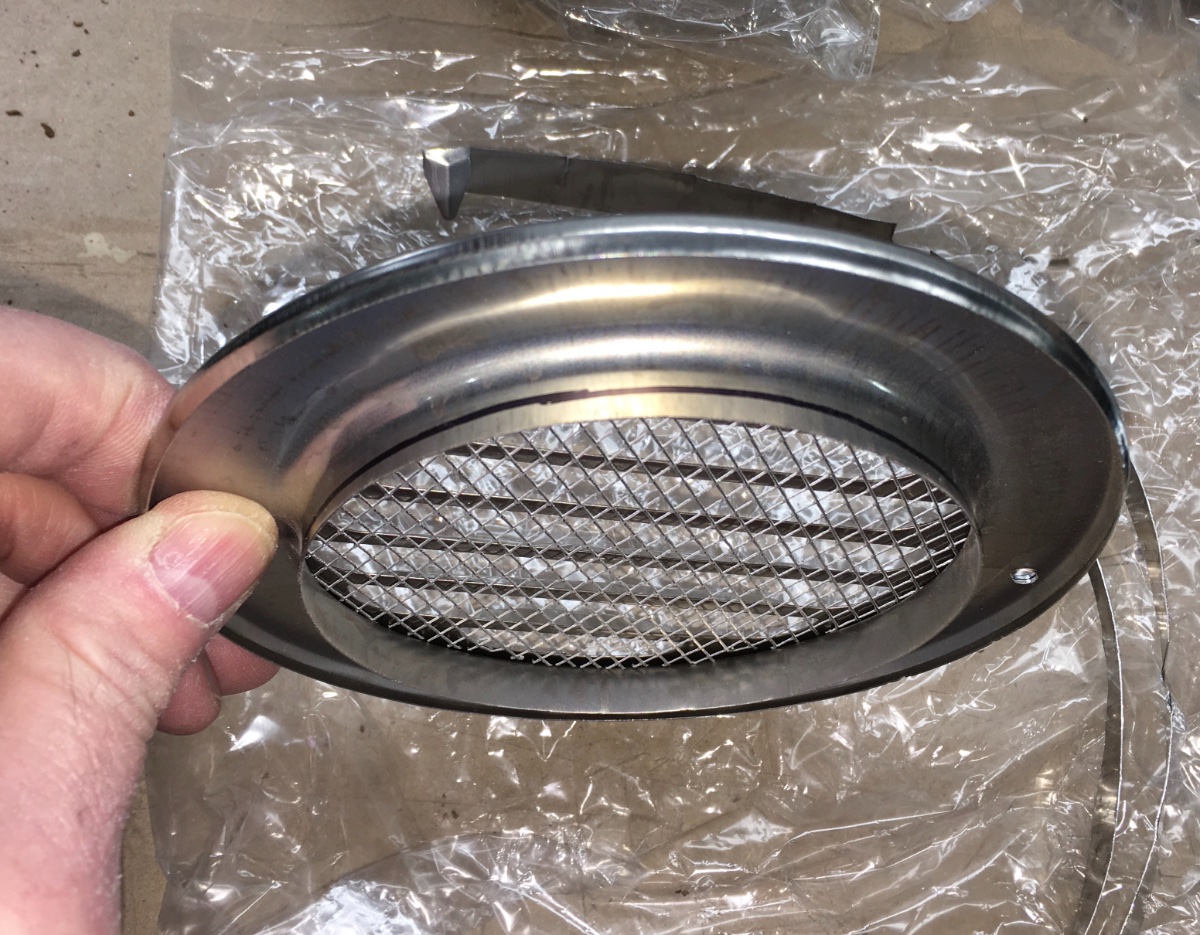
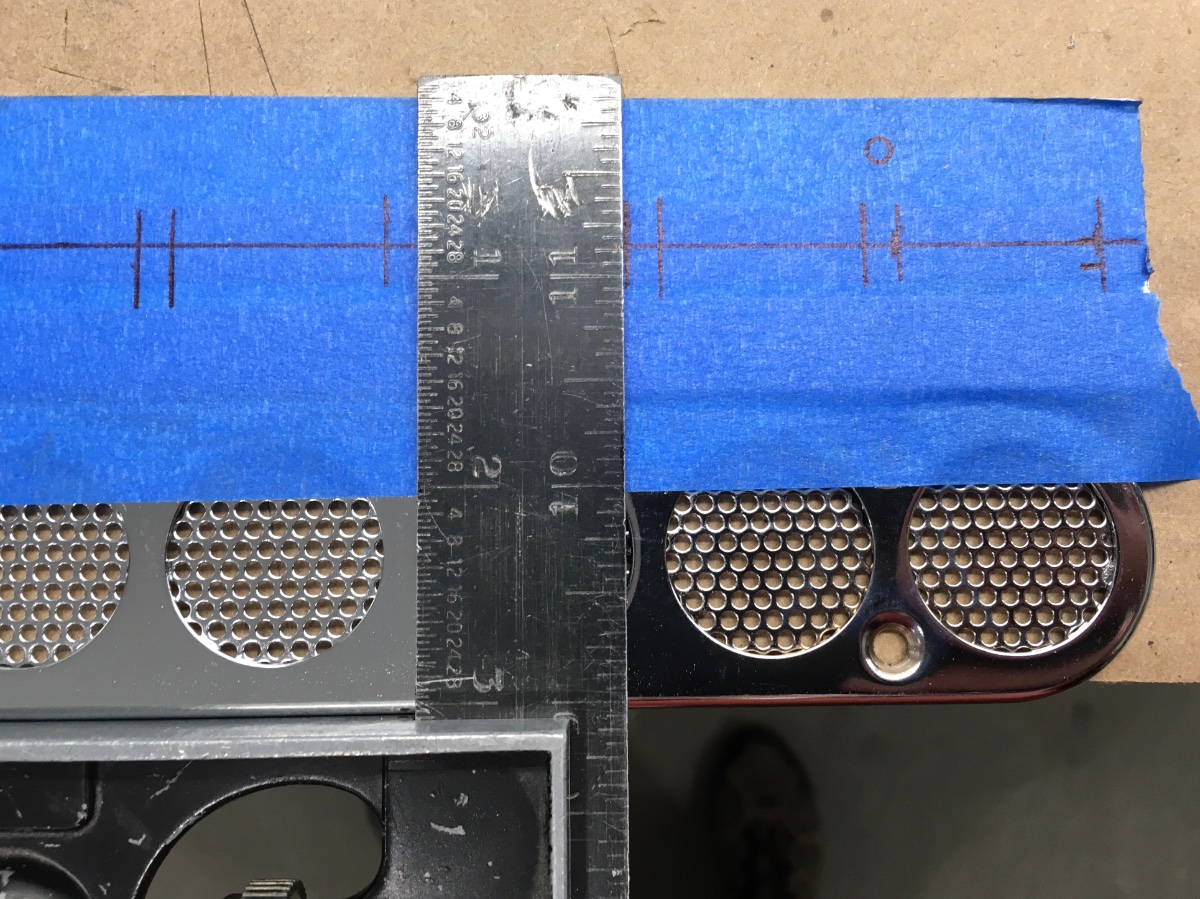
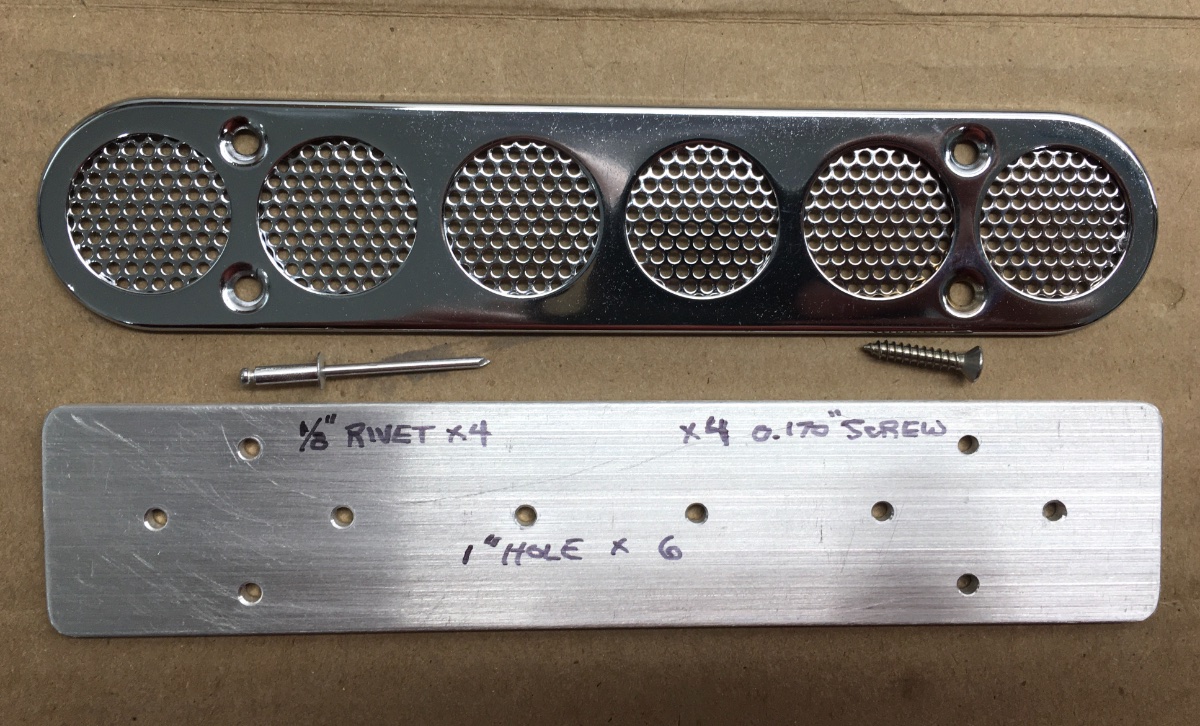
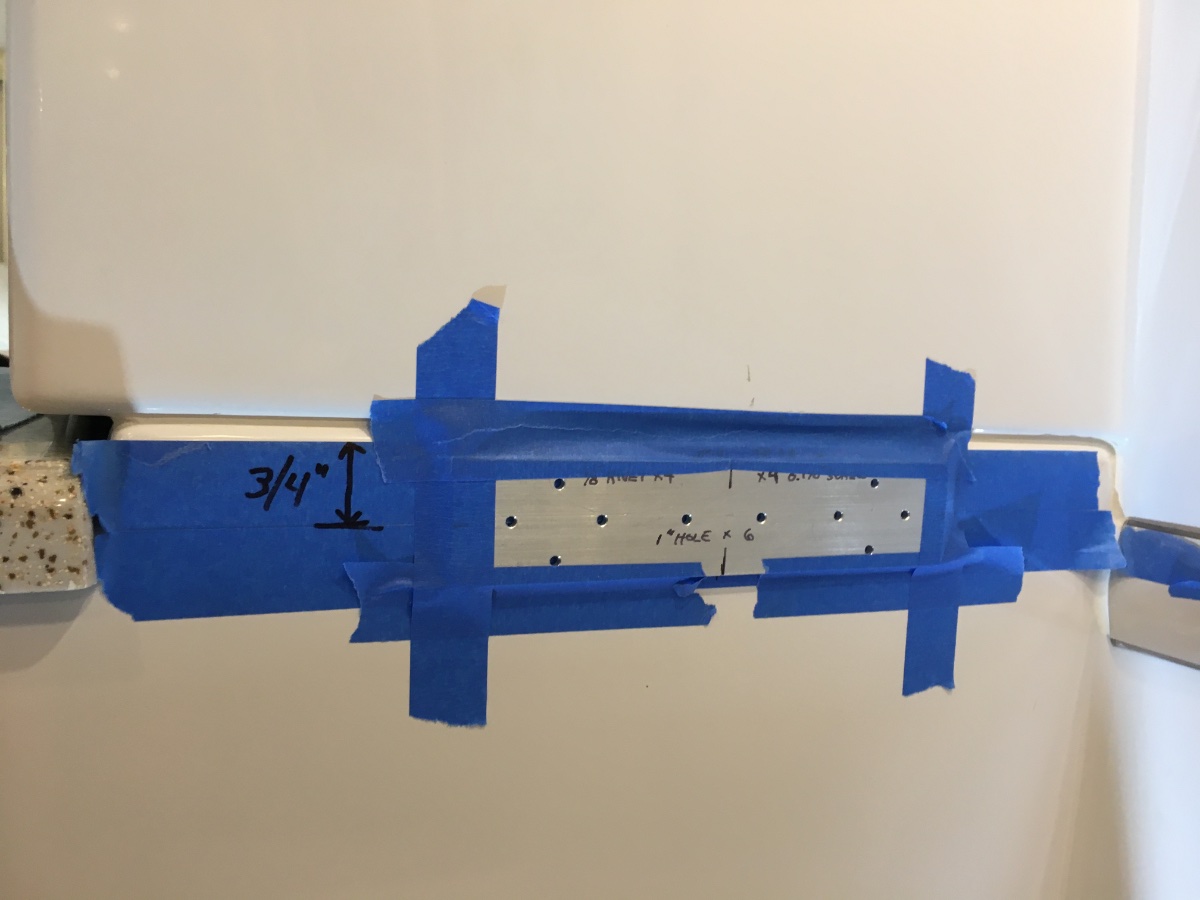
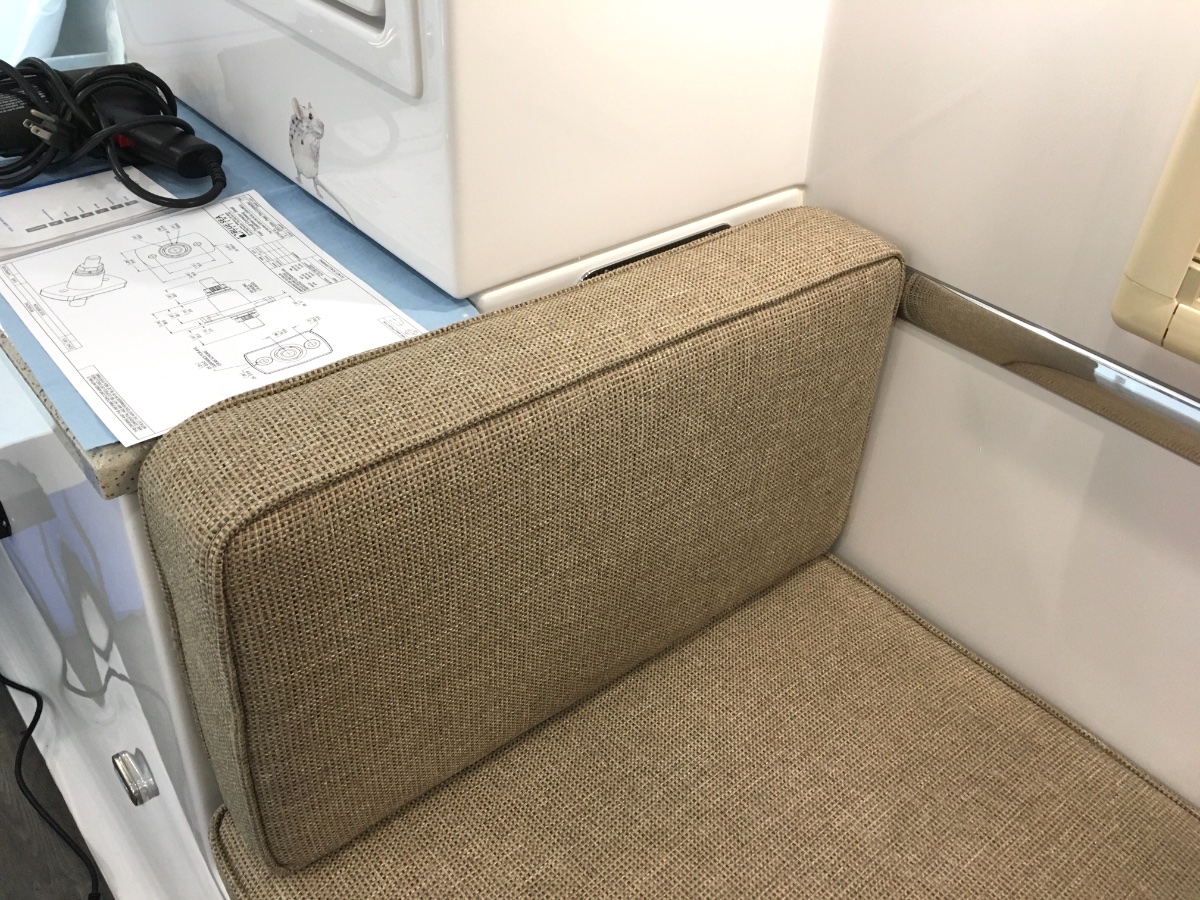
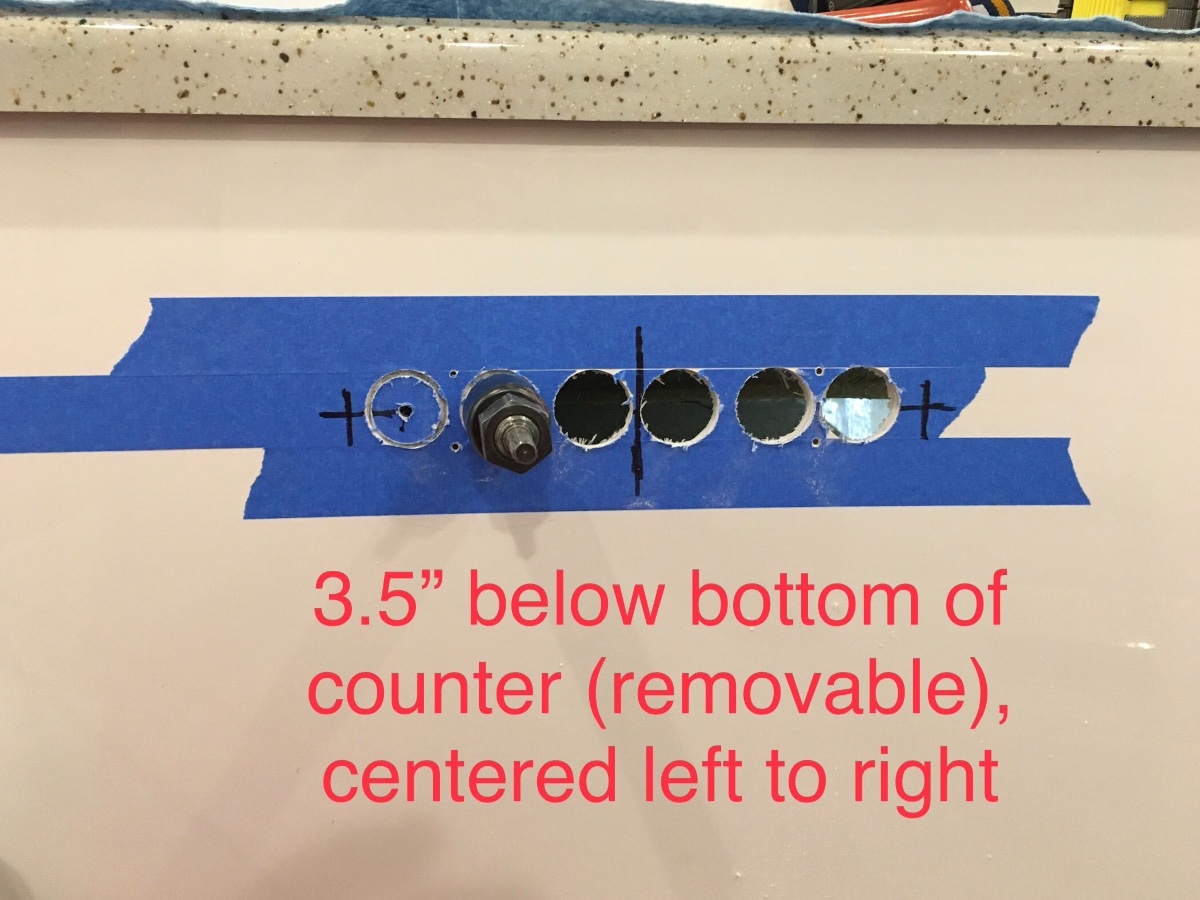
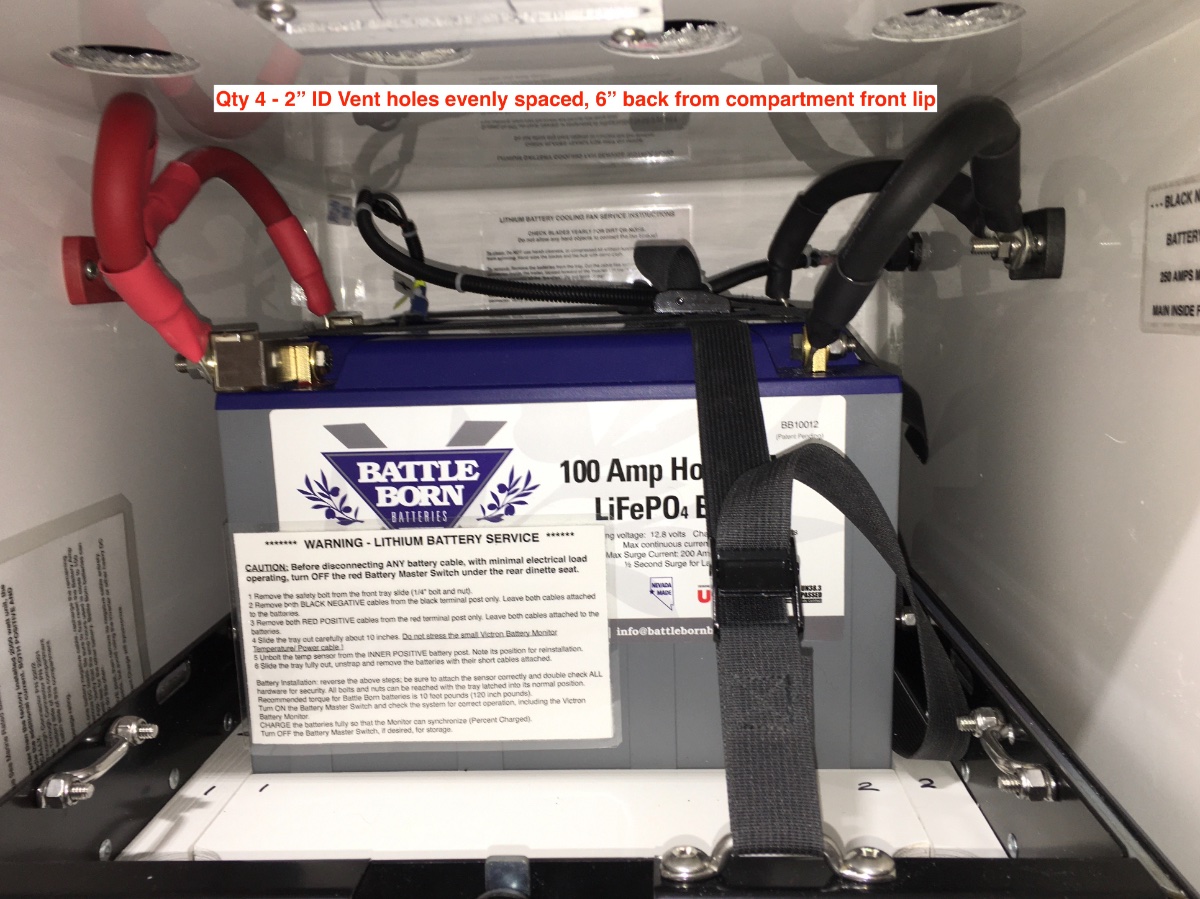
Battery box exhaust vents. Qty 3 - Perko 51840 Chrome plated brass (same part used on the battery door factory vents) ... https://www.go2marine.com/perko-ventilator-vent Make a template - there are a lot of holes to drill: The 4 mounting holes can be sized for 1/8" rivets (not recommended) or number 6 sheet metal screws. Choose the correct size for your fasteners! I chose screws. The front and back vents go here: You will be staring at these for a long time, so be very sure the holes are perfectly straight, measure thrice, cut once. Don't use a bubble level, measure up to the joining line. Here is the reason you can't position it higher: Deburr the holes CAREFULLY with 80 grit sandpaper (wear gloves or you will drive glass shards into your fingers), do not scratch the surrounding gelcoat!!!! Install the Perko cover. Repeat these steps for the rear wall. The optional factory granite countertop keeps the seat cushion slightly away from the wall in this position. If yours does not have the optional ones, the front vent will be blocked with the cushion as shown here.. Here is a view inside the compartment, looking back at the INSIDE of the rear vent. Notice you cannot position it higher or the screws will not clear the top: The third vent goes in the center of the inside wall, directly below the pantry shelf. Having three vents means that one blocked vent (a pillow for example) will not significantly affect the airflow. Finally, there need to be holes in the TOP of the battery box, to let air out from that space. Since I mounted a fan in the bottom, at the very back, I chose to place them in front, so air would move below and across the batteries, leaving no "still air" pockets. All other openings in the box should be sealed with heavy aluminum tape or a similar product. There is plenty of space on top of the box for air movement: John Davies Spokane WA
1 point


.jpg.f834665b7ed999b18cefda64ee77a29e.jpg)


.jpg.caebd13733a18fcb82f87a9a72d56678.jpg)
.JPG.b5419bb6264986c24303fe50c23faa4d.JPG)


-
Recent Achievements
-


")


")


